SharePoint Online Auditing
Netwrix 1Secure allows you to audit Office 365 organizations that have established modern authentication as their identity management approach, including support for multi-factor authentication (MFA). See the Microsoft App Registration and Configuration in Microsoft Entra ID article for additional information.
In this scenario, Netwrix 1Secure will access the cloud-based infrastructure via Microsoft Graph and other modern APIs, being authenticated through a pre-configured Microsoft Entra ID application, formerly Azure AD, with appropriate access permissions. So, you should register a Microsoft Entra ID app and provide its settings to Netwrix 1Securewhen adding a SharePoint Online data source.
Modern Authentication
Support for modern authentication will allow you to audit the organizations where MFA is enabled for all users, including service accounts. See the App Registration and Configuration in Microsoft Entra ID topic for additional information.
Configure SharePoint Online Auditing
To collect audit data from your SharePoint Online and OneDrive for Business, Netwrix 1Secure uses a dedicated Microsoft Entra ID application and leverages APIs access permissions granted to that app. To register this application and assign required permissions, an Azure AD account with an administrative role will be required:
Microsoft Entra ID application should be created manually by user with administrative role and assigned required permissions. This app will allow you to collect activity. See the App Registration and Configuration in Microsoft Entra ID topic for additional information.
Add a Source and Connectors for SharePoint Online
Follow the steps to add a SharePoint Online source and connector(s) to your organization.
Step 1 – Click Configuration in the top bar. The Managed organizations page is displayed, that lists the managed organizations defined in 1Secure.
Step 2 – Click an organization to define a data source and connector(s) for it. The properties page for the organization is displayed with the Sources tab selected by default.
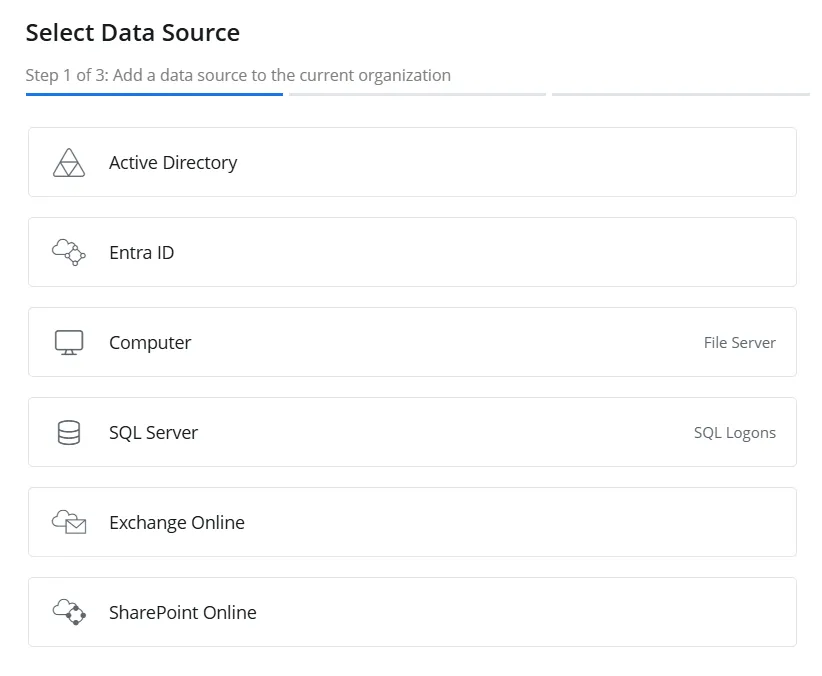
Step 3 – On the Sources tab, click Add to add a source. The Select Data Source (Step 1 of 3) pane is displayed.

Step 4 – Select SharePoint Online and click Next.

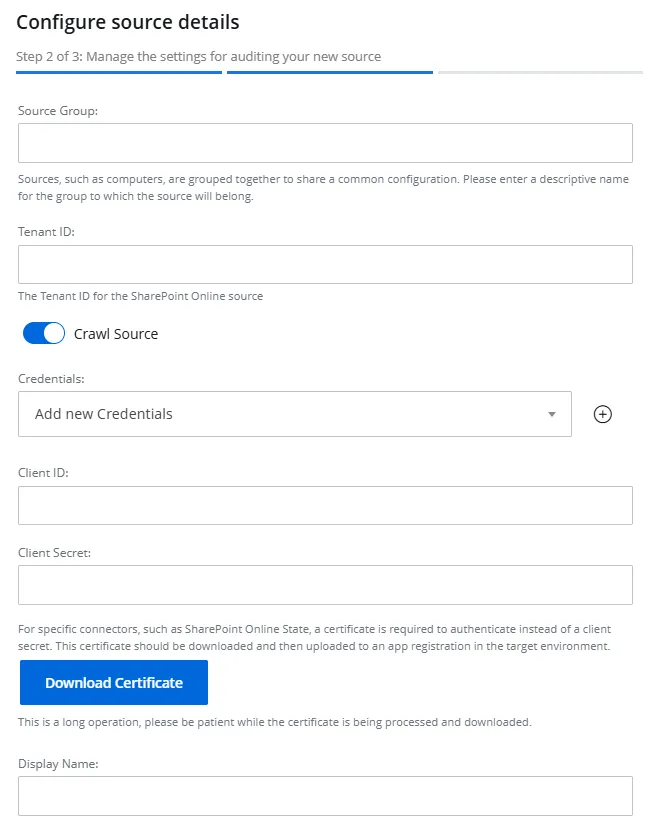
Step 5 – On the Configure source details (Step 2 of 3) pane, specify the following settings:
-
Source Group – Specify a name for the group to which the data source will belong. Grouping sources, such as computers, allows them to share a common configuration and makes it easier to manage related sources together.
-
Tenant ID – The tenant ID of the app registered in Microsoft Entra ID. See the App Registration and Configuration in Microsoft Entra ID topic for additional information.
-
Crawl Source – Toggle this option to ON to enable data collection for the source
-
Credentials – Displays the crdentials that have already been added, while also providing the option to add new credentials. Netwrix 1Secure uses these credentials to connect to the data source. You can select existing credentials or add new ones. To add new credentials, select Add new Credentials from the drop-down menu or click the Add icon, then specify the following:
- Client ID – The client ID of the app registered in Microsoft Entra ID. See the App Registration and Configuration in Microsoft Entra ID topic for additional information.
- Client Secret – The client secret of the app registered in Microsoft Entra ID. See the App Registration and Configuration in Microsoft Entra ID topic for additional information.
- Download Certificate – For certain connectors, such as SharePoint Online State, authentication requires a certificate instead of a client secret. Download this certificate and then upload it to the app registered in Microsoft Entra ID. See the Upload a Certificate topic for additional information.
- Display Name – Specify a name you want to show for your credentials. It will be displayed on the Credentials tab of the Managed Organizations page.
Step 6 – Click Next.

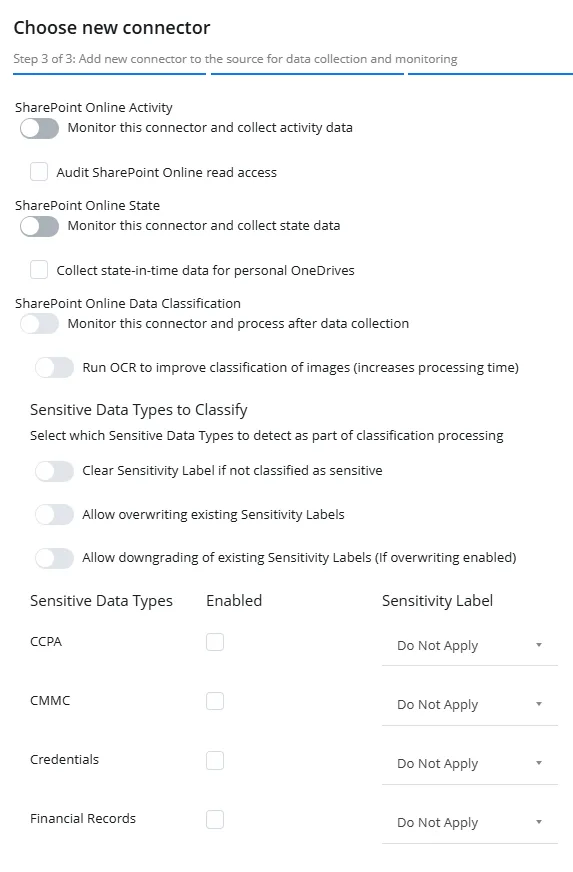
Step 7 – The Choose new connector (Step 3 of 3) pane lists three connectors for SharePoint Online. Specify the following:
-
SharePoint Online Activity – Toggle the SharePoint Online Activity switch to ON to collect and monitor data for this connector. With this, you can generate activity reports on SharePoint Online data. See the SharePoint Online topic for additional information.
- Audit SharePoint Online read access – Select this checkbox to audit the files with read access in SharePoint Online.
-
SharePoint Online State – Toggle the SharePoint Online State switch to ON to collect and monitor data for this connector. With this, you can generate state-in-time reports on SharePoint Online data. See the State In Time Risks Reports topic for additional information.
- Collect state-in-time data for personal OneDrives – Select this checkbox to collect state-in-time data for personal OneDrives.
-
SharePoint Online Data Classification – Toggle the SharePoint Online Data Classification switch to ON to allow 1Secure to read the documents in order to classify and label them based on the type of data they contain.
- Run OCR to improve classification of images (increases processing time) – Toggle this switch to ON to use Optical Character Recognition (OCR) to scan images for text, which helps to classify the sensitive data more effectively. Note that this increases the processing time for data classification.
- In the Sensitive Data Types to Classify area, specify how 1Secure would handle already
classified documents and select which sensitive data types to detect as part of classification
processing.
- Clear Sensitivity Label if not Classified as Sensitive – Toggle this switch to ON to automatically remove sensitivity label from a document that 1Secure detects as mislabeled and not sensitive.
- Allow overwriting existing Sensitivity Labels – Toggle this switch to ON to allow 1Secure to overwrite any existing sensitivity label applied to a document (such as when a label was applied manually) with a new label. Toggling OFF this switch indicates that the previously applied label takes precedence.
- Allow downgrading of existing Sensitivity Labels (if overwriting enabled) – Sensitivity labels can range from less restrictive to more restrictive, such as Public > Sensitive < Highly Critical. When this switch is toggled ON, it allows 1Secure to overwrite the label for a document, even when this label is less restrictive than the existing one. When toggled OFF, 1Secure will not be able to overwrite the existing label with a less restrictive one, even if overwriting is enabled. For example, if a document is already labeled as "Highly Critical", and 1Secure determines its sensitivity level as "Sensitive", it will not change it.
- Select the Enabled checkbox for each data type you want 1Secure to identify and label when classifying scanned documents. For example, you might enable PII but leave PCI DSS unchecked if it is not applicable to your organization. Available data types include CCPA, CMMC, Credentials, Financial Records, GDPR, GDPR Restricted, GLBA, HIPAA, PCI DSS, PHI, and PII. For each enabled data type, select a label from the Sensitivity Label drop-down menu. Once you map a label to a data type, that label will be applied to a document that contains the respective data type.
Step 8 – Click Finish.
The SharePoint Online data source and connector(s) have been configured.