Add Hosts
The Add Hosts option creates a new host list. It can be accessed through the Host Management node. Follow the steps to add a new host list.
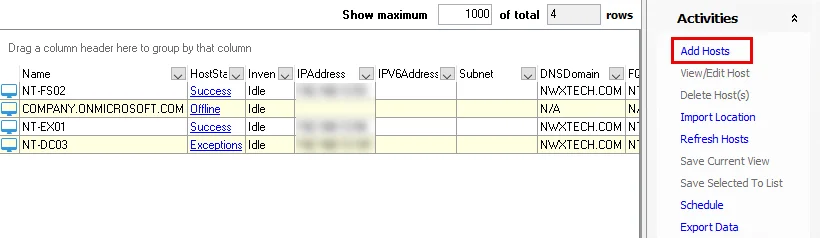
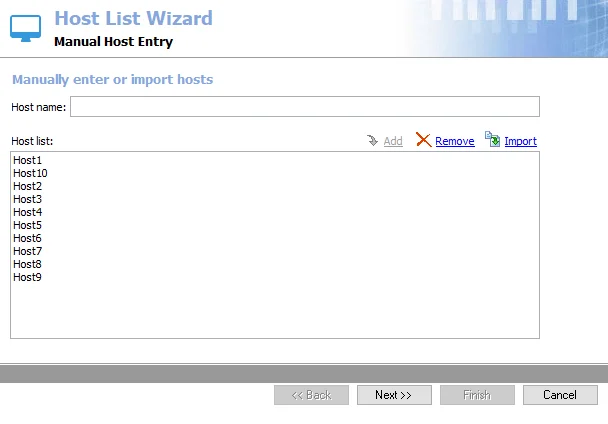
Step 1 – Click Add Hosts to open the Host List Wizard in the Results pane.
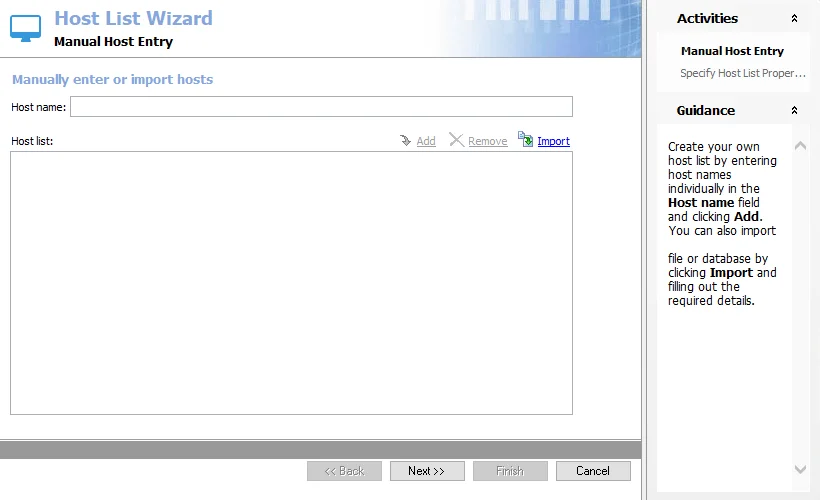
Step 2 – On the Manual Host Entry page, choose to either enter the hosts manually one at a time, or use the Import option. When the list is completed, click Next.
- To enter hosts manually, type the host name in the Host name textbox. Then click Add. The entry will appear in the Host list box. Repeat the process until all hosts for this list have been entered.
- The Import option opens the Import Hosts window. See the Import Hosts Option topic for additional information.
- Use Remove to delete a selected host from the Host list box
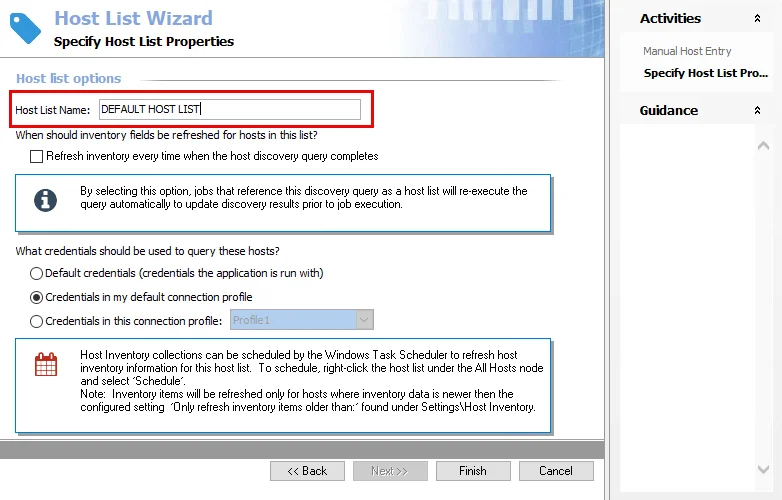
Step 3 – On the Specify Host List Properties page, provide a unique descriptive Host List Name.
- There cannot be two host lists with the same name. Enterprise Auditor automatically appends a numeral to the end of a host list name to avoid duplicates.
Step 4 – On the Specify Host List Properties page, configure when inventory fields should be refreshed for hosts in the list and set the credentials to use to conduct the host inventory.
-
Refresh inventory every time when the host discovery query completes – Automates the host inventory process and is dependent on the Settings > Host Inventory node configuration for the age of previously inventoried records. Leaving this option deselected applies the global settings for host inventory.
-
Set the credentials to use to conduct the host inventory.
- Default credentials (credentials the application is run with) – Applies the credentials used to launch the Enterprise Auditor application
- Credentials in my default connection profile – Applies the default Connection Profile configured at the global level (Settings > Connection)
- Credentials in this connection profile – Use the dropdown list to select a Connection Profile from those preconfigured at the global level (Settings > Connection)
See the Connection topic for additional information on Connection Profiles.
Step 5 – Click Finish to save the host list and close the Host Lost Wizard.
The new list displays at the bottom of the host lists under the Host Management node in the Navigation pane. Every host added is included in the host master table at the Host Management node as well as in the newly created host list.
Delete Host(s)
Use the Delete Host(s) option at the Host Management node to permanently delete a host from the master host table, or at an individual host list node to remove the host from the selected list.
Delete From Host Management Node
Follow the steps to delete a host from the Host Management node.
Step 1 – In the Host Management node, select the host in the data grid and click Delete Host(s) on the Activities pane.

CAUTION: A deletion from the host master table at the Host Management node cannot be undone, as it deletes it from the host management database tables. It also removes the host from any host list to which it has been assigned. Click Cancel to stop the deletion.
Step 2 – A dialog box asks for confirmation of the action. Click OK to proceed with the deletion.
The host is no longer in the master host table.
Delete From Individual Host List
Follow the steps to delete a host from an individual host list.
Step 1 – In the host list, select the host in the data grid and click Delete Host(s) on the Activities pane.
Step 2 – A dialog box asks for confirmation of the action. Click OK to proceed with the deletion.
Enterprise Auditor checks to see if the host exists in any other static host lists. If so, the deletion is limited to removing the selected host from the current host list.

CAUTION: A deletion from the host master table cannot be undone, as it deletes it from the host management database tables.
Step 3 – If the host is not found in another static host list, Enterprise Auditor asks if you also want to remove the host from the Host Master Table. On the Confirm dialog, select the desired action.
- Click Yes to remove the host from all dynamic host lists and from the host master table
- Click No to remove only the host for the current host list
The host is no longer in the host list.
Delete List
Use the Delete List option to remove the selected list. This option is available only at an individual host list node.
RECOMMENDED: Before deleting a host list, first ensure it is not assigned to a job.
Step 1 – In the Navigation pane, select the host list to delete and click Delete List.

CAUTION: This action cannot be undone. Click Cancel to stop the deletion.
Step 2 – On the Confirm dialog box, click OK to continue with the deletion.
Enterprise Auditor checks to see if any hosts within the host list are found in any other static host lists.

Step 3 – If no hosts are found in any other host list, then Enterprise Auditor asks if you want to remove the host from the master host table. On the Confirm dialog box, select the desired option.
- Yes – Deletes the specified host from the master host table
- No – Does not delete the specified host from the master host table
- No to All – Does not delete other hosts that are not found in another static host list from the master host table
- Yes to All – Deletes other hosts not found in any other static host list from the master host table
When the operation is complete, the list is no longer visible under the Host Management node in the Navigation pane and it cannot be used to execute jobs against.
Edit List
Use the Edit List option to edit properties for the selected host list. This option is available only from an individual host list node.
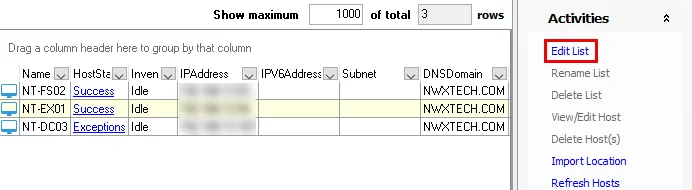
Select the host list to edit and click Edit List. The Host List Wizard opens for the selected host list. If the selected host list is a custom static host list, the wizard opens on the Manual Host Entry page where you can add and remove hosts from the list. Other host lists open directly to the Specify Host List Properties page where you can modify the following:
-
Host List Name
CAUTION: Changing the name of a host list that has been assigned to a job can cause the job to fail.
-
Refresh inventory setting
-
Credentials used for host inventory
See the Add Hosts topic for information on modifying these settings.
Edit Query
Use the Edit Query option to modify host lists created by a Host Discovery query.
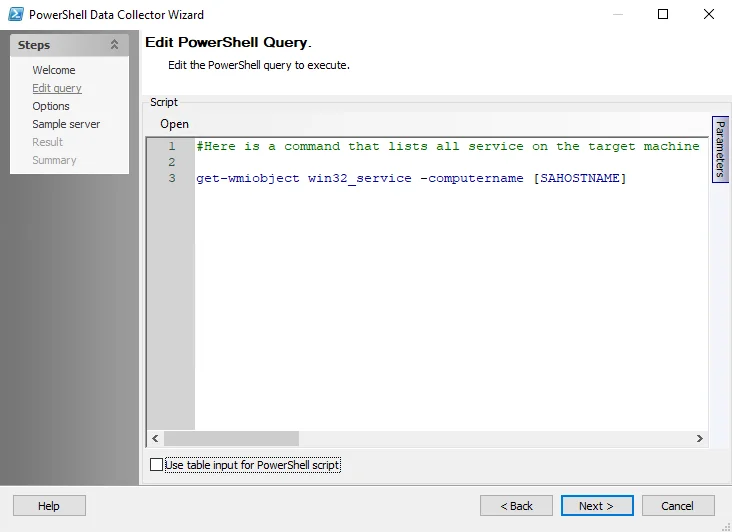
In the Navigation pane, select the query-created host list to edit and click Edit Query. The Host Discovery Wizard opens to the Query page where the query settings for the selected query-created host list are modified. See the Host Discovery Wizard topic for information on modifying these settings.
Export Data
Use the Export Data option to export all information available in the current grid view for the selected host list to a HTML, XML , or CSV file. Follow the steps to export data.
Step 1 – Select the Host Management or individual host list node to export data from, and configure the data grid to contain all the columns you want to export. See the Host Inventory Data Grid topic for additional information.
![]()
Step 2 – When the data grid contains all columns desired for export, click Export Data. A Save As window opens.
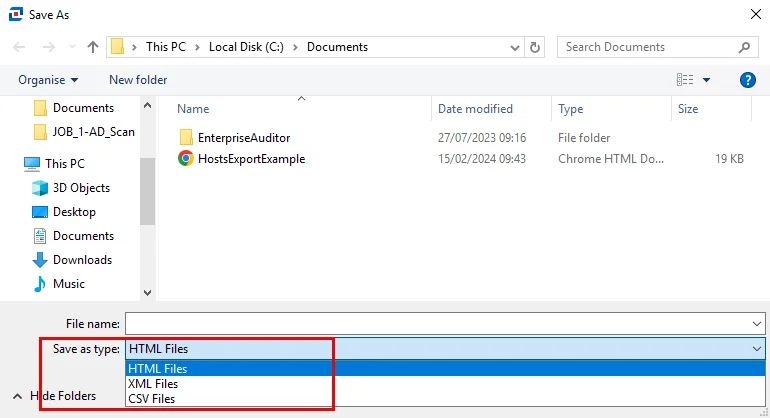
Step 3 – On the Save As window, select the required format (HTML Files, XML Files, or CSV Files) and provide a name and location for the export file.
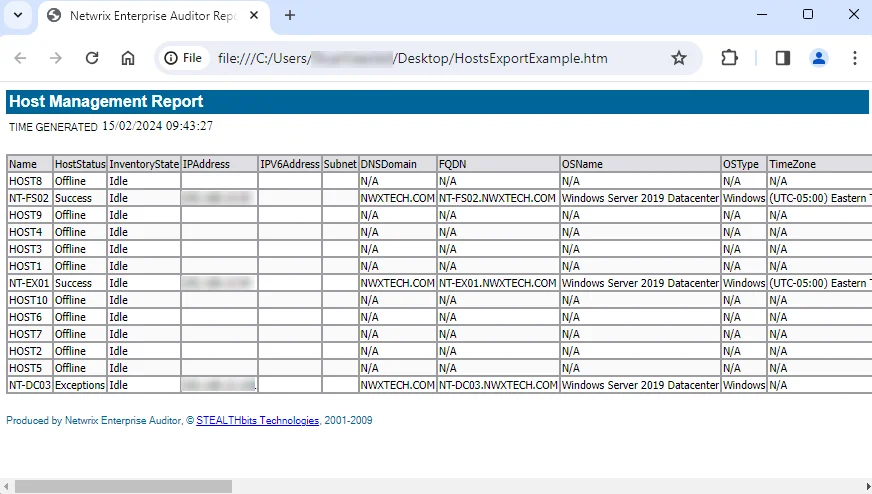
This export is now shareable. Unlike the View/Edit Host export option, this file will be in the same format as the data grid.
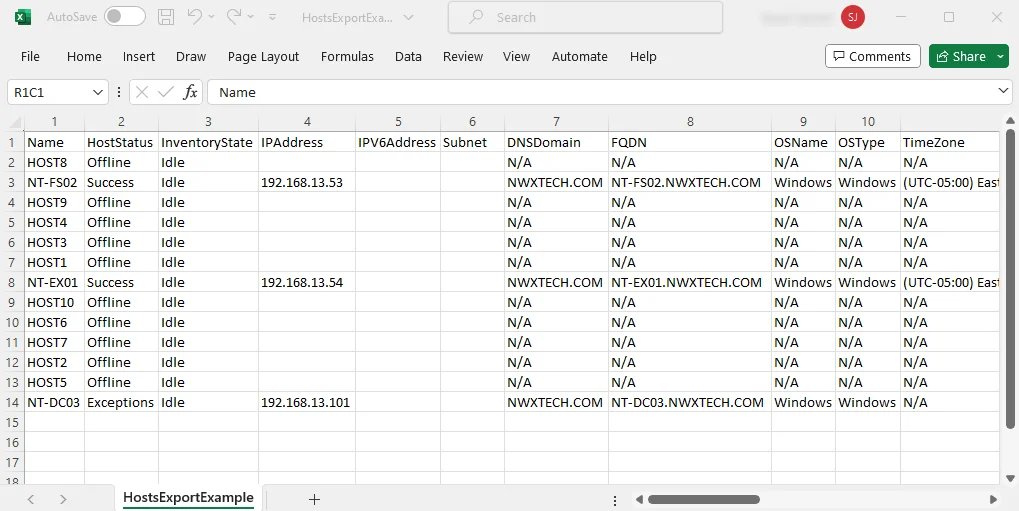
Export Examples
The following examples show the different export format options.
Example HTML File Export
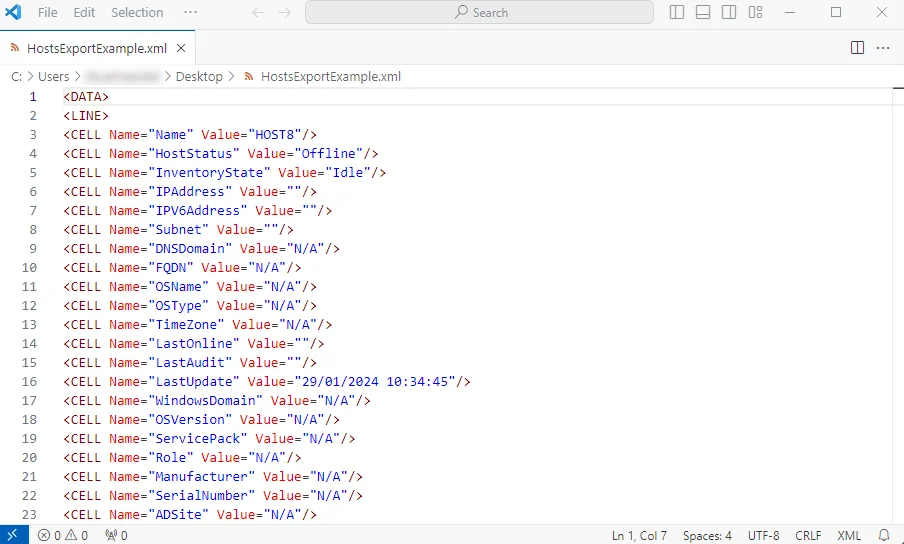
Example XML File Export
Example CSV File Export
Import Hosts Option
On the Manual Host Entry page of the Host List Wizard, the Import option allows hosts to be imported from either a CSV file or a database into the host list being created.
Follow the steps to import hosts.
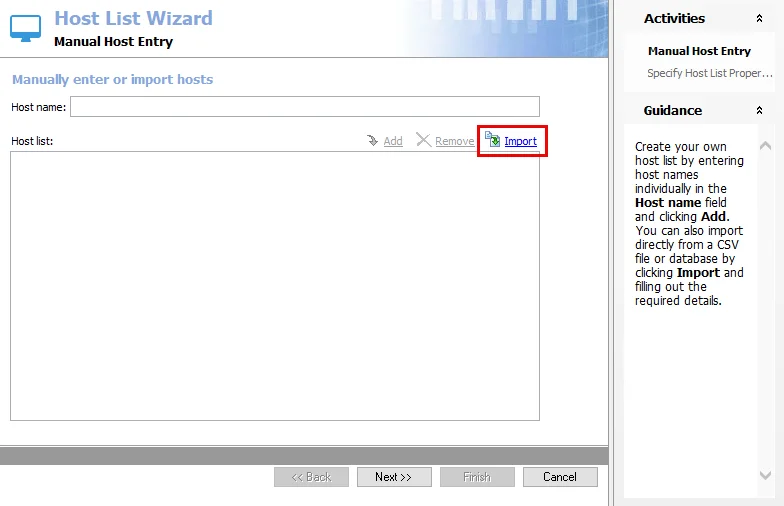
Step 1 – On the Manual Host Entry page of the Host List Wizard, click Import. The Import Hosts window opens.

Step 2 – On the Import Hosts window, use the Import from dropdown to select the source as either CSV File or Database.
Step 3 – Configure the source file. The necessary fields depend on the selection in the previous step.
-
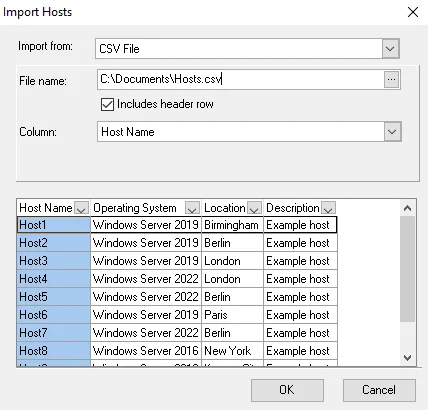
CSV File
- File Name – Click the ellipsis (…) to open a browser window and select the CSV file. This file needs to be stored on the Enterprise Auditor Console server. Once selected, a preview of the file is shown in the preview box.
- Includes header row – Select this checkbox if the file contains a header row. Otherwise, the header row will be included in the import (visible within the preview box).
-
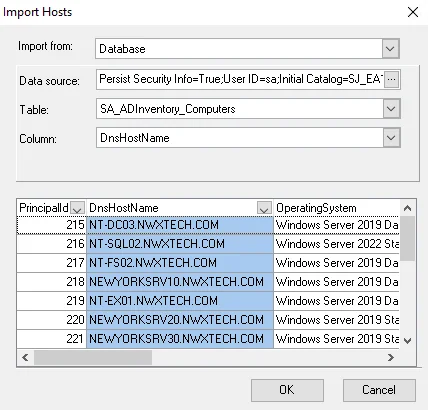
Database
-
Data source – Identify the database. Click the ellipsis (…) to open the Data Link Properties window. Provide the required information on the Connection tab of the Data Link Properties window, and then click OK. See the Import From a Database topic for additional information.
NOTE: The Provider, Advanced, and All tabs of the Data Link Properties window should not be modified.
-
Table – Use the dropdown to select the table that contains the hosts to be imported. A preview of the selected table is displayed in the preview box.
-
Step 4 – Use either the drop-down menu or click on the column in the preview box to select the column containing the host names. The selected column is highlighted in the preview box.
Step 5 – Click OK to complete the import.
The Import Hosts window closes, and the imported list of host names is added in the Host list box on the Manual Host Entry page of the Host List Wizard. Click Next to proceed with configuring the host list. See the Add Hosts topic for additional information on the Host List Wizard.
Import Location
Use the Import Location option to import the physical location data for hosts and opens a customized version of the Import Hosts window. Add host locations from a CSV file or SQL Server database without creating a new host list. See the Host Inventory Data Grid topic for information on the Location column of host inventory.
Follow the steps to import physical location data for hosts.
Step 1 – Ensure the import source file has columns for both the host name as it is identified within Enterprise Auditor and the location.
NOTE: When a host name does not match any existing hosts within the Host Master Table, it can be added as a new host.
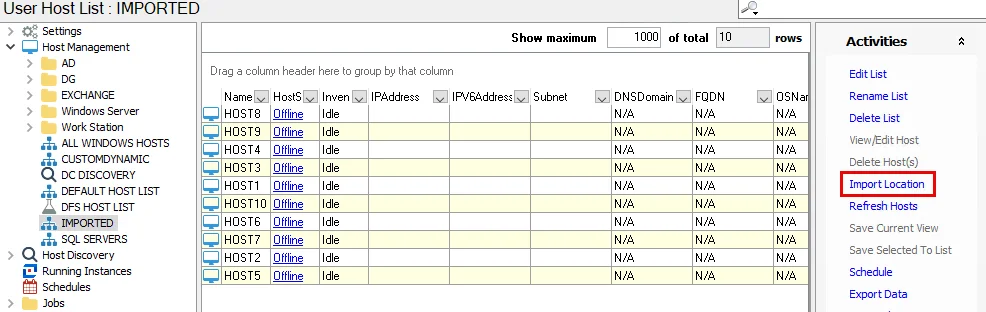
Step 2 – Select the host list and click Import Location.

Step 3 – On the Import Hosts window, use the Import from dropdown to select the source as either CSV File or Database.
Step 4 – Configure the source file. The necessary fields depend on the selection in the previous step.
-
CSV File
- File Name – Click the ellipsis (…) to open a browser window and select the CSV file. This file needs to be stored on the Enterprise Auditor Console server. Once selected, a preview of the file is shown in the preview box.
- Includes header row – Select this checkbox if the file contains a header row. Otherwise, the header row will be included in the import (visible within the preview box).
-
Database
-
Data source – Identify the database. Click the ellipsis (…) to open the Data Link Properties window. Provide the required information on the Connection tab of the Data Link Properties window, and then click OK. See the Import From a Database topic for additional information.
NOTE: The Provider, Advanced, and All tabs of the Data Link Properties window should not be modified.
-
Table – Use the dropdown to select the table that contains the hosts to be imported. A preview of the selected table is displayed in the preview box.
-
Step 5 – Use either the drop-down menu or click on the column in the preview box to select the column containing the host names. The selected column is highlighted in the preview box.
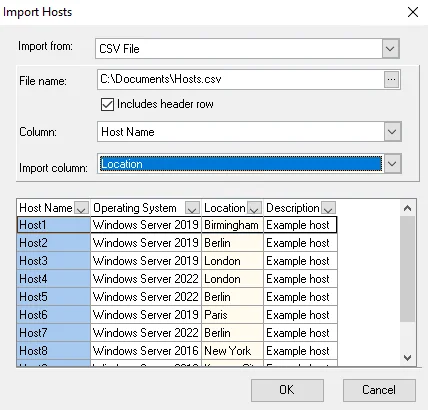
Step 6 – Use the Import column drop-down menu to select the column containing the location information. The selected column is highlighted a lighter color in the preview box.
Step 7 – Click OK to complete the import.
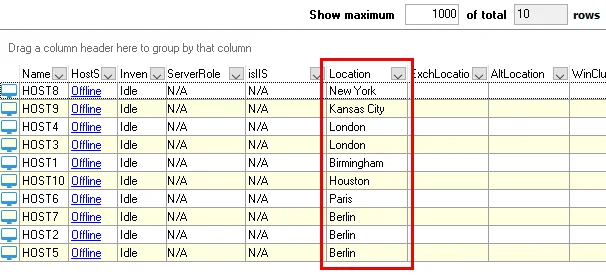
The Location column now contains the imported information. If any of the hosts included in the import file are not already in the Host Master Table, Enterprise Auditor prompts for confirmation on whether or not to import the host. Selecting Yes or Yes to All adds the new hosts to the Host Master Table but not to any individual host lists.
NOTE: Any new hosts that match dynamic host list criteria will be added to the appropriate dynamic host lists.
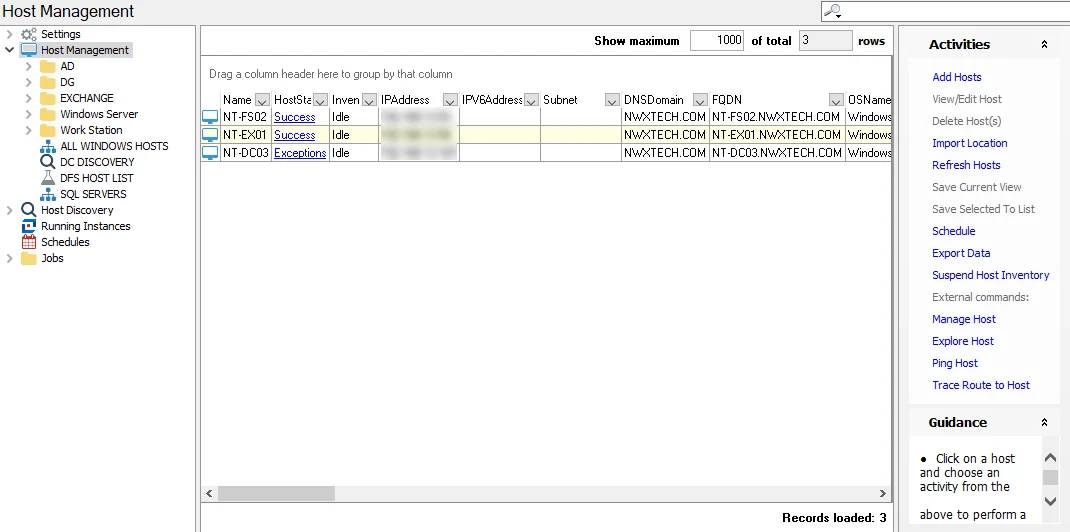
Host Management Activities
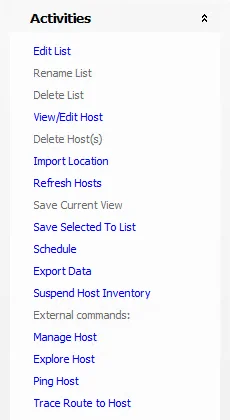
The Activities pane available at the Host Management node and at the individual host list nodes provides the tools needed to manage hosts and host lists.
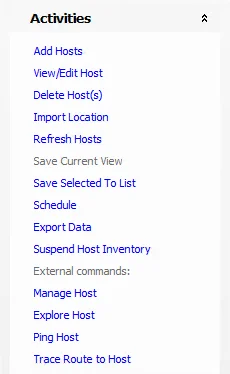 |  |
|---|---|
| Host Management Node | Individual Host List Nodes |
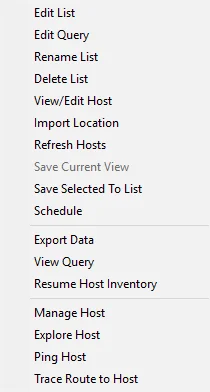
The available actions are:
-
Add Hosts – Create a new host list by manually entering hosts or importing a host list (only available in the Host Management node)
-
View/Edit Host – Open the Host Details View, which displays the collected host inventory information for the selected host in an easier-to-read format and allows you to manually edit the host inventory information
-
Delete Host(s) – Delete host from the selected list (permanently deletes host from the host master table if used in the Host Management node)
-
Import Location – Import the physical location data for hosts from a CSV file or database without creating a new host list. Location column is in the Host Inventory Data Grid.
-
Refresh Hosts – Manually executes the host inventory query for the selection
-
Save Current View – Create a dynamic host list from the current (filtered) data grid view
-
Save Selected To List – Create a static host list from the selected hosts within the current data grid
-
Schedule (Activities Pane Option) – Opens a customized Schedule Properties window to schedule a host inventory query
-
Export Data – Export the current data grid to a HTML, XML, or CSV file
-
Suspend/Resume Host Inventory – Pause an In progress host inventory or resume a paused In queue host inventory
-
External commands – Sub-header (not activity) that separates the Activities above which occur within the Enterprise Auditor Console from the Activities below which open external processes:
- Manage Host – Opens the Microsoft Management Console interface for the selected host if it has that feature enabled
- Explore Host – Opens Windows Explorer, displaying the shares on the selected host
- Ping Host – Opens a Command Prompt to run a ping command targeting the selected host
- Trace Route to Host – Opens a Command Prompt to run the
TraceRoutecommand, locating a path to the selected machine in less than 30 hops
Activities available only at the individual host list nodes are:
- Edit List – Edit the selected host list in the Host List Wizard
- Edit Query – Edit the Host Discovery query settings for the selected query-created host list
- Rename List – Rename the selected host list (should not be used if the host list has already been assigned to a job for execution)
- Delete List – Delete the selected host list
- View Query – Opens the Host Discovery Queries window
Refresh Hosts
Use the Refresh Hosts option to manually execute the Host Inventory query. It can be selected for the following:
- All hosts – Use from the Host Management node
- Individual host list – Use from a host list node to refresh all hosts in the selected host list
- Selected hosts in a list – Select hosts using the Windows Ctrl and left-click function or by filtering the data grid view
- Individual host – Select a host from the current view

Select the hosts or host list to inventory and then click Refresh Hosts in the Activities pane.

When only particular hosts are selected in a list, a dialog box asks for confirmation of the action.
Rename List
Use the Rename List option to change the name of a selected host list. This option is available only from an individual host list node.
CAUTION: Changing the name on a host list that has been assigned to a job can cause the job to fail.

Select the host list to rename and click Rename List to open the Host list name window. Enter the new name for the host list and click OK.
NOTE: Host list names can also be changed using the Edit List option, see the Edit List topic for additional information.
Save Selected To List
Use the Save Selected To List option to create a static host list. This option is available from either the Host Management node or an individual host list node. See the Static Host Lists topic for additional information on static host lists. This option is inactive until at least one host within the data grid is selected.
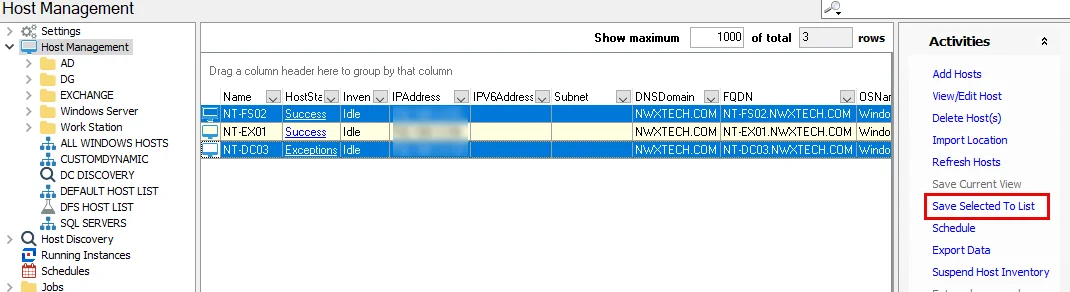
Use the Windows Ctrl + left-click function to select multiple hosts from the data grid. In the Activities pane, click Save Selected To List. The Host List Wizard opens with the selected hosts in the Host list box on the Manual Host Entry page. See the Add Hosts topic for information on creating a host list.
Save Current View
Use the Save Current View option to create a dynamic host list. This option is available from either the Host Management node or an individual host list node. The option is inactive until you apply a filter to the data grid. Follow the steps to create a dynamic host list.
Step 1 – Select the Host Management or individual host list node to create the host list from.
Step 2 – Filter the data grid for the desired criteria. See the Host Inventory Data Grid topic for additional information.
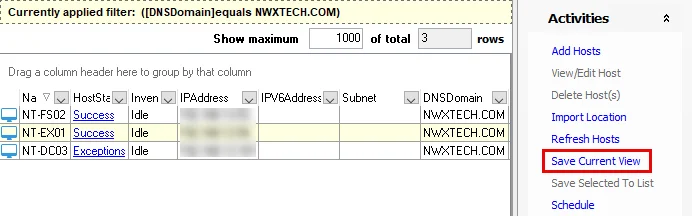
Step 3 – Click Save Current View in the Activities pane.
Step 4 – On the Host list name window, provide a unique, descriptive name for the new host list and click OK.
The new host list displays under the Host Management node. When the Enterprise Auditor Console closes the host lists under the Host Management node, the hosts reorganize in alphanumeric order. Like the default host lists, custom dynamic host lists are auto-populated and updated according to host inventory.
RECOMMENDED: Do not modify the criteria once a dynamic based list has been created. It is better to delete and recreate the list in order to modify a dynamic-based list.
See the Dynamic Host Lists topic for more information on dynamic host lists.
Schedule (Activities Pane Option)
Use the Schedule option in the Activities pane to schedule a host inventory query to run for any of the following:
- All hosts in the Host Master Table
- An individual host list
- Selected hosts in a list
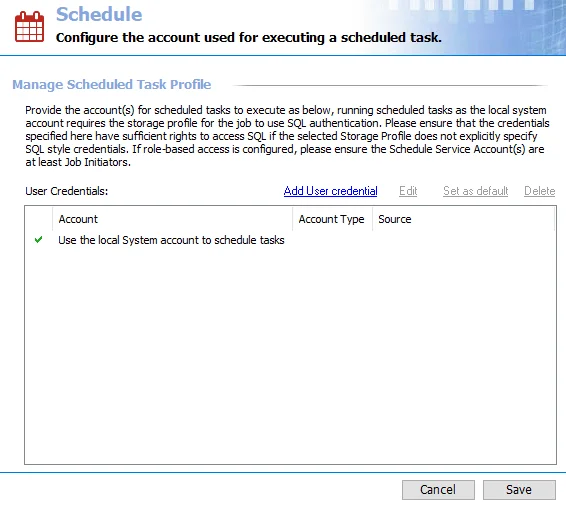
Select the hosts or host list to inventory and click Schedule in the Activities pane. The Schedule Wizard opens for the selected host or host list.
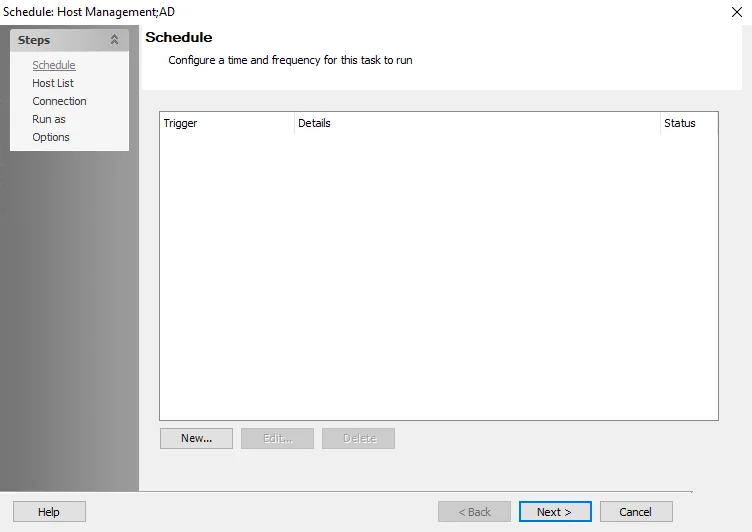
Use the Schedule Wizard to configure the scheduled task. See the Schedule Wizard topic for additional information.
The details of the scheduled Inventory query are available in the Schedules view, including the next run date and time. See the Schedules topic for additional information.
Suspend/Resume Host Inventory
Use the Suspend Host Inventory option to pause an in progress inventory.
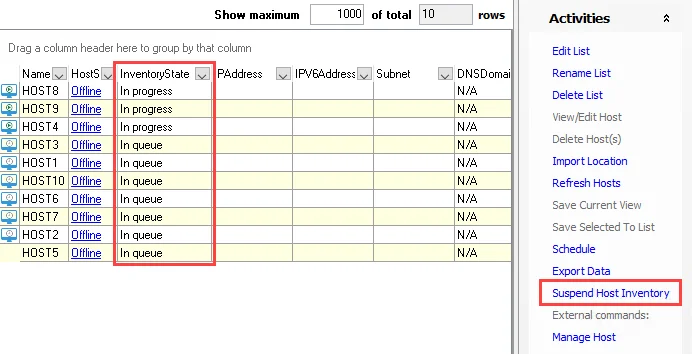
Once clicked, the option changes to Resume Host Inventory and the In progress host inventories change to an In queue state.
NOTE: Clicking Refresh Hosts while inventory is suspended adds to the queue but does not resume the inventory.
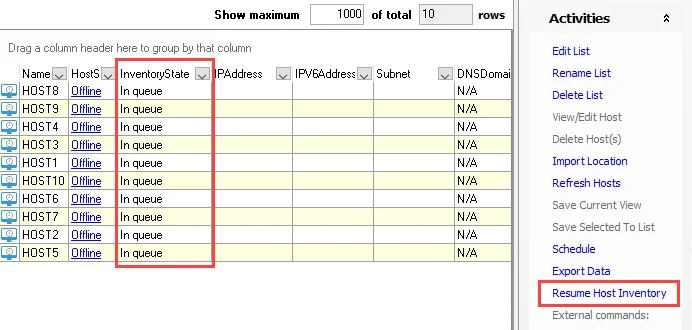
Click Resume Host Inventory to resume the inventory queries.
View/Edit Host
Use the View/Edit Host option to open the Host Details View. This view displays the collected host inventory information for the selected host in an easy-to-read format.
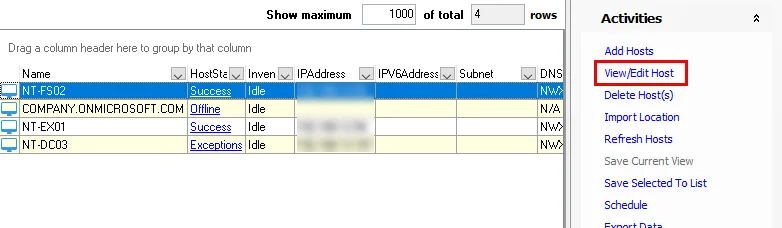
Select a host from either the Host Master Table or an individual host list and click View/Edit Host.
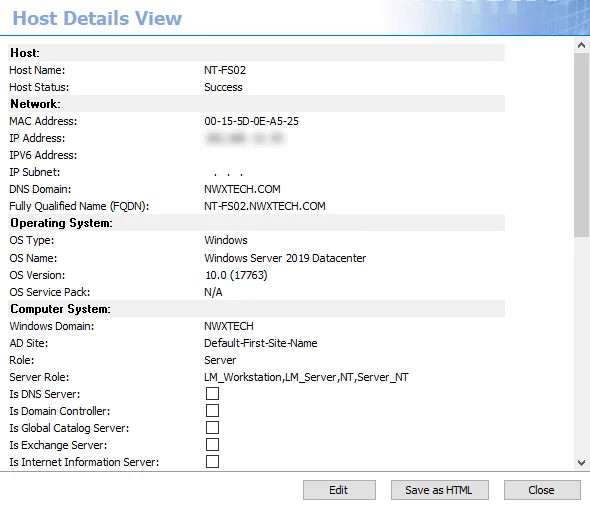
The Host Details View displays in the Results pane, and the rest of the Enterprise Auditor Console is unavailable while it is open. You can use the view to manually edit the host inventory information.
- Edit – Enables the textboxes and checkboxes for editing
- Apply – Saves any changes. This button appears when Edit is clicked.
- Save as HTML – Exports the current view of the selected host’s inventory to an HTML file. Click, then provide a name and location for the export. The export is now sharable as desired. This button is inactive while in edit mode.
- Cancel – Abandons any changes. This button displays when Edit is clicked.
- Close – Exits the Host Details View
View Query
Use the View Query option to open the Host Discovery Queries pane.
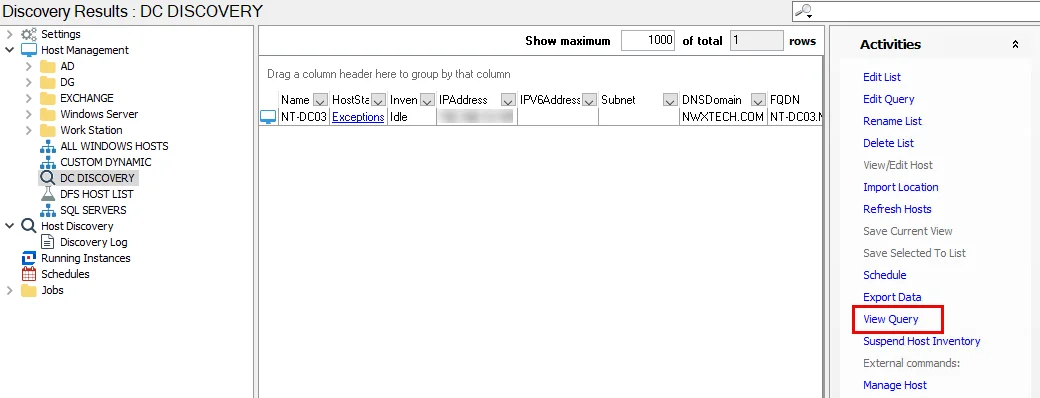
Click View Query to go to the Host Discovery Queries pane. See the Host Discovery Queries topic for additional information.
Host Inventory Data Grid
The data grid provides all host inventory information collected on the hosts. View this information at the Host Management node (the Host Master Table) or at individual host list nodes. See the Hosts Lists topic for information on host lists.
The icon for each host entry is an indicator of its inventory state:
| Icon | Inventory State |
|---|---|
| Idle | |
| In Queue | |
| In Progress |
The Name, HostStatus, and InventoryState grid columns are fixed by default. If desired, you can move these columns to the scrollable section of the table.
Use the horizontal scrollbar at the bottom to view the host inventory data, which includes:
-
Name – Unique host name
-
HostStatus – Status of the host during the last time it was queried for host inventory collection
-
InventoryState – Last known status of the host inventory query (Idle, In progress, or In queue)
NOTE: If the Enterprise Auditor application is stopped during host inventory collection, hosts queued for inventory retain the InventoryState of In queue within the Host Management node data grid, as this is the last known state of inventory. It retains that state until the next host inventory collection is executed against the host.
-
IPAddress – Last known IP Address for the host from host inventory collection
-
Subnet – Subnet mask for the host’s IP Address
-
DNSDomain – Domain in which the host participates
-
FQDN – Fully Qualified Domain Name of host
-
OSName – Name of host’s operating system
-
OSType – Type of host’s operating system
-
TimeZone – Configured time zone for the host
-
LastOnline – Timestamp for the last time the host was found to be online during a host inventory query
-
LastAudit – Timestamp for the last time the host was executed against at the job level
-
LastUpdate – Timestamp for the last time the host inventory record was updated
-
WindowsDomain – Domain in which the host resides
-
OSVersion – Version of the host’s operating system
-
ServicePack – Operating system Service Pack for the host
-
Role – Estimated role of the workstation or server (only applicable to Windows devices)
-
Manufacturer – Name of the manufacturer of the device, if applicable
-
SerialNumber – Serial number of the device, if applicable
-
ADSite – Active Directory site in which the host resides
-
isDNSServer – True or False if the host serves the role of DNS server
-
isDomainController – True or False if host serves the role of domain controller
-
isGlobalCatalog – True or False if host serves the role of Global Catalog
-
isExchangeServer – True or False if host serves the role of Exchange server
-
Model – Model of the device, if applicable
-
FirstDiscovered – Timestamp of the Host Discovery query which introduced the host
-
LastUpdatedBy – Name of the Enterprise Auditor Console server which last updated the host’s inventory record
-
MACAddress – Media Access Control address, if applicable
-
ServerRole – Indicates what role is served by the server (only applicable to Exchange servers)
-
isIIS – True or False if IIS is present on the server
-
Location – Distinct physical location, entered manually through the Import Location activity
-
ExchLocation – Distinct physical location of Exchange server, entered manually through the Import Location activity
-
AltLocation – Alternate physical location, entered manually through the Import Location activity
-
WinCluster – Name of the Windows cluster in which the host is a part, if applicable
-
ExchCluster – Name of the Exchange cluster in which the host is a part, if applicable
-
ExchangeServerRole – Name of the Exchange server roles served by the host
-
ExchangeVersion – Exchange Server application version obtained from the registry
-
IsSQLServer – True or False if host serves the role of SQL Server
-
hostID – Unique identifier of the host within the Enterprise Auditor inventory tables
See the Data Grid Functionality topic for information on how to sort, filter, and search within the data grid.
The Activities pane provides several options for managing hosts within the Host Management node. See the Host Management Activities topic for information on these options.
Host List Data Grid Right-Click Menus
The right-click menu available in the Host Management data grid varies according to the selection in the Navigation pane.
 |  |  |
|---|---|---|
| Host Management Node | Individual Host List | Query-Created Host List |
These right-click menu options contain the Host Management Activities available for the selection. See the Host Management Activities topic for additional information on these options.
Hosts Lists
A host list is a grouping of hosts for the purpose of executing jobs against. Every host list created can be accessed by expanding the Host Management node in the Navigation pane.
There are two types of host lists:
- Dynamic host lists – Auto-populated and updated according to the most recent inventory information available for the hosts. They include both the default host lists and custom created dynamic host lists. See the Dynamic Host Lists topic for additional information.
- Static host lists – Only changed manually or through a scheduled host discovery query. They include both host lists created during host discovery queries and custom created static host lists. See the Static Host Lists topic for additional information.
A newly created host list will appear in alphanumerical order under the Host Management node. The icon in front of the host list will indicate which type of host list it is:
| Icon | Type of Host List |
|---|---|
| Default Host List or Custom Host List (Static or Dynamic) | |
| Host Discovery Query List | |
| Host List created by Job |
You can view host inventory information at the Host Discovery node (the Host Master Table) or at individual host list nodes. See the Host Inventory Data Grid topic for information on the data collected by host inventory.
Dynamic Host Lists
Dynamic host lists are lists of hosts that are grouped according to selected criteria within the host inventory. Each time a host inventory record is refreshed, the hosts are automatically added to or removed from dynamic host lists in accordance with the criteria set for the list. They include both the default host lists and custom created dynamic host lists. See the Host Inventory topic for a list of the default host lists and instructions on controlling which of these lists are visible under the Host Management node.
Custom dynamic host lists are created by filtering the data grid and using the Save Current View option in the Activities pane or right-click menu. This can be done at the Host Management node with the Host Master Table or at any host list node. See the Filter topic for additional information on filtering data grids.
RECOMMENDED: Do not modify the criteria once a dynamic based list has been created. It is better to delete and recreate the list in order to modify a dynamic-based list.
Static Host Lists
Static host lists are created either through host discovery queries or manually entered within the Host Management node. Lists created by Host Discovery Node queries are updated each time the query is run, manually or scheduled. Other static host lists can only be changed manually. Custom host lists are frequently created in order to scope a job to execute against a select set of hosts.
For example, a user running the Exchange Solution might create a list to just run Mailbox queries against. Whereas a user running the File System Solution might create a list of servers being used for file shares.
There are two common ways to create static host lists:
- Use the Add Hosts option in the Activities pane or right-click menu to access the Host List Wizard
- Select multiple hosts from the data grid using the Windows Ctrl and left-click function. This can be done from the Host Mast Table or any host list under the Host Management node. Then use the Save Selected To List option in the Activities pane or right-click menu to open the Host List Wizard with a pre-filled in Manual Host Entry page.
See the Add Hosts section for information using the Host List Wizard.
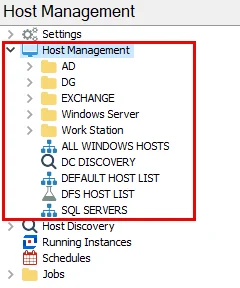
Host Management
The Host Management node is used to manage hosts in a targeted environment. Hosts configured under the Host Management node can be audited using other features in Enterprise Auditor. This node maintains information for audited computers. To view information on all computers in the environment, use the .Active Directory Inventory Solution, specifically the Active Directory Summary report.
The Host Management node provides a master list of every host ever introduced to Enterprise Auditor. Introduce hosts through Host Discovery Node queries or by entering them manually. Hosts are removed from this list only by manually deleting them. This master listing of hosts, or the Host Master Table, is designed around unique host names, not necessarily unique hosts themselves. The data grid provides all host inventory information collected on the hosts. See the Host Inventory Data Grid topic for additional information.
The Host Management process consists of the following phases:
- Host Discovery – The process of discovering hosts to audit through Host Discovery queries, which can be scoped to identify computers with commonalities. These queries are managed under the Host Discovery node. See the Host Discovery Node topic for additional information.
- Host Inventory – The process of collecting key pieces of information about each host to aid in segregating the hosts into logical sub-groupings for targeted auditing. Use either the Host Discovery or Host Management nodes.
- Host List Creation – Enterprise Auditor creates Default host lists based on Host Inventory results. Create and manage Custom host lists under the Host Management node. See the Hosts Lists topic for additional information.
The nodes under the Host Management node are:
- Default hosts lists
- Host lists generated by Host Discovery queries
- Custom host lists
See the Host Inventory topic for global settings that affect Host Management.