AD_PasswordExpirationNotification Job
The AD_PasswordExpirationNotification Job determines when Active Directory user passwords are about to expire and can be configured to send notifications to users prior to password expiration. It is available through the Instant Job Library under the Active Directory library. See the Instant Job Wizard section for instructions to add this instant job into the Jobs tree. Since this job does not require a host to target, select Local host on the Hosts page of the Instant Job Wizard.
Runtime Details:
- Dependencies – The .Active Directory Inventory Job Group must be successfully run before running this job
- Target Hosts – None
- Scheduling – This job should be scheduled to run as desired
- History Retention – Not supported and should be turned off
- Multi-console Support – Not supported
The AD_PasswordExpirationNotification Job runs analysis tasks that generate tables and configure password expiration notifications. It also generates a report on passwords expiring within a specified parameter, by default within 15 days. If desired, notifications of password expiration can be configured to send to a help desk email (through an analysis task) and to the user (through an action task).
Analysis Tasks for the AD_PasswordExpirationNotification Job
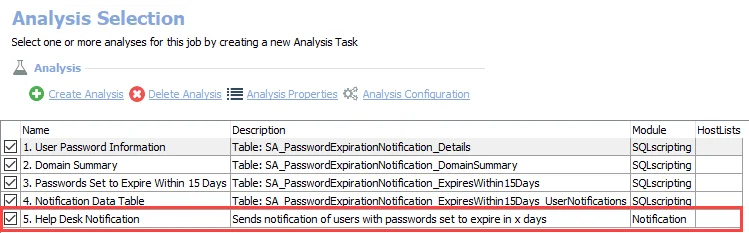
Navigate to the Jobs > AD_PasswordExpirationNotification > Configure node and select Analysis to view the analysis tasks.
The default analysis tasks are:
-
- User Password Information – Creates the PasswordExpirationNotification_Details table accessible under the job’s Results node
- Contains a configurable parameter for the number of days until a password expires to be identified
- See the Customizable Analysis Tasks for the AD_PasswordExpirationNotification Job topic for additional information.
-
- Domain Summary – Creates an interim processing table in the database for use by downstream analysis and report generation
-
- Passwords Set to Expire Within 15 Days – Creates the PasswordExpirationNotification_ExpiresWithin15Days table accessible under the job’s Results node
-
- Notification Data Table – Creates the PasswordExpirationNotification_ExpiresWithin15Days_UserNotifications table accessible under the job’s Results node
-
- Help Desk Notification – Sends notification of users with passwords set to expire in X days
- See the Notification Analysis Task in the AD_PasswordExpirationNotification Job topic for additional information.
Action for the AD_PasswordExpirationNotification Job
Navigate to the Jobs > AD_PasswordExpirationNotification > Configure node and select Actions to view the action modules.
CAUTION: This action is enabled by default.
The default actions are:
-
- User Notification – Uses the SendMail Action Module to send notifications to users on password expiration
- Requires the Notification Actions license feature
- See the Action Task in the AD_PasswordExpirationNotification Job topic for additional information.
In addition to the tables created by the analysis and action tasks, the AD_PasswordExpirationNotification Job produces the following pre-configured report.
| Report | Description | Default Tags | Report Elements |
|---|---|---|---|
| Passwords Expiring Within 15 Days | This report displays users accounts with passwords set to expire within 15 days. | None | This report is comprised of one element: - Table – Displays details on passwords expiring within 15 days |
Customizable Analysis Tasks for the AD_PasswordExpirationNotification Job
Customizable parameters enable Enterprise Auditor users to set the values used to classify user and group objects during this job’s analysis. The parameters can be customized and are listed in a section at the bottom of the SQL Script Editor. Follow the steps to customize an analysis task’s parameters.
CAUTION: Do not change the table names or report name to align with a different value supplied for this parameter. Modifying the table names will result in analysis and report errors downstream. Only the report title and descriptions can be modified within the report configuration.
| Analysis Task | Customizable Parameter Name | Default Value | Value Indicates |
|---|---|---|---|
| 1. User Password Information | @pswLen | 15 | Number of days left until a password expires, should be set according to an organizations policy. |
The parameters that can be customized are listed in a section at the bottom of the SQL Script Editor. Follow the steps to customize an analysis task’s parameters.
Step 1 – Navigate to the AD_PasswordExpirationNotification > Configure node and select Analysis to view the analysis tasks.
Step 2 – In the Analysis Selection view, select the 1. User Password Information Analysis Task and click on Analysis Configuration. The SQL Script Editor opens.
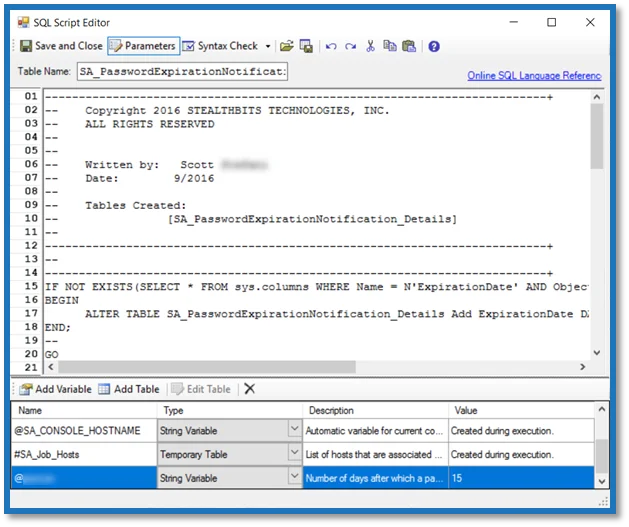
Step 3 – In the parameters section at the bottom of the editor, find the Value column. Double-click on the current value and change as desired.
CAUTION: Do not change any parameters where the Value states Created during execution.
Step 4 – Click Save and Close to finalize the customization and close the SQL Script Editor.
The new value will be applied to the next job execution.
Notification Analysis Task in the AD_PasswordExpirationNotification Job
The Notification Analysis Task can be used to send a single email to specified recipients containing a list of all users whose passwords will expire in the specified number of days, that is the users listed in the PasswordExpirationNotification_ExpiresWithin15Days table. The analysis is enabled by default. Therefore, when the job is executed the following message is sent to the specified recipient, such as the organization’s help desk, with information from the associated table:
Subject: Users with Passwords About To Expire
Support Team,
Heads-up. The following users are facing password expiration in seven days or less:
[[ -- Password for [User] ([NTAccount]) expires in [DaysUntilExpiration] days
]
Thank you,
Netwrix
CAUTION: Do not modify the tags, highlighted in bold text above.
The Subject or message body can be modified, for example to replace Netwrix with the
organization’s name. Follow the steps to configure the 5. Help Desk Notification Analysis Task.
Step 1 – Navigate to the AD_PasswordExpirationNotification > Configure node and select Analysis to view the Analysis tasks.
Step 2 – In the Analysis Selection view, select the 5. Help Desk Notification Analysis Task and click on Analysis Configuration. The Notification Data Analysis Module opens.
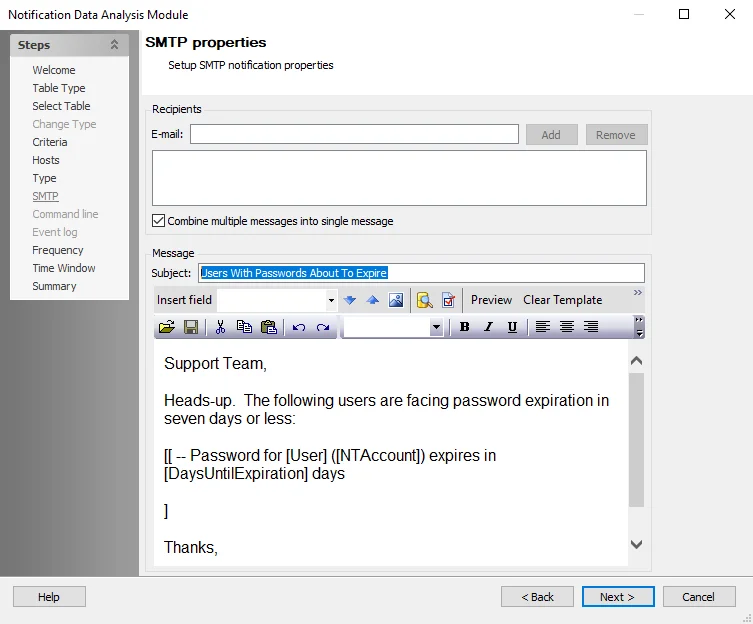
Step 3 – Use the Next button to navigate to the SMTP properties page. Do not make changes to the preceding pages. The email configuration takes place on the SMTP page. Provide the recipients’ email addresses, Message Subject, and add the notification email content.
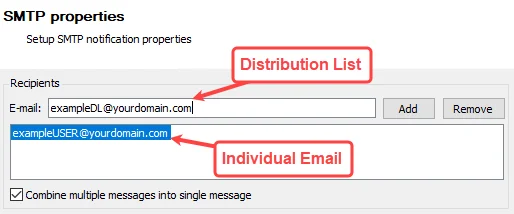
In the Recipients section, provide the email addresses in the text box or distribution lists in the E-mail field (fully qualified address) for those who are to receive this notification, for example the organization’s Help Desk. Multiple addresses can be input by adding a semicolon (;) and space between entries.
Use the Add and Remove buttons to add or remove the address in the E-mail field from the Recipients list. There is an option to Combine multiple messages into single message, which is checked by default so that it sends one email for all users in the record set instead of one email per user.
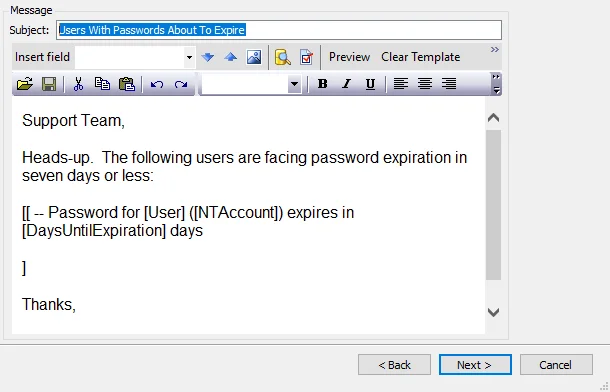
In the Message section, the Subject should be configured. Then set the email content in the text box as desired.
Step 4 – To save these configuration changes, use the Next button to navigate to the Summary page. Do not make changes to any other pages. Click Finish. The Notification Data Analysis Module window closes.
Step 5 – This notification analysis task is now configured to send emails. In the Analysis Selection view, ensure the 5. Help Desk Notification Analysis Task is checked so that notifications can be sent automatically during the execution of the AD_PasswordExpirationNotification Job.
The recipients added in Step 3 receive a notification when the AD_PasswordExpirationNotification Job is executed.
Action Task in the AD_PasswordExpirationNotification Job
The 1. User Notification Action Task uses the SendMail Action Module to send users notification of password expiration. It targets the SMTP Address Column of the users whose passwords are going to expire within the desired number of days, that is the users listed in the PasswordExpirationNotification_ExpiresWithin15Days_UserNotifications table. The action is enabled by default. Therefore, when the job is executed the following message is sent to all users in the associated table:
Subject: Attention [User] - Your Password Expires in [DaysUntilExpiration] Days
Hello [User],
The password for the account [NTAccount] expires on [ExpirationDate]. Please change the password prior to the expiration date. If account profiles are used on mobile devices, please remember to update the password on each device used.
Thank you,
Netwrix
CAUTION: Do not change the recipient for the action task. While the tags can be moved, do not remove or modify the tags, which are highlighted in bold text above.
The subject or message body can be modified, for example to replace Netwrix with the
organization’s name. Follow the steps to modify the Subject or message body within the 1. User
Notification Action Task.
NOTE: It is necessary for the PasswordExpirationNotification_ExpiresWithin15Days_UserNotifications table to exist in the database before this action task can be modified.
Step 1 – Navigate to the AD_PasswordExpirationNotification > Configure node and select Actions.
Step 2 – In the Action Selection view, select the 1. User Notification Action Task and click on Action Properties to view the actions.
CAUTION: Do not modify the action task properties.
Step 3 – In the Action Properties view, the action properties and a preview of the users from the associated table are displayed. Click Configure Action. The Send Mail Action Module Wizard opens.
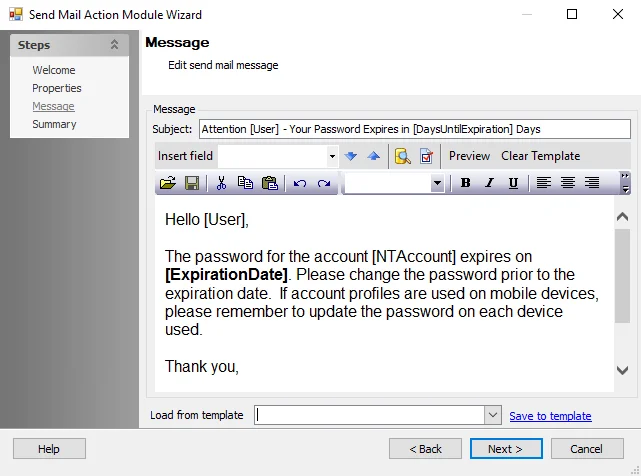
Step 4 – Click Next to navigate to the Message page. Modify the message Subject and email content as desired.
Step 5 – Click Next and then Finish to save the changes. The Send Mail Action Module Wizard closes.
Step 6 – Click Save on the Action Properties view.
When the action task is enabled, it executes as part of the job. Optionally, the action task can be manually executed.
EX_RegisterAzureAppAuth Job
EX_RegisterAzureAppAuth will register an Microsoft Entra ID (formerly Azure AD) application for authentication and provision appropriate permissions for Exchange Online scans. It requires:
-
A Connection Profile containing a Microsoft Entra ID Global Admin credential with an Account Type of Task (Local)
-
Exchange Online Management v3.4.0
-
You can install this module with the following command:
Install-Module -Name ExchangeOnlineManagement -RequiredVersion 3.4.0
-
-
Azure AD PowerShell module installed on targeted hosts
NOTE: If the module is not already installed, the job will attempt to install it.
-
You can install the module with the following command:
Install-Module AzureAD -
TLS 1.2 is required for the Azure AD PowerShell module. Run the following command to configure it:
[Net.ServicePointManager]::SecurityProtocol = [Net.SecurityProtocolType]::Tls12
-
-
Microsoft Graph PowerShell module installed on targeted hosts
-
You can install the module with the following command:
Install-Module Microsoft.Graph
-
Using the EX_RegisterAzureAppAuth Job
Follow the steps to configure and run the EX_RegisterAzureAppAuth Job.
Step 1 – In Enterprise Auditor navigate to the Exchange Job Group (or any other Job Group you wish to place the EX_RegistureAzureApp job into).
Step 2 – Click Add Instant Job to open the Instant Job Wizard.
Step 3 – Install the EX_RegisterAzureAppAuth Job from the Instant Job Library under the Exchange General library. After installation, the job tree automatically refreshes with the new job available within the selected Job Group. See the Instant Job Wizard topic for additional information.
Step 4 – On the job description page, in the Configuration section, select the edit button for Name of the app as it will appear in the Azure applications list and enter the name you want to apply to the registered Microsoft Entra ID application. Click Save.
Step 5 – In the same section, select the edit button for Password used for the Azure application and to encrypt the certificate file in the local file system and enter the password to use for the Microsoft Entra ID application. Click Save.
Step 6 – (Optional) For non-standard tenant types, edit the Azure Environment Name... option to provide the full environment name. For a standard tenant, leave this option blank.
- For example, if leveraging a government (or GCC) tenant, enter AzureGovernment
- Additional options include: AzureChinaCloud, AzureCloud, AzureGermanyCloud, AzurePPE, AzureGovernment2, and AzureGovernment3
Step 7 – On the Configure > Hosts node, select the target hosts. The targeted hosts
should be the Microsoft Entra tenant name (for example, myorg.onmicrosoft.com). Click Save.
The job is now ready to be run.
Step 8 – Run the EX_RegisterAzureAppAuth Job.
Step 9 – After the job successfully runs, it opens a browser window to Microsoft Entra ID. Log-in as a Global Administrator, and grant administrator consent to the Application's configured API Permissions.
- If this login attempt fails or you close the browser, you will need to login to Microsoft Entra ID as a Global Administrator and navigate to the Application's API Permissions to grant Admin Consent before the Application can be used for Exchange scans in Enterprise Auditor.
The Microsoft Entra ID application is now provisioned with the necessary permissions for Exchange Online scans. There will be a new Connection Profile for this Application. Restart the Enterprise Auditor Console and enter a password to use this Connection Profile.
Remember, the required rights and roles for Exchange Online still need to be configured. See the Target Exchange Online Requirements, Permissions, and Ports topic for additional information.
FS_DEFEND_SDD Job
The FS_DEFEND_SDD Job exports sensitive data matches collected by the File System Solution Sensitive Data Discovery Auditing jobs to Threat Manager. It is available through the Instant Job Library under the File System library. See the Instant Job Wizard topic for instructions to add this instant job into the Jobs tree.
For installing the job, select Local host on the Hosts page of the Instant Job Wizard. Then set the host list according to the following information.
Runtime Details:
- Dependencies – The following job groups must be successfully run before running this job
- FileSystem > 0.Collection Job Group
- FileSystem > 7.Sensitive Data Job Group
- Special Instructions
- A Connection Profile must be created using the Web Services (JWT) credential account type with
the specified Threat Manager App Token and assigned to this job
- See the Custom Connection Profile for FS_DEFEND_SDD Job topic for additional information
- Assign the Connection Profile on the Connection tab of the job’s Properties
- The Threat Manager host name with port, [HOST]:8080, and App Token are generated within Threat
Manager:
- Navigate to the Configuration > App Tokens page
- Create a new app token
- Copy the Host Name and Token
- See the Enterprise Auditor Integration topic of the Netwrix Threat Manager Documentation for additional information.
- A Connection Profile must be created using the Web Services (JWT) credential account type with
the specified Threat Manager App Token and assigned to this job
- Target Hosts – Custom Host List
- Threat Manager target host is the Threat Manager host name with port, [HOST]:8080
- Format – [HOST]:8080
- Assign host list at the FS_DEFEND_SDD > Configure > Hosts (see the Hosts Node topic for additional information)
- Scheduling – This job should be scheduled to run as desired
- History Retention – Not supported and should be turned off
- Multi-console Support – Not supported
The FS_DEFEND_SDD Job runs an analysis task that generates the SA_FSAA_SDD_RESULTS table, which places the data in a compatible format for Threat Manager. It then runs an action task using the Web Request Action Module to send the data to Threat Manager.
Analysis Tasks for the FS_DEFEND_SDD Job
Navigate to the Jobs > FS_DEFEND_SDD > Configure node and select Analysis to view the analysis tasks.
The default analysis tasks are:
- Create FSAA DEFEND table – Creates the FSAA_SDD_RESULTS table accessible under the job’s Results node
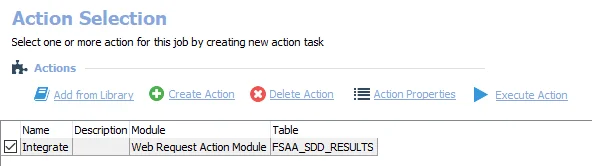
Actions for the FS_DEFEND_SDD Job
Navigate to the Jobs > FS_DEFEND_SDD > Configure node and select Actions to view the actions.
CAUTION: This action is enabled by default.
The default action is:
- Integrate – Uses the Web Request Action Module to send data to Threat Manager
Custom Connection Profile for FS_DEFEND_SDD Job
The FS_DEFEND_SDD Job requires a custom Connection Profile to authenticate to Threat Manager. The credential for the Connection Profile must be created with the Web Services (JWT) account type. Remember, the Threat Manager App Token is generated within Threat Manager.
Create a Connection Profile and set the following information on the User Credentials window:
- Select Account Type – Web Services (JWT)
- Domain – Not a field for this type of credential, defaults to
<WSJWT> - User name – Not a field for this type of credential
- Password Storage: Application – Uses Enterprise Auditor’s configured Profile Security setting as selected at the Settings > Application node
- Access Token – Copy and paste the Threat Manager App Token
See the Application topic for additional information.
FS_MigrateSchema Job
The FS_Migrate_Schema Job migrates the schema in order to support the use of 64-bit ResourceID's without affecting data. It is available through the Instant Job Library under the File System library. See the Instant Job Wizard topic for instructions to add this instant job into the Jobs tree.
For installing the job, select Local host on the Hosts page of the Instant Job Wizard.
Runtime Details:
- Dependencies – None
- Target Hosts – None
- Scheduling – This job should be scheduled to run as desired
- History Retention – Not supported and should be turned off
- Multi-console Support – Not supported
- Additional Notes – None
The FS_Migrate Schema Job migrates the schema in order to support the use of 64-bit ResourceID's without affecting data.
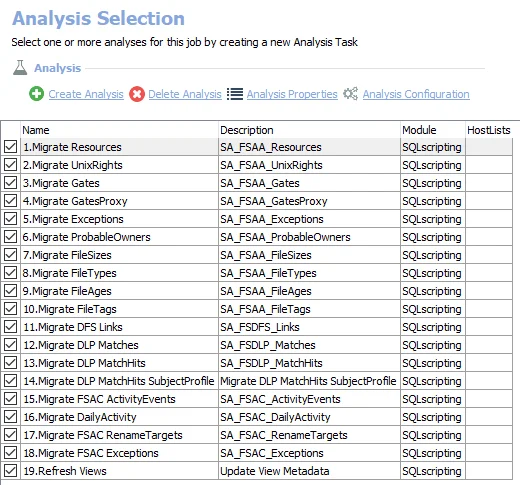
Analysis Tasks for the FS_MigrateSchema Job
Navigate to the Jobs > FS_MigrateSchema > Configure node and select Analysis to view the analysis tasks.
CAUTION: Do not modify or deselect the selected analysis tasks. The analysis tasks are preconfigured for this job.
The default analysis tasks are:
- 1.Migrate Resources – Migrates the SA_FSAA_Resources table to leverage 64-bit IDs
- 2.Migrate UnixRights – Migrates the SA_FSAA_UnixRights table to leverage 64-bit IDs
- 3.Migrate Gates – Migrates the SA_Gates table to leverage 64-bit IDs
- 4.Migrate GatesProxy – Migrates the SA_FSAA_GatesProxy table to leverage 64-bit IDs
- 5.Migrate Exceptions – Migrates the SA_FSAA_Exceptions table to leverage 64-bit IDs
- 6.Migrate ProbableOwners – Migrates the SA_FSAA_ProbableOwners table to leverage 64-bit IDs
- 7.Migrate FileSizes – Migrates the SA_FSAA_FileSizes table to leverage 64-bit IDs
- 8.Migrate FileTypes – Migrates the SA_FSAA_FileTypes table to leverage 64-bit IDs
- 9.Migrate FileAges – Migrates the SA_FSAA_FileAges table to leverage 64-bit IDs
- 10.Migrate FileTags – Migrates the SA_FSAA_FileTags table to leverage 64-bit IDs
- 11.Migrate DFS Links – Migrates the SA_FSDFS_Links table to leverage 64-bit IDs
- 12.Migrate DLP Matches – Migrates the SA_FSDLP_Matches table to leverage 64-bit IDs
- 13.Migrate DLP MatchHits – Migrates the SA_FSDLP_MatchHits table to leverage 64-bit IDs
- 14.Migrate DLP MatchHits Subject Profile – Migrates the SA_FSDLP_MatchHits_SubjectProfile table to leverage 64-bit IDs
- 15.Migrate FSAC ActivityEvents – Migrates the SA_FSAC_ActivityEvents table to leverage 64-bit IDs
- 16.Migrate DailyActivity – Migrates the SA_FSAC_DailyActivity table to leverage 64-bit IDs
- 17.Migrate FSAC RenameTargets – Migrates the SA_FSAC_RenameTargets table to leverage 64-bit IDs
- 18.Migrate FSAC Exceptions – Migrates the SA_FSAC_Exceptions table to leverage 64-bit IDs
- 19.Refresh Views – Updates viewable metadata
Instant Job Wizard
The Enterprise Auditor Instant Job Wizard provides access to a library of instant solutions and instant jobs, which are pre-configured for Enterprise Auditor. Instant solutions contain groups of jobs to help solve a wide range of problems within each category. Instant jobs help solve specific problems. The instant solutions available align to an organization’s license key. See theSolutions topic for additional information.
Follow the steps to install an instant solution or an instant job with the Instant Job Wizard.
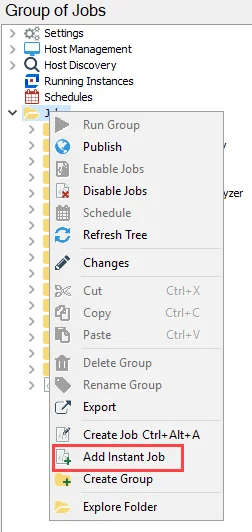
Step 1 – Select the Jobs tree (for an instant solution) or the desired job group (for an instant job), right-click on the node, and select Add Instant Job.
Step 2 – On the Welcome page, click Next.
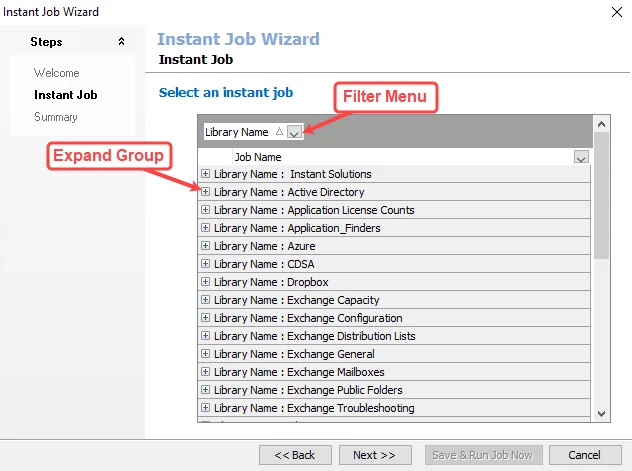
Step 3 – On the Instant Job page, use the filter menu to only view instant jobs in a particular category, or click the plus icon (+) to expand a category group.

Step 4 – Select the desired instant solution or job. To select multiple instant solutions or jobs, press the Windows Ctrl key and select the items to install. Click Next.
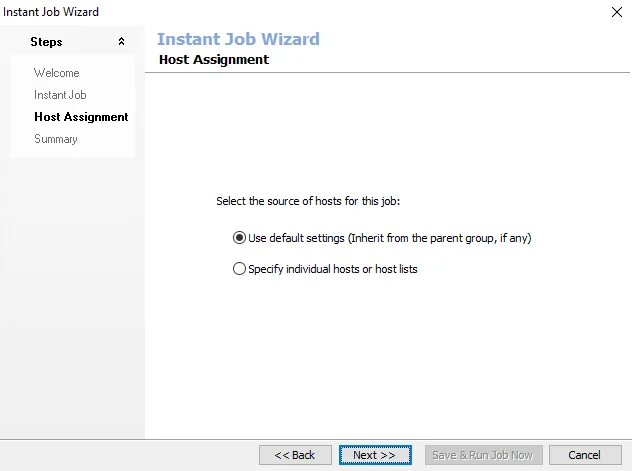
Step 5 – Some of the Library selections add a Host Assignment page. If this page does not appear, skip to Step 7. If the page does appear, select either the Use default settings (Inherit from the parent group, if any) or Specify individual hosts or hosts lists option. If the first option is selected, skip to Step 7. If the second option is selected, click Next to go to the Host Lists and Individual Hosts wizard pages.
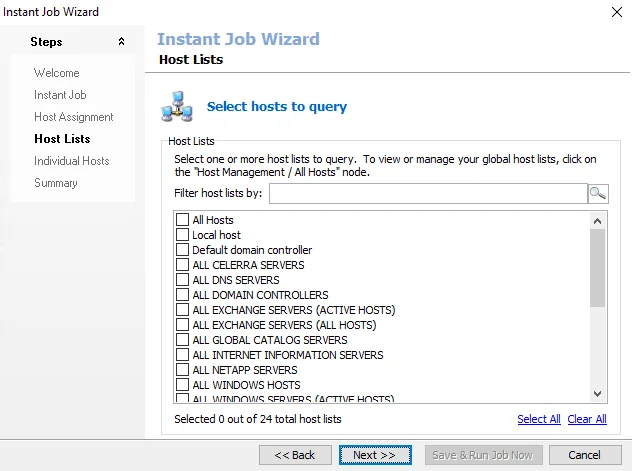 | 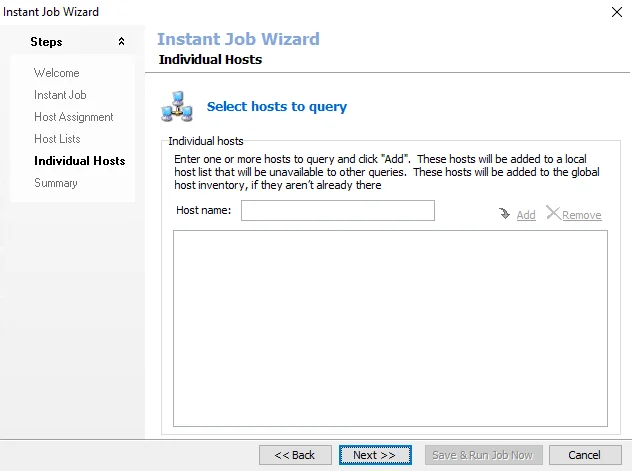 | |
|---|---|---|
| Host Lists page | Individual Hosts page |
Step 6 – Some of the Library selections add a Host Lists, and Individual Hosts page. If these pages do not appear with the selection, skip to Step 7. If the pages do appear, check the host list to be assigned to the job group or job. Alternatively enter hosts manually. Then click Next.
Step 7 – On the Summary page, click Save & Exit.

Step 8 – For Instant Solutions, when the installation is complete, click Finish.
The Instant Job Wizard closes, and the Jobs tree refreshes automatically. See the individual sections in the Solutions topic for additional information.
SAS_ExecutionStatistics Job
The SAS_ExecutionStatistics Job tracks historical performance of Enterprise Auditor job and analysis functions and highlights when a particular task takes an abnormal length of time to execute. It is available through the Instant Job Library under the Enterprise Auditor Utilities library. See the Instant Job Wizard section for instructions to add this instant job into the Jobs tree. Since this job does not require a host to target, select Local host on the Hosts page of the Instant Job Wizard.
The job is dependent upon the Job Statistics Retention configuration in the Settings > Application node. See the Application topic for additional information.
Runtime Details:
- Dependencies – None
- Target Hosts – None
- Scheduling – This job should be scheduled to run as desired
- History Retention – Not supported and should be turned off
- Multi-console Support – Not supported
- Additional Notes – The jobs uses custom SQL scripts to render views on collected data. SQL views are used to populate report element tables and graphs. Changing or modifying the Group, Job, or Table names will result in no data displayed within the reports.
The SAS_ExecutionStatistics Job runs analysis tasks and generates reports on the latest job executions, analysis history, host query details, and analysis details.
Analysis Tasks for the SAS_ExecutionStatistics Job
Navigate to the Jobs > SAS_ExecutionStatistics > Configure node and select Analysis to view the analysis tasks.
CAUTION: Do not modify or deselect the selected analysis tasks. The analysis tasks are preconfigured for this job.
The default analysis tasks are:
- Analyze Jobs – Collects and analyzes all job-level execution statistics from the database based on the statistics retention settings set in the Application node
- Analyze All Statistics – Collects and analyzes all task-level execution statistics from the database based on the statistics retention settings set in the Application node
- Query Execution Details – Organizes query-related statistics
- Analysis Details – Organizes analysis-related statistics
In addition to the tables created by the analysis tasks, the SAS_ExecutionStatistics Job produces the following pre-configured reports.
| Report | Description | Default Tags | Report Elements |
|---|---|---|---|
| Analysis Execution | This report identifies abnormally long analysis times. | None | This report is comprised of two elements: - Bar graph – Displays Abnormally Long Analysis Times - Table – Displays details on analysis times |
| Collection Statistics | This report identifies abnormally long collection times. | None | This report is comprised of two elements: - Bar graph – Displays Abnormally Long Collection Times - Table – Displays details on collection times |
| Job Execution Statistics | This report identifies jobs which have abnormally long run times. | None | This report is comprised of two elements: - Pie chart – Displays Job Status - Table – Displays details on job status |
SP_RegisterAzureAppAuth Job
SP_RegisterAzureAppAuth will register an Microsoft Entra ID (formerly Azure AD) application for authentication and provision appropriate permissions for SharePoint Online scans. It requires:
-
A Connection Profile containing the following two user credentials, both with an Account Type of Task (Local):
- Microsoft Entra ID Global Admin credential
- A credential with the username
newappthat contains the password for the new application
-
Microsoft Graph API PowerShell module to be installed on targeted hosts
Instantiate the SP_RegisterAzureAppAuth Job.
Follow the steps to instantiate the SP_RegisterAzureAppAuth Job.
Step 1 – In Enterprise Auditor navigate to the SharePoint Job Group (or any other Job Group you wish to place the SP_RegistureAzureApp job into).
Step 2 – Click Add Instant Job to open the Instant Job Wizard.
Step 3 – Install the SP_RegisterAzureAppAuth Job from the Instant Job Library under the SharePoint library. After installation, the job tree automatically refreshes with the new job available within the selected Job Group.
Step 4 – On the job description page, in the Configuration section, select the edit button for The new application’s display name and enter the name you want to apply to the registered Microsoft Entra ID application. Click Save.
Step 5 – On the Configure > Hosts node, select the targeted host. The targeted host
should be the Microsoft Entra ID tenant on which you want to install the Microsoft Entra ID
application (for example, myorg.onmicrosoft.com). Click Save. The job is now ready to be run.
After the job successfully runs it will open a browser window to Microsoft Entra ID that, when logged-in as a Global Administrator, allows the user to grant administrator consent to the Application's configured API Permissions. If the login attempt fails, or the user closes the browser, they will need to login to Microsoft Entra ID as a Global Administrator and navigate to the Application's API Permissions to grant Admin Consent before the Application can be used for SharePoint scans in Enterprise Auditor.
Additional Considerations
-
After the job successfully runs, there will be a new Connection Profile for this Application. Restart the Enterprise Auditor Console and enter a password to use this Connection Profile.
-
The password is the location of the PFX file generated by the script (in the \PrivateAssemblies directory), the Microsoft Entra ID application's password, and a numeric designator for the Microsoft 365 environment (0 is the default for production environments; the other supported options are 1 for pre-production environments, 2 for China, 3 for Germany, 4 for US Government, 5 for US Government-High, and 6 for US Government-DoD). To allow for multiple unique certificates for different Microsoft Entra ID tenants to be stored on the same Enterprise Auditor server, the script appends the targeted host name (without the domain) to the filename of the PFX file generated by the script. For example, if the targeted host is
myorg.onmicrosoft.com, then the password for the connection profile would be:...\STEALTHbits\StealthAUDIT\PrivateAssemblies\spaa_cert_myorg.pfx,YourPasswordHere,0
SP_RemoveHost Job
The SP_RemoveHost Job removes desired SharePoint hosts from the Enterprise Auditor database. It is available through the Instant Job Library under the SharePoint library. See the Instant Job Wizard topic for instructions to add this instant job into the Jobs tree.
Runtime Details:
- Dependencies – None
- Target Hosts – SharePoint host to be deleted
- Scheduling – This job should be scheduled to run as desired
- History Retention – Not supported and should be turned off
- Multi-console Support – Not supported
- Additional Notes – None
The SP_RemoveHosts Job removes desired SharePoint hosts from the Enterprise Auditor database, target the hosts on the job and run it to delete the respective hosts SharePoint data.
Analysis Tasks for the SP_RemoveHost Job
Navigate to the Jobs > SP_RemoveHost > Configure node and select Analysis to view the analysis tasks.
CAUTION: Do not modify or deselect the selected analysis tasks. The analysis tasks are preconfigured for this job.
The default analysis tasks are:
- Remove Host(s) — Remove Scanned Hosts from Tier 1