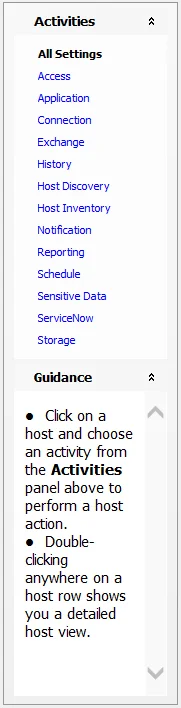
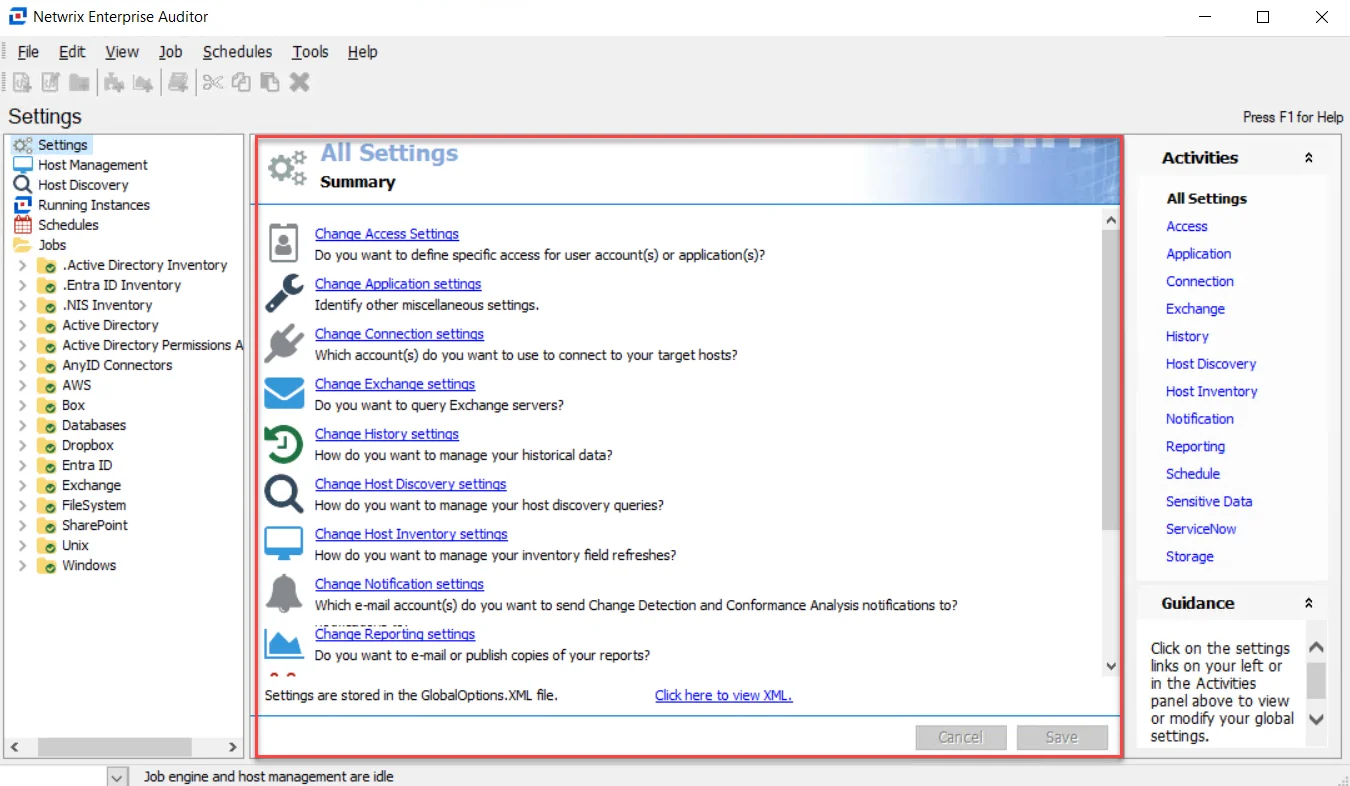
Activities Pane
The Activities pane displays a list of activities which can be conducted within the currently selected console section. It is only visible if there are activities available for the selected section. In the few cases where the Results pane is a wizard, this pane becomes the navigation pane for the wizard, e.g. the Enterprise Auditor Host Discovery Wizard. If the currently selected console section has an associated Activities Pane, it can be found on the right-hand side of the Enterprise Auditor Console.
The following console sections have associated Activities Panes:
- All Global Settings > [Settings] nodes
- Host Management nodes
- Host Discovery node
- Jobs > [Job Group/Job] > Settings node
The Guidance section of the Activities Pane will display context sensitive information depending on what the currently selected console section is.
Data Grid Functionality
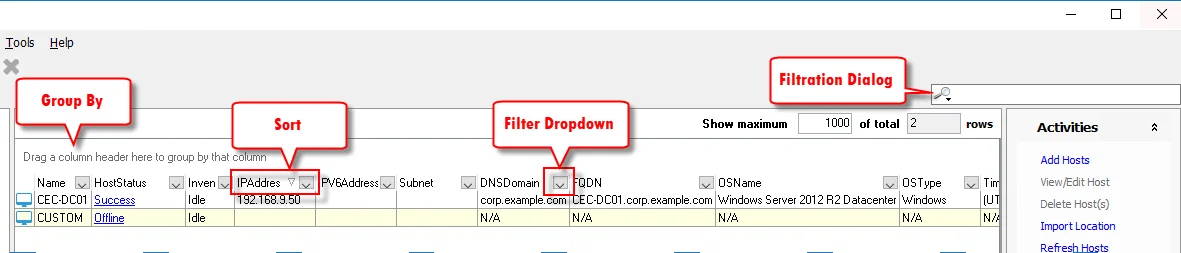
All data grids within the Enterprise Auditor Console have functions and features that allow Enterprise Auditor users to group by, filter, and sort via the filtration dialog through the data.
The different grouping, filtering, and search methods in the Data Grid are:
The Show maximum [value] of total [value] rows, located in the upper-right hand corner of the Data Grid view in the Results Pane, indicates how many rows of data are available within this data grid (the first value) and how many rows of data are available in the Enterprise Auditor database for this data grid (the second value). The maximum value can be changed by the user and only affects the maximum number of rows available for this data grid within the Enterprise Auditor Console. The total value is automatically supplied from the Enterprise Auditor database and cannot be changed by the user. If the total value is less than the maximum value, then all available data for this grid is present for sorting, filtering, and searching.
Data Grid Right-Click Menu
The right-click menu that affects data grid functionality is accessible by right-clicking on the data grid header row.
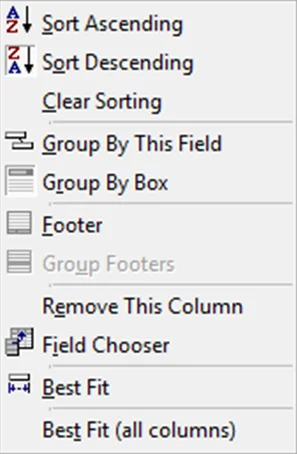
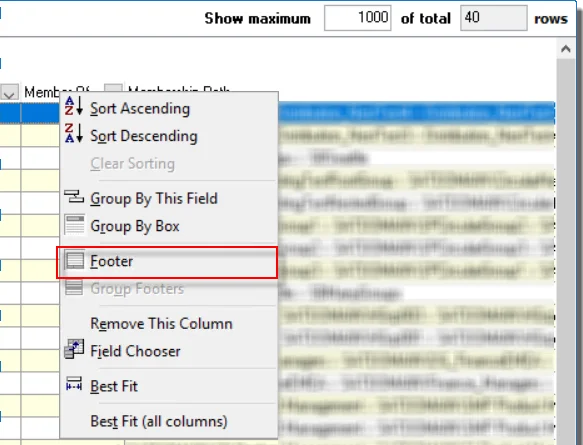
The Data Grid Right-click menu contains the following selections:
- Sort Ascending – Sorts data by selected column in alphanumeric order
- Sort Descending – Sorts data by selected column in alphanumeric order
- Clear Sorting – Removes all sorting from selected column
- Group By This Field – Groups data or clears grouping of data by selected column
- Group By Box – Hides or shows the Group By Box where headers can be dragged-and-dropped to group the data
- Footer – Provides a data grid summation row at the bottom of the data grid (see the Footer section)
- Group Footers – Provides a data grid summation row at the bottom of each group (see the Footer section)
- Remove This Column – Removes selected column from the data grid
- Field Chooser – Opens the Customization window (see the Customization Window section)
- Best Fit – Changes column width to fit the data within the selected column
- Best Fit (all columns) – Changes column width for all columns to fit the data
Some data grids include right-click menus for actions on the data. See the corresponding sections for information on right-click menus within a data grid.
Customization Window
The Customization window can be used to customize the data grid to only display specific columns.
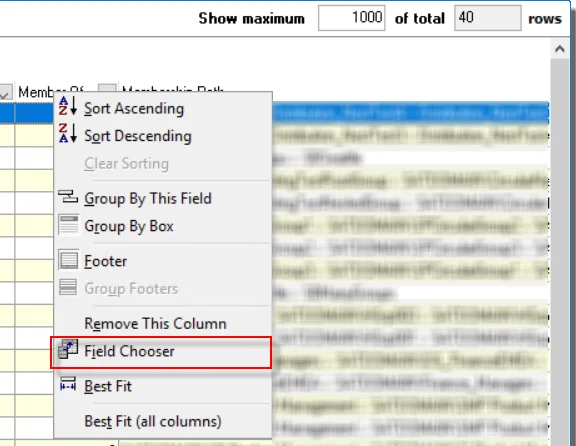
To open the Customization window, select Field Chooser from the column header right-click menu.

Any column that has been removed from the data grid, either by dragging it off the screen or by dropping it into this window, will be listed here. A column not currently displayed can be returned to the data grid by dragging-and-dropping it from this window onto the header row.
Footer
The footer provides a data grid summation row. The summation capabilities exist for every column on the footer either for the entire data grid or by grouped sections of the data grid.
To enable the footer, right-click in a column header and select Footer from the right-click menu.
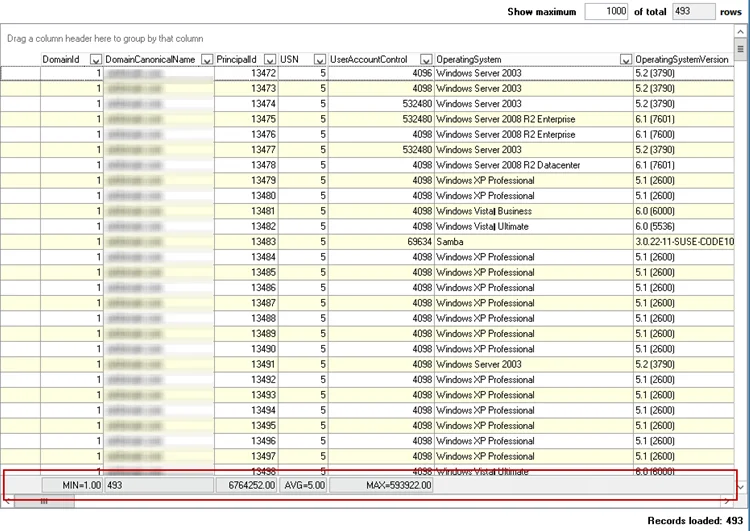
The footer appears as a gray bar at the bottom of the grid (or grid group). Right-click on the footer under the desired column. Only the options applicable to the desired column will be valid for selection.

The different footer options are:
- Sum – Available for columns with numeric values, adds all values in the column
- Min – Available for columns with numeric values, identifies the minimum value in the column
- Max – Available for columns with numeric values, identifies the maximum value in the column
- Count – Counts the number of records within the column
- Average – Available for columns with numeric values, calculates the average value for the column
- None – Removes the selected summation
Sort
The data grid can be sorted in alphanumeric order by clicking on a column header.
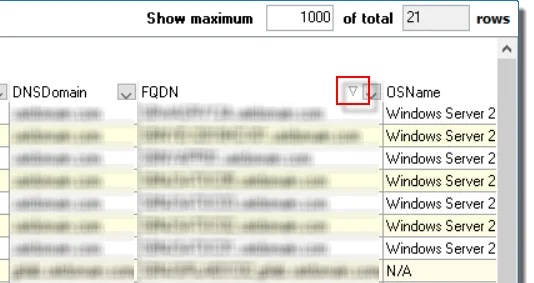
An arrow displays on the column header indicating if the sort is increasing or decreasing. This feature only works on one column at a time.
Group By
Users can interact and search through data grids in the Results Pane.
 |  |
|---|---|
| Default view | Organized by Column Header |
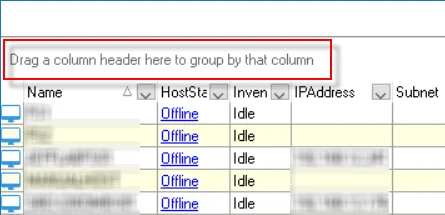
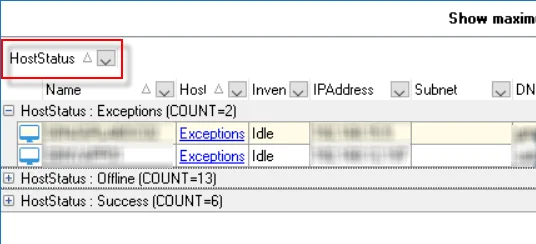
To use this feature, drag a column header into the “Drag a column header here to group by that column” area. The data grid groups according to the data within that column. The sub-header provides a ‘count’ of records within each group. Expand the group to view the data.

Multiple columns can be dragged into the Group By area to form tiered groupings.
NOTE: Sorting by the FQDN column is an easy way to see if there are two entries for the same host.
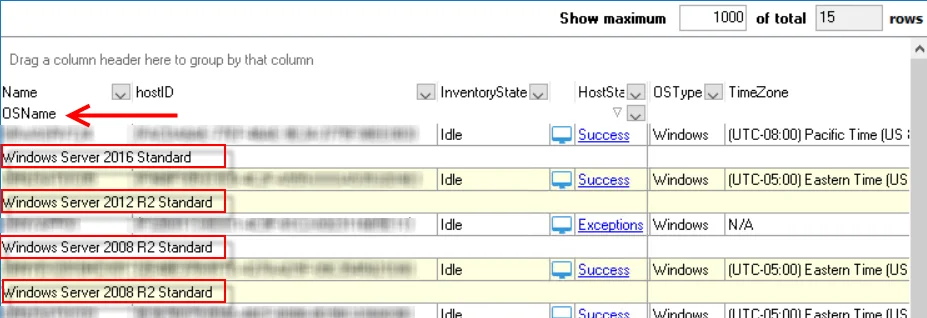
The data grid can also be grouped by dragging a column header beneath the other column headers either to the stationary section on the left or to the mobile section on the right. Each record counts as a single row for the total rows value, but displays in two rows with the second row dedicated for the moved column.
Drag the column header(s) back to the table to remove the grouping or use the Clear Sort option in the Data Grid Right-Click Menu. Additionally, the sort will clear when the user navigates to another place in the console.
Filter
Users can filter and search data in the Data Grid by using the dropdown arrow in the column headers to select from a list of filters, configuring a custom filter, or by using the Data Grid filtration dialog located above the Activities Pane.
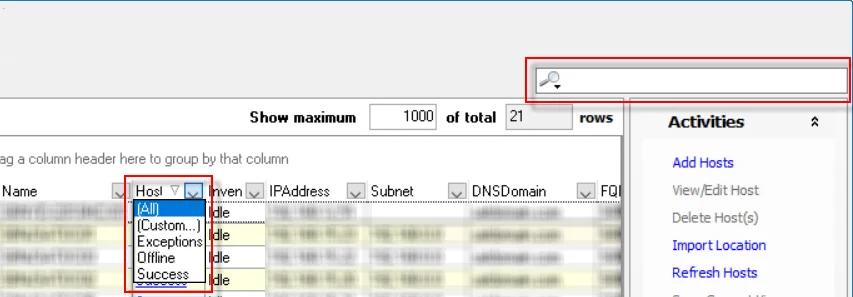
In the header of every column is a drop-down arrow. This provides users with the ability to filter the data grid for a particular item or items within a column. The drop-down menu has the options of (All), (Custom…), and an alphabetical listing of all items currently within that column for the data grid.
- Custom Filter – Click Custom Filter in the header dropdown to open the Custom Filter window
- Filtration Dialog – Click the Magnifying Glass icon in the Filtration Dialog to select a specific filter
Custom Filter
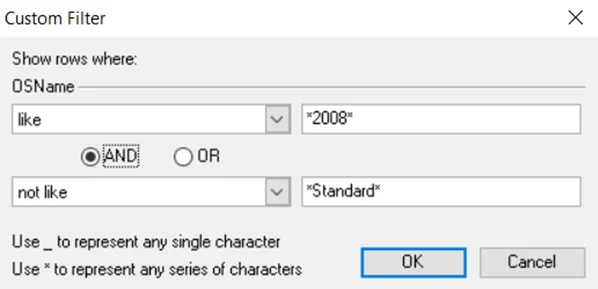
The Custom option opens a Custom Filter builder for the selected column.

The Custom Filter window options are:
- Show rows where
- First Comparison Operator – Select from a list of different logical operators that will apply to the first custom filter criteria
- AND/OR radio buttons – Select logical relationship between the first and second custom filter criteria
- Second Comparison Operator – Select from a list of different logical operators that will apply to the second custom filter criteria.
- Two wildcard options:
- The underscore (_) can be used to represent any single character
- The asterisk (*) can be used to represent any series of characters
Creating a Custom Filter
Follow the steps to create a Custom Filter:
Step 1 – Click the dropdown arrow in the column header for the column where the Custom Filter is going to be applied and select (Custom…) from the list. The Custom Filter window opens.
Step 2 – Set the desired criteria for the custom filter. Select the logical operator from the drop-down menu on the left and set the criteria in the textbox on the right.
Step 3 – Select either AND/OR and set the second criteria field, following the same method as Step 2.
Step 4 – Click OK to confirm changes. The custom filter criteria is now applied to the Data Grid.
In the example above, OSName is like *2008* AND not like *Standard*, the filter returns all data records with an operating system name that contains “2008” but not “Standard,” e.g. Windows Server 2008 Enterprise Edition, 64 bit and Windows Server 2008 R2 Datacenter Edition, 64-bit, etc. Complex filters can be created using the Advanced Search option in the Filtration Dialog.
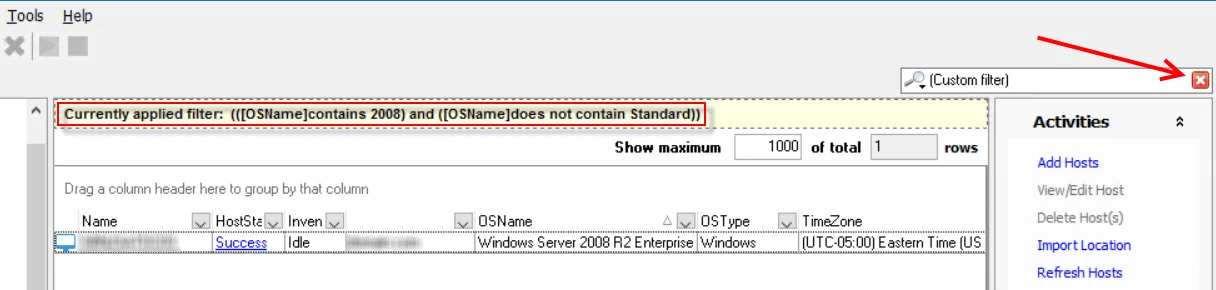
The selected filter criteria will appear at the top of the data grid. A red X appears in the filtration dialog, and the total rows value drops to the number of records that match the filter criteria. Additional filter statements can be added for other columns by repeating the process to build complex filters. The filtration dialog also provides other ways to filter and search the data set. See the Filtration Dialog topic for additional information on this feature.
Filters can be cleared by clicking the red X in the filtration dialog (to clear all filter statements), selecting All from the column’s drop-down menu (to clear filters one column at a time), or by navigating to another place in the console (to clear all filter statements). However, the Recent Filters option in the filtration dialog provides a list of the most recent filters applied to the data set for users to quickly return to a filtered view.
Filtration Dialog
The filtration dialog in the upper-right corner with the magnifying glass icon provides additional filtering options.

The magnifying glass icon opens a dropdown list of columns for the selected data grid, the Advanced Search option, and the Recent Filters list. Typing in the textbox at the top filters the data grid for the selected column (identified by the black dot). Hover over the Recent Filters menu item to open the list of the last server filters applied to this data grid.
Advanced Search
The Advanced Search option opens a Set Filter builder for users to build a filter for multiple columns using multiple logical operators.

The filter options and logical operators are:
- Filter Button – The Filter button opens a menu with the options to:
- Add Condition
- Add Group
- Clear All
- Logical Operator – The logical operator (red text) beside the Filter button can be changed by
clicking on it to open a menu with:
- AND
- OR
- NOT AND
- NOT OR
- Ellipsis Button – The ellipsis (…) button at the beginning of each row opens a menu with options
to:
- Add Condition
- Add Group
- Remove Row
- Column Selection – The selected column (green text) can be changed by clicking on it to open a menu with all available columns for the data grid.
- Comparison Operator – The comparison operator (dark red text) can be changed by clicking on it to
open a menu with:
- equals
- does not equal
- is less than
- is less than or equal to
- is greater than
- is greater than or equal to
- like
- not like
- is blank
- is not blank
- between
- not between
- in
- not in
- Filter Criteria – The filter criteria (blue text) can be changed by clicking on it and typing in the textbox that appears. The Custom Filter builder wildcards can also be used in the Set Filter builder.
Navigating the Console
There are several options that can be used to navigate the Enterprise Auditor Console. This section covers basic Enterprise Auditor Console navigation, including menu options, buttons, and the different panes through which users can access Enterprise Auditor’s various functions and options.
The primary sections of the Enterprise Auditor Console are:
- Top Navigation – Comprised of the Menu Bar and the Actions Bar
- Navigation Pane – Navigate through all of Enterprise Auditor’s major functions using the Navigation Pane. Selecting a node or sub-folder in the Navigation Pane will change what can be done in the Results Pane.
- Results Pane – Displays various interfaces based on what is selected in the Navigation Pane or Activities Pane
- Activities Pane – Displays a list of activities which can be conducted within the currently selected console section
Enterprise Auditor Data Grids also have specific navigation options that enable users to filter, group, and search through data. See the Data Grid Functionality topic for additional information.
Navigation Pane
The Navigation Pane, located on the left-hand side of the Enterprise Auditor Console, lists all the major functions of Enterprise Auditor in a collapsible list format. Clicking on any node with an arrow will open a collapsible list that shows more navigation, configuration, and use options.

The items in the Navigation Pane are:
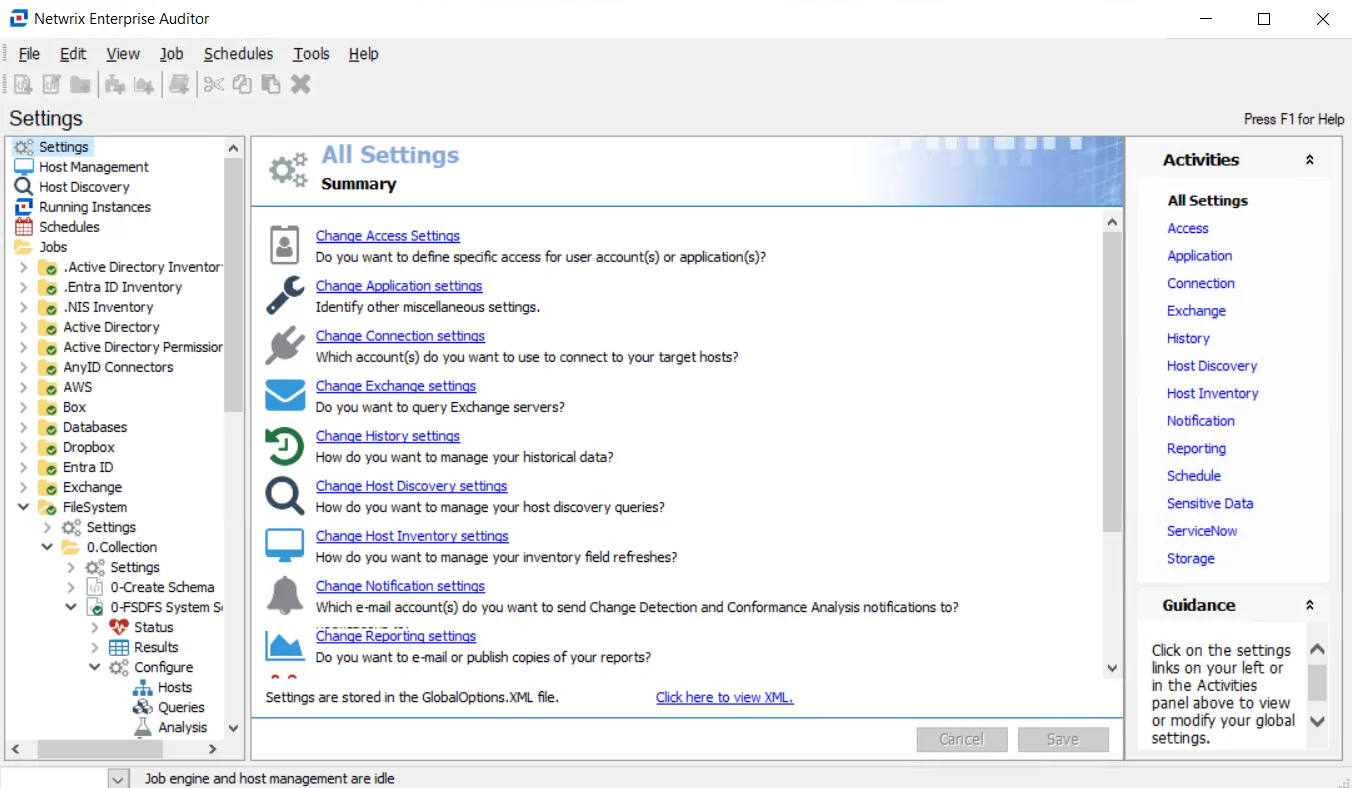
- Settings – Opens the Global Settings section for configurations which affect the running of Enterprise Auditor jobs. See the Global Settings topic for additional information.
- Host Management – Opens the Host Management section for inventorying and managing hosts to be targeted by Enterprise Auditor jobs. See the Host Management topic for additional information.
- Host Discovery - Opens the Host Discovery section for discovering hosts to be targeted by the Enterprise Auditor jobs. See the Host Discovery topic for additional information.
- Running Instances – Displays progress for all running jobs. This includes jobs that are run by a scheduled task, interactively within the open Enterprise Auditor instance, or interactively in any other running instance of Enterprise Auditor See the Running Instances Node topic for additional information.
- Schedules – Opens the Scheduled Actions view which displays information on all scheduled tasks. See the Schedules topic for additional information.
- Jobs – Lists all solutions, job groups, and jobs within a folder structure. See the Jobs Tree topic for additional information.
The title above the Navigation Pane will change depending on what is selected. There are also several right-click or context menus available throughout the console. See the Navigation Pane Right-click Menus topic for additional information.
Navigation Pane Right-click Menus
There are several contextual right-click menus that are accessed by right-clicking on individual nodes or sub-nodes in the Navigation Pane. The different right-click menus are:
- Host Management Right-click Menus
- Jobs Tree Right-click Menus
Host Management Right-click Menus
The following right-click menus are available within the Host Management node.
See the Host Management topic for additional information on these actions.
Discovery Node
The Discovery node right click-menu can be accessed in the Host Management node in the Navigation Pane.

The Discovery node right-click menu options are:
- Create Query – Opens the Host Discovery Wizard
- Suspend/Resume Query Queue – Pauses or resumes the host discovery queue
All Hosts Node
The All Hosts node right-click menu can be accessed in the Host Management node in the Navigation Pane.

The All Hosts right-click menu options are:
- Add Hosts – Opens the Add Hosts window
- Refresh Lists – Refreshes host list
- Refresh Hosts – Executes the host inventory query
- Save Selected to Lists – Opens the Add Hosts window with the selected hosts already added to a new list
- Schedule – Opens the Schedule (Activities Pane Option) window to schedule a host inventory query
- Export Data – Export the current data grid to an HTML file, an XML file, or a CSV file
- Suspend/Resume Host Inventory – Pauses or resumes a host inventory query
All Hosts > [Host List] Node
The All Hosts > [Host List] right-click menu can be accessed in the Host Management node in the Navigation Pane.
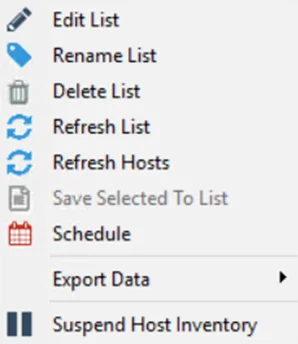
The All Hosts > [Host List] node right-click menu options are:
- Edit List – Opens the Add Hosts window for the selected list
- Rename List – Opens the Host list name window
- Delete List – Delete the selected host list
- Refresh List – Refreshes host list
- Refresh Hosts – Executes the host inventory query
- Save Selected to List – Opens the Add Hosts window with the selected hosts already added to a new list
- Schedule – Opens the Schedule (Activities Pane Option) window to schedule a host inventory query
- Export Data – Export the current data grid to an HTML file, an XML file, or a CSV file
- Suspend Host Inventory – Pauses or resumes a host inventory query
Jobs Tree Right-click Menus
The following right-click menus are available within the Jobs tree.
See the Jobs Tree topic for additional information on these actions.
Jobs Tree Primary Nodes
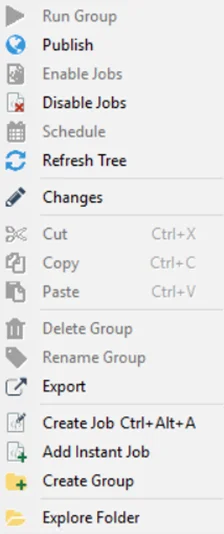
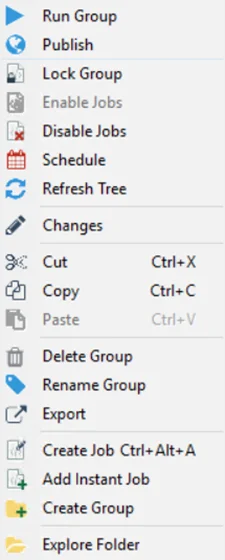
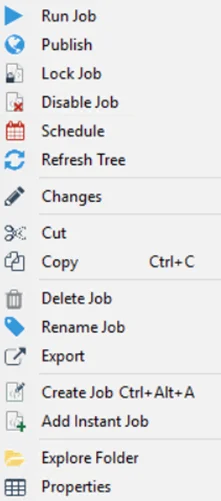
The Job tree primary nodes have the following right-click menu items:
NOTE: These menu items apply to a Jobs Tree, Job Group, and a Job. Depending on the chosen selection, some menu items are grayed out.
 |  |  |
|---|---|---|
| Jobs Tree Node | A Job Group Node | A Job Node |
Menu items include:
-
Run Group/Jobs – Executes the selected job group or job
-
Publish – Publishes the reports from the selected job group or job without regenerating the report. See the Reporting topic for additional information.
-
Lock Group/Job – Locks job group or job, indicating configuration has been approved and the job group or job is ready to be scheduled/run. This option only applies to Role Based Access. See the Role Based Access topic for additional information.
-
Unlock Group/Job – Unlocks job group or job, indicating the configuration has not been approved or needs to be modified. Unlocking a job will prevent Job Initiators from scheduling or running the job. This option only applies to Role Based Access. See the Role Based Access for additional information.
-
Enable/Disable Job(s) – Disables the selected job or job group and skips them during scan execution. When a job group is disabled, all existing jobs within the job group are disabled. See the Disable or Enable a Job topic for more information.
-
Schedules – Opens the Schedule Jobs to schedule job group or job execution
-
Refresh Tree – Refreshes the Jobs tree
-
Changes – Opens the Changes Window to track changes to job configuration in a change log
-
Cut – Cuts the selected job group or job (Ctrl+X)
-
Copy – Copies the selected job group or job (Ctrl+C)
-
Paste – Pastes a copied/cut job group or job to the selected location (Ctrl+V)
CAUTION: Delete Group/Job will also delete all tables that match the job’s naming convention from the database.
-
Delete Group/Job – Deletes the selected job group or job. See the Report Cleanup when Deleting a Job or Job Group topic for additional information.
CAUTION: Rename Group/Job will rename all tables that match the job’s naming convention within the database.
-
Rename Group/Job – Opens a textbox over the selected job group or job to rename
-
Export – Zips the selected job group or job. Options allow for including the job, the reports, and/or the job log and SA_Debug log.
- Save the ZIP file to a desired location, and optionally attach it to an email to Netwrix Support.
- Email option requires Notification settings to be configured.
-
Create Job (Ctrl+Alt+A) – Creates a new job at the same location as the selected job group or job. See the Create a New Job topic for additional information.
-
Add Instant Job – Opens the Instant Job Wizard.
-
Create Group – Creates a new job group within the selected location
-
Explore Folder – Opens the Windows Explorer folder for the select object
-
Properties – Opens the Job Properties window
[Job] > Status Node
The [Job] > Status node has the following right-click menu items:

The Status node right-click menu items are:
- Run Job – Executes the selected job
- Add Instant Job – Opens the Instant Job Wizard
- Create Job – Creates a new job at the same location as the selected job group or job (Ctrl+Alt+A)
[Job] > Status > [Table/View] Nodes
The [Job] > Status > [Table/View] nodes have the following right-click menu items:
 |  |  |
|---|---|---|
| ConnectStatus Table | Job Stats & Task Stats Tables | Messages Table |
These menu items apply to the ConnectStatus Tables, Job Stats and Task Stats Tables, and the Messages Table. Depending on the chosen selection, some menu items are grayed out. The menu items are:
- Create Hostlist From Data – Opens the New host list from job results window
- Edit Host List – Opens the Edit Dynamic Job Host Lists window
- Export Data – Export the current data grid to an HTML file, an XML file, or a CSV file
- Run Job – Executes the selected job
- Add Instant Job – Opens the Instant Job Wizard
- Creates Job – Creates a new job at the same location as the selected job group or job (Ctrl+Alt+A)
[Job] > Results Node
The [Job] > Results node has the following right-click menu items:

The menu items are:
- Refresh Tree – Refreshes the Jobs Tree
- Run Job – Executes the selected job
- Add Instant Job – Opens the Instant Job Wizard
- Create Job – Creates a new job at the same location as the selected job group or job (Ctrl+Alt+A)
[Job] > Results > [Table/View] Nodes
The [Job] > Results > [Table/View] nodes have the following right-click menu items:

The menu items are:
- Create Hostlist From Data – Opens the New host list from job results window. See the Host Management topic for additional information.
- Edit Host List – Opens the Edit Dynamic Job Host Lists window. See the Host Management topic for additional information.
- Export Data – Export the current data grid to an HTML file, an XML file, or a CSV file
- Actions – Opens the selected Action Modules for the selected table/view
- Run Job – Executes the selected job
- Add Instant Job – Opens the Instant Job Wizard
- Create Job - Creates a new job at the same location as the selected job group or job (Ctrl+Alt+A)
[Job] > Results > [Report] Nodes
The [Job] > Results > [Report] nodes have the following right-click menu items:

The [Job] > Results > [Report] node right-click menu items are:
- Run Job – Executes the selected job
- Add Instant Job – Opens the Instant Job Wizard
- Create Job – Creates a new job at the same location as the selected job group or job (Ctrl+Alt+A)
[Job] > Configure Node
The [Job] >Configure node have the following right-click menu items:
The [Job] > Configure node right-click menu items are:
-
Run Job – Executes the selected job
-
Add Instant Job – Opens the Instant Job Wizard
-
Create Job – Creates a new job at the same location as the selected job group or job (Ctrl+Alt+A)
NOTE: This right-click menu is also opened at the Configure > Hosts node.
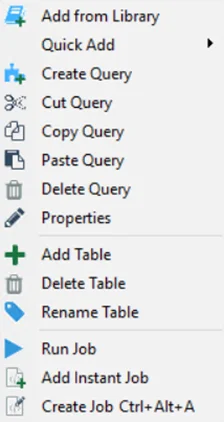
[Job] > Configure > [Configuration] Nodes
The right-click menu items for the [Job] > Configure > [Configuration] node are the same right-click menus as those available within the job’s individual configuration views:
 |  |  |
|---|---|---|
| Queries Node | Analysis Node | Actions Node |
Each configuration node has a different right-click menu. For additional information on each:
- For the Queries node, see the Jobs section for information on these options
- For the Analysis node, see the Jobs section for information on these options
- For the Actions node, see the Jobs section for information on these options
[Job] > Configure > Reports Node
The [Job] >Configure > Reports node has the following right-click menu items:

The [Job] > Configure > Reports node right-click menu items are:
- Create Report – Opens a new report Configuration under the job’s Configure > Reports Node
- Paste Report – Paste a copied report from a different job into this job’s Reports node
- Run Job – Executes the selected job
- Add Instant Job – Opens the Instant Job Wizard
- Create Job – Creates a new job at the same location as the selected job group or job
[Job] > Configure > Reports > [Report Configuration] Node
The [Job] >Configure > Reports > [Report Configuration] node has the following right-click menu items:
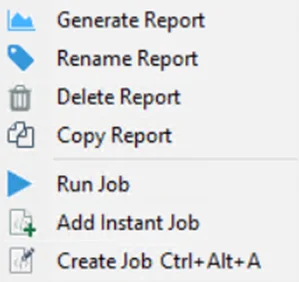
The [Job] > Configure > Reports > [Report Configuration] node right-click menu items are:
- Generate Report – Generates the selected report
- Rename Report – Opens a textbox over the selected report to rename
- Delete Report – Deletes the selected report
- Copy Report – Copies the report configuration to clipboard. The copied report will have only the roles inherited from the parent job when pasted.
- Run Job – Executes the selected job
- Add Instant Job – Opens the Instant Job Wizard
- Create Job – Creates a new job at the same location as the selected job group or job (Ctrl+Alt+A)
Results Pane
The Results pane displays all views for the selected console section.
The Results pane displays all views for the selected console section. This includes solution, job group, and job descriptions, configuration views, native and materialized data tables and views, and reports.
Top Navigation
The Top Navigation bars provide users quick access to various options and functions in Enterprise Auditor. The two parts of the Top Navigation section are:
Menu Bar on the Console
Users can access various Enterprise Auditor functions and actions in the Menu Bar.

The Menu Bar options are:
-
File
-
Create Job – Creates a new job (Ctrl+Alt+A) at the selected location within the Jobs tree
-
Add Instant Job – Opens the Enterprise Auditor Instant Job Wizard to install an instant job set at the selected location within the Jobs tree. See the Instant Job Wizard section for information on installing instant solutions from the Enterprise Auditor Library.
CAUTION: Delete Job will also delete all data tables with the job’s base naming convention from the SQL database.
-
Delete Job – Deletes the selected job from the Jobs tree
-
Properties – Opens the Job Properties window for the selected job. See the Job Properties topic for additional information.
-
Export Data – Exports the selected data table or view to an HTML, XML, or CSV file format
-
Exit – Closes the Enterprise Auditor application
-
-
Edit
-
Cut – Cuts (Ctrl+X) the selected job group or job
-
Copy – Copies (Ctrl+C) the selected job group or job
-
Paste – Pastes (Ctrl+V) a copied job group or job to the selected job group folder (or into the Jobs tree)
CAUTION: Delete will also delete all data tables with the job’s base naming convention from the SQL database.
-
Delete – Deletes the job group or job at the selected location within the Jobs tree
-
-
View
- Refresh Tree – Refreshes the Jobs tree
- Reset Current Data View – This is a legacy feature
- Show Change Deltas – This is a legacy feature
- Show Job Progress – Redirects the Enterprise Auditor Console to the Running Job Node to view the running job’s progress. See the Running Instances Node topic for additional information.
-
Job
-
Add Instant Job – Opens the Enterprise Auditor Instant Job Wizard to install an instant job set at the selected location within the Jobs tree. See the Instant Job Wizard section for information on installing instant solutions from the Enterprise Auditor Library.
-
Create Job – Creates a new job (Ctrl + Alt + A) at the selected location within the Jobs tree
CAUTION: Delete Job will also delete all data tables with the job’s base naming convention from the SQL database.
-
Delete Job – Deletes the selected job from the Jobs tree
CAUTION: Rename Job will also rename all data tables with the job’s base naming convention within the SQL database.
-
Rename Job – Renames the selected job
-
Properties – Opens the Job Properties window for the selected job. See the Job Properties topic for additional information.
-
Execute:
- Run Job or Group – Starts job execution for the selected job group or job
- Stop Job or Group – Stops job execution for the selected job group or job
- Schedule – Opens the selected job’s Schedule window. See the Schedule Jobs topic for additional information.
-
Queries:
-
Add from Library – Opens the Library to add a query to the selected job’s Query Selection view. See the Query Selection topic for additional information.
-
Create Query – Opens the Query Selection window to create a new query at the selected job’s Query Selection view
-
Cut Query – Deletes the selected query from the selected job’s Query Selection view
-
Properties – Opens the Query Selection window for the selected query
-
Add Table – Opens the Query Selection window to add a table to the selected query
-
Delete Table – Opens the Delete Table window which identifies associated tasks to be deleted and asks for confirmation of the deletion action. See the Query Selection topic for additional information.
-
Rename Table – Opens the Rename Table window to enter a new table name for the selected query. See the Query Selection topic for additional information.
See the Data Collectors topic for additional information. See the Data Collectors topic for additional information.
-
-
Reports
- Create Report – Creates a new report at the selected Reports node
- Generate Report – Generates the selected report and opens the report in a browser window
- Rename Report – Rename the selected report for the database and how it is seen in the Jobs tree
- Delete Report – Delete the selected report
-
-
Schedules
- Schedule – Opens the selected object’s Schedule window to create a new scheduled action. The Enterprise Auditor Console is redirected to the Schedules node. See the Schedule topic for additional information.
- Delete – Delete the selected scheduled task from the Scheduled Actions view of the Schedules node
- Properties – Opens the selected scheduled task’s Schedule window. See the Schedule topic for additional information.
-
Tools
- Libraries – Opens the Add Query from Library window to add a query to the selected job’s Query Selection view. See the Schedule topic for additional information.
- Options – Redirects the Enterprise Auditor Console to the Settings node
-
Help
- Content – Opens Enterprise Auditor help documentation
- User Details – Opens an information window display Current Logged In User and Role Assigned To Current User (when applicable)
- Reference – This is a legacy feature
- Enable Support Mode – Enables Support Mode for Netwrix Support Engineers
- About – Opens the About window with the Enterprise Auditor Console’s version and license information, including License Expiration date, Host Limit, and Licensed Features
Button Bar on the Console
The Button bar provides quick links to various actions and functions in Enterprise Auditor.

The options in the Button Bar are:
| Icon | Icon Description | Name |
|---|---|---|
 | Paper with plus sign | Select an Instant Job |
 | Paper with pencil | Create a new job (Ctrl + Alt + A) |
 | Folder with plus sign | Create a new group |
 | Puzzle piece with plus sign | Create a new query and add it to the selected table |
 | Graph with plus sign | Add a report |
 | Book with plus sign | Add a query from a library |
 | Scissors | Cut the selected query to the clipboard (Ctrl + X) |
 | Duplicate papers | Copy the selected query to the clipboard (Ctrl + C) |
 | Clipboard with paper | Paste the query from the clipboard (Ctrl + V) |
 | Red X | Delete the selected query |
Select a button for the desired action.