CyberArk Integration
In order for Enterprise Auditor to be able to retrieve service account passwords from the CyberArk Password Vault, the following prerequisites must be completed:
-
The Secrets Manager must be installed on the Enterprise Auditor Console server. The organization’s Vault administrator can provide the Secrets Manager installation package and most likely needs to be present during the installation to provide credentials in order for the Secrets Manager installation to complete. See the CyberArk Credential Provider (CP) article for additional information.
-
An application must be added to CyberArk for the integration with Enterprise Auditor. The Application Id of this application must then be added to the
GlobalOptions.xmlfile for Enterprise Auditor. See the Customize CyberArk Application Id topic for additional information. The application can be locked down by providing an OS User, a Path, or a Hash. See the CyberArk Add applications article for additional information.-
The OS User needs to be the account running Enterprise Auditor. This could be the account used to launch the Enterprise Auditor application or an account used as the Schedule Service Account within Enterprise Auditor. More than one OS User can be added.
-
The Path should be a local path to the
StealthAUDIT.exefile. The path should end with the file name:…\StealthAUDIT.exe. -
The Hash should be generated using the AimGetAppInfo tool in the
…\CyberArk\ApplicationPasswordProvider\Utilsfolder on the server where Secrets Manager is installed. AimGetAppInfo should be run in an Administrator Command Prompt. Run the following command:..\CyberArk\ApplicationPasswordProvider\Utils\NETAimGetAppInfo.exe GetHash /AppExecutablesPattern <DevInstall>\PrivateAssemblies\Stealthbits.StealthAUDIT.Console.dllRECOMMENDED: Pipe the output hash value to a file to easily copy and paste it to the CyberArk application.
See the CyberArk Generate an application hash value article for additional information.
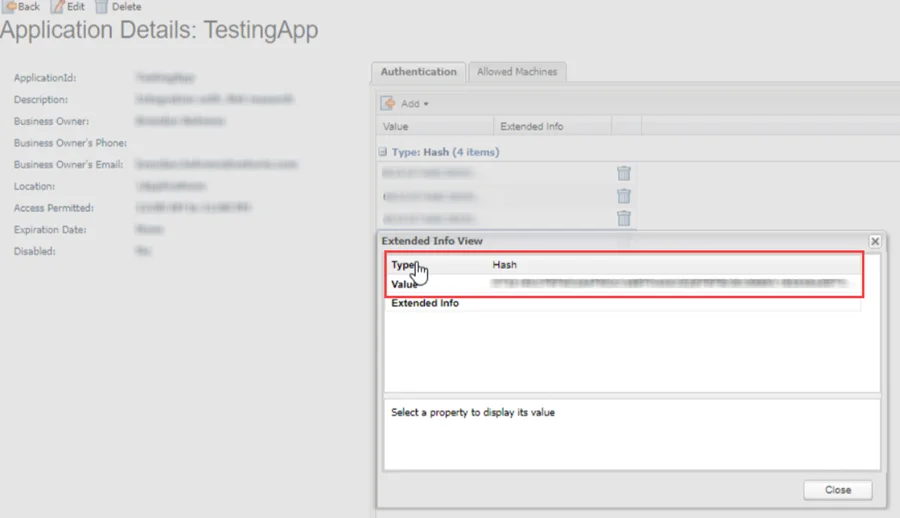
Add the generated hash value in the Authentication tab of the Application Details page for the CyberArk Application.

-
The machine name for the Enterprise Auditor console needs to be added on the Allowed Machines list for the CyberArk application
-
-
Once the Secrets Manager installation has completed and the Enterprise Auditor application has been created, the necessary CyberArk accounts must be given access to the Safes in which the Enterprise Auditor service accounts are stored. This includes the account which was created automatically during the Secrets Manager installation, as well as the account created automatically as a result of the application creation.
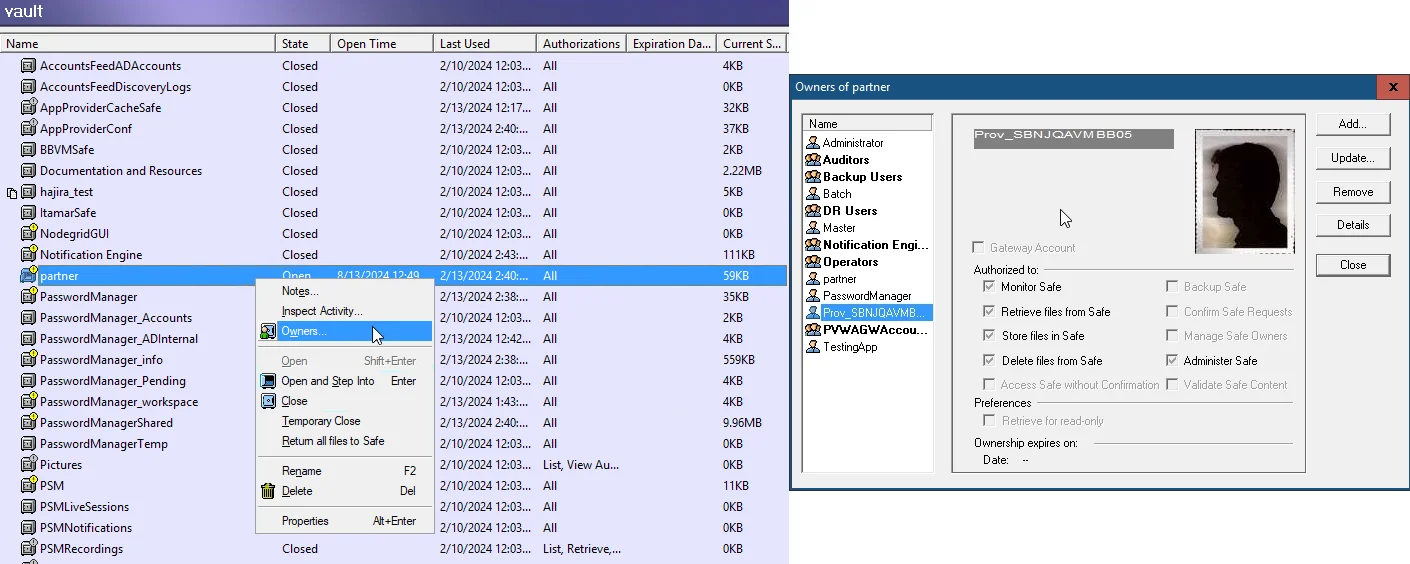
- The account created during the AIM installation is under the naming convention
Prov_[COMPUTERNAME], whereCOMPUTERNAMEis the name of the computer on which AIM is installed. This account should be given Retrieve accounts, List accounts, and View Safe Members rights on the desired Safes. - The account created during the application creation has the same name as the application itself and should be given Retrieve accounts rights on the desired Safes
- The account created during the AIM installation is under the naming convention
Customize CyberArk Application Id
The Application id value of the application created within CyberArk for the integration with
Enterprise Auditor must be configured within Enterprise Auditor. This is done in the
GlobalOptions.xml file within the Enterprise Auditor installation directory. The default location
is …\STEALTHbits\StealthAUDIT\.
Follow the steps to customize the CyberArk Application Id within Enterprise Auditor.
Step 1 – Navigate to the GlobalOptions.xml file. Open it with a text editor, for example
Notepad.
CAUTION: Ensure Enterprise Auditor is closed when modifying this file.
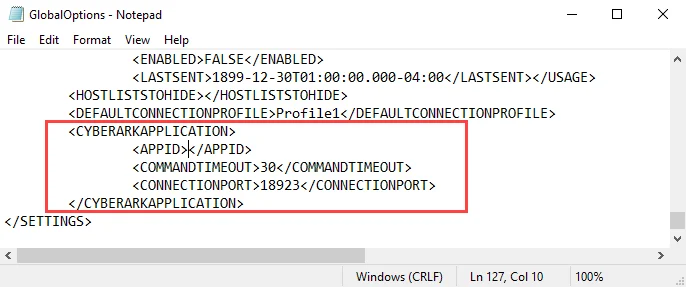
Step 2 – Find the <CYBERARKAPPLICATION> section of the GlobalOptions.xml file. Add the
Application Id of the configured CyberArk application for the integration in the <APPID> tag. If
required, customize the Command Timeout and Connection Port properties.
<CYBERARKAPPLICATION>
    <APPID>CyberArkApplicationID</APPID>
    <COMMANDTIMEOUT>30</COMMANDTIMEOUT>
    <CONNECTIONPORT>18923</CONNECTIONPORT>
</CYBERARKAPPLICATION>
-
AppId – The name of the CyberArk application
-
CommandTimeout – Set to the suggested default of 30
-
ConnectionPort – This is a configurable option found during the installation of the CyberArk Credential Provider. After installation, it can be found in the configuration file located in the installation folder.
See the CyberArk TCP parameters article for additional information.
Step 3 – Save and close the file.
Enterprise Auditor now uses the CyberArk Application Id identified in the XML string.
User Credentials Window
In Enterprise Auditor, the CyberArk option for Password Storage is available on the User Credentials window when configuring an Active Directory Account or Local Windows Account.
The credential information supplied in the User Credentials window must be an exact match to what is in CyberArk as the privileged account for which it is linked. It is case-sensitive.
If the Connection Profile with a Local Windows Account credential using CyberArk password storage is used to target multiple hosts, then the local credential on each host needs to have the exact same username and password combination.

The Connection view displays CyberArk in the Source column of the User Credentials list for the
selected Connection Profile.
Active Directory Account
Match the User Credentials window settings in Enterprise Auditor with the privilege account properties in CyberArk. These values are case-sensitive, and must be an exact match.

The table below shows the values from your CyberArk configuration that the User Credentials window should be populated with:
| Enterprise Auditor | CyberArk Property | CyberArk Description | Example Value |
|---|---|---|---|
| Domain | Address | Domain address | ExampleDomain.com |
| User name | Username | Privilege account | ExampleUser |
| Safe | Safe | Vault managing the privileged accounts | Test |
| Folder | Folder | Folder within Safe | Root |
Local Windows Account
Match the User Credentials window settings in Enterprise Auditor with the privilege account
properties in CyberArk. These values are case-sensitive, and must be an exact match. The Enterprise
Auditor Domain value is <HOST> and the CyberArk Address property value is the server address.

The table below shows the values from your CyberArk configuration that the User Credentials window should be populated with:
| Enterprise Auditor | CyberArk Property | CyberArk Description | Example Value |
|---|---|---|---|
| User name | Username | Privilege account | ExampleUser2 |
| Safe | Safe | Vault managing the privileged accounts | Test |
| Folder | Folder | Folder within Safe | Root |
RECOMMENDED: Only use one Local Windows Account credential with CyberArk password storage in a Connection Profile. As part of the Enterprise Auditor to CyberArk integration, the Enterprise Auditor job is stopped immediately if the query from Enterprise Auditor to CyberArk for the credential fails. Therefore, a second credential within the Connection Profile would not be queried.
Group Managed Service Accounts (gMSA) Configuration
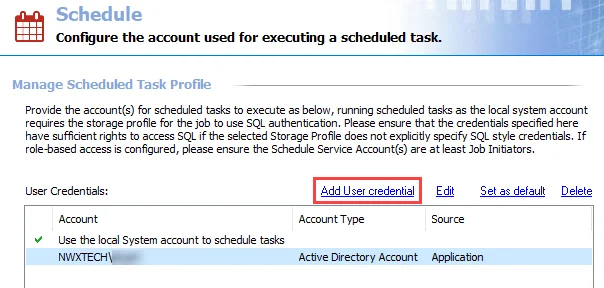
Enterprise Auditor can use a previously-configured Group Managed Service Accounts (gMSA/MSA) account. Make sure that Managed Service Account is selected in the User Credentials window. See the Create a Connection Profile or Create a Schedule Service Account topic for additional information.
To run a job or scheduled task with a gMSA/MSA account, the following prerequisites must be met:
- The account that Enterprise Auditor is run with must have permissions to retrieve the gMSA account password
- The gMSA account must be a Local Admin in the target hosts
- The gMSA account does not have to be a local admin in the Enterprise Auditor Console
- The Data Collector used must support unicode characters in the Connection Profile's credential password to retrieve the gMSA account password
NOTE: For FSAA, remote scans using gMSA credentials need to use the Windows Service launch mechanism in the query configuration.
See the Microsoft Group Managed Service Accounts article for additional information.
Connection
The Connection node contains objects referred to as Connection Profiles. A Connection Profile houses the information Enterprise Auditor uses to connect to the target hosts during job execution.
There are two methods for authentication to a targeted host:
- Use Local Login Credentials
- Use a Connection Profile
Use Local Login Credentials
This method is traditionally assigned through the Only use the Windows account that the application is run with System default option. It is generally referred to as the System Default or trusted method. When used, Enterprise Auditor authenticates to the target hosts during host inventory or job execution with the Windows account used to launch Enterprise Auditor. This can be:
- Account which was used to log on to the Enterprise Auditor Console server and start the application
- Account which was used to launch the Enterprise Auditor application through the run-as security context
- Account which was used to provision a Windows scheduled task when running a job group or job via a scheduled task
Use a Connection Profile
This method allows you to define a Connection Profile which houses one or several sets of credentials to be used for authentication on the target hosts during host inventory or job execution. The credentials specified in a Connection Profile could be any of the following:
- Local machine account
- Active Directory account
- Unix account
- SQL account
- Microsoft Entra ID (formerly, Azure Active Directory) key
- Dropbox access token
- Web service JWT
- Oracle account
For the majority of auditing scenarios, domain-based accounts are preferred if not required by the nature of the auditing task. The credentials must have the permissions required by the data collector being used.
Password Storage Options
The password for the credential provided can be stored in Enterprise Auditor application or Enterprise Auditor Vault. Certain types of credentials can be stored in CyberArk®.
Choosing to store passwords in either the Enterprise Auditor application or the Enterprise Auditor Vault is a global setting configured in the Settings > Application node. See the Application topic for additional information.
The Enterprise Auditor vault provides enhanced security through enhanced encryption to various credentials stored by the Enterprise Auditor application. See the Vault topic for additional information.
CyberArk integration stores supported credentials in the CyberArk Enterprise Password Vault. CyberArk Privileged Account Security Solution offers components designed to discover, secure, rotate, and control access to privileged account passwords used to access systems through the enterprise IT environment. See the CyberArk Integration topic for additional information.

The Cancel and Save buttons are in the lower-right corner of the Connection view. These buttons become enabled when modifications are made to the Connection global setting.

Whenever changes are made at the global level, click Save and then OK to confirm the changes. Otherwise, click Cancel if no changes were intended.
Active Directory Account for User Credentials
If the account type selected on the User Credentials window is Active Directory Account, the following information is required for the credential:
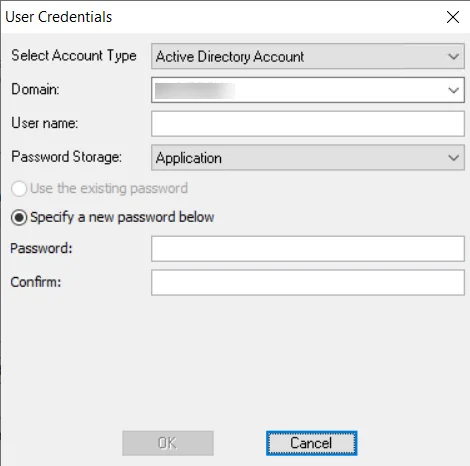
-
Domain – Drop-down menu with available trusted domains will appear. Either type the short domain name in the textbox or select a domain from the menu.
-
User name – Type the user name
-
Password Storage – Choose the option for credential password storage:
- Application – Uses the configured Profile Security setting as selected at the Settings > Application node. See the Application topic for additional information.
- CyberArk – Uses the CyberArk Enterprise Password Vault. See the CyberArk Integration topic for additional information. The password fields do not apply for CyberArk password storage.
- Managed Service Account – Use previously configured MSA and gMSAs for authentication. The password fields are not applicable when this option is selected. See the Group Managed Service Accounts (gMSA) Configuration topic for additional information.
-
Password – Type the password
-
Confirm – Re-type the password
Amazon Web Services for User Credentials
The information in this section applies to Select Account Type > Amazon Web Services account type in the User Credentials window.

The required credentials for Amazon Web Services are:
- Access Key ID — Used to sign programmatic requests made to AWS. If access keys are not available, create them with the IAM console.
- Password Storage: Application – Uses the configured Profile Security setting as selected at the Settings > Application node
- Secret Key — Used to sign programmatic requests made to AWS. If secret keys are not available, create them with the IAM console.
- Scan Roles — Role used to scan other organization accounts
Create a Connection Profile for AWS
A new connection profile will need to be created to be leveraged in the AWS Solution.
Step 1 – Under Settings > Connection, click Add Connection profile.
Step 2 – Click Add User credential and select the Amazon Web Services account type.
Step 3 – Input the Access Key ID into the Username section, and the Secret Access Key into the Access Token section.
Remember, these are obtained from AWS when the permissions are configured. See the Configure AWS for Scans topic for additional information.
Step 4 – Click OK in the User Credentials modal, name the Connection Profile, and click Save.
This connection profile can now be assigned to the AWS Solution.
Create a Connection Profile
Follow the steps to create a Connection Profile.
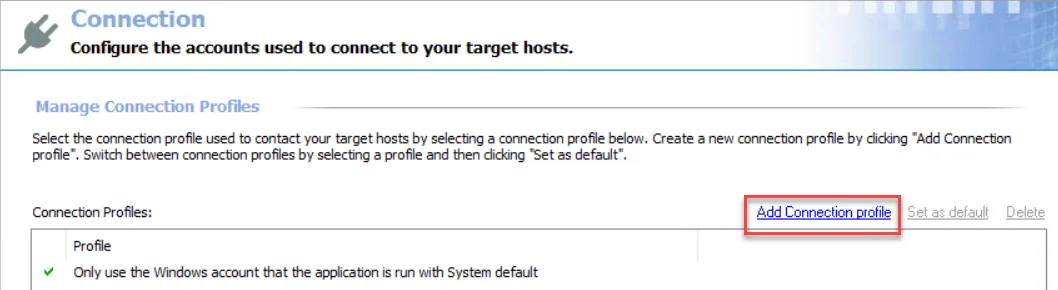
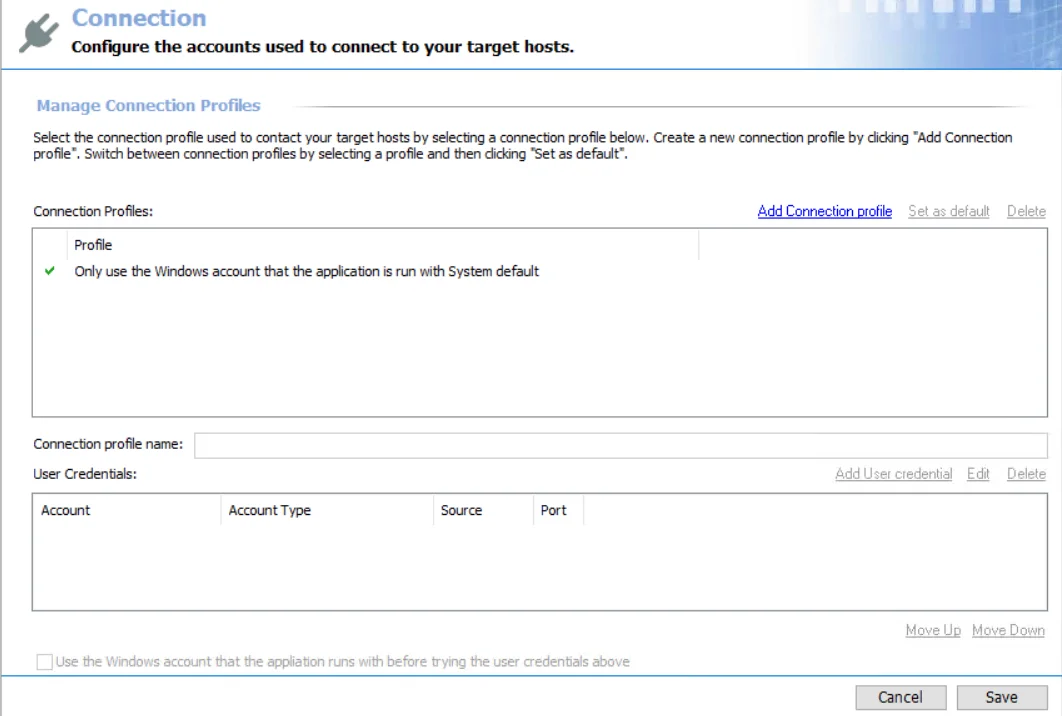
Step 1 – Click Add Connection profile at the top of the Connection view.
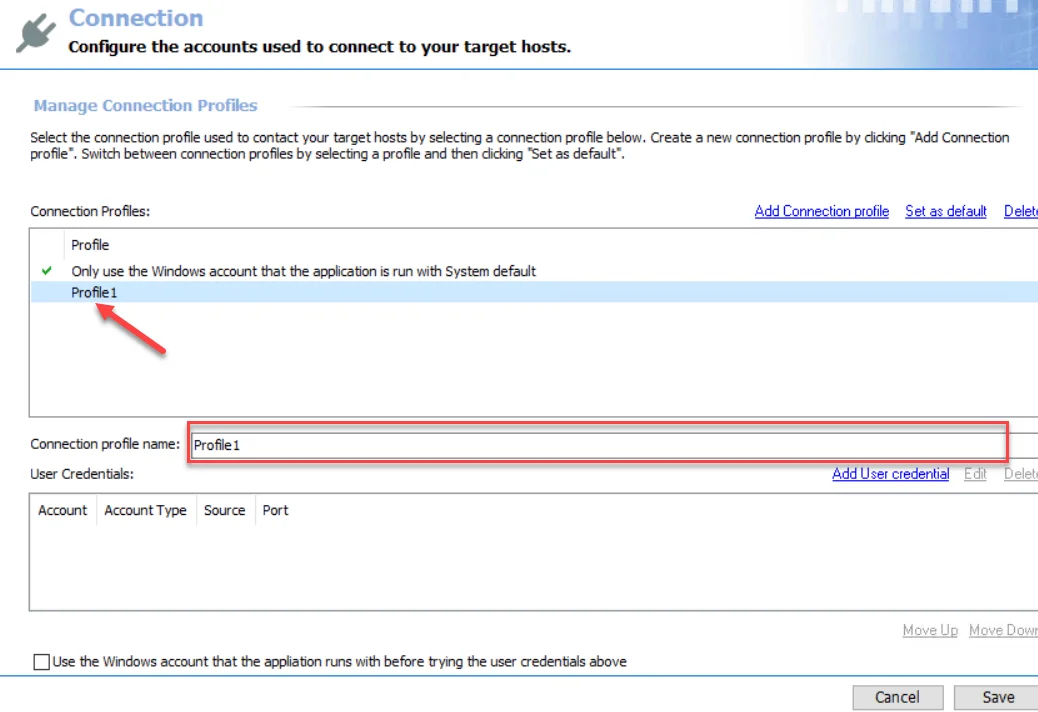
Step 2 – A new profile displays in the list with a generic name. Provide a unique, descriptive name in the Connection profile name textbox.
NOTE: A good profile name should be chosen so that it does not need to be changed at a later time. If the profile name is changed after being applied to job groups or jobs, it requires the user to go back through all of those job groups or jobs and re-apply the Connection Profile.
Step 3 – Now it is time to add credentials to this profile. Click Add User credential and the User Credentials window opens.
Step 4 – The window options change according to the value for the Selected Account Type field. Select the appropriate account type and then provide the required information. The account types are:
- Active Directory Account for User Credentials
- Local Windows Account for User Credentials
- Unix Account for User Credentials
- SQL Authentication for User Credentials
- Task for User Credentials
- Azure Active Directory for User Credentials
- Dropbox for User Credentials
- Web Services (JWT) for User Credentials
- Oracle for User Credentials
- Exchange Modern Authentication for User Credentials
See the individual account type sections for information on the fields. Then click OK.

NOTE: If the entered passwords are not the same, an error message will pop-up after clicking OK on the User Credentials window. Click OK on the error message and re-type the passwords.
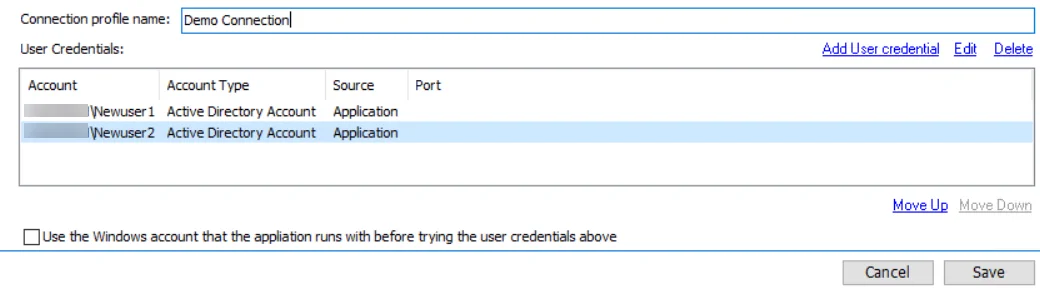
Step 5 – Repeat Steps 3-4 until the User Credentials list for this profile is complete.
When Enterprise Auditor authenticates to a target host, it looks at the value of the WindowsDomain field in the Host Inventory for the target host. It then matches the first credential in the Connection Profile which matches that domain. If authentication fails, it moves consecutively through the User Credentials list. It will first match to all credentials listed for target host’s domain, and then proceed through all other credentials until authentication is successful or there are no more credentials to try.
RECOMMENDED: Limit the User Credentials list to a minimal number per profile, especially when considering that a successful authentication does not automatically mean that particular credential has the appropriate level of permissions in order for the data collection to occur.
![]()
There are Move Up and Move Down buttons for arranging priority within the User Credentials list.

Step 6 – (Optional): At the bottom of the Connection view, is the Use the Windows account that Enterprise Auditor runs with before trying the user credentials above option. This option is per Connection Profile. If checked, Enterprise Auditor applies the local login credentials prior to any of the credentials saved to the Connection Profile.
NOTE: If a data collector utilizes an applet, this option must be unchecked.
Step 7 – When the user credentials have been added and ordered, click Save and then OK to confirm the changes to the Connection Profile.
The new Connection Profile is now visible in the Profile list and available for use at the job group or job level.
Edit User Credentials within a Connection Profile
Follow the steps to edit user credentials within a Connection Profile.
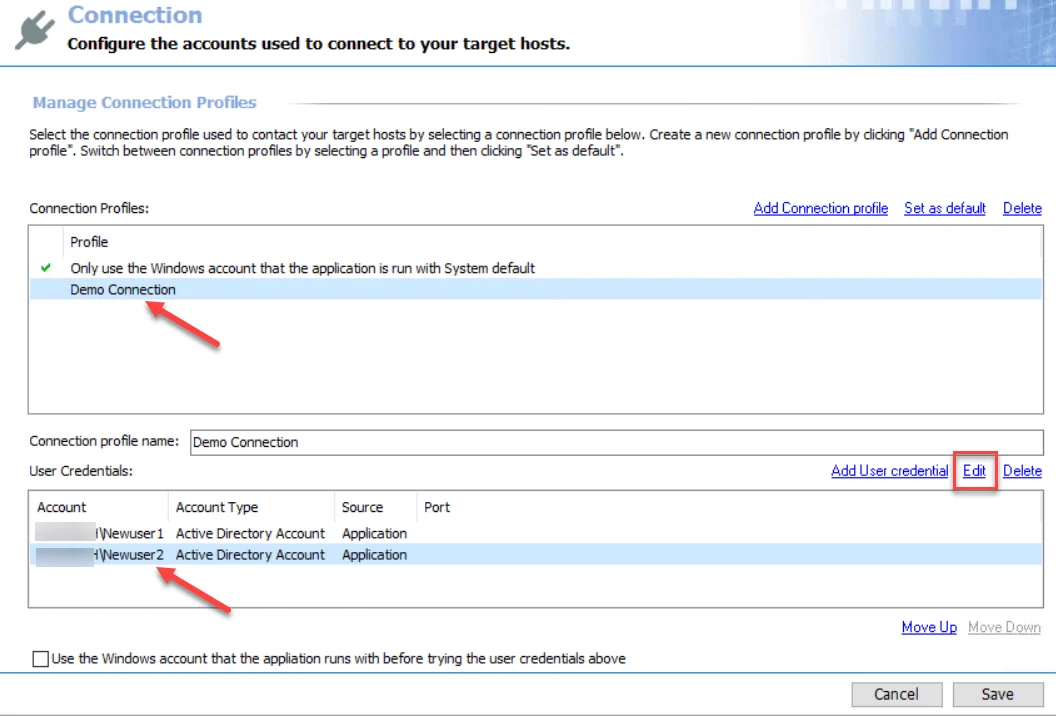
Step 1 – Select the Connection Profile to be modified from the Profile list. Remember, changing the Connection Profile name results in breaking job groups or jobs that are assigned this profile.
Step 2 – Select the user credential to be edited from the User Credentials list. Click Edit.
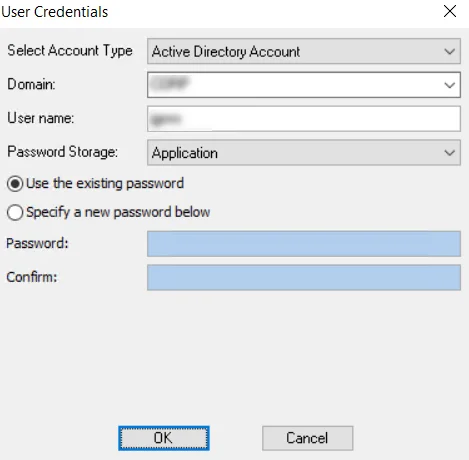
Step 3 – Modify the information in the User Credentials window. For the password, choose between the Use the existing password option or the Specify a new password below option. Click OK.
Step 4 – When the Connection Profile’s user credentials have been edited as desired, click Save and then OK to confirm the changes to the Connection Profile.
The edited user credentials are now used for authentication to target hosts for this Connection Profile.
Delete a User Credential from a Connection Profile
Follow the steps to delete a user credential from a Connection Profile.
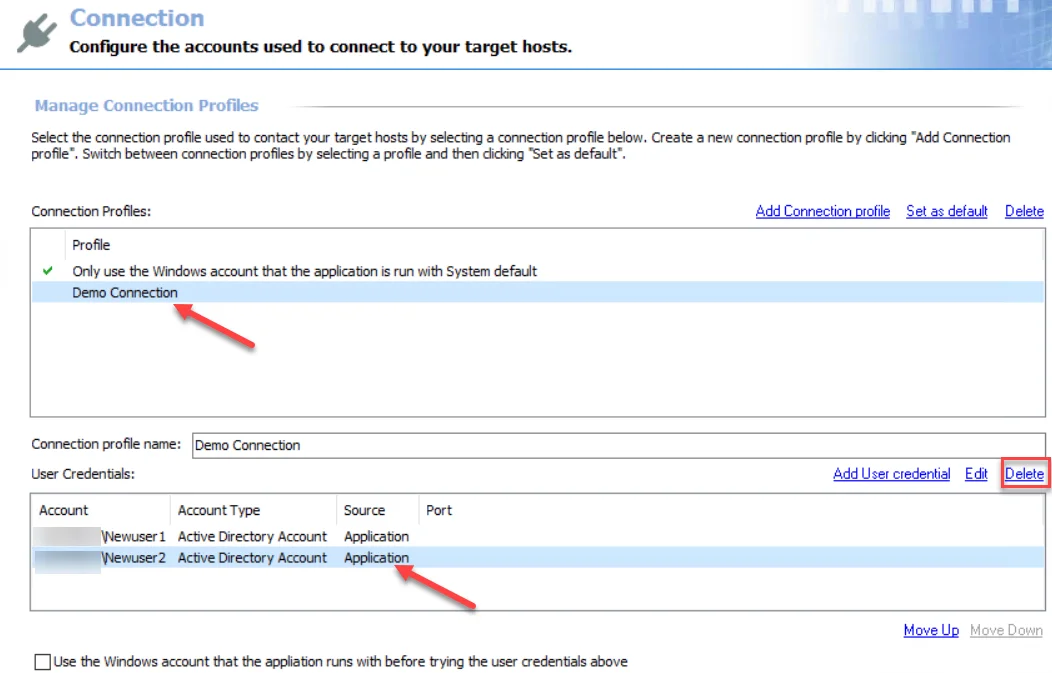
Step 1 – Select the Connection Profile to be modified from the Profile list. Remember, changing the Connection Profile name results in breaking job groups or jobs that are assigned this profile.
Step 2 – Select the user credential to be edited from the User Credentials list. Click Delete.

Step 3 – Click OK to confirm the deletion.
Step 4 – The selected credential is no longer visible in the User Credentials list. Click Save and then OK to confirm the changes to the Connection Profile.
The deleted user credentials are no longer available for authentication to target hosts for this Connection Profile.
Set a Default Connection Profile
The default profile is marked with the green checkmark.

Follow the steps to set a new default Connection Profile.
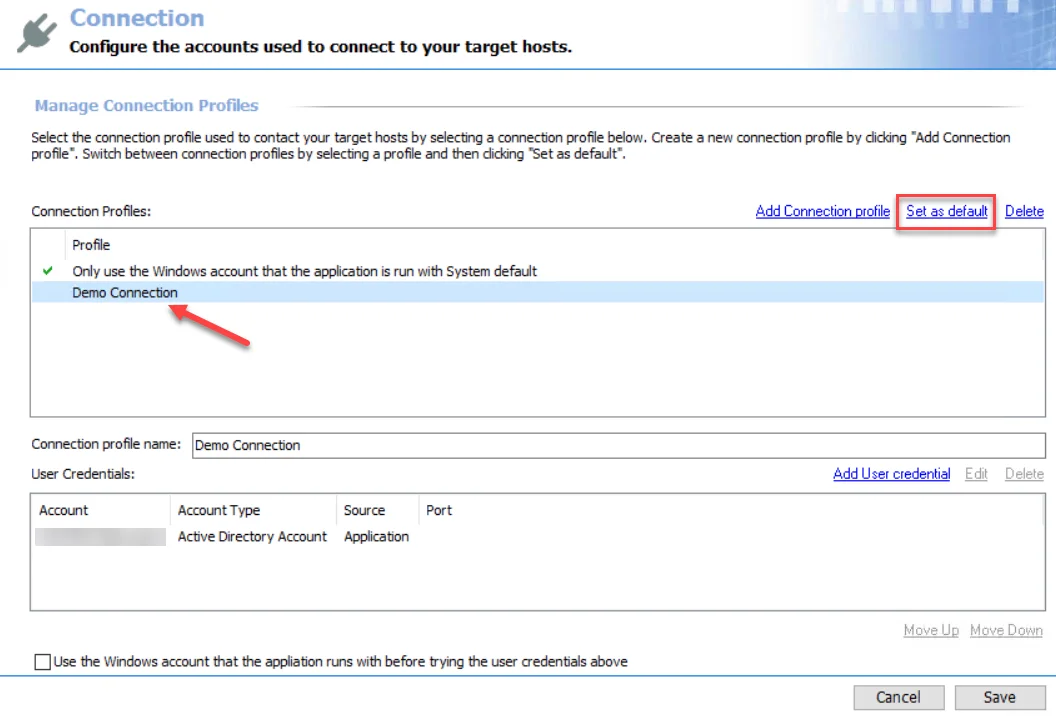
Step 1 – Select the desired profile in the Connection Profile list and click Set as default.
Step 2 – The green checkmark moves. Click Save and then OK to confirm the changes.
This Connection Profile is now used as the default Connection Profile.
Delete a Connection Profile
Follow the steps to delete a Connection Profile.
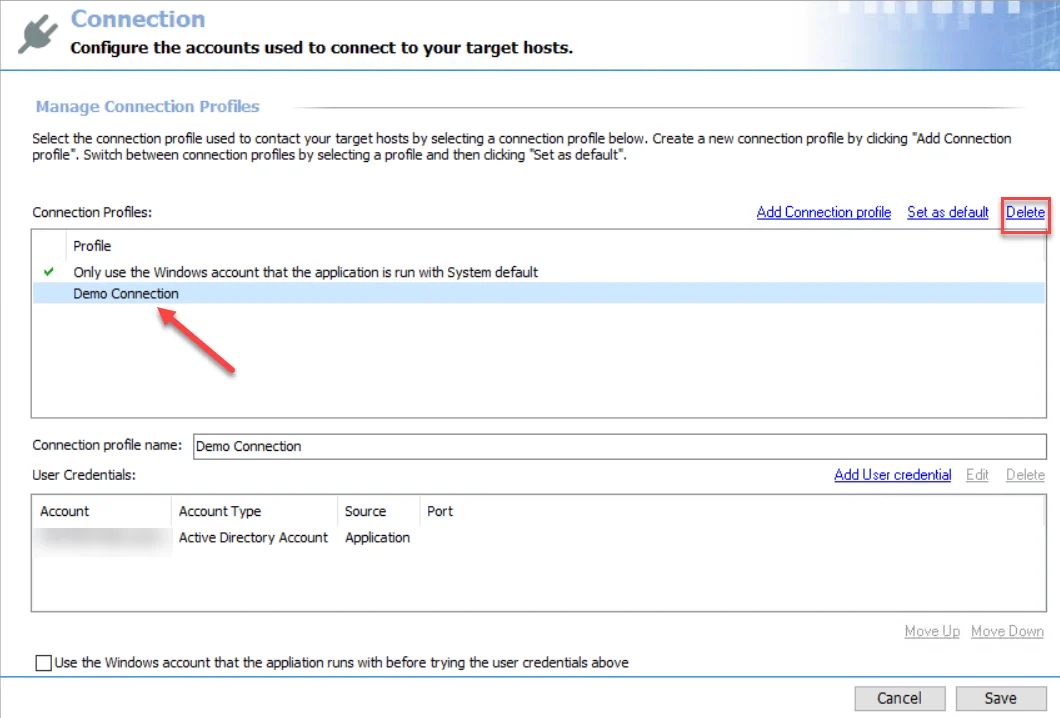
Step 1 – Select the profile from the Connection Profile list and click Delete.

Step 2 – Click OK to confirm the deletion.
Step 3 – The selected profile is no longer visible in the Connection Profiles list. Click Save and then OK to confirm the changes.
The deleted Connection Profile is no longer available for authentication to target hosts.
Dropbox for User Credentials
The information in this topic applies to Select Account Type > Dropbox in the User Credentials window.

The required credentials for Dropbox are:
- Password Storage – Application (Uses the configured Profile Security setting as selected at the Settings > Application node. See the Application topic for additional information.)
- Access Token – Copy and paste the access token after it has been generated from the Scan Options page of the DropboxAccess Data Collector configuration wizard. See the Dropbox for User Credentials topic for additional information.
Azure Active Directory for User Credentials
The information in this topic applies to Select Account Type > Azure Active Directory in the User Credentials window. This account type is for Microsoft Entra ID, formerly Azure Active Directory.

The required credentials for this account type are:
-
Client ID – Application (client) ID of the Enterprise Auditor application registered with Microsoft Entra ID. See the Identify the Client ID topic for additional information.
-
Password Storage – Application (Uses the configured Profile Security setting as selected at the Settings > Application node. See the Application topic for additional information.)
-
Key – The required Key depends on the target environment the Connection Profile is being used for:
- Entra ID – Client secret value for the Enterprise Auditor application registered with Microsoft Entra ID. See the Generate the Client Secret Key topic for additional information.
- SharePoint Online – The comma delimited string containing the path to the certificate PFX
file, certificate password, and the Microsoft Entra ID environment identifier (
CertPath,CertPassword,AzureEnvironment). See the SharePoint Online Credential for a Connection Profile using Modern Authenticationtopic for additional information.
Exchange Modern Authentication for User Credentials
The information in this topic applies to Select Account Type > Exchange Modern Authentication account type in the User Credentials window.

The values for the required credentials for the Exchange Modern Authentication account are:
- Password Storage – Application (Uses the configured Profile Security setting as selected at the Settings > Application node. See the Application topic for additional information.)
- Organization – The primary domain name of the Microsoft Entra tenant being leveraged to make the connection. See the Identify the Tenant's Name topic for additional information.
- Email Address – The email address for the mailbox to be leveraged in Exchange Online environment scans. The mailbox must belong to the primary domain used in the Organization field.
- AppID – Application (client) ID of the Enterprise Auditor application registered with Microsoft Entra ID. See the Identify the Client ID topic for additional information.
- Certificate Thumbprint – The thumbprint value of the certificate uploaded to the Microsoft Entra ID application. See the Upload Self-Signed Certificate topic for additional information.
Local Windows Account for User Credentials
The information in this topic applies to Select Account Type > Local Windows Account in the User Credentials window.

The required credentials for the Local Windows Account are:
-
User name – Type the user name
-
Password Storage – Choose the option for credential password storage:
-
Application – Uses the configured Profile Security setting as selected at the Settings > Application node. See the Application topic for additional information.
-
CyberArk – Uses the CyberArk Enterprise Password Vault. See the CyberArk Integration topic for additional information. The password fields do not apply for CyberArk password storage.
NOTE: If using the CyberArk option, then the associated Connection Profile can only have one user credential in it. Multiple user credentials are not supported with the CyberArk integration when using local Windows accounts.
-
-
Password – Type the password
-
Confirm – Re-type the password
Oracle for User Credentials
The information in this section applies to Select Account Type > Oracle in the User Credentials window.
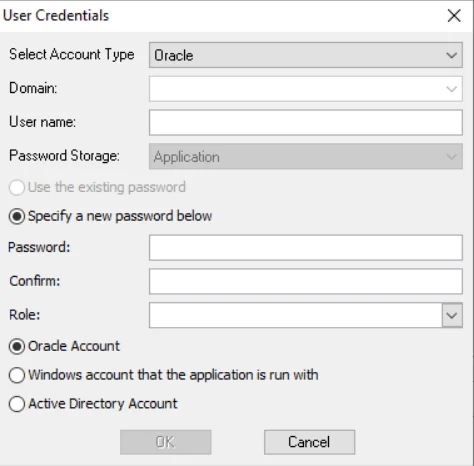
The required credentials for Oracle are:
- Domain – Field options are dependent upon the additional account type option selected:
- Oracle Account – Domain is not a field for this type of credential
- Windows account that Enterprise Auditor is run with – (Domain is not a field for this type of credential)
- Active Directory – Drop-down menu with available trusted domains displays. Either type the short domain name in the textbox or select a domain from the menu.
- User name – Type the user name
- This is not a field for the additional account type of Windows account that Enterprise Auditor is run with is selected
- Password Storage: Application – Uses the configured Profile Security setting as selected at the Settings > Application node
- Password – Type the password
- This is not a field for the additional account type of Windows account that Enterprise Auditor is run with
- Confirm – Re-type the password
- This is not a field for the additional account type of Windows account that Enterprise Auditor is run with
- Role – Specify an Oracle role, if desired. The drop-down menu provides a list of roles. Either
type the role name in the textbox or select a role from the menu.
- NOTE: When using a least privileged model for Oracle, SYSDBA must be selected for the Role.
- Additional Account type – Select radio button of the secondary account type from the list at the
bottom of the window:
- Oracle Account – Use an Oracle account for target host authentication
- Windows account that Enterprise Auditor is run with – Use the account that launched the Enterprise Auditor application through the run-as security context
- Active Directory – Use an Active Directory account for target host authentication
Selecting default from the list is the same as leaving the field blank.
SQL Authentication for User Credentials
This information applies to Select Account Type > SQL Authentication in the User Credentials window.
NOTE: SQL Authentication credentials are used in the Connection Profiles for the SQL, MySQL, and PostgreSQL Solutions.

The required credentials for SQL Authentication are:
- User name – Enter user name
- Password Storage – Application (Uses the configured Profile Security setting as selected at the Settings > Application node. See the Application topic for additional information.)
- Password – Type the password
- Confirm – Re-type the password
Task for User Credentials
The information in this section applies to Select Account Type > Task (Local) or Task (Domain) in the User Credentials window.
 |  |
|---|---|
| Task (Local) | Task (Domain) |
The required credentials for Task (Local) and Task (Domain) are:
- Domain
- Local – Not a field for this type of credential, defaults to
<TASK> - Domain – Drop-down menu with available trusted domains displays. Either type the short domain name in the textbox or select a domain from the menu.
- Local – Not a field for this type of credential, defaults to
- User name – Type the user name
- Password Storage: Application – Uses the configured Profile Security setting as selected at the Settings > Application node
- Password – Type the password
- Confirm – Re-type the password
Unix Account for User Credentials
The information in this topic applies to Select Account Type > Unix Account in the User Credentials window.
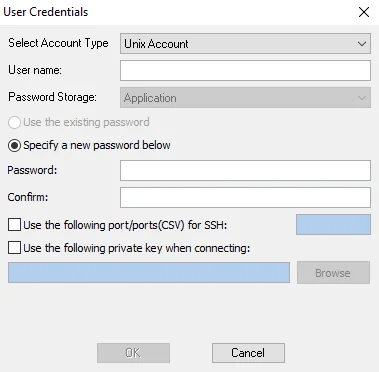
The required credentials for the Unix Account are:
-
User name – Enter user name
-
Password Storage – Application (Uses the configured Profile Security setting as selected at the Settings > Application node. See the Application topic for additional information.)
-
Password/Confirm
- If not using a private key, enter the Password and re-type in the Confirm field
- If using a private key, then the password is not needed. Provide the private key information in the Use the following private key when connecting field.
-
Use the following port/ports (CSV) for SSH
- The SSH port needs to be opened in software and hardware firewalls
- If desired, select this option and provide the port value
-
Use the following private key when connecting
-
This option uses the authentication method of an SSH Private Key
-
Supported Key types:
- Open SSH
- PuTTY Private Key
-
If desired, select this option and provide the key value
-
Web Services (JWT) for User Credentials
The information in this section applies to Select Account Type > Web Services (JWT) in the User Credentials window.

The required credentials for Web Services (JWT) are:
- User name – (not a field for this type of credential)
- Password Storage: Application – Uses the configured Profile Security setting as selected at the Settings > Application node
- Access Token – Copy and paste the StealthDEFEND App Token after it has been generated within StealthDEFEND. See the FS_DEFEND_SDD Job topic for additional information.