Mailbox: Affected Mailboxes
Use the Affected Mailboxes page to select the mailboxes to target for the action. It is a wizard page for the following operations:
- Add/Change Permissions
- Remove Permissions
- Add Delegates, Remove Delegates
- Remove Stale SIDs
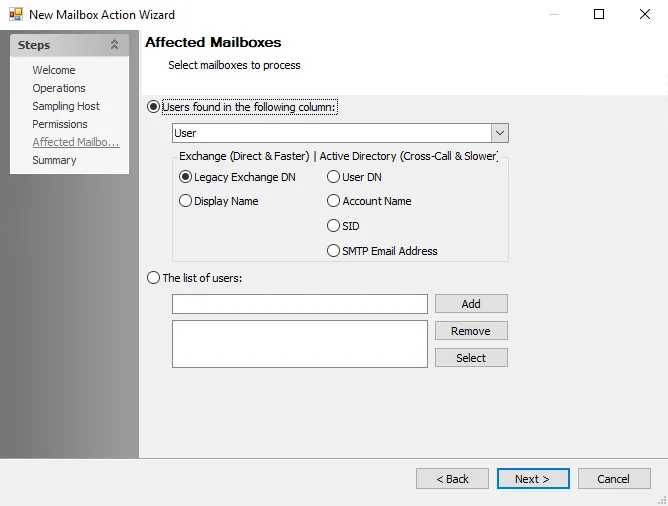
Select mailboxes to process using the following options:
-
Users found in the following column – Select this option to identify users via a data table column
-
Use the drop-down menu to select a data table column containing either the Mailbox display name or email address
-
Select a data type for the selected field using the following options:
-
Exchange (Direct and Faster) – Connects to Exchange Mailboxes using the following data types:
- Legacy Exchange DN
- Display Name
-
Active Directory (Cross-Call and Slower) – Connects to Exchange mailboxes using the Active Directory Data Collector with the following data types:
- User DN
- Account Name
- SID
- SMTP Email Address
-
-
-
The list of users – Identifies users in one of the following ways:
- Click Select to choose from the global address list (GAL)
- Manually enter a user name and click Add. Repeat for additional users.
- To restore anonymous permissions to folders, enter
anonymousand click Add - To remove a user, select it and click Remove
Mailbox: Criteria Selection
Use the Criteria Selection page to choose search criteria saved in a previous Exchange Mailbox Data Collector query or define new criteria. It is a wizard page for the Delete Mailbox Contents operation.
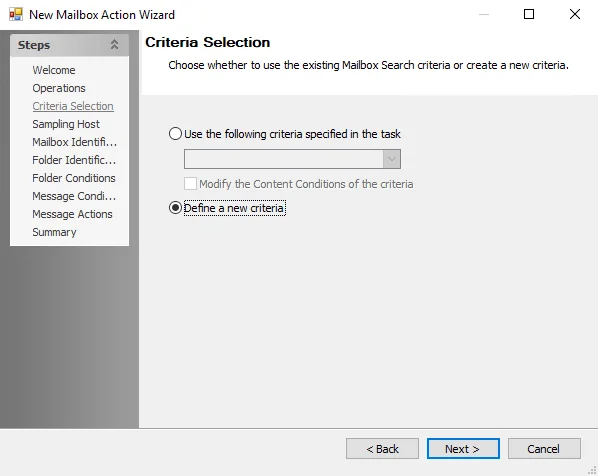
Choose whether to use existing Mailbox Search criteria or determine new criteria:
-
Use the following criteria specified in the task – Applies a predetermined search criteria
- Use the dropdown menu to select existing Mailbox search criteria (if any)
- Select the checkbox to modify Content Conditions of existing search criteria
-
Define a new criteria – Proceed while establishing new criteria
Mailbox: Delegate Rights
Use the Delegate Rights page to specify folder permissions for the selected delegates. A permission level can be specified for each folder on the page. It is a wizard page for the Add Delegates operation.
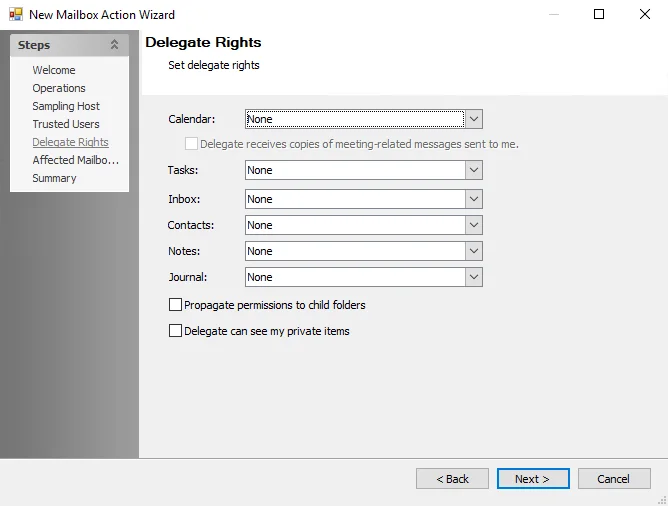
Set delegate rights using the following options:
-
The following delegate rights can be chosen to access each mailbox folder:
- None
- Reviewer
- Contributor
- Nonediting Author
- Author
- Editor
- Publishing Author
- Publishing Editor
- Owner
-
Select a right from the drop-down menu of any desired mailbox folder, including:
-
Calendar
NOTE: If Editor or a higher rights level is selected, the Delegate receives copies of meeting-related messages sent to me option is enabled for selection.
-
Tasks
-
Inbox
-
Contacts
-
Notes
-
Journal
-
-
Propagate permissions to child folders – Select the checkbox to Propagate permissions to the child folders of the selected folders
-
Delegate can see my private items – Select the checkbox to allow a delegate to access your personal items of the selected folders
Mailbox: Folder Conditions
Use the Folder Conditions page to customize folder search filter conditions. It is a wizard page for the No, the query results do not contain a mailbox identification column option on the Folder Identification page.
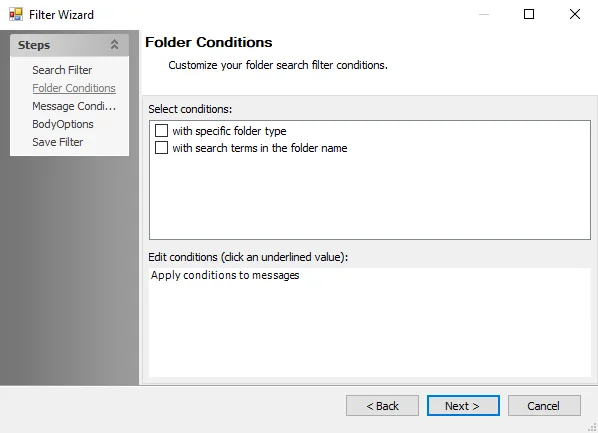
Customize folder search conditions using the following options:
-
Select conditions – Select the checkbox next to any of the following filter conditions to apply them to the search and add them to the Edit conditions box. Folder Conditions include:
- With specific folder type
- With search terms in the folder name
- With specific folder(s) to include/exclude
-
Edit conditions – Any selected conditions populate here. To modify filter conditions, click the underlined portion of the condition, which opens a corresponding window.
Folder Type Window
Use the Folder Type window to select which folder types to run the action against. The Folder Type window opens if specific in with specific folder type is selected in the Edit Conditions box. .

Select the checkbox next to any desired folder type to include it in the search criteria, including:
- Calendar
- Contact
- Journal
- Notes
- Task
- Reminder
- RSS Feed
Search Terms Window
Use the Search Terms window to select terms contained in folder names to run the action against.The Search Terms window opens if search terms is selected in the Edit Conditions box.

Edit the search terms using the following options:
-
To add a term to the search, enter the desired term into the upper text box and click Add
-
To remove a term from the search, select a term in the lower text box and click Remove
-
Click Clear to clear all terms from the lower box
-
Select a qualifier option:
- Contains ALL of the following search terms (And) – Search only returns results containing all of the search terms
- Contains ANY of the following search terms (Or) – Search returns results containing one or more of the search terms
-
Click Import CSV to open a file explorer and select a CSV file to import
Folder Inclusion/Exclusion Window
Use the Folder Inclusion/Exclusion window to select individual folders to add to or remove from the action. The Folder Inclusion/Exclusion window opens if specific in with specific folder(s) to include/exclude is selected in the Edit Conditions box.

Include/Exclude folders using the following options:
-
Click Add to populate a field to add a folder path

-
Click the ellipsis (…) or enter the path to the desired folder in the text box
-
Scope auto-populates with This folder. Click This folder to reveal a drop-down menu to select from the following scope options:
- This folder
- This folder and subfolders
- Subfolders only
-
The Remove button becomes enabled once a folder is added to either section. To remove a folder from the scope, select it and click Remove.
Mailbox: Folder Identification
Use the Folder Identification page to specify folders to target. It is a wizard page for the Delete Mailbox Contents operation.
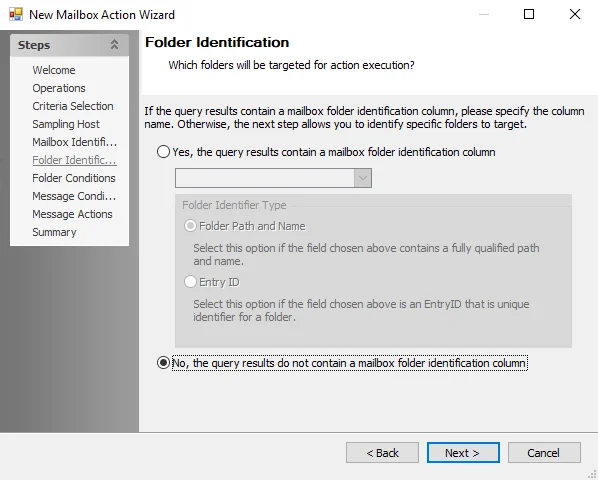
Select whether the query results contain a mailbox identification column using the following options:
-
Yes, the query results contain a mailbox folder identification column
-
Select the mailbox identification column using the drop-down menu
-
Folder Identifier Type – Choose which mailbox identifier the selected column uses:
- Folder Path and Name – Select this option if the specified field contains a fully qualified path
- Entry ID – Select this option if the selected field is an EntryID that is a unique identifier for a folder
-
-
No, the query results do not contain a mailbox folder identification column – Selecting this enables the Folder Conditions page, used to identify specific folders to target. See the Mailbox: Folder Conditions topic for additional information.
Mailbox: Mailbox Identification
The Mailbox Identification page specifies the mailboxes the action targets. It is a wizard page for the Delete Mailbox Contents operation.
Depending on the data in the source table, users must specify a data table column containing either the Mailbox display name or email address.
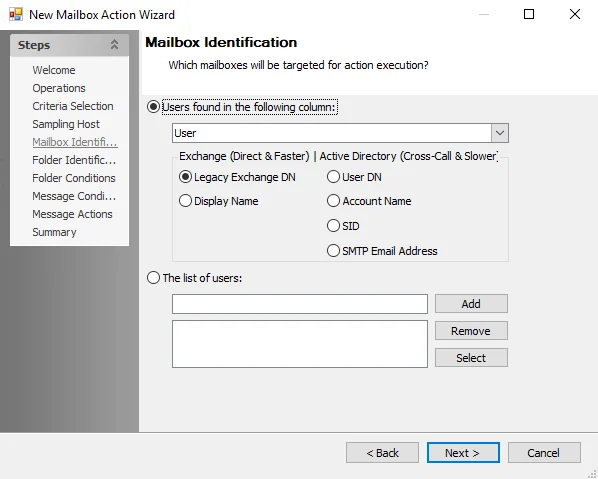
Select which mailboxes to target using the following options:
-
Users found in the following column – Select this option to identify users via a data table column
-
Use the drop-down menu to select a data table column containing either the Mailbox display name or email address
-
Select a data type for the selected field using the following options:
-
Exchange (Direct and Faster) – Connects to Exchange Mailboxes using the following data types:
- Legacy Exchange DN
- Display Name
-
Active Directory (Cross-Call and Slower) – Connects to Exchange mailboxes using the Active Directory Data Collector with the following data types:
- User DN
- Account Name
- SID
- SMTP Email Address
-
-
-
The list of users – Identifies users in one of the following ways:
- Click Select to choose from the global address list (GAL)
- Manually enter a user name and click Add. Repeat for additional users.
- To restore anonymous permissions to folders, enter
anonymousand click Add - To remove a user, select it and click Remove
Mailbox: Message Actions
Use the Message Actions page to specify the action to take with the messages that meet the search criteria. It is a wizard page for the Delete Mailbox Contents operation.
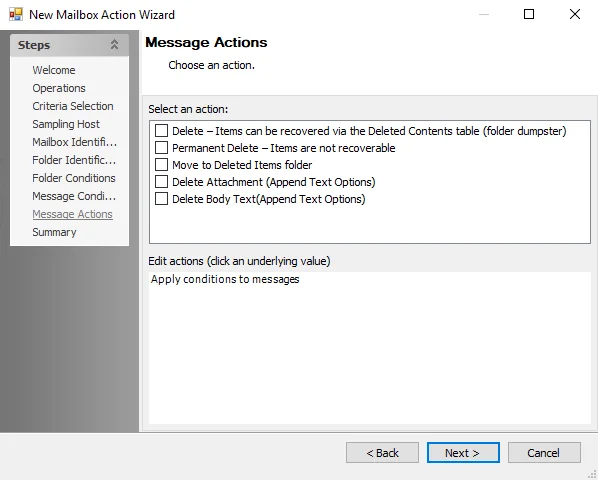
To select a message action, use the following options:
-
Select an action – Select the checkbox next to a message action to apply it to the search. The selected action displays in the Edit Actions box. Possible actions include:
- Delete – Items can be recovered via the Deleted Contents table (folder dumpster)
- Permanent Delete – Items are not recoverable
- Move to Deleted Items folder
- Delete Attachment (Append Text Options) – Deletes attachment and adds Append Text Options to the Edit Conditions box
- Delete Body Text (Append Text Options) – Deletes body text and adds Append Text Options to the Edit Conditions box
-
Edit conditions – Any selected conditions populate here
- To edit a filter condition, click the underlined portion of the condition to open the corresponding window
Options Window
Use the Options window to add an appended text. The Options window opens if Append Text Options is selected in the Edit Conditions box.

To append text to the attachment or body, select the checkbox to enable editing and enter the desired text to append in the textbox.
Mailbox: Message Conditions
Use the Message Conditions page to customize message search filter conditions. It is a wizard page for the Delete Mailbox Contents operation.
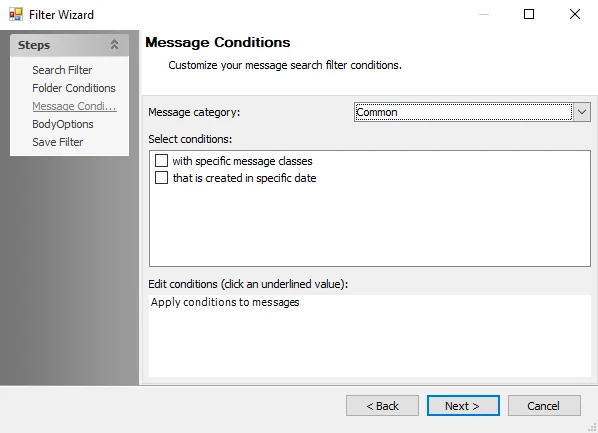
Customize the folder search conditions using the following options:
-
Message Category – Use the drop-down menu to select a message category
NOTE: Each selection may populate various conditions in the Select Conditions section.
-
Select conditions – Select the checkbox next to any desired filter conditions to apply them to the search. The selected conditions then show in the Edit conditions box. Message Conditions include:
- with specific message classes
- that is created in specific date
- with search terms in the subject
- with search terms in the body
- with search terms in the subject or body
- with search terms in the message header
- with search terms in the recipient’s address
- with search terms in the sender’s address
- that has an attachment
- that is received in specific date
- with specific message ID
- that occurs in specific date
-
Edit conditions – Any selected conditions populate here
-
To edit filter conditions, click the underlined portion of the condition. This opens a corresponding window to configure the condition, with the exception of has attachment(s).
- Clicking has attachment(s) changes it to has no attachment(s and vice versa
-
MessageClasses Window
Use the MessageClasses window to select a message class to apply to the scope of the action. The MessageClasses window opens if specific in with specific message classes is selected in the Edit Conditions box.

Modify message classes using the following options:
-
Click Add to populate a field to add a message class

-
Click the ellipsis (…) or enter the path to the desired folder in the text box
-
Matching Strategy auto-populates with Exact Match. Click Exact Match to reveal a drop-down menu to select from the following scope options:
- Exact Match
- Starts With
- Contains
-
To remove a message class, select it and click Remove
-
Click Import CSV to open a file explorer and select a CSV file to import
Data Range Selection Window
Use the Date Range Selection window to determine a time period to scope. The Date Range Selection window opens if in specific date in either the that is created in specific date or that is received in specific date conditions is selected in the Edit condition box.

To specify a date range, use the following options:
-
Select one of the following qualifier options:
- Over
- Last
- Before
- After
- Between
-
Configure the date range using the textbox or drop-down menus for the selected option
Search Terms Window
Use the Search Terms window to select terms in messages to run the action against. The Search Terms window opens if search terms in any condition is selected in the Edit Conditions box.
Edit the search terms using the following options:
- To add a term to the search, enter the desired term into the upper text box and click Add
- To remove a term from the search, select a term in the lower text box and click Remove
- Click Clear to clear all terms from the lower box
- Specify a qualifier option:
- Contains ALL of the following search terms (And) – Search only returns results containing all of the search terms
- Contains ANY of the following search terms (Or) – Search returns results containing any one or more of the search terms
- Click Import CSV to open a file explorer and select a CSV file to import
Values Window
Use the Values window to add or remove values to or from the search. The Values window opens if specific in with specific Message ID is selected in the Edit Conditions box.

- To add a term to the search, enter the desired term into the upper text box and click Add
- To remove a term from the search, select a term in the lower text box and click Remove
- Click Clear to clear all terms from the lower box
- Click Import CSV to open a file explorer and select a CSV file to import
Mailbox: Operations
Use the Operations page to specify the operation to be performed as part of the action.
Select from the following operations:
- Delete Mailbox Contents
- Add/Change Permissions
- Remove Permissions
- Add Delegates
- Remove Delegates
- Remove Stale SIDS
NOTE: The Operation selected alters the subsequent steps displayed by the wizard.
Mailbox Action Module
The Mailbox action module allows you to perform bulk operations on Microsoft Exchange mailboxes, for example deleting mailbox content and modifying permissions and delegates.
CAUTION: This action module can add, change, or remove permissions and delegates from an environment. Always verify the data and target mailboxes prior to executing any action.
Mailbox Action Source Table Configuration
All data tables used in Enterprise Auditor action modules require the presence of certain data columns. In addition, individual action modules including Mailbox may have their own column requirements. The Mailbox action module requires a column containing mailbox names.
Configuration
Use the New Mailbox Action Wizard to target mailboxes or folders and to define the operation to perform against the selected objects. The wizard has the following pages:
- Welcome
- Mailbox: Operations
- Mailbox: Criteria Selection
- Mailbox: Sampling Host
- Mailbox: Mailbox Identification
- Mailbox: Folder Identification
- Mailbox: Folder Conditions
- Mailbox: Message Conditions
- Mailbox: Message Actions
- Mailbox: Permissions
- Mailbox: Affected Mailboxes
- Mailbox: Trusted Users
- Mailbox: Delegate Rights
- Mailbox: Summary
The Welcome page gives an overview of the action module. The steps navigation pane contains links to the pages in the wizard, which change based on the operation selected on the Operations page.
To proceed, click Next or use the Steps navigation pane to open another page in the wizard.
Mailbox: Permissions
Use the Permissions page to determine which permissions to remove. It is a wizard page for the Add/Change Permissions and Remove Permissions operations.
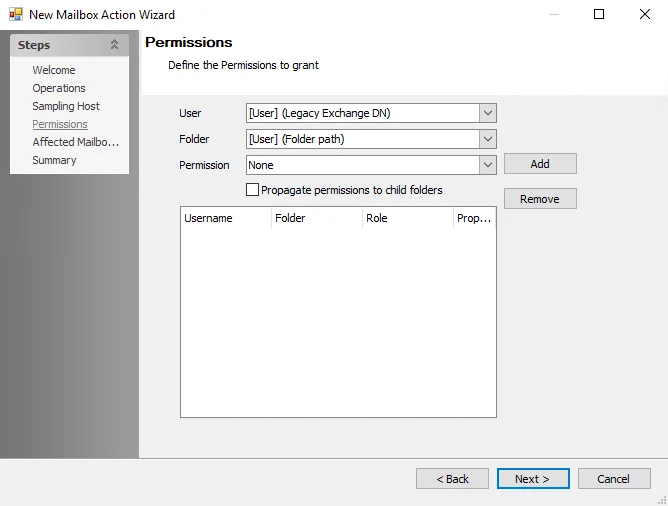
Use the following options to add, change or remove Permissions:
- User – Specifies user permissions to add or change. To select different users, click the down-arrow to display the User window. See the User Window topic for additional information.
- Folder – Specifies the folder for which to change permissions. Click the down-arrow to display the Folder window. See the Folder Window topic for additional information.
- Permission – Selects a permission to assign. Click the down-arrow to display the Permission window. See the Permission Window topic for additional information.
- Propagate permissions to child folders – Propagates permissions to the child folders of the selected folders
- Once User, Folder, and Permission are selected, click Add to add them to the summary of the action to be taken
- To remove an added Permission, select it in the panel and click Remove
User Window
Use the User window to select a user. The User window opens when the User down-arrow is selected on the Permissions page.
Select a user using the following options:
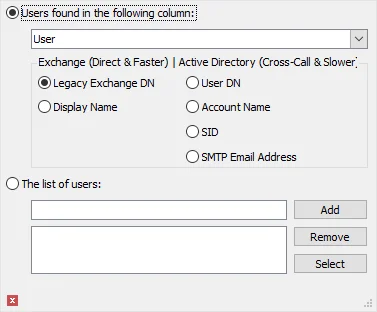
-
Users found in the following column – Select this option to identify users via a data table column
-
Use the drop-down menu to select a data table column containing either the Mailbox display name or email address
-
Select a data type for the selected field using the following options:
-
Exchange (Direct and Faster) – Connects to Exchange Mailboxes using the following data types:
- Legacy Exchange DN
- Display Name
-
Active Directory (Cross-Call and Slower) – Connects to Exchange mailboxes using the Active Directory Data Collector with the following data types:
- User DN
- Account Name
- SID
- SMTP Email Address
-
-
-
The list of users – Identifies users in one of the following ways:
- Click Select to choose from the global address list (GAL)
- Manually enter a user name and click Add. Repeat for additional users.
- To restore anonymous permissions to folders, enter
anonymousand click Add - To remove a user, select it and click Remove
Folder Window
Use the Folder window to select folders. The Folder window opens when the Folder down-arrow is selected on the Permissions page.

Select a folder using the following options:
-
Folder names in the following column – Select from folder names present in the column
-
Click the down arrow and select either the folder path or the Entry ID column for that folder
-
Select the appropriate folder identifier type:
- Folder Path
- Entry ID
-
-
The list of folders – Select one of the default folders
- Select a folder from the drop-down menu and click Add
- To remove a folder, select it and click Remove
Permission Window
Use the Permission window to specify permissions. The Permission window opens when the Permission down-arrow is selected on the Permissions page.

Specify permissions using the following options:
-
Permissions Level – Each permission level has a set of default selections. If a setting is changed, the Permissions Level field changes to Custom. Permission levels are associated with the different permissions available for assignment through Outlook. Options include:
- None
- Contributor
- Reviewer
- Nonediting Author
- Author
- Publishing Author
- Editor
- Publishing Editor
- Owner
-
Read – Choose the read permissions from the following:
- None
- Full Details
-
Write – Select any desired write permissions from the following:
- Create Items
- Create subfolders
- Edit Own
- Edit all
-
Delete Items – Choose delete permissions from the following:
- None
- Own
- All
-
Other – Select any other permissions to apply from the following:
- Folder owner – User has all permissions for the folder
- Folder Contact – User receives automated messages about the folder such as replication conflict messages, requests from users for additional permissions, and other changes to folder status
- Folder visible – User can see the folder but cannot read or edit the items within
-
To add anonymous permissions, choose None
- To re-add Anonymous to the folder but not assign any access, select a permission level to assign
Mailbox: Sampling Host
Use the Sampling Host page to specify the Exchange server to target. It is a wizard page for all operation types.
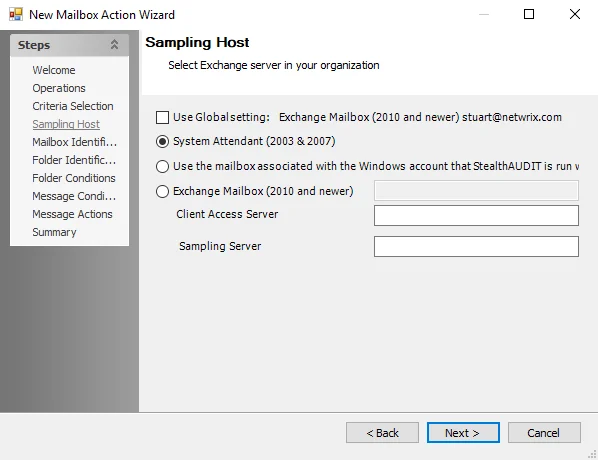
Select an Exchange server to target using the following options:
-
Select the Use Global Setting checkbox to query the global Exchange setting
-
Use the radio buttons to select a specific host
-
System Attendant (2003 & 2007) – Audits Microsoft Exchange 2007 or older versions
-
Use the mailbox associated with the Windows account that Enterprise Auditor is run with – Uses either the account logged into the Enterprise Auditor Console server or the account set to run the Enterprise Auditor application to access the Exchange mailbox
-
Exchange Mailbox (2010 and newer) – Allows Exhange Mailbox Alias to be specified for MAPI connections
- When Exchange Mailbox (2010 and newer) is selected, the textbox is enabled. Enter the Alias name in the textbox. The Alias needs to be an Exchange 2010 or newer mailbox, not a mail-enabled service account. However, this mailbox does not need rights on the Exchange Organization; it only needs to reside within it.
- Client Access Server – Enter the name of the physical CAS in the textbox. This server can be part of an array, but do enter the name of a CAS Array. This should also be the Exchange CAS where both Remote PowerShell and Windows Authentication on the PowerShell Virtual Directory have been enabled.
Mailbox: Summary
The Summary page summarizes the configuration of the action.
Click Finish to save configuration changes and exit, or Cancel to exit with saving.
Mailbox: Trusted Users
Use the Trusted Users page to select delegates to add. Users can be added individually or from a server with a mailbox environment. It is a wizard page for the following operations:
- Add Delegates
- Remove Delegates
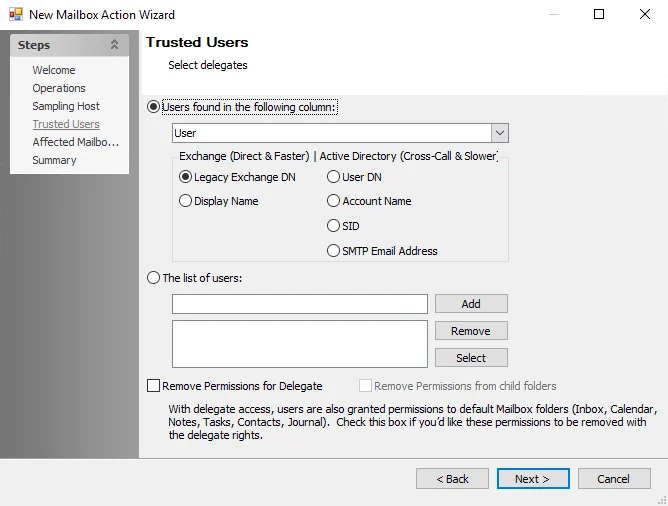
Select Trusted User delegates using the following options:
-
Users found in the following column – Select this option to identify users via a data table column
-
Use the drop-down menu to select a data table column containing either the Mailbox display name or email address
-
Select a data type for the selected field using the following options:
-
Exchange (Direct and Faster) – Connects to Exchange Mailboxes using the following data types:
- Legacy Exchange DN
- Display Name
-
Active Directory (Cross-Call and Slower) – Connects to Exchange mailboxes using the Active Directory Data Collector with the following data types:
- User DN
- Account Name
- SID
- SMTP Email Address
-
-
-
The list of users – Identifies users in one of the following ways:
- Click Select to choose from the global address list (GAL)
- Manually enter a user name and click Add. Repeat for additional users.
- To restore anonymous permissions to folders, enter
anonymousand click Add - To remove a user, select it and click Remove
The following additional options are available for the Remove Delegates operation:
-
Remove Permissions for Delegate – Remove Mailbox permissions in addition to removing delegate rights
-
Remove Permissions from Child Folders – Removes permissions from child folders
NOTE: This option is only enabled if the Remove Permissions for Delegate option is selected.