Dell Unity Access & Sensitive Data Auditing Configuration
This topic provides instructions for assigning group membership for Dell Unity devices.
Assign Group Membership for Dell Devices
Follow the steps assign group membership through Computer Management.
Step 1 – Open Computer Management (compmgmt.msc).
Step 2 – Right-click on the Computer Management (local) node and select Connect to another computer.
Step 3 – Enter the name of the Dell device in the textbox and click OK.
Step 4 – Navigate to the Local Users and Groups > Groups node for the device.
Step 5 – Select the Backup Operators group and add the account being provisioned.
Step 6 – Select the Power Users group and add the account being provisioned.
The account has been provisioned for Access Auditing and Sensitive Data Discovery Auditing.
Dell Unity Activity Auditing Configuration
A Dell Unity device can be configured to audit Server Message Block (SMB) protocol access events. All audit data can be forwarded to the Dell Common Event Enabler (CEE). The Netwrix Activity Monitor listens for all events coming through the Dell CEE and translates all relevant information into entries in the TSV files or syslog messages.
If the service is turned off, a notification will be sent to the Dell CEE framework to turn off the associated Activity Monitor filter, but the policy will not be removed.
The Dell CEE Framework uses a “push” mechanism so a notification is sent only to the activity agent when a transaction occurs. Daily activity log files are created only if activity is performed. No activity log file is created if there is no activity for the day.
Configuration Checklist
Complete the following checklist prior to configuring activity monitoring of Dell Unity devices. Instructions for each item of the checklist are detailed within the following topics.
Checklist Item 1: Plan Deployment
-
Prior to beginning the deployment, gather the following:
-
Data Mover or Virtual Data Mover hosting the share(s) to be monitored
-
Account with access to the CLI
-
Download the Dell CEE from:
-
Checklist Item 2: Install Dell CEE
-
Dell CEE should be installed on the Windows proxy server(s) where the Activity Monitor activity agent will be deployed
RECOMMENDED: The latest version of Dell CEE is the recommended version to use with the asynchronous bulk delivery (VCAPS) feature.
-
Important:
- Open MS-RPC ports between the Dell device and the Windows proxy server(s) where the Dell CEE is installed
- Dell CEE 8.4.2 through Dell CEE 8.6.1 are not supported for use with the VCAPS feature
- Dell CEE requires .NET Framework 3.5 to be installed on the Windows proxy server
Checklist Item 3: Dell Unity Device Configuration
-
Configure initial setup for a Unity device
Checklist Item 4: Activity Monitor Configuration
-
Deploy the Activity Monitor activity agent to a Windows proxy server where Dell CEE was installed
-
After activity agent deployment, configure the Dell CEE Options tab of the agent’s Properties window within the Activity Monitor Console
- Automatically sets the Dell registry key settings
-
Checklist Item 5: Configure Dell CEE to Forward Events to the Activity Agent
NOTE: When Dell CEE is installed on Windows proxy server(s) where the Activity Monitor activity agent will be deployed, the following steps are not needed.
- Ensure the Dell CEE registry key has enabled set to 1 and has an EndPoint set to StealthAUDIT.
- Ensure the Dell CAVA service and the Dell CEE Monitor service are running.
- See the Validate Setup topic for instructions.
Install Dell CEE
Dell CEE should be installed on a Windows or a Linux server. The Dell CEE software is not a Netwrix product. Dell customers have a support account with Dell to access the download.
Remember, the latest version is the recommended version of Dell CEE.
RECOMMENDED: The Dell CEE package can be installed on the Windows server where the Activity Monitor agent will be deployed (recommended) or on any other Windows or Linux server.
Follow the steps to install the Dell CEE.
Step 1 – Obtain the latest CEE install package from Dell and any additional license required for this component. It is recommended to use the most current version.
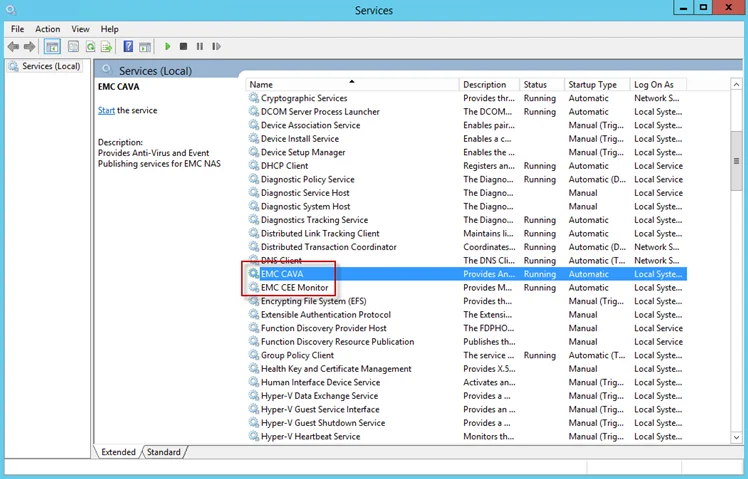
Step 2 – Follow the instructions in the Dell Using the Common Event Enabler on Windows Platforms guide to install and configure the CEE. The installation will add two services to the machine:
- EMC Checker Service (Display Name: EMC CAVA)
- EMC CEE Monitor (Display Name: EMC CEE Monitor)
RECOMMENDED: The latest version of .NET Framework and Dell CEE is recommended to use with the asynchronous bulk delivery (VCAPS) feature.
After Dell CEE installation is complete, it is necessary to complete the Unity Initial Setup with Unisphere.
Configure Dell Registry Key Settings
There may be situations when Dell CEE needs to be installed on a different Windows server than the one where the Activity Monitor activity agent is deployed. In those cases it is necessary to manually set the Dell CEE registry key to forward events.
Step 1 – Open the Registry Editor (run regedit).
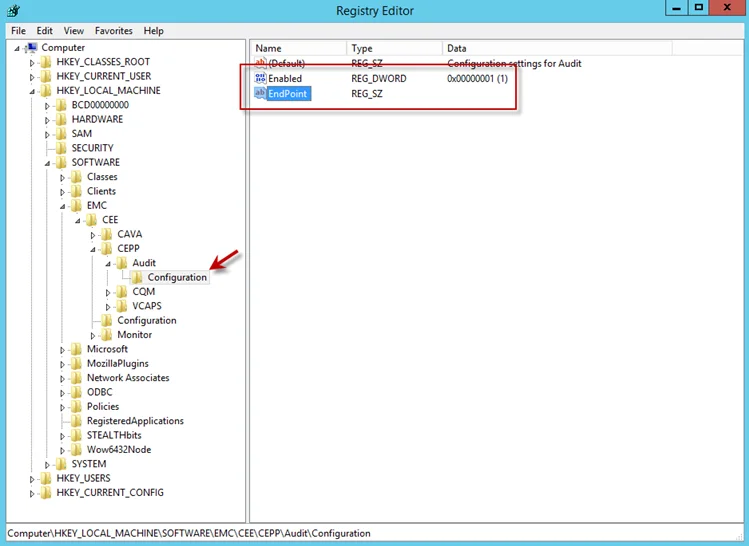
Step 2 – Navigate to following location:
HKEY_LOCAL_MACHINE\SOFTWARE\EMC\CEE\CEPP\AUDIT\Configuration
Step 3 – Right-click on Enabled and select Modify. The Edit DWORD Value window opens.
Step 4 – In the Value data field, enter the value of 1. Click OK, and the Edit DWORD Value window closes.
Step 5 – Right-click on EndPoint and select Modify. The Edit String window opens.
Step 6 – In the Value data field, enter the StealthAUDIT value with the IP Address for the Windows proxy server hosting the Activity Monitor activity agent. Use the following format:
StealthAUDIT@[IP ADDRESS]
Examples:
StealthAUDIT@192.168.30.15
Step 7 – Click OK. The Edit String window closes. Registry Editor can be closed.
Step 8 – Open Services (run services.msc). Start or Restart the EMC CEE Monitor service.
The Dell CEE registry key is now properly configured to forward event to the Activity Monitor activity agent.
Dell Unity Target Requirements
Netwrix Enterprise Auditor can execute Access Auditing (FSAA) and/or Sensitive Data Discovery Auditing scans on Dell Unity devices. The Netwrix Activity Monitor can be configured to monitor activity on Dell Unity devices and make the event data available for Enterprise Auditor Activity Auditing (FSAC) scans.
Access & Sensitive Data Auditing Permissions
The credentials used by the Enterprise Auditor scans must have the following permissions on the target host:
-
Group membership in both of the following groups:
- Power Users
- Backup Operators
These permissions grant the credential the ability to enumerate shares, access the remote registry, and bypass NTFS security on folders. The credential used within the assigned Connection Profile for these target hosts requires these permissions. See the Dell Unity Access & Sensitive Data Auditing Configuration topic for instructions.
NOTE: These permissions are in addition to those needed to either deploy applet scans for running scans in proxy mode with applet or installing the File System Proxy Service Permissions for running scans in proxy mode as a service. See the File System Scan Options topic for additional information.
Troubleshooting Dell Unity Denied Access Errors
If there are folders to which the credential is denied access, it is likely that the Backup Operators group does not have the “Back up files and directories” right. In that case, it is necessary to assign additional the “Back up files and directories” right to those groups or to create a new local group, using Computer Management from a Windows server. Then assign rights to it using the CelerraManagementTool.msc plugin, which is available to Dell customers. For further information, see the Celerra guide Using Windows Administrative Tools on VNX found on the Celerra website.
Access & Sensitive Data Auditing Port Requirements
The firewall ports required by Enterprise Auditor for Access Auditing (FSAA) and/or Sensitive Data Discovery Auditing scans are based on the File System scan mode to be used. See the File System Scan Options topic for additional information.
Activity Auditing Permissions
Windows Proxy Server for Activity Agent Monitoring of Dell Unity
The Netwrix Activity Monitor must have an Activity Agent deployed on a Windows proxy server. While actively monitoring, the Activity Agent generates activity log files stored on the proxy server. The credential used to deploy the Activity Agent must have the following permissions on the proxy server:
- Membership in the local Administrators group
- READ and WRITE access to the archive location for Archiving feature only
It is also necessary to enable the Remote Registry Service on the Activity Agent server.
For integration between the Activity Monitor and Enterprise Auditor, the credential used by Enterprise Auditor to read the activity log files must have also have this permission.
Dell Unity Requirements
Additionally, the EMC Common Event Enabler (CEE) should be installed on the Windows proxy server, where the activity agent is deployed.
RECOMMENDED: Use the latest available CEE version from the Dell Support website.
EMC CEE requires .NET Framework 3.5 to be installed on the Windows proxy server in order for the EMC CEE service to start.
See the Dell Unity Activity Auditing Configuration topic for instructions.
Activity Monitor Archive Location
If the activity log files are being archived, configurable within the Netwrix Activity Monitor Console, then the credential used by Enterprise Auditor to read the activity log files must also have READ and WRITE permissions on the archive location.
Activity Auditing Port Requirements
Firewall settings depend on the type of environment being targeted. The following firewall settings are required for communication between the Agent server and the Netwrix Activity Monitor Console:
| Communication Direction | Protocol | Ports | Description |
|---|---|---|---|
| Activity Monitor to Agent Server | TCP | 4498 | Agent Communication |
The Windows firewall rules need to be configured on the Windows server, which require certain inbound rules be created if the scans are running in applet mode. These scans operate over a default port range, which cannot be specified via an inbound rule. For more information, see the Microsoft Connecting to WMI on a Remote Computer article.
Additional Firewall Rules for Dell Unity Devices
The following firewall settings are required for communication between the CEE server/ Activity Monitor Activity Agent server and the target Dell device:
| Communication Direction | Protocol | Ports | Description |
|---|---|---|---|
| Dell Device CEE Server | TCP | RPC Dynamic Range | CEE Communication |
| CEE Server to Activity Agent Server (when not same server) | TCP | RPC Dynamic Range | CEE Event Data |
Additional Firewall Rules for Integration between Enterprise Auditor and Activity Monitor
Firewall settings are dependent upon the type of environment being targeted. The following firewall settings are required for communication between the agent server and the Enterprise Auditor Console:
| Communication Direction | Protocol | Ports | Description |
|---|---|---|---|
| Enterprise Auditor to Agent Server | TCP | 445 | SMB, used for Agent Deployment |
| Enterprise Auditor to Agent Server | TCP | Predefined | WMI, used for Agent Deployment |
Unity Initial Setup with Unisphere
Follow the steps to configure the initial setup for a Unity device with Unisphere.
Step 1 – Edit the NAS Server > Protection and Events > Events Publishing > Select Pool settings:
- Add CEPA server – This is the server where CEE is installed. It is recommended that this is also the server were the Activity Monitor activity agent is deployed.
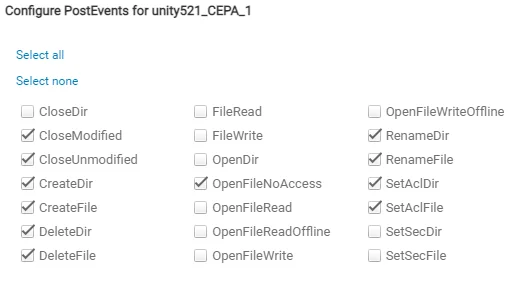
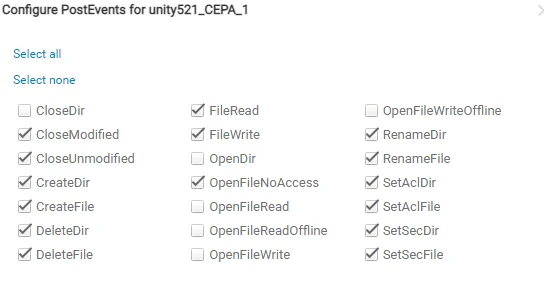
- Enable the following events for Post Events.
Required Unity events needed for CIFS Activity:
Required Unity events needed for NFS Activity:
Step 2 – Enable Events Publishing:
-
Edit the FileSystem > Advanced settings:
- NFS Events Publishing – Enabled (required for NFS protocol monitoring)
- SMB Events publishing – Enabled (required for SMB / CIFS protocol monitoring)
Once Unity setup is complete, it is time to configure and enable monitoring with the Activity Monitor.
Validate Setup
Once the Activity Monitor agent is configured to monitor the Dell device, the automated configuration must be validated to ensure events are being monitored.
Validate CEE Registry Key Settings
NOTE: See the Configure Dell Registry Key Settings topic for information on manually setting the registry key.
After the Activity Monitor activity agent has been configured to monitor the Dell device, it will configure the Dell CEE automatically if it is installed on the same server as the agent. This needs to be set manually in the rare situations where it is necessary for the Dell CEE to be installed on a different server than the Windows proxy server(s) where the Activity Monitor activity agent is deployed.
If the monitoring agent is not registering events, validate that the EndPoint is accurately set. Open the Registry Editor (run regedit). For the synchronous real-time delivery mode (AUDIT), use the following steps.
Step 1 – Navigate to the following windows registry key:
HKEY_LOCAL_MACHINE\SOFTWARE\EMC\CEE\CEPP\Audit\Configuration
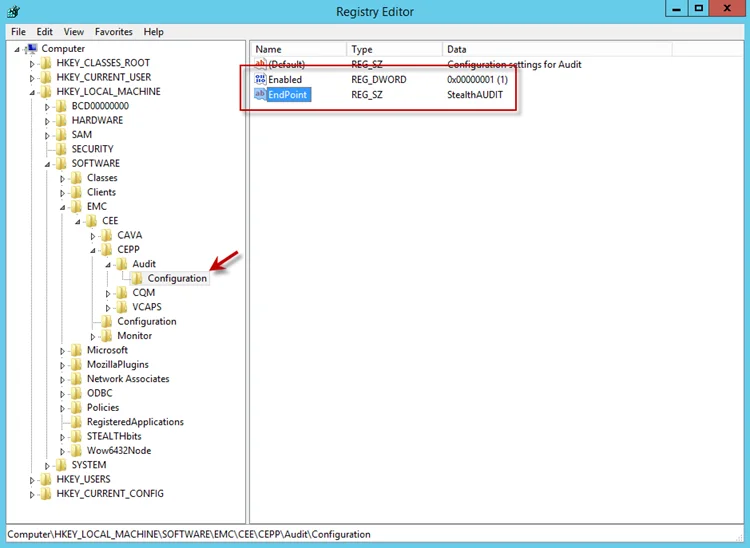
Step 2 – Ensure that the Enabled parameter is set to 1.
Step 3 – Ensure that the EndPoint parameter contains an address string for the Activity Monitor agent in the following formats:
-
For the RPC protocol,
StealthAUDIT@'ip-address-of-the-agent' -
For the HTTP protocol,
StealthAUDIT@http://'ip-address-of-the-agent':'port'
NOTE: All protocol strings are case sensitive. The EndPoint parameter may also contain values for other applications, separated with semicolons.
Step 4 – If you changed any of the settings, restart the CEE Monitor service.
For Asynchronous Bulk Delivery Mode
For the asynchronous bulk delivery mode with a cadence based on a time period or a number of events (VCAPS), use the following steps.
Step 1 – Navigate to the following windows registry key:
HKEY_LOCAL_MACHINE\SOFTWARE\EMC\CEE\CEPP\VCAPS\Configuration
Step 2 – Ensure that the Enabled parameter is set to 1.
Step 3 – Ensure that the EndPoint parameter contains an address string for the Activity Monitor agent in the following formats:
- For the RPC protocol,
StealthVCAPS@'ip-address-of-the-agent' - For the HTTP protocol,
StealthVCAPS@http://'ip-address-of-the-agent':'port'
NOTE: All protocol strings are case sensitive. The EndPoint parameter may also contain values for other applications, separated with semicolons.
Step 4 – Ensure that the FeedInterval parameter is set to a value between 60 and 600; the MaxEventsPerFeed - between 10 and 10000.
Step 5 – If you changed any of the settings, restart the CEE Monitor service.
Set the following values under the Data column:
- Enabled – 1
- EndPoint – StealthAUDIT
If this is configured correctly, validate that the Dell CEE services are running. See the Validate Dell CEE Services are Running topic for additional information.
Validate Dell CEE Services are Running
After the Activity Monitor Activity Agent has been configured to monitor the Dell device, the Dell
CEE services should be running. If the Activity Agent is not registering events and the EndPoint is
set accurately, validate that the Dell CEE services are running. Open the Services (run
services.msc).
The following services laid down by the Dell CEE installer should have Running as their status:
- Dell CAVA
- Dell CEE Monitor
CEE Debug Logs
If an issue arises with communication between the Dell CEE and the Activity Monitor, the debug logs need to be enabled for troubleshooting purposes. Follow the steps.
Step 6 – In the Activity Monitor Console, change the Trace level value in the lower right corner to Trace.
Step 7 – In the Activity Monitor Console, select all Dell hosts from the Monitored Hosts list and Disable monitoring.
Step 8 – Download and install the Debug View tool from Microsoft on the CEE server:
http://docs.microsoft.com/en-us/sysinternals/downloads/debugview
Step 9 – Open the Registry Editor (run regedit). Navigate to following location:
HKEY_LOCAL_MACHINE\SOFTWARE\EMC\CEE\Configuration
Step 10 – Right-click on Debug and select Modify. The Edit DWORD Value window opens. In the Value data field, enter the value of 3F. Click OK, and the Edit DWORD Value window closes.
NOTE: If the Debug DWORD Value does not exist, it needs to be added.
Step 11 – Right-click on Verbose and select Modify. The Edit DWORD Value window opens. In the Value data field, enter the value of 3F. Click OK, and the Edit DWORD Value window closes.
NOTE: If the Verbose DWORD Value does not exist, it needs to be added.
Step 12 – Run the Debug View tool (from Microsoft). In the Capture menu, select the following:
- Capture Win32
- Capture Global Win32
- Capture Events
Step 13 – In the Activity Monitor Console, select all Dell hosts from the Monitored Hosts list and Enable monitoring.
Step 14 – Generate some file activity on the Dell device. Save the Debug View Log to a file.
Step 15 – Send the following logs to Netwrix Support:
- Debug View Log (from Dell Debug View tool)
- Use the Collect Logs button to collect debug logs from the activity agent
RECOMMENDED: After the logs have been gathered and sent to Netwrix Support, reset these configurations.