NetApp Data ONTAP Cluster-Mode Access & Sensitive Data Auditing Configuration
This topic provides instructions for configuring NetApp Data ONTAP Cluster-Mode devices.
CIFS Method 1 Credential Configuration
Configuring access to CIFS shares using FPolicy and ONTAP API for Enterprise Auditor requires the following:
- Configure Data LIF to Allow HTTPS Traffic
- Configure Empty FPolicy
See the CIFS Method 2 Credential Configuration topic for an alternative method.
Configure Data LIF to Allow HTTPS Traffic
As of NetApp Clustered ONTAP 9.6, users can assign service policies (instead of LIF roles) to LIFs that determine the kind of traffic that is supported for the LIFs.
- Starting with ONTAP 9.5, ONTAP supports service policies
- Starting with ONTAP 9.6, LIF roles are deprecated and service policies are supported for all types of services
For users running ONTAP 9.6+, data LIFs used for HTTPS communication with Enterprise Auditor are
required to use a LIF service policy that includes the management-https service. Without this
service applied to a data LIF’s service policy, HTTPS communication will not be possible.
The following examples offer guidance for managing service policies, but may vary depending on the NetApp environment’s specific configuration and needs.
Use the following command to display available services:
network interface service show
Use the following command to create a service policy (example includes NFS, CIFS, and HTTPS traffic):
network interface service-policy create -vserver [SVM_NAME] -policy [SERVICE_POLICY_NAME] -services [LIST_OF_SERVICES_COMMA-SEPARARTED] -allowed-addresses [IP_CIDR_NOTATION]
Example with the NFS, CIFS, and HTTPS protocols being allowed:
network interface service-policy create -vserver testserver -policy new_service_policy -services data-nfx,data-cifs,management-https,data-core -allowed-addresses 0.0.0.0/0
Use the following command to verify if the service policy was properly created:
network interface service-policy show
Use the following command to add the created service policy to an existing data LIF:
network interface modify -vserver [SVM_NAME] -lif [LIF_NAME] -service-policy [SERVICE_POLICY_NAME]
Example:
network interface modify -vserver testserver -lif lif_1 -service-policy new_service_policy
A service policy can only be used by LIFs in the same SVM that is specified when creating the service policy.
CIFS Method 2 Credential Configuration
Configuring access to CIFS shares using the special C$ share is an alternative least privileged access option for NetApp Data ONTAP Cluster-Mode devices v9.0+. See the CIFS Method 1 Credential Configuration topic for an alternative method.
The following permissions are required:
-
Group membership in the Backup Operators group on either the file system proxy server for Proxy Mode scans or the Enterprise Auditor server for Local Mode scans (to get a high integrity token)
-
Group membership in the NetApp SVM's Power Users group (to enumerate shares)
-
Use the following command to add the Service Account to BUILTIN\Power Users:
cifs users-and-groups local-group add-members ‑group-name "BUILTIN\Power Users" ‑member-names [DOMAIN_USER] ‑vserver [SVM_NAME]
-
-
Group membership in the NetApp SVM's Backup Operators group (to bypass NTFS permissions)
-
NetApp SVM's SeBackupPrivilege needs to be applied to this group
-
This group must have read-only access to the SVM's C$ share
-
Use the following command to add the Service Account to BUILTIN\Backup Operators:
cifs users-and-groups local-group add-members ‑group-name "BUILTIN\Backup Operators" ‑member-names [DOMAIN_USER] ‑vserver [SVM_NAME]
-
If an ACE does not already exist for a specific user/group on an SVM's c$ share, then it needs to be added with the desired rights (No_access, Read, Change, or Full_Control). To check the current ACE for a user or group on each SVM's c$ share, the following ONTAP CLI command should be used at the cluster management level.
vserver cifs share access-control show -share c$
The output will list each SVM's ACL for its c$ share. For example:

If the desired ACE does not exist on an SVM's c$ share, then one can be created with the following command:
vserver cifs share access-control create -share c$ -user-or-group [USER_OR_GROUP_NAME] -permission Read -vserver [SVM_NAME]
If an existing ACE needs to be modified, the following command should be used:
CAUTION: The following command will overwrite an existing ACE. For example, it is possible to downgrade a user with Full_Control to Read, or vice versa.
vserver cifs share access-control modify -share c$ -user-or-group [USER_OR_GROUP_NAME] -permission Read -vserver [SVM_NAME]
NOTE: If users would prefer to avoid permissioning C$, then there is an alternative. Users can instead give the SVM's Backup Operators group read-only access to each share to be scanned.
In order to utilize Enterprise Auditor’s LAT Preservation (Last Access Time) feature during sensitive data scans and metadata tag collection, applying ONTAP’s SeRestorePrivilege to the service account is also required.
As an alternative to membership in BUILTIN\Backup Operators, SeBackupPrivilege can be directly applied to a user via the NetApp command line.
The following commands can be used to grant these permissions to the service account to be used for scanning by Enterprise Auditor.
Use the following commands to add SeBackupPrivilege to the Service Account (or a BUILTIN Group):
cifs users-and-groups privilege add-privilege ‑user-or-group-name [USER_OR_GROUP_NAME] ‑privileges SeBackupPrivilege ‑vserver [SVM_NAME]
Use the following commands to add the Service Account to BUILTIN\Power Users:
cifs users-and-groups local-group add-members ‑group-name "BUILTIN\Power Users" ‑member-names [DOMAIN_USER] ‑vserver [SVM_NAME]
Use the following commands to add the Service Account to BUILTIN\Backup Operators:
cifs users-and-groups local-group add-members ‑group-name "BUILTIN\Backup Operators" ‑member-names [DOMAIN_USER] ‑vserver [SVM_NAME]
Use the following commands to verify the results from the previous commands:
cifs users-and-groups privilege show ‑vserver [SVM_NAME] ‑user-or-group-name [USER_OR_GROUP_NAME]
Use the following commands to give the Service Account Read-only Access to NetApp SVM's c$ Share:
cifs share access-control create ‑vserver [SVM_NAME] ‑share c$ ‑user-or-group [USER_OR_GROUP_NAME] ‑permission Read
NOTE: In the previous command, "create" needs to be replaced with "modify" if the CIFS share ACE already exists for the share/user combination.
Use the following commands to verify the results from the previous command:
cifs share access-control show ‑vserver [SVM_NAME] ‑share c$
NFSv3 Credential Configuration
The following is a list of example commands that can be used to configure a NetApp export policy to scan a volume via NFSv3 using the Enterprise Auditor File System Solution.
CAUTION: The export policy for a volume's parent (ex. the SVM's root volume), or the export policy for a qtree's parent, must have access rights that are equal or wider in scope to the export policy for the target volume/qtree. If Enterprise Auditor cannot access all segments of a target volume/qtree's junction path, then NFS access will be denied.
Use the following command to create an export policy:
vserver export-policy create ‑vserver [SVM_NAME] ‑policyname [EXPORT_POLICY_NAME]
Example:
vserver export-policy create ‑vserver testserver ‑policyname testNFS
Use the following command to add a rule to the previous export policy, using the nfsv3, auth_sys (aka auth_unix), and superuser properties:
vserver export-policy rule create ‑vserver [SVM_NAME] ‑policyname [EXPORT_POLICY_NAME] ‑clientmatch [IP_CIDR_NOTATION] ‑rorule sys ‑rwrule sys ‑superuser sys -protocol nfs3
Example:
vserver export-policy rule create ‑vserver testserver ‑policyname testNFS ‑clientmatch 0.0.0.0/0 ‑rorule sys ‑rwrule sys ‑superuser sys -protocol nfs3
Use the following command to show each volume’s export policy:
volume show ‑vserver [SVM_NAME] ‑fields policy
Example:
volume show ‑vserver testserver ‑fields policy
Use the following command to change a volume’s export policy:
volume modify ‑vserver [SVM_NAME] ‑volume [VOLUME_NAME] ‑policy [EXPORT_POLICY_NAME]
Example:
volume modify ‑vserver testserver ‑volume testVolume ‑policy testNFS
Troubleshooting NFSv3 Export Access
If Enterprise Auditoris not discovering the expected NFS export, it is possible that the export policy is not properly configured to allow the Enterprise Auditor server or proxy server IP Address to mount the NFS export. One step in troubleshooting this issue is to confirm a Unix client (or WSL for Windows) in the same IP range as the Enterprise Auditor server or proxy server can mount the NFS export.
Run the following command from a Unix host to verify the NFS mount is available:
showmount ‑e [NFS_HOSTNAME_OR_IP]
If the NFS export is returned as a result of the previous command, then Enterprise Auditor should
also be able to mount it. If not, it may be necessary to run the following command on the NetApp SVM
to get the NFS export to be returned by the showmount command:
vserver nfs modify ‑vserver [SVM_NAME] ‑showmount enabled
NetApp Data ONTAP Cluster-Mode Activity Auditing Configuration
The Activity Monitor agent employed to monitor NetApp leverages NetApp ONTAP API, and the NetApp FPolicy framework to monitor file system events. This includes both NetApp 7-Mode and Cluster-Mode configurations. For more information about FPolicy read the What are the two parts of the FPolicy solution article.
Activity Monitor requires two communication channels for ONTAP monitoring:
- Activity Monitor Agent connects to ONTAP on port 80 or 443 for access to ONTAP API (ONTAPI/ZAPI or REST API).
- Data LIFs of the SVM connect to Activity Monitor Agent on port 9999 for FPolicy notifications.
The ONTAP API access is mandatory; without the API access the agent will not be able to receive and translate events from FPolicy. Both classic ONTAPI/ZAPI and the new REST API are supported. The agent uses the API to retrieve information about the storage virtual machines (SVM): CIFS settings, list of volumes, list of LIFs. Depending on the configuration, the agent can also retrieve the state of FPolicy to ensure it is enabled; configure FPolicy and register or unregister itself.
The FPolicy framework enables the collection of audit events on the ONTAP side and their transfer to the agent(s) via the designated Data LIFs. Each LIF establishes its own connection with one or several agents and sends notifications as soon as the file transaction occurs. The FPolicy connection is asynchronous and buffered; both ONTAP and Activity Monitor have techniques in place to make sure that connections are alive and working. The connection can be secured using TLS with server or mutual authentication.
FPolicy may have a significant impact on file system throughput, and it is always a best practice to monitor performance when enabling FPolicy.
RECOMMENDED: Create a tailored FPolicy which only collects the desired activity from the environment to limit the scope and impact.
For scale-out and fault tolerance purposes, the product supports a range of deployment options. A single agent can receive events from multiple SVMs. Or events from a single SVM can be distributed among multiple agents. Or a set of SVMs can distribute events among a set of agents. The choice depends on the fault tolerance requirements and the expected event flow. As a rule of thumb, the average load on a single agent should not exceed 5000 events per second.
Configuration Checklist
Complete the following checklist prior to configuring the activity monitoring of NetApp Data ONTAP Cluster-Mode devices. Instructions for each item of the checklist are detailed within the following sections.
Checklist Item 1: Plan Deployment
-
Gather the following information:
-
Names of the SVM(s) to be monitored
- FPolicy is configured for each SVM separately
- This should be the SVM(s) hosting the CIFS or NFS shares(s) to be monitored
-
Credentials to access ONTAP to provision a role and account.
-
Desired functionality level:
- Manual. A user configures FPolicy manually and ensures it stays enabled.
- Enable and Connect FPolicy. The product ensures that FPolicy stays enabled and connected all the time. RECOMMENDED.
- Configure FPolicy. The product configures FPolicy automatically and ensures it stays enabled and connected all the time. RECOMMENDED.
-
Volumes or shares on each SVM to be monitored
- Limiting the FPolicy to select volumes or shares is an effective way to limit the performance impact of FPolicy
-
Successful/failed file operations to be monitored
- Limiting the FPolicy to specific file operations is an effective way to limit the performance impact of FPolicy
-
IP Address of the server(s) where the Activity Monitor Agent is deployed
-
API enabled in ONTAP: the classic ONTAPI/ZAPI or the new REST API
- The product supports the REST API for ONTAP 9.13.1 and above.
-
Encryption and Authentication protocol for FPolicy connection
- No Authentication (default)
- TLS, server authentication (the SVM authenticates the agent)
- TLS, mutual authentication (both the SVM and the agent authenticate each other)
-
Checklist Item 2: Provision ONTAP Account
-
Permission names depend on the API used, ONTAPI/ZAPI or REST API.
-
The case of domain and username created during the account provisioning process must match exactly to the credentials provided to the activity agent for authentication to work.
-
The credential associated with the FPolicy used to monitor activity must be provisioned with access to (at minimum) the following CLI or API commands, according to the level of collection desired:
-
Manual, Collect Activity Events Only (Least Privilege)
-
ONTAPI/ZAPI
version– Readonly accessvolume– Readonly accessvserver– Readonly access
-
REST API
/api/cluster– Readonly access/api/protocols/cifs/services– Readonly access/api/storage/volumes– Readonly access/api/svm/svms– Readonly access
-
-
Employ the “Enable and connect FPolicy” Option (Less Privilege) – RECOMMENDED
-
ONTAPI/ZAPI
version– Readonly accessvolume– Readonly accessvserver– Readonly accessnetwork interface– Readonly accessvserver fpolicy disable– All accessvserver fpolicy enable– All accessvserver fpolicy engine-connect– All access
-
REST API
/api/cluster– Readonly access/api/protocols/cifs/services– Readonly access/api/storage/volumes– Readonly access/api/svm/svms– Readonly access/api/network/ip/interfaces– Readonly access/api/protocols/fpolicy– All access
-
-
Employ the “Configure FPolicy” Option (Automatic Configuration of FPolicy) – RECOMMENDED
-
ONTAPI/ZAPI
version– Readonly accessvolume– Readonly accessvserver– Readonly accessnetwork interface– Readonly accessvserver fpolicy– All accesssecurity certificate install– All access (only if FPolicy uses a TLS connection)
-
REST API
/api/cluster– Readonly access/api/protocols/cifs/services– Readonly access/api/storage/volumes– Readonly access/api/svm/svms– Readonly access/api/network/ip/interfaces– Readonly access/api/protocols/fpolicy– All access/api/security/certificates– All access (only if FPolicy uses a TLS connection)
-
-
Enterprise Auditor Integration requires the addition of the following CLI command:
security login role show-ontapi– Readonly access
-
Checklist Item 3: Configure Network
-
Agent must be able to connect to ONTAP API via a management LIF on ports HTTP (80) or HTTPS (443)
- NetApp firewall policy may need to be modified.
- LIF's service policy may need to be modified to include
management-httpsormanagement-httpservices. - Either of these ports is required. Activity Monitor requires ONTAP API access.
-
ONTAP cluster nodes, which serve the SVM, must be able to connect to the agent on port 9999.
- LIFs' service policy may need to be modified to include
data-fpolicy-clientservice. - Each data serving node should have its own LIF with the
data-fpolicy-clientservice. - The default port 9999 can be changed in the agent's settings.
- LIFs' service policy may need to be modified to include
Checklist Item 4: Configure FPolicy
-
Remember: all FPolicy objects and SVM names are case sensitive.
-
FPolicy must be configured for each SVM to be monitored.
-
If using TLS, … authentication options, generate needed certificates and PEM files
-
Select method:
-
Configure FPolicy Manually – If you want to exclude certain volumes or shares; a tailored FPolicy decreases the impact on NetApp.
- Required when the FPolicy account is provisioned for either Least Privileged or Less Privilege permission model
- If using TLS, … authentication options, set authentication
-
Allow the Activity Monitor to create an FPolicy automatically
- If using TLS, … authentication options, set authentication
- This option is enabled using the Configure FPolicy. Create or modify FPolicy objects if needed checkbox for each monitored SVM.
- It monitors file system activity on all volumes and shares of the SVM.
- FPolicy configuration is automatically updated to reflect the Activity Monitor configuration.
- Requires a Privileged Access credential be provided.
-
Checklist Item 5: Activity Monitor Configuration
- Deploy the Activity Monitor Agent to a Windows server.
- Configure the Agent to monitor the SVM.
Configure Empty FPolicy
The credential used to just run Access Auditing (FSAA) and/or Sensitive Data Discovery Auditing scans requires access to the specified API calls as well as association to an FPolicy. Therefore, it is necessary to:
- Create Security Role for FSAA Scans
- Create Security Login for FSAA Scans
- Create External Engine for Empty FPolicy
- Create FPolicy Event for Empty FPolicy
- Create Empty FPolicy Policy
- Create Empty FPolicy Scope
- Enable the Empty FPolicy
NOTE: The commands in the following sections have been verified for NetApp Data ONTAP 9.6+. Users of older versions should consult the NetApp documentation to find the appropriate syntax.
Create Security Role for FSAA Scans
This section provides instructions for creating an access-control role. An access-control role consists of a role name and a command to which the role has access. It optionally includes an access level (none, read-only, or all) and a query that applies to the specified command or command directory. The following commands need to be run to create the security role.
Use the following command to provision read-only access to Version* commands:
security login role create ‑role [ROLE_NAME] ‑cmddirname "version" ‑access readonly ‑query "" ‑vserver [SVM_NAME]
Example:
security login role create ‑role enterpriseauditor ‑cmddirname "version" ‑access readonly ‑query "" ‑vserver testserver
Use the following command to provision read-only access to Volume* commands:
security login role create ‑role [ROLE_NAME] ‑cmddirname "volume" ‑access readonly ‑query "" ‑vserver [SVM_NAME]
Example:
security login role create ‑role enterpriseauditor ‑cmddirname "volume" ‑access readonly ‑query "" ‑vserver testserver
Use the following command to provision read-only access to SVM* commands:
security login role create ‑role [ROLE_NAME] ‑cmddirname "vserver" ‑access readonly ‑query "" ‑vserver [SVM_NAME]
Example:
security login role create ‑role enterpriseauditor ‑cmddirname "vserver" ‑access readonly ‑query "" ‑vserver testserver
Use the following command to provision read-only access to security login role show-ontapi commands:
security login role create ‑role [ROLE_NAME] ‑cmddirname "security login role show-ontapi" ‑access readonly ‑query "" ‑vserver [SVM_NAME]
Example:
security login role create ‑role enterpriseauditor ‑cmddirname "security login role show-ontapi" ‑access readonly ‑query "" ‑vserver testserver
Before creating the Security Login, validate this configuration.
Validate Security Role Configuration
Run the following command to validate the security role configuration:
security login role show [ROLE_NAME]
Example:
security login role show enterpriseauditor
Relevant NetApp Documentation: To learn more about creating security login roles, please visit the NetApp website and read the security login role create article.
Create Security Login for FSAA Scans
Once the access control role has been created, apply it to a domain account.
CAUTION:
-
The SVM used in the following command must be the same SVM used when creating the role. See the Create Security Role for FSAA Scans topic for additional information.
CAUTION: Cluster-Mode is case sensitive.
-
It is recommended to use lowercase for both domain and username. The case of domain and username created during the account provisioning process must match exactly to the credentials provided to the Enterprise Auditor for authentication to work.
Use the following command to create the security login for the security role:
security login create ‑user-or-group-name [DOMAIN\DOMAINUSER] ‑application ontapi ‑authentication‑method domain ‑role [ROLE_NAME] ‑vserver [SVM_NAME]
Example:
security login create ‑user-or-group-name example\user1 ‑application ontapi ‑authentication‑method domain ‑role enterpriseauditor ‑vserver testserver
Before creating the External Engine, validate this security login.
Validate Security Login Creation
Run the following command to validate security login:
security login show [DOMAIN\DOMAINUSER]
Example:
security login show example\user1
Verify that the output is displayed as follows:

Relevant NetApp Documentation: To learn more about creating security logins, please visit the NetApp website and read the security login create article.
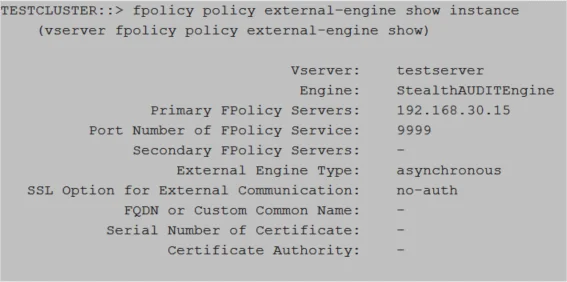
Create External Engine for Empty FPolicy
The External Engine defines how FPolicy makes and manages connections to external FPolicy servers.
IMPORTANT:
-
The
-primary-serversmust be the server from which the StealthAUDIT scans will be executed:- StealthAUDIT Console server for local mode
- proxy server if running in any of the proxy mode options
-
The following values are required:
-
engine-name StealthAUDITEngine -
port 9999- Port number can be customized, but it is recommended to use 9999.
-
extern-engine-type asynchronous -
ssl-option no-auth
-
CAUTION: Cluster-Mode is case sensitive.
Use the following command to create the external engine:
vserver fpolicy policy external-engine create ‑vserver [SVM_NAME] ‑engine-name StealthAUDITEngine ‑primary-servers [IP_ADDRESS,…] ‑port 9999 ‑extern-engine-type asynchronous ‑ssl-option no-auth
Example:
vserver fpolicy policy external-engine create ‑vserver testserver ‑engine-name StealthAUDITEngine ‑primary-servers 192.168.30.15 ‑port 9999 ‑extern-engine-type asynchronous ‑ssl-option no-auth
Before creating the FPolicy Event, validate this external engine was created.
Validate External Engine Creation
Run the following command to validate the creation of the external engine:
fpolicy policy external-engine show ‑instance
Verify that the output is displayed as follows:
Relevant NetApp Documentation: To learn more about creating an external engine, please visit the NetApp website and read the vserver fpolicy policy external-engine create article.
Create FPolicy Event for Empty FPolicy
An event defines which protocol and which file operations are associated with the FPolicy.
IMPORTANT:
-
The SVM used must be the SVM hosting the CIFS or NFS shares.
-
The following values are required:
event-name StealthAUDITScreeningvolume-operation true
CAUTION: Cluster-Mode is case sensitive.
Use the following command to create the FPolicy event:
vserver fpolicy policy event create ‑vserver [SVM_NAME] ‑event-name StealthAUDITScreening ‑volume-operation true ‑protocol [PROTOCOL] ‑file-operations ""
Example:
vserver fpolicy policy event create ‑vserver testserver ‑event-name StealthAUDITScreening ‑volume-operation true ‑protocol cifs ‑file-operations ""
Before creating the FPolicy Policy, validate this FPolicy Event was created.
Validate FPolicy Event Creation
Run the following command to validate the creation of the FPolicy event:
fpolicy policy event show ‑event-name StealthAUDITScreening‑instance
Verify that the output is displayed as follows:
Relevant NetApp Documentation: To learn more about creating an event, please visit the NetApp website and read the vserver fpolicy policy event create article.
Create Empty FPolicy Policy
The FPolicy policy associates the other three FPolicy components and allows for the designation of a privileged FPolicy user, or the account granted Security Login.
IMPORTANT:
-
The SVM used must be the SVM hosting the CIFS or NFS shares.
-
The External Engine and FPolicy Event used in this command must be the External Engine and the FPolicy Event created for this purpose. See the Create External Engine for Empty FPolicy and Create FPolicy Event for Empty FPolicy sections for additional information.
-
The following values are required:
privileged-user-namemust be the account granted Security Login. See the Create Security Login for FSAA Scans topic for additional information.policy-name StealthAUDIT
CAUTION: Cluster-Mode is case sensitive.
Use the following command to create the FPolicy policy:
vserver fpolicy policy create ‑vserver [SVM_NAME] ‑policy-name StealthAUDIT ‑events StealthAUDITScreening ‑engine StealthAUDITEngine ‑is-mandatory false ‑allow-privileged-access yes ‑privileged-user-name [DOMAIN\DOMAINUSER]
Example:
vserver fpolicy policy create ‑vserver testserver ‑policy-name StealthAUDIT ‑events StealthAUDITScreening ‑engine StealthAUDITEngine ‑is-mandatory false ‑allow-privileged-access yes ‑privileged-user-name example\user1
Before creating the FPolicy Scope, validate this FPolicy Policy was created.
Validate FPolicy Policy Creation
Run the following command to validate the creation of the FPolicy policy:
fpolicy policy show ‑instance
Relevant NetApp Documentation: To learn more about creating a policy, please visit the NetApp website and read the vserver fpolicy policy create article.
Create Empty FPolicy Scope
The FPolicy scope creates the filters necessary to perform scans on specific shares or volumes.
IMPORTANT:
- The SVM used must be the SVM hosting the CIFS shares.
- It is not necessary to specify both volumes and shares. One or the other is sufficient.
Use the following command to create the FPolicy scope by volume(s):
vserver fpolicy policy scope create ‑vserver [SVM_NAME] ‑policy-name StealthAUDIT ‑volumes-to-include
Example:
vserver fpolicy policy scope create ‑vserver testserver ‑policy-name StealthAUDIT ‑volumes-to-include
Use the following command to create the FPolicy scope by share(s):
vserver fpolicy policy scope create ‑vserver [SVM_NAME] ‑policy-name StealthAUDIT ‑shares-to-include
Example:
vserver fpolicy policy scope create ‑vserver testserver ‑policy-name StealthAUDIT ‑shares-to-include
Before enabling the FPolicy, validate this FPolicy Scope was created.
Validate FPolicy Scope Creation
Run the following command to validate the FPolicy scope creation:
fpolicy policy scope show ‑instance
Relevant NetApp Documentation: To learn more about creating scope, please visit the NetApp website and read the vserver fpolicy policy scope create article.
Enable the Empty FPolicy
Once the empty FPolicy has been created, it must be enabled.
IMPORTANT:
- The SVM used must be the SVM hosting the CIFS or NFS shares.
Use the following command to enable the FPolicy:
vserver fpolicy enable ‑vserver [SVM_NAME] ‑policy-name StealthAUDIT ‑sequence-number [INTEGER]
Example:
vserver fpolicy enable ‑vserver testserver ‑policy-name StealthAUDIT ‑sequence-number 10
Validate this FPolicy was enabled.
Validate FPolicy Enabled
Run the following command to validate the FPolicy scope creation:
vserver fpolicy show

Relevant NetApp Documentation: To learn more about enabling a policy, please visit the NetApp website and read the vserver fpolicy enable article.
Configure Network
Activity Monitor requires two communication channels for ONTAP monitoring:
- ONTAP API – Activity Monitor Agent connects to ONTAP on port 80 (http) or 443 (https) for access to ONTAP API (ONTAPI/ZAPI or REST API).
- FPolicy – Data LIFs of the SVM connect to Activity Monitor Agent on port 9999 for FPolicy notifications.
The following sections discuss network configuration required to enable API and FPolicy communication.
ONTAP API
The ONTAP API access is mandatory; without the API access the agent will not be able to receive and translate events from FPolicy. The agent uses the API to retrieve information about the SVM: CIFS settings, list of volumes, list of LIFs. Depending on the configuration, the agent can also retrieve the state of FPolicy to ensure it is enabled; configure FPolicy and register or unregister itself.
The API access is needed either through the SVM's LIF or through the cluster management LIF with vserver tunneling feature. If you want to use the vserver tunneling feature, specify the cluster management LIF's address in the "Management LIF" parameter in the host's settings in the Activity Monitor.
Both classic ONTAPI/ZAPI and the new REST API are supported. Starting with ONTAP 9.13.1, the product uses REST API by default if it is available. HTTP and HTTPS protocols are supported. For HTTPS, two modes are supported: strict and ignore errors. For the strict mode, the product allows you to disable the host name validation in case the agent cannot resolve the FQDN of the LIF.
Enabling the API access varies depending on ONTAP version. The following sections list common steps on enabling the API access. Please refer to the NetApp documentation for more details.
Management-http Service
Starting with ONTAP 9.6, data LIFs used for HTTPS communication with the Activity Monitor are
required to use a service policy that includes the management-https service. This service enables
HTTPS access to the LIF.
The following examples offer guidance for managing service policies, but may vary depending on the NetApp environment’s specific configuration and needs.
Step 1 – Display LIFs of the SVM. Take note of the service policy name used by the LIF you want to be used for API access.
network interface show -vserver [SVM] -instance
Step 2 – Check the services included in the SVM service policy
network interface service-policy show -policy [POLICY_NAME]
Step 3 – Add the management-https service if it is missing
set -privilege advanced
network interface service-policy add-service -service management-https -policy [POLICY_NAME] -vserver [SVM]
Example:
set -privilege advanced
network interface service-policy add-service -service management-https -policy default-data-files -vserver testserver
Firewall Policy
For ONTAP 9.5 and older, the following commands can be used to either create a new firewall policy or modify an existing policy if ONTAPI is blocked.
Create New Firewall HTTP Policy
Use the following commands with the Cluster Management LIF to create a new firewall HTTP policy:
system services firewall policy clone ‑policy data ‑vserver [ADMIN_SVM_NAME] ‑destination-policy [FIREWALL_POLICY_NAME] ‑destination-vserver [SVM_NAME]
system services firewall policy create ‑vserver [SVM_NAME] ‑policy [FIREWALL_POLICY_NAME] ‑service http ‑allow-list [IP_ADDRESS]/[NETMASK], [IP_ADDRESS]/[NETMASK]
Example:
system services firewall policy clone ‑policy data ‑vserver myontap ‑destination-policy enterpriseauditorfirewall ‑destination-vserver testserver
system services firewall policy create ‑vserver testserver ‑policy enterpriseauditorfirewall ‑service http ‑allow-list 192.168.30.15/32
Create New Firewall HTTPS Policy
Use the following commands with the Cluster Management LIF to create a new firewall HTTPS policy:
system services firewall policy clone ‑policy data ‑vserver [ADMIN_SVM_NAME] ‑destination-policy [FIREWALL_POLICY_NAME] ‑destination-vserver [SVM_NAME]
system services firewall policy create ‑vserver [SVM_NAME] ‑policy [FIREWALL_POLICY_NAME] ‑service https ‑allow-list [IP_ADDRESS]/[NETMASK], [IP_ADDRESS]/[NETMASK]
Example:
system services firewall policy clone ‑policy data ‑vserver myontap ‑destination-policy enterpriseauditorfirewall ‑destination-vserver testserver
system services firewall policy create ‑vserver testserver ‑policy enterpriseauditorfirewall ‑service https ‑allow-list 192.168.30.15/32
Apply Firewall Policy to SVM Data LIF
Use the following command to modify an existing firewall policy:
network interface modify ‑vserver [SVM_NAME] ‑lif [DATA LIF NAME] ‑firewall-policy [FIREWALL_POLICY_NAME]
Example:
network interface modify ‑vserver testserver ‑lif datal ‑firewall-policy enterpriseauditorfirewall
For more information about creating a firewall policy and assigning it to a LIF, read the Configure firewall policies for LIFs article.
Validate Firewall Policy
Run the following command to validate the firewall policy:
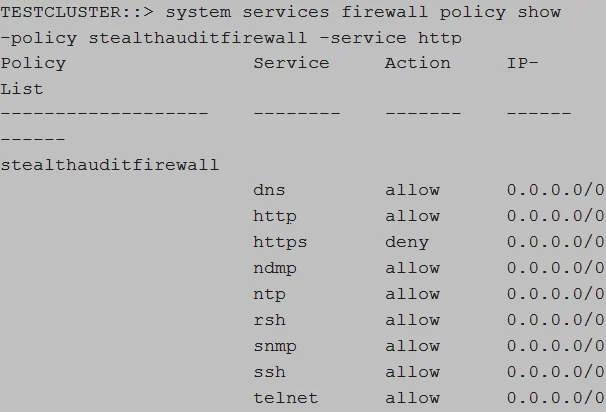
system services firewall policy show ‑policy [FIREWALL_POLICY_NAME] ‑service [HTTP_HTTPS]
Example:
system services firewall policy show ‑policy enterpriseauditorfirewall ‑service http
Verify that the output is displayed as follows:
FPolicy
The FPolicy framework enables the collection of audit events on the ONTAP side and their transfer to the agent(s) via the designated Data LIFs. Each LIF establishes its own connection with one or several agents and sends notifications as soon as the file transaction occurs. The FPolicy connection is asynchronous and buffered; both ONTAP and Activity Monitor have techniques in place to make sure that connections are alive and working. The connection can be secured using TLS with server or mutual authentication.
ONTAP cluster nodes connect to the agent on port 9999 by default. The port can be changed in the agent's settings. The agent adds this port to Windows Firewall exclusions automatically. Please ensure the port is not blocked by other firewalls between ONTAP and the agent.
Data-fpolicy-client Service
Starting with ONTAP 9.8, each data LIF of the SVM must have the data-fpolicy-client service included in its service-policy configuration. This service enables the FPolicy protocol for the LIF. Use the following commands to ensure that the service is included.
Step 1 – Display LIFs of the SVM. Take note of the service policy name used by the data LIFs.
network interface show -vserver [SVM] -instance
Step 2 – Check the services included in the SVM service policy
network interface service-policy show -policy [POLICY_NAME]
Step 3 – Add the data-fpolicy-client service if it is missing
set -privilege advanced
network interface service-policy add-service -service data-fpolicy-client -policy [POLICY_NAME] -vserver [SVM]
Example:
set -privilege advanced
network interface service-policy add-service -service data-fpolicy-client -policy default-data-files -vserver testserver
Configure FPolicy
Activity Monitor relies on the NetApp FPolicy framework for monitoring of file access events on SVMs. FPolicy needs to be configured for each SVM.
There are two ways to configure FPolicy:
- Activity Monitor agent can facilitate the Automatic Configuration of FPolicy for the monitored SVM using the ONTAP API. This mode is simple, but does not allow you to exclude certain volumes or shares of the SVM from being monitored. It also requires additional permissions to create and modify FPolicy.
- Another option is to Manually Configure FPolicy for each SVM. This mode allows you to fine tune FPolicy by excluding certain volumes or shares from being monitored. It also reduces product permissions.
Regardless of the chosen approach for FPolicy configuration, one also needs to perform extra steps if the FPolicy communication has to be secured with TLS.
TLS Authentication Options
There are two TLS FPolicy Authentication options that can be used:
-
TLS, server authentication – Server only authentication
- A certificate (Server Certificate) for the Agent server needs to be generated and copied to a PEM file. The Server Certificate PEM file needs to be saved locally on the Activity Monitor Console server.
- For manual FPolicy configuration, the Server Certificate needs to be installed on the SVM, and then server-authentication set.
- For automatic FPolicy configuration, the Activity Monitor manages installation of the Server Certificate.
-
TLS, mutual authentication – Mutual authentication
- A certificate (Server Certificate) for the Agent server needs to be generated and copied to a PEM file. The Server Certificate PEM file needs to be saved locally on the Activity Monitor Console server.
- A certificate (Client Certificate) for the SVM needs to be copied to a PEM file and saved locally on the Activity Monitor Console server.
- For manual FPolicy configuration, the Server Certificate needs to be installed on the SVM and then mutual-authentication set.
- For automatic FPolicy configuration, mutual-authentication set before the configuration process. The Activity Monitor manages installation of both certificates.
Generate Server Certificate
A certificate (Server Certificate) for the Agent server needs to be generated and copied to a PEM file. This is required for both of the TLS authentication options.
The PEM file must contain both Public Key and Private Key parts. A certificate may be self-signed or issued by a certification authority. Below are the steps for generation of a self-signed certificate using OpenSSL toolkit.
Use the following command on the agent server to create the Server Certificate and copy it to a .pem file:
openssl.exe req -x509 -newkey rsa:2048 -keyout key.pem -out cert.pem -days 365 -nodes -subj "/CN=[ACTIVITY_AGENT_SERVER_NAME]"
copy cert.pem+key.pem [CERTIFICATE_FILE_NAME.pem]
del cert.pem key.pem .rnd
Example:
openssl.exe req -x509 -newkey rsa:2048 -keyout key.pem -out cert.pem -days 365 -nodes -subj "/CN=testagentserver"
copy cert.pem+key.pem agentkey.pem
del cert.pem key.pem .rnd
openssl.exe req x509 newkey rsa:2048 keyout key.pem out cert.pem days 365 nodes subj "/CN=testagentserver"
copy cert.pem+key.pem agentkey.pem
del cert.pem key.pem .rnd
In this example agentkey.pem would be used as the Server Certificate. Save the Server Certificate
locally on the Activity Monitor Console server.
Create PEM File for Client Certificate
A certificate (Client Certificate) for the SVM needs to be copied to a PEM file. This is required for the TLS, mutual authentication option. Follow the steps to create the PEM file for the Client Certificate.
Step 1 – On the SVM , use the following command to show the security certificate details:
security certificate show -vserver [SVM_NAME] -type server instance
Example:
security certificate show -vserver testserver -type server instance
Step 2 – Copy the security certificate details into a text file and copy the public key to a PEM file. The following variables from security details will be needed to set mutual-authentication during Part 6 of manual configuration and prior to automatic configuration:
- SVM
- Common Name
- Certificate Serial
- Public Key Certificate
Step 3 – Copy the value of Public Key Certificate field to a PEM file. The value spans multiple
lines, starts with "----BEGIN CERTIFICATE-----" and ends with "-----END CERTIFICATE-----".
The Client Certificate PEM file has been created.
Manually Configure FPolicy
This section describes how to manually configure FPolicy. Manual configuration of the FPolicy is recommended if the policy needs to be scoped to monitor select volumes or shares. It is necessary to create several FPolicy components and then enable the FPolicy. See the sections corresponding to each part of this list:
-
Part 1: Install Server Certificate on the SVM (only if using TLS authentication)
- This is only needed if using either of the TLS, … authentication options.
-
Part 2: Create External Engine
- The External Engine defines how FPolicy makes and manages connections to external FPolicy servers like Activity Monitor Agent.
-
Part 3: Create FPolicy Events
- An FPolicy event defines which protocol(s) to monitor and which file access events to monitor.
-
Part 4: Create FPolicy Policy
- The FPolicy policy associates the other three FPolicy components and allows for the designation of a privileged FPolicy user
- If running the Access Auditing (FSAA), Activity Auditing (FSAC), and/or Sensitive Data Discovery Auditing scans, then this is the user account credential to be added to the Enterprise Auditor Connection Profile.
-
Part 5: Create FPolicy Scope
- The FPolicy scope creates the filters necessary to perform scans on specific shares or volumes.
-
Part 6: Set TLS Authentication (optional)
- This is only needed if using either of the TLS authentication options.
-
Part 7: Enable the FPolicy
- Once the FPolicy is enabled, the Activity Monitor Agent can be configured to monitor the SVM.
-
Part 8: Connect FPolicy Server / Agent to Cluster Node (optional)
- This is only needed if there is an issue with connection to the Cluster node or for troubleshooting a disconnection issue.
Part 1: Install Server Certificate on the SVM
If using the TLS authentication options, it is necessary to install the Server Certificate on the SVM.
Use the following command to install the Server Certificate:
security certificate install type client-ca -vserver [SVM_NAME]
Example:
security certificate install type client-ca -vserver testserver
The command will ask you to provide a public certificate. Copy the public key from the Server
Certificate PEM file, i.e. the block starting with "-----BEGIN CERTIFICATE-----" and ending with
"-----END CERTIFICATE-----". Paste the block to the terminal window.
Validate Part 1: Server Certificate Install
Run the following command to validate the Server Certificate is installed:
security certificate show -vserver [SVM_NAME] -commonname [ACTIVITY_AGENT_SERVER_NAME] -type client-ca instance
Example:
security certificate show -vserver testserver -commonname testagentserver -type client-ca instance
Part 2: Create External Engine
The External Engine defines how FPolicy makes and manages connections to external FPolicy servers.
IMPORTANT:
-
The
-primary-serversmust be the server hosting the Activity Monitor Agent. -
If intending to use the Activity Monitor with Enterprise Auditor, then the primary server must also be the proxy server from which the Enterprise Auditor Access Auditing (FSAC) scans are running, e.g. the Enterprise Auditor Console server for local mode or the proxy server if running in any of the proxy mode options.
-
The following values are required:
engine-name StealthAUDITEngine, the names of the external engine object can be customized (see below).port 9999, Port number can be customized, but it is recommended to use 9999.extern-engine-type asynchronousssl-option no-authsend-buffer-size 6291456, for ONTAP 9.10+ usesend-buffer-size 8388608
CAUTION: All parameters are case sensitive.
Use the following command to create the external engine:
set -privilege advanced
vserver fpolicy policy external-engine create -vserver [SVM_NAME] -engine-name StealthAUDITEngine -primary-servers [IP_ADDRESS,…] -port 9999 -extern-engine-type asynchronous -ssl-option no-auth -send-buffer-size 6291456
Example:
set -privilege advanced
vserver fpolicy policy external-engine create -vserver testserver -engine-name StealthAUDITEngine -primary-servers 192.168.30.15 -port 9999 -extern-engine-type asynchronous -ssl-option no-auth -send-buffer-size 6291456
Validate Part 2: External Engine Creation
Run the following command to validate the creation of the external engine:
fpolicy policy external-engine show -instance
Verify that the output is displayed as follows:
Relevant NetApp Documentation: To learn more about creating an external engine, please visit the NetApp website and read the vserver fpolicy policy external-engine create article.
Part 3: Create FPolicy Event
An event defines which protocol to monitor and which file access events to monitor.
IMPORTANT:
-
The SVM used must be the SVM hosting the CIFS or NFS shares to be monitored.
-
Enterprise Auditor and the Activity Monitor are capable of monitoring both NFS and CIFS. However, it is necessary to create separate events for each protocol.
-
The following values are required:
-
event-name- For CIFS shares –
StealthAUDITScreeningCifsfor successful events;StealthAUDITScreeningFailedCifsfor failed events. - For NFS shares –
StealthAUDITScreeningNfsV3, StealthAUDITScreeningNfsV4for successful events;StealthAUDITScreeningFailedNfsV3, StealthAUDITScreeningFailedNfsV4for failed events.
The names of the event objects can be customized (see Customization of FPolicy Object Names).
- For CIFS shares –
-
volume-operation true -
protocol– one of the followingcifs,nfsv3,nfsv4 -
monitor-fileop-failure–trueorfalse, indicates whether failed file operations are reported.
-
-
Limiting the file operations to be monitored is an excellent way to limit the performance impact the FPolicy will have on the NetApp device. The file operations from which to choose are below with additional filter options:
-
create– File create operations -
create_dir– Directory create operations -
close– File close operations- Enable this operation for NFSv4 to capture all read operations
-
delete– File delete operations -
delete_dir– Directory delete operations -
link– Link operations -
open– File open operations for CIFS protocol-
open-with-delete-intent– Limits notification to only when an attempt is made to open a file with the intent to delete it, according to theFILE_DELETE_ON_CLOSEflag specificationNOTE: File open operations are only supported with the
open-with-delete-intentfilter applied.
-
-
read– File read operationsfirst-read– Limits notification to only first read operations for CIFS protocol. For ONTAP 9.2+, this filter can be used for both CIFS and NFS protocols.
-
rename– File rename operations -
rename_dir– Directory rename operations -
setattr– Set attribute operations and permission changes. The following filters are available for ONTAP 9.0+ to limit events to permission changes only:-
CIFS:
setattr-with-owner-changesetattr-with-group-changesetattr-with-sacl-changesetattr-with-dacl-change
-
NFSv3:
setattr-with-owner-changesetattr-with-group-changesetattr-with-mode-change
-
NFSv4:
setattr-with-owner-changesetattr-with-group-changesetattr-with-mode-changesetattr-with-sacl-changesetattr-with-dacl-change
-
-
symlink– Symbolic link operations -
write– File write operationsfirst-write– Limits notification to only first write operations for CIFS protocol. For ONTAP 9.2+, this filter can be used for both CIFS and NFS protocols.
-
-
For failed/denied events, the list of supported file operations is limited to the following values:
- CIFS:
open - NFSv3:
create, create_dir, read, write, delete, delete_dir, rename, rename_dir, setattr, link - NFSv4:
open, create, create_dir, read, write, delete, delete_dir, rename, rename_dir, setattr, link
- CIFS:
CAUTION: All parameters are case sensitive.
Use the following command to create the FPolicy event for CIFS protocols:
vserver fpolicy policy event create -vserver [SVM_NAME] -event-name StealthAUDITScreeningCifs -volume-operation true -protocol cifs -file-operations [COMMA_SEPARATED_FILE_OPERATIONS] -filters [COMMA_SEPARATED_FILTERS]
Example:
vserver fpolicy policy event create -vserver testserver -event-name StealthAUDITScreeningCifs -volume-operation true -protocol cifs -file-operations create,create_dir,delete,delete_dir,open,read,write,rename,rename_dir,setattr -filters first-read,first-write,open-with-delete-intent,setattr-with-owner-change,setattr-with-group-change,setattr-with-sacl-change,setattr-with-dacl-change
Use the following command to create the FPolicy event for NFSv3 protocols:
vserver fpolicy policy event create -vserver [SVM_NAME] -event-name StealthAUDITScreeningNfsV3 -volume-operation true -protocol nfsv3 -file-operations [COMMA_SEPARATED_FILE_OPERATIONS] -filters [COMMA_SEPARATED_FILTERS]
Example:
vserver fpolicy policy event create -vserver testserver -event-name StealthAUDITScreeningNfsV3 -volume-operation true -protocol nfsv3 -file-operations create,create_dir,delete,delete_dir,read,write,rename,rename_dir,setattr,link,symlink -filters first-read,first-write,setattr-with-owner-change,setattr-with-group-change,setattr-with-mode-change
Use the following command to create the FPolicy event for NFSv4 protocols:
vserver fpolicy policy event create -vserver [SVM_NAME] -event-name StealthAUDITScreeningNfsV4 -volume-operation true -protocol nfsv4 -file-operations [COMMA_SEPARATED_FILE_OPERATIONS] -filters [COMMA_SEPARATED_FILTERS]
Example:
vserver fpolicy policy event create -vserver testserver -event-name StealthAUDITScreeningNfsV4 -volume-operation true -protocol nfsv4 -file-operations create,create_dir,delete,delete_dir,read,write,rename,rename_dir,setattr,link,symlink,close -filters group-change,setattr-with-mode-change,setattr-with-sacl-change,setattr-with-dacl-change
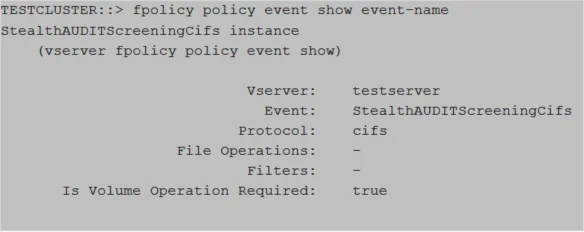
Validate Part 3: FPolicy Event Creation
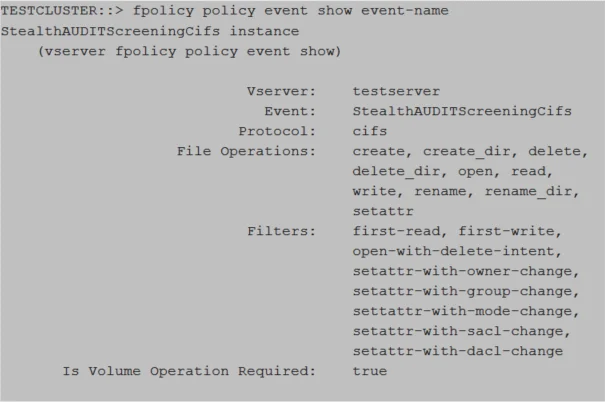
Run the following command to validate the creation of the FPolicy event:
fpolicy policy event show -event-name [StealthAUDITScreeningCifs or StealthAUDITScreeningNfsV3 or StealthAUDITScreeningNfsV4 or ...] -instance
Example:
fpolicy policy event show -event-name StealthAUDITScreeningCifs -instance
Verify that the output is displayed as follows:
Relevant NetApp Documentation: To learn more about creating an event, please visit the NetApp website and read the vserver fpolicy policy event create article.
Part 4: Create FPolicy Policy
The FPolicy policy associates the other three FPolicy components and allows for the designation of a privileged FPolicy user, or the provisioned FPolicy account. If running the Access Auditing (FSAA), Activity Auditing (FSAC), and/or Sensitive Data Discovery Auditing scans in Enterprise Auditor, then this is also the user account credential to be added to the Enterprise Auditor Connection Profile.
IMPORTANT:
-
To monitor both CIFS and NFS protocols, two FPolicy Event were created. Multiple events can be included in the FPolicy policy.
-
The SVM used must be the SVM hosting the CIFS or NFS shares to be monitored.
-
The External Engine and FPolicy Event used in this command must be the External Engine created in Part 2 and the FPolicy Event created in Part 3 from the previous steps.
-
The following values are required:
policy-name StealthAUDIT, the name of the policy object can be customized (see Customization of FPolicy Object Names).
-
The following values are required for Enterprise Auditor integration:
privileged-user-name, which must be a provisioned FPolicy accountallow-privileged-access yes
CAUTION: All parameters are case sensitive.
Use the following command to create the FPolicy policy to monitor both CIFS and NFS protocols:
vserver fpolicy policy create -vserver [SVM_NAME] -policy-name StealthAUDIT -events StealthAUDITScreeningCifs,StealthAUDITScreeningNfsV3,StealthAUDITScreeningNfsV4 -engine StealthAUDITEngine -is-mandatory false -allow-privileged-access yes -privileged-user-name [DOMAIN\DOMAINUSER]
Example:
vserver fpolicy policy create -vserver testserver -policy-name StealthAUDIT -events StealthAUDITScreeningCifs,StealthAUDITScreeningNfsV3,StealthAUDITScreeningNfsV4 -engine StealthAUDITEngine -is-mandatory false -allow-privileged-access yes -privileged-user-name example\user1
Use the following command to create the FPolicy policy to monitor only CIFS protocols:
vserver fpolicy policy create -vserver [SVM_NAME] -policy-name StealthAUDIT -events StealthAUDITScreeningCifs -engine StealthAUDITEngine -is-mandatory false -allow-privileged-access yes -privileged-user-name [DOMAIN\DOMAINUSER]
Example:
vserver fpolicy policy create -vserver testserver -policy-name StealthAUDIT -events StealthAUDITScreeningCifs -engine StealthAUDITEngine -is-mandatory false -allow-privileged-access yes -privileged-user-name example\user1
Use the following command to create the FPolicy policy to monitor only NFS protocols:
vserver fpolicy policy create -vserver [SVM_NAME] -policy-name StealthAUDIT -events StealthAUDITScreeningNfsV3,StealthAUDITScreeningNfsV4 -engine StealthAUDITEngine -is-mandatory false -allow-privileged-access yes -privileged-user-name [DOMAIN\DOMAINUSER]
Example:
vserver fpolicy policy create -vserver testserver -policy-name StealthAUDIT -events StealthAUDITScreeningNfsV3,StealthAUDITScreeningNfsV4 -engine StealthAUDITEngine -is-mandatory false -allow-privileged-access yes -privileged-user-name example\user1
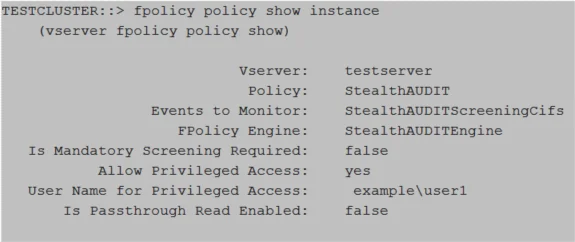
Validate Part 4: FPolicy Policy Creation
Run the following command to validate the creation of the FPolicy policy:
fpolicy policy show -instance
Relevant NetApp Documentation: To learn more about creating a policy, please visit the NetApp website and read the vserver fpolicy policy create article.
Part 5: Create FPolicy Scope
The FPolicy scope creates the filters necessary to perform scans on specific shares or volumes. It is possible to set the scope to monitor all volumes or all shares by replacing the volume/share name variable [SVM_NAME] in the command with an asterisk (*).
IMPORTANT:
- The SVM used must be the SVM hosting the CIFS or NFS shares to be monitored.
- It is not necessary to specify both volumes and shares. One or the other is sufficient.
- If you want to monitor everything, set the "
volumes-to-include" value to "*".
Use the following command to create the FPolicy scope by specifying volume(s):
vserver fpolicy policy scope create -vserver [SVM_NAME] -policy-name StealthAUDIT -volumes-to-include [VOLUME_NAME],[VOLUME_NAME]
Example:
vserver fpolicy policy scope create -vserver testserver -policy-name StealthAUDIT -volumes-to-include samplevolume1,samplevolume2
Use the following command to create the FPolicy scope by specifying share(s):
vserver fpolicy policy scope create -vserver [SVM_NAME] -policy-name StealthAUDIT -shares-to-include [SHARE_NAME],[SHARE_NAME]
Example:
vserver fpolicy policy scope create -vserver testserver -policy-name StealthAUDIT -shares-to-include sampleshare1,sampleshare2
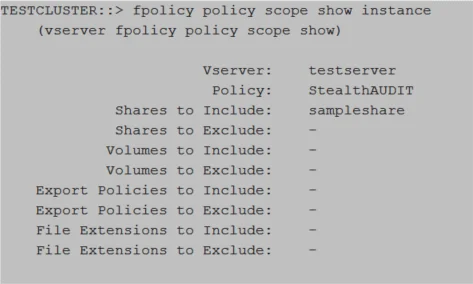
Validate Part 5: FPolicy Scope Creation
Run the following command to validate the FPolicy scope creation:
fpolicy policy scope show -instance
Relevant NetApp Documentation: To learn more about creating scope, please visit the NetApp website and read the vserver fpolicy policy scope create article.
Part 6: Set TLS Authentication
If using the TLS authentication options, it is necessary to set authentication for the type of authentication.
Set Server-Authentication
Use the following command to set server-authentication:
vserver fpolicy policy externalengine modify -vserver [SVM_NAME] -engine-name StealthAUDITEngine -ssl-option server-auth
Example:
vserver fpolicy policy externalengine modify -vserver testserver -engine-name StealthAUDITEngine -ssl-option server-auth
Set Mutual-Authentication
Use the following command to set mutual-authentication:
vserver fpolicy policy external-engine modify ‑vserver [SVM_NAME] -engine-name StealthAUDITEngine -ssl-option mutual-auth -certificate-common-name [COMMON_NAME] -certificate-serial [CERTIFICATE_SERIAL] -certificate-ca [CERTIFICATE_AUTHORITY]
Example:
vserver fpolicy policy external-engine modify -vserver testserver -engine-name StealthAUDITEngine -ssl-option mutual-auth -certificate-common-name testserver -certificate-serial 461AC46521B31321330EBBE4321AC51D -certificate-ca "VeriSign Universal Root Certification Authority"
Validate Mutual-Authentication Is Set
Run the following command to confirm mutual-authentication is set:
vserver fpolicy policy external-engine show -fields ssl-option
Part 7: Enable the FPolicy
The FPolicy must be enabled before the Activity Monitor Agent can be configured to monitor the SVM.
IMPORTANT:
- The SVM used must be the SVM hosting the CIFS or NFS shares to be monitored.
Use the following command to enable the FPolicy:
vserver fpolicy enable -vserver [SVM_NAME] -policy-name StealthAUDIT -sequence-number [INTEGER]
Example:
vserver fpolicy enable -vserver testserver -policy-name StealthAUDIT -sequence-number 10
Validate Part 7: FPolicy Enabled
Run the following command to validate the FPolicy scope creation:
vserver fpolicy show
Relevant NetApp Documentation: To learn more about enabling a policy, please visit the NetApp website and read the vserver fpolicy enable article.
Part 8: Connect FPolicy Server / Agent to Cluster Node
Manually connecting the FPolicy server (or Agent server) to the Cluster Node is only needed if there is an issue with connection to the Cluster Node or for troubleshooting a disconnection issue.
Use the following command to connect the StealthAUDITEngine that belongs to the StealthAUDIT
policy to all Cluster Nodes:
policy engine-connect -vserver [SVM_NAME] -policy-name StealthAUDIT -node *
Example:
policy engine-connect -vserver testserver -policy-name StealthAUDIT -node *
Validate Part 8: Connection to Cluster Node
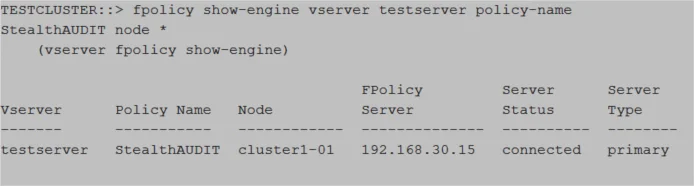
Run the following command to validate connection to the Cluster Node:
fpolicy show-engine -vserver [SVM_NAME] -policy-name StealthAUDIT -node *
Automatic Configuration of FPolicy
The Activity Monitor can automatically configure FPolicy on the targeted SVM. The FPolicy created will monitor file system activity from all volumes and shares of the SVM. This feature can be enabled using the Configure FPolicy. Create or modify FPolicy objects if needed checkbox in the monitored host's properties in the Activity Monitor.
If using the TLS, mutual authentication option, you will need to create the PEM file for the Client Certification, which is needed during the monitored host configuration in the Activity Monitor. It will also be necessary to set mutual authentication on the SVM.
Set TLS Mutual-Authentication
If using the TLS, mutual authentication options, it is necessary to set authentication.
Use the following command to set mutual-authentication:
vserver fpolicy policy external-engine modify -vserver [SVM_NAME] -engine-name StealthAUDITEngine -ssl-option mutual-auth -certificate-common-name [COMMON_NAME] -certificate-serial [CERTIFICATE_SERIAL] -certificate-ca [CERTIFICATE_AUTHORITY]
Example:
vserver fpolicy policy external-engine modify -vserver testserver -engine-name StealthAUDITEngine -ssl-option mutual-auth -certificate-common-name testserver -certificate-serial 461AC46521B31321330EBBE4321AC51D -certificate-ca "VeriSign Universal Root Certification Authority"
Validate: Mutual-Authentication
Run the following command to confirm mutual-authentication is set:
vserver fpolicy policy external-engine show -fields ssl-option
Customization of FPolicy Object Names
Activity Monitor uses the following FPolicy object names by default:
- Policy name:
StealthAUDIT - External Engine name:
StealthAUDITEngine - CIFS Event name:
StealthAUDITScreeningCifs - NFS v3 Event name:
StealthAUDITScreeningNfsV3 - NFS v4 Event name:
StealthAUDITScreeningNfsV4 - Failed CIFS Event name:
StealthAUDITScreeningFailedCifs - Failed NFS v3 Event name:
StealthAUDITScreeningFailedNfsV3 - Failed NFS v4 Event name:
StealthAUDITScreeningFailedNfsV4
These names can be customized in the monitored host's settings in the Activity Monitor. It can be useful in two scenarios:
- You want the names to match the company policies;
- You want to configure FPolicy manually using your custom names, but also want to leverage the "Enable and Connect FPolicy" feature of the Activity Monitor, so that the product ensures that FPolicy stays enabled and connected at all times.
NetApp Data ONTAP Cluster-Mode Target Requirements
Netwrix Enterprise Auditor can execute Access Auditing (FSAA) and/or Sensitive Data Discovery Auditing scans on NetApp Data ONTAP Cluster-Mode devices. The Netwrix Activity Monitor can be configured to monitor activity on NetApp Data ONTAP Cluster-Mode devices and make the event data available for Enterprise Auditor Activity Auditing (FSAC) scans.
Access & Sensitive Data Auditing Permissions
The credentials used by the Enterprise Auditor scans must have the following permissions on the target host:
-
For CIFS access:
-
Method 1 – Use FPolicy & ONTAP API
- Enumerate shares by executing specific NetApp API calls
- Bypass NTFS security to read the entire folder structure to be scanned and collect file/folder permissions
-
Method 2 – Use the c$ Share
- Enumerate shares with standard Windows file sharing APIs.
- Bypass NTFS security to read the entire folder structure to be scanned and collect file/folder permissions
-
-
For NFSv3 access:
- IP Address of scanning server in the export policy for each volume
These permissions grant the credential the ability to enumerate shares, access the remote registry, and bypass NTFS security on folders. The credential used within the assigned Connection Profile for these target hosts requires these permissions. See the NetApp Data ONTAP Cluster-Mode Access & Sensitive Data Auditing Configuration topic for instructions.
NOTE: These permissions are in addition to those needed to either deploy applet scans for running scans in proxy mode with applet or installing the File System Proxy Service Permissions for running scans in proxy mode as a service. See the File System Scan Options topic for additional information.
Access & Sensitive Data Auditing Port Requirements
The firewall ports required by Enterprise Auditor for Access Auditing (FSAA) and/or Sensitive Data Discovery Auditing scans are based on the File System scan mode to be used. See the File System Scan Options topic for additional information.
Activity Auditing Permissions
Windows Proxy Server for Activity Agent Monitoring of NetApp Data ONTAP Cluser-Mode Device
The Netwrix Activity Monitor must have an Activity Agent deployed on a Windows proxy server. While actively monitoring, the Activity Agent generates activity log files stored on the proxy server. The credential used to deploy the Activity Agent must have the following permissions on the proxy server:
- Membership in the local Administrators group
- READ and WRITE access to the archive location for Archiving feature only
It is also necessary to enable the Remote Registry Service on the Activity Agent server.
For integration between the Activity Monitor and Enterprise Auditor, the credential used by Enterprise Auditor to read the activity log files must have also have this permission.
NetApp Data ONTAP Cluster-Mode Device Requirements
An FPolicy must be configured on the target device for Activity Auditing (FSAC) scans. A tailored FPolicy is recommended as it decreases the impact on the NetApp device. The credential associated with the FPolicy used to monitor activity must be provisioned with access to (at minimum) the following CLI commands, according to the level of collection desired:
-
Collect Activity Events (Least Privilege)
version– Readonly accessvolume– Readonly accessvserver– Readonly access
-
Employ the “Enable and connect FPolicy” Option (Less Privilege)
version– Readonly accessvolume– Readonly accessvserver– Readonly accessvserver fpolicy disable– All accessvserver fpolicy enable– All accessvserver fpolicy engine-connect– All accessnetwork interface– Readonly access
-
Employ the “Configure FPolicy Option (Automatic Configuration of FPolicy)
version– Readonly accessvolume– Readonly accessvserver– Readonly accessvserver fpolicy– All accessnetwork interface– Readonly access
-
If FPolicy uses a TLS connection, the following CLI command is also needed:
security certificate install– All access
-
StealthAUDIT Integration requires the addition of the following CLI command:
security login role show-ontapi– Readonly access
See the NetApp Data ONTAP Cluster-Mode Activity Auditing Configuration topic for instructions.
Activity Monitor Archive Location
If the activity log files are being archived, configurable within the Netwrix Activity Monitor Console, then the credential used by Enterprise Auditor to read the activity log files must also have READ and WRITE permissions on the archive location.
Activity Auditing Port Requirements
Firewall settings depend on the type of environment being targeted. The following firewall settings are required for communication between the Agent server and the Netwrix Activity Monitor Console:
| Communication Direction | Protocol | Ports | Description |
|---|---|---|---|
| Activity Monitor to Agent Server | TCP | 4498 | Agent Communication |
The Windows firewall rules need to be configured on the Windows server, which require certain inbound rules be created if the scans are running in applet mode. These scans operate over a default port range, which cannot be specified via an inbound rule. For more information, see the Microsoft Connecting to WMI on a Remote Computer article.
Additional Firewall Rules for NetApp Data ONTAP Cluster-Mode Device
The following firewall settings are required for communication between the Activity Monitor Activity Agent server and the target NetApp Data ONTAP Cluster-Mode device:
| Communication Direction | Protocol | Ports | Description |
|---|---|---|---|
| Activity Agent Server to NetApp* | HTTP (optional) | 80 | ONTAPI |
| Activity Agent Server to NetApp* | HTTPS (optional) | 443 | ONTAPI |
| NetApp to Activity Agent Server | TCP | 9999 | FPolicy events |
*Only required if using the FPolicy Configuration and FPolicy Enable and Connect options in Activity Monitor.
NOTE: If either HTTP or HTTPS are not enabled, the FPolicy on the NetApp Data ONTAP 7-Mode device must be configured manually. Also, the External Engine will not reconnect automatically in the case of a server reboot or service restart.
Additional Firewall Rules for Integration between Enterprise Auditor and Activity Monitor
Firewall settings are dependent upon the type of environment being targeted. The following firewall settings are required for communication between the agent server and the Enterprise Auditor Console:
| Communication Direction | Protocol | Ports | Description |
|---|---|---|---|
| Enterprise Auditor to Agent Server | TCP | 445 | SMB, used for Agent Deployment |
| Enterprise Auditor to Agent Server | TCP | Predefined | WMI, used for Agent Deployment |
Provision ONTAP Account
This topic describes the steps needed to create a user account with the privileges required to connect the Activity Monitor Agent to ONTAP API and to execute the API calls required for activity monitoring and configuration.
Provisioning this account is a two part process:
- Part 1: Create Security Role
- Part 2: Create Security Login
Part 1: Create Security Role
This section provides instructions for creating an access-control role. An access-control role consists of a role name and a set of commands or API endpoints to which the role has access. It also includes an access level (none, read-only, or all) and a query that applies to the specified command or API endpoint.
The permissions needed depends on the functionality level:
- Least Privileged: ONLY Collect Events – This is the minimal functionality level. A user manually configures FPolicy and ensures that it stays enabled and connected. The product only collects events. This functionality level is not recommended as it requires an additional solution that tracks the state of FPolicy and fixes the problem should ONTAP disconnect or should the policy become disabled.
- RECOMMENDED: Less Privileged: Enable/Connect Policy & Collect Events – With this level, the user still performs the initial FPolicy configuration manually. The product tracks the state of FPolicy with periodic checks to ensure it stays enabled and connected all the time.
- RECOMMENDED: Automatically Configure the FPolicy – With this full-blown level, no manual configuration is needed. The product performs the initial FPolicy configuration; updates FPolicy to reflect configuration changes; ensures that FPolicy stays enabled and connected all the time.
No matter which set of permissions you provision, validate the configuration before continuing to Part 2. See the Validate Part 1: Security Role Configuration topic for additional information.
If the FPolicy is to be used for both the Activity Monitor and Enterprise Auditor, the account also needs to be provisioned with an additional permission. See the Enterprise Auditor Integration topic for additional information.
The commands to create a role and names of permissions depend on the ONTAP API used. The product
supports both the classic ONTAPI/ZAPI and the new REST API. For ONTAPI/ZAPI you need to use
security login role create command to create a RBAC access control role. The required commands are
listed in the cmddirname parameter. For REST API, use security login rest-role create command to
create a REST access control role. The required API endpoint is specified in the api parameter.
The following sections provide instructions for both API modes.
Least Privileged: ONLY Collect Events
If the desire is for a least privileged model, the Activity Monitor requires the following permissions to collect events.
ONTAPI/ZAPI
version– Readonly accessvolume– Readonly accessvserver– Readonly access
Use the following commands to provision read-only access to all required commands:
security login role create -role [ROLE_NAME] -cmddirname "version" -access readonly -query "" -vserver [SVM_NAME]
security login role create -role [ROLE_NAME] -cmddirname "volume" -access readonly -query "" -vserver [SVM_NAME]
security login role create -role [ROLE_NAME] -cmddirname "vserver" -access readonly -query "" -vserver [SVM_NAME]
Example:
security login role create -role enterpriseauditor -cmddirname "version" -access readonly -query "" -vserver testserver
security login role create -role enterpriseauditor -cmddirname "volume" -access readonly -query "" -vserver testserver
security login role create -role enterpriseauditor -cmddirname "vserver" -access readonly -query "" -vserver testserver
REST API
/api/cluster– Readonly access/api/protocols/cifs/services– Readonly access/api/storage/volumes– Readonly access/api/svm/svms– Readonly access
Use the following commands to provision read-only access to all required API endpoints:
security login rest-role create -role [ROLE_NAME] -api "/api/cluster" -access readonly -vserver [SVM_NAME]
security login rest-role create -role [ROLE_NAME] -api "/api/protocols/cifs/services" -access readonly -vserver [SVM_NAME]
security login rest-role create -role [ROLE_NAME] -api "/api/storage/volumes" -access readonly -vserver [SVM_NAME]
security login rest-role create -role [ROLE_NAME] -api "/api/svm/svms" -access readonly -vserver [SVM_NAME]
Example:
security login rest-role create -role enterpriseauditorrest -api "/api/cluster" -access readonly -vserver testserver
security login rest-role create -role enterpriseauditorrest -api "/api/protocols/cifs/services" -access readonly -vserver testserver
security login rest-role create -role enterpriseauditorrest -api "/api/storage/volumes" -access readonly -vserver testserver
security login rest-role create -role enterpriseauditorrest -api "/api/svm/svms" -access readonly -vserver testserver
NOTE: If the FPolicy account is configured with these permissions, it is necessary to manually configure the FPolicy. See the Configure FPolicy topic for additional information.
Less Privileged: Enable/Connect FPolicy & Collect Events
If the desire is for a less privileged model, the Activity Monitor requires the following permissions to collect events:
ONTAPI/ZAPI
-
version– Readonly access -
volume– Readonly access -
vserver– Readonly accessnetwork interface– Readonly access -
vserver fpolicy disable– All access -
vserver fpolicy enable– All accessRemember, this permission permits the Activity Monitor to enable the FPolicy. If the “Enable and connect FPolicy” option is employed but the permission is not provided, the agent will encounter “Failed to enable policy” errors, but it will still be able to connect to the FPolicy. Since this permission model requires a manual configuration of the FPolicy, then the need to manually enable the FPolicy will be met.
-
vserver fpolicy engine-connect– All access
Use the following command to provision access to all required commands:
security login role create -role [ROLE_NAME] -cmddirname "version" -access readonly -query "" -vserver [SVM_NAME]
security login role create -role [ROLE_NAME] -cmddirname "volume" -access readonly -query "" -vserver [SVM_NAME]
security login role create -role [ROLE_NAME] -cmddirname "vserver" -access readonly -query "" -vserver [SVM_NAME]
security login role create -role [ROLE_NAME] -cmddirname "network interface" -access readonly -query "" -vserver [SVM_NAME]
security login role create -role [ROLE_NAME] -cmddirname "vserver fpolicy disable" -access all -query "" -vserver [SVM_NAME]
security login role create -role [ROLE_NAME] -cmddirname "vserver fpolicy enable" -access all -query "" -vserver [SVM_NAME]
security login role create -role [ROLE_NAME] -cmddirname "vserver fpolicy engine-connect" -access all -query "" -vserver [SVM_NAME]
Example:
security login role create -role enterpriseauditorrest -cmddirname "version" -access readonly -query "" -vserver testserver
security login role create -role enterpriseauditorrest -cmddirname "volume" -access readonly -query "" -vserver testserver
security login role create -role enterpriseauditorrest -cmddirname "vserver" -access readonly -query "" -vserver testserver
security login role create -role enterpriseauditorrest -cmddirname "network interface" -access readonly -query "" -vserver testserver
security login role create -role enterpriseauditorrest -cmddirname "vserver fpolicy disable" -access all -query "" -vserver testserver
security login role create -role enterpriseauditorrest -cmddirname "vserver fpolicy enable" -access all -query "" -vserver testserver
security login role create -role enterpriseauditorrest -cmddirname "vserver fpolicy engine-connect" -access all -query "" -vserver testserver
REST API
/api/cluster– Readonly access/api/protocols/cifs/services– Readonly access/api/storage/volumes– Readonly access/api/svm/svms– Readonly access/api/network/ip/interfaces– Readonly access/api/protocols/fpolicy– All access
Use the following commands to provision read-only access to all required API endpoints:
security login rest-role create -role [ROLE_NAME] -api "/api/cluster" -access readonly -vserver [SVM_NAME]
security login rest-role create -role [ROLE_NAME] -api "/api/protocols/cifs/services" -access readonly -vserver [SVM_NAME]
security login rest-role create -role [ROLE_NAME] -api "/api/storage/volumes" -access readonly -vserver [SVM_NAME]
security login rest-role create -role [ROLE_NAME] -api "/api/svm/svms" -access readonly -vserver [SVM_NAME]
security login rest-role create -role [ROLE_NAME] -api "/api/network/ip/interfaces" -access readonly -vserver [SVM_NAME]
security login rest-role create -role [ROLE_NAME] -api "/api/protocols/fpolicy" -access all -vserver [SVM_NAME]
Example:
security login rest-role create -role enterpriseauditorrest -api "/api/cluster" -access readonly -vserver testserver
security login rest-role create -role enterpriseauditorrest -api "/api/protocols/cifs/services" -access readonly -vserver testserver
security login rest-role create -role enterpriseauditorrest -api "/api/storage/volumes" -access readonly -vserver testserver
security login rest-role create -role enterpriseauditorrest -api "/api/svm/svms" -access readonly -vserver testserver
security login rest-role create -role enterpriseauditorrest -api "/api/network/ip/interfaces" -access readonly -vserver testserver
security login rest-role create -role enterpriseauditorrest -api "/api/protocols/fpolicy" -access all -vserver testserver
NOTE: If the FPolicy account is configured with these permissions, it is necessary to manually configure the FPolicy. See the Configure FPolicy topic for additional information.
Automatically Configure the FPolicy
If the desire is for the Activity Monitor to automatically configure the FPolicy, the security role requires the following permissions:
ONTAPI/ZAPI
-
version– Readonly access -
volume– Readonly access -
vserver– Readonly accessnetwork interface– Readonly access -
vserver fpolicy– All access -
security certificate install– All accessRemember, this permission is only needed for FPolicy TLS connections.
Use the following command to provision access to all required commands:
security login role create -role [ROLE_NAME] -cmddirname "version" -access readonly -query "" -vserver [SVM_NAME]
security login role create -role [ROLE_NAME] -cmddirname "volume" -access readonly -query "" -vserver [SVM_NAME]
security login role create -role [ROLE_NAME] -cmddirname "vserver" -access readonly -query "" -vserver [SVM_NAME]
security login role create -role [ROLE_NAME] -cmddirname "network interface" -access readonly -query "" -vserver [SVM_NAME]
security login role create -role [ROLE_NAME] -cmddirname "vserver fpolicy" -access all -query "" -vserver [SVM_NAME]
security login role create -role [ROLE_NAME] -cmddirname "security certificate install" -access all -query "" -vserver [SVM_NAME]
Example:
security login role create -role enterpriseauditorrest -cmddirname "version" -access readonly -query "" -vserver testserver
security login role create -role enterpriseauditorrest -cmddirname "volume" -access readonly -query "" -vserver testserver
security login role create -role enterpriseauditorrest -cmddirname "vserver" -access readonly -query "" -vserver testserver
security login role create -role enterpriseauditorrest -cmddirname "network interface" -access readonly -query "" -vserver testserver
security login role create -role enterpriseauditorrest -cmddirname "vserver fpolicy" -access all -query "" -vserver testserver
security login role create -role enterpriseauditorrest -cmddirname "security certificate install" -access all -query "" -vserver testserver
REST API
-
/api/cluster– Readonly access -
/api/protocols/cifs/services– Readonly access -
/api/storage/volumes– Readonly access -
/api/svm/svms– Readonly access -
/api/network/ip/interfaces– Readonly access -
/api/protocols/fpolicy– All access -
/api/security/certificates– All accessRemember, this permission is only needed for FPolicy TLS connections.
Use the following commands to provision access to all required API endpoints:
security login rest-role create -role [ROLE_NAME] -api "/api/cluster" -access readonly -vserver [SVM_NAME]
security login rest-role create -role [ROLE_NAME] -api "/api/protocols/cifs/services" -access readonly -vserver [SVM_NAME]
security login rest-role create -role [ROLE_NAME] -api "/api/storage/volumes" -access readonly -vserver [SVM_NAME]
security login rest-role create -role [ROLE_NAME] -api "/api/svm/svms" -access readonly -vserver [SVM_NAME]
security login rest-role create -role [ROLE_NAME] -api "/api/network/ip/interfaces" -access readonly -vserver [SVM_NAME]
security login rest-role create -role [ROLE_NAME] -api "/api/protocols/fpolicy" -access all -vserver [SVM_NAME]
security login rest-role create -role [ROLE_NAME] -api "/api/security/certificates" -access all -vserver [SVM_NAME]
Example:
security login rest-role create -role enterpriseauditorrest -api "/api/cluster" -access readonly -vserver testserver
security login rest-role create -role enterpriseauditorrest -api "/api/protocols/cifs/services" -access readonly -vserver testserver
security login rest-role create -role enterpriseauditorrest -api "/api/storage/volumes" -access readonly -vserver testserver
security login rest-role create -role enterpriseauditorrest -api "/api/svm/svms" -access readonly -vserver testserver
security login rest-role create -role enterpriseauditorrest -api "/api/network/ip/interfaces" -access readonly -vserver testserver
security login rest-role create -role enterpriseauditorrest -api "/api/protocols/fpolicy" -access all -vserver testserver
security login rest-role create -role enterpriseauditorrest -api "/api/security/certificates" -access all -vserver testserver
NOTE: If the FPolicy account is configured with these permissions, the Activity Monitor can automatically configure the FPolicy. See the Configure FPolicy topic for additional information.
Enterprise Auditor Integration
If the desire is for FPolicy to be used with both the Activity Monitor and Enterprise Auditor, then the following permission is also required:
security login role show-ontapi– Readonly access
Use the following command to provision read-only access to security login role show-ontapi commands:
security login role create -role [ROLE_NAME] -cmddirname "security login role show-ontapi" -access readonly -query "" -vserver [SVM_NAME]
Example:
security login role create -role enterpriseauditor -cmddirname "security login role show-ontapi" -access readonly -query "" -vserver testserver
Validate Part 1: Security Role Configuration
For ONTAPI, run the following command to validate the RBAC security role configuration:
security login role show [ROLE_NAME]
Example:
security login role show enterpriseauditor
Relevant NetApp Documentation: For more information about creating RBAC access control roles, read the security login role create article.
For REST API, run the following command to validate the REST security role configuration:
security login rest-role show [ROLE_NAME]
Example:
security login rest-role show enterpriseauditorrest
For more information about creating REST access control roles, read the security login rest-role create article.
Part 2: Create Security Login
Once the access control role has been created, apply it to a domain account. Ensure the following requirements are met:
- The SVM used in the following command must be the same SVM used when creating the access control role in Part 1.
- All parameters are case sensitive.
- It is recommended to use lowercase for both domain and username. The case of domain and username created during the account provisioning process must match exactly to the credentials provided to the Activity Monitor activity agent for authentication to work.
Use the following command to create the security login for the security role created in Part 1:
security login create -user-or-group-name [DOMAIN\DOMAINUSER] -application ontapi -authentication-method [DOMAIN_OR_PASSWORD_AUTH] -role [ROLE_NAME] -vserver [SVM_NAME]
Example:
security login create -user-or-group-name example\user1 -application ontapi -authentication-method domain -role enterpriseauditor -vserver testserver
Validate this security login was created.
Validate Part 2: Security Login Creation
Run the following command to validate security login:
security login show [DOMAIN\DOMAINUSER]
Example:
security login show example\user1
Verify that the output is displayed as follows:
For more information about creating security logins, read the security login create article.