FSAA: Activity Settings
The File System Activity Auditor Scan Filter Settings page is where activity scan filter settings are configured. It is a wizard page for the category of File System Activity Scan.
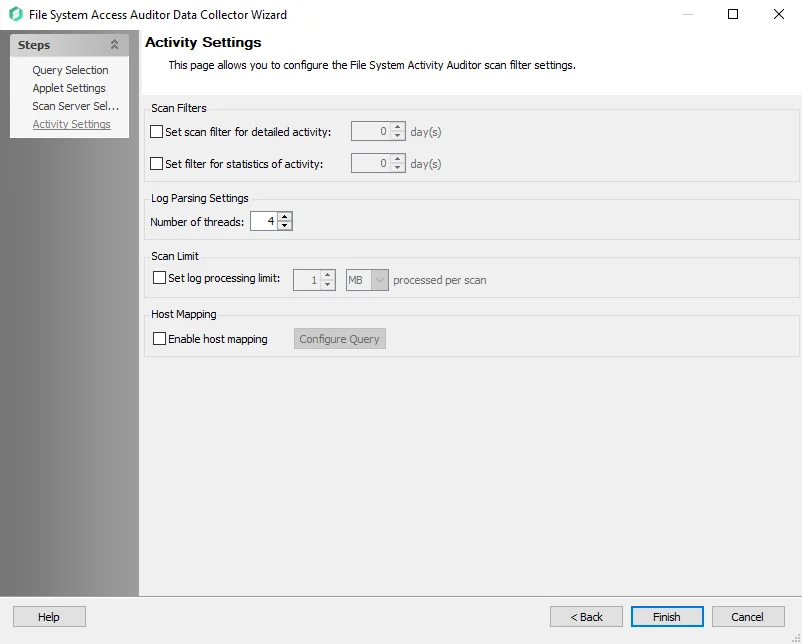
In the Scan Filters section, choose from the following options:
- Set Scan Filter for Detailed Activity – Enables the Days number box. Select the number of past days for activity details to be collected.
- Set Filter for Statistics of Activity – Enables the Days number box. Select the number of past days for activity statistics to be collected.
In the Log Parsing Limits section, choose from the following option:
- Number of Threads – Number of parsing threads FSAC can use at any given time. The default is four threads.
In the Scan Limit section, configure the following:
- Set Log Processing Limit – Stops the scan after the set number of MB or GB of log files are processed and the threshold number is reached
These filters affect what data is collected from the activity logs. However, enabling these filters also causes the corresponding bulk import query to purge the database of selected activity information older than the time filter specified here.
If either is left deselected, all available log files are collected and stored. This has a direct impact on both scan time and database size.
Remember, the file activity options require the Activity Monitor to be deployed, configured, and services running.
In the Host Mapping section, configure the following:
- Host Mapping – Provides a mapping between the target host and the hosts where activity logs reside. Select Configure Query to open the File System Activity Scan Host Mapping page. This feature requires advanced SQL scripting knowledge to build the query. See the Host Mapping topic for additional information.
Host Mapping
If desired, enable the host mapping feature and select Configure Query to open the Host Mapping Query window.
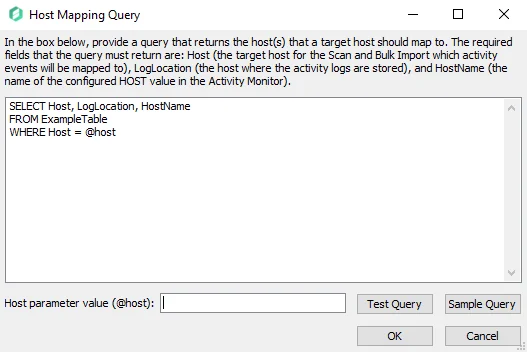
When the Enable host mapping checkbox is selected, the query textbox is enabled. The SQL query provided by a user should return a set of log locations, target hosts, and host names of the Monitored Hosts in the Activity Monitor. The target tables must reside within the Enterprise Auditor database and contain at least the following columns:
-
LogLocation – Name of the hosts where activity logs reside. The required column name is case sensitive and must be exactly
LogLocation. -
HostName – Name of the configured HOST value in the Activity Monitor. The required column name is case sensitive and must be exactly
HostName.- Format must match exactly how the host is known to the Activity Monitor, on the Monitored Host tab
-
Host – Name of the host being targeted in the FSAC scan and Bulk Import which the activity events will be mapped to
Enter the SQL query by clicking Sample Query then replacing the sample text in the textbox, as shown above. The SQL query must target tables that have the required columns populated with the host mapping.
(Optional) Enter a host in the Host parameter value (@host) textbox to test the query to retrieve the data for that host.
Select Test Query to open a preview of the results in the Query Results window. Ensure that the data being retrieved by the query is expected. When this option is selected, the data collector runs against the target table.
Host-Agent Mapping
Enterprise Auditor can be configured via the Host Mapping feature to support the use of Multiple Activity Monitor Agents for a single targeted Host. See the examples below:
Single-Host Single-Agent Example:

Single-Host Multiple-Agent Example:

NOTE: For multiple-agent setup, the configured Host Mapping table must have the same value for HostName and Host, as shown in the Single-Host Multiple-Agent example.
FSAA: Applet Settings
The Applet Settings page is where the Applet Launch Mechanism and Applet Settings are configured. It is a wizard page for the categories of:
- File System Access/Permission Auditing Scan
- File System Activity Scan
- Sensitive Data Scan
NOTE: This wizard page identifies options associated with the scan mode to be used. See the File System Scan Options topic for additional information.
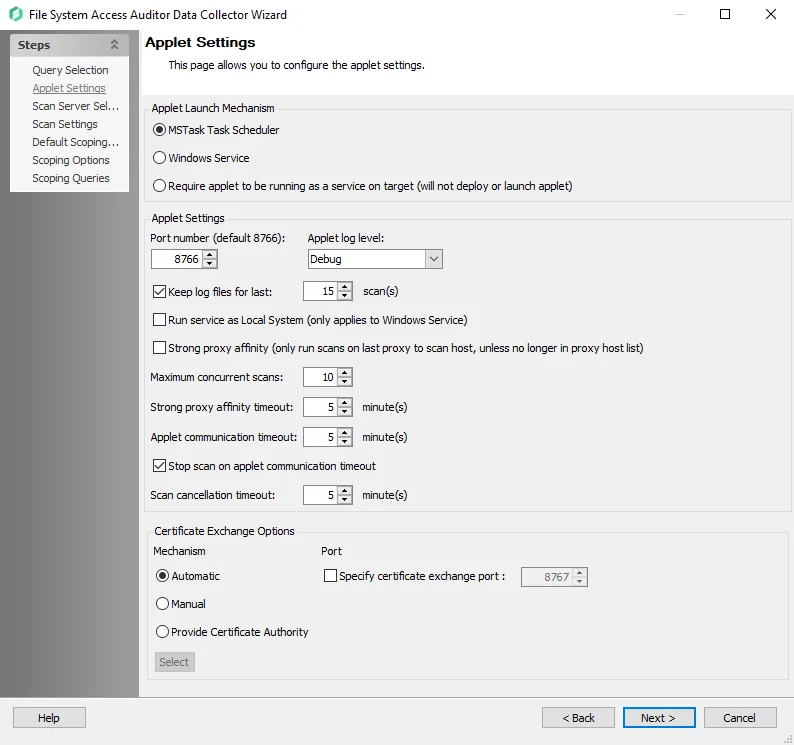
In the Applet Launch Mechanism section, choose one of three radio buttons:
- MSTask Task Scheduler – Creates a scheduled task on the target host that runs the applet
- Windows Service – Automatically installs the FSAA Applet as a proxy service
- The Applet service runs as a Connection Profile credential unless the Local System checkbox is selected in the Applet Settings options below. Then it runs the service in Local mode.
- Require applet to be running as a service on target (does not deploy or launch applet)
- See the File System Proxy Service Installation topic for additional information.
- It requires the
FSAAAppletServer.exeto run as a service on the proxy host in order to run a successful scan. When this radio button is selected, Enterprise Auditor does not deploy an applet on the target or proxy machine. Therefore, if the File System Proxy service is not running, the FSAA scan will fail. - To avoid a failed scan when an applet cannot be deployed or the File System Proxy service is not running, the Applet Gathering Settings page contains the Fallback to local mode if applet can’t start option. This option allows the scan to run in local mode when an applet cannot be deployed or the service is not running.
In the Applet Settings section, configure the following options:
- Port number – Default port number is 8766
- See Custom Parameters for File System Proxy Service topic for additional information.
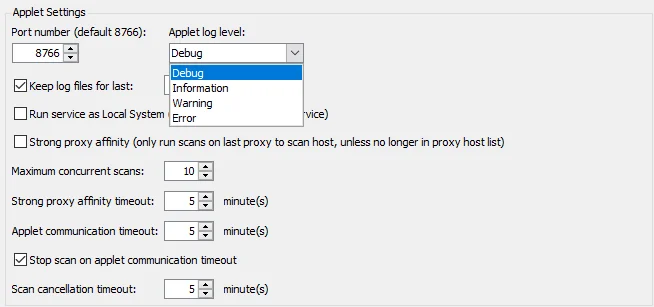
- Applet Log level – The type of log created on the target host. Checking the box to Enable Logging
enables the Applet log level drop-down menu. The Set To Default button resets the log level to
Information.
- Debug – Most verbose logging method, records everything that happens while the applet is processing
- Information – Records the steps the applet takes while processing as well as errors and warnings
- Warning – Record when the applet encounters both errors and warnings while processing
- Error – Least verbose logging method, only records when the applet encounters an error while processing
- Keep log files for last [number] scan(s) – Data retention period. The default is set to 15.
- Run service as Local System (only applies to Windows Service)
- When this checkbox is selected, the applet is deployed to run as a service on the target host. The credentials in the Connection Profile are used to deploy and run the service unless System Default is selected as the Connection Profile.
- This option is active when the Windows Service radio button in the Applet Launch Mechanism section is selected
- Strong proxy affinity (only run scans on last proxy to scan host, unless no longer in proxy host
list)
- This is an optional setting when using proxy architecture
- If this checkbox is selected and a host was previously scanned with a given proxy, it will only be rescanned with that same proxy. If that proxy is unreachable for any reason and no connection can be made, Enterprise Auditor will not try another proxy on the host list and will fail to scan that host. However, if that proxy is no longer on the host list, it will choose another proxy on the list and rescan.
- If unchecked, proxy affinity is still considered, though rather than the scan failing if the proxy is unreachable, a new proxy will be chosen and will scan the host
- If a host has not yet been scanned by a proxy server, the data collector should choose the least loaded proxy at that time. After that host has been scanned, it will follow the proxy affinity mapped out above.
- Maximum concurrent scans [number] – This option dictates a set limit to the number of simultaneous
scans allowed to run on a proxy host regardless of max threads set on the job
- For example, if there are two proxy servers with max concurrent scans set to ten per proxy and one proxy is offline, the remaining proxy should never exceed the value set in the query configuration for this option, even if the job is configured with 20 threads
- Strong proxy affinity timeout [number] minute(s) – This option determines the time a host waits, while the proxy server is busy, before it gets pushed into the job engine queue
- Applet communication timeout: [number] minute(s) – This option determines the length of time (in
minutes) the Enterprise Auditor Console attempts to reach the proxy before giving up. Depending on
the job configuration, the data collector behaves in one of three ways after the timeout value has
been exceeded:
- If a communication timeout is reached and the Stop scan on applet communication timeout option is unchecked, the scan continues running. When the proxy is available again, the data collector gets the database files on the next scan of that host. It will either bring the database files back, if the scan has finished, or display the current state of the scan in a Running Job node if it is still running.
- If the communication timeout is reached and the Stop scan on applet communication timeout option is checked, the remote scan is either automatically suspended or canceled. If the Restart incomplete scans after (0 always restarts) [number] days option or the Rescan unimported hosts after (0 always rescans) [number] days option on the Applet Gathering Settings page are both set to zero or unchecked, the scan cancels.
- If either of these options on the Applet Gathering Settings page are checked with values higher than zero, the scan is suspended after the communication timeout value has been exceeded
- Scan cancellation timeout: [number] minute(s) – When checked, this option will timeout the applet if there is an attempt to pause the scan and the applet does not respond

In the Certificate Exchange Options section, configure the following options:
-
Mechanism – Select one of the following options:
-
Automatic – Certificate exchange is handled automatically by the FSAA Data Collector. This is the default option.
-
Manual – The FSSA Data Collector and applet server expect all certificates to be valid and in their respective stores beforehand. See the FSAA Manual Certificate Configuration topic for additional information.
NOTE: If the FSAA Data Collector and the applet server are on separate domains without a trust, this option must be used.
-
Provide Certificate Authority – Enables the Select button, which allows you to upload an existing certificate
-
-
Port – Select the checkbox to specify the port number for certificate exchange. The Default port number is 8767.
See the FSAA Applet Certificate Management Overview topic for additional information.
FSAA: Azure Tenant Mapping
The Azure Tenant Mapping page is where the target domain or Tenant ID are configured for Azure Information Protection (AIP) scanning. It is a wizard page for the categories of:
- File System Access/Permission Auditing Scan
- File System SDD Scan
Remember, select the Enable scanning of files protected by Azure Information Protection checkbox on the FSAA: Scan Settings page to enable this page in the data collector wizard. In order for FSAA to scan files protected by AIP, ensure that the prerequisites are met and an Azure Connection Profile is successfully created. See the Azure Information Protection Target Requirements topic for additional information on configuring the File System solution to scan for AIP labels.

Populate this page with the App ID (created during prerequisites) and a domain name or Tenant ID for an Azure environment. These values must be associated with each application ID in the Azure Connection Profile.
Use the Add and Remove buttons and manually enter or Paste into the textbox the required information.
FSAA: Bulk Import Settings
The Bulk Import Settings page is where the bulk import process settings are configured. It is a wizard page for the categories of:
- Bulk Import File System Access/Permission Auditing
- Bulk Import File System Activity
- Bulk Import Sensitive Data

Select the Import incomplete scan data checkbox to enable imports of partial scan data. If the scan is stopped before successful completion, this option must be checked in order to bulk import the data from a partially scanned host.
FSAA Applet Certificate Management Overview
Communication between the FSAA Data Collector and the FSAA Applet is secure by default using HTTPS. For authentication, at least three certificates are required and need to be stored in the correct certificate store managed by the FSAA Data Collector. These three certificates are:
- The certificate authority (stored in the FSAA Certificate Authority Store)
- The server certificate (stored in the FSAA Server Certificate Store)
- The client certificate (stored in the FSAA Client Certificate Store)
NOTE: The FSAA Data Collector and Applet server support certificates in both the user’s certificate store and the computer’s certificate store. It is recommended to store certificates in the user's certificate store that is running the FSAA Data Collector or Applet server because administrative access is required for the computer's certificate store. When certificates are generated using the Automatic option below, they are stored in the user’s certificate store.
There are three Certificate Exchange Options provided by the FSAA Data collector:
-
Automatic (Default Option) – The creation of a self-signed certificate and certificate exchange between the FSAA Data Collector and Applet are handled entirely by the FSAA Data Collector and Applet server
- The self-signed CA generated will be valid for two years and the FSAA Data Collector and Applet server will also manage expired certificates and remove certificates that are no longer valid from the FSAA stores
-
Manual – The FSAA Data Collector will expect all certificates to be valid and in their respective certificate stores prior to running a scan
-
To create and store certificates, the
FSAACertificateManager.exetool can be used. This application was created to simplify the process of creating certificates and will store the certificates in the location that the FSAA Data Collector and Applet server expect them to be stored. See the FSAA Manual Certificate Configuration topic for additional information.The
FSAACertificateManager.exetool is located in theStealthAUDIT\PrivateAssemblies\FILESYSTEMACCESS\Appletdirectory. For complete instructions and examples on how to use the tool, runFSAACertificateExchangeManager.exewith the-helpcommand.
NOTE: If the FSAA Data Collector and Applet are on separate domains without a trust, this option must be used.
-
-
Provide Certificate Authority – The certificate exchange process is the same as with the Automatic option. However, instead of creating a self-signed certificate, the FSAA Data Collector uses a certificate you provide through the FSAA Data Collector Wizard. The provided certificate is stored in the FSAA Certificate Authority Store.
NOTE: If the provided certificate is not self-signed as the Certificate Authority, the root certificate and the Certificate Authority’s certificate chain must also be stored in the FSAA Certificate Authority Store on both the client and server hosts.
CAUTION: The FSAA Applet does not support password-protected certificates. Certificates generated when the Automatic option is selected have no password. When manually creating a certificate for use with the FSAA Applet the password parameter should be omitted.
Additionally, the port used for secure certificate exchange can be configured by selecting the Specify certificate exchange port checkbox on the Applet Settings page of the FSAA Data Collector Wizard. The default port is 8767.
FSAA: Default Scoping Options
The Default Scoping Options page is where scan settings, file details, and file properties settings can be configured for every resource in the targeted environment by the data collector. The settings assigned on this page are used by all resources involved in the scan. It is a wizard page for the categories of:
- File System Access/Permission Auditing Scan
- Sensitive Data Scan

See the Scoping Options tab setting topics to target individual resources for the scan:
File Details Tab
The File Details tab allows configuration of settings for file detail collection.
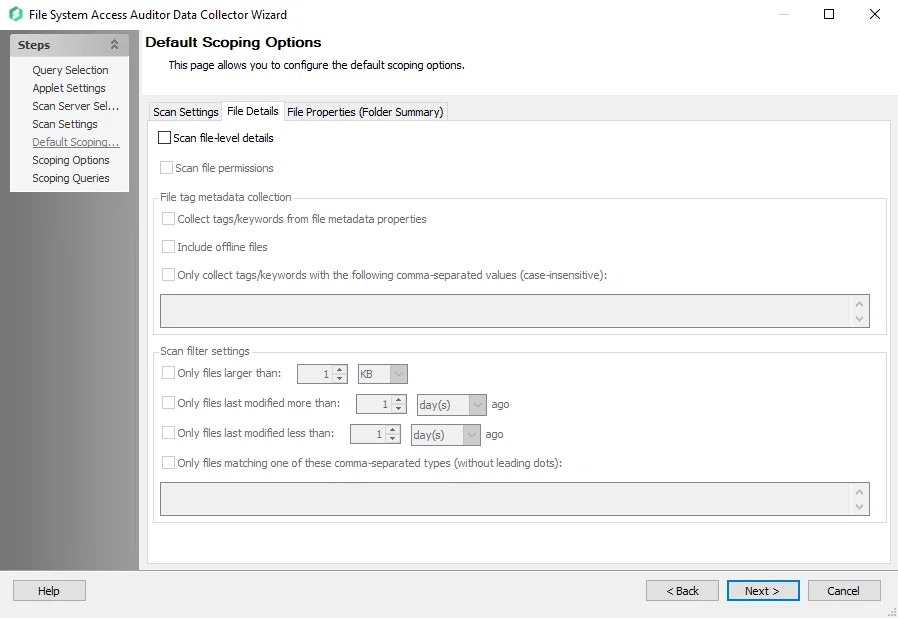
Select the desired settings for additional scoping:
- Scan file-level details – Turns on file-level scanning and collects a full list of files, file size, last modified, and last accessed
- Scan file permissions – Turns on file permission scanning and collects a full list of who has access to which files
File tag metadata collection
- Collect tags/keywords from file metadata properties – Enables the collection of file Microsoft Office metadata tags and stores the tags into the tables when the Scan file-level details checkbox and the Collect File Metadata Tags checkbox are selected on the page. It only scans the files that satisfy the scan filter settings.
- Include offline files – Include offline files in the scan
- Only collect tags/keywords with the following comma-separated values (case-insensitive) – Collects
tags from the files and stores the tags into the tables. Filters results to only collect from
files with extensions matching to the list of file types entered.
- This option is enabled when the Scan file-level details and the Collect tags/keywords from file metadata properties checkboxes are selected.
The FSAA scan collects the tags from the files and stores the information at the folder level, which provides a count for the number of occurrences of each tag.
Scan filter settings
The Scan filter settings options are enabled if the Scan file-level details checkbox is selected.
- Only files larger than [number] [size unit] – Filters the results to only collect file data on files larger than the set value. If this option is not set, all file sizes are collected.
- Only files last modified more than [number] [time period] ago – Filters results to only collect file data on files modified older than the set value
- Only files last modified less than [number] [time period] ago – Filters results to only collect file data on files modified younger than the set value
- Only files matching one of these comma-separated types (without leading dots) – Filters results to only collect files with extensions matching to the list of file types entered. If this option is not set, all file types are collected.
CAUTION: Be careful when configuring these settings. If no filters are applied when file detail scanning has been enabled, it can result in returning large amounts of data to the database.
File Properties (Folder Summary) Tab
The File Properties (Folder Summary) tab is where file property collection settings for the scan is configured.
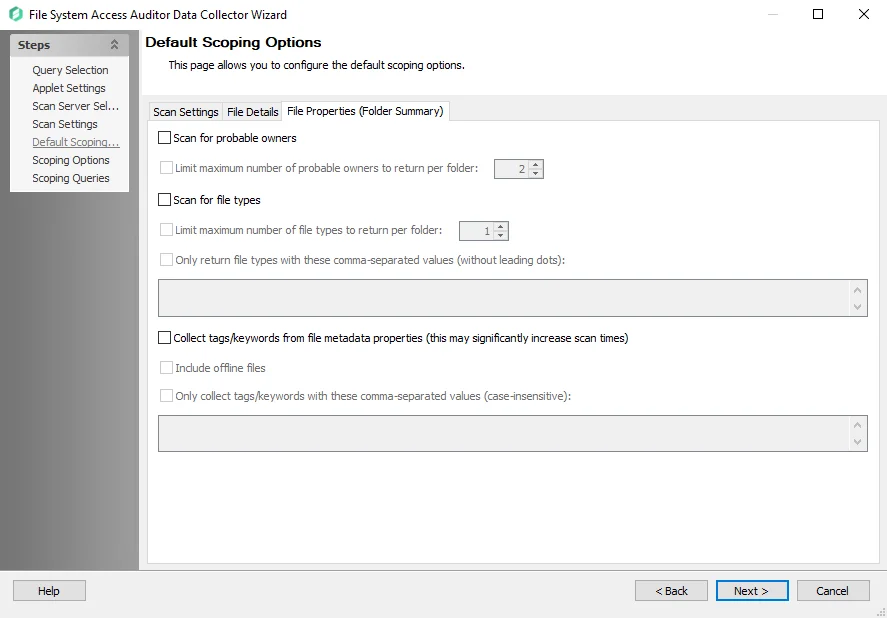
- Scan for probable owners – Gathers file ownership information to determine the most probable owner
of every resource
- Limit maximum number of probable owners to return per folder [number] – Stops the collection of probable owners when the number provided is reached
- Scan for File Types – Gathers file type information within the audited folders
- Limit maximum number of file types to return per folder [number] – Stops the collection of file types when the number provided is reached per folder
- Only return file types with these comma-separated values (without leading dots) – Enter the file types that will be returned from the scan. Any types not provided are ignored.
- Collect tags/keywords from file metadata properties (this may significantly increase scan times) –
Scans the files and collects metadata tags from Microsoft Office files
- Include offline files – Scans network files that have the offline files feature enabled
- Include AIP Protected Files – Scans for files protected by Azure Information Protection (AIP)
that have protection labels
- This option is only available when the Enable scanning of files protected by Azure Information Protection checkbox is enabled on the Scan Settings page
- Only collect tags/keywords with these comma-separated values (case-insensitive) – scopes the scan to only collect tags from the files with the tags specified by comma-separated values
The FSAA scan collects the tags from the files and stores the information at the folder level, which provides a count for the number of occurrences of each tag.
Scan Settings Tab
The Scan Settings tab allows configuration of data collection settings.
The Scan Settings tab has the following configurable options:
-
Limit returned subfolder depth to: [number] level – Value indicates the depth of the scan
- Higher numbers increases scan time but return more thorough data
-
Exclude snapshot directories on NetApp server – Excludes folders on NetApp Filers that begin with ~snapshot
-
Exclude system shares – Part of the OS that most users don’t have access to so its hidden by Microsoft
-
Exclude hidden shares – Excludes shares with names ending with $
-
Last Access Time (LAT) preservation – Preserves Data Access timestamp attribute on files that are scanned for Metadata tags and sensitive data
- Warn if unable to preserve Last Access Time – Scan throws a warning if the LAT cannot be preserved. The file is still scanned unless the Skip file if unable to preserve Last Access Time checkbox is also selected.
- Skip file if unable to preserve Last Access Time – Scan skips the file if the LAT cannot be preserved
Selecting the Last Access Time (LAT) preservation checkbox enables the Action on failure to enable LAT preservation and Action on changed LAT after scan dropdown menus.

-
Action on failure to enable LAT Preservation – Before scanning each file, FSAA attempts to enable an operating system feature to preserve the LAT when accessing the file. This operation may fail for a variety of reasons, which include but are not limited to: the operating system or file system where the file is located does not support LAT preservation, or insufficient permissions from the service account trying to access the file. The following configuration addresses a failure to enable the LAT preservation mode:
- Continue to scan file silently – FSAA scans the file with the possibility that LAT preservation is not possible. No warning will be shown.
- Continue to scan file with warning – FSAA scans the file with the possibility that LAT will not be preserved. A warning will be shown for this file.
- Skip file silently – FSAA will not scan the file. No warning will be shown.
- Skip file with warning – FSAA will not scan the file. A warning will be shown indicating the file was skipped.
- Abort the scan – FSAA will abort the scan. No further files will be processed.

-
Action on changed LAT After scan – Before scanning each file, the LAT of the current file is recorded. After scanning, it is verified whether the LAT has changed since then (likely scenarios are either that the LAT preservation mechanism failed to function as intended, or that the file was accessed by someone while the scan was occurring). The following configuration addresses a changed LAT:
- Continue scan silently – The scan will move on to the next file while updating the LAT for the processed file. No warning will be shown.
- Continue scan with warning – The scan will continue on to the next file. LAT will be updated for the processed file. A warning will be shown.
- Force-reset file LAT silently – The scan will reset the file's LAT to its original state before processing. No warning will be shown. The scan will proceed to the next file.
- Force-reset file LAT with warning – The scan will Reset the file's LAT to its original state before processing. A warning will be shown. The scan will proceed to the next file.
- Abort the scan – FSAA will abort the scan. LAT will be updated for the processed file. No other files will be processed
FSAA Manual Certificate Configuration
To create and store the certificates needed to set up FSAA scans using manual certificate exchange,
use the FSAACertificateManager.exe tool. The FSAACertificateManager.exe tool is located in the
StealthAUDIT\PrivateAssemblies\FILESYSTEMACCESS\Applet directory. All commands in the tool are
case-sensitive.
Follow the steps to use the tool to create and store the required certificates.
NOTE: In these steps, some commands need to be run on the Enterprise Auditor console and some on the Proxy host. In the provided example commands:
- All files that are generated by the Certificate Manager or copied to the Enterprise Auditor
console are placed in the
%SAInstallDir%\PrivateAssemblies\FILESYSTEMACCESS\Applet\My Certificatesdirectory. This folder is created by the tool if it does not already exist. - When operating on the proxy host, files are placed into the root of the FSAA folder
Remember, all commands in the FSAACertificateManager.exe tool are case-sensitive.
Step 1 – Create a Certificate Authority (CA). The CA is a self signed certificate that will be used to sign the client and server certificates. On the Enterprise Auditor console, run the following command:
.\FSAACertificateManager.exe -createCertificate -subjectDN CN=FSAA CA NEAConsole.my.domain.com -purpose CertificateAuthority -friendlyName FSAA_CA -outputPath ".\My Certificates" -name MyFSAACA
- Replace the Common Name (CN) in this example command (
FSAA CA NEAConsole.my.domain.com) with a unique and descriptive name - The output file is stored at the specified output path
.\My Certificates
The following message is returned when the command completes successfully:
Successfully wrote certificate to .\My Certificates\MyFSAACA.pfx
Step 2 – Create a client certificate using the CA from the previous step. On the Enterprise Auditor console, run the following command:
.\FSAACertificateManager.exe -createCertificate -issuer ".\My Certificates\MyFSAACA.pfx" -subjectDN CN=NEAConsole.my.domain.com -purpose ClientAuth -subjectAlternativeNames NEAConsole -friendlyName FSAA_Client_Auth -outputPath ".\My Certificates" -name MyFSAAClientCert
- Replace the CN (
NEAConsole.my.domain.com) with the fully qualified domain name (FQDN) of your Enterprise Auditor console - Replace the alternate subject name (
NEAConsole) with the short name for the Enterprise Auditor console - The output file is stored at the specified output path
.\My Certificates
The following message is returned when the command completes successfully:
Successfully wrote certificate to .\My Certificates\MyFSAAClientCert.pfx
Step 3 – Store the CA in an FSAA managed certificate store. As the user that runs the Enterprise Auditor console, run the following command on the Enterprise Auditor console:
.\FSAACertificateManager.exe -storeCertificate -certificate ".\My Certificates\MyFSAACA.pfx" -store CertificateAuthority -location CurrentUser
The following message is returned when the command completes successfully:
Successfully added FSAA_CA to CertificateAuthority
Step 4 – Store the client certificate in an FSAA managed certificates store. As the user that runs the Enterprise Auditor console, run the following command on the Enterprise Auditor console:
.\FSAACertificateManager.exe -storeCertificate -certificate ".\My Certificates\MyFSAAClientCert.pfx" -store Client -location CurrentUser
The following message is returned when the command completes successfully:
Successfully added FSAA_Client_Auth to Client
Step 5 – Convert the CA from a PFX file to a CER file. On the Enterprise Auditor console, run the following command:
NOTE: This conversion to a CER file is necessary so that the private key of the CA is not shared.
.\FSAACertificateManager.exe -createCER -certificate ".\My Certificates\MyFSAACA.pfx" -outputPath ".\My Certificates" -name MyFSAACA
The following message is returned when the command completes successfully:
Successfully wrote CER certificate to .\My Certificates\MyFSAACA.cer
Step 6 – Copy FSAACertficateManager.exe and the CA CER file (.\My Certificates\MyFSAACA.cer)
to the proxy host that will be running FSAAAppletServer.exe. These files must be copied to the
same directory.
NOTE: These copied files will be deleted from the destination directory later in Step 12.
Step 7 – Generate the server certificate signing request and key on the Proxy host. On the proxy
host, run the following command out of the FSAA folder where the FSAACertificateManager.exe was
copied to:
.\FSAACertificateManager.exe -createCertificateSigningRequest -subjectDN CN=proxy01.my.domain.com -subjectAlternativeNames Proxy01 -outputPath . -name Proxy01
- Replace the CN (
proxy01.my.domain.com) with the FQDN of the proxy host - Replace the alternate subject name (
proxy01) with the short name for the proxy host - The generated certificate signing request and key are stored in the same directory as
FSAACertificateManager.exeon the proxy host
The following message is returned when the command completes successfully:
Successfully wrote certificate signing request to .\Proxy01.csr
Successfully wrote certificate key to .\Proxy01.key
Step 8 – Store the CA on the proxy host in an FSAA managed certificate store. As the user that
runs the proxy scanner (FSAAAppletServer.exe), run the following command on the proxy host:
.\FSAACertificateManager.exe -storeCertificate -certificate .\MyFSAACA.cer -store CertificateAuthority -location CurrentUser
The following message is returned when the command completes successfully:
Successfully added FSAA_CA to CertificateAuthority
Step 9 – Complete the server certificate signing request on the Enterprise Auditor console. Copy the CSR file from the proxy host to the My Certificates directory on the Enterprise Auditor console (where the original CA PFX file is located), then run the following command on the Enterprise Auditor console:
.\FSAACertificateManager.exe -completeCertificateSigningRequest -certificateSigningRequest ".\My Certificates\Proxy01.csr" -purpose ServerAuth -issuer ".\My Certificates\MyFSAACA.pfx" -days 365 -outputPath ".\My Certificates" -name Proxy01
The following message is returned when the command completes successfully:
Successfully completed certificate signing request to .\My Certificates\Proxy01.cer
Step 10 – Store the server certificate on the proxy host in an FSAA managed certificate store.
Copy the Proxy CER file back to the proxy host from the Enterprise Auditor console. Then, as the
user that runs the proxy scanner (FSAAAppletServer.exe), run the following command on the proxy
host:
.\FSAACertificateManager.exe -storeCertificate -certificate .\Proxy01.cer -key .\Proxy01.key -friendlyName FSAA_Server_Auth -store Server -location CurrentUser
The following message is returned when the command completes successfully:
Successfully added FSAA_Server_Auth to Server
Step 11 – Repeat Steps 6-10 for each proxy host.
Step 12 – Delete all the PFX, CER, and Key files that were generated or copied in the above steps from the output locations.
All of the required FSAA certificates have been stored in the FSAA managed certificate stores. The FSAA queries need to be configured to use the Manual certificate exchange option. This option can be found under Applet Settings in the FSAA Data Collector Wizard. See the FSAA: Applet Settings topic for additional information.
For additional information on how to use the FSAACertificateManager.exe tool, run the
.\FSAACertificateManager.exe -help command.
FileSystemAccess Data Collector
The FileSystemAccess (FSAA) Data Collector collects permissions, content, and activity, and sensitive data information for Windows and NAS file systems. The FSAA Data Collector has been preconfigured within the File System Solution. Both this data collector and the solution are available with a special Enterprise Auditor license. See the File System Solution topic for additional information.
Protocols
- Remote Registry
- WMI
Ports
- Ports vary based on the Scan Mode Option selected. See the File System Scan Options topic for additional information.
Permissions
- Permissions vary based on the Scan Mode Option selected. See the File System Supported Platforms topic for additional information.
Sensitive Data Discovery Considerations
The Sensitive Data Discovery Add-On must be installed on the Enterprise Auditor Console server, which enables Sensitive Data criteria for scans. If running Sensitive Data Discovery (SDD) scans, it will be necessary to increase the minimum amount of RAM. Each thread requires a minimum of 2 additional GB of RAM per host. By default, SDD scans are configured to run two concurrent threads. For example, if the job is configured to scan 8 hosts at a time with two concurrent SDD threads, then an extra 32 GB of RAM are required (8x2x2=32).
Remember, if employing either of the File System Proxy Mode as a Service scan mode options, it is also necessary for the Sensitive Data Discovery Add-on to be installed on the server where the proxy service is installed.
FSAA Query Configuration
The FSAA Data Collector is configured through the File System Access Auditor Data Collector Wizard. The wizard contains the following pages, which change based up on the query category selected:
- FSAA: Query Selection
- FSAA: Applet Settings
- FSAA: Scan Server Selection
- FSAA: Scan Settings
- FSAA: Azure Tenant Mapping
- FSAA: Activity Settings
- FSAA: Default Scoping Options
- FSAA: Scoping Options
- FSAA: Scoping Queries
- FSAA: Sensitive Data Settings
- FSAA: SDD Criteria Settings
- FSAA: Bulk Import Settings
- FSAA: FSAA Update Service Setting
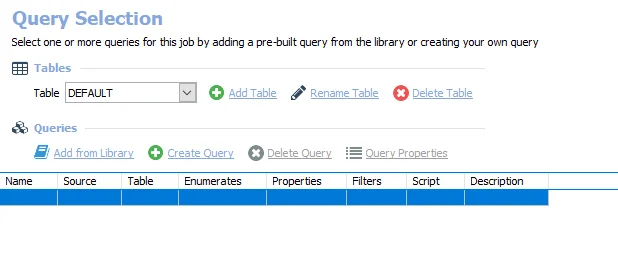
FSAA: Query Selection
The FSAA Data Collector Query Selection page contains the following query categories, sub-divided by auditing focus:
-
The File System Access/Permission Auditing options scan hosts for file system information, and there are two categories to choose from:
- Scan – Scans file systems for permission information, ownership, and content profiling
- Bulk import– Imports access scan data into the SQL database
-
The File System Activity options runs user and group activity and inactivity related queries based on FSAC data, and there are two categories to choose from:
- Scan – Performs file system activity scan for the target host
- Bulk import – Imports File System Activity scan data into the SQL database
-
The Sensitive Data options scan hosts for sensitive data, and there are two categories to choose from:
- Scan – Scans file system content for sensitive information
- Bulk import – Imports SDD scan data into the SQL database
-
The DFS options collect Distributed File System information, and there is one category:
-
Scan and import – Collects Distributed File System information
NOTE: Starting with v8.1, DFS Audits are completed with a streaming method and do not require a bulk import query following the scan query.
-
-
The Maintenance options perform maintenance for the FSAA Data Collector, and there are three categories to choose from:
-
Remove scan executables and data – Removes file system access audit scan applet and data from the remote server
-
Upgrade proxy service – Update FSAA binaries for hosts running the File System Proxy Service
NOTE: The Upgrade proxy service category only applies to updating a v8.0+ File System Proxy installation to a newer version. Manual updating is necessary for v7.x File System Proxy installations.
-
Remove Host Data – Removes host from all SQL tables created by the FSAA Data Collector and deletes StrucMap (removes host assigned to job where query exists)
-
Remember, the Sensitive Data category options require the Sensitive Data Discovery Add-On to be installed on the Enterprise Auditor Console before the FSAA Data Collector can collect sensitive data.
Once a query scan using the FSAA DC has been executed, the Maintenance button is enabled to allow troubleshooting of scan errors that may have occurred.
CAUTION: Do not use the Maintenance button unless instructed by Netwrix Support. It is possible to cause corruption of the database and loss of data to occur.
Maintenance Wizard
The Maintenance Wizard is opened by clicking the Maintenance button on the Query Selection page of the FSAA Data Collector Wizard. You can use the wizard to reset hosts or repair file system data errors.
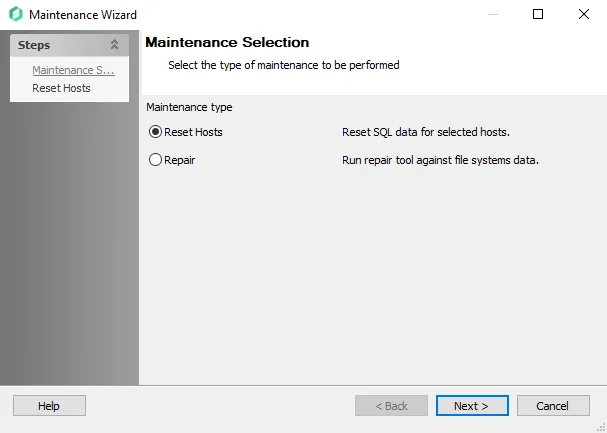
The Maintenance Selection page allows you to select the type of maintenance to be performed:
- Reset Hosts – Resets the Access GUID column value in the SA_FSAA_Hosts table for the Hosts selected. Allows data to be bulk imported when there is a GUID mismatch.
- Repair – Resets the MinResourceID and MinTrusteeID column values to 0. Removes duplicate and data consistency issues, including resources with nonexistent parents. Deletes StrucMap database.
Select the required option and click Next. The subsequent wizard page is determined by the selection made.
-
If Reset Hosts was selected, the Reset Hosts page displays:
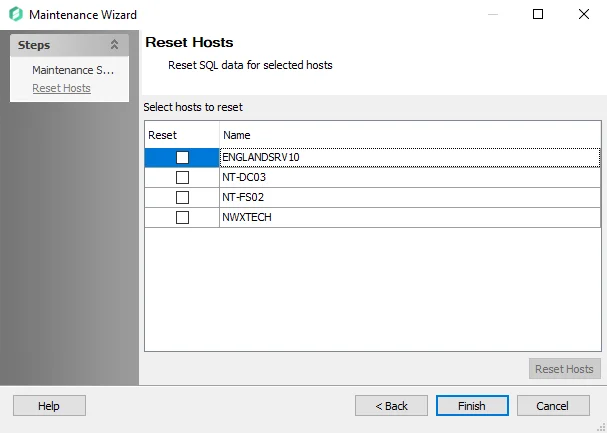
Select the desired hosts to reset the SQL data for, and click Reset Hosts to perform the maintenance.
-
If Repair was selected, the Repair Tool page displays:
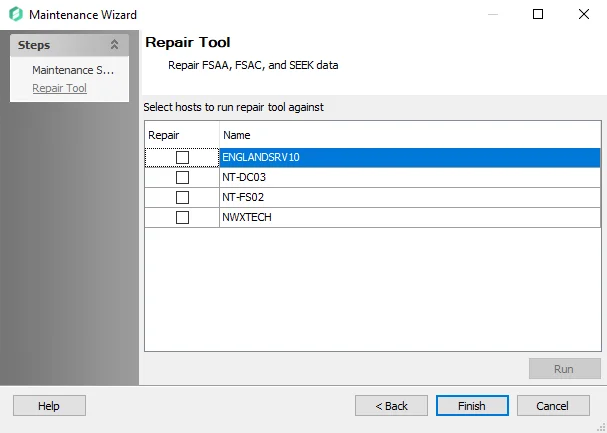
Select the desired hosts to repair the SQL data for, and click Run to perform the maintenance.
Click Finish to close the wizard when you have completed the required maintenance.
FSAA: Scan Server Selection
The Scan Server Selection page is where the server that executes the scan is configured. It is a wizard page for the categories of:
- File System Access/Permission Auditing Scan
- File System Activity Scan
- Sensitive Data Scan
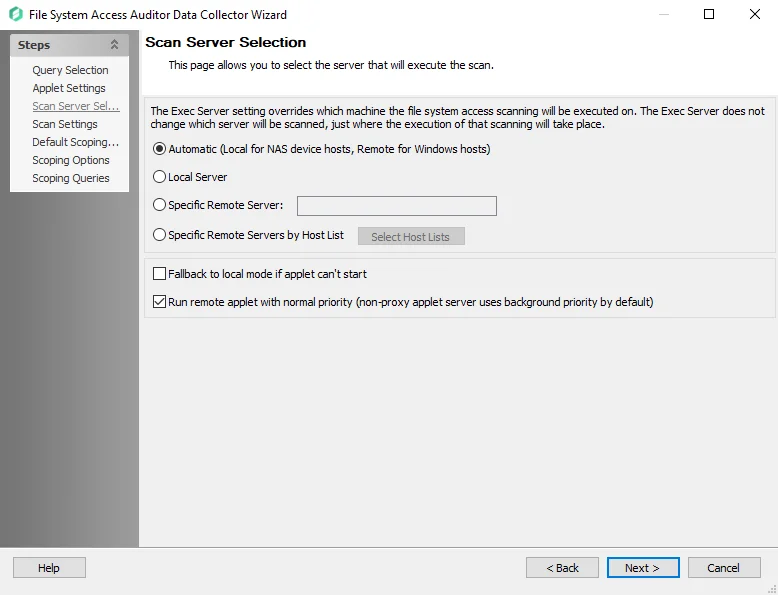
Using the radio buttons, select where the execution of the applet will take place:
-
Automatic (Local for NAS device hosts, Remote for Windows hosts) – Applet is deployed to all targeted Windows servers. Other targeted devices, for example NAS, are scanned locally by the Enterprise Auditor Console server.
- The scan identifies Windows servers through the host inventory field OSType
-
Local Server – Assigns all scanning to the Enterprise Auditor Console server
-
Specific Remote Server – Assign a specified server for scanning by entering a server name in the textbox. This option uses proxy architecture and requires the targeted server to have the File System Proxy deployed.
- See the File System Proxy Service Installation topic for additional information
-
Specific Remote Servers by Host List – Assign hosts from a custom created host list for scanning. This option uses proxy architecture and requires the targeted servers to have the File System Proxy deployed
- See the File System Proxy Service Installation topic for additional information
-
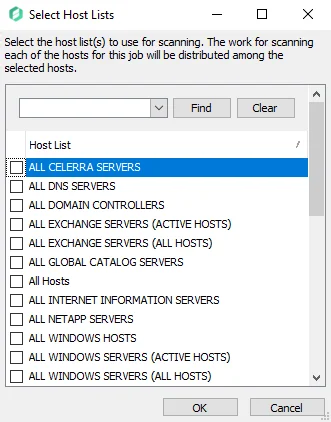
Select Host Lists – Opens the Select Host Lists window displaying all the available hosts to choose from. If more than one list is selected, scanning is distributed across each host.
RECOMMENDED:
It is best practice in global implementations to utilize a specific remote server or proxy scanner that is located in the same data center as the target hosts. This is particularly beneficial if the Enterprise Auditor Console server is in a different data center. See the Proxy Scanning Architecture topic for additional information.
In the bottom section, the checkbox options affect the execution of the applet:
- Fallback to local mode if applet can't start – If the applet cannot be deployed on the target host, it is deployed locally on the same server as the Enterprise Auditor Console and the scan collects data across the network
- Run remote applet with normal priority (non-proxy applet server uses background priority by default) – Select this option to run the applet with normal priority. Running at low-priority allows other normal priority applications to take precedent over the scan when consuming processing power and system resources. Running at low priority allows the scan to run with little or no impact on the applet host.
FSAA: Scan Settings
The Scan Settings page is where additional scan protocols and settings are configured. It is a wizard page for the categories of:
- System Access/Permission Auditing Scan
- Sensitive Data
In the Scan Protocols section, select the desired checkboxes for including certain types of shared folders:
- Scan Windows (SMB/CIFS) shares – Includes types of Windows and NAS shares
- Scan NFS exports (shares) – Includes this type of UNIX and NAS shares
In the middle section, select the desired checkboxes for additional settings:
-
Enable file system scan streaming – Sends the streamed data directly to the Enterprise Auditor database. A bulk import query is not required when this option is selected
-
Enable scanning of files protected by Azure Information Protection – Adds additional options to this wizard to scan for protection labels and encrypted files for sensitive data
- See the Azure Information Protection Target Requirements for additional information.
-
Use SQL query to manually specify shares – For advanced SQL users. This option provides a least privileged model for enumerating shares. It bypasses share permission requirements and eliminates the need for the Connection Profile credentials to have local Administrator or Power User permissions. Click Configure Query to open the Manual Shares Query window. See the Enable the Use SQL Query to Manually Specify Shares topic for additional information.
-
NetApp communication security – This option provides the ability to choose levels of encryption and authentication applied during Access Auditing scans of NetApp devices

-
HTTPS – Encrypts communication and verifies the targeted server's SSL certificate
-
HTTPS, Ignore Certificate Errors – Encrypts communication but ignores certificate errors
- This option is primarily used for troubleshooting
- Alternative use for this option would be for access scans within a trusted and secured network
-
HTTP – Applies no encryption or authentication of communication
The HTTPS options require Enterprise Auditor to have access to the targeted server's SSL certificate. Enterprise Auditor ships with a file containing trusted certificates from a trusted Certification Authority (
cacert.pem). If the organization uses a self-signed certificate, see the HTTPS Encryption Certificate for FSAA & NetApp Communication topic for information on adding the organization's certificate. -
The bottom section is only available for the File System Access/Permission Auditing Scan and Sensitive Data Scan categories and contains the following options:
-
Restart incomplete scans after (0 always restarts) [number] days – Determines when the saved progress should be discarded and the scan restarted
-
Rescan unimported hosts after (0 always rescans) [number] days – Controls when the host is rescanned even if its data has not been imported yet
- When this option is enabled, set to a value higher than zero, and results in a host not being scanned, a warning message is logged
- The Messages table records the
No need to scan, Tier 2 DB USN > Tier 1 DB USN, needs to bulk importwarning
Enable the Use SQL Query to Manually Specify Shares
If desired, enable this feature and click Configure Query to open the Manual Share Query window.
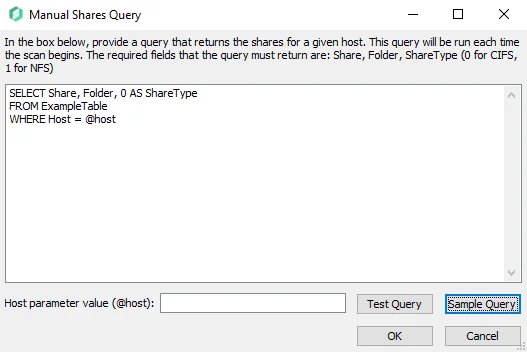
The SQL query provided by a user should return a list of all shares in the target environment. The target tables must reside within the Enterprise Auditor database and contain at least the following columns for all shares in the target environment:
-
Host – Name of host where the share resides matching the Host Master table Name field value
RECOMMENDED: Use this column but it is not required.
-
Share – Name of the share
-
Folder – Landing folder path of the share on the host
-
ShareType – Integer representing the protocol for the type of share:
- 0 = CIFS share
- 1 = NFS share
For example, if the share has a path of \\cec-fs01\Documentation, then the columns are populated
in this way:
- Host –
cec-fs01 - Share –
Documentation - Folder –
C:\Documentation - ShareType –
0
CAUTION: If the FSAA Data Collector has identified a share in a previous scan, but that share is not in a table targeted by this query, then it is marked as a deleted share.
Enter the SQL query by replacing the sample text in the textbox. The SQL query must target tables that have the required columns populated with the list of all shares in the target environment.
(Optional) Enter a host in the Host parameter value (@host) textbox to test the query to retrieve the data for that host.
Select Test Query to open a preview of the results in the Query Results window. Ensure that the data being retrieved by the query is expected.
When this option is selected, the data collector runs against the target table to enumerate shares in the environment.
Remember, if a share is not in the target table, the data collector assumes that the share does not exist and marks it as deleted.
HTTPS Encryption Certificate for FSAA & NetApp Communication
The HTTPS encryption options for the NetApp communication security setting of the global Remote Data Collection Configuration page in the File System Access Auditor Data Collector Wizard requires a certificate. If the organization uses a self-signed certificate, it is necessary to add this certificate to enable HTTPS encryption of Enterprise Auditor communications.
The certificate (cacert.pem) which is shipped with Enterprise Auditor is in the DC folder of the
installation directory. The default location is:
…\STEALTHbits\StealthAUDIT\DC
If employing remote applet mode or proxy servers, then the certificate (cacert.pem) must exist in
the FSAA folder where the FSAAAppletServer.exe process is running (applet/proxy host). Therefore,
it is necessary to also copy it to the FSAA folder on the target hosts andr proxy servers. This is
done at runtime when using remote applet mode, but any updates or custom certificates must be copied
manually. The default location is:
…\STEALTHbits\StealthAUDIT\FSAA
RECOMMENDED: Do not overwrite this certificate. It is fully trusted by Netwrix. Instead, add
an underscore (_) character to the start of the file name. Then copy the organization's self-signed
certificate to this location with the name cacert.pem.
There is another cacert.perm file within the Enterprise Auditor installation directory used by the
Notification SSL encryption options. While these files have the same name, they serve different
purposes and are stored in different locations.
FSAA: Scoping Options
The Scoping Options page is where scan settings, file details, and file properties settings can be configured for a specified resource in the targeted environment. It is a wizard page for the following categories:
- File System Access/Permission Auditing Scan
- Sensitive Data
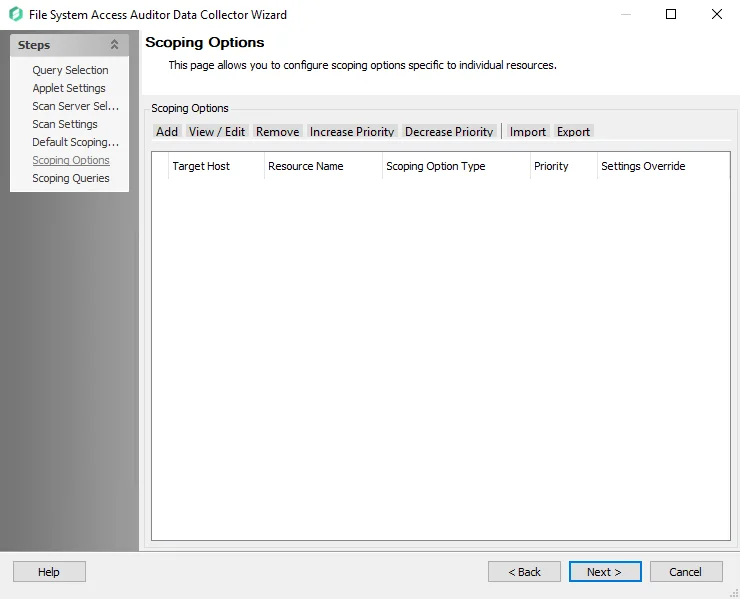
The Scoping Options buttons have the following:
-
Add – Add a resource to be included or excluded in the scan. Opens the Scoping Configuration window.
-
View/Edit – Make changes to a previously added resource. Opens the Scoping Configuration window.
-
Remove – Deletes the resource from the table and therefore the scan
-
Increase Priority – Sets a lower numerical value to the resource, which sets a higher priority when conflicting settings occur with one resource
-
Decrease Priority – Sets a higher value to the resource, which sets a lower priority when conflicting settings occur with one resource
-
Import – Import scoping options from a
.fsaascopefile.- If a conflict arises between an existing configured scoping option and an option that is being imported, the user will be prompted to resolve the conflict by either keeping the existing configuration or importing the new one, which will overwrite the scoping option.
-
Export – Take the currently configured scoping options in the job and export it to a
.fsaascopefile
By default, priority is assigned in the order it is added to the table. Priority can also be manually assigned with the Increase Priority and Decrease Priority buttons or in the Scoping Configuration Window. If there is a conflict between an inclusion scoping option and an exclusion scoping option with the same priority, the inclusion takes precedence.
See the Common Scoping Scenarios section for example configurations of scoping options and the expected results.
Scoping Configuration Window
The Scoping Configuration Window allows a specific share or folder to be included or excluded from the scan. Only included resources require additional scoping. Remember, these settings override the default scoping settings for the selected resource.
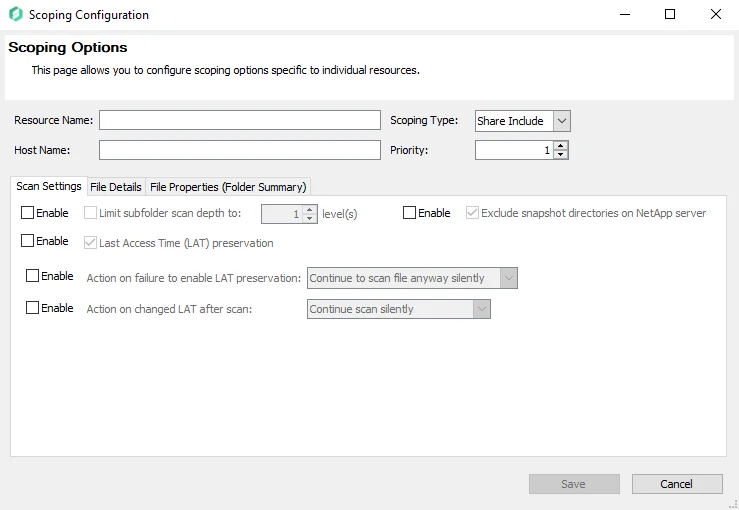
Set the Resource Name and Host Name:
- Resource Name – Specify a local path or individual share to the target folder or the share name
- Host Name – Apply scoping options to a specific target host. If a host name is not supplied, all hosts targeted by the job have the scoping options applied.
Both the Resource Name and Host Name textboxes support regular expressions and pattern matching.
-
For wildcards – Use the
?or*as the share or folder name. Example of Wildcard Support: You have three shares namedShare1,Share2, andMyShare. You want to includeShare1andShare2. You can enter into this field:share*share?Share*SHARE?
-
For regular expressions – Use the prefix
RE:and escape the backslash characters. Example of Regular Expression: To provide an expression that would include all shares or files that start with the letterA:NOTE: This option is case sensitive.
RE:\\\\[^\\[+\\A
Then set Scoping Type and Priority:
-
Scoping Type – Choose from the dropdown menu the type of resource to scan:
- Share Include – Provided share name is included in the scan. All scoping options must match or it is excluded.
- Share Exclude – Provided share is excluded from the scan
- Folder Include – Provided folder name is included in the scan. All scoping options must match or the scan ignores the resource.
- Folder Exclude – Provided folder is excluded from the scan. All scoping options must match or it is excluded.
NOTE: Any included files or folders inherit all options previously checked in the FSAA: Default Scoping Options page. Manually apply new options if the default ones are not desired in this scan.
-
Priority – Numerical value that determines which options are used in the case of more than one scoping option overlaps for a particular resource. Lower numerical values have a higher priority for this scan. When multiple scoping options are added to a single resource, and there is no conflict, the scoping options are merged. However, in some instances, the settings conflict. Below are some known conflicts and their results:
- Conflict between two options for a single resource – Higher priority takes precedence
- Folder scoping option conflicts with a share scoping option – Folder takes precedence
- Conflict between two scoping options with the same priority – Path determines which option is used. The scoping option with the child takes precedence over the parent.
-
Enable Button – Adds the scoping option to the scan criteria
See the Scan Settings Tab, File Details Tab, and File Properties (Folder Summary) Tab tabs for more detail on these scoping options.
Common Scoping Scenarios
The following examples show some common configurations of scoping options and the expected results.
Scenario 1
Scan for all shares except one.

All shares included except for the ProbableOwner share.
Scenario 2
Scan for one share and exclude all others.

The ProbableOwner Share is included. All other shares are excluded. Share Inclusion must have a priority that is greater than or equal to the Share Exclusion.
Scenario 3
Scan all folders except one.

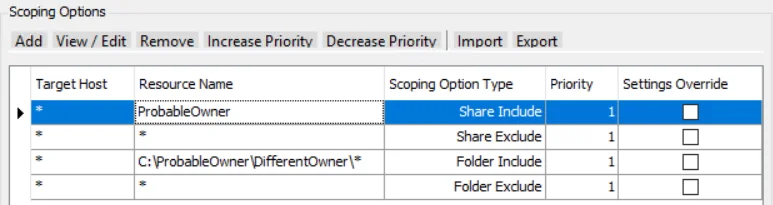
All Shares are scanned and all folders are included except for C:\ProbableOwner\DifferentOwner.
Scenario 4
Scan one folder and exclude all others.
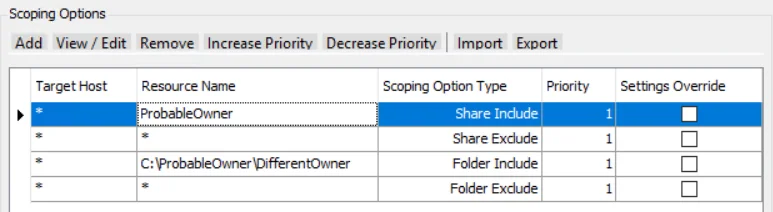
The ProbableOwner Share is included and all other shares are excluded. Within the ProbableOwner Share, Folder path C:\ProbableOwner\DifferentOwner is included. All other folder paths are excluded.
Scenario 5
Scan one folder and all of its children and exclude all others.
The ProbableOwner Share is included and all other shares are excluded. Within the ProbableOwner Share, Folder path C:\ProbableOwner\DifferentOwner is included along with all of its children (Notice the \* at the end of folder include path). All other folder paths are excluded.
Scenario 6
Scan for all content within a folder except one sub-folder.
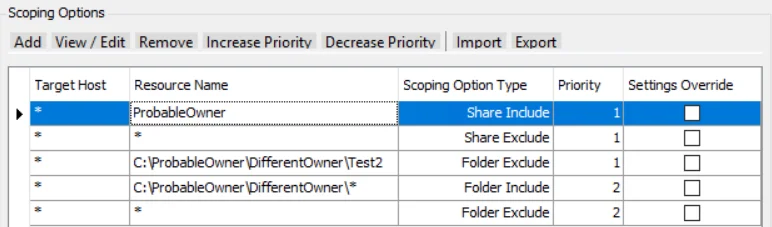
The ProbableOwner Share is included and all other shares are excluded. Within the ProbableOwner Share, Folder path C:\ProbableOwner\DifferentOwner is included along with all of its children (Notice the \* at the end of folder include path). Within the DifferentOwner folder the path C:\ProbableOwner\DifferentOwner\Test2 is excluded (Notice the higher priority for the exclusion). All other folder paths are excluded.
Additional Considerations
The scoping options listed above can be used to scope for SMB shares and NFS exports but NFS exports are enumerated differently. The include/exclude logic outlined above should be the same for both, but when scoping for NFS exports the Resource Name should be the full path to the export.
For example, in the scenario below, the NFS export named NFS_Export is included. All other exports are excluded. Within the NFS_Export export, folder path \ifs\NFS_Export\Test_Folder is included. All other folder paths are excluded.
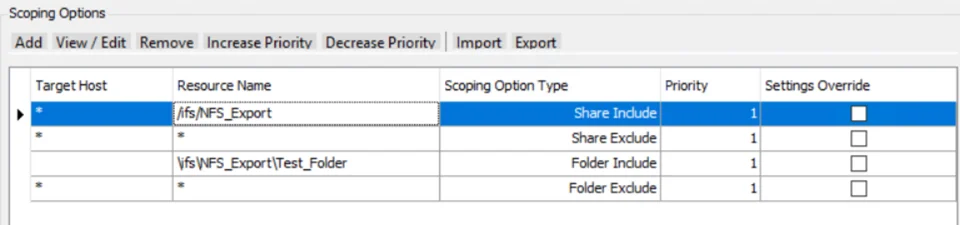
Note the different slash types for exports compared to folders.
FSAA: Scoping Queries
Use the Scoping Queries page to query the SQL database and return exclude and include resources from a specified host. This feature bypasses share permission requirements and eliminates the need for the Connection Profile credentials to have local Administrator or Power User permissions. It is a wizard page for the following categories:
- File System Access/Permission Auditing Scan
- Sensitive Data
The Scoping Queries buttons have the following functionality:
-
Add – Add a resource to be included or excluded in the scoping query. Opens the Scoping Query Configuration window. See the Scoping Query Configuration Window topic for additional information.
-
View / Edit – Make changes to a previously added scoping query. Opens the Scoping Query Configuration window. See the Scoping Query Configuration Window topic for additional information.
-
Remove – Deletes the resource from the table and therefore the scan
-
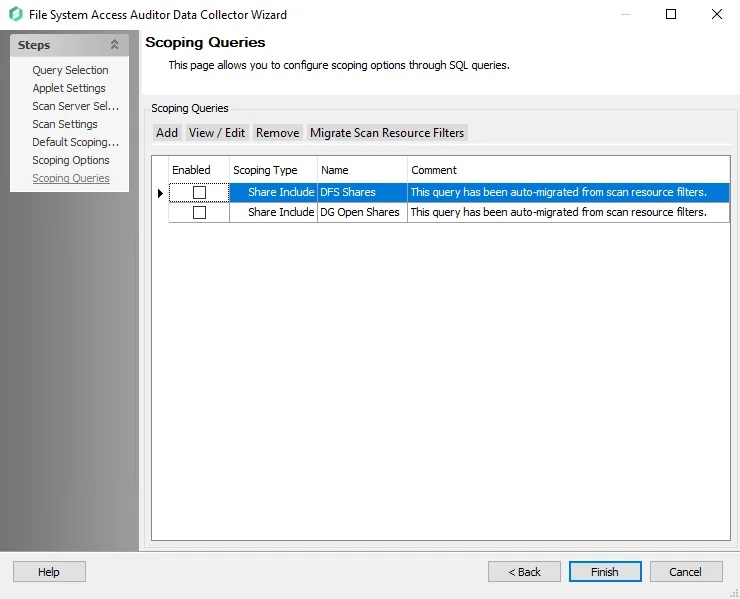
Migrate Scan Resource Filters – Migrates configured scan resource filters from the
FSAAConfig.xmlfile and imports them into the FSAA data collector-
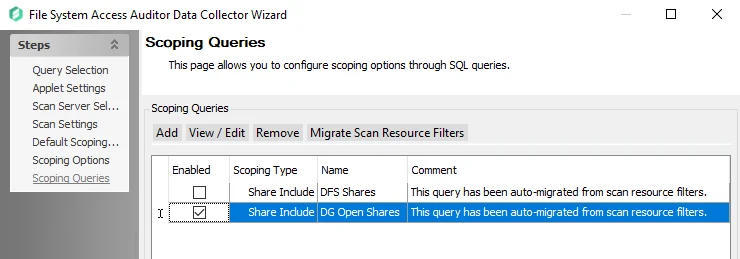
There are two Scan Resource Filters migrated by default:
-
DFS Shares
- Scoping Query that will query the SQL database and return a list of Distributed File System (DFS) Shares from the targeted host to include in the Scan
- Requires the 0-FSDFS System Scans, 1-FSAA System Scans, and 2-FSAA Bulk Import jobs to have been run as a prerequisite
-
DG Open Shares
- Scoping Query that will query the SQL database and return a list of Open Shares as identified by the 3-FSAA Exceptions job
- Requires the 1-FSAA System Scans, 2-FSAA Bulk Import, and 3-FSAA Exceptions jobs to have been run as a prerequisite
-
-
NOTE: These two Scan Resource Filters are both Share Include queries by default. To restrict the scan to only Open Shares or only DFS Shares it is necessary to also configure the Scoping Options on the previous page of the wizard to exclude all other shares.
For example, to restrict the scan to only Open Shares and exclude all other shares, the Scoping Options page should be configured as shown:
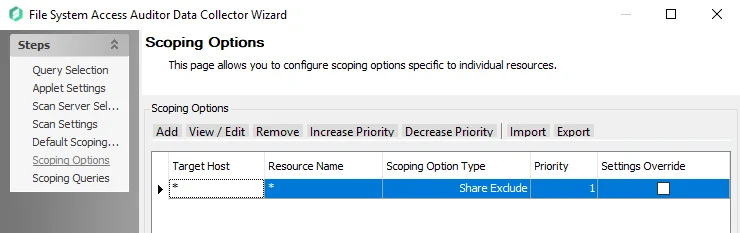
The Scoping Queries page should be configured as shown:
See the FSAA: Scoping Options topic for additional information and common scoping scenarios.
Scoping Query Configuration Window
The Scoping Query Configuration window allows you to create a custom Scoping Query to specify shares and folders to be included in or excluded from the scan.

Configure the following fields:
- Name – Enter a unique name for the scoping query
- Scoping Type – Choose from the dropdown menu the type of resource to scan
- Configure Query – Select Configure Query to open the Advanced Scoping Options Query Configuration window. See the Advanced Scoping Options Query Configuration Window topic for additional information.
RECOMMENDED: Provide a descriptive Comment on the Scoping Queries page.
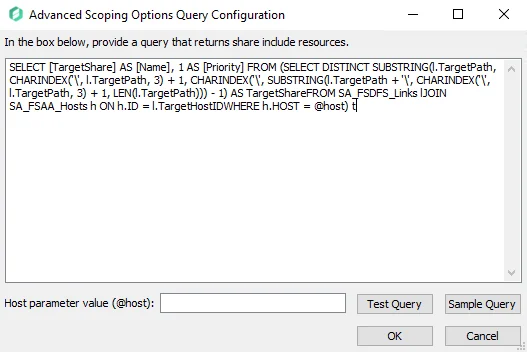
Advanced Scoping Options Query Configuration Window
Clicking Configure Query on the Scoping Query Configuration Window brings up the Advanced Scoping Options Query Configuration window.
Follow the steps to configure a query.
Step 1 – Enter a SQL Query that will return a list of resources to be included in or excluded from the scan.
NOTE: The target tables must reside within the Enterprise Auditor database and the result must return at least the following columns:
- Name
- Priority
Step 2 – (Optional) Enter a host in the Host parameter value (@host) textbox to test the query to retrieve the data for that host.
Step 3 – Select Test Query to open a preview of the results in the Query Results window. Ensure that the data being retrieved by the query is expected.
Step 4 – Click OK.
When a query configuration is enabled, the data collector runs against the target table to configure scoping for shares or folders in the environment.
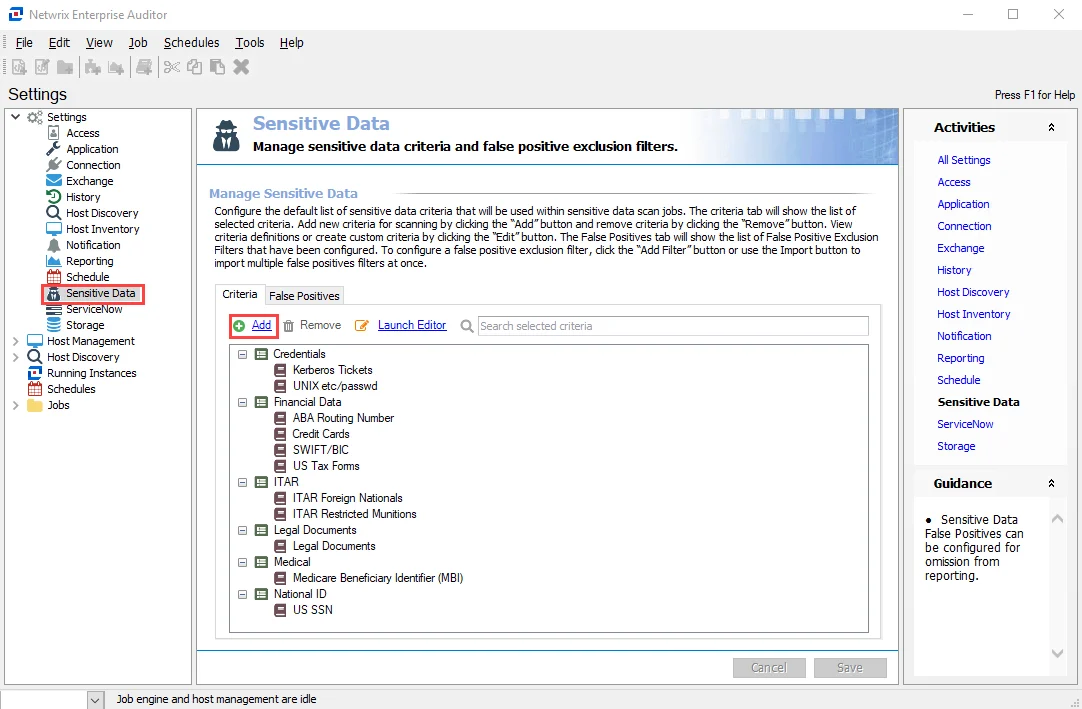
FSAA: SDD Criteria Settings
The SDD Criteria Settings page is where criteria to be used for discovering sensitive data during a scan is configured. It is a wizard page for the category of Sensitive Data Scan.
This page requires the Sensitive Data Discovery Add-On to be been installed on the Enterprise Auditor Console to define the criteria and enable the Sensitive Data Criteria Editor. See the Sensitive Data Discovery Add-On Installation topic for additional information.
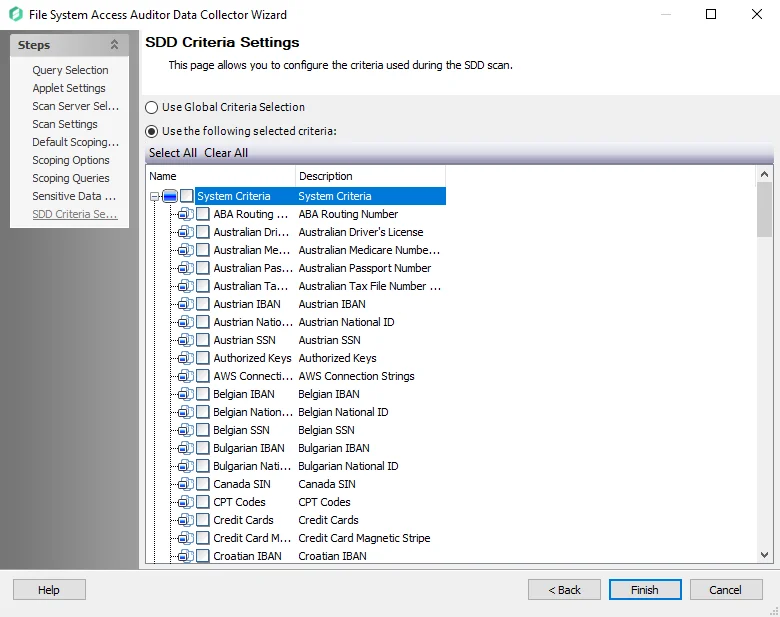
The options on the SDD Criteria Settings page are:
- Use Global Criterion Selection – Select this option to inherit sensitive data criteria settings from the Settings > Sensitive Data node. See the Sensitive Data topic for additional information.
- Use the following selected criteria – Select this option to use the table to select which sensitive data criteria to scan for
- Select All - Click Select All to enable all sensitive data criteria for scanning
- Clear All - Click Clear All to remove all selections from the table
- Select the checkboxes next to the sensitive data criteria options to enable them to be scanned for during job execution
The table contains the following types of criteria:
-
System Criteria – Lists pre-defined criteria
-
User Criteria – Lists user-defined criteria
Use the Sensitive Data Criteria Editor in the Settings > Sensitive Data to create and edit user-defined criteria. See the Sensitive Data Discovery Add-On Installation topic for additional information.
NOTE: Until the Sensitive Data Discovery Add-On is installed, only the headers for the System Criteria and User Criteria nodes are visible in the table.
FSAA: Sensitive Data Settings
The Sensitive Data Settings page is where sensitive data discovery settings are configured. It is a wizard page for the category of Sensitive Data Scan.
-
Don’t process files larger than: [number] MB – Limits the files to be scanned for sensitive content to only files smaller than the specified size
-
Include offline files (this may significantly increase scan times) – Includes offline files in the scan
-
Perform Optical Character Recognition for image files – Enables the data collector to scan for sensitive data within digital images of physical documents
NOTE: The OCR option is intended to work for clear scanned physical documents or documents directly converted to images, with standard fonts. It will not work for scanning photos of documents and may not be able to recognize text on images of credit cards, driver's licenses, or other identity cards.
-
Store discovered sensitive data – Stores discovered sensitive data in the database
-
Limit stored matches per criteria to [number] – Limits database storage of matches per criteria for discovered sensitive data
Use the radio buttons to select the File types to scan:
-
Scan all file types – Scans everything in a given environment
-
Scan custom file types – Select the checkboxes from the list of file and document types that are included in a sensitive data scan. The table contains the following categories and their sub-options available:
- Compressed Archive files
- Documents
- Image files
- Presentations
- Spreadsheets
- Text/Markup files
-
Perform differential scan of – Enables users to choose whether to employ incremental scanning:
- Files modified or newly discovered since last scan – Scans newly discovered files and files with a modified date after the previous scan date
- Files modified since [date] – Only scans files with a modified date after the specified date
- Files modified within the last [number] days – Only scans files with a modified date within the specified date range
Remember, the sensitive data discovery options require the Sensitive Data Discovery Add-On to be been installed on the Enterprise Auditor Console.
The Performance Options section allows the user to modulate the efficiency of SDD scans.
-
Number of SDD scan processes [number] – Increases the number of SDD scanner processes that spawn as part of a scan, increasing parallel scanning. The value should not exceed 2x the number of CPU threads available.
RECOMMENDED: For optimal performance, the total number of scan processes on a scan host should be 1 to 2 times the number of CPU threads available.
Standard Reference Tables & Views for the FSAA Data Collector
The FSAA Data Collector gathers essential File System information into standard reference tables. Unlike most of the other Enterprise Auditor data collectors, the FSAA Data Collector writes data to these tables regardless of the job executing the query.
File System Access Auditing Tables & Views
The tables and their associated views are grouped by types.
Structure Tables
| Tables | Details |
|---|---|
| SA_FSAA_Hosts | Contains the name and ID of all File System hosts that have been scanned for permissions |
| SA_FSAA_ImportHistory | Contains historical information about the import process for each host that is imported |
| SA_FSAA_Resources | Contains information about all audited resources, which can be file shares or folders. This provides information on the hierarchy relationship and references to the name and rights applied to that folder. |
Trustee Tables
| Tables | Details |
|---|---|
| SA_FSAA_Trustees | Contains information about any domain user, group, or security principal that has been assigned permissions. This table does not contain local users and groups since none of the trustees in this table are specific to any one host. |
| SA_FSAA_LocalTrustees | Contains information about any trustees that do not belong to a domain, primarily local users and local groups |
| SA_FSAA_TrusteeEquivalence | Contains information about Local Group membership. The trustees described can be found in the SA_FSAA_LocalTrustees table. |
Access Calculation Tables
| Tables | Details |
|---|---|
| SA_FSAA_Rights | Contains information about the actual permissions that have been granted to folders. Each entry summarizes the rights assigned to every trustee that would appear in the DACL of a folder. If a trustee is entered twice in a DACL, then that trustee’s rights will be summarized into a single row in this table. |
| SA_FSAA_Gates | Contains information about all gates, or access points, to shared data. This includes shared folders, administrative shares, and policies. |
| SA_FSAA_GatesProxy | Allows for quick determination of the shares through which a folder can be accessed as well as the child folders that can be accessed from a single share. The combination of ID and GateID is unique by host. |
| SA_FSAA_Policies | Contains information about what trustees are allowed or denied through the policies described in the SA_FSAA_Gates table |
| SA_FSAA_UnixRights | Contains information about permissions as they exist within the targeted Unix environment |
Calculated Tables
| Tables | Details |
|---|---|
| SA_FSAA_Exceptions | Contains information about security issues and concerns. One out-of-box exception stored inside this table is the Open Shares exception. This exception identifies where resources which are open to Everyone, Authenticated Users, or Domain users are located. |
| SA_FSAA_ExceptionTypes | Identifies how many instances of exceptions exist on the audited hosts. This table will contain a row for each exception type for each host. Exceptions are specific conditions set forth by Enterprise Auditor that are considered to be issues, such as folders with open access. |
Folder Content Tables
| Tables | Details |
|---|---|
| SA_FSAA_FileAges | Contains information about the age of files within folders by looking at the created timestamp |
| SA_FSAA_FileSizes | Contains information about the size of the files stored within audited folders. This table will tell the total size of every folder and the number of files within it. |
| SA_FSAA_FileTags | Contains file tag information at the folder level |
| SA_FSAA_FileTypes | Contains information about the types of files stored within audited folders by their extensions. This table will tell how many files of particular extension types exist within a folder. |
| SA_FSAA_ProbableOwners | Contains information about the owners of the files stored within audited folders. This table will tell what trustees own the most files and, therefore, may be the owners of the entire folder. |
| SA_FSAA_TagKeys | Contains the unique combination of the tags and ID |
| SA_FSAA_TagProxies | Contains the unique combination of the TagID and TagProxyID |
| SA_FSAA_Tags | Contains file tags and the unique ID |
System Tables
| Tables | Details |
|---|---|
| SA_FSAA_ScanHistory | Track the history of the scans for troubleshooting purposes |
| SA_FSAA_SchemaVer | Tracks the schema version of the tables for upgrading purposes |
Views are the recommended way for Enterprise Auditor users to obtain the information gathered by the FSAA Data Collector. They contain additional information for building queries easily. The following is an explanation of the corresponding views created for some of the tables generated by the FSAA Data Collector:
Permission Views
| Views | Details |
|---|---|
| SA_FSAA_PermissionsView | Contains any folder or share permission, regardless of whether they have been made directly to folders or are inherited |
| SA_FSAA_DirectPermissionsView | Contains only permissions which are directly applied to resources |
| SA_FSAA_ExpandedPermissionsView | Contains an expansion of any domain groups that are assigned rights |
| SA_FSAA_InheritedPermissionsView | Contains only the inherited permission values for the folder, share, or audited object |
| SA_FSAA_EffectiveAccessView | Correlates share folder permissions and group membership |
| SA_FSAA_ExceptionsView | Contains how many instances of exceptions exist on the audited hosts |
Resources Views
| Views | Details |
|---|---|
| SA_FSAA_ResourcesView | Contains information about file shares or folders |
| SA_FSAA_SharesTraversalView | Contains information about shared folders. It also provides useful information for the locations of these resources, including the local and network paths. Additionally, mount/junction points will show as a normal path traversal, unless the mount/junction point has system and hidden attributes set. |
| SA_FSAA_Paths | Contains information about the full paths to every distinct folder location for which permissions have been scanned and child folders exist |
Additional Views
| Views | Details |
|---|---|
| SA_FSAA_LocalGroupMembersView | Contains information on the local groups present on each host and the members of those groups |
File System Activity Auditing Tables & Views
The tables and their associated views are grouped by types.
Activity Changes Tables (FSAC)
| Tables | Details |
|---|---|
| SA_FSAC_ActivityEvents | Contains all of the logged activity events |
| SA_FSAC_DailyActivity | Contains roll-up information of the number of operations that have been performed by a trustee on a file or folder. This information is date-wise. |
| SA_FSAC_Exceptions | Contains information about security issues and concerns |
| SA_FSAC_ExceptionTypes | Identifies how many instances of exceptions exist on the audited hosts |
| SA_FSAC_OwnerChanges | Contains information about ownership changes on folders and files |
| SA_FSAC_PermissionChanges | Contains details around permission changes events for an activity |
| SA_FSAC_ProcessNames | Contains process names by which user have performed activity |
| SA_FSAC_RenameTargets | Contains the target path for rename operations |
| SA_FSAC_UserExceptions | Contains information about user security issues and concerns |
| SA_FSAC_UserExceptionTypes | Identifies how many instances of user exceptions exist on the audited hosts |
Views are the recommended way for Enterprise Auditor users to obtain the information gathered by the FSAA Data Collector. They contain additional information for building queries easily. The following is an explanation of the corresponding views created for some of the tables generated by the FSAA Data Collector:
Activity Change Views (FSAC)
| Views | Details |
|---|---|
| SA_FSAC_ActivityEventsView | Contains detailed activity event information |
| SA_FSAC_DailyActivityView | Contains the daily rollup statistics for activity events per day |
| SA_FSAC_DailyResourceActivityView | Contains the daily rollup statistics per folder |
| SA_FSAC_DailyUserActivityView | Contains the daily rollup statistics for activity events per user |
| SA_FSAC_ExceptionsView | Contains how many instances of exceptions exist on the audited hosts |
| SA_FSAC_PermissionChangesView | Contains detailed permission changes event information |
| SA_FSAC_UserExceptionsView | Contains how many instances of user exceptions exist on the audited hosts |
File System DFS Auditing Tables & Views
The tables and their associated views are grouped by types.
FSDFS Tables
| Tables | Details |
|---|---|
| SA_FSDFS_Links | Contains information on links |
| SA_FSDFS_Namespaces | Contains a list of all of the domain and server namespaces with corresponding links to the SA_FSAA_Hosts table |
Views are the recommended way for Enterprise Auditor users to obtain the information gathered by the FSAA Data Collector. They contain additional information for building queries easily. The following is an explanation of the corresponding views created for some of the tables generated by the FSAA Data Collector:
FSDFS Views
| Views | Details |
|---|---|
| SA_FSDFS_NamespacesTraversalView | Expands all of the scanned namespaces |
File System Sensitive Data Discovery Auditing (SEEK) Tables & Views
The tables and their associated views are grouped by types.
FSDLP Tables
| Tables | Details |
|---|---|
| SA_FSDLP_Criteria | Contains the sensitive data criteria which are selected for collection by the scan engine (data collector configuration) |
| SA_FSDLP_ImportHistory | Contains historical information about the import process for each host that is imported |
| SA_FSDLP_Matches | Contains rolled up aggregate counts of the sensitive data criteria matches found during the scan |
| SA_FSDLP_MatchHits | Contains the actual sensitive data discovered within files which matched selected criteria |
| SA_FSDLP_MatchHits_SubjectProfile | Contains the actual sensitive data within files that matched selected criteria for subject profiles |
Views are the recommended way for Enterprise Auditor users to obtain the information gathered by the FSAA Data Collector. They contain additional information for building queries easily. The following is an explanation of the corresponding views created for some of the tables generated by the FSAA Data Collector:
FSDLP Views
| Views | Details |
|---|---|
| SA_FSDLP_MatchesView | Surfaces all relevant data about the files, its location, and the type of criteria found |
| SA_FSDLP_MatchHitsView | Surfaces all actual sensitive data discovered within files which matched selected criteria |
FSAA: FSAA Update Service Setting
The FSAA Update Service Setting page is where the File System Proxy Service can be automatically updated on hosts where the service has already been installed. It requires the File System Proxy Service to be v8.0 or later prior to using this feature. It is a wizard page for the category of Update Proxy Service.
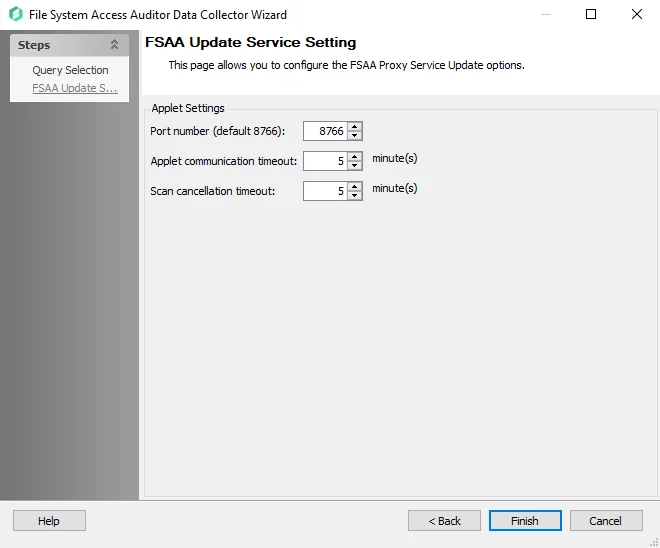
Configure the settings for the targeted File System Proxy Service:
- Port number – The default port number is 8766
- Applet communication timeout: [number] minute(s) – This option determines the length of time (in minutes) the Enterprise Auditor Console attempts to reach the proxy before giving up. Depending on the job configuration, the data collector behaves in one of three ways after the timeout value has been exceeded.
- Scan cancellation timeout: [number] minute(s) – When selected, this option will timeout the applet if there is an attempt to pause the scan and the applet does not respond
See the FSAA: Applet Settings topic for additional information.
Additional FSAA Workflows
The following FSAA Data Collector query categories that provide additional functionality:
-
Remove scan executables and data – Removes file system access audit scan applet and data from remote server
-
Update proxy service – Update FSAA binaries for hosts running the File System Proxy Service
NOTE: Requires the existing File System Proxy Service to be v8.0 or later.
-
Remove host data – Removes host from all SQL tables created by the FSAA Data Collector and deletes StrucMap (removes host assigned to job where query exists)
Additional workflows include:
- Remove Host and Criteria SDD Data – Removes SDD data for a host or a criteria from the SQL tables
- Drop Tables & Views – Drops the standard reference tables and views
Remember, the FSAA Data Collector always records data in Standard Reference Tables, no matter what job it is applied to.
Remove File System Access Scan Category
The FSAA Data Collector can be used to clean-up or troubleshoot the applet and proxy scanning servers. This would need to be done through a new job’s query. Set the host list and Connection Profile to target the desired applet and proxy servers.
Follow these steps to build a new query using the FSAA Data Collector with the Remove scan executables and data category.
Step 1 – Navigate to the Configure node of a new or chosen job and select the Queries node.
Step 2 – In the Query Selection view, click the Create Query link. The Query Properties window displays.
Step 3 – Select the Data Source tab. From the Data Collector drop-down menu, select FILESYSTEMACCESS and then click the Configure button. The File System Access Auditor Data Collector Wizard opens.
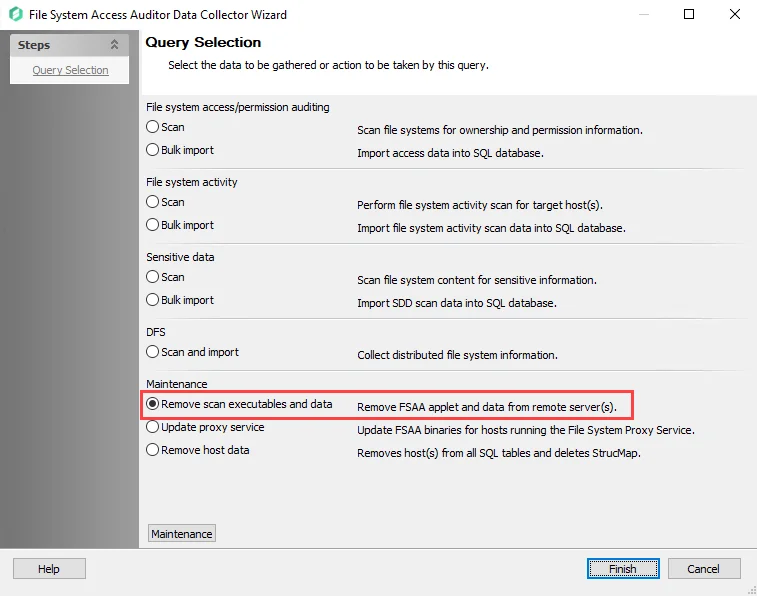
Step 4 – On the Query Selection page, select the Remove scan executables and data category.
Step 5 – Click Finish to save the selection and close the wizard. Then click OK to close the Query Properties window.
This job has now been configured to run the FSAA Data Collector to remove the file system access audit scan applet and data from the target server. Run the job to clean-up the targeted hosts.
Update Proxy Service Category
The FSAA Data Collector can be used to upgrade the File System Proxy Service already installed on proxy servers. The FS_UpdateProxy Job is preconfigured to run with the default settings with the category of Update proxy service. It is available through the Instant Job Library under the File System library.
The Update Proxy Service category option enables users with the ability to update v8.0+ File System Proxy Service installations to newer versions. When this query is employed, the job compresses the updated binaries and deploy them to the proxy server. Once the proxy server has no active sessions, the Netwrix Enterprise Auditor FSAA Proxy Scanner service shuts down and the components are updated. Finally, the service restarts itself.
NOTE: This option is not for updating v7.x File System Proxy installations. Those must be manually updated to at least v8.0 on the proxy server before this query can be used to automate the process.
Follow the Upgrade Proxy Service Procedure and use the FS_UpdateProxy Job.
Remove Host Category
The FSAA Data Collector can be used to clean-up the Standard Reference Tables by removing data for particular hosts. This would need to be done through a new job’s query. The host to be removed is set as the host list for the new job. The Connection Profile applied should be the same as the one used for the associated FileSystem > 0.Collection > … Bulk Import Job.
CAUTION: Be careful when applying this query task, as it results in the deletion of collected data. Ensure proper configuration prior to job execution.
RECOMMENDED: Manually enter individual hosts into the host list executing this query.
Follow the steps to build a new query using the FSAA Data Collector with the Remove host data category.
Step 1 – Navigate to the Configure node of a new or chosen job and select the Queries node.
Step 2 – In the Query Selection view, click the Create Query link. The Query Properties window displays.
Step 3 – Select the Data Source tab. From the Data Collector drop-down menu, select FILESYSTEMACCESS and then click Configure. The File System Access Auditor Data Collector Wizard opens.
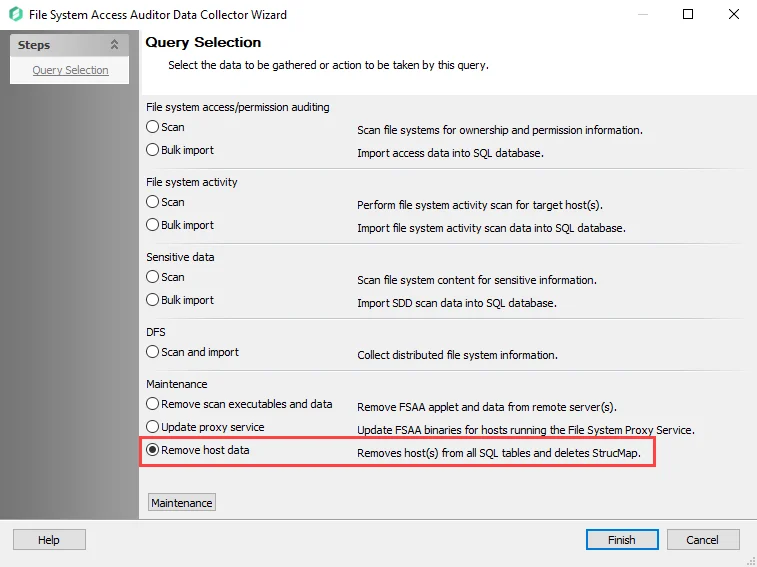
Step 4 – On the Query Selection page, select the Remove host data category.
Step 5 – Click Finish to save the selection and close the wizard. Then click OK to close the Query Properties window.
This job has now been configured to run the FSAA Data Collector to remove the host identified in the job’s Configure > Hosts node. Run the job to clean-up the targeted hosts.
Remember, this job deletes data from the Enterprise Auditor database. Use caution and ensure proper configuration prior to job execution.
Remove Host and Criteria SDD Data
The FS_SDD_DELETE job removes host and criteria sensitive data matches from the Tier 1 database. It is preconfigured to run analysis tasks with temporary tables that requires modification prior to job execution. It is available through the Instant Job Library under the File System library. See the Instant Job Wizard topic for additional information.

The 0.Collection Job Group must be run before executing the FS_SDD_DELETE Job.
Analysis Tasks for the FS_SDD_DELETE Job
The analysis tasks are deselected by default. View the analysis tasks by navigating to the Jobs > FS_SDD_DELETE > Configure node and select Analysis.
CAUTION: Applying these analysis tasks result in the deletion of collected data.
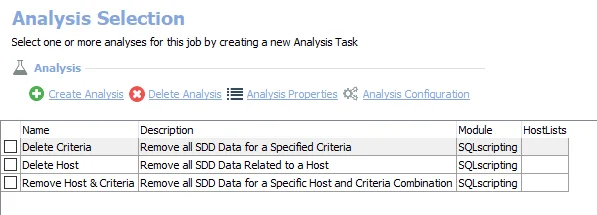
- Delete Criteria – Remove all SDD Data for a Specified Criteria
- Delete Host – Remove all SDD Data Related to a Host
- Remove Host & Criteria – Remove all SDD Data for a Specific Host and Criteria Combination
Configure the FS_SDD_DELETE Analysis Tasks
Follow the steps to configure and run the analysis tasks.
Step 1 – Prior to job execution, modify the desired analysis tasks using the Customizable Analysis Parameters for FS_SDD_DELETE Job instructions.
Step 2 – In the Analysis Selection Pane, check the type of analysis task that will be run.
Step 3 – Right-click the FS_SDD_DELETE Job and select Run Job. The analysis execution status is visible from the Running Instances node.
Step 4 – When the job has completed, return to the Analysis Selection Pane and deselect all analysis tasks.
CAUTION: Do not leave these analysis tasks checked in order to avoid accidental data loss.
All of these tables have been dropped from the SQL Server database and the data is no longer available.
Customizable Analysis Parameters for FS_SDD_DELETE Job
A customizable parameter enables Enterprise Auditor users to set the sensitive data values that will be deleted during this job’s analysis.
| Analysis Task | Customizable Parameter Name | Value Indicates |
|---|---|---|
| Delete Host | #hosts | List of Host Names to be removed |
| Delete Criteria | #Criteria | List of Criteria to be removed |
| Remove Host & Criteria | #Criteria #hosts | List of Criteria and Host Names to be removed |
The parameters that can be customized are listed in a section at the bottom of the SQL Script Editor. Follow the steps to customize analysis task parameters.
Step 1 – Navigate to the FS_SDD_DELETE > Configure node and select Analysis.
Step 2 – In the Analysis Selection view, select the desired analysis task and click on Analysis Configuration. The SQL Script Editor opens.
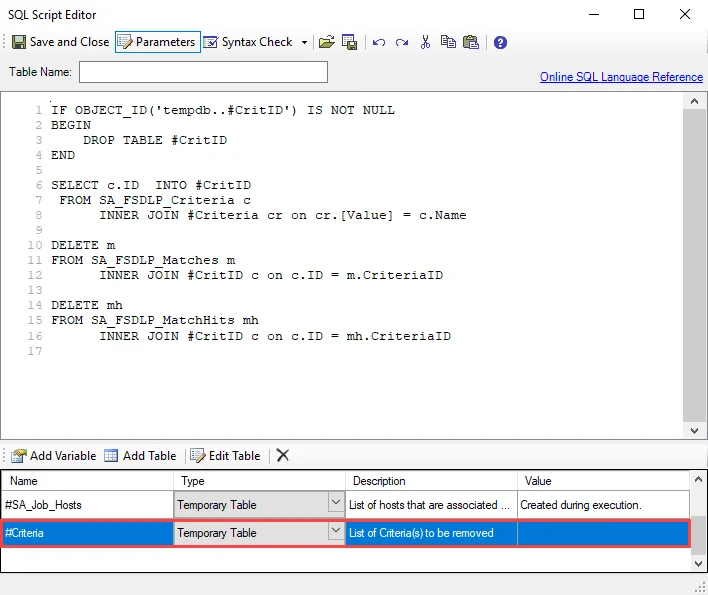
Step 3 – In the Parameters section at the bottom of the editor, select either the #Criteria or #hosts row, depending on the analysis task chosen, and then Edit Table. The Edit Table window opens.
CAUTION: Do not change any parameters where the Value states Created during execution.

Step 4 – Use the Add New Item button to enter host names or criteria to the temporary table list manually, or select the Browse button to upload a list of hosts in CSV format. Click OK to save any changes. Other Edit Table buttons include:
- Edit a Value
- Delete this row/column
- Move up
- Move down
Step 5 – Click Save and Close to finalize the customization and close the SQL Script Editor.
The job is now ready to be executed.
Drop Tables & Views
If it becomes necessary to clear the FSAA Data Collector tables and views to resolve an issue, the FS_DropTables Job is preconfigured to run analysis tasks that drop functions and views for the File System Solution as well as the standard tables and views generated by the FSAA Data Collector.
It is available through the Instant Job Library under the File System library. Since this job does not require a host to target, select Local host on the Hosts page of the Instant Job Wizard. See the Instant Job Wizard topic for additional information.

The 0.Collection Job Group must be run before executing the FS_DropTables Job.
Analysis Tasks for the FS_DropTables Job
The analysis tasks are deselected by default. View the analysis tasks by navigating to the Jobs > FS_DropTables > Configure node and select Analysis.
CAUTION: Applying these analysis tasks result in the deletion of collected data.
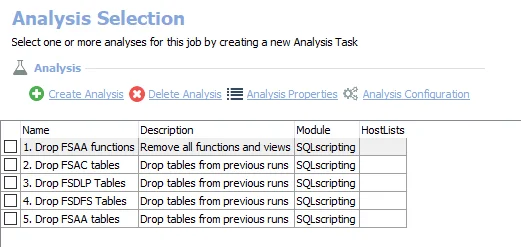
-
- Drop FSAA functions – Removes all functions and views from previous runs of the File System Solution
-
- Drop FSAC tables – Drops the File System Activity Auditing tables imported from the previous runs
-
- Drop FSDLP Tables – Drops the File System Sensitive Data Discovery Auditing tables imported from the previous runs
-
- Drop FSDFS Tables – Drops the File System DFS Auditing tables imported from the previous runs
-
- Drop FSAA Tables – Drops File System Access Auditing tables imported from the previous runs
Do not try to run these tasks separately, as they are designed to work together. Follow these steps to run the analysis tasks:
Step 1 – In the Analysis Selection Pane, click Select All. All tasks will be checked.
Step 2 – Right-click the FS_DropTables Job and select Run Job. The analysis execution status is visible from the Running Job node.
Step 3 – When the job has completed, return to the Analysis Selection Pane and click Select All to deselect these analysis tasks.
CAUTION: Do not leave these analysis tasks checked in order to avoid accidental data loss.
All of these tables have been dropped from the SQL Server database and the data is no longer available.
SystemInfo: Category
The Category page contains the following categories:
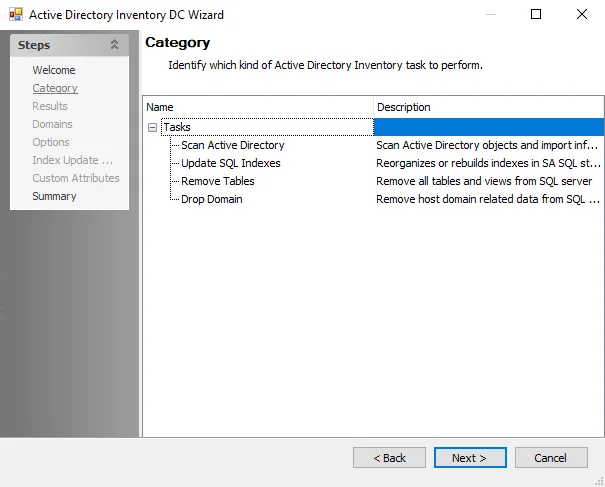
The report categories are:
- Computer System – Returns hardware and software related information
- Files Shares – Returns file share, permissions, and content information
- Logged On Users – Returns information about users logged on to local and remote machines
- Network Interface(NIC) – Returns network adapter configuration information
- Open File Shares – Returns information on accessible file shares
- Open Files – Returns information on locked and in use files
- Scheduled Tasks – Returns information on scheduled tasks
- Sessions – Returns information on local and remote sessions
SystemInfo: File Types
The File Types page is where to enable count file types and specify filename masks if it is desired to count files of given types. Two properties are generated for every mask provided, one for size and one for count. It is a wizard page for the category of File Shares.
To enable counting file types, select the Count file types checkbox. To add new file types, click Add New. To load a list of default file types for counting, click Load Defaults. To remove a file type, select the file type and click Remove.
SystemInfo: Job Scope
The Job Scope page is where to select whether or not scoping should be used during execution. It is a wizard page for the category of File Shares.
Select from the following options:
- Don’t Use Scoping
- Use Scoping
SystemInfo: Options
The Options page contains options for the Files Shares category. It is a wizard page for the categories of:
- File Shares
- Network Interface (NIC)
- Open File Shares
NOTE: This is a legacy feature, as it is more efficient to use the FileSystemAccess (FSAA) Data Collector to gather this information.
File Shares and Open File Shares
For the File Shares and Open File Shares categories:
Select from the following options to control the depth of processing and the amount of information to be returned by the query:
-
Include file level permissions
-
Do not collect inherited file permissions
- Return All Folders
-
-
Enumerate subfolders within shared folders
- Limit returned subfolders depth to – Specify the number of levels
-
Size units for corresponding properties – Select the desired size unit:
- Bytes
- KBytes
- Mbytes
- GBytes
Network Interface (NIC)
For the Network Interface (NIC) category:
The configurable option is:
- Show primary IP address only – Select this checkbox to return data for the primary network interface only
SystemInfo Data Collector
The SystemInfo Data Collector extracts information from the target system based on the selected category. The SystemInfo Data Collector is a core component of Enterprise Auditor, but it has been preconfigured within the Windows Solution. While the data collector is available with all Enterprise Auditor license options, the Windows Solution is only available with a special Enterprise Auditor license. See the Windows Solution topic for additional information.
Protocols
- Remote Registry
- RPC
- WMI
Ports
- TCP 135-139
- Randomly allocated high TCP ports
Permissions
- Member of the Local Administrators group
SystemInfo Query Configuration
The SystemInfo Data Collector is configured through the System Info Data Collector Wizard, which contains the following wizard pages:
- Welcome
- SystemInfo: Category
- SystemInfo: Results
- SystemInfo: Shares List
- SystemInfo: Probable Owner
- SystemInfo: VIP Membership
- SystemInfo: File Types
- SystemInfo: Options
- SystemInfo: Summary
The Welcome page can be hidden by selecting the Do not display this page the next time checkbox when the wizard is open and configuration settings are saved.
SystemInfo: Probable Owner
On the Probable Owner page, select options for determining the owner using weighted calculations. This page is enabled when the Probable Owner property is selected on the Results page.
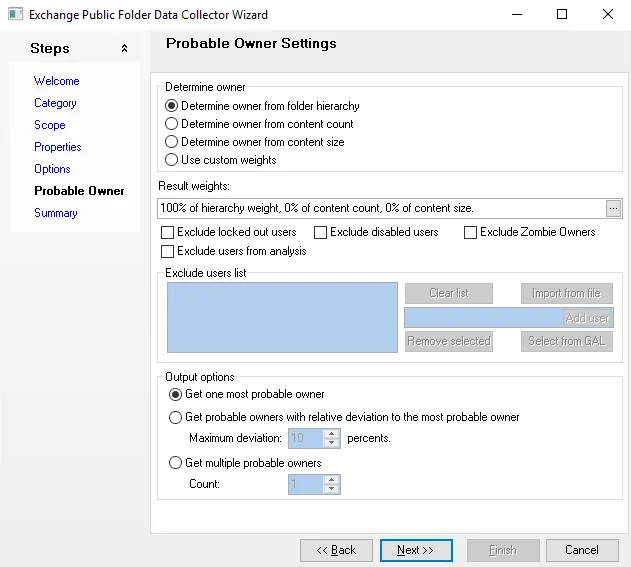
Determine owner
In the Determine owner section, select from the following options:
- Determine owner from User Profile Last Modified Date
- Determine owner from User Profile Size
- Determine owner from Current User
- Determine owner from Last User
- Custom weights – Select this radio button to use custom weights to determine the probable owner. These weights can be set by clicking the ellipsis next to the Result weights box to open the Probable Owner Settings window.

The Result weights box displays the custom weights set in the Probable Owner Settings window.
Exclude users list
In the Exclude users list section, select from the following checkboxes:
- Exclude users by list – Enables the Set List of Users to Exclude button
- Exclude locked out users
- Exclude disabled users

Click Set Users to Exclude to open the Probable Owner Settings window:
- User – Enter users in the following format:
Domain\Username - Add user – Click Add user to add the users entered in the User box to the excluded users list
- Removed selected – Select a user and click Removed selected to remove the user
- Clear list – Click Clear list to remove the list of excluded users
- Select users or groups – Click Select users or groups to open the Select User or Group window and select users or groups to add the excluded users list
- Import from file – Select Import from file to open the Import File Dialog and import files to add to the excluded users list
Output options
In the Output options section, select from the following options:
-
Get the most probable owner(s)
-
Get probable owners with relative deviation to the most probable owner – Enables the following option:
- Maximum deviation: [number] percents
-
Get probable owners limited by probability – Enables the following options:
- Probability threshold [number] percents
- Return at least one probable owner regardless of probability
Select the following checkbox if desired:
- Return the top [number] ranked probable owners
SystemInfo: Results
The Results page is used to select which properties are gathered out of those available for the category. It is a wizard page for all categories.

Properties can be selected individually or the Check all, Uncheck all, and Reset to defaults buttons can be used. All selected properties are gathered. Available properties vary based on the category selected.
SystemInfo: Shares List
On the Shares List page, configure the shares to include and exclude. It is a wizard page for the category of File Shares.

Select from the following options to exclude system or hidden shared folders from enumeration:
- Exclude system and special shared folders
- Exclude hidden shared folders
Select the following checkbox to identify nested shares and exclude them from the output:
- Skip Nested Shares
To configure individual shares to include or exclude, enter a share name and click Add as inclusion or Add as exclusion. To remove the share from the list, select the share and click Remove selected. To clear the list of inclusions and exclusions, click Clear list.
SystemInfo: Summary
The Summary page displays a summary of the configured query. It is a wizard page for all categories.
Click Finish to save configuration changes. If no changes were made, it is a best practice to click Cancel to close the System Info Data Collector Wizard ensuring that no accidental clicks are saved.
SystemInfo: VIP Membership
The VIP Membership provides the option to add members to a VIP List and exclude them from contact about probable ownership. Any users can be added to VIP membership. This page is enabled when the VIPList property is selected on the Results page.
To add a user to the VIPList members table, enter the username in the User box in the
Domain\Username format and click Add user. To remove a user from the list, select the user and
click Remove selected. To clear the list, click Clear list.
To select users or groups to add to the VIPList members table, click Select users or groups to open the Select User or Group browser window and add a user or group. To import a file, click Import from file to open the Import File Dialog browser window.