Domain Target Requirements, Permissions, and Ports
The Enterprise Auditor for Active Directory Permissions Analyzer Solution is compatible with the following Active Directory versions as targets:
- Windows Server 2016 and later
- Windows 2003 Forest level or higher
NOTE: See the Microsoft Windows Server end of support and Microsoft 365 Apps article for additional information.
Domain Controller Requirements
The following are requirements for the domain controllers to be scanned:
- .NET Framework 4.5+ installed
- WINRM Service installed
Data Collectors
Successful use of the Enterprise Auditor Active Directory Permissions Analyzer solution requires the necessary settings and permissions in a Microsoft® Active Directory® environment described in this topic and its subtopics. This solution employs the following data collectors to scan the domain:
Permissions
- LDAP Read permissions
- Read on all AD objects
- Read permissions on all AD Objects
Ports
The following firewall ports are needed:
For ADInventory Data Collector
- TCP 389
- TCP 135-139
- Randomly allocated high TCP ports
For ADPermissions Data Collector
- TCP 389
- TCP 135 – 139
- Randomly allocated high TCP ports
Target Amazon Web Service Requirements, Permissions, and Ports
The Enterprise Auditor for AWS Solution provides the ability to audit Amazon Web Services (AWS) to collect IAM users, groups, roles, and policies, as well as S3 permissions, content, and sensitive data from target AWS accounts. It scans:
- Amazon AWS IAM
- Amazon AWS S3
Data Collector
This solution employs the following data collector to scan the target environment:
Permissions
The permissions required to scan an AWS account are based on the type of information being collected:
-
To collect details about the AWS Organization, the following permission is required:
- organizations:DescribeOrganization
-
To collect details regarding IAM, the following permissions are required:
- iam:GenerateCredentialReport
- iam:GenerateServiceLastAccessedDetails
- iam:Get*
- iam:List*
- iam:Simulate*
- sts:GetAccessKeyInfo
-
To collect details related to S3 buckets and objects, the following permissions are required:
- s3:Describe*
- s3:Get*
- s3:HeadBucket
- s3:List*
This provides a least privilege model for your auditing needs. See the Configure AWS for Scans topic for additional information.
Ports
The following firewall ports are needed:
For AWS Data Collector
- 443
Target Box Requirements, Permissions, and Ports
The Enterprise Auditor for Box scans:
- Box for Business
Box Requirements
The following are requirements from the target environment:
- Enterprise_ID of the target Box environment
Data Collectors
This solution employs the following data collector to scan the target environment:
Permissions
For .Active Directory Inventory Prerequisite
-
Read access to directory tree
-
List Contents & Read Property on the Deleted Objects Container
NOTE: See the Microsoft Searching for Deleted Objects article and the Microsoft Dsacls article for additional information.
For Box Data Collection
Box scans require the Enterprise Admin or Co-Admin account credentials to generate an authorization code. The following can be used as a least privilege model:
-
Enterprise Admin account
-
Co-Admin account with the permission to Run new reports and access existing reports enabled
- See the Box Co-Admin Permissions Required to Run Reports article for details on enabling this permission
NOTE: Scans run with Co-Admin account credentials will complete. However, the data returned from the scan might not include content owned by the Enterprise Admin account.
See the Recommended Configurations for the Box Solution topic for additional information.
Ports
The following firewall ports are needed:
For ADInventory Data Collector
- TCP 389
- TCP 135-139
- Randomly allocated high TCP ports
For Box Data Collector
- TCP 80
- TCP 443
Configure AWS for Scans
In order to scan multiple AWS accounts using one account you need to create a role in each target account, so that It can provide the designated scanning account permissions to scan resources it controls. This is achieved through the following steps which will need to be completed leveraging a user with administrative access to each target account:
Step 1 – Create a Managed Policy in each target account that will be used to allow access to account (S3, Org and IAM).
Step 2 – Create a Role in each target account that will be used to allow access to listing IAM users.
Step 3 – Create a Managed Policy in the designated scanning account that will be used to allow the service account to assume the configured role in each target account.
Step 4 – Add Role to Enterprise Auditor. The Role created in the scanning account will need to be added to the 1-AWS_OrgScan, 2-AWS_S3Scan, and 3-AWS_IAMScan job query configurations. See the AWS: Login Roles topic for additional information.
Once these steps are completed, the role must be added to the AWS queries within Enterprise Auditor.
Create a Managed Policy in Each Target Account
The following steps will need to be completed in each target account.
Step 1 – Sign into the Identity and Access Management Console (IAM) as an administrator of the Trusting account.
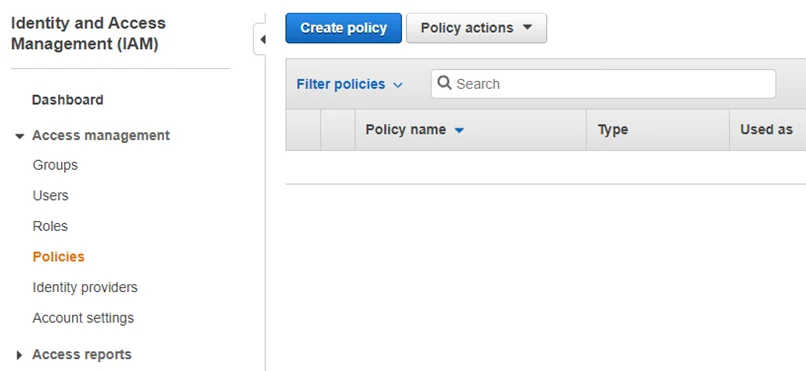
Step 2 – Browse to the Identity and Access Management (IAM) Console. Navigate to Policies and click Create policy.

Step 3 – Select the JSON tab.
Step 4 – Paste the following:
{
    "Version": "2012-10-17",
    "Statement": [
        {
            "Sid": "CapabilityIamScan",
            "Effect": "Allow",
            "Action": [
                "iam:GenerateCredentialReport",
                "iam:GenerateServiceLastAccessedDetails",
                "iam:Get*",
                "iam:List*",
                "iam:Simulate*",
        "sts:GetAccessKeyInfo"
            ],
            "Resource": "*"
        },
        {
            "Sid": "CapabilityS3Scan",
            "Effect": "Allow",
            "Action": [
                "s3:Describe*",
                "s3:Get*",
                "s3:HeadBucket",
                "s3:List*"
            ],
            "Resource": "*"
        }
    ]
}
Step 5 – Click Review Policy.
Step 6 – Enter a name for the policy in the Name box.

Step 7 – Click Create Policy.
NOTE: If the designated scanning account is not in Root (Master Account), create a second policy in the Master Account with the following JSON definition:
{
    "Version": "2012-10-17",
    "Statement": [
        {
            "Sid": "RequiredCapabilityOrgScan",
            "Effect": "Allow",
            "Action": [
                "iam:GenerateOrganizationsAccessReport",
                "organizations:Describe*",
                "organizations:List*"
            ],
            "Resource": "*"
        }
    ]
}
The next step is to create a role in each target account that will be used to allow access to listing IAM users.
Create a Role in Each Target Account
The following steps will need to be completed in each target account. For this, you will need the Account ID of the designating scanning account.
NOTE: If the scanning account is also a target account, be sure to complete these steps for the scanning account as well.
Step 1 – Sign into the Identity and Access Management Console (IAM) as an administrator of the target account.
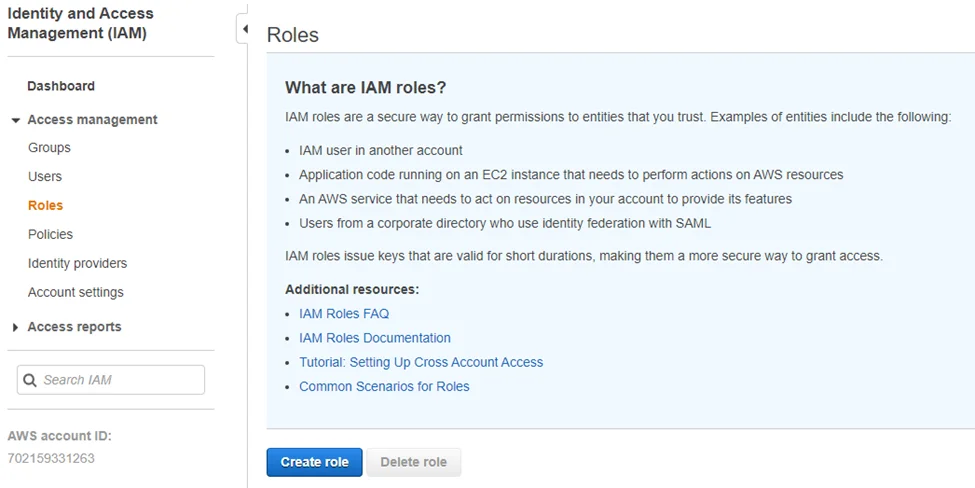
Step 2 – Navigate to Access management > Roles and click Create role.
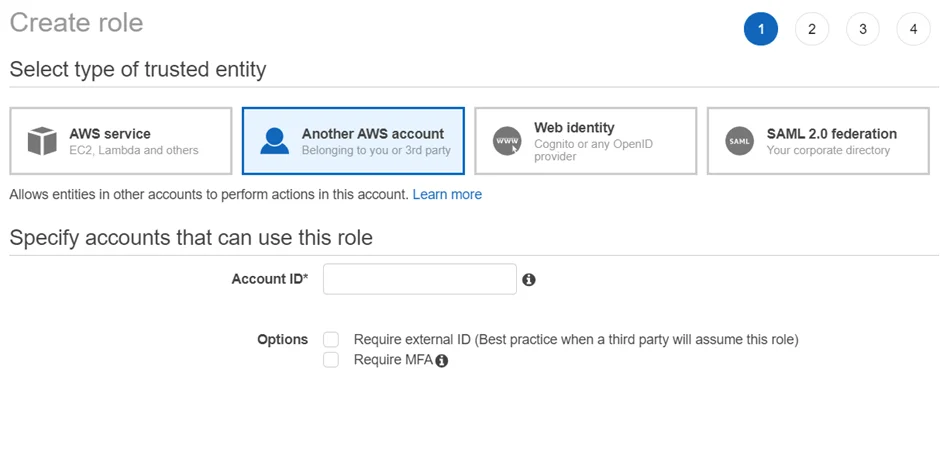
Step 3 – Select the Another AWS Account option and add the Account ID of the scanning account that will be leveraged within Enterprise Auditor.
Step 4 – Click Next: Permissions.

Step 5 – Add the policy or policies created earlier in this topic to this role.
Step 6 – Click Next: Tags.
Step 7 – Click Next: Review.
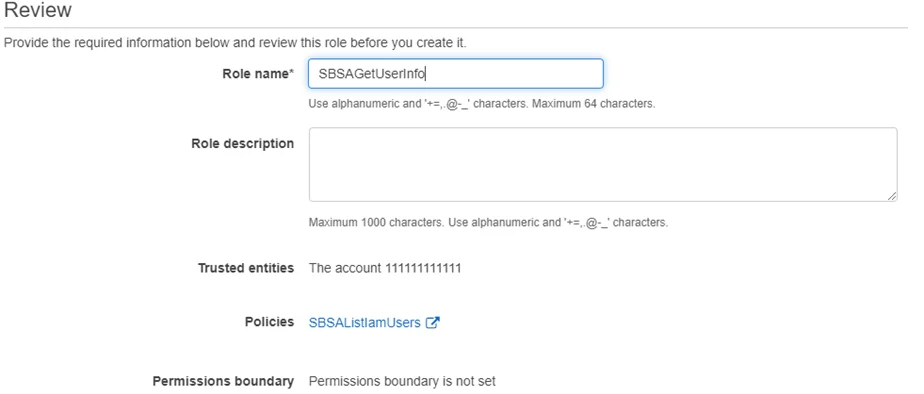
Step 8 – Enter a Role name.
Step 9 – Click Create Role.
The next step is to create a Managed Policy in the designated scanning account that will be used to allow the service account to assume the configured role in each target account.
Configure the Scanning Account
Create a Managed Policy in the scanning account that will be used to allow the user to assume the roles configured in each target account.
Step 1 – Sign into the Identity and Access Management Console (IAM) as an administrator of the scanning account.
Step 2 – Navigate to Access Management > Policies and click Create policy.
Step 3 – Select the JSON tab.
Step 4 – Paste the following:
{
"Version": "2012-10-17",
"Statement": [
{
"Sid": "RequiredCapabilityOrgScan",
"Effect": "Allow",
"Action": [
"iam:GenerateOrganizationsAccessReport",
"organizations:Describe*",
"organizations:List*"
],
"Resource": "*"
},
{
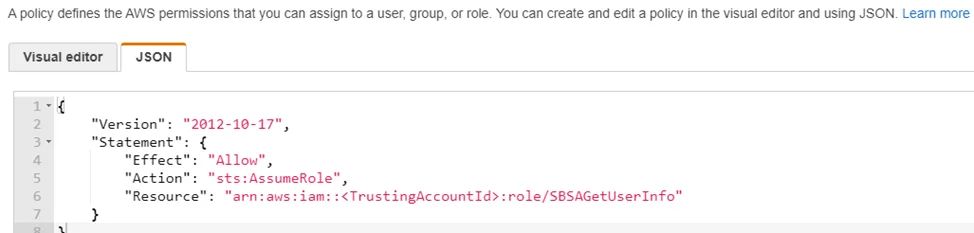
"Sid": "RequiredCapabilityMemberAccountAccess",
"Effect": "Allow",
"Action": "sts:AssumeRole",
"Resource": "arn:aws:iam::*:role/ROLENAME"
}
]
}
NOTE: Replace ROLENAME with the name of the role that was created. If the ROLENAME is
different in each account, then a policy will need to be created for each distinct role name.
Step 5 – Click Review Policy.

Step 6 – Enter a Policy Name.
Step 7 – Click Create Policy.
Step 8 – Create a group with the service account user and assign both policies to this group.
Step 9 – Under Access Management > Users, select the service account user.

Step 10 – In the Security credentials tab, click Create access key. Make sure to note the Access key ID and Secret access key which need to be input into Enterprise Auditor.
You can now create the Connection Profile for the AWS Solution. See the Amazon Web Services for User Credentials topic for additional information.
Azure Information Protection Target Requirements
Microsoft® Azure is a cloud-based computing platform that provides a range of services, such as file storage. Azure uses Azure Information Protection (AIP) labels, a Microsoft tool used to classify and protect stored files. Enterprise Auditor employs the File System Solution to execute Access Auditing (FSAA) and/or Sensitive Data Discovery Auditing scans in order to find AIP Protection labels and scan protected (i.e. encrypted) files for sensitive data.
This document provides information needed to properly configure access required by Enterprise Auditor to successfully scan for Azure Information Protection labels in a targeted environment.
NOTE: Enterprise Auditor does not scan for AIP Marking labels, only Protection labels.
Workflow for Scanning AIP Labels
Before the Enterprise Auditor File System solution can scan for Azure Information Protection (AIP) labels, certain prerequisites are required both in Enterprise Auditor and Azure environments.
-
Enable settings in FSAA Data Collector in Enterprise Auditor.
- See the FileSystemAccess Data Collector section in the File System Solution topic for additional information
Prerequisites
Ensure the following prerequisites are met before configuring AIP scanning:
-
Microsoft Entra ID Admin credentials
-
The PowerShell
Install-Modulecommand requires:- PowerShell 5.0 (Run as Administrator)
- Windows Server 2016and later
-
Active Directory Rights Management Services Client 2.1 installed on the server where the FSAA applet or proxy is being run
Rights Management Service Client Installation
The Rights Management Service Client must be installed on the applet servers where FSAA is running. This may be the local Enterprise Auditor server, a Proxy server, or a File Server running in applet mode.
-
To install the Rights Management Service Client 2.1 on the server where the scan is taking place, go to the Microsoft download center:
https://www.microsoft.com/en-us/download/details.aspx?id=38396
RECOMMENDED: Read the System Requirements and Install Instructions provided by Microsoft to complete the installation.
Create a Service Principal Account using PowerShell
Follow the steps to create a service principal account with a symmetric key to connect to AIP:
NOTE: All PowerShell commands should be run in order through PowerShell as an Admin.
Step 1 – Open up PowerShell (Administrator).
Step 2 – Install and import MsOnline module:
Install-Module MsOnline
Import-Module MsOnline
Step 3 – Connect to Azure with the Connect-MsolService command. Enter the Azure credentials in
the Sign in to your account window that displays from Microsoft.
Step 4 – Once successfully connected to Azure, create a service principal with the following command:
New-MsolServicePrincipal
Enter the DisplayName of the new service principal name. (For example, AIP_EnterpriseAuditor)
Step 5 – Take note and save the Symmetric Key and AppPrincipalID to be used in later steps.
CAUTION: Do not lose the symmetric key. It is not retrievable again once the PowerShell window is closed.
The service principal account with the proper key has been created.
Enable the Account as an AIP Super User using PowerShell
Follow the steps to enable the Service Principal Account in AIP as a Super User:
NOTE: All PowerShell commands should be run in order through PowerShell as an Admin.
Step 1 – In PowerShell, install Microsoft Azure Active Directory Rights Manager (AIPService) module:
Install-Module AIPService
Import-Module AIPService
Step 2 – Connect to Azure using the Connect-AIPService command and supply Azure credentials in
the Sign in to your account window that displays from Microsoft.
Step 3 – Add the service principal to the Azure AD Rights Management service super users, using the AppPrincipalID saved from the steps in the Create a Service Principal Account using PowerShell section:
Add-AipServiceSuperUser-ServicePrincipalID <AppPrincipalID>
Step 4 – Enable the DisplayName account using the following command:
Enable-AIPServiceSuperUserFeature
The Service Principal Account is now added to the Rights Management service as a Super User, and the Super User feature is enabled.
Add User to the AIP Role in Microsoft® Azure
In Microsoft Azure, add the Account to the Azure Information Protection Administrator Role.
Step 1 – Log into http://portal.azure.com with Azure credentials and select Microsoft Entra ID from the list of resources on the left-hand pane.
Step 2 – Navigate to Roles and Administrators. On the Administrative Roles page, select the Azure Information Protection Administrator role.
Step 3 – Use the Add Assignment button to display the Add assignments pane. Search for the name of the new service principal account (the DisplayName entered in PowerShell) and add it to the list of assignments.
The Service Principal Account is now successfully added to the Azure Information Protection Administrator role.
Enterprise Auditor Configurations
Before Enterprise Auditor can scan for AIP labels, two configurations must be done prior to the initial scan.
Azure Connection Profile
To collect tags for files protected with Azure Information Protection, an Azure connection profile must be configured in Enterprise Auditor before an FSAA scan runs. See the Global Settings topic for additional information on how to set up a connection profile at the global level.
Step 1 – In Enterprise Auditor, add a credential for an Azure Active Directory account type to the existing Connection Profile used for File System scanning. Supply the Client ID field with the AppPrincipalID and the Key field with the Symmetric key created upon creation of the new service principal.
Step 2 – At the job level, apply the connection profile that contains both the Microsoft Entra ID credential and credentials required for File System scanning under the Jobs > [Job] > Settings > Connection node.
Step 3 – Ensure that the job is configured correctly before running a scan. See the Configure FSAA Data Collector topic for additional information.
An Azure Connection Profile has now been successfully created for an FSAA scan.
Configure FSAA Data Collector
In Enterprise Auditor, configure the FSAA Data Collector wizard pages to scan files protected by Azure Information Protection. This can be done for both FSAA System Scans and SEEK System Scans. In the FSAA Data Collector Wizard, configure the following menus to scan for AIP protection labels:
For FSAA System Scans:
-
Scan Server Selection – Choose the server that scanning is executed on. Target the server that has the Rights Management Service Client 2.1 installed where the applet is running.
- This may be a proxy server, file server (applet mode), or the local Enterprise Auditor console depending on scan configuration
-
Scan Settings – Select the Enable scanning of files protected by Azure Information Protection checkbox to add AIP files to the scan criteria
-
Azure Tenant Mapping page – Add the AppPrincipalID (App ID) and the Domain Name or Tenant ID
Remember, the Azure Tenant Mapping page is only visible when the Enable scanning of files protected by Azure Information Protection checkbox is selected on the Scan Settings page.
-
Default Scoping Options
- File Details tab – Include files protected by Azure Information Protection (AIP)
- File Properties (Folder Summary) – Include AIP Protected Files
-
Scoping Options – if needed, scope to a specific subset of resources on a selected host
For SEEK System Scans:
-
Scan Server Selection – Choose the server that scanning is executed on. Target the server that has the Rights Management Service Client 2.1 installed where the applet is running.
- This may be a proxy server, file server (applet mode), or the local Enterprise Auditor console depending on scan configuration
-
Scan Settings – Select the Enable scanning of files protected by Azure Information Protection checkbox to add AIP files to the scan criteria
-
Azure Tenant Mapping page – Add the AppPrincipalID (App ID) and the Domain Name or Tenant ID
Remember, the Azure Tenant Mapping page is only visible when the Enable scanning of files protected by Azure Information Protection checkbox is selected on the Scan Settings page.
-
Scoping Options – if needed, scope to a specific subset of resources on a selected host
-
Sensitive Data Settings – Select Decrypt Files Protected by Azure Information Protection. This page only applies for SEEK scans.
See the FileSystemAccess Data Collector section in the File System Solution topic for additional information on these scoping options.
Azure SQL Auditing Configuration
Enterprise Auditor for Azure SQL relies on the native Azure SQL auditing capabilities to collect and report on user activity, as well as successful or unsuccessful server or database logon activity. Azure SQL Auditing supports three different audit log destinations. At present Enterprise Auditor only supports storage as the audit log destination. This document describes the necessary permissions required to configure the Enterprise Auditor Azure SQL Job Group.
Enterprise Auditorfor Azure SQL enables users to create custom roles which allow for differential access to Enterprise Auditor.
Within Enterprise Auditor for Azure SQL, roles are created specifically to target Azure SQL Databases:
- Stand-Alone Databases
- Managed Instances
- Elastic Pools
Role can be largely defined by the scope that particular role possesses. A scope-defined role has access to, or is limited to all resources in a Management Group, Subscription, Resource Group or Resource. For example, if all SQL databases reside within a resource group, then the scope can be restricted to that resource group. If databases reside in different resource groups, then the scope for the custom role should be at the subscription level.
This will enable Enterprise Auditor to discover all the SQL databases present in the subscription.
Create a StealthAUDIT Custom Role
Follow the steps below to create an Azure SQL custom role at the subscription level.
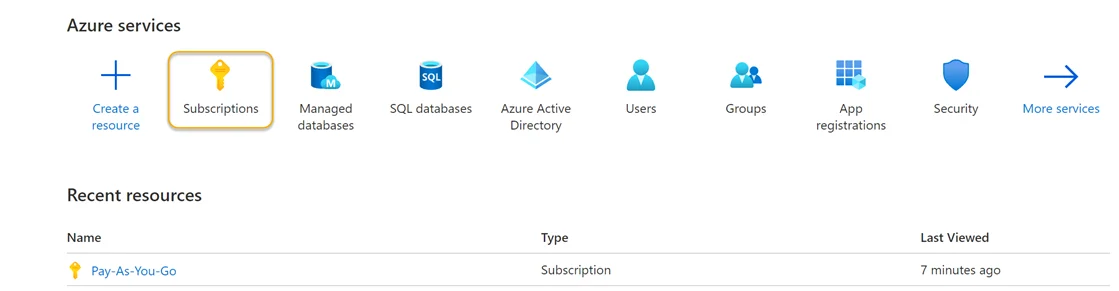
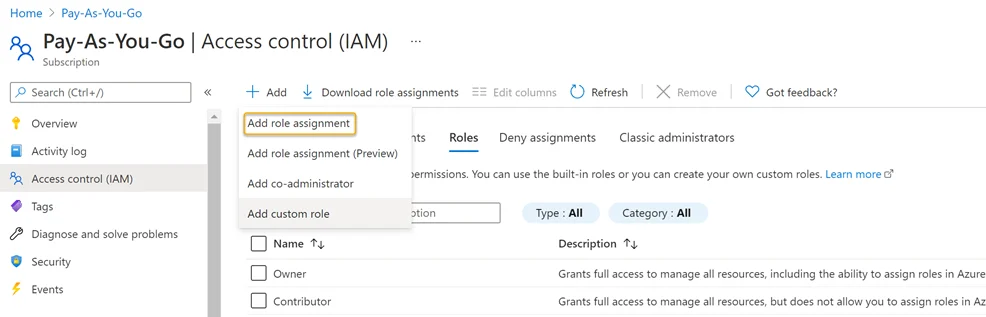
Step 1 – Sign in to Azure. Navigate to the Azure Services section and click Subscriptions. This will navigate you to the Pay-As-You-Go page of the Azure Portal.
Step 2 – Locate and click the Access Control (IAM) view option blade from the available subscriptions in the left-hand menu.
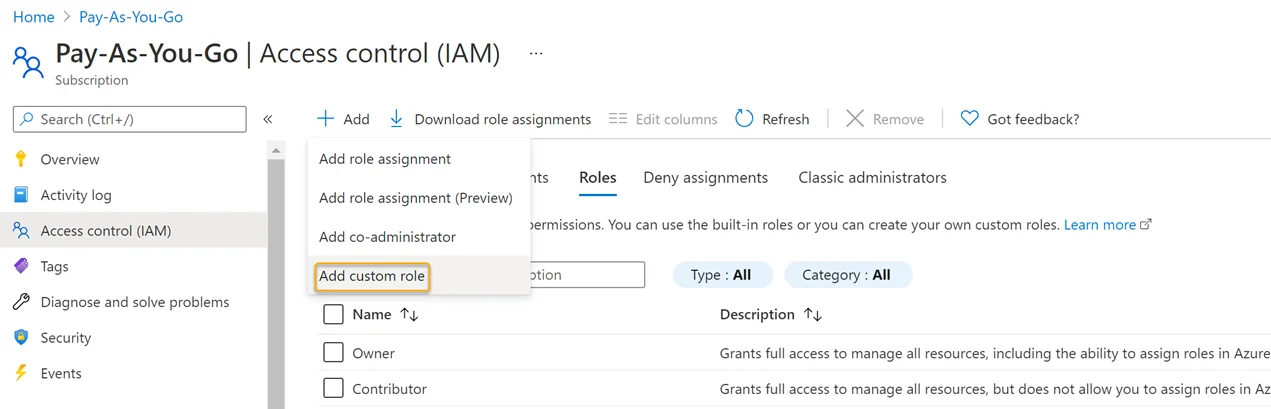
Step 3 – Click Add > Add Custom Role.
Step 4 – Create a JSON file using the subscription ID provided by Microsoft Azure (see the example below) and save it to a local directory.
{
  "properties": {
    "roleName": "StealthAUDIT Azure SQL Role",

    "description": "This is a custom role created for use by StealthAUDIT Azure SQL Job Group for Azure SQL Database discovery and auditing",

    "assignableScopes": ["/subscriptions/<Your Subscription ID goes here>"],

    "permissions": [
      {
        "actions": [
          "Microsoft.Authorization/\*/read",

          "Microsoft.Network/virtualNetworks/subnets/joinViaServiceEndpoint/action",

          "Microsoft.Sql/locations/administratorAzureAsyncOperation/read",

          "Microsoft.Sql/managedInstances/databases/currentSensitivityLabels/\*",

          "Microsoft.Sql/managedInstances/databases/recommendedSensitivityLabels/\*",

          "Microsoft.Sql/managedInstances/databases/schemas/tables/columns/sensitivityLabels/\*",

          "Microsoft.Sql/managedInstances/databases/securityAlertPolicies/\*",

          "Microsoft.Sql/managedInstances/databases/sensitivityLabels/\*",

          "Microsoft.Sql/managedInstances/databases/vulnerabilityAssessments/\*",

          "Microsoft.Sql/managedInstances/securityAlertPolicies/\*",

          "Microsoft.Sql/managedInstances/databases/transparentDataEncryption/\*",

          "Microsoft.Sql/managedInstances/vulnerabilityAssessments/\*",

          "Microsoft.Sql/servers/extendedAuditingSettings/read",

          "Microsoft.Sql/servers/databases/auditRecords/read",

          "Microsoft.Sql/servers/databases/currentSensitivityLabels/\*",

          "Microsoft.Sql/servers/databases/dataMaskingPolicies/\*",

          "Microsoft.Sql/servers/databases/extendedAuditingSettings/read",

          "Microsoft.Sql/servers/databases/read",

          "Microsoft.Sql/servers/databases/recommendedSensitivityLabels/\*",

          "Microsoft.Sql/servers/databases/schemas/read",

          "Microsoft.Sql/servers/databases/schemas/tables/columns/read",

          "Microsoft.Sql/servers/databases/schemas/tables/columns/sensitivityLabels/\*",

          "Microsoft.Sql/servers/databases/schemas/tables/read",

          "Microsoft.Sql/servers/databases/securityAlertPolicies/\*",

          "Microsoft.Sql/servers/databases/securityMetrics/\*",

          "Microsoft.Sql/servers/databases/sensitivityLabels/\*",

          "Microsoft.Sql/servers/databases/transparentDataEncryption/\*",

          "Microsoft.Sql/servers/databases/vulnerabilityAssessments/\*",

          "Microsoft.Sql/servers/databases/vulnerabilityAssessmentScans/\*",

          "Microsoft.Sql/servers/databases/vulnerabilityAssessmentSettings/\*",

          "Microsoft.Sql/servers/devOpsAuditingSettings/\*",

          "Microsoft.Sql/servers/firewallRules/\*",

          "Microsoft.Sql/servers/read",

          "Microsoft.Sql/servers/securityAlertPolicies/\*",

          "Microsoft.Sql/servers/vulnerabilityAssessments/\*",

          "Microsoft.Sql/servers/azureADOnlyAuthentications/\*",

          "Microsoft.Sql/managedInstances/read",

          "Microsoft.Sql/managedInstances/azureADOnlyAuthentications/\*",

          "Microsoft.Security/sqlVulnerabilityAssessments/\*",

          "Microsoft.Sql/managedInstances/administrators/read",

          "Microsoft.Sql/servers/administrators/read",

          "Microsoft.Storage/storageAccounts/blobServices/containers/read",

          "Microsoft.Sql/servers/auditingSettings/read",

          "Microsoft.Sql/servers/databases/auditingSettings/read"
        ],

        "notActions": [],

        "dataActions": [],

        "notDataActions": []
      }
    ]
  }
}
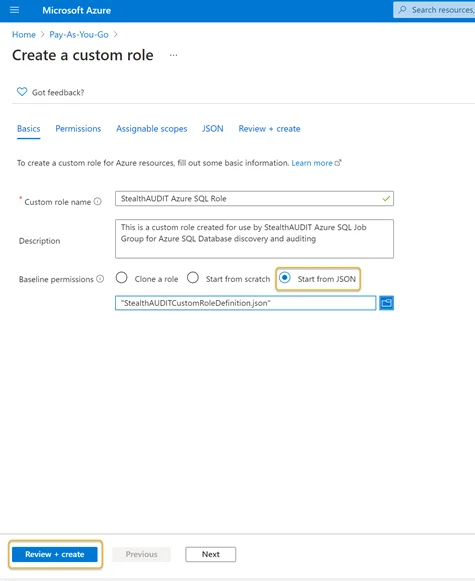
Step 5 – Once created, click Start from JSON in the Azure portal and select the JSON file. Once that file is chosen, the Review + Create button should be enabled.
Click Review + Create to create the role or click Next to review and edit the permissions. Once the JSON file is opened, the Custom Role Name and Description boxes will be populated automatically. The name and description of the custom role can be customized if required in this step.
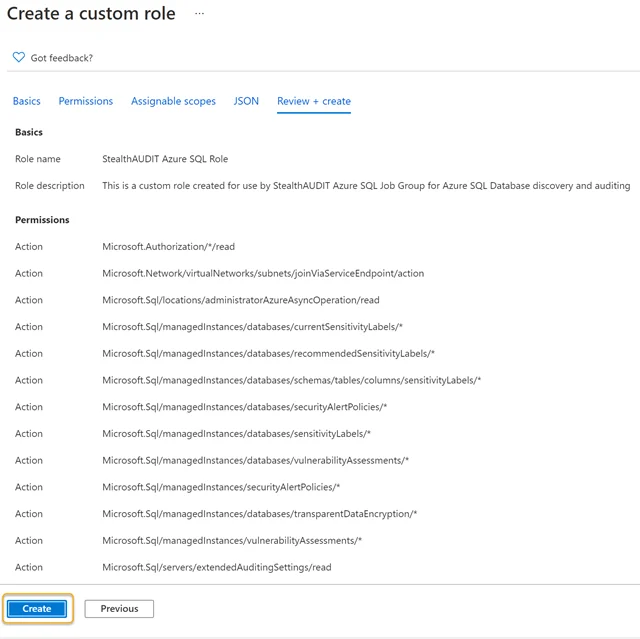
Step 6 – Click Create. This action will save and finalize a custom role entitled Enterprise Auditor Azure SQL Role.
Step 7 – Click OK on the final screen to complete the custom role creation process. The custom role can now be used to register the Enterprise Auditor application within the Azure portal.
NOTE: Depending upon the number of resources in the Azure tenancy, it might take some time for the role to be made available to the resources.
Register an Azure SQL Application
Follow the steps below to create an Azure SQL Application Registration in the Azure portal.
Step 1 – In the Azure portal under Azure Services, click the App Registration icon.
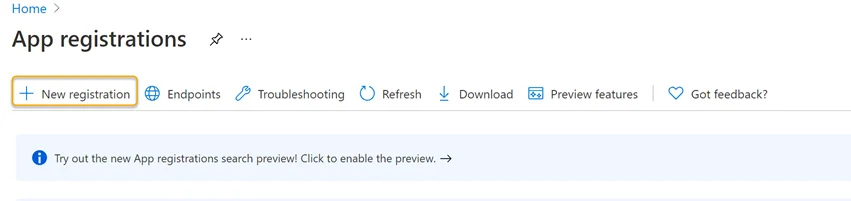
Step 2 – Click New Registration in the Register an application blade.

Step 3 – Enter a Name for the application and select an appropriate option from the Supported account types options.
Step 4 – Click Register at the bottom of the page when finished. Once the application has been registered, the App registration overview blade will appear. Take note of the Application (client) ID on this page.
NOTE: The Application (client) ID is required to create a Connection Profile within the Enterprise Auditor.
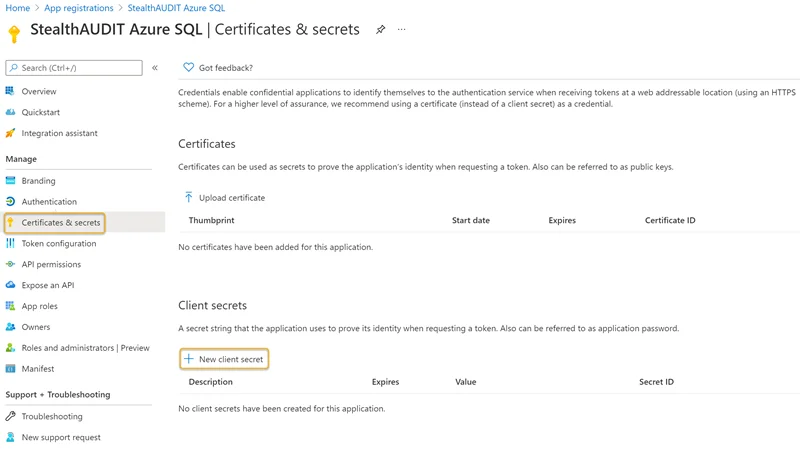
Step 5 – Click the Certificates & secrets blade in the left-hand menu. Click New Client secret.
Step 6 – Enter a unique identifier in the Description field of the Add a client secret window. Select a Expiration time frame from the drop down. Click Add when finished.
Remember, you will have to update the Enterprise Auditor Connection Profile once the expiration time frame is reached (within 24 months, for example).
Step 7 – Make note of the key under the Value column.
NOTE: The Value key on this paged will be used to create the Enterprise Auditor connection profile.
Add a Role Assignment
Follow the steps below to add a role assignment to the custom role and newly registered Enterprise Auditor Azure SQL application.
Step 1 – Navigate to the Subscriptions blade and click the Access Control (IAM) option. Click the Add drop down > Click Add role assignment.
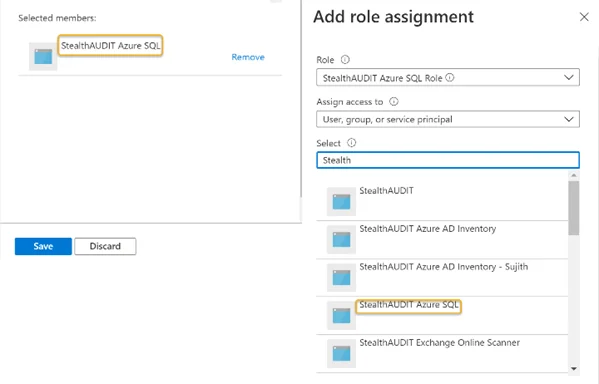
Step 2 – Search for and click the recently created custom role from the Role drop down. See Create a StealthAUDIT Custom Role for steps required to create a custom role in the Azure portal.
Step 3 – Search for and select the recently registered Azure SQL application from the Select drop down. See Register an Azure SQL Application for steps required to register an Azure SQL application in the Azure portal. The registered application will be visible in the Selected members window. Click Save when finished.
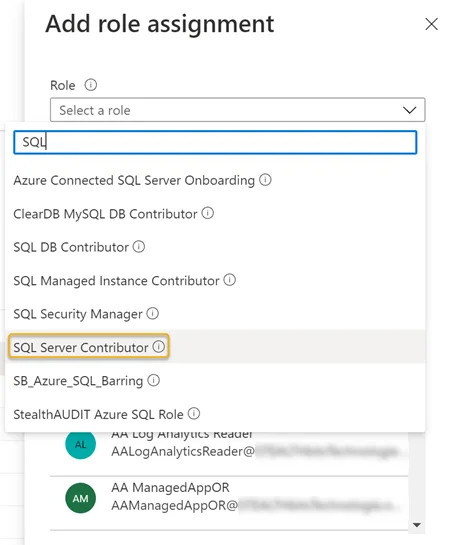
Step 4 – Search for and select the SQL Server Contributor role in the Role drop down.
Step 5 – Search for and select the recently registered Azure SQL application from the Select drop down. See Register an Azure SQL Application for steps required to register an Azure SQL application in the Azure portal. The registered application will be visible in the Selected members window. Click Save when finished.
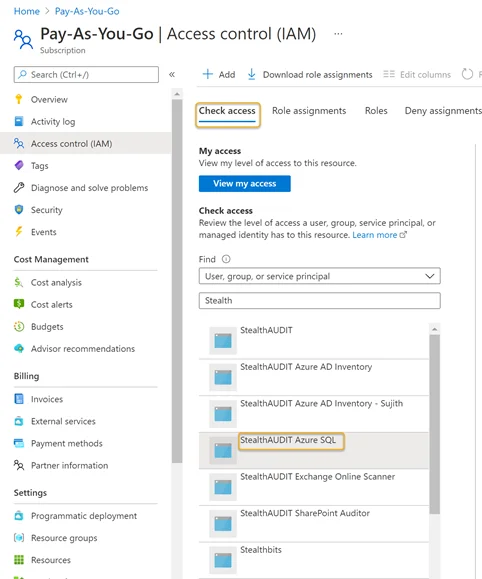
Step 6 – Navigate to the Subscriptions blade. Click Access Control (IAM).
Step 7 – Click the Check access menu tab Search for and select the recently registered Azure SQL application from the drop down. See Register an Azure SQL Application for steps required to register an Azure SQL application in the Azure portal. A preview window will appear on the right-hand side of the window.
AzureSQL Target Least Privilege Model
To access the AzureSQL database, users require the Control permission for the target database. Users with the Control Database permission have access to perform activity scans due to the function leveraged by AzureSQL to return the required audit logs. See the Auditing for Azure SQL Database and Azure Synapse Analytics Microsoft Knowledge Base article for additional information.
RECOMMENDED: It is recommended to create a new user when leveraging a least privilege access model to access the AzureSQL database because the user must exist in the master database and all target database(s). A least privilege access model is one that uses the bare minimum privileges required to carry out collections for the AzureSQL data collector.
The following role and permission are required for the Least Privilege Model:
-
db_datareader role
-
View Database Performance State permission
-
Control permission on target database(s)
NOTE: Control permission must be granted on any database you wish to collect data for.
Follow the steps to configure the least privilege access model for AzureSQL collections.
Step 1 – To login with the user, run the following script against the master database:
CREATE LOGIN LPAUser WITH PASSWORD = [insert password]
CREATE USER LPAUser FROM LOGIN LPAUser
Step 2 – Create the user in the target database with the following script:
CREATE USER LPAUser FROM LOGIN LPAUser
Once complete, confirm that the newly created user exists in the instance of the master database and the target database before proceeding to the next step.
Step 3 – Run the following script against the target database to apply the db_datareader role:
EXEC sp_addrolemember N’db_datareader’, N’LPAUser’
Step 4 – Apply the View Database State Permission against the target database with the following script:
GRANT VIEW DATABASE PERFORMANCE STATE TO LPAUSER
Step 5 – Grant the control permission with the following script:
GRANT CONTROL ON DATABASE
The user is granted Control permission based on the least privilege access model.
Oracle Target Least Privilege Model
We recommend using an account DBA privilege to run Enterprise Auditor against an Oracle database. However, if that is not acceptable all the privileges that are required to configure and run the solution are below and can be used to implement the least privileges necessary.
Create Session Privilege
Before getting started with the least privilege model, ensure that the Enterprise Auditor Connection Profile user has the Create Session privilege granted. To do it, run the following command in Oracle environment (SQL Plus or SQL Developer):
GRANT CREATE SESSION TO %USERNAME%;
NOTE: The above command will grant the privilege only in the current container. To follow the least privilege model, only grant the privilege on the containers (or pluggable databases) that you will be scanning with Enterprise Auditor.
However, if you target all of your pluggable databases, then to grant the Create Session privilege on all of those containers at once, run the following command:
GRANT CREATE SESSION TO %USERNAME% CONTAINER=ALL;
User Credentials Role
When using a least privileged model for Oracle, SYSDBA must be selected for the Role in the User Credentials window for the Oracle Connection Profile. See the Oracle for User Credentials topic for additional information.
Oracle Server Discovery
This Job uses Nmap to locate listening Oracle ports on servers by scanning for ports using the
service Oracle TNS Listener or optionally using specified ports, such as 1521. The Nmap utility can
be downloaded from nmap.org. To run this job, the user needs to have a
permission to execute any PowerShell script on the local host if the host is running the Microsoft
Windows operating system. In addition, on the Windows host, PowerShell execution policy needs to be
sent as well. For example, to set the execution policy to Unrestricted, run the following command
on the PowerShell command line:
Set-ExecutionPolicy -ExecutionPolicy Unrestricted
In case of Linux and UNIX hosts, the plink command needs to be executed on the Enterprise Auditor
Console server to update the local file with the SSH keys.
NOTE: The plink utility in the Enterprise Auditor installation directory has to be used. A version of plink gets installed with the Nmap utility.
The syntax is as follows:
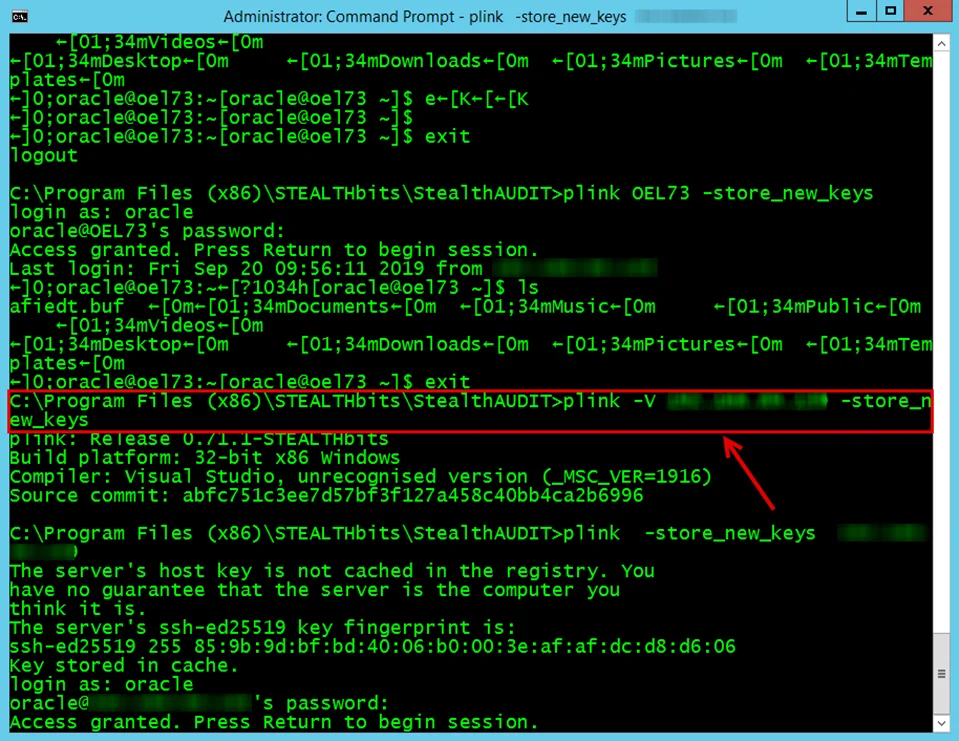
Run the following on the command prompt:
C:\Program Files (x86)\Stealthbits\StealthAUDIT\plink <hostname> -store_new_keys
Oracle SID Discovery
This Job collects the Oracle SID from discovered Oracle servers and uses WMI or SSH to collect running Oracle processes from the Oracle servers. The process is used to determine the name of the Oracle SID. When multiple Oracle instances are running on a server, each SID will have its own entry in this table.
This Job requires local administrator rights on the target hosts in order to read the running processes using either WMI or SSH.
Oracle Instance Discovery
This Job verifies Oracle SID, IP Address, and Port combinations and inserts them into the SA_SQL_Instances table.
This Job requires read rights on the Oracle table DUAL, all users with any read right on an Oracle server should be able to validate this query.
For example, to grant a user SELECT permission on DUAL, run the following command in SQL Developer
or SQL*Plus:
GRANT SELECT ON DUAL TO %USERNAME%;
NOTE: Replace %USERNAME% with the actual username of the user.
CONTAINER_DATA=ALL FOR %NAME_OF_PLUGGABLE_DATABASE% CONTAINER = CURRENT;
If you want to scan all pluggable databases in the given environment, run the following command in the root container:
ALTER USER %USERNAME% SET CONTAINER_DATA=ALL CONTAINER = CURRENT;
Oracle Permission Auditing
The Oracle Permissions Scan job is responsible for collecting all permissions from all licensed database types for all target instances.
Oracle Database 19c Series Permissions
In order to collect permissions from Oracle Database 19c series, the user credential requires at
least the following SELECT privilege on the targeted database for the following views and tables:
- CDB_COL_PRIVS view
- CDB_TAB_COLS view
- CDB_OBJECTS view
- CDB_PROFILES view
- CDB_ROLE_PRIVS view
- CDB_ROLES view
- CDB_SYS_PRIVS view
- CDB_TABLESPACES view
- CDB_TAB_PRIVS view.
- CDB_USERS view.
- V_$DATABASE view.
- V_$RSRC_CONSUMER_GROUP view.
- V_$CONTAINERS view.
- V_$PARAMETER view.
- V_$PDBS view.
- V_$INSTANCE view.
- SYS.USER$ table.
- DBA_TABLESPACES view
- DBA_ROLES view
- DBA_USERS view
- DBA_OBJECTS view
- DBA_COL_PRIVS view
- DBA_TAB_COLS view
- DBA_ROLE_PRIVS view
- DBA_SYS_PRIVS view
- DBA_TAB_PRIVS view
For example, to grant all of the above privileges, run the following set of commands in SQL Developer or SQL*Plus:
GRANT CONNECT TO %USERNAME%;
GRANT CREATE SESSION TO %USERNAME%;
GRANT SELECT ON DUAL TO %USERNAME%;
GRANT SELECT ON CDB_COL_PRIVS TO %USERNAME%;
GRANT SELECT ON CDB_TAB_COLS TO %USERNAME%;
GRANT SELECT ON CDB_OBJECTS TO %USERNAME%;
GRANT SELECT ON CDB_PROFILES TO %USERNAME%;
GRANT SELECT ON CDB_ROLE_PRIVS TO %USERNAME%;
GRANT SELECT ON CDB_ROLES TO %USERNAME%;
GRANT SELECT ON CDB_SYS_PRIVS TO %USERNAME%;
GRANT SELECT ON CDB_TABLESPACES TO %USERNAME%;
GRANT SELECT ON CDB_TAB_PRIVS TO %USERNAME%;
GRANT SELECT ON CDB_USERS TO %USERNAME%;
GRANT SELECT ON V_$DATABASE TO %USERNAME%;
GRANT SELECT ON V_$RSRC_CONSUMER_GROUP TO %USERNAME%;
GRANT SELECT ON V_$CONTAINERS TO %USERNAME%;
GRANT SELECT ON V_$PARAMETER TO %USERNAME%;
GRANT SELECT ON V_$PDBS TO %USERNAME%;
GRANT SELECT ON V_$INSTANCE TO %USERNAME%;
GRANT SELECT ON SYS.USER$ TO %USERNAME%;
GRANT SELECT ON DBA_TABLESPACES TO %USERNAME%;
GRANT SELECT ON DBA_ROLES TO %USERNAME%;
GRANT SELECT ON DBA_USERS TO %USERNAME%;
GRANT SELECT ON DBA_OBJECTS TO %USERNAME%;
GRANT SELECT ON DBA_COL_PRIVS TO %USERNAME%;
GRANT SELECT ON DBA_TAB_COLS TO %USERNAME%;
GRANT SELECT ON DBA_ROLE_PRIVS TO %USERNAME%;
GRANT SELECT ON DBA_SYS_PRIVS TO %USERNAME%;
GRANT SELECT ON DBA_TAB_PRIVS TO %USERNAME%;
Oracle Database 12c Series Permissions
In order to collect permissions from Oracle Database 12c series, the user credential requires at
least the following SELECT privilege on the targeted database for the following views and tables:
- CDB_COL_PRIVS view
- CDB_TAB_COLS view
- CDB_OBJECTS view
- CDB_PROFILES view
- CDB_ROLE_PRIVS view
- CDB_ROLES view
- CDB_SYS_PRIVS view
- CDB_TABLESPACES view
- CDB_TAB_PRIVS view.
- CDB_USERS view.
- V_$RSRC_CONSUMER_GROUP view.
- V_$DATABASE view.
- V_$PARAMETER view.
- V_$PDBS view.
- V_$CONTAINERS view.
- SYS.USER$ table.
For example, to grant all of the above privileges, run the following set of commands in SQL Developer or SQL*Plus:
GRANT SELECT ON CDB_COL_PRIVS TO %USERNAME%;
GRANT SELECT ON CDB_TAB_COLS TO %USERNAME%;
GRANT SELECT ON CDB_OBJECTS TO %USERNAME%;
GRANT SELECT ON CDB_PROFILES TO %USERNAME%;
GRANT SELECT ON CDB_ROLE_PRIVS TO %USERNAME%;
GRANT SELECT ON CDB_ROLES TO %USERNAME%;
GRANT SELECT ON CDB_SYS_PRIVS TO %USERNAME%;
GRANT SELECT ON CDB_TABLESPACES TO %USERNAME%;
GRANT SELECT ON CDB_TAB_PRIVS TO %USERNAME%;
GRANT SELECT ON CDB_USERS TO %USERNAME%;
GRANT SELECT ON V_$DATABASE TO %USERNAME%;
GRANT SELECT ON V_$RSRC_CONSUMER_GROUP TO %USERNAME%;
GRANT SELECT ON V_$CONTAINERS TO %USERNAME%;
GRANT SELECT ON V_$PARAMETER TO %USERNAME%;
GRANT SELECT ON V_$PDBS TO %USERNAME%;
GRANT SELECT ON SYS.USER$ TO %USERNAME%;
Oracle Database 11g Series Permissions
In order to collect permissions from Oracle Database 11g series, the user credential requires at
least the following SELECT privileges on the targeted database for the following views and tables:
- DBA_COL_PRIVS view
- DBA_TAB_COLS view
- DBA_OBJECTS view
- DBA_PROFILES view
- DBA_ROLES view
- DBA_ROLE_PRIVS view
- DBA_SYS_PRIVS view
- DBA_TABLESPACES view
- DBA_TAB_PRIVS view
- DBA_USERS view
- V_$RSRC_CONSUMER_GROUP view
- V_$DATABASE view
- V_$PARAMETER view
- SYS.USER$ table
For example, to grant all of the above privileges, run the following set of commands in Oracle SQL Developer or SQL*Plus:
GRANT SELECT ON DBA_TAB_COLS TO %USERNAME%;
GRANT SELECT ON DBA_OBJECTS TO %USERNAME%;
GRANT SELECT ON DBA_TABLESPACES TO %USERNAME%;
GRANT SELECT ON DBA_PROFILES TO %USERNAME%;
GRANT SELECT ON DBA_TAB_PRIVS TO %USERNAME%;
GRANT SELECT ON DBA_ROLES TO %USERNAME%;
GRANT SELECT ON DBA_ROLE_PRIVS TO %USERNAME%;
GRANT SELECT ON DBA_SYS_PRIVS TO %USERNAME%;
GRANT SELECT ON DBA_COL_PRIVS TO %USERNAME%;
GRANT SELECT ON DBA_USERS TO %USERNAME%;
GRANT SELECT ON V_$RSRC_CONSUMER_GROUP TO %USERNAME%;
GRANT SELECT ON V_$DATABASE TO %USERNAME%;
GRANT SELECT ON V_$PARAMETER TO %USERNAME%;
GRANT SELECT ON SYS.USER$ TO %USERNAME%;
Oracle Sensitive Data Auditing
This job is responsible for identifying sensitive data that has been stored within target database instances.
Before running this scan, ensure that Oracle database statistics are up to date at least for the targeted schema or tables. Use one of the following commands:
EXEC DBMS_STATS.GATHER_SCHEMA_STATS('%SCHEMA_NAME%');
EXEC DBMS_STATS.GATHER_TABLE_STATS('%SCHEMA_NAME%', ‘%TABLE_NAME%’);
Oracle Database 12c Series Sensitive Data
In order to perform a sensitive data scan on Oracle database 12c series, the user credential
requires at least the following SELECT privileges on the targeted database for the following
views:
- V_$CONTAINERS view
- V_$DATABASE view
- CDB_TAB_COLS view
- CDB_OBJECTS view
For example, to grant the above privileges, run the following set of commands in SQL Developer or SQL*Plus:
GRANT SELECT ON V_$CONTAINERS TO %USERNAME%;
GRANT SELECT ON V_$DATABASE TO %USERNAME%;
GRANT SELECT ON CDB_TAB_COLS TO %USERNAME%;
GRANT SELECT ON CDB_OBJECTS TO %USERNAME%;
Oracle Database 11g Series Sensitive Data
In order to perform a sensitive data scan on Oracle database 11g series, the user credential
requires at least the following SELECT privileges on the targeted database for the following
views:
- V_$DATABASE view
- DBA_TAB_COLS view
- DBA_OBJECTS view
For example, to grant the above privileges, run the following set of commands in SQL Developer or SQL*Plus:
GRANT SELECT ON V_$DATABASE TO %USERNAME%;
GRANT SELECT ON DBA_TAB_COLS TO %USERNAME%;
GRANT SELECT ON DBA_OBJECTS TO %USERNAME%;
Please note that the SELECT privilege needs to be granted individually on all sensitive data
tables to be targeted (more secure). To accomplish it, run the following command for each targeted
sensitive data table:
GRANT SELECT ON %YOUR_SENSITIVE_DATA_TABLE% TO %USERNAME%;
(Optional) Grant the SELECT privilege on any table (less secure) by running the following
command:
GRANT SELECT ANY TABLE TO %USERNAME%;
Oracle Activity Auditing
This job is responsible for collecting audit data from configured database server audits on target endpoints.
Oracle Database 12c Series Activity Data
In order to perform an activity data scan on Oracle database 12c series, the user credential
requires at least the following SELECT privileges on the targeted database for the following
views:
- V_$DATABASE view
- CDB_COMMON_AUDIT_TRAIL view
- UNIFIED_AUDIT_TRAIL view
For example, to grant the above privileges, run the following set of commands in SQL Developer or SQL*Plus:
GRANT SELECT ON V_$DATABASE TO %USERNAME%;
GRANT SELECT ON CDB_COMMON_AUDIT_TRAIL TO %USERNAME%;
GRANT SELECT ON UNIFIED_AUDIT_TRAIL TO %USERNAME%;
If the audit trail mode is QUEUED, then audit records are not written to disk until the in-memory
queues are full. The following procedure explicitly flushes the queues to disk, so that the audit
trail records are viewable in the UNIFIED_AUDIT_TRAIL view:
EXEC SYS.DBMS_AUDIT_MGMT.FLUSH_UNIFIED_AUDIT_TRAIL;
Oracle Database 11g Series Activity Data
In order to perform an activity data scan on Oracle database 11g series, the user credential
required at least the following SELECT privileges on the targeted database for the following
views:
- V_$DATABASE view
- DBA_COMMON_AUDIT_TRAIL view
For example, to grant the above privileges, run the following set of commands in SQL Developer or SQL*Plus:
GRANT SELECT ON V_$DATABASE TO %USERNAME%;
GRANT SELECT ON DBA_COMMON_AUDIT_TRAIL TO %USERNAME%;
Oracle Users with Default Passwords Job
The 4-Oracle_DefaultPasswordUsers job is responsible for collecting usernames of users whose passwords have not been updated since the database creation.
The user needs to have a SELECT privilege on CDB_USERS_WITH_DEFPWD table for Oracle container
databases (version 12c and higher) or DBA_USERS_WITH_DEFPWD for the non-container database (any
version below 12c).
To grant the required privileges, execute the following statements in SQL Developer or SQL*Plus:
For version 12c and later:
GRANT SELECT ON CDB_USERS_WITH_DEFPWD TO %USERNAME%;
For version 11g:
GRANT SELECT ON DBA_USERS_WITH_DEFPWD TO %USERNAME%;
Target Db2 Requirements, Permissions, and Ports
The Enterprise Auditor for Databases Solution provides the ability to audit and monitor Db2 database environments to collect permissions and sensitive data. It scans:
- DB2LUW 11+
Target Db2 Requirements
Successful installation of the IBM Data Server Client is required to run the Db2 Job Group. In addition, the following clients and drivers must be installed:
- IBM Data Server Driver Package (DS Driver)
- IBM Data Server Driver for JDBC and SQLJ (JCC Driver)
- IBM Data Server Driver for ODBC and CLI (CLI Driver)
- IBM Data Server Runtime Client
- IBM Data Server Client
- IBM Database Add-Ins for Visual Studio
- IBM .NET Driver NuGet
NOTE: All necessary clients and drivers can be found on IBM Support's Download initial version 11.5 clients and drivers page. From the list of available packages, select the IBM Data Server Client, which is the all-in-one client package. This package includes all of the client tools and available libraries, as well as the add-ins for Visual Studio.
Data Collectors
This solution employs the following data collector to scan the target environment:
Permissions
For .Active Directory Inventory Prerequisite
-
Read access to directory tree
-
List Contents & Read Property on the Deleted Objects Container
NOTE: See the Microsoft Searching for Deleted Objects article and the Microsoft Dsacls article for additional information.
Ports
The following firewall ports are needed:
For ADInventory Data Collector
- TCP 389
- TCP 135-139
- Randomly allocated high TCP ports
For SQL Data Collector
- Specified by Instances table (default is 5000)
Target MongoDB Requirements, Permissions, and Ports
The Enterprise Auditor for Databases Solution provides the ability to audit and monitor MongoDB database environments to collect permissions and sensitive data. It scans:
- MongoDB 5.0
- MongoDB 6.0
- MongoDB 7.0
- Windows and Linux distributions supported by MongoDB
Target MongoDB Requirements for Sensitive Data Discovery Scans
- .NET Framework 4.8 is required to run the MongoDB_SensitiveDataScan Job
- MongoDB Cluster on Windows Only – Domain Administrator or Local Administrator privilege
Data Collectors
This solution employs the following data collector to scan the target environment:
Permissions
For MongoDB Prerequisite
-
Read Only access to ALL databases in the MongoDB Cluster including:
- Admin databases
- Config databases
- Local databases
-
Read Only access to any user databases is required for sensitive data discovery
-
Read access to NOSQL instance
-
Read access to MongoDB instance
-
Requires NOSQL Full-Text and Semantic Extractions for Search feature to be installed on the target NOSQL instances when using the Scans full rows for sensitive data option on the Options wizard page
Ports
The following firewall ports are needed:
For NoSQL Data Collector
- MongoDB Cluster
- Default port is 27017 (A custom port can be configured)
Target MySQL Requirements, Permissions, and Ports
The Enterprise Auditor for Databases Solution provides the ability to audit and monitor MySQL database environments to collect permissions and sensitive data. It scans:
- MySQL 5.x
- MySQL 8.x
- Amazon MySQL RDS
- Amazon Aurora MySQL Engine
- MariaDB 10.x
Target MySQL Requirements
The following are requirements for the MySQL to be scanned:
- WINRM Service installed and enabled — Required only if MySQL is running on Windows
Data Collectors
This solution employs the following data collector to scan the target environment:
Requirements
-
Windows (Enterprise Auditor host) - Windows Management Framework 3+ installed on the Enterprise Auditor Console server (Windows 2012 and later)
-
Windows (MySQL host)
- WinRM enabled
-
MySQL
- Read access to all databases contained within each MySQL instance
- Domain Admin or Local Admin privilege (Windows only)
Permissions
For .Active Directory Inventory Prerequisite
-
Read access to directory tree
-
List Contents & Read Property on the Deleted Objects Container
NOTE: See the Microsoft Searching for Deleted Objects article and the Microsoft Dsacls article for additional information.
For MySQL Data Collection
- Read access to MySQL instance to include all databases contained within each instance
- Windows Only — Domain Admin or Local Admin privilege
Ports
The following firewall ports are needed:
For ADInventory Data Collector
- TCP 389
- TCP 135-139
- Randomly allocated high TCP ports
For SQL Data Collector
- Specified by Instances table (default is 3306)
Target Oracle Requirements, Permissions, and Ports
The Enterprise Auditor for Databases Solution provides the ability to audit and monitor Oracle database environments to collect permissions, sensitive data, and activity events. It scans:
- Oracle Database 12c
- Oracle Database 18c
- Oracle Database 19c
Data Collectors
This solution employs the following data collector to scan the target environment:
Permissions
For .Active Directory Inventory Prerequisite
-
Read access to directory tree
-
List Contents & Read Property on the Deleted Objects Container
NOTE: See the Microsoft Searching for Deleted Objects article and the Microsoft Dsacls article for additional information.
For PowerShell Data Collection
- Member of the Local Administrators group
For Oracle Data Collection
- User with SYSDBA role
- Local Administrator on the target servers – Only applies to Windows Servers and not on Linux or Unix operating systems
There is a least privilege model for scanning your domain. See the Oracle Target Least Privilege Model topic for additional information.
Ports
The following firewall ports are needed:
For ADInventory Data Collector
- TCP 389
- TCP 135-139
- Randomly allocated high TCP ports
For PowerShell Data Collector
- Randomly allocated high TCP ports
For SQL Data Collector
- Specified by Instances table (default is 1521)
Target PostgreSQL Requirements, Permissions, and Ports
The Enterprise Auditor for Databases Solution provides the ability to audit and monitor PostgreSQL database environments to collect permissions and sensitive data. It scans:
- Open Source PostgreSQL 9x through 12x
- Enterprise DB PostgreSQL (10x trhough 12x)
- Amazon AWS Aurora PostgreSQL Engine (all versions supported by Amazon AWS)
- Azure PostgreSQL (9.6)
Data Collectors
This solution employs the following data collector to scan the target environment:
Requirements
- Read access to all databases contained within each PostgreSQL instance
- Domain Admin or Local Admin privilege (Windows only)
- Login account for each instance of PostgreSQL to be audited
Permissions
For .Active Directory Inventory Prerequisite
-
Read access to directory tree
-
List Contents & Read Property on the Deleted Objects Container
NOTE: See the Microsoft Searching for Deleted Objects article and the Microsoft Dsacls article for additional information.
For PostgreSQL Data Collection
- Read access to all the databases in PostgreSQL cluster or instance
- Windows Only — Domain Admin or Local Admin privilege
Ports
The following firewall ports are needed:
For ADInventory Data Collector
- TCP 389
- TCP 135-139
- Randomly allocated high TCP ports
For SQL Data Collector
- Specified by Instances table (default is 5432)
Target Redshift Requirements, Permissions, and Ports
The Enterprise Auditor for Databases Solution provides the ability to audit and monitor Redshift database environments to collect permissions and sensitive data. It scans:
- Amazon AWS Redshift
- AWS Redshift Cluster
Target Redshift Requirements
-
Creation of a user name and password through the AWS portal.
-
Successful retrieval of the following items from the AWS website:
- Database Name – Unique identifier for a specific database
- Port Number – String of unique numbers used by networks to identify specific incoming processes
- Endpoint name – Publicly accessible elastic IP address specific to the database
-
Retrieval of the information from the Enterprise Auditor console.
Additional requirements for Sensitive Data Discovery:
- Windows Only – Domain Administrator or Local Administrator privilege
Data Collectors
This solution employs the following data collector to scan the target environment:
Permissions
For .Active Directory Inventory Prerequisite
-
Read access to directory tree
-
List Contents & Read Property on the Deleted Objects Container
NOTE: See the Microsoft Searching for Deleted Objects article and the Microsoft Dsacls article for additional information.
For Redshift Data Collection
-
Read-access to the following tables:
- pg_tables
- pg_user
Ports
The following firewall ports are needed:
For ADInventory Data Collector
- TCP 389
- TCP 135-139
- Randomly allocated high TCP ports
Target SQL Server Requirements, Permissions, and Ports
The Enterprise Auditor for Databases Solution provides the ability to audit and monitor SQL Server database environments to collect permissions, sensitive data, and activity events. It scans:
-
Azure SQL
-
SQL Server 2022
-
SQL Server 2019
-
SQL Server 2017
-
SQL Server 2016
Target SQL Server Requirements
The following are requirements for the SQL Server to be scanned:
-
WINRM Service installed
-
Ensure the following rights are in the
ROOT\Microsoft\SQLServerandROOT\InteropWMI NameSpaces:-
Execute Methods
-
Enable Account
-
Remote Enable
NOTE: Restart WMI after applying changes.
-
-
For Activity Auditing – SQL Server Audit:
- SQL Server Audit Specifications to be configured on the target databases
- Audit destination must be a binary file
- See the Microsoft Create a server audit and database audit specification article.
Data Collectors
This solution employs the following data collector to scan the target environment:
Permissions
For .Active Directory Inventory Prerequisite
-
Read access to directory tree
-
List Contents & Read Property on the Deleted Objects Container
NOTE: See the Microsoft Searching for Deleted Objects article and the Microsoft Dsacls article for additional information.
For SMARTLog Data Collection
- Member of the local Administrators group
For SQL Server Data Collection
-
For Instance Discovery, local rights on the target SQL Servers:
- Local group membership to Remote Management Users
- Permissions on the following WMI NameSpaces:
root\Microsoft\SQLServer, root\interop
-
For permissions for data collection:
- Read access to SQL instance
- Requires SQL Full-Text and Semantic Extractions for Search feature to be installed on the target SQL instance(s) when using the Scan full rows for sensitive data option on the Options wizard page
- Grant Authenticate Server to [DOMAIN\USER]
- Grant Connect SQL to [DOMAIN\USER]
- Grant View any database to [DOMAIN\USER]
- Grant View any definition to [DOMAIN\USER]
- Grant View server state to [DOMAIN\USER]
- Grant Control Server to [DOMAIN\USER] (specifically required for the Weak Passwords Job)
See the Azure SQL Auditing Configuration topic for additional information.
Ports
The following firewall ports are needed:
For ADInventory Data Collector
- TCP 389
- TCP 135-139
- Randomly allocated high TCP ports
For SMARTLog Data Collector
- TCP 135
- TCP 445
- Randomly allocated high TCP ports
For SQL Data Collector
- Specified by Instances table (default is 1433)
Target Dropbox Requirements, Permissions, and Ports
The Enterprise Auditor for AWS Solution provides the ability to audit Dropbox. It scans:
- Dropbox
Data Collector
This solution employs the following data collector to scan the target environment:
Permissions
- Dropbox Team Administrator
The DropboxAccess Data Collector requires the generation of an access token that is used to configure the Connection Profile for Dropbox. The access token is generated from within the Dropbox Access Auditor Data Collector Wizard on the Scan Options page. Once the access token is copied into a Connection Profile for Dropbox, it will be saved and does not need to be generated again. See the DropboxAccess: Scan Options topic for additional information.
Ports
The following firewall ports are needed:
For DropboxAccess Data Collector
- TCP 80
- TCP443
Target Exchange Servers Requirements, Permissions, and Ports
The Enterprise Auditor for Exchange Solution is compatible with the following Exchange Server versions as targets:
- Exchange 2019 (Limited)
- Exchange 2016 (Limited)
- Exchange 2013
- Exchange 2010 (Limited)
See the Exchange Support and Permissions Explained topic for details on the type of auditing supported by data collector and by job group.
Domain Controller Requirements
The following are requirements for the Exchange servers to be scanned:
-
Enable Remote PowerShell on one Client Access Server (CAS)
-
Enable Windows Authentication for the PowerShell Virtual Directory on the same CAS
-
.NET Framework 4.5+ installed on all Exchange servers to be targeted
-
WINRM Service installed on all Exchange servers to be targeted as a back up in the event of a remote PowerShell failure
-
Within the Enterprise Auditor Console, the global Settings > Exchange node must be configured
NOTE: For Exchange 2013, 2016, and 2019 – If the global Settings have been configured for "MAPI over HTTP," then an actual CAS server name was supplied and will be used by the ExchangePS Data Collector. If the global Settings have been configured for "MAPI over HTTPS," then the global Settings will have a web address instead of an actual server. Therefore, each ExchangePS query requires the CAS server to be set as the specific server on the Category page. See the ExchangePS Data Collector & Client Access Server topic for a list of queries for which this would apply.
Data Collectors
This solution employs the following data collector to scan the target environment:
- ADInventory Data Collector
- EWSMailbox Data Collector
- EWSPublicFolder Data Collector
- Exchange2K Data Collector
- ExchangeMailbox Data Collector
- ExchangeMetrics Data Collector
- ExchangePS Data Collector
- ExchangePublicFolder Data Collector
- SMARTLog Data Collector
Permissions
For .Active Directory Inventory Prerequisite
-
Read access to directory tree
-
List Contents & Read Property on the Deleted Objects Container
NOTE: See the Microsoft Searching for Deleted Objects article and the Microsoft Dsacls article for additional information.
For Exchange Web Services API Permissions with the EWSMailbox Data Collector
- Exchange Admin Role
- Discovery Management Role
- Application Impersonation Role
- Exchange Online License
See the Exchange Web Services API Permissions topic for additional information.
For Exchange Web Services API Permissions with the EWSPublicFolder Data Collector
- Exchange Admin Role
- Discovery Management Role
- Application Impersonation Role
- Exchange Online License with a mailbox
See the Exchange Web Services API Permissions topic for additional information.
For Exchange2K Data Collector
- Member of the Exchange Administrator group
- Domain Admin for AD property collection
- Public Folder Management
For ExchangeMailbox Data Collector
- Member of the Exchange Administrator group
- Organization Management
- Discovery Management
For Exchange Mail Flow with ExchangeMetrics Data Collector
- Member of the local Administrator group on the targeted Exchange server(s)
See the Exchange Mail-Flow Permissions topic for additional information.
For Exchange Remote Connection with SMARTLog Data Collector
- Member of the local Administrators group
See the Exchange Remote Connections Permissions topic for additional information.
For Exchange PowerShell with ExchangePS Data Collector
- Remote PowerShell enabled on a single Exchange server
- Windows Authentication enabled for the PowerShell Virtual Directory on the same Exchange server where Remote PowerShell has been enabled
- View-Only Organization Management Role Group
- Discovery Search Management Role Group
- Public Folder Management Role Group
- Mailbox Search Role
See the Exchange PowerShell Permissions topic for additional information.
For ExchangePublicFolders Data Collector
- Member of the Exchange Administrator group
- Organization Management
Ports
The following firewall ports are needed:
For ADInventory Data Collector
- TCP 389
- TCP 135-139
- Randomly allocated high TCP ports
For EWSMailbox Data Collector
- TCP 389
- TCP 443
For EWSPublicFolder Data Collector
- TCP 389
- TCP 443
For Exchange2K Data Collector
- TCP 135-139
- Randomly allocated high TCP ports
- TCP 389
- Optional TCP 445
For ExchangeMailbox Data Collector
- TCP 135
- Randomly allocated high TCP ports
For ExchangeMetrics Data Collector
- TCP 135
- Randomly allocated high TCP ports
For ExchangePS Data Collector
- TCP 135
- Randomly allocated high TCP ports
For ExchangePublicFolder Data Collector
- TCP 135
- Randomly allocated high TCP ports
For SMARTLog Data Collector
- TCP 135
- TCP 445
- Randomly allocated high TCP ports
Target Exchange Online Requirements, Permissions, and Ports
The Enterprise Auditor for Exchange Solution provides the ability to audit Exchange Online. It scans:
- Exchange Online (Limited)
See the Exchange Support and Permissions Explained topic for details on the type of auditing supported by data collector and by job group.
Data Collectors
This solution employs the following data collectors to scan the target environment:
- AzureADInventory Data Collector
- EWSMailbox Data Collector
- EWSPublicFolder Data Collector
- ExchangePS Data Collector
Permissions
For .Entra ID Inventory Prerequisite with the AzureADInventory Data Collector
-
Microsoft Graph API
-
Application Permissions:
- AuditLog.Read.All – Read all audit log data
- Directory.Read.All – Read directory data
-
Delegated Permissions:
- Group.Read.All – Read all groups
- User.Read.All – Read all users' full profiles
-
-
Access URLs
-
- All sub-directories of the access URLs listed
See the Microsoft Entra ID Auditing Configuration topic for additional information.
Permissions for the Registered Microsoft Entra ID Application: Office 365 Exchange Online
-
Application Permissions:
- Exchange.ManageAsApp – Manage Exchange As Application
- full_access_as_app – Use Exchange Web Services with full access to all mailboxes
-
Exchange Administrator role assigned to the registered application's service principal
See the Exchange Online Auditing Configuration topic for additional information.
For Exchange Web Services API Permissions with the EWSMailbox Data Collector
- Exchange Admin Role
- Discovery Management Role
- Exchange Online License
See the Exchange Web Services API Permissions topic for additional information.
For Exchange Web Services API Permissions with the EWSPublicFolder Data Collector
- Exchange Admin Role
- Discovery Management Role
- Exchange Online License with a mailbox
See the Exchange Web Services API Permissions topic for additional information.
For Exchange PowerShell with ExchangePS Data Collector
- Discovery Management Role
- Organization Management Role
See the Exchange PowerShell Permissions topic for additional information.
Ports
The following firewall ports are needed:
For AzureADInventory Data Collector
- TCP 80 and 443
For EWSMailbox Data Collector
- TCP 389
- TCP 443
For EWSPublicFolder Data Collector
- TCP 389
- TCP 443
For ExchangePS Data Collector
- TCP 135
- Randomly allocated high TCP ports
File System Supported Platforms
Netwrix Enterprise Auditor audits Microsoft® Windows® file servers, Network Attached Storage (NAS) devices, and Unix platforms.
Enterprise Auditor employs the File System Solution to execute Access Auditing (FSAA), Activity Monitoring (FSAC), and Sensitive Data Discovery Auditing scans. The Activity Monitoring (FSAC) scans also require an additional application, either Netwrix Activity Monitor or Netwrix Threat Prevention, to monitor the target environment.
NOTE: Access Auditing and Sensitive Data Discovery Auditing support CIFS and NFSv3.
Ports and permissions vary based on the scan mode option selected as well as the target environment.
Data Collectors
This solution employs the following data collector to scan the target environment:
Permissions and Ports for ADInventory Data Collector Prerequisite
The following permissions are needed:
-
Read access to directory tree
-
List Contents & Read Property on the Deleted Objects Container
NOTE: See the Microsoft Searching for Deleted Objects article and the Microsoft Dsacls article for additional information.
The following firewall ports are needed:
- TCP 389
- TCP 135-139
- Randomly allocated high TCP ports
Permissions and Ports for FileSystemAccess Data Collector
- Permissions vary based on the Scan Mode Option selected. See the File System Supported Platforms topic for additional information.
Supported Windows Platforms
The following are supported Microsoft® Windows® operating systems:
- Windows Server 2022
- Windows Server 2019
- Windows Server 2016
See the Windows File Server Target Requirements topic for target environment requirements.
Windows File System Clusters
See the topic for target environment requirements.
Windows File System DFS Namespaces
See the topic for target environment requirements.
Supported Network Attached Storage Devices
The following are supported Network Attached Storage (NAS) devices.
Dell Celerra® & VNX
- Celerra 6.0+
- VNX 7.1
- VNX 8.1
See the Dell Celerra & Dell VNX Target Requirements topic for target environment requirements.
Dell Isilon/PowerScale
- 7.0+
See the Dell Isilon/PowerScale Target Requirements topic for target environment requirements.
Dell Unity
See the Dell Unity Target Requirements topic for target environment requirements.
Hitachi
- 11.2+
See the Hitachi Target Requirements topic for target environment requirements.
Nasuni Nasuni Edge Appliances
- 8.0+
See the Nasuni Target Requirements topic for target environment requirements.
NetApp Data ONTAP
-
7-Mode 7.3+
-
Cluster-Mode 8.2+
NOTE: The Resiliency feature introduced in ONTAP 9.0 is not supported.
See the following topics for target environment requirements:
Nutanix
See the Nutanix Target Requirements topic for target environment requirements.
Qumulo
- Qumulo Core 5.0.0.1B+
See the Qumulo Target Requirements topic for target environment requirements.
Supported Unix Platforms
The following are supported Unix operating systems for Access Auditing (FSAA) and Sensitive Data Discovery Auditing only:
- AIX® 4+
- Solaris™ 8+
- Red Hat® Enterprise Linux® 4+
- Red Hat® Linux® 5.2+
- HP-UX® 11+
- SUSE® 10+
SharePoint Support
Netwrix products audit and monitor Microsoft® SharePoint® environments. Enterprise Auditor employs the SharePoint solution to execute Access Auditing (SPAA) and Sensitive Data Discovery Auditing scans against SharePoint on-premise and SharePoint Online. Through integration with Activity Monitor, Enterprise Auditor can also execute Activity Auditing (SPAC) scans against SharePoint on-premise and SharePoint online environments. Additionally, Activity Monitor can be configured to provide activity data to various SIEM products.
Ports and permissions vary based on the scan mode option selected as well as the target environment.
Data Collectors
This solution employs the following data collector to scan the target environment:
Permissions and Ports for ADInventory Data Collector Prerequisite
The following permissions are needed:
-
Read access to directory tree
-
List Contents & Read Property on the Deleted Objects Container
NOTE: See the Microsoft Searching for Deleted Objects article and the Microsoft Dsacls article for additional information.
The following firewall ports are needed:
- TCP 389
- TCP 135-139
- Randomly allocated high TCP ports
Permissions and Ports for AzureADInventory Data Collector Prerequisite
The following permissions are needed:
-
Microsoft Graph API
-
Application Permissions:
- AuditLog.Read.All – Read all audit log data
- Directory.Read.All – Read directory data
-
Delegated Permissions:
- Group.Read.All – Read all groups
- User.Read.All – Read all users' full profiles
-
-
Access URLs
-
- All sub-directories of the access URLs listed
The following firewall ports are needed:
- TCP 80 and 443
Supported SharePoint Online
The following are supported Microsoft® SharePoint® Online:
-
SharePoint Online® (Agent-less mode scans only)
-
OneDrive® for Business (Access Auditing and/or Sensitive Data Discovery Auditing for Agent-less mode scans only)
See the SharePoint Scan Options topic for additional information.
NOTE: You can use the SP_RegisterAzureAppAuth instant job to make the configuration for SharePoint Online easier. This job registers the necessary Microsoft Entra ID application and provisions it with the required permissions. See the SP_RegisterAzureAppAuth Job topic for additional information.
Supported SharePoint On-Premise
The following are supported Microsoft® SharePoint® operating systems:
- SharePoint® 2019
- SharePoint® 2016
- SharePoint® 2013
See the SharePoint Scan Options topic for additional information.
Target Unix Requirements, Permissions, and Ports
The Enterprise Auditor for Unix Solution provides the ability to audit Unix servers. It scans:
- AIX® 4+
- Solaris™ 8+
- Red Hat® Enterprise Linux® 4+
- Red Hat® Linux® 5.2+
- HP-UX® 11+
- CentOS® 7+
- SUSE® 10+
Data Collectors
This solution employs the following data collectors to scan the target environment:
Permissions
For NIS Data Collector Prerequisite
- No special permissions are needed aside from access to a NIS server
For Unix Data Collector
- Root permissions in Unix/Linux
If the Root permission is unavailable, a least privileged model can be used. See the Least Privilege Model topic additional information.
Ports
The following firewall ports are needed:
For NIS Data Collector Prerequisite
- TCP 111 or UDP 111
- Randomly allocated high TCP ports
For Unix Data Collector
- TCP 22
- User configurable
Least Privilege Model
Enterprise Auditor for Unix collects information from Unix devices by running commands or executing scripts on your Unix hosts (if configured properly our tool can SCP scripts to your hosts before execution). Therefore, the domain or local user credentials entered in the Connection Profile within the Enterprise Auditor must be capable of running the necessary commands, executing the necessary scripts or, in some cases, have rights to SCP scripts to the host.
Connecting to Unix Hosts
Enterprise Auditor for Unix connects to your host in two ways:
- Plink – This mechanism is leveraged during our tools Host Inventory to test connectivity to a host and to collect basic details about a host (Host Name, OS Type, etc.)
- Implementation of the SSH2 protocol built into Enterprise Auditor – This is how the Unix Data Collector interacts with and pulls information from your environment
Authentication Methods
-
SSH Login Required
-
SSH Private Key
-
Supported Key Types
- Open SSH
- PuTTY Private Key
-
Device Connectivity
-
SSH port opened in software and hardware firewalls. Default is 22.
- If you do not use Port 22, you can specify your SSH port in the Connection Profile
Commands for Non-Root Accounts
We recommend using the root account to run Enterprise Auditor against a Unix system. However, if that is not acceptable all the commands we leverage in the solution set are below and can be used to implement least privilege:
All Perl scripts require the account to be able to execute the following commands:
scp [script] to a target location: /tmp/[script]
perl [script]
rm -f [script]
UX_UsersAndGroups Job Requirements
The 1.Users and Groups > 0.Collection > UX_UsersAndGroups Job requires permissions in the Unix environment to run the following commands:
Commands Used
-
grep -
egrep -
uname -
cat /etc/passwd(read access) -
cat /etc/group(read access) -
cat /etc/security/user(read access) -
cat /etc/shadow- Requires root or customization to job to utilize sudo without password prompt (:NOPASSWD)
-
egrep /etc/security/user(read access) -
egrep /etc/login.defs(read access) -
egrep /etc/default/passwd(read access) -
cat /etc/security/passwd(read access)
Perl Scripts Used
SA_UX_AIX_User.pl
SA_UX_AIX_UserLastUpdate.pl
UX_MakeDirectory Job Requirements
The 2.PrivilegedAccess > Sudoers > 0.Collection > UX_MakeDirectory Job requires permissions in the Unix environment to run the following commands:
Commands Used
mkdir /tmp/Stealthbits/
UX_ParseSudoers Job Requires
The 2.PrivilegedAccess > Sudoers > 0.Collection > UX_ParseSudoers Job requires permissions in the Unix environment to run the following commands:
NOTE: To parse sudoers we either need root or an account that has access to use sudo without password prompt (:NOPASSWD)
Commands Used
sudo chmod 500 SA_UX_ParseSudoers.plsudo ./SA_UX_ParseSudoers.plsudo rm SA_UX_ParseSudoers.plsudo rmdir /tmp/Stealthbits/
Perl Scripts Used
SA_UX_ParseSudoers.pl
This grants read access to /etc/sudoers
UX_CriticalFiles Job Requires
The 2.PrivilegedAccess > UX_Critical Files Job requires permissions in the Unix environment to run the following commands:
Commands Used
ls -al /etc/ls -al /etc/samba/ls -al /etc/sysconfig
UX_NFSConfiguration Job Requires
The 3.Sharing > 0.Collection > UX_NFSConfiguration Job requires permissions in the Unix environment to run the following commands:
Perl Scripts Used
SA_UX_NFSConfiguration.pl
This grants:
- read access to
/etc/exports - read access to
/etc/dfs/dfstab
UX_SambaConfiguration Job Requires
The 3.Sharing > 0.Collection > UX_SambaConfiguration Job requires permissions in the Unix environment to run the following commands:
Perl Scripts Used
SA_UX_SambaConfiguration.pl
This grants:
- read access to
/etc/sfw/smb.conf - read access to
/etc/samba/smb.conf
Target Windows Server and Desktop Requirements, Permissions, and Ports
The Enterprise Auditor for Windows Solution is compatible with the following Microsoft Windows versions as targets:
- Windows 7 and higher
- Windows Server 2016 and later
Server and Desktop Requirements
The following are requirements for the servers and desktops to be scanned:
- WINRM Service installed
Data Collectors
This solution employs the following data collector to scan the target environment:
- GroupPolicy Data Collector
- PowerShell Data Collector
- Registry Data Collector
- Script Data Collector
- Services Data Collector
- SMARTLog Data Collector
- SystemInfo Data Collector
- TextSearch Data Collector
- UsersGroups Data Collector
- WMICollector Data Collector
Permissions
- Member of the local Administrators group
- If target host is a domain controller, member of the Domain Administrator group in the target domain
Ports
The following firewall ports are needed:
For GroupPolicy Data Collector
- TCP 389
- TCP 135-139
- Randomly allocated high TCP ports
For PowerShell Data Collector
- Randomly allocated high TCP ports
For Registry Data Collector
- TCP 135-139
- Randomly allocated high TCP ports
For Script Data Collector
- Randomly allocated high TCP ports
For Services Data Collector
- TCP 135-139
- Randomly allocated high TCP ports
For SMARTLog Data Collector
- TCP 135
- TCP 445
- Randomly allocated high TCP ports
For SystemInfo Data Collector
- TCP 135-139
- Randomly allocated high TCP ports
For TextSearch Data Collector
- TCP 135-139
- Randomly allocated high TCP ports
For UsersGroups Data Collector
- TCP 135-139
- Randomly allocated high TCP ports
- 445
For WMICollector Data Collector
- TCP 135-139
- Randomly allocated high TCP ports