Mailbox: Permissions
Use the Permissions page to determine which permissions to remove. It is a wizard page for the Add/Change Permissions and Remove Permissions operations.
Use the following options to add, change or remove Permissions:
- User – Specifies user permissions to add or change. To select different users, click the down-arrow to display the User window. See the User Window topic for additional information.
- Folder – Specifies the folder for which to change permissions. Click the down-arrow to display the Folder window. See the Folder Window topic for additional information.
- Permission – Selects a permission to assign. Click the down-arrow to display the Permission window. See the Permission Window topic for additional information.
- Propagate permissions to child folders – Propagates permissions to the child folders of the selected folders
- Once User, Folder, and Permission are selected, click Add to add them to the summary of the action to be taken
- To remove an added Permission, select it in the panel and click Remove
User Window
Use the User window to select a user. The User window opens when the User down-arrow is selected on the Permissions page.
Select a user using the following options:
-
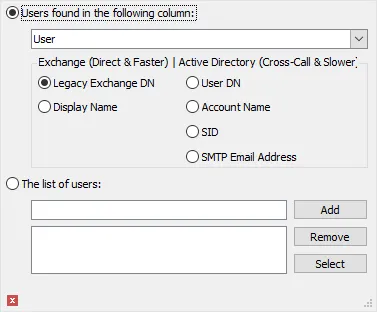
Users found in the following column – Select this option to identify users via a data table column
-
Use the drop-down menu to select a data table column containing either the Mailbox display name or email address
-
Select a data type for the selected field using the following options:
-
Exchange (Direct and Faster) – Connects to Exchange Mailboxes using the following data types:
- Legacy Exchange DN
- Display Name
-
Active Directory (Cross-Call and Slower) – Connects to Exchange mailboxes using the Active Directory Data Collector with the following data types:
- User DN
- Account Name
- SID
- SMTP Email Address
-
-
-
The list of users – Identifies users in one of the following ways:
- Click Select to choose from the global address list (GAL)
- Manually enter a user name and click Add. Repeat for additional users.
- To restore anonymous permissions to folders, enter
anonymousand click Add - To remove a user, select it and click Remove
Folder Window
Use the Folder window to select folders. The Folder window opens when the Folder down-arrow is selected on the Permissions page.

Select a folder using the following options:
-
Folder names in the following column – Select from folder names present in the column
-
Click the down arrow and select either the folder path or the Entry ID column for that folder
-
Select the appropriate folder identifier type:
- Folder Path
- Entry ID
-
-
The list of folders – Select one of the default folders
- Select a folder from the drop-down menu and click Add
- To remove a folder, select it and click Remove
Permission Window
Use the Permission window to specify permissions. The Permission window opens when the Permission down-arrow is selected on the Permissions page.

Specify permissions using the following options:
-
Permissions Level – Each permission level has a set of default selections. If a setting is changed, the Permissions Level field changes to Custom. Permission levels are associated with the different permissions available for assignment through Outlook. Options include:
- None
- Contributor
- Reviewer
- Nonediting Author
- Author
- Publishing Author
- Editor
- Publishing Editor
- Owner
-
Read – Choose the read permissions from the following:
- None
- Full Details
-
Write – Select any desired write permissions from the following:
- Create Items
- Create subfolders
- Edit Own
- Edit all
-
Delete Items – Choose delete permissions from the following:
- None
- Own
- All
-
Other – Select any other permissions to apply from the following:
- Folder owner – User has all permissions for the folder
- Folder Contact – User receives automated messages about the folder such as replication conflict messages, requests from users for additional permissions, and other changes to folder status
- Folder visible – User can see the folder but cannot read or edit the items within
-
To add anonymous permissions, choose None
- To re-add Anonymous to the folder but not assign any access, select a permission level to assign