Jobs
An Access Analyzer job is responsible for running data collection, conducting data analysis, executing actions on collected or analyzed data, or generating reports. Each of these are configured in the corresponding section under the job’s Configure node. A single job can be configured to execute one or multiple tasks. See the Configure Node topic for additional information.

RECOMMENDED: Use job group organization to spread these tasks across jobs. For example, create a job to run a query and a second job to run analysis or generate a report. Then use the job group structure to run those jobs together in the proper order.
Jobs do not have a Settings node like a job group. Job Properties provide the option to break inheritance on global or job group settings. See the Job Properties topic for additional information.
Once a job has been configured and is being executed, job progress can be viewed at the Running Instances node on the Navigation pane. See the Running Instances Node topic for additional information.
At the bottom of the Access Analyzer Console, there is an indication of how many jobs are in queue and the View Job Progress link, which opens the Running Instances node.
When a job execution has completed, the tables, views, and reports generated by the job are accessible under the job’s Status and Results nodes. See the Status Node and Results Node topics for additional information. Reports are also accessible through the Web Console.
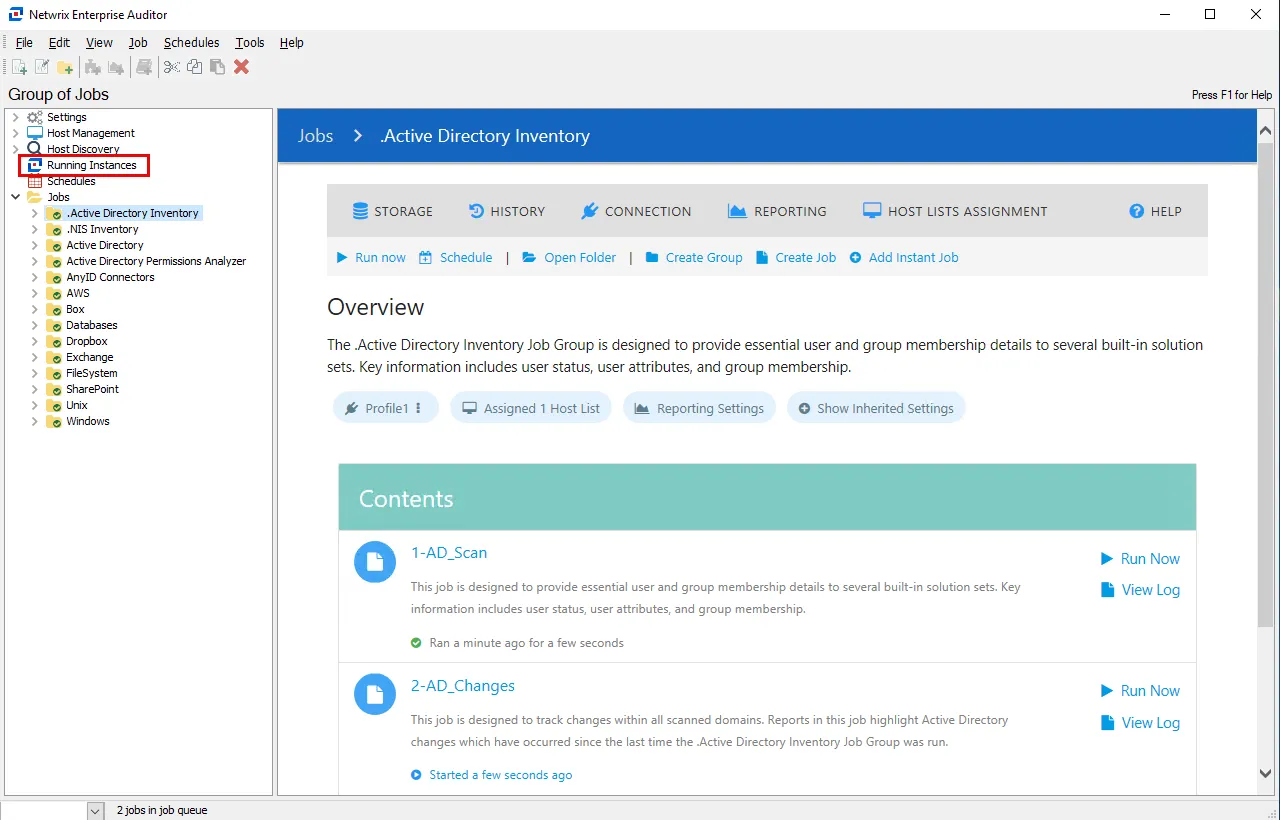
Job Description Page
The Job Description page displays shortcuts, links, and important information on the job. The Job Page allows users to view and modify common job configurations, such as Connection and Storage profiles, job properties, SQL analysis parameters, and PowerShell parameters. Depending on the type of job, the description page will appear different and display information specific to the job selected.
|  |
| ------------------------------------------------------------------------------------------------------------------ | ---------------- |
| Pre-Configured Job | User-Created Job |
|
| ------------------------------------------------------------------------------------------------------------------ | ---------------- |
| Pre-Configured Job | User-Created Job |
The two types of Job Groups in Access Analyzer are:
- Pre-configured – The job description page provides a brief summary of the purpose of the job, the reports and data contained within it, and summary information of the last five times the job was executed
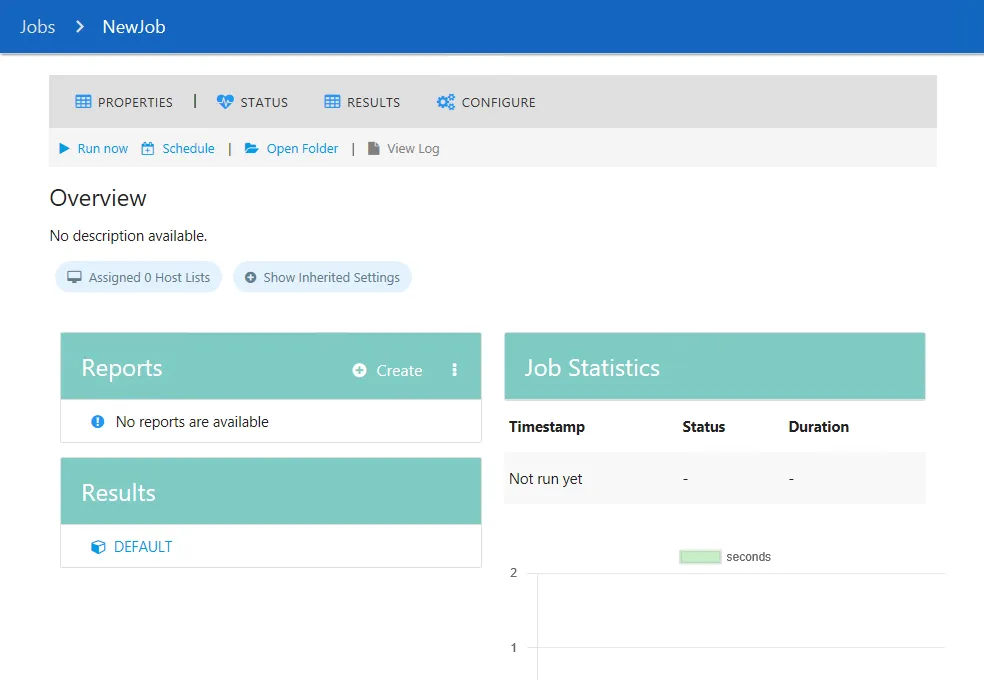
- User Created – The job description page of User Created jobs will be blank until the job is configured
Pre-configured job description pages provide users with shortcuts and links to many of the functions that can be accessed under the [Job Group] > [Job] node in the Jobs Tree in the Navigation Pane.

The sections and options of the job description page are:
- Properties – Opens the Job Properties window. See the Job Properties topic for additional information.
- Status – Opens the job Status page. See the Status Node topic for additional information.
- Results – Opens the job Results page. See the Results Node topic for additional information.
- Configure – Opens the job Configure page. See the Configure Node topic for additional information.
- Run Now – Executes the job
- Schedule – Opens the Schedule Wizard
- Open Folder – Opens the job folder location with supporting files in the Windows Explorer
- View Log – Opens the job’s log

The Overview section provides summary information about the job, and includes the following information:
-
Inherited settings – Job settings can be applied directly or inherited from a parent job group or even the General Settings level. See the Jobs with Inherited Settings topic for additional information.
-
Reports – Displays a list of reports that are generated by this job
-
Results – Displays a list of data tables and views created and populated by the job
-
Configuration - If applicable, configure parameters for the job's analysis tasks
- See the Parameter Configuration topic for additional information.
-
Job Statistics – Displays important information for the last five times the job was executed including:
- Timestamp – Date timestamp of when job was initiated
- Status – Displays information on job status (Running, Success, Error)
- Duration – Displays length of time each job took
-
Graph – Displays a line graph that has information for the last five times the job was executed
Prior to running any job or job group, ensure the following have been properly configured:
- Queries, Analysis, Actions, and Reports are configured as desired
- If collecting data, at least one host list has been assigned
- If a host list is assigned, the appropriate Connection Profile with credentials to collect data from the targeted hosts has been assigned
Finally, ensure these settings are configured at the recommended location for the job or job group and that the inheritance of settings is adjusted accordingly.
Jobs with Inherited Settings
Job settings can be applied directly or inherited from a parent job group or even the General Settings level. If settings are applied directly to a job, these are shown in the Overview section under the job description:
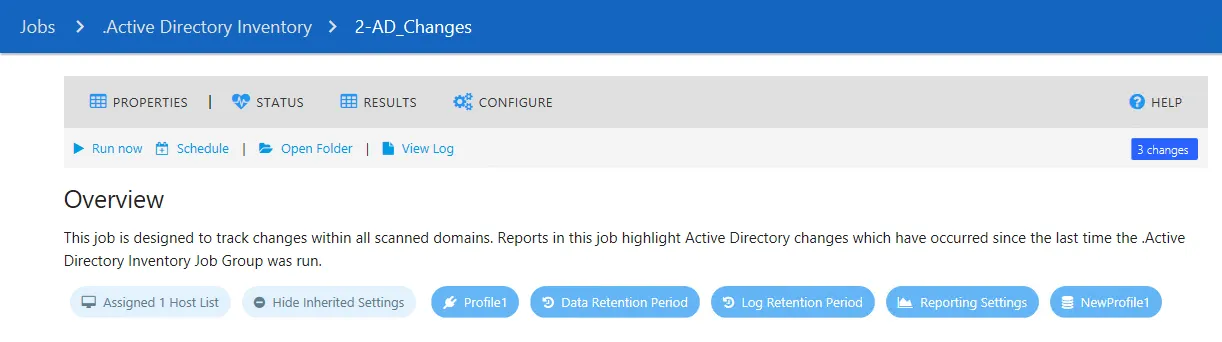
In the example above, the Assigned 1 Host List setting is applied directly to the job. Other settings are inherited from the parent job group. Clicking the Show inherited settings button opens this list of the inherited settings.
The following settings can be inherited from a parent:
| Setting | Description |
|---|---|
| Connection profile | The tooltip shows the account name used in the connection profile. Clicking the button opens the parent Connection settings for the selected job. See the Connection Node topic for additional information. Clicking the three dots menu on the right part of the button opens the Edit menu. The following options are available: - Edit the Profile – Clicking the link opens the Connection settings for the current profile - Use Default Profile – Clicking the link applies the connection profile set as default on a global level to a job. In this case, this setting will be hidden under the Show Inherited Settings button. - List of existing profiles – Allows switching between existing connection profiles and apply a desired one to a job |
| Data Retention Period | The tooltip shows the current value for the data retention period (by default, Never retain previous job data). Clicking the button opens the parent History settings for the selected job. See the History Node topic for additional information. |
| Log Retention Period | The tooltip shows the current value for the log retention period (by default, Retain previous job log for 7 times). Clicking the button opens the parent History settings for the selected job. See the History Node topic for additional information. |
| Hosts Lists | The tooltip shows the number and the names of the host lists assigned to this job. If you have more than three host lists assigned to a job, the tooltip shows 3 hosts name and the number of other hosts lists assigned (for example, if 5 hosts are assigned it shows Host1, Host2, Host3 + 2 more). Clicking the button opens the parent Host Lists setting for the selected job. See the Hosts Node topic for additional information. |
| Reporting Settings | Clicking the Reporting Settings button opens the parent Reporting settings for the selected job including publishing options, email settings, and roles. See the Reporting Node topic for additional information. |
| Storage Profile | The tooltip shows the current SQL Server instance, database name, user account, and authentication type used for the selected job. See the Storage Node topic for additional information. Clicking the three dots menu on the right part of the button opens the Edit menu. The following options are available - Edit This Profile – Clicking the link opens the Storage settings for the current profile - Use Default Profile – Clicking the link applies the storage profile set as default on a global level to a job. In this case, this setting will be hidden under the Show Inherited Settings button - List of existing profiles – Allows switching between existing storage profiles and apply a desired one to a job |
Parameter Configuration
If a job has analysis parameters that can be customized, those parameters can be configured in the Configuration section of the Job Description Page.
Follow the steps to configure customizable parameters using the Configuration option on the Job Description Page:
Step 1 – Navigate to the Jobs > [Job Group] > [Job] node. If the job has customizable parameters, they will be located under Configuration in the job's Overview section.
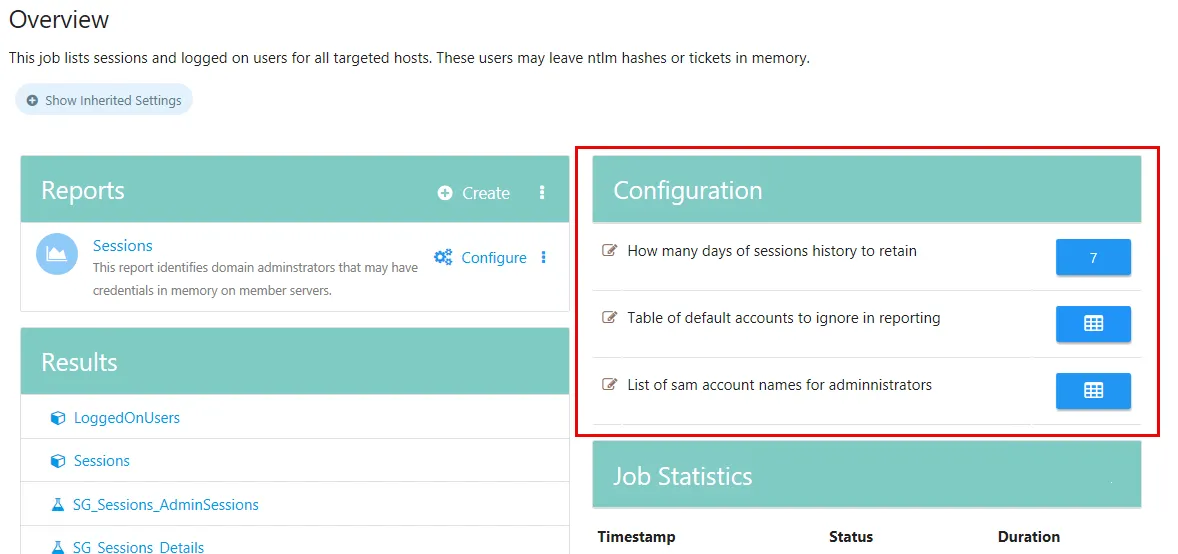
Step 2 – Click on a parameter to open the Parameter Configuration window.
NOTE: To view a tool-tip that contains information about the Variable Name and the Task Name that the parameter is associated with, hover the mouse over the parameter.

Step 3 – Configure the parameter in the Parameter Configuration window. Click Save to save changes and exit the window. Click Cancel to exit without saving.
The parameter has now been configured. The parameters can also be configured in the Analysis Node under the job's Configure Node. See the Analysis Node topic for additional information.