Configuring Roles
To ensure a least privilege access model, roles need to be configured within both the Access Analyzer Console for folder rights and SQL Management Studio for database access rights.
This is a three-part process:
-
Configure the Access Analyzer Installation Account
-
Configure Roles in SQL Management Studio
- Create SQL Server Database Roles
- Assign Users to SQL Roles
-
Assign User Roles in the Access Analyzer Console
- Edit Role Members’ Responsibilities
- Delete Role Members
NOTE: This configuration process is not required if only using Role Based Access to secure Published Reports. See the Securing Published Reports Only topic for additional information.
Configure the Installation Account
The Access Analyzer Installation Account is used both to perform the initial installation of Access Analyzer and to change Storage Profile settings. It needs additional rights in order to query objects in the master database. This is only necessary so the user can enumerate the available databases to choose from when configuring the Access Analyzer Storage Profile.
The following script can be executed to give these necessary rights only to the account performing the initial installation of Access Analyzer and any changes to the database where Access Analyzer writes data:
--Create a login for the user if one does not already exist
IF NOT EXISTS (SELECT *FROM sys.server_principals WHERE [name] = '<DOMAIN>\<USERNAME>')
BEGIN
    create login [<DOMAIN>\<USERNAME>] from windows
END
GO
--Grant that user rights to query the master database to get a list of all database objects
USE [master]
GRANT VIEW ANY DEFINITION TO [<DOMAIN>\<USERNAME>]
GRANT CREATE DATABASE TO [<DOMAIN>\<USERNAME>]
GO
Configure Roles in SQL Management Studio
It is necessary to provision rights to the SQL Server database so the Access Analyzer application rights and database access rights are consistent and provide the minimum rights necessary to support the Access Analyzer roles. This approach involves creating custom database roles which will be assigned rights and privileges. Then, individual domain user accounts must be assigned to these roles.
NOTE: For any SQL Server version prior to 2012, Windows groups cannot be used because SQL Server does not allow the assignment of default schemas to Windows groups. Access Analyzer requires the default schema of [dbo] to function properly.
Create SQL Server Database Roles
To create the roles within the SQL Server database, run the following script.
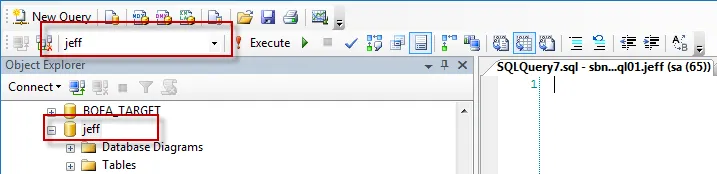
Be sure to set the context of this query to the Access Analyzer database by selecting the right
database from the drop-down window. Alternatively, prefix the script with a
USE [Access Analyzer DATABASE NAME] clause.
--create SMP Viewer role
CREATE ROLE SMP_Viewer
--grant role permissions at the schema level
GRANT SELECT
ON SCHEMA::dbo
TO SMP_Viewer
Go
--create SMP Builder role
CREATE ROLE SMP_Builder
--grant role permissions at the schema level
GRANT SELECT,INSERT,DELETE
ON SCHEMA::dbo
TO SMP_Builder
Go
--grant additional creation rights
GRANT CREATE TABLE TO [SMP_Builder]
GO
--create SMP Admin role
CREATE ROLE SMP_Admin
--grant role permissions at the schema level
GRANT ALTER,EXECUTE,INSERT,UPDATE,REFERENCES
ON SCHEMA::dbo
TO SMP_Admin
Go
--grant additional creation rights
GRANT CREATE TABLE TO [SMP_Admin]
GO
GRANT CREATE VIEW TO [SMP_Admin]
GO
GRANT CREATE PROCEDURE TO [SMP_Admin]
GO
GRANT CREATE FUNCTION TO [SMP_Admin]
GO
GRANT CREATE TYPE TO [SMP_Admin]
GO
Once the script has been successfully executed, assign domain users to these database roles.
Assigning Users to SQL Roles
Now that the SQL Server database roles have been created the next step is to assign domain users to those roles. This can be done interactively in SQL Management Studio. Follow the steps to assign users to SQL Server database roles.
Step 1 – Connect to the Access Analyzer database through SQL Management Studio.
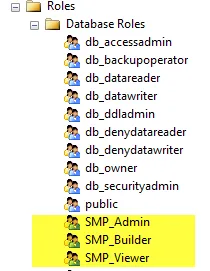
Step 2 – Validate that the roles have been properly created by navigating to Security > Roles > Database Roles. The three new roles should be visible:
- SMP_Admin
- SMP_Builder
- SMP_Viewer
 |
Step 3 – After confirmation of role creation, the next step is to map users to these roles. Right-click on the Security > Users node and select New User.
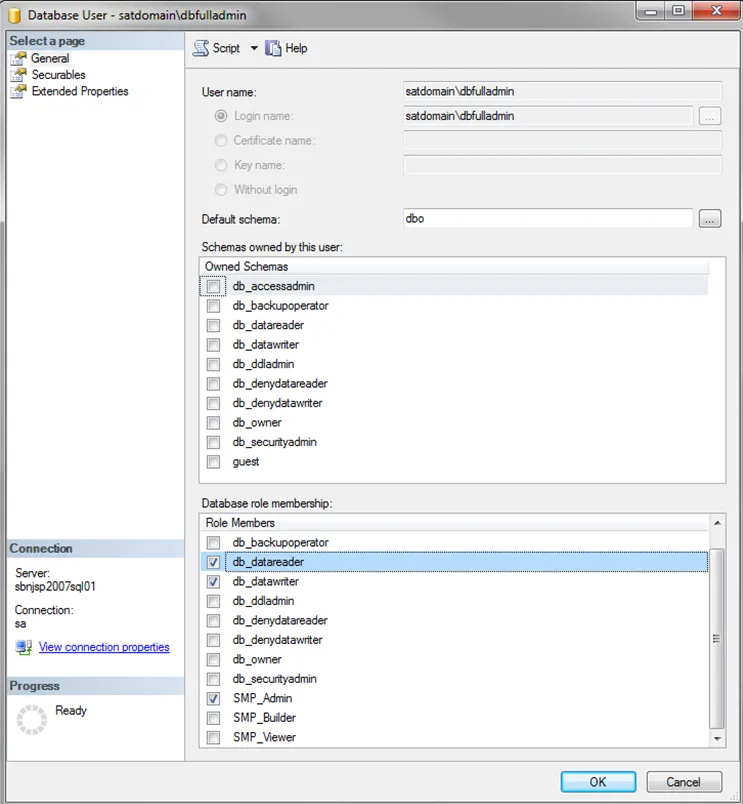
Step 4 – Enter the user information in the dialog as follows:
-
User Name – Display name given to the user which is shown under the user’s folder.
RECOMMENDED: Use a descriptive name.
-
Login name – Qualified domain name of the user:
[DOMAIN]\[Username] -
Default Schema – Should be set to
dbo -
Database role membership – Should be set to the appropriate role for this user. See the Role Definitions topic for more information.
When all of the users have been assigned to the appropriate SQL Server database roles, complete the process by assigning users to roles within the Access Analyzer Console. See the Assign User to Role Members topic for additional information.