Configure Empty FPolicy
The credential used to just run Access Auditing (FSAA) and/or Sensitive Data Discovery Auditing scans requires access to the specified API calls as well as association to an FPolicy. Therefore, it is necessary to:
- Create Security Role for FSAA Scans
- Create Security Login for FSAA Scans
- Create External Engine for Empty FPolicy
- Create FPolicy Event for Empty FPolicy
- Create Empty FPolicy Policy
- Create Empty FPolicy Scope
- Enable the Empty FPolicy
NOTE: The commands in the following sections have been verified for NetApp Data ONTAP 9.6+. Users of older versions should consult the NetApp documentation to find the appropriate syntax.
Create Security Role for FSAA Scans
This section provides instructions for creating an access-control role. An access-control role consists of a role name and a command to which the role has access. It optionally includes an access level (none, read-only, or all) and a query that applies to the specified command or command directory. The following commands need to be run to create the security role.
Use the following command to provision read-only access to Version* commands:
security login role create ‑role [ROLE_NAME] ‑cmddirname "version" ‑access readonly ‑query "" ‑vserver [SVM_NAME]
Example:
security login role create ‑role enterpriseauditor ‑cmddirname "version" ‑access readonly ‑query "" ‑vserver testserver
Use the following command to provision read-only access to Volume* commands:
security login role create ‑role [ROLE_NAME] ‑cmddirname "volume" ‑access readonly ‑query "" ‑vserver [SVM_NAME]
Example:
security login role create ‑role enterpriseauditor ‑cmddirname "volume" ‑access readonly ‑query "" ‑vserver testserver
Use the following command to provision read-only access to SVM* commands:
security login role create ‑role [ROLE_NAME] ‑cmddirname "vserver" ‑access readonly ‑query "" ‑vserver [SVM_NAME]
Example:
security login role create ‑role enterpriseauditor ‑cmddirname "vserver" ‑access readonly ‑query "" ‑vserver testserver
Use the following command to provision read-only access to security login role show-ontapi commands:
security login role create ‑role [ROLE_NAME] ‑cmddirname "security login role show-ontapi" ‑access readonly ‑query "" ‑vserver [SVM_NAME]
Example:
security login role create ‑role enterpriseauditor ‑cmddirname "security login role show-ontapi" ‑access readonly ‑query "" ‑vserver testserver
Before creating the Security Login, validate this configuration.
Validate Security Role Configuration
Run the following command to validate the security role configuration:
security login role show [ROLE_NAME]
Example:
security login role show enterpriseauditor
Relevant NetApp Documentation: To learn more about creating security login roles, please visit the NetApp website and read the security login role create article.
Create Security Login for FSAA Scans
Once the access control role has been created, apply it to a domain account.
CAUTION:
-
The SVM used in the following command must be the same SVM used when creating the role. See the Create Security Role for FSAA Scans topic for additional information.
CAUTION: Cluster-Mode is case sensitive.
-
It is recommended to use lowercase for both domain and username. The case of domain and username created during the account provisioning process must match exactly to the credentials provided to the Access Analyzer for authentication to work.
Use the following command to create the security login for the security role:
security login create ‑user-or-group-name [DOMAIN\DOMAINUSER] ‑application ontapi ‑authentication‑method domain ‑role [ROLE_NAME] ‑vserver [SVM_NAME]
Example:
security login create ‑user-or-group-name example\user1 ‑application ontapi ‑authentication‑method domain ‑role enterpriseauditor ‑vserver testserver
Before creating the External Engine, validate this security login.
Validate Security Login Creation
Run the following command to validate security login:
security login show [DOMAIN\DOMAINUSER]
Example:
security login show example\user1
Verify that the output is displayed as follows:

Relevant NetApp Documentation: To learn more about creating security logins, please visit the NetApp website and read the security login create article.
Create External Engine for Empty FPolicy
The External Engine defines how FPolicy makes and manages connections to external FPolicy servers.
IMPORTANT:
-
The
-primary-serversmust be the server from which the StealthAUDIT scans will be executed:- StealthAUDIT Console server for local mode
- proxy server if running in any of the proxy mode options
-
The following values are required:
-
engine-name StealthAUDITEngine -
port 9999- Port number can be customized, but it is recommended to use 9999.
-
extern-engine-type asynchronous -
ssl-option no-auth
-
CAUTION: Cluster-Mode is case sensitive.
Use the following command to create the external engine:
vserver fpolicy policy external-engine create ‑vserver [SVM_NAME] ‑engine-name StealthAUDITEngine ‑primary-servers [IP_ADDRESS,…] ‑port 9999 ‑extern-engine-type asynchronous ‑ssl-option no-auth
Example:
vserver fpolicy policy external-engine create ‑vserver testserver ‑engine-name StealthAUDITEngine ‑primary-servers 192.168.30.15 ‑port 9999 ‑extern-engine-type asynchronous ‑ssl-option no-auth
Before creating the FPolicy Event, validate this external engine was created.
Validate External Engine Creation
Run the following command to validate the creation of the external engine:
fpolicy policy external-engine show ‑instance
Verify that the output is displayed as follows:
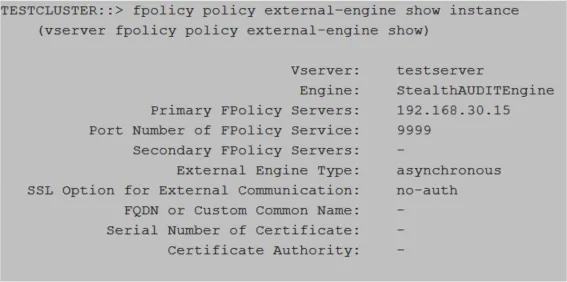
Relevant NetApp Documentation: To learn more about creating an external engine, please visit the NetApp website and read the vserver fpolicy policy external-engine create article.
Create FPolicy Event for Empty FPolicy
An event defines which protocol and which file operations are associated with the FPolicy.
IMPORTANT:
-
The SVM used must be the SVM hosting the CIFS or NFS shares.
-
The following values are required:
event-name StealthAUDITScreeningvolume-operation true
CAUTION: Cluster-Mode is case sensitive.
Use the following command to create the FPolicy event:
vserver fpolicy policy event create ‑vserver [SVM_NAME] ‑event-name StealthAUDITScreening ‑volume-operation true ‑protocol [PROTOCOL] ‑file-operations ""
Example:
vserver fpolicy policy event create ‑vserver testserver ‑event-name StealthAUDITScreening ‑volume-operation true ‑protocol cifs ‑file-operations ""
Before creating the FPolicy Policy, validate this FPolicy Event was created.
Validate FPolicy Event Creation
Run the following command to validate the creation of the FPolicy event:
fpolicy policy event show ‑event-name StealthAUDITScreening‑instance
Verify that the output is displayed as follows:

Relevant NetApp Documentation: To learn more about creating an event, please visit the NetApp website and read the vserver fpolicy policy event create article.
Create Empty FPolicy Policy
The FPolicy policy associates the other three FPolicy components and allows for the designation of a privileged FPolicy user, or the account granted Security Login.
IMPORTANT:
-
The SVM used must be the SVM hosting the CIFS or NFS shares.
-
The External Engine and FPolicy Event used in this command must be the External Engine and the FPolicy Event created for this purpose. See the Create External Engine for Empty FPolicy and Create FPolicy Event for Empty FPolicy sections for additional information.
-
The following values are required:
privileged-user-namemust be the account granted Security Login. See the Create Security Login for FSAA Scans topic for additional information.policy-name StealthAUDIT
CAUTION: Cluster-Mode is case sensitive.
Use the following command to create the FPolicy policy:
vserver fpolicy policy create ‑vserver [SVM_NAME] ‑policy-name StealthAUDIT ‑events StealthAUDITScreening ‑engine StealthAUDITEngine ‑is-mandatory false ‑allow-privileged-access yes ‑privileged-user-name [DOMAIN\DOMAINUSER]
Example:
vserver fpolicy policy create ‑vserver testserver ‑policy-name StealthAUDIT ‑events StealthAUDITScreening ‑engine StealthAUDITEngine ‑is-mandatory false ‑allow-privileged-access yes ‑privileged-user-name example\user1
Before creating the FPolicy Scope, validate this FPolicy Policy was created.
Validate FPolicy Policy Creation
Run the following command to validate the creation of the FPolicy policy:
fpolicy policy show ‑instance
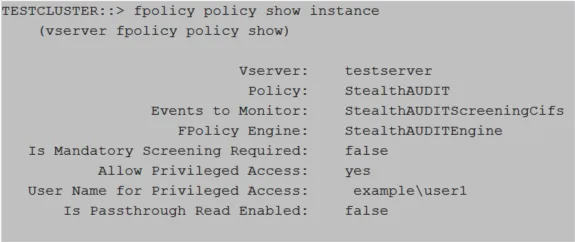
Relevant NetApp Documentation: To learn more about creating a policy, please visit the NetApp website and read the vserver fpolicy policy create article.
Create Empty FPolicy Scope
The FPolicy scope creates the filters necessary to perform scans on specific shares or volumes.
IMPORTANT:
- The SVM used must be the SVM hosting the CIFS shares.
- It is not necessary to specify both volumes and shares. One or the other is sufficient.
Use the following command to create the FPolicy scope by volume(s):
vserver fpolicy policy scope create ‑vserver [SVM_NAME] ‑policy-name StealthAUDIT ‑volumes-to-include
Example:
vserver fpolicy policy scope create ‑vserver testserver ‑policy-name StealthAUDIT ‑volumes-to-include
Use the following command to create the FPolicy scope by share(s):
vserver fpolicy policy scope create ‑vserver [SVM_NAME] ‑policy-name StealthAUDIT ‑shares-to-include
Example:
vserver fpolicy policy scope create ‑vserver testserver ‑policy-name StealthAUDIT ‑shares-to-include
Before enabling the FPolicy, validate this FPolicy Scope was created.
Validate FPolicy Scope Creation
Run the following command to validate the FPolicy scope creation:
fpolicy policy scope show ‑instance
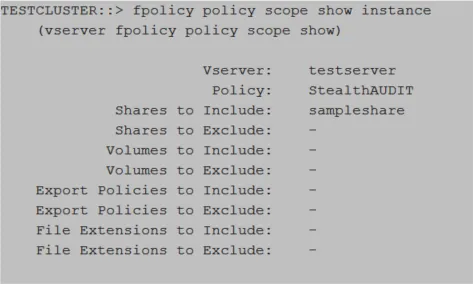
Relevant NetApp Documentation: To learn more about creating scope, please visit the NetApp website and read the vserver fpolicy policy scope create article.
Enable the Empty FPolicy
Once the empty FPolicy has been created, it must be enabled.
IMPORTANT:
- The SVM used must be the SVM hosting the CIFS or NFS shares.
Use the following command to enable the FPolicy:
vserver fpolicy enable ‑vserver [SVM_NAME] ‑policy-name StealthAUDIT ‑sequence-number [INTEGER]
Example:
vserver fpolicy enable ‑vserver testserver ‑policy-name StealthAUDIT ‑sequence-number 10
Validate this FPolicy was enabled.
Validate FPolicy Enabled
Run the following command to validate the FPolicy scope creation:
vserver fpolicy show

Relevant NetApp Documentation: To learn more about enabling a policy, please visit the NetApp website and read the vserver fpolicy enable article.