Import From a Database
Follow the steps to create a Host Discovery query using the Import from a database source option.
CAUTION: Each time a query refresh occurs for a query with an import option set as the source, it re-imports the host list. Therefore, deleting, renaming, or moving the import source file causes the query to fail.
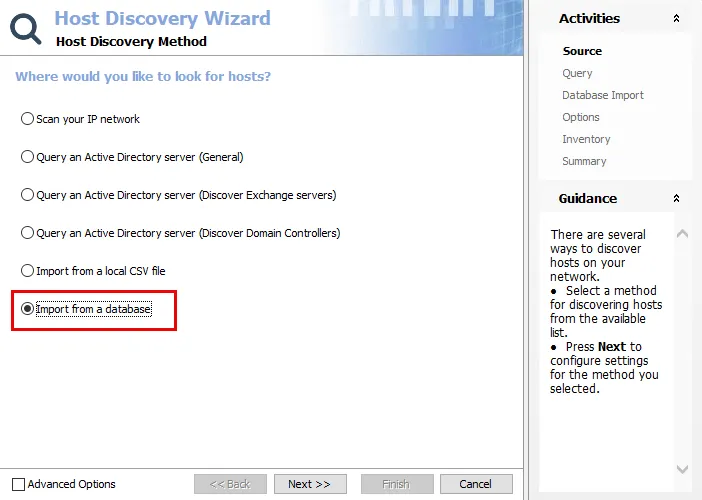
Step 1 – Open the Host Discovery Wizard. On the Source page, select the Import from a database option. Click Next.
Step 2 – On the Query page, name the query and select the credentials used to access the source.
-
Query Name – Provide a unique descriptive name for this query by typing over the
NEWQUERYdefault name. Two queries cannot have the same name. If you use an existing name, a number is automatically appended to the query name, for exampleNEWQUERYbecomesNEWQUERY1. -
Credentials – Select a Connection Profile. These credentials require the appropriate permissions for querying the source:
- Default credentials (credentials the application is run with) – Applies the credentials used to launch the Access Analyzer application
- Credentials in my default connection profile – Applies the default Connection Profile configured at the global level (Settings > Connection)
- Credentials in this connection profile – Use the dropdown list to select a Connection Profile from those preconfigured at the global level (Settings > Connection)
See the Connection topic for additional information on Connection Profiles.
Click Next to continue.

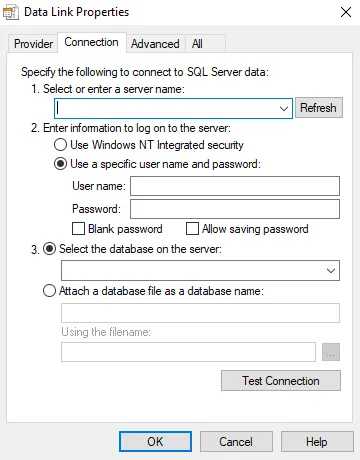
Step 3 – On the Database Import page, identify the database, table, and column where the host names are located:
-
Data source – Identify the database. Click the ellipsis (…) to open the Data Link Properties window. Then provide the required information on the Connection tab.
-
Server name – Use the drop-down menu to select the server. The Refresh button refreshes the list of available servers.
-
Credentials – Select the credentials to use to log on to the server:
- Use Windows NT Integrated security – This option applies the credentials used to run the Access Analyzer application
- Use a specific user name and password – Provide the user name and password and select the Allow saving password option
- If selected, the Blank password option indicates that no password is required

-
Click Test Connection to confirm a connection has been established. Click OK on the confirmation window.
-
Database – Select the Select the database on the server option and use the drop-down menu to select the database
-
The other tabs in the Data Link Properties window should not be modified
- Provider tab – The database connector, dictated by the source of the data and the data sources that are available on the Access Analyzer Console server. This is set by default to the Microsoft OLE DB Provider for SQL Server.
- Advanced tab – Allows modifications of the connection timeout to the database server in case the server is slow or far away
- All tab – Do not modify this tab
-
Click OK to close the Data Link Properties window
-
-
Table – Use the drop-down menu to select a table from the database
-
Column – Use the drop-down menu to select the column where the host names are located. The selection is highlighted in the Sample data box.
-
Sample data Box – Displays a preview of the selected database table
Click Next to continue.
Step 4 – On the Options page, configure the query options as required.
-
Run the query when jobs that reference it are run – Select this option to automatically execute the Host Discovery query prior to executing a job that has the host list generated by this query assigned. This ensures any new hosts have been discovered and are available for auditing.
RECOMMENDED: Use this setting only for host lists tied to specific jobs that require up-to-date host lists.
-
Query Result Retention – Select how to maintain the host list generated by this discovery query:
- Yes, grow the host list by appending newly discovered hosts – The host list includes every host the query has ever discovered
- No, only show hosts that were found during the most recent run – The host list generated by this query includes only hosts found in the most recent query execution. This option removes hosts from the generated host list, but does not remove hosts from the Host Master Table.
Click Next to continue.
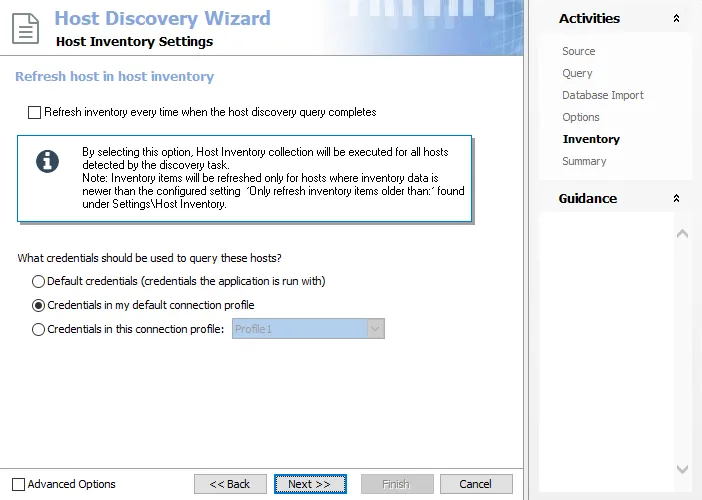
Step 5 – On the Inventory page, the host inventory process can be automatically included with the discovery query.
-
Refresh inventory every time when the host discovery query completes – Automates the host inventory process and is dependent on the Settings > Host Inventory node configuration for the age of previously inventoried records. Leaving this option deselected applies the global settings for host inventory.
-
Credentials – Select a Connection Profile. These credentials require the appropriate permissions for gathering inventory information from the discovered hosts:
- Default credentials (credentials the application is run with) – Applies the credentials used to launch the Access Analyzer application
- Credentials in my default connection profile – Applies the default Connection Profile configured at the global level (Settings > Connection)
- Credentials in this connection profile – Use the dropdown list to select a Connection Profile from those preconfigured at the global level (Settings > Connection)
See the Connection topic for additional information on Connection Profiles.
Click Next to continue.
Step 6 – The Summary page displays all the selected query configuration settings. To make changes, click Back to navigate to the relevant wizard page. Click Finish to complete the configuration process.

Step 7 – A Confirm dialog box opens. Click Yes to run the query now or No to run the query at another time.
Both options close the Host Discovery Wizard and return to the Host Discovery Queries view on the Host Discovery node. If Yes is selected, the Query State indicates the running query.