Microsoft Information Protection Target Requirements
Microsoft Purview Information Protection (formerly Azure Information Protection, and referred to in this topic as Microsoft Information Protection, or MIP) is a Microsoft service that classifies and protects stored files with sensitivity labels. Access Analyzer uses the File System Solution to run Access Auditing (FSAA) and/or Sensitive Data Discovery Auditing scans to find sensitivity labels and scan protected (i.e. encrypted) files for sensitive data. Access Analyzer uses the MIP File SDK to read labels and decrypt protected files.
This document explains how to configure the access Access Analyzer needs to scan for Microsoft Information Protection labels in a target environment.
Workflow for Scanning MIP Labels
Before the Access Analyzer File System solution can scan for MIP labels, complete the following prerequisites in Access Analyzer, Microsoft Entra ID, and Microsoft Purview.
If you configured AIP scanning in an earlier release, add the permissions in Create a Service Principal Account to your existing app registration, grant admin consent again, and complete the super user steps. You can uninstall the Rights Management Service Client.
- Create a Service Principal Account
- Enable the Account as a Super User using PowerShell
- Configure Access Analyzer
- See the FileSystemAccess Data Collector section in the File System Solution topic for additional information
Prerequisites
Meet the following prerequisites before you configure MIP scanning:
- Microsoft Entra ID Global Administrator credentials, or an account holding the Azure Information Protection Administrator, Compliance Administrator, or Compliance Data Administrator role
- Windows PowerShell 5.1 (run as Administrator) and the ability to run
Install-Module - The server where the FSAA applet runs doesn't need a client installation, because Access Analyzer includes the MIP File SDK. Access Analyzer no longer requires the Rights Management Service Client
- Optional: The Microsoft Purview Information Protection client, installed on the Access Analyzer console server. It's required only to apply labels with the FS_MIPLabeling Job
- Allow outbound HTTPS (port 443) traffic from the server where the FSAA applet or proxy runs to the following Microsoft endpoints. Firewall or proxy rules must allow this traffic for applications, not only for web browsers:
login.microsoftonline.comdataservice.protection.outlook.com*.aadrm.com*.informationprotection.azure.com
The MIP File SDK uses the machine-wide WinHTTP proxy settings (netsh winhttp show proxy). If the configured static proxy is unreachable, MIP initialization can stall or fail, and the scan turns off MIP scanning. Confirm the proxy is reachable, or reset it with netsh winhttp reset proxy.
Create a Service Principal Account
-
Open the Microsoft Entra admin center and sign in with an administrator account.
-
Create a new app registration:
- Navigate to Identity > Applications > App registrations > New registration
- Give the new application a distinguishable name
- Set Supported account types to Accounts in this organizational directory only (single tenant)
- Leave Redirect URI blank
-
Create a client secret:
- Open Certificates & secrets > Client secrets
- Click New client secret
- Provide a brief description and expiration date
- Click Add
- Record the client secret Value immediately (not the Secret ID)
warningThe portal displays the secret value only once. It disappears when you leave the page.
-
Add API permissions:
-
Open API permissions
-
Click Add a permission > APIs my organization uses
-
Search for Microsoft Rights Management Services, select Application permissions, and add
Content.DelegatedReader,Content.DelegatedWriter, andContent.SuperUserinfoAfter you add it, the portal lists the API as Azure Rights Management Services.
-
Click Add a permission > APIs my organization uses
-
Search for Microsoft Information Protection Sync Service, select Application permissions, and add
UnifiedPolicy.Tenant.Read -
Confirm that Microsoft Graph
User.Read(Delegated) is present. Microsoft Entra ID adds it by default when you create the app registration
API Permission type Permission Purpose Azure Rights Management Services Application Content.DelegatedReaderRead protected content on behalf of a user Azure Rights Management Services Application Content.DelegatedWriterRequired to apply labels with the FS_MIPLabeling Job Azure Rights Management Services Application Content.SuperUserRead all protected content for the tenant Microsoft Graph Delegated User.ReadSign in and read user profile Microsoft Information Protection Sync Service Application UnifiedPolicy.Tenant.ReadRead the tenant's sensitivity label policy 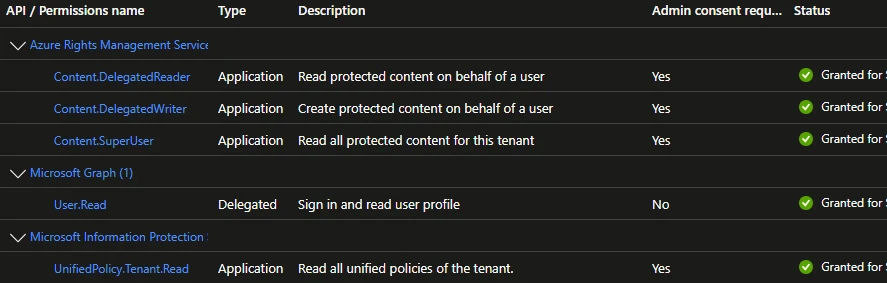
-
-
After adding the required API permissions, click Grant admin consent. Each permission must show a green Granted for status.
-
Record the Application (client) ID and Directory (tenant) ID from the Overview page, together with the secret value.
Enable the Account as a Super User using PowerShell
The Content.SuperUser permission takes effect only after you add the service principal as an Azure Rights Management super user. This is a separate step from the app registration and requires an account with the Global Administrator or Azure Information Protection Administrator role.
Super users can decrypt all protected content in the tenant. Enable the super user feature only for accounts that require it, and review this step with your security team.
Run all PowerShell commands in order through Windows PowerShell 5.1 (powershell.exe) as an Administrator. Connecting with Connect-AipService can fail in PowerShell 7 (pwsh.exe). Modules installed under one PowerShell host aren't available in the other.
The module and cmdlet names in this section contain "AIP" because Microsoft hasn't renamed the AIPService module that manages super users for Microsoft Purview Information Protection. Use the names exactly as shown.
-
Install the AIPService module and import it into PowerShell:
Install-Module -Name AIPServiceImport-Module AIPService -
Connect to the service using the
Connect-AipServicecommand and supply the administrator credentials in the Microsoft Sign in to your account window. -
Enable the super user feature:
Enable-AipServiceSuperUserFeature -
Add the service principal as a super user, using the Application (client) ID recorded in the Create a Service Principal Account section:
Add-AipServiceSuperUser -ServicePrincipalId <AppID> -
Verify that the output lists the service principal:
Get-AipServiceSuperUser
The service principal is now a super user in the Rights Management service, and the super user feature is enabled.
Access Analyzer Configurations
Complete two configurations before Access Analyzer can scan for MIP labels.
Azure Connection Profile
To collect labels for files protected with Microsoft Information Protection, configure an Azure connection profile in Access Analyzer before an FSAA scan runs. See the Global Settings topic for additional information on how to set up a connection profile at the global level.
- In Access Analyzer, add a credential with the Azure Active Directory account type (Microsoft Entra ID) to the existing Connection Profile used for File System scanning. Enter the Application (client) ID in the Client ID field. In the Key field, enter the client secret Value you recorded in Create a Service Principal Account.
- At the job level, apply the connection profile that contains both the Microsoft Entra ID credential and credentials required for File System scanning under the Jobs > [Job] > Settings > Connection node.
- Confirm the job configuration before running a scan. See the Configure FSAA Data Collector topic for additional information.
The Azure Connection Profile is now ready for an FSAA scan.
Configure FSAA Data Collector
In Access Analyzer, configure the FSAA Data Collector wizard pages to scan files protected by Microsoft Information Protection. You can do this for both FSAA System Scans and SEEK System Scans. In the FSAA Data Collector Wizard, configure the following menus to scan for MIP labels:
For FSAA System Scans:
-
Scan Server Selection – Choose the server that runs the scan. This may be a proxy server, file server (applet mode), or the local Access Analyzer console depending on scan configuration. The server must meet the network requirements listed in the Prerequisites section.
-
Scan Settings – Select the Enable scanning of files protected by Microsoft Information Protection checkbox to add MIP files to the scan criteria
-
Azure Tenant Mapping page – Add the Application (client) ID and the Domain Name or Tenant ID
tipRemember, the Azure Tenant Mapping page is only visible when you select the Enable scanning of files protected by Microsoft Information Protection checkbox on the Scan Settings page.
-
Default Scoping Options
- File Details tab – Include files protected by Microsoft Information Protection
- File Properties (Folder Summary) – Include MIP Protected Files
-
Scoping Options – if needed, scope to a specific subset of resources on a selected host
For SEEK System Scans:
-
Scan Server Selection – Choose the server that runs the scan. This may be a proxy server, file server (applet mode), or the local Access Analyzer console depending on scan configuration. The server must meet the network requirements listed in the Prerequisites section.
-
Scan Settings – Select the Enable scanning of files protected by Microsoft Information Protection checkbox to add MIP files to the scan criteria
-
Azure Tenant Mapping page – Add the Application (client) ID and the Domain Name or Tenant ID
tipRemember, the Azure Tenant Mapping page is only visible when you select the Enable scanning of files protected by Microsoft Information Protection checkbox on the Scan Settings page.
-
Scoping Options – if needed, scope to a specific subset of resources on a selected host
-
Sensitive Data Settings – Select Decrypt Files Protected by Microsoft Information Protection. This page only applies for SEEK scans.
See the FileSystemAccess Data Collector section in the File System Solution topic for additional information on these scoping options.