AnyID_EpicClarity Job
The AnyID_EpicClarity job collects patient information from Epic including MRNs, SSNs, Subscriber IDs, and Account IDs. An account with read access to the underlying Clarity Oracle database is required in order to run queries.

The AnyID_EpicClarity job is located in the Jobs > AnyID Connectors job group.
Recommended Configurations for the AnyID_EpicClarity Job
The following are recommended configurations for the AnyID_EpicClarity job:
Dependencies
The AnyID_EpicClarity job requires a CSV file with a filepath configured in the job's query to collect data. See the Configure the AnyID_EpicClarity Queries topic for additional information.
Targeted Host
Epic Clarity Database Server
Connection Profile
Read Access to the underlying Clarity Oracle database.
History Retention
Default Retention Period. See the History topic for additional information.
Multi-Console Support
Not supported
Schedule Frequency
This job should be run based on the desired frequency of Sensitive Data Scans.
Query Configuration
This job contains configurable queries. See the Configure the Configure the AnyID_EpicClarity Queries topic for additional information.
Analysis Configuration
Run the solution with the default analysis configuration for best results.
Workflow
Step 1 – Configure the configurable query parameters for the job.
Step 2 – Run the job.
Step 3 – Review the report generated by the job.
Queries for the AnyID_EpicClarity Job
The AnyID_EpicClarity job uses the PowerShell Data Collector for queries.
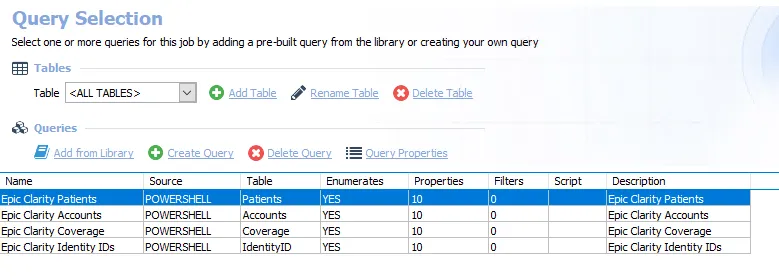
The queries are:
- Epic Clarity Patients – Imports Epic Clarity subject profile information for patients
- Epic Clarity Accounts – Imports Epic Clarity subject profile information on accounts
- Epic Clarity Coverage – Imports Epic Clarity subject profile information on coverage
- Epic Clarity Identity IDs – Imports Epic Clarity subject profile information on identity IDs
The above queries have configurable parameters. See the Configure the AnyID_EpicClarity Queries topic for additional information.
Configure the AnyID_EpicClarity Queries
Follow the steps to configure the AnyID_EpicClarity queries.
Step 1 – Navigate to the AnyID Connectors > AnyID_EpicClarity > Configure node and select Queries.
Step 2 – In the Query Selection view, select a query and click Query Properties. The Query Properties window opens.
Step 3 – Select the Data Source tab, and click Configure. The PowerShell Data Collector Wizard opens.
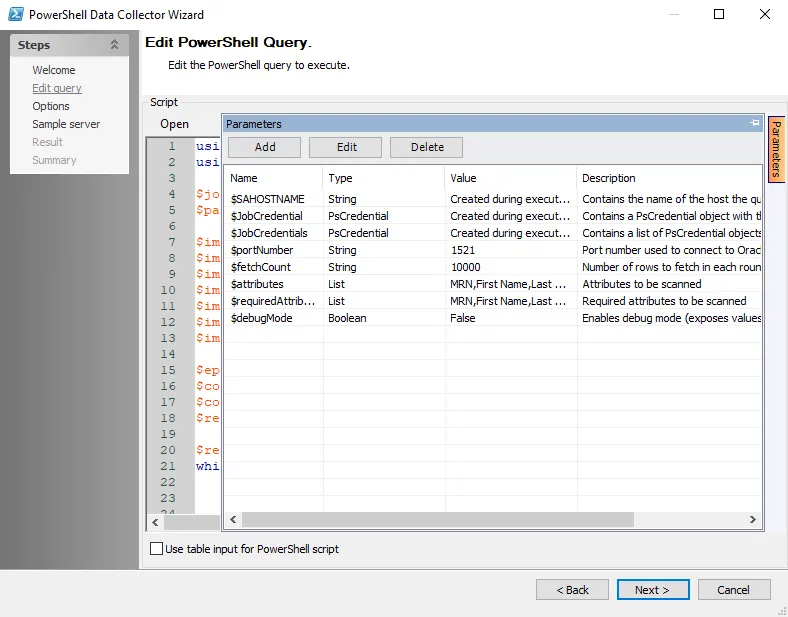
Step 4 – Navigate to the Edit Query page. Click the Parameters tab on the right-hand side of the page to expand the Parameters window. See the PowerShell: Edit Query topic for additional information. Configure the following attributes as needed:
-
$portNumber – The port number used to access the Oracle Database Server
-
$fetchCount – The number of rows to process in a batch. Leave at default unless otherwise required.
-
$Attributes – The list of attributes that will be scanned for during sensitive data scanning. Default values are MRN, SSN, Name, Date of Birth, Subscriber ID, Identity ID, and Account ID.
- An attribute in the Attributes list will not be considered a match (in reporting and AIC) unless an attribute in the RequiredAttributes list is also found in the same file
-
$RequiredAttributes – The list of attributes that need to be found in the document in order to trigger a match. The default values are SSN, MRN, and IdentityID.
- An attribute in the Attributes list will not be considered a match (in reporting and AIC) unless an attribute in the RequiredAttributes list is also found in the same file
-
$debugMode – When set to true, stores unhashed attribute values for troubleshooting purposes
Step 5 – Click Next. Continue to the Sample server page and click Finish to save changes. Click Cancel to exit the wizard without saving changes.
Repeat these steps for each query in the case that a non default port value is required. Once completed, the queries are ready to run.
Analysis Tasks for the AnyID_EpicClarity Job
Navigate to the Jobs > AnyID Connectors > AnyID_EpicClarity > Configure node and select Analysis to view the analysis tasks.
CAUTION: Do not modify or deselect the selected analysis tasks. The analysis tasks are preconfigured for this job.
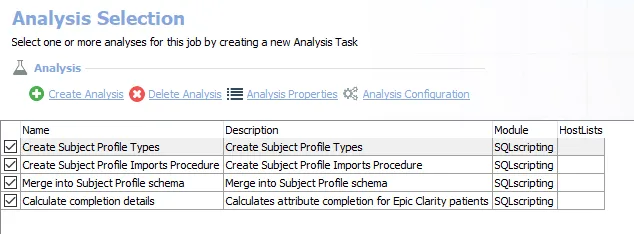
The default analysis tasks are:
- Create Subject Profile Types – Create subject profile types
- Create Subject Profile Imports Procedure – Create subject profile imports procedure
- Merge into Subject Profile schema – Merge into Subject Profile schema
- Calculate completion details – Calculates attribute completion for Epic Clarity patients
In addition to the tables created by the analysis tasks, the AnyID_EpicClarity job produces the following preconfigured report:
| Report | Description | Default Tags | Report Elements |
|---|---|---|---|
| Epic Clarity Patients | This report highlights Epic Clarity Patients and summarizes attribute completion by patient identity and by attribute. | None | This report is comprised of four elements: - Table – Contains information on Epic Clarity patients - Bar Chart – Provides information on subject types - Table – Contains information on the attributes summary - Table – Contains information on subject details |