Patterns
A pattern finds candidate values in a file's text. It's either a regular expression, such as \bEMP-\d{6}\b for an employee badge number, or a keyword list, such as the words that appear in a confidentiality banner. A pattern on its own reports nothing: a classifier's detector uses it, and the classifier's filters and severity rules decide what counts as a finding. See Build a classifier.
Access Analyzer ships the patterns its built-in classifiers use. You can add your own and use them in any custom classifier. You need the Admin role to create, edit, or delete patterns.
The Patterns tab
Go to Classification > Classifiers and select the Patterns tab.
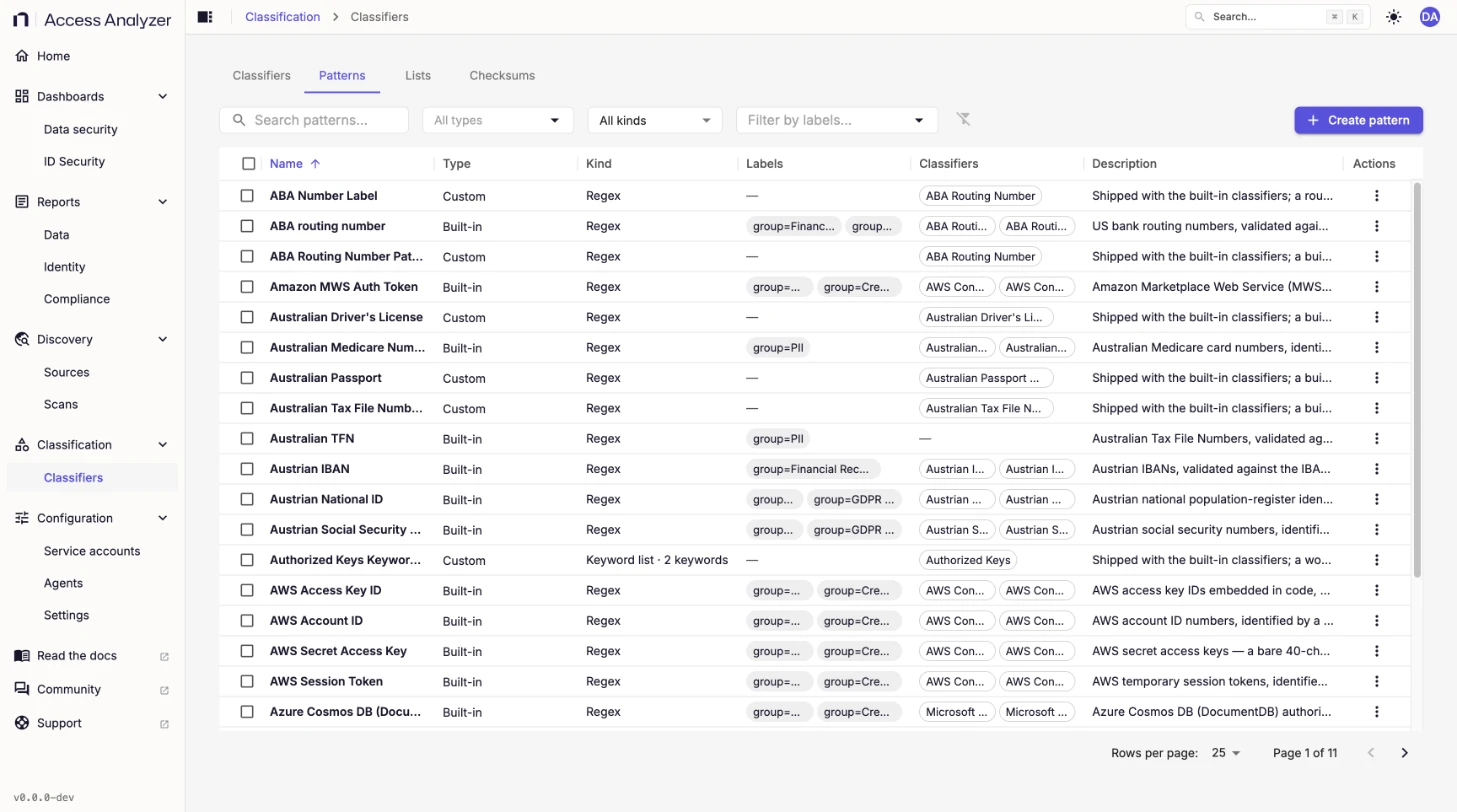
The toolbar has a Search patterns field, a Types filter (Built-in and Custom), a Kind filter with All kinds, Regex, and Keyword list, a Filter by labels field, and Create pattern. The table shows 25 patterns per page.
Select rows to act on several patterns at once: New classifier opens the builder with a detector for each selected pattern (up to 200), Edit labels changes their labels, and Delete removes them. Delete skips built-in patterns and patterns a classifier reads.
| Column | What it shows |
|---|---|
| Name | The pattern name. |
| Type | Built-in or Custom. A built-in pattern you copied shows Replaced by your copy. |
| Kind | Regex, or Keyword list with its number of keywords. |
| Labels | Key and value labels on the pattern. Detectors can use every pattern with a given label. |
| Classifiers | The classifiers whose detectors use the pattern. |
| Description | What the pattern finds. |
| Actions | For every pattern, Test pattern and Edit labels. For a built-in pattern, View pattern and Edit (makes your copy), or Open your copy and Restore the built-in after you copy it. For a custom pattern, Copy regex (regular expressions only), Edit, and Delete. |
Create a pattern
- On the Patterns tab, click Create pattern.
- In Name, enter a name, such as
Employee ID. - In Description, describe what the pattern finds.
- Select Regex or Keyword list.
- For a regular expression, enter it in Regex pattern. For a keyword list, enter the keywords, one word per line.
- Optionally, add Labels as key and value pairs.
- Click Create pattern.
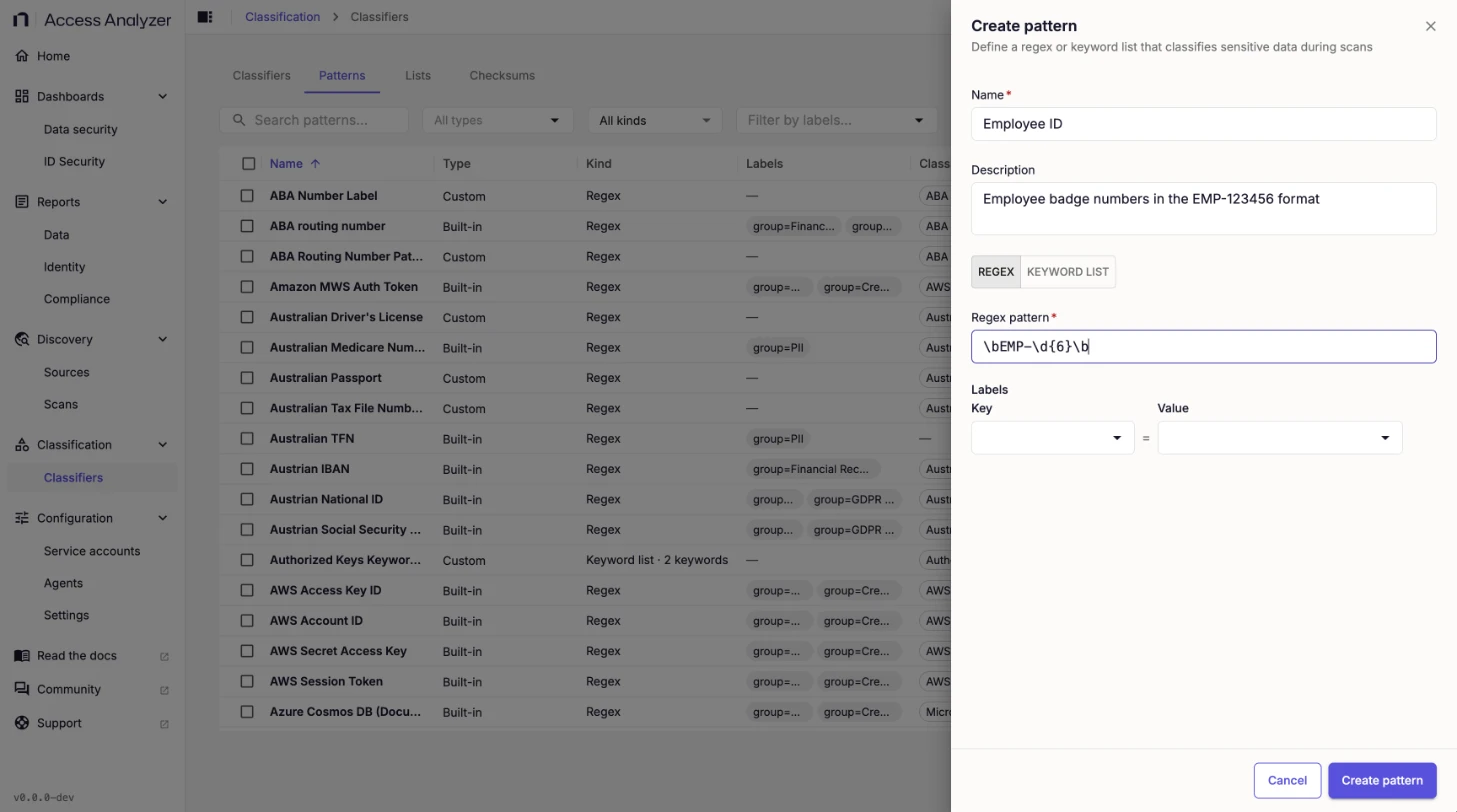
A message confirms the save: Pattern "<name>" created. Use the pattern in a classifier's detector to start finding values with it, or select it on the Patterns tab and click New classifier.
| Field | Required | Details |
|---|---|---|
| Name | Yes | Up to 255 characters. Shown on the Patterns tab, in the builder's pattern picker, and in findings. |
| Description | No | Up to 2,000 characters. |
| Regex pattern | Yes, for Regex | A regular expression in the dialect described in Regular expression dialect. Access Analyzer checks it on the server as you type. |
| Keywords | Yes, for Keyword list | One word per line; up to 10,000 keywords of up to 200 characters each, and 256 KB in total. A keyword list ignores letter case and also matches inside longer words; add the is a whole word or matches case exactly filter in the detector to change that. |
| Labels | No | Key and value pairs. A detector set to use every pattern with a label picks up the patterns that carry it. |
Regular expression dialect
Access Analyzer compiles regular expressions with a linear-time engine that uses the RE2 dialect. Linear-time matching means a pattern can't stall a scan on a pathological input, but the engine rejects a few constructs that other regex engines accept:
| Construct | Tokens |
|---|---|
| Lookahead | (?= and (?! |
| Lookbehind | (?<= and (?<! |
| Backreferences | \1, \2, and so on |
| Atomic groups | (?> |
| Conditional patterns | (?( |
When the expression uses one of these, the field shows an error that names the construct and its position. Rewrite the expression without it. Most lookarounds become a detector filter instead: to require a label before a value, use is within N characters of text rather than a lookbehind. A word boundary (\b) at each end stops a pattern from matching inside a longer token.
A checksum checks the whole match, unless the match captures exactly one named group, written (?P<name>…). Then it checks only that group's text, and the match still includes the text around the group. Use a named group to keep a label out of the check. For example, with the UK NHS number (mod 11) checksum, the pattern NHS:\s*(?P<nhs>\d{3} \d{3} \d{4}) keeps NHS: 943 476 5919 and drops NHS: 943 476 5918, because the checksum reads only the number after the label. Unnamed groups don't count, and a match with two or more named groups is checked whole.
Test a pattern
- On the Patterns tab, open the pattern's Actions menu.
- Click Test pattern.
- Replace the prefilled Sample text with your own.
- Select Line by line or Multiline.
- Click Test.
Line by line, the default, checks each line separately; Multiline checks the whole text as one document and highlights every match, up to the first 100. A test accepts up to 64 KB of sample text, and up to 200 lines in Line by line mode, and has 2 seconds to complete. To test a pattern together with the filters and severity rules around it, test the classifier instead; see Test a classifier.
Change a built-in pattern
Built-in patterns are read-only. Click Edit (makes your copy) to create your own copy; scans then use your copy wherever a classifier uses the built-in pattern. Click Restore the built-in to delete your copy. Scans run the built-in pattern as shipped from their next run, and past findings stay.
Edit or delete a custom pattern
- On the Patterns tab, open the pattern's Actions menu.
- Click Edit to change the pattern in the side panel, or Delete to remove it.
A change to a pattern applies to every classifier whose detectors use it, from the next scan on. Before you delete a pattern, check the Classifiers column for the classifiers that use it.