Scan SMB File Servers
Connect one SMB file server to Access Analyzer and run the two scans that matter for file data: an Access scan that inventories shares, folders, and permissions, and a Sensitive data scan that classifies the files the Access scan found. At the end you'll have data in the Data security dashboard and the File system reports.
The UI calls the source type File Server. It covers Windows file servers, NetApp, Dell PowerScale (formerly Isilon), and Nutanix Files over SMB 2 or SMB 3.
Before You Start
You need three things: an account that can read the shares, a network path to the server, and the Admin role in Access Analyzer.
The account - Access Analyzer only reads, so the account needs no write or administrator rights. Grant it four rights on the file server:
- Read share permission on every share to scan.
- Read & execute NTFS permission on the root folder of every share to scan, applied to This folder, subfolders and files. It covers listing folders, reading permissions, and the file contents that Sensitive data scans read.
- Membership in the local Access Control Assistance Operators group (Windows Server only), so the scan can list the server's shares and read their share-level permissions.
- For a domain account, membership in the local Backup Operators group, so Access scans can open folders whose permissions have no entry for the account. Without it, the scan records those folders without their owner or permissions, logs a warning, and skips their contents.
SMB file servers explains each right and gives a PowerShell example that grants all four.
The network - The Access Analyzer server, or the agent that runs the scan, needs TCP 445 to the file server. The connection uses SMB 2 or 3 with signing; Access Analyzer doesn't support SMB 1. Authentication uses NT LAN Manager version 2 (NTLMv2), not Kerberos.
| Direction | Port | Purpose |
|---|---|---|
| Access Analyzer or agent to file server | TCP 445 | SMB for share enumeration, permission collection, and file content |
Keep Port at 445 unless the file server listens on another port. Access scans and Sensitive data scans both use the port you enter.
Names in reports - The Access scan records permissions as security identifiers (SIDs). To see account and group names in reports, and to expand group membership, add the domain as an Active Directory source and run an Identity sync. The Scan Active Directory guide covers it; you can do it before or after this guide.
1. Create the Service Account
File Server sources use a Username/password service account.
- Go to Configuration > Service accounts and click Add service account.
- In Name, enter a unique name, for example
svc-fileserver-scan. - Leave Service account type set to Username/password.
- In Username, enter the account as
DOMAIN\username. - In Password, enter the password.
- Click Add account.
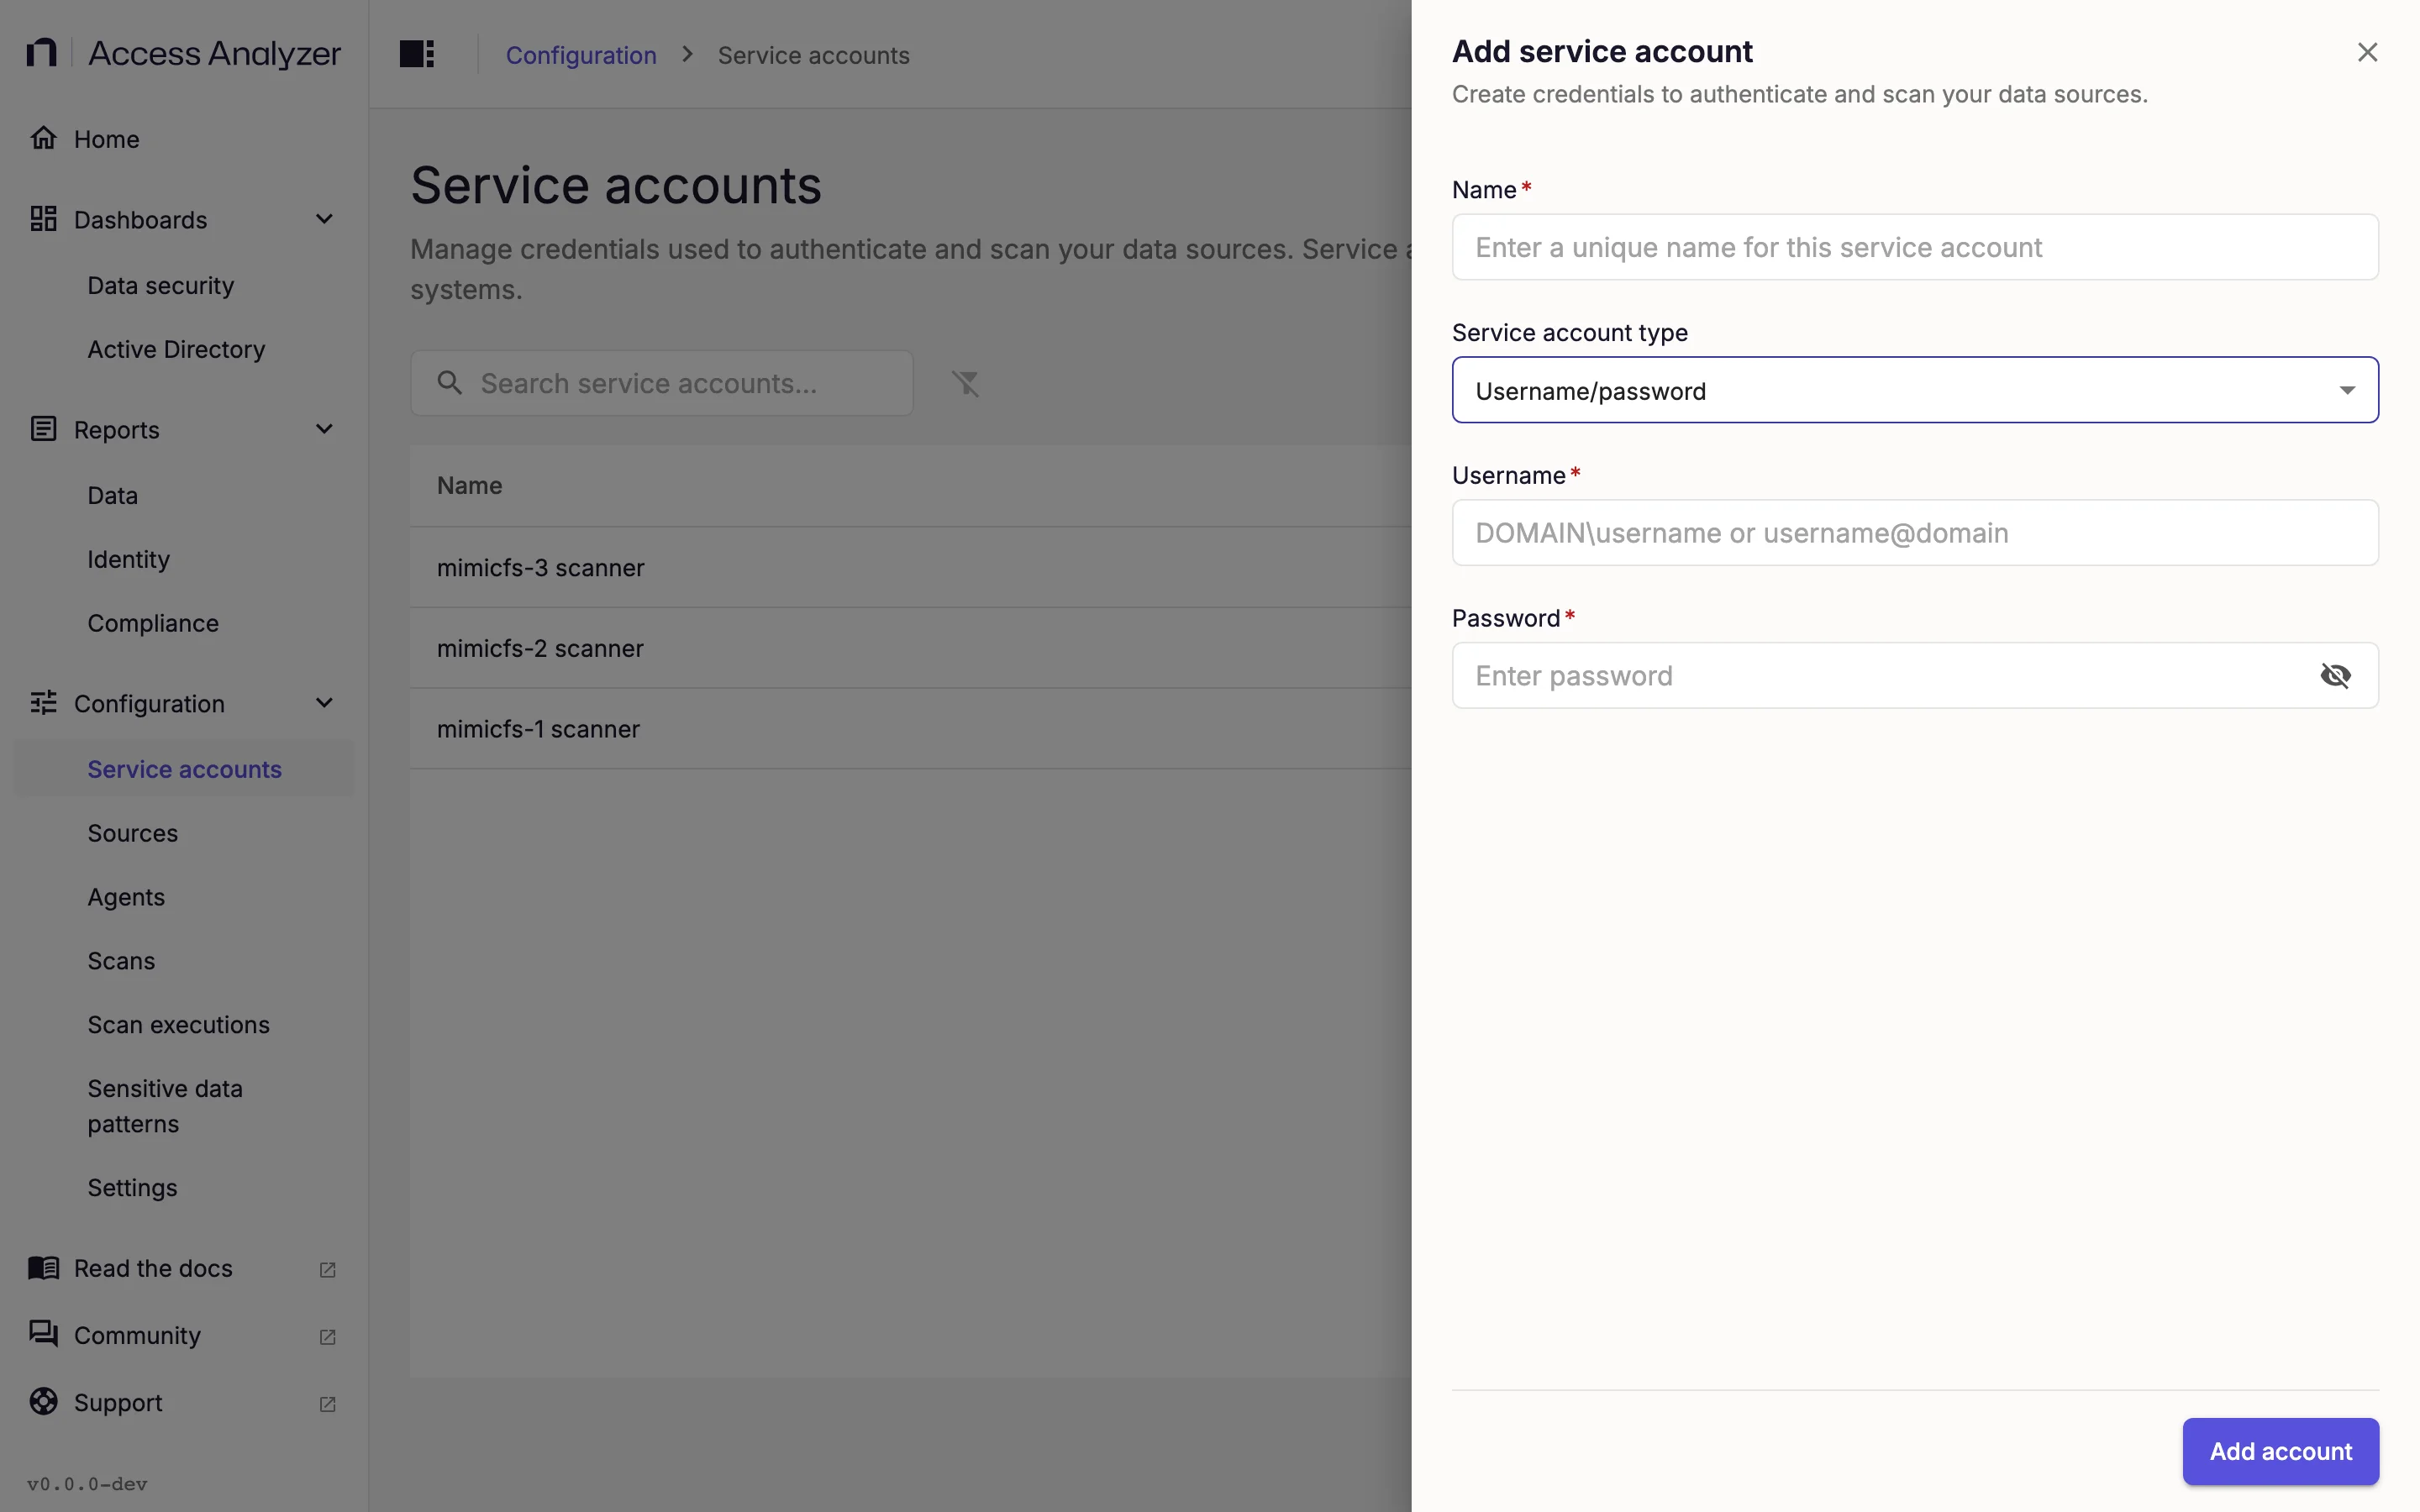
The field accepts username@domain too, but Sensitive data scans read only the DOMAIN\username form. Use that form for any account that runs both scan types.
The Username and password page has the full field reference.
2. Add the Source
- Go to Configuration > Sources and click Add source.
- In Source type, select File Server.
- Under Details, enter a Name for the source.
- Optionally, add a Description and Labels. A label is a
key=valuepair such asenv=production; it lets you target scans at groups of sources later. - Under Connection, in Host, enter the hostname or IP address of the server, for example
fileserver.example.com. - Leave Port at 445.
- In Domain, enter the Windows domain or workgroup name. Access Analyzer uses it only when the username doesn't carry a domain, so leave it empty if the service account's username is in the
DOMAIN\usernameform. - Under Access, in Service account, select the service account you created earlier.
- Click Test connection. Access Analyzer opens an SMB session and enumerates the shares. Success shows a Connection successful message; failure shows a Connection failed alert with the reason.
- Click Add source.
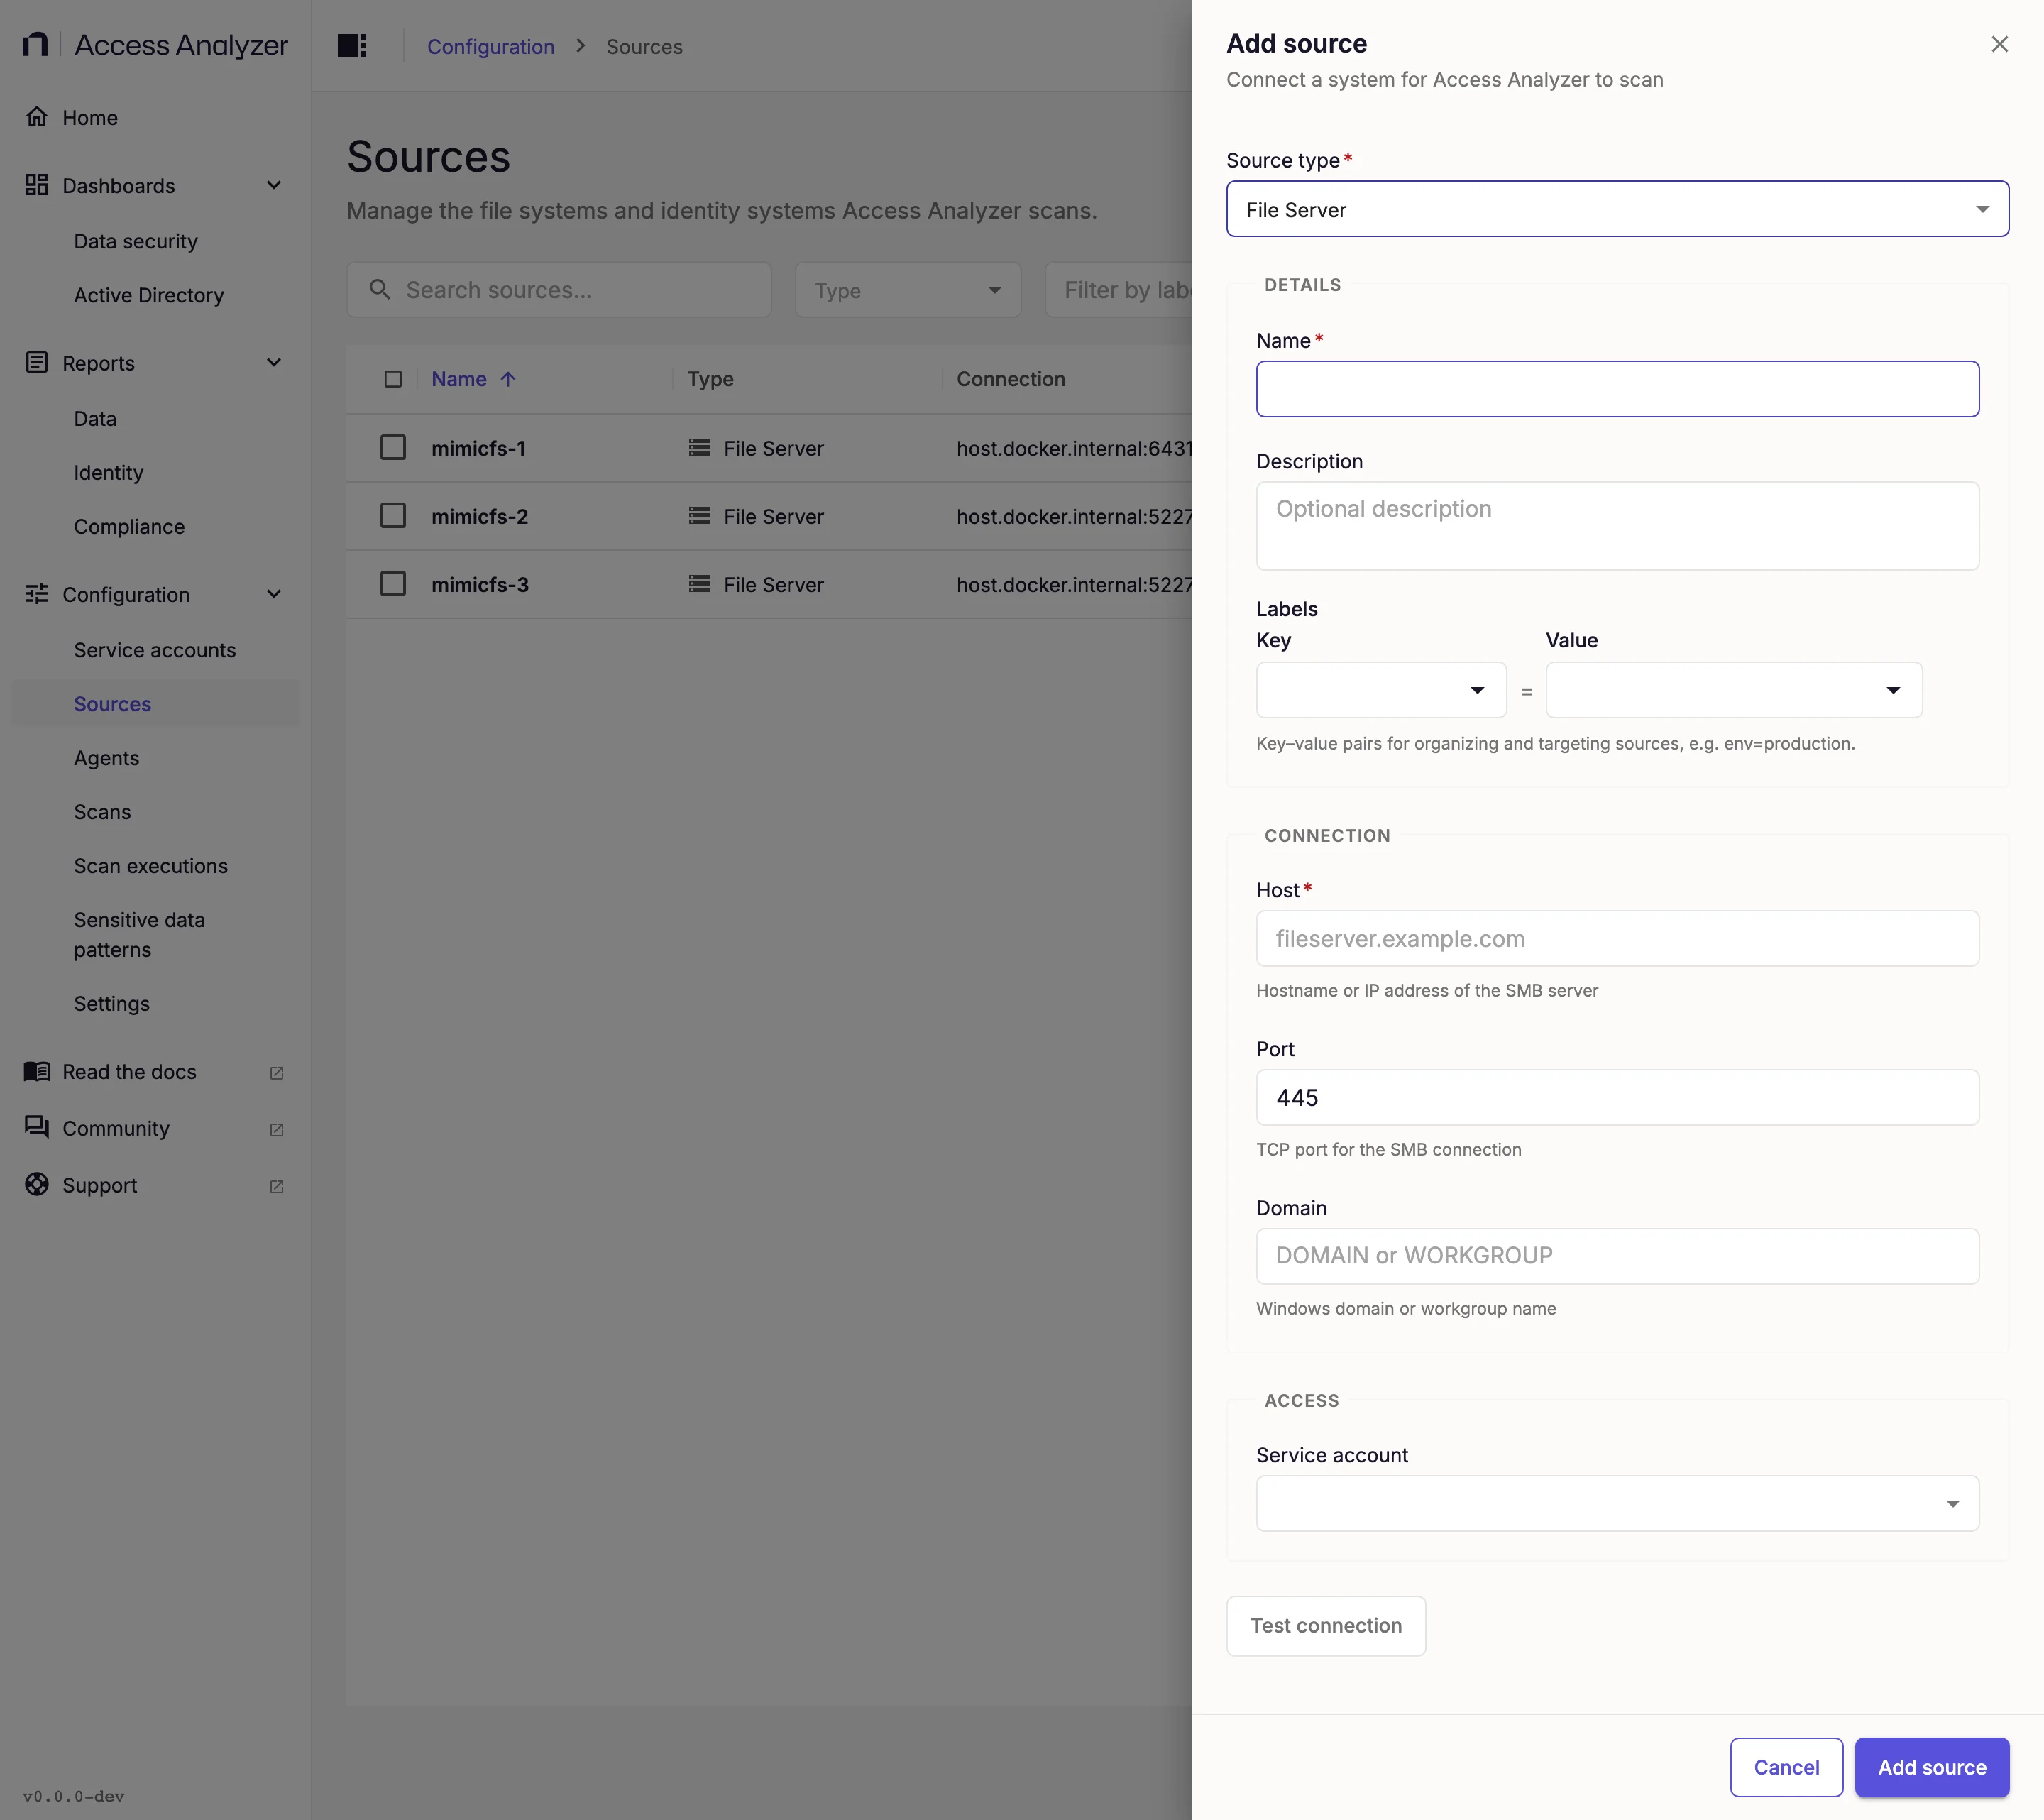
To add many servers at once, import sources from a CSV file instead. Field details and the connection checks are on the SMB file servers source page.
3. Create the Access Scan
Run the Access scan first. The Sensitive data scan you create in Create the Sensitive data scan works from the file inventory this scan builds, so there's nothing for it to classify until an Access scan has completed.
-
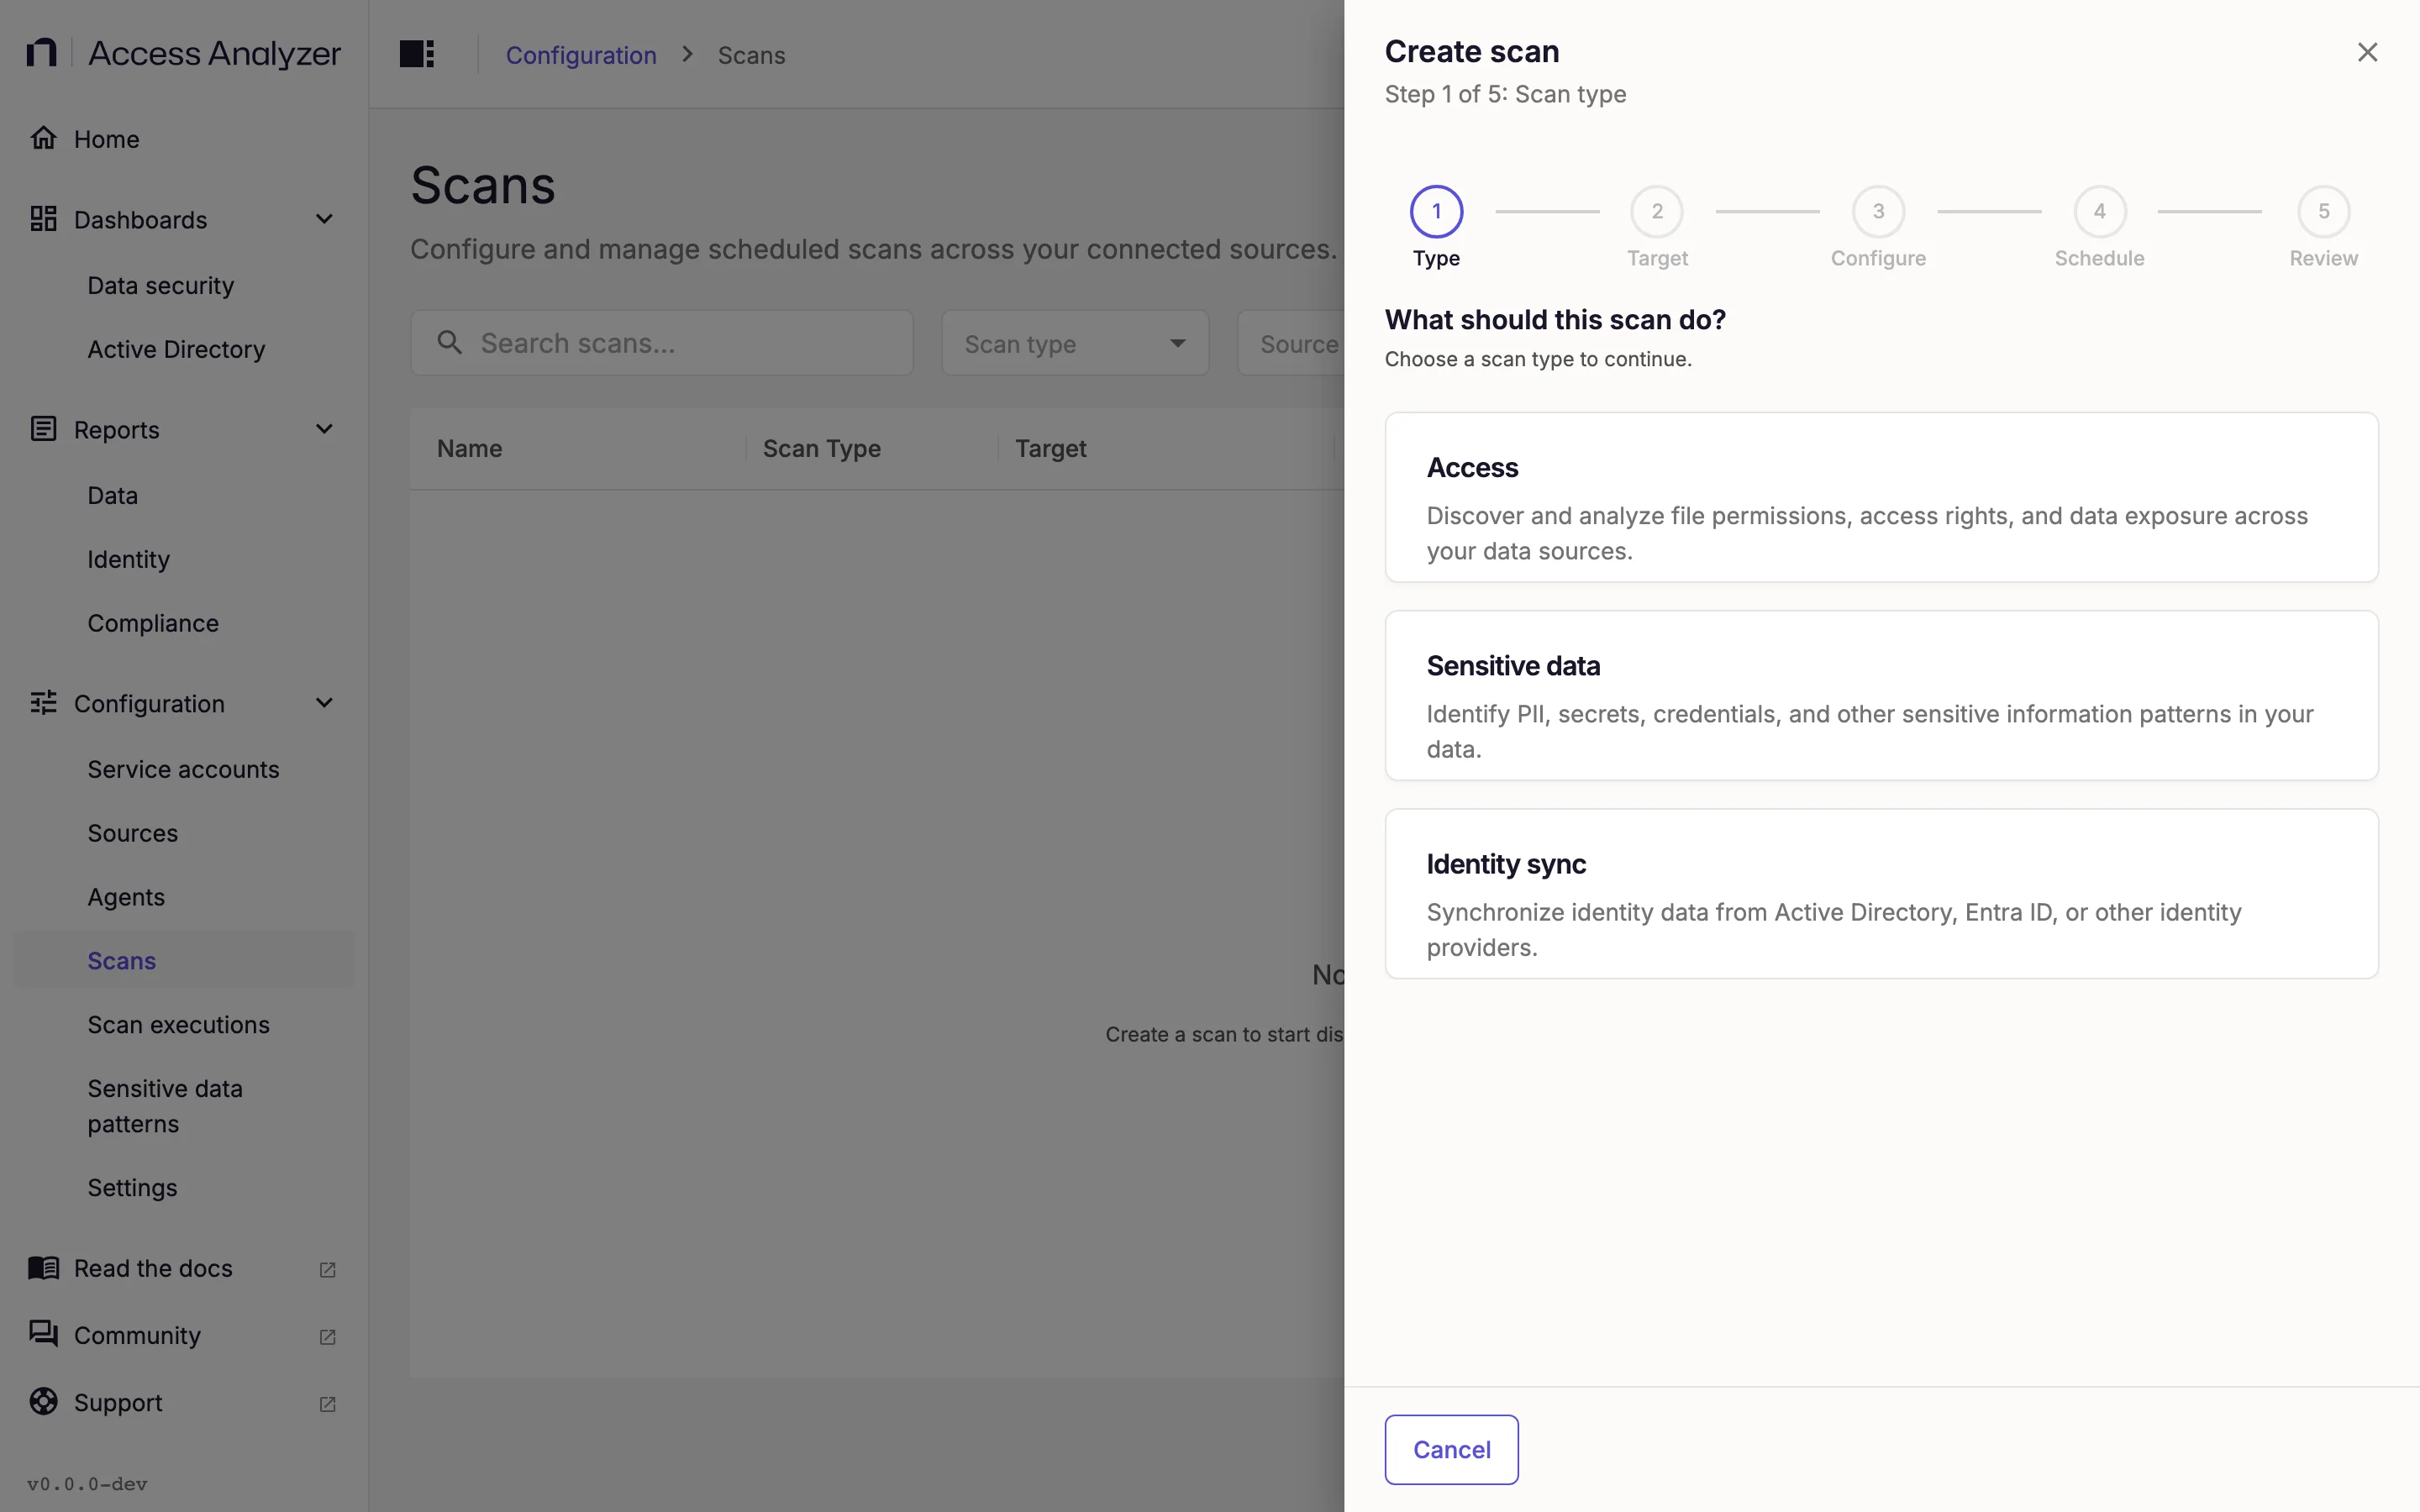
Go to Configuration > Scans and click Create scan.
-
On the Type step, select Access and click Next.
-
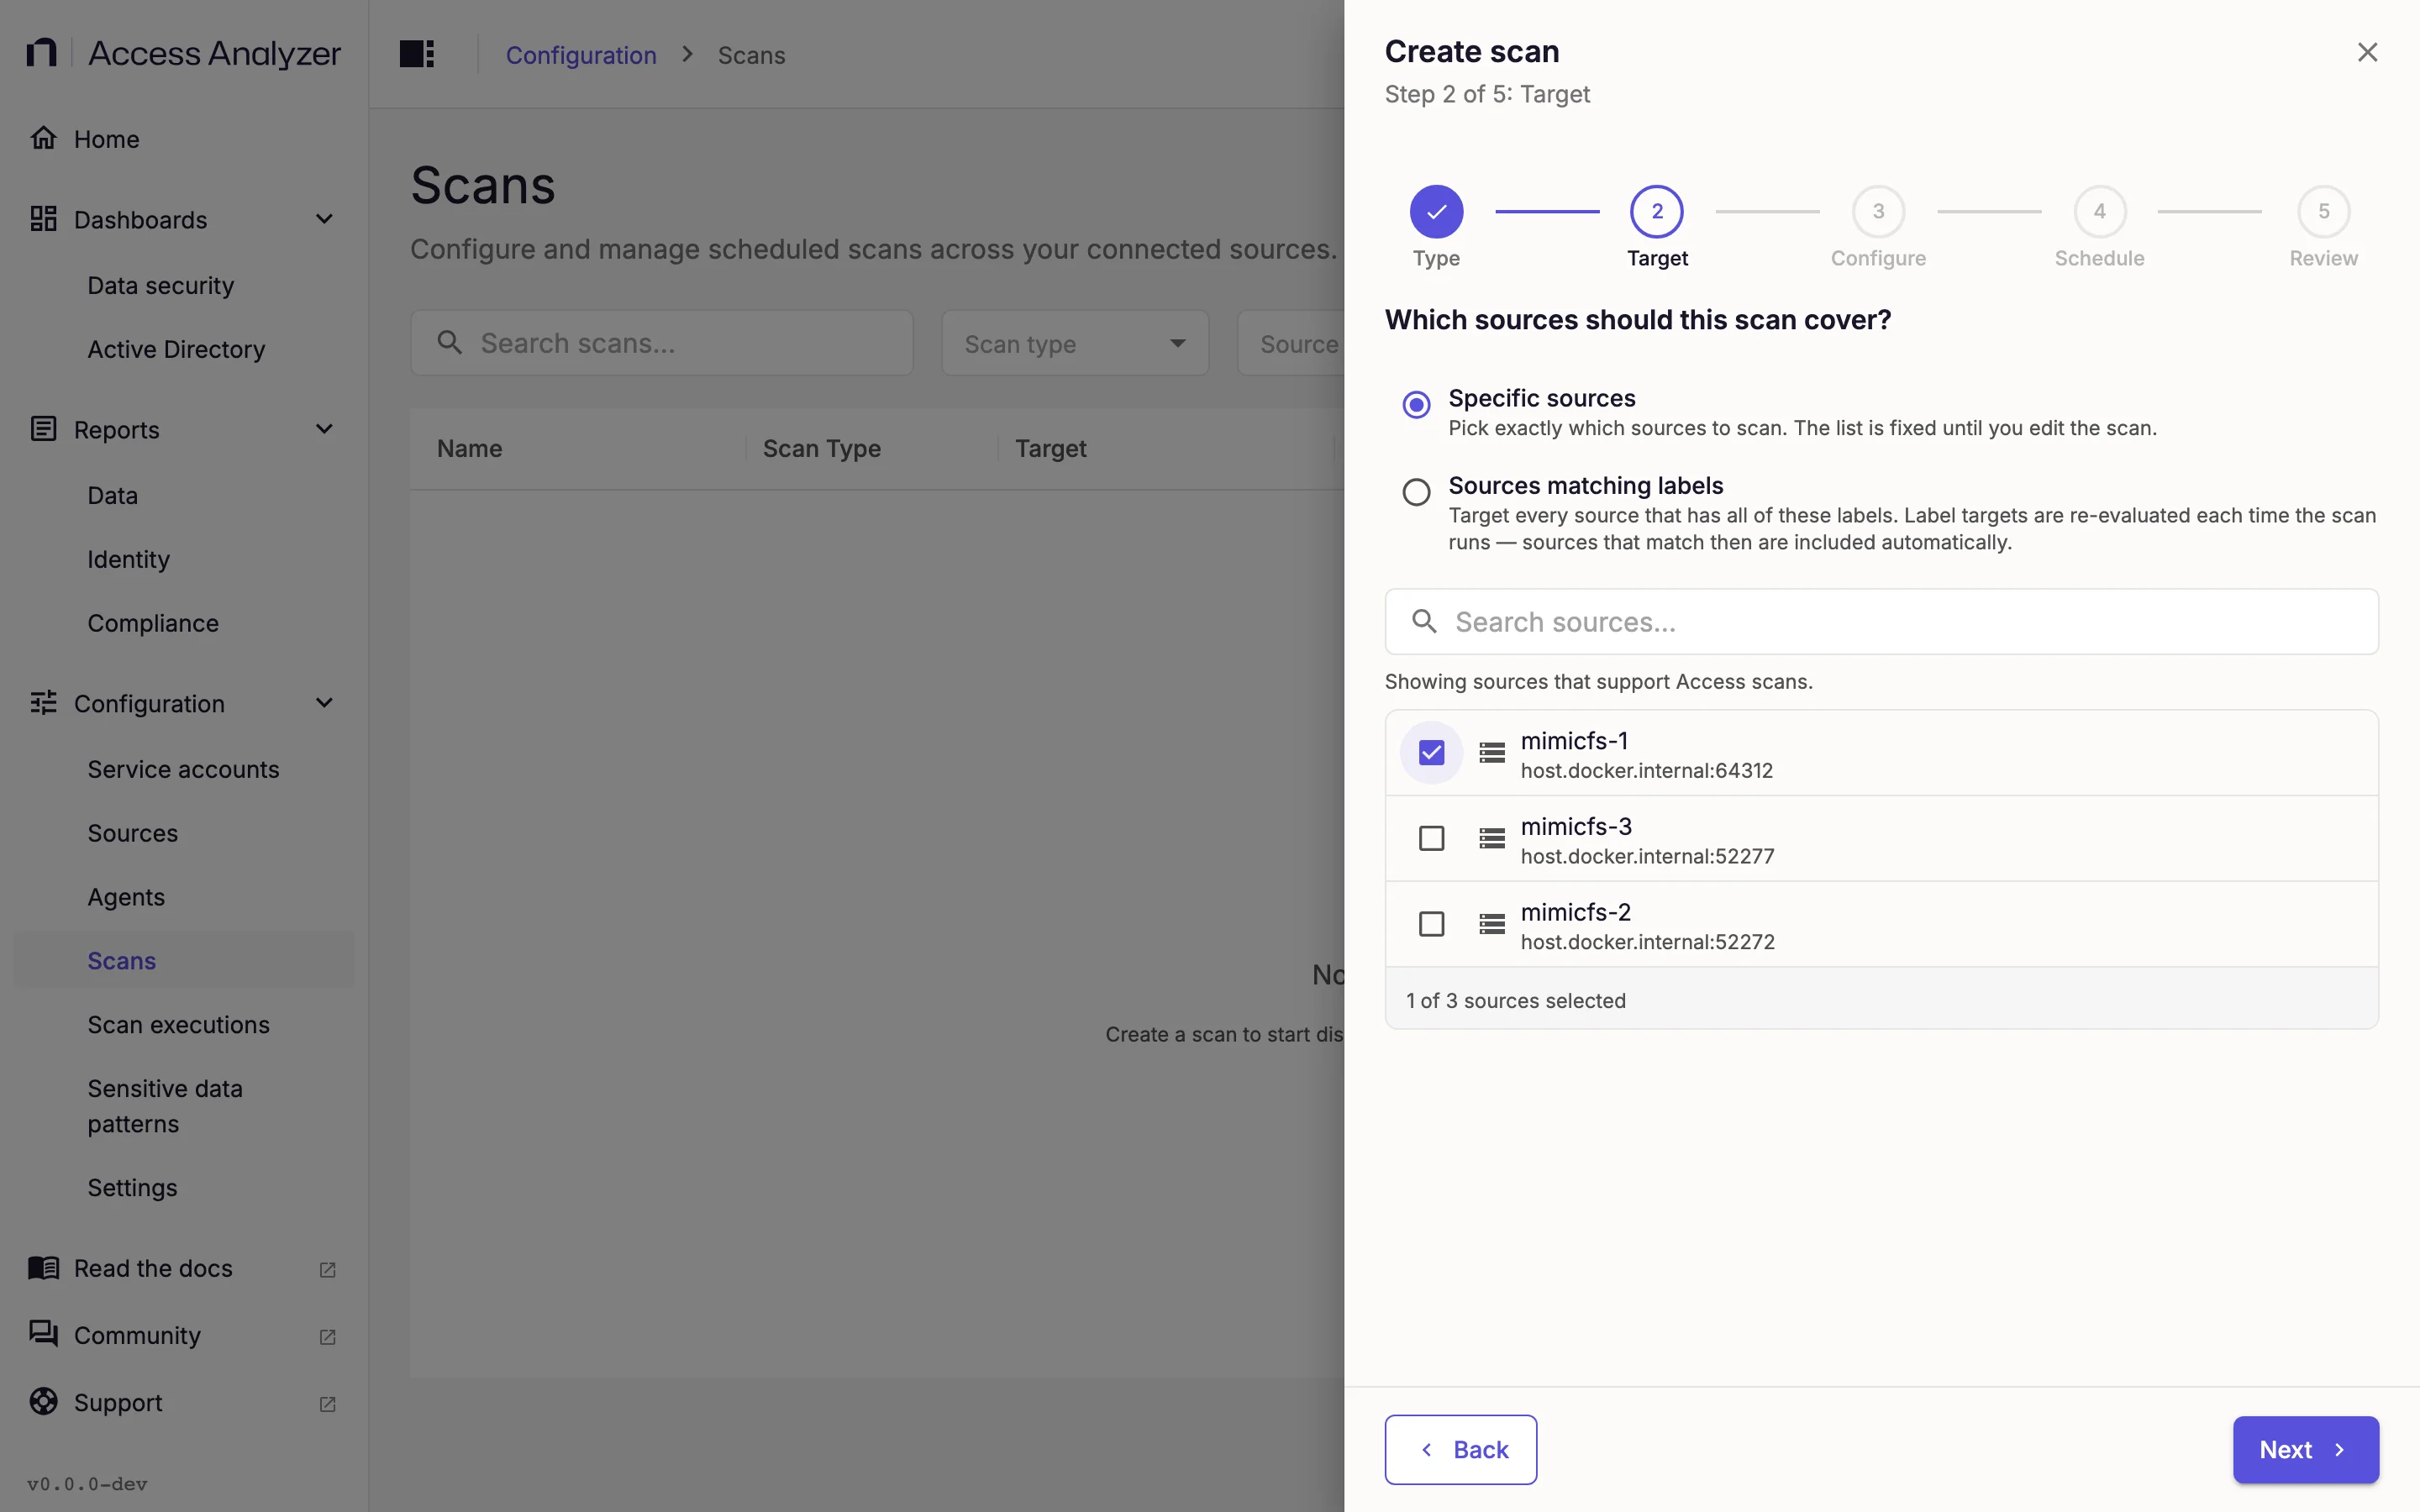
On the Target step, keep Specific sources and select the file server you added. The list shows only sources that support Access scans. For a group of servers, select Sources matching labels instead and enter the label; the scan picks up any source that carries it at run time.
-
On the Configure step, leave Use default configuration selected. The defaults are Workers 32, Exclude system shares on (the scan skips administrative and system shares such as
C$,ADMIN$, andSYSVOL), Exclude hidden shares off, Maximum scan depth 50, and Enable File-Level Permission Scanning off, which means the scan collects permissions for shares and folders but not for individual files. Change these later, after you've seen a first run; Scan types explains each setting. -
On the Schedule step, leave Manual — run on demand for the first run. When the first run looks right, edit the scan and switch to On a schedule; the default is Daily at 02:00. Leave the agent set to System agent unless you have deployed an agent closer to the file server.
-
On the Review step, enter a Name such as
Finance file server - accessand check the summary. -
Click Create & run now.
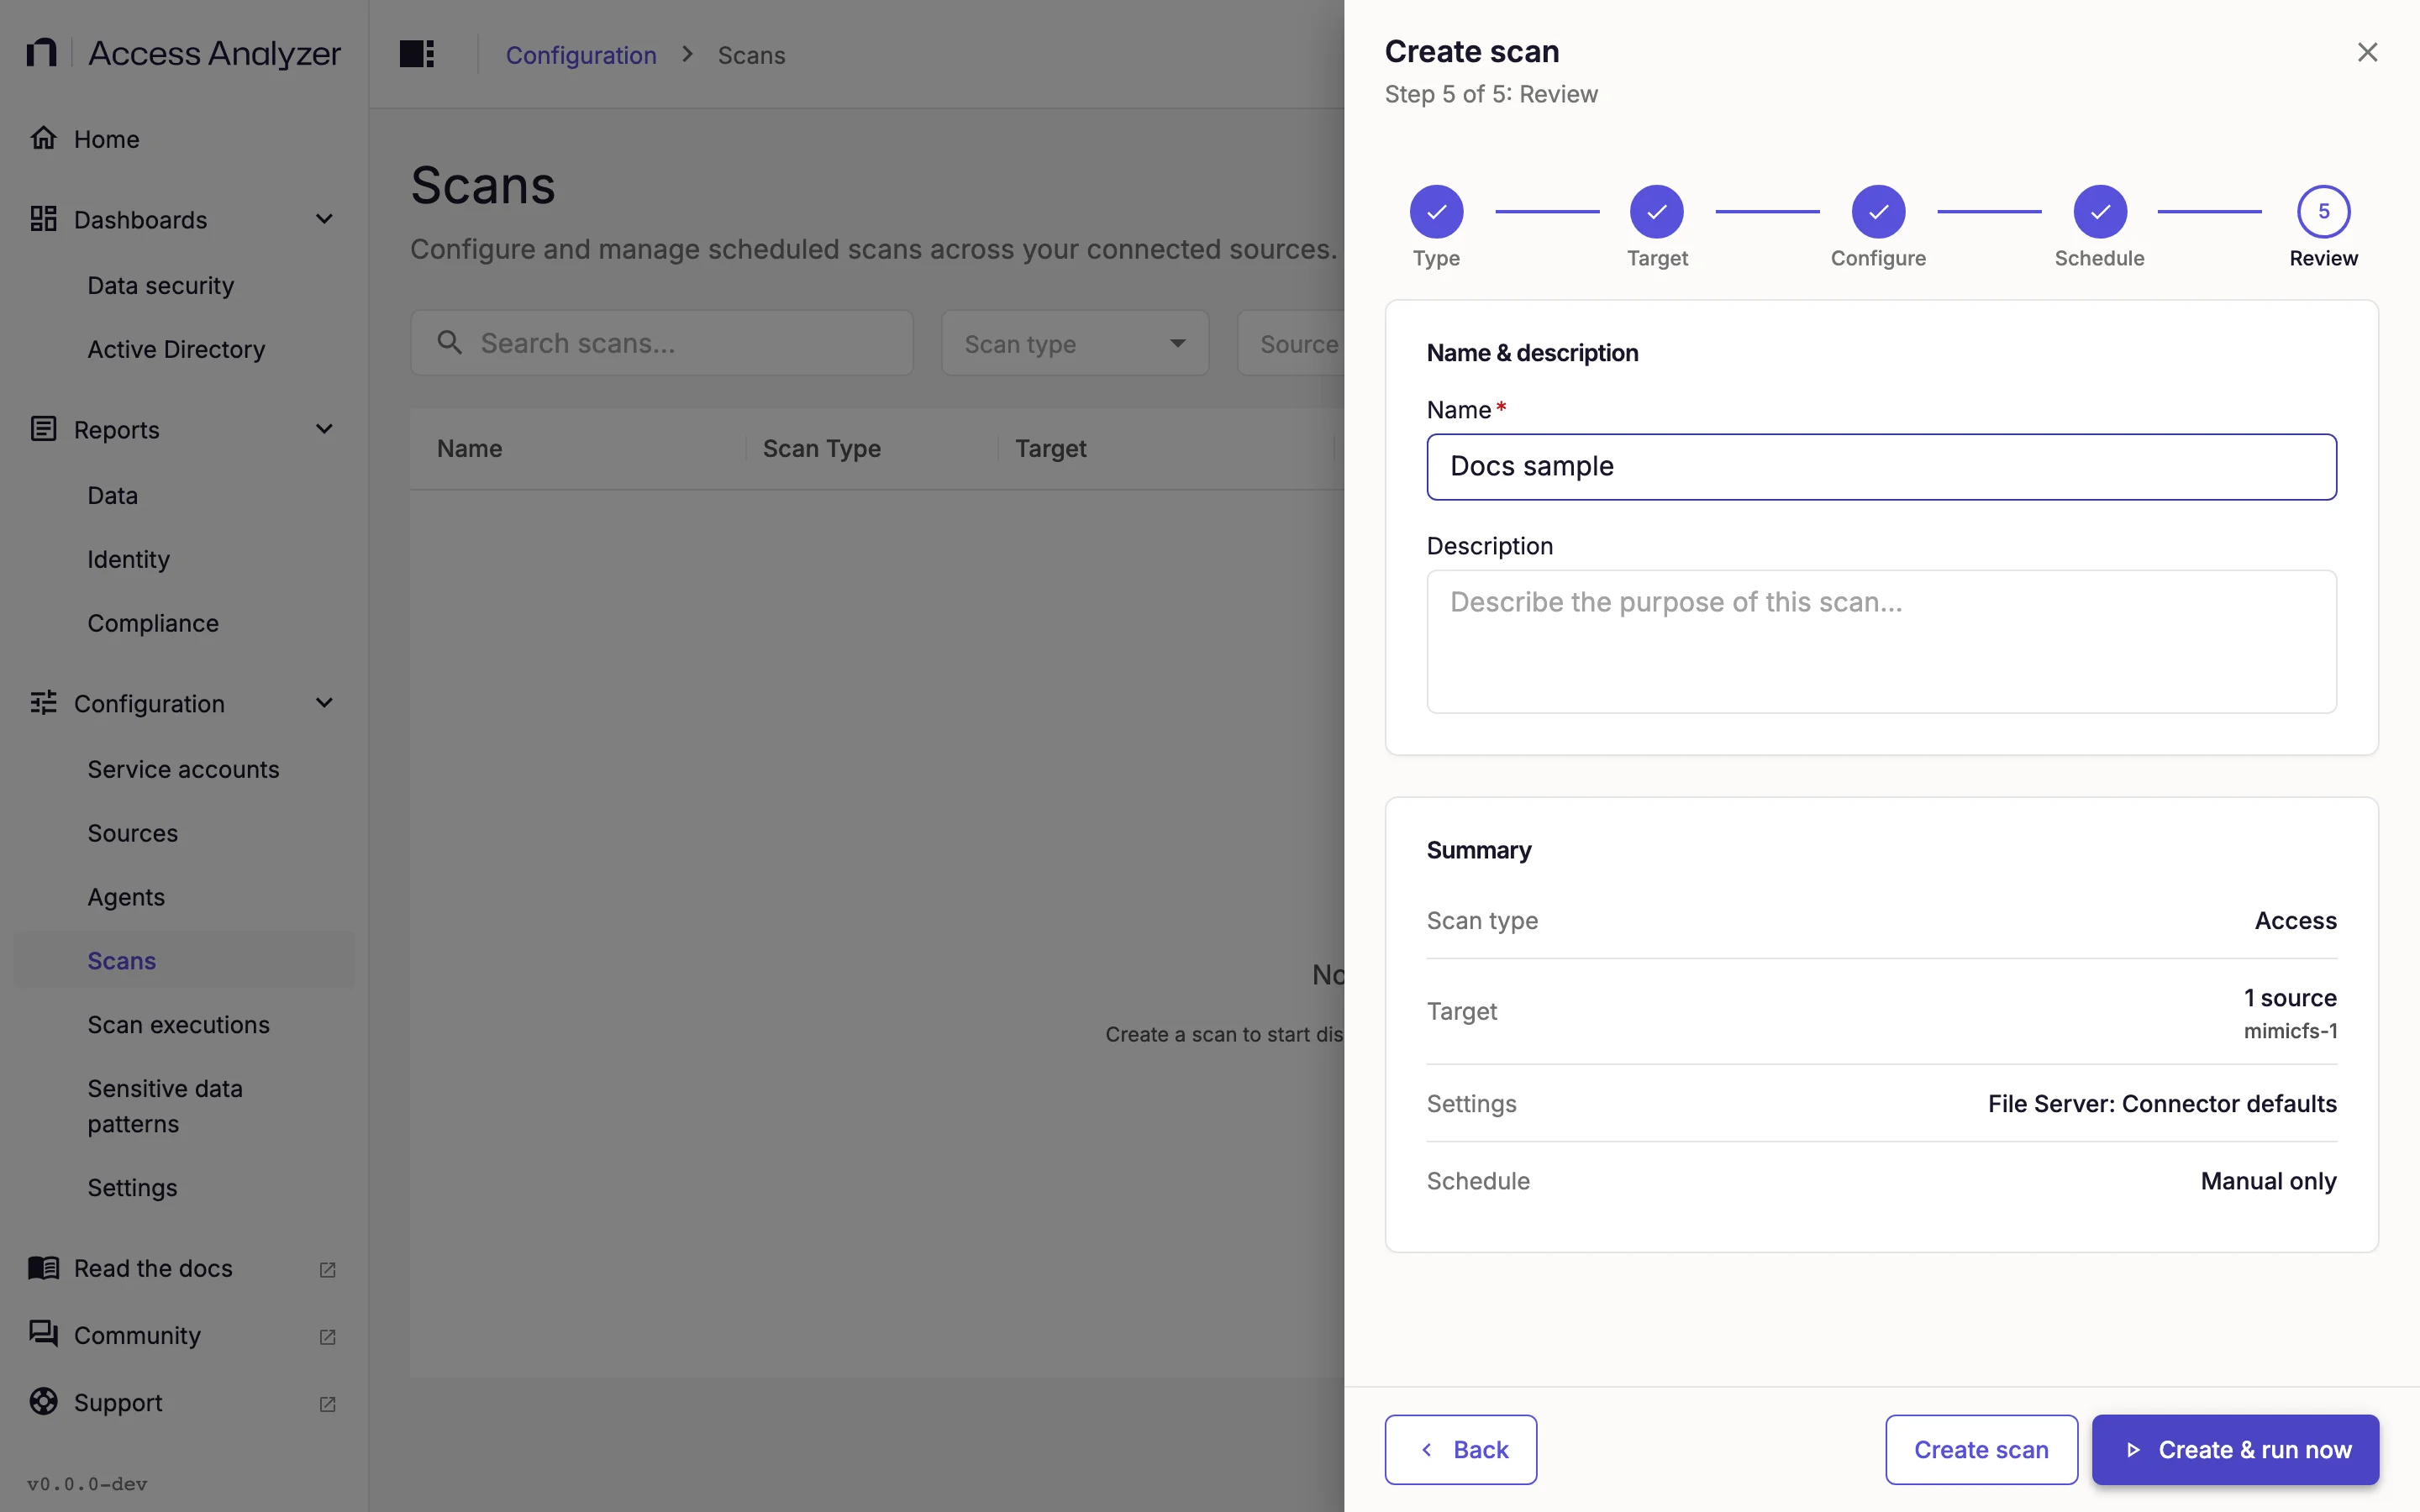
Create scan saves the scan without running it. You can start it any time from Configuration > Scans with Run in the row's actions menu.
4. Watch the Execution
Go to Configuration > Scan executions and find the row for your scan. The list refreshes on its own.
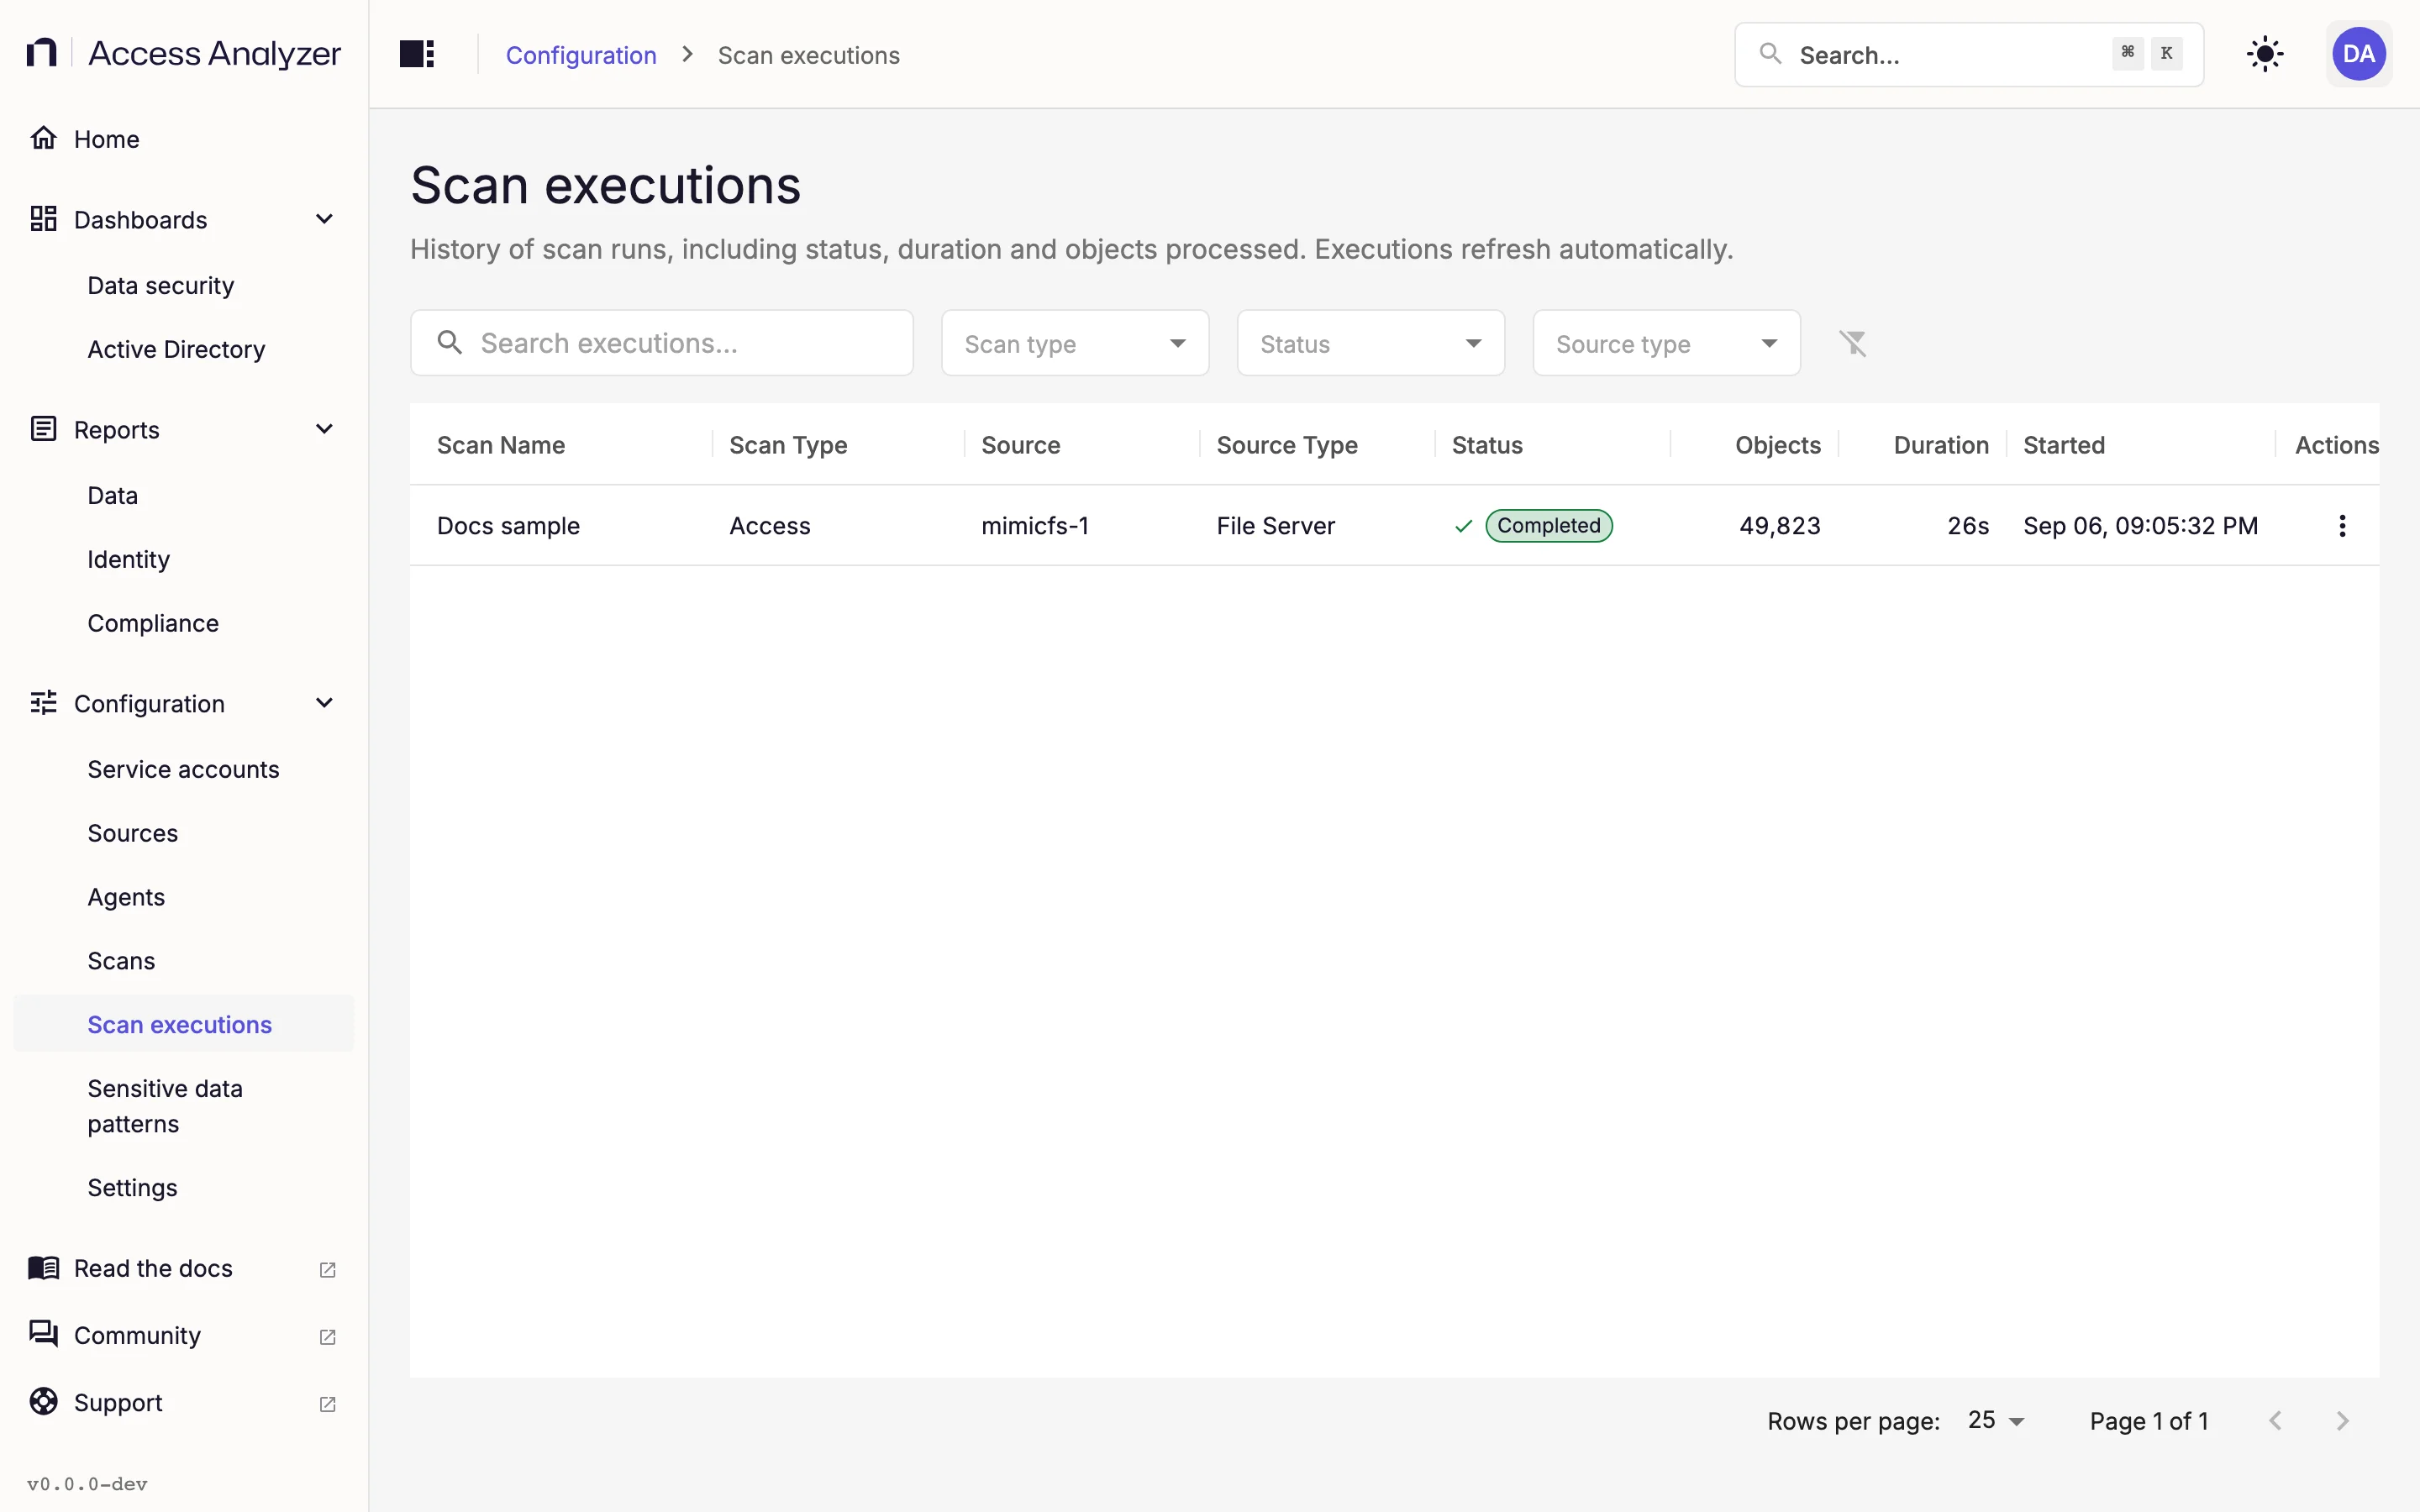
The status moves from Pending to Running and ends at Completed, Completed with errors, or Failed. The Progress and Duration columns fill in as the scan works. To follow along, open the row's actions menu and click View logs: the Overview tab shows milestones such as when the scan started and how long it took, and the Detailed logs tab shows every message.
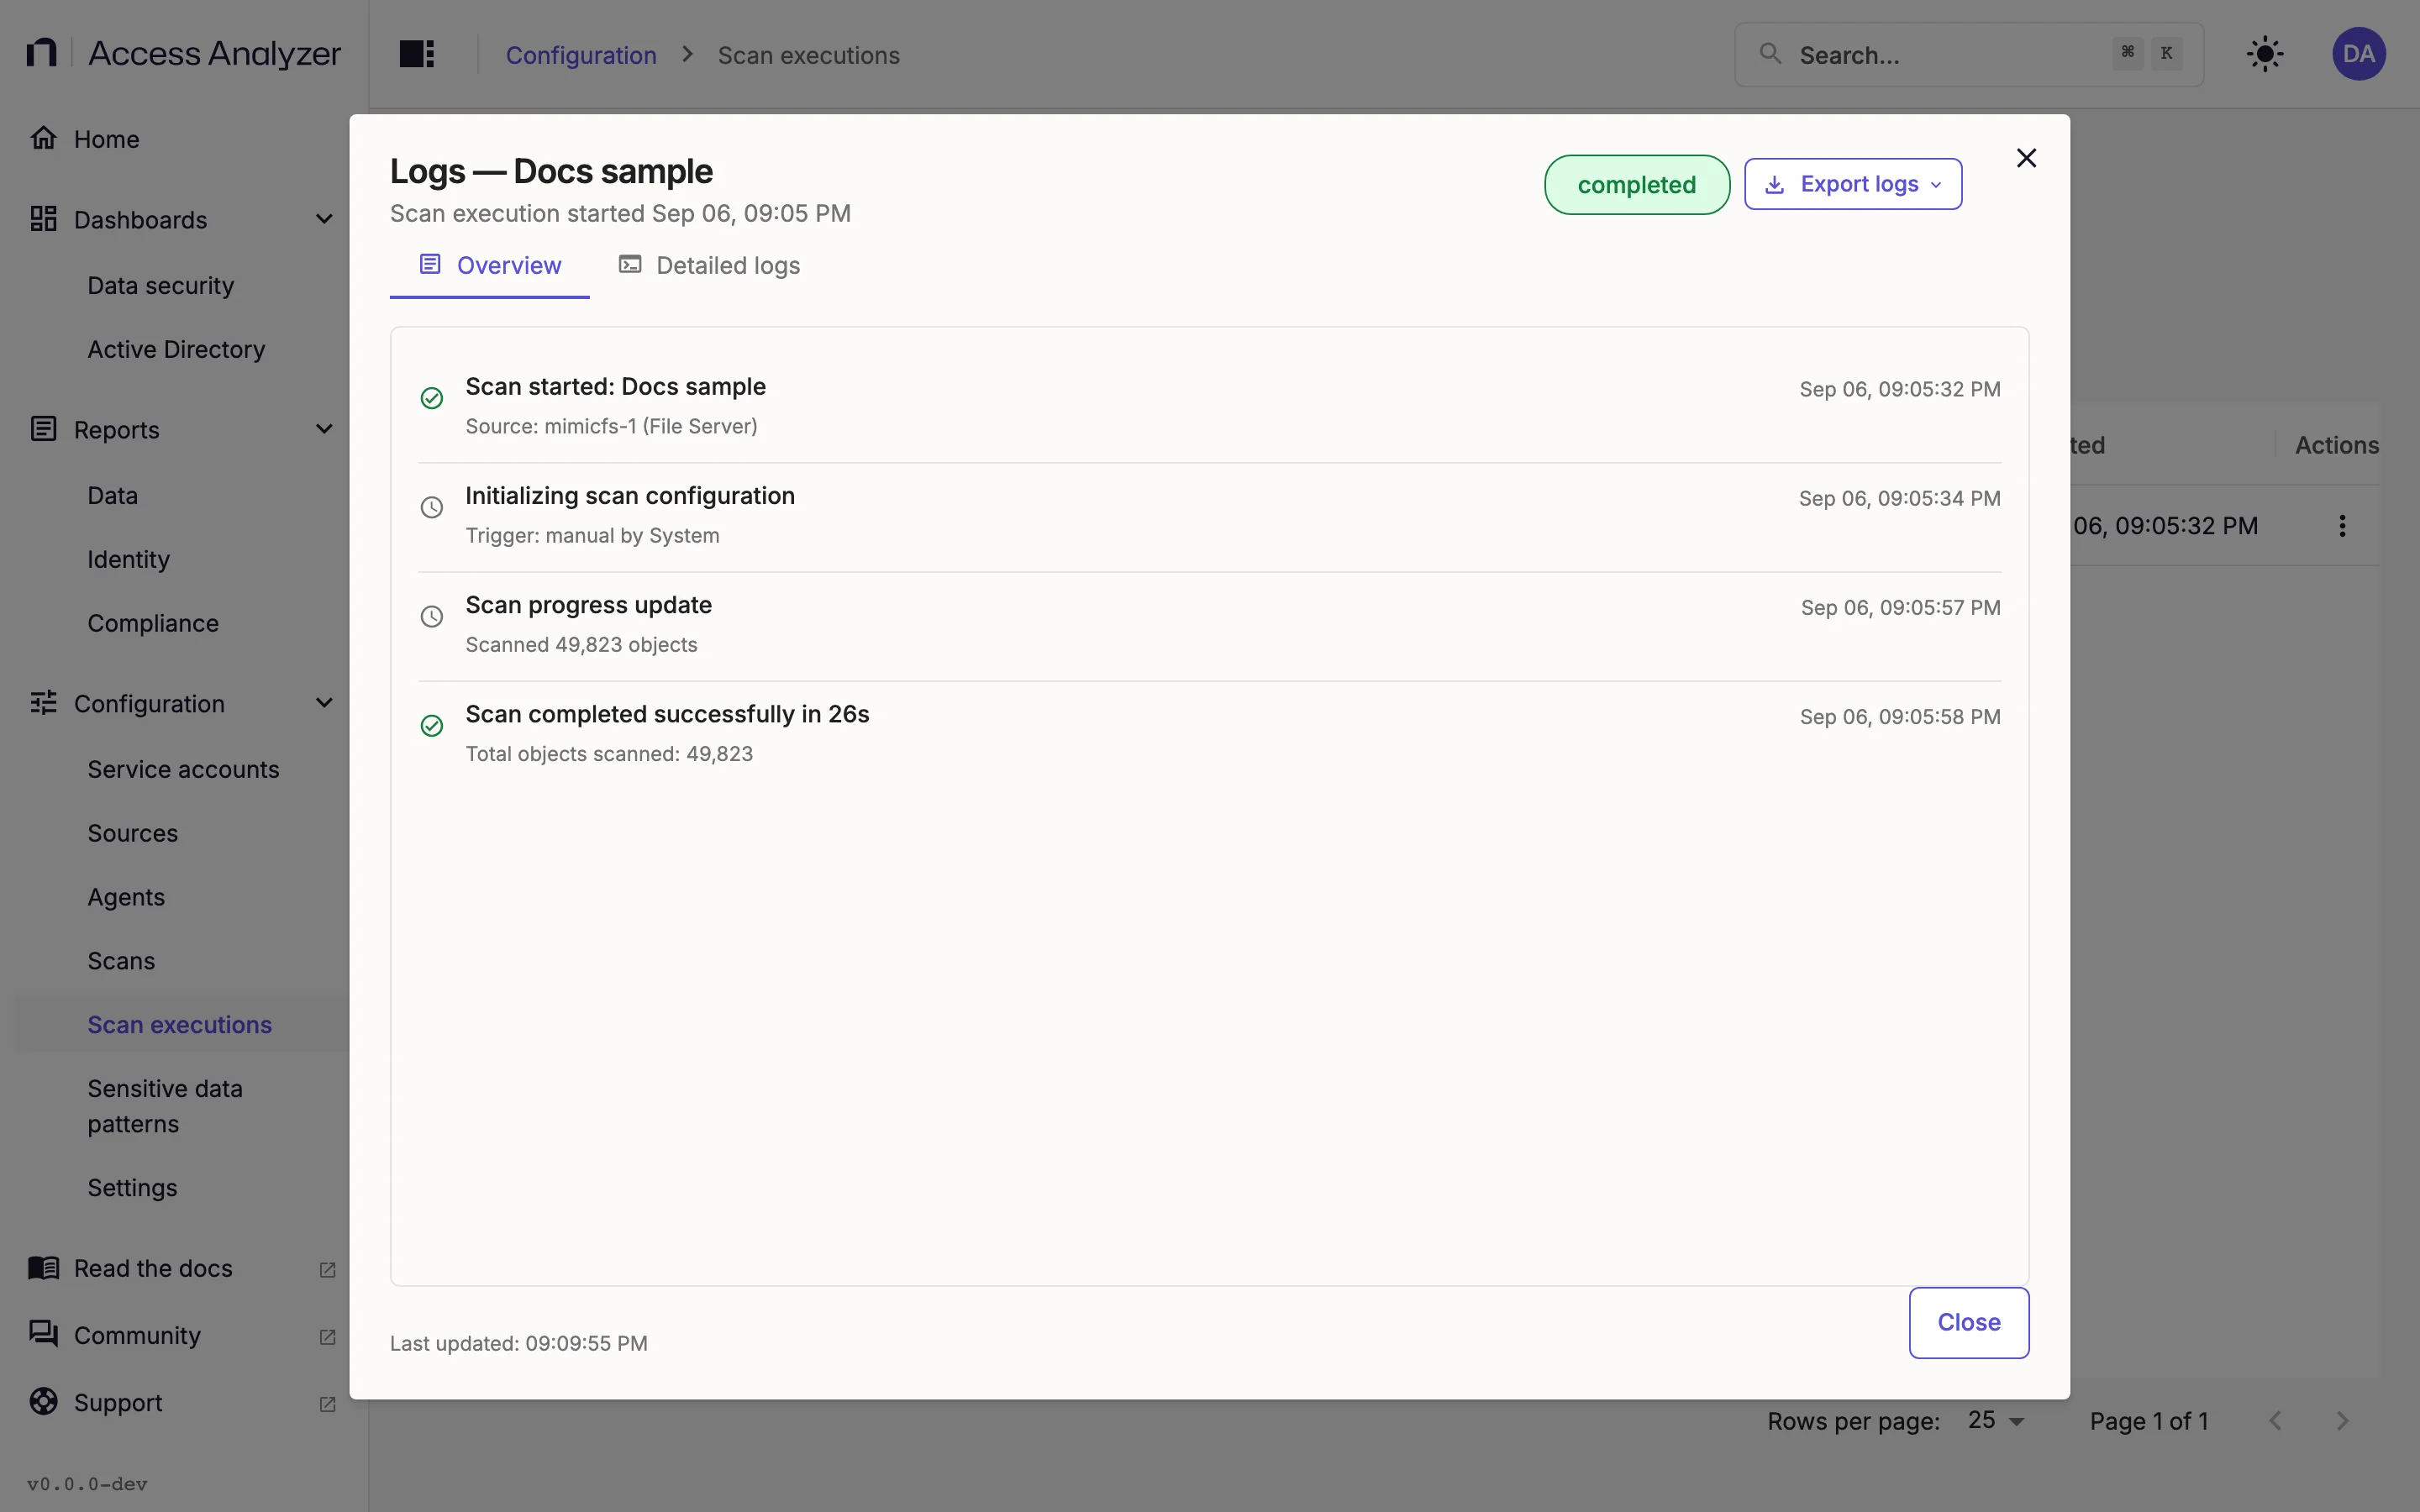
Completed with errors means the scan couldn't read some objects, most often folders the account has no rights to. Access Analyzer keeps the data the scan did collect, and the next run uploads the rest. Check Detailed logs for the paths, fix the permissions or add the account to Backup Operators, and run the scan again from Configuration > Scans.
Scan executions lists every status and the pause, resume, and stop controls.
5. Create the Sensitive Data Scan
After the Access scan shows Completed, create the second scan. It classifies files from the Access scan's inventory against sensitive data patterns. By default the scan classifies only the file types on Include list and skips files larger than 10 MB; both settings are on the File server scanning card in Application settings.
-
Go to Configuration > Scans and click Create scan.
-
On the Type step, select Sensitive data and click Next.
-
On the Target step, select the same file server.
-
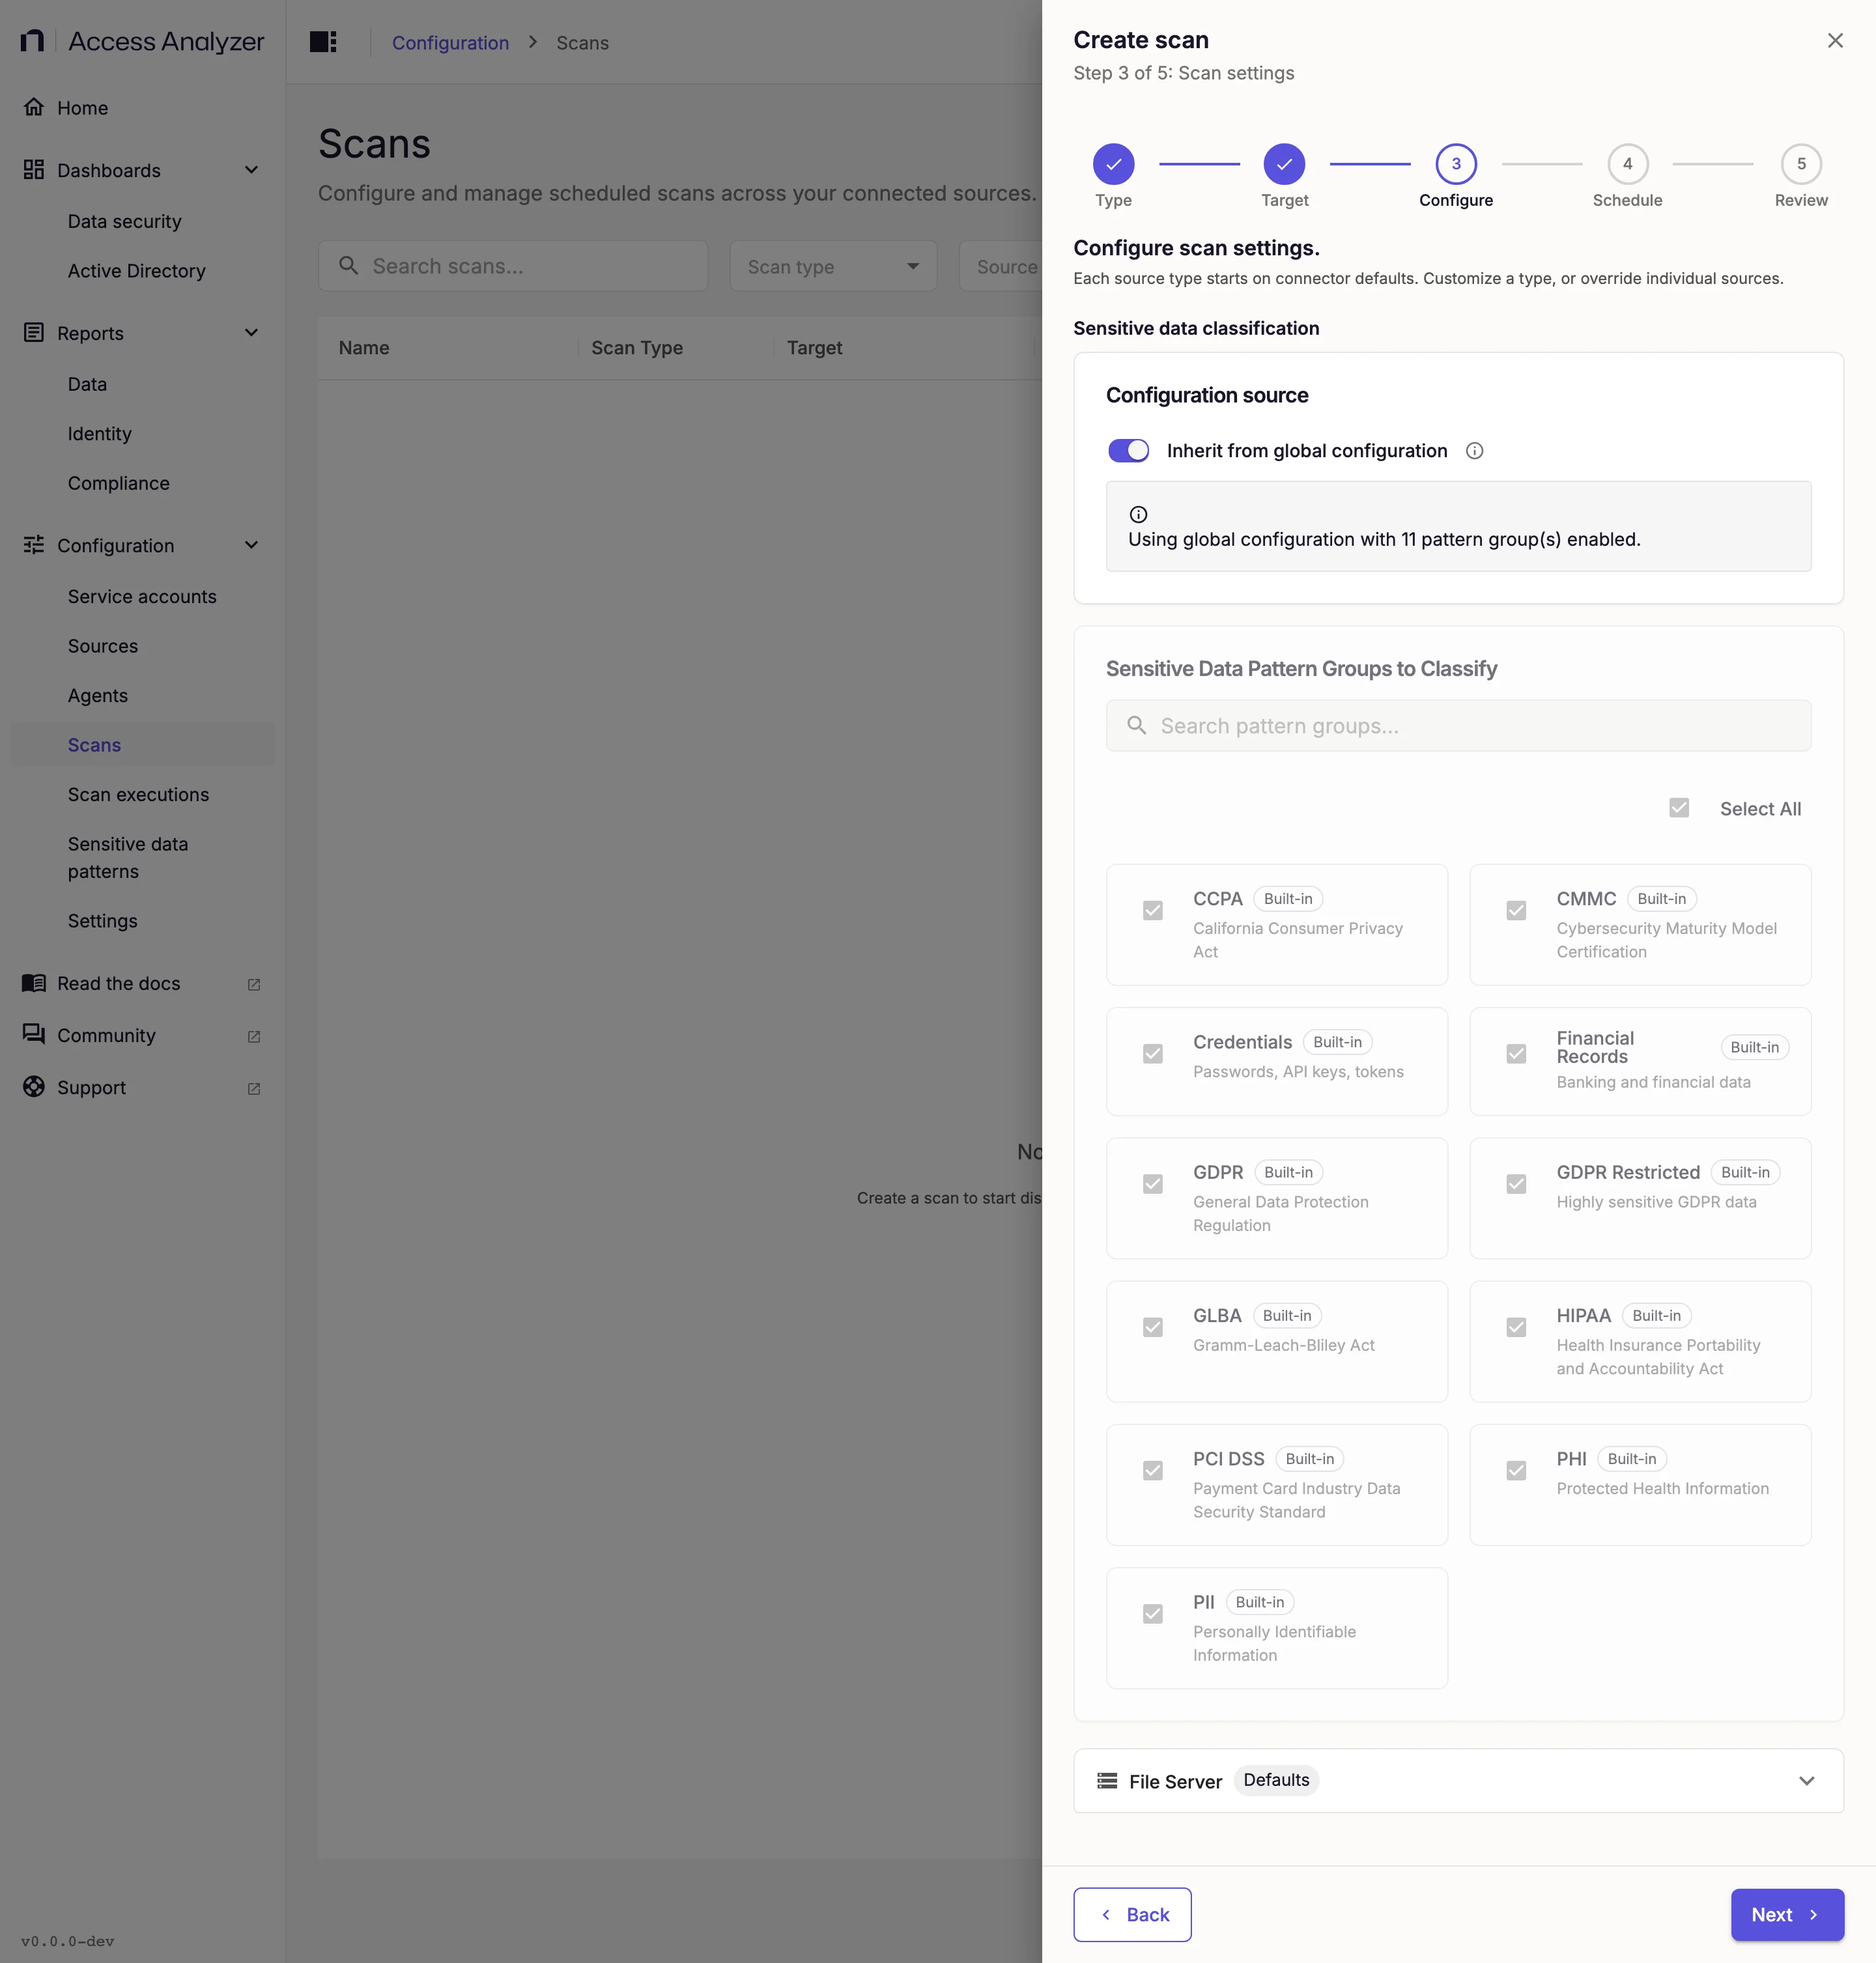
On the Configure step, under Sensitive data classification, select the pattern groups to look for. With Inherit from global configuration on, the scan uses the groups marked Scanned by default at Configuration > Sensitive data patterns. Turn it off to select groups for this scan only, such as PCI DSS, PII, and Credentials, under Sensitive Data Pattern Groups to Classify.
-
Leave the File Server settings at their defaults: Workers 3, Differential scan off, and Exclude system shares on. Turn Differential scan on later so scheduled runs classify only files that changed since the last run.
-
On the Schedule step, leave Manual — run on demand.
-
On the Review step, enter a Name such as
Finance file server - sensitive data. -
Click Create & run now.
On a fresh install no pattern group carries Scanned by default. A scan that inherits the global configuration with no groups enabled, or that has no groups selected, classifies against every pattern group, built-in and custom. Select groups when you want the findings limited to the categories you care about.
Follow the run in Configuration > Scan executions, as described in Watch the execution. Sensitive data patterns describes the built-in groups and how to add your own patterns.
6. Check the Dashboards and Reports
Dashboards and reports don't refresh on their own. Open one and click Refresh after a scan completes.
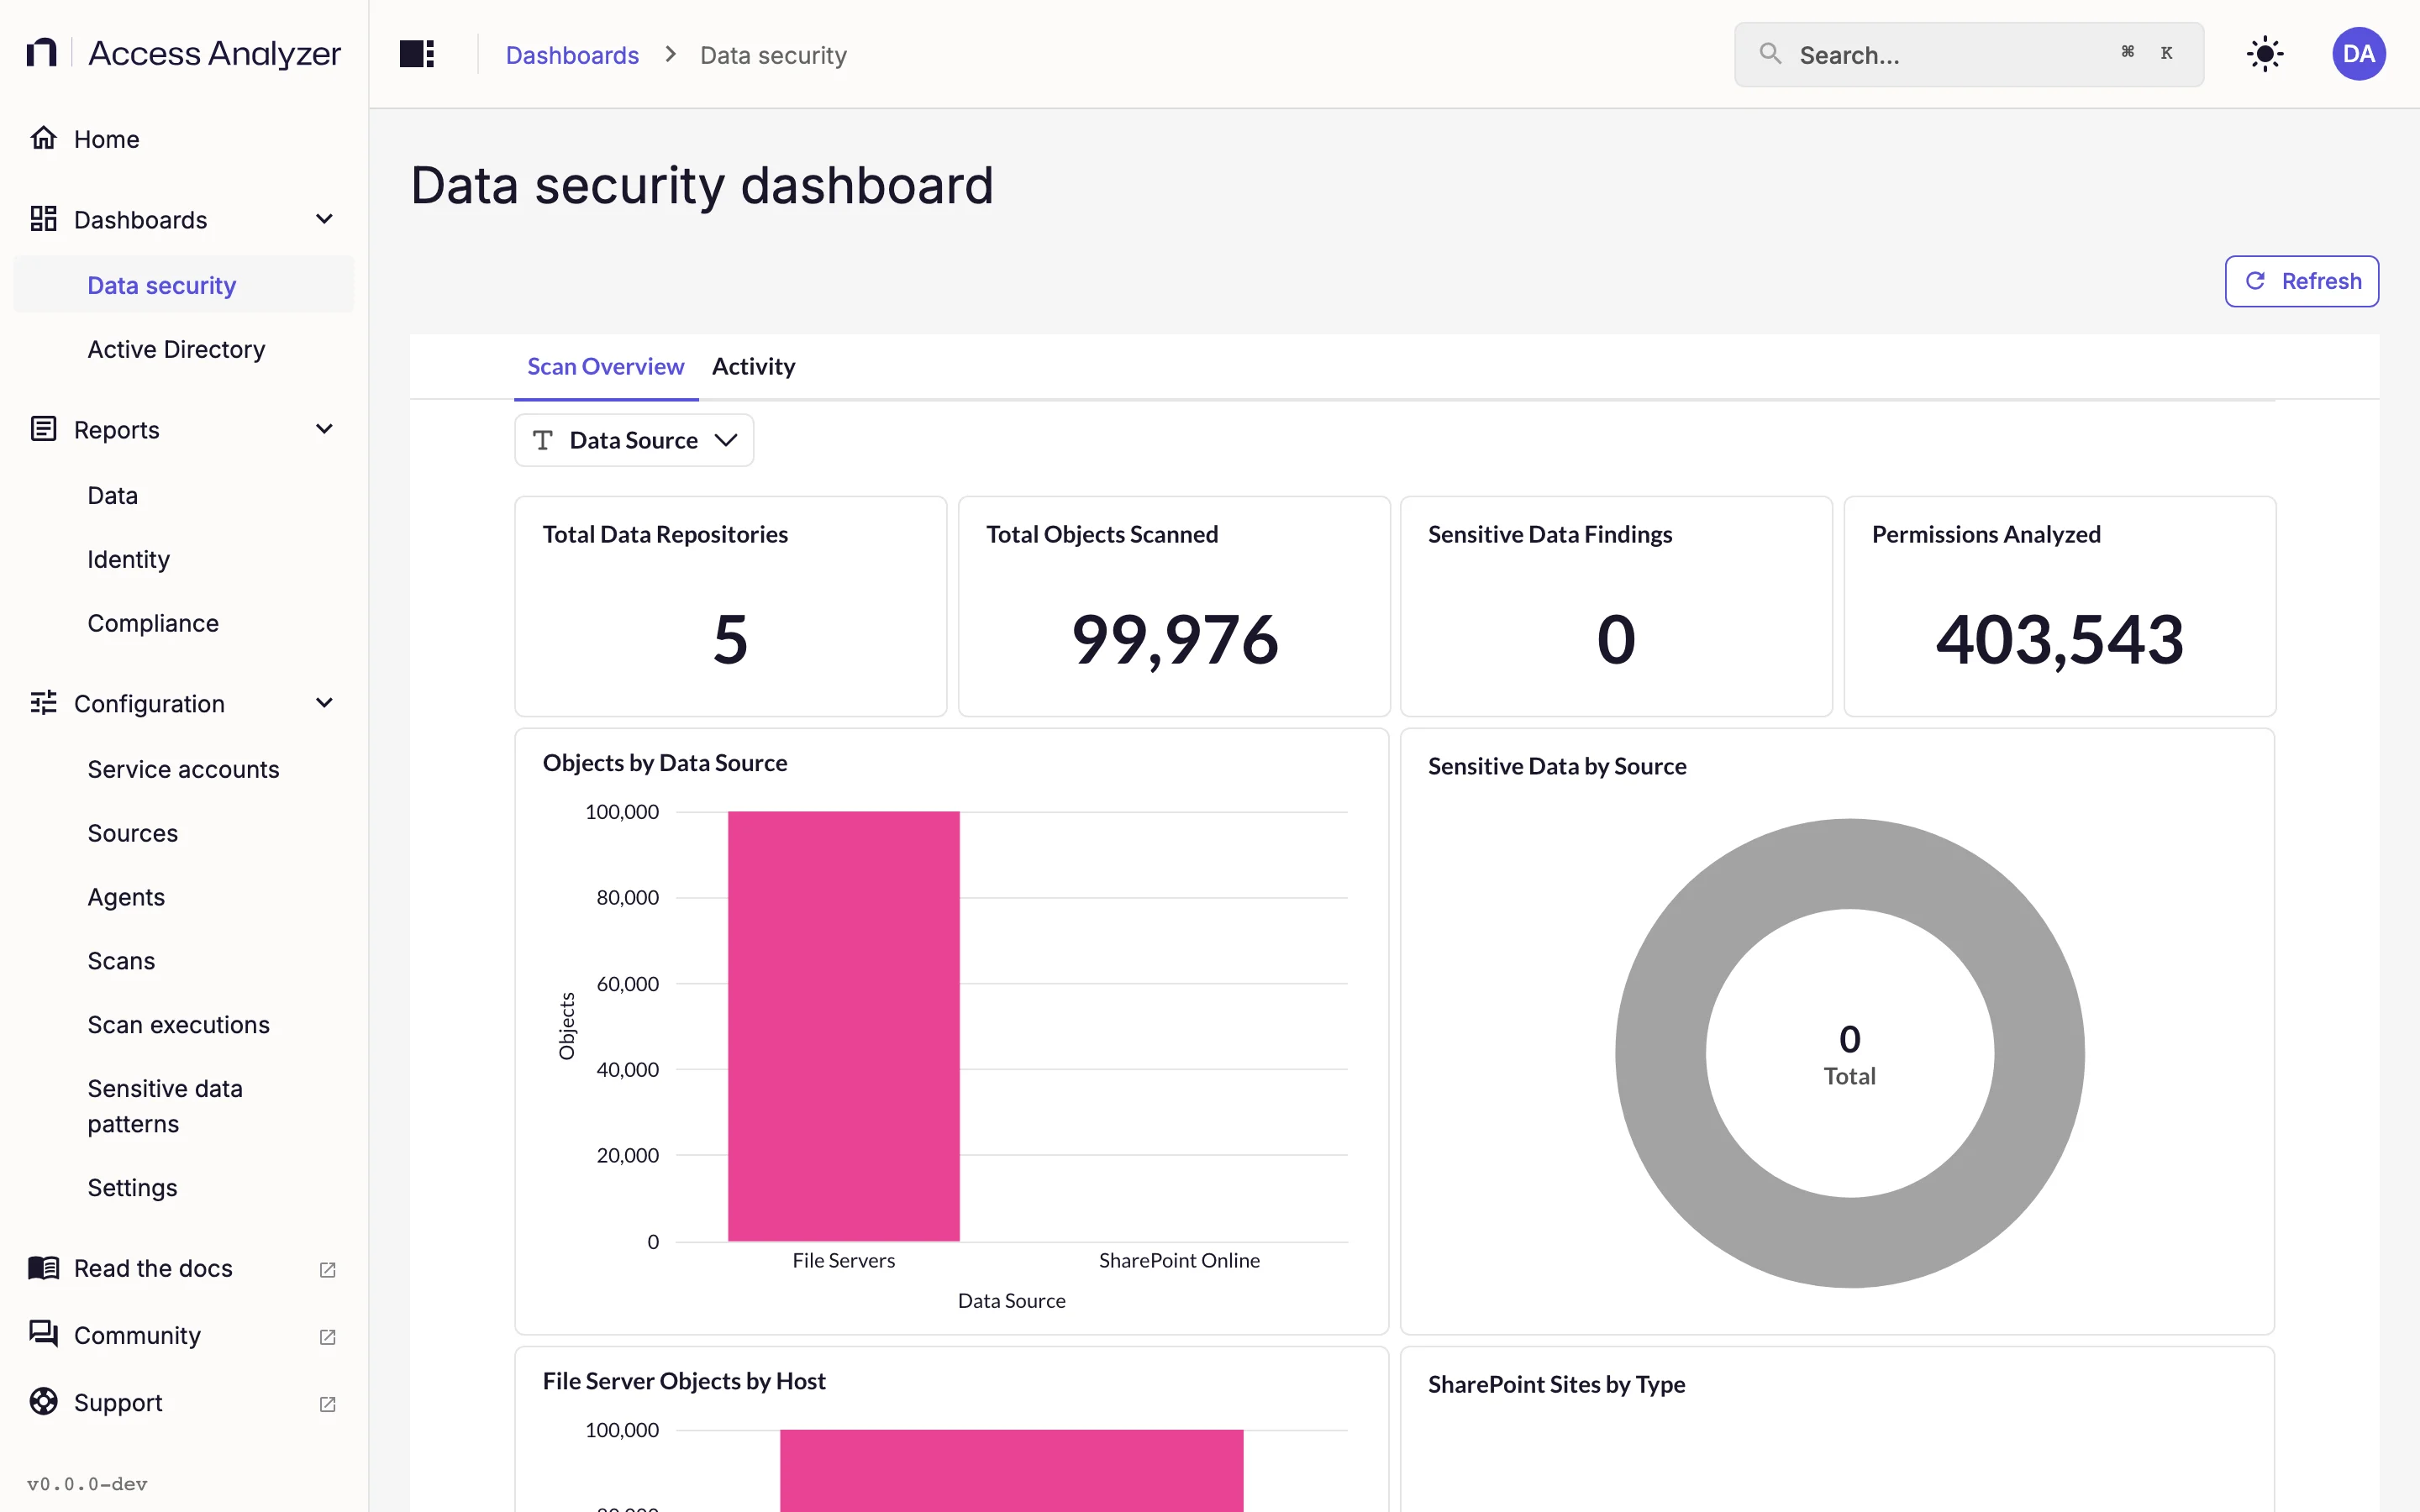
Dashboards > Data security fills in after the Access scan: Total Data Repositories, Total Objects Scanned, Permissions Analyzed, File Server Objects by Host, and Data Source Inventory. After the Sensitive data scan, Sensitive Data Findings and Sensitive Data by Source show counts too. The Data Source filter narrows the view by source type, File Servers or SharePoint Online, not to a single server.
Reports > Data, on the File system tab, has the reports that matter for file servers:
| Report | Needs | What it shows |
|---|---|---|
| Open Access | Access scan | Shares that Everyone or Domain Users can reach without restriction |
| High Risk ACLs | Access scan | Shares and folders with overly permissive ACLs |
| Broken Inheritance | Access scan | Folders with broken inheritance and explicit permissions |
| Share Audit | Access scan | Effective permissions on one share; select a Share in the filters first |
| Sensitive Data Overview | Sensitive data scan | Findings across the scanned locations, filtered by host, share, pattern group, or pattern |
Activity Investigation appears in the same tab but stays empty until you connect Netwrix Activity Monitor. Reports > Compliance arranges the same reports by framework, so the GDPR or PCI DSS tabs populate from these two scans as well.
If the permission reports show SIDs instead of names, follow Scan Active Directory and run an Identity sync for the domain. Data reports describes every report and its filters.