Owners & Resource Reviews
When your organization performs a resource review on a resource for which you are the assigned owner, it means you, the business user or data custodian, need to attest to the access and privileges users have to your resource. When the Review Administrator creates a new review or starts a new instance of an existing review, you receive an email notification that includes a link to the your pending reviews.
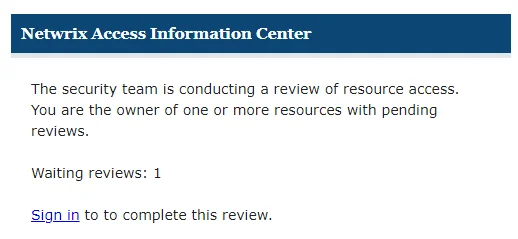
Use the Sign in link at the bottom to open the Owner portal in the Access Information Center.
Remember, Your company domain credentials are used to log in.
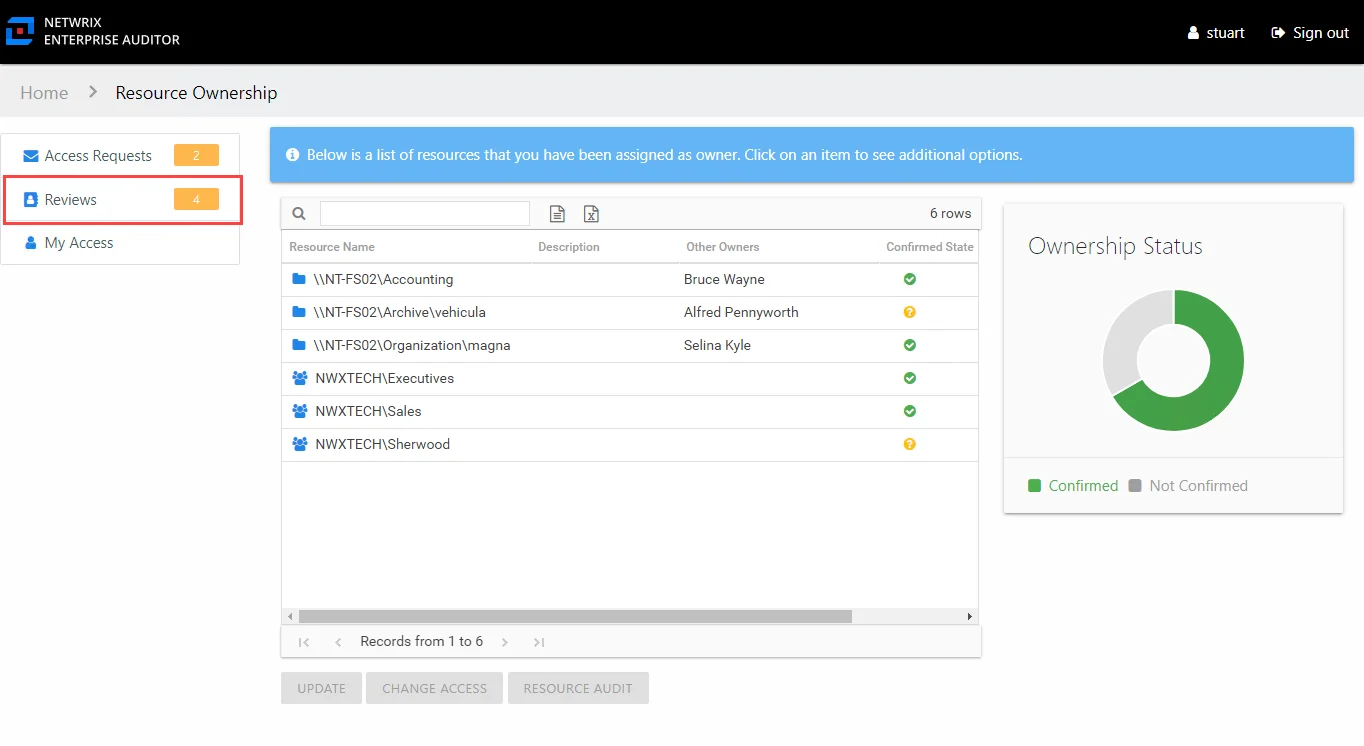
The Owner portal displays a number next to the Reviewslink to indicate how many of your resources are included in pending reviews. Click the link to open the Reviews interface. The Reviews interface has two pages: Pending Reviews and Review History. See the Pending Reviews Page and Review History Page topics for additional information.
Pending Reviews Page
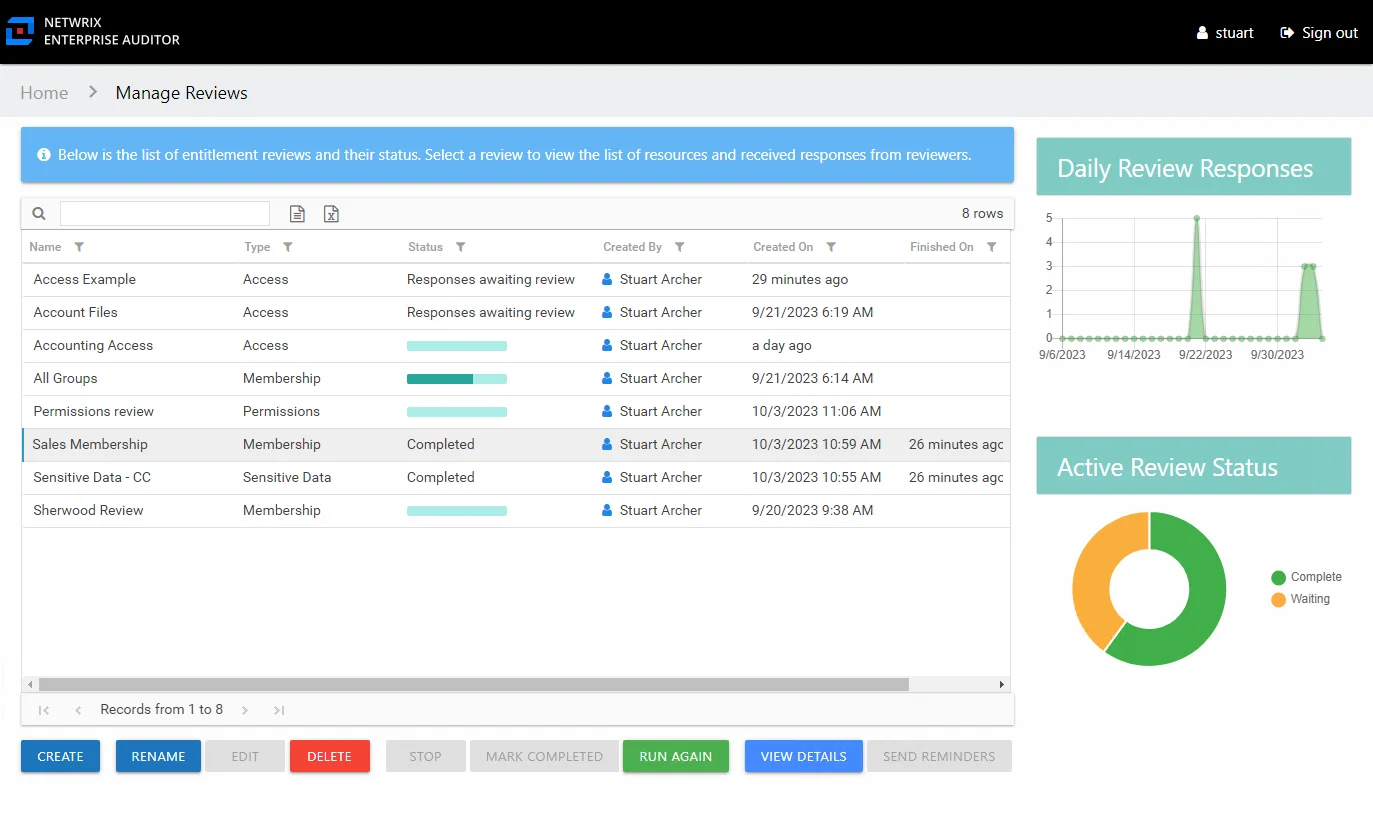
The Pending Reviews page lists all of your resources included in pending reviews.
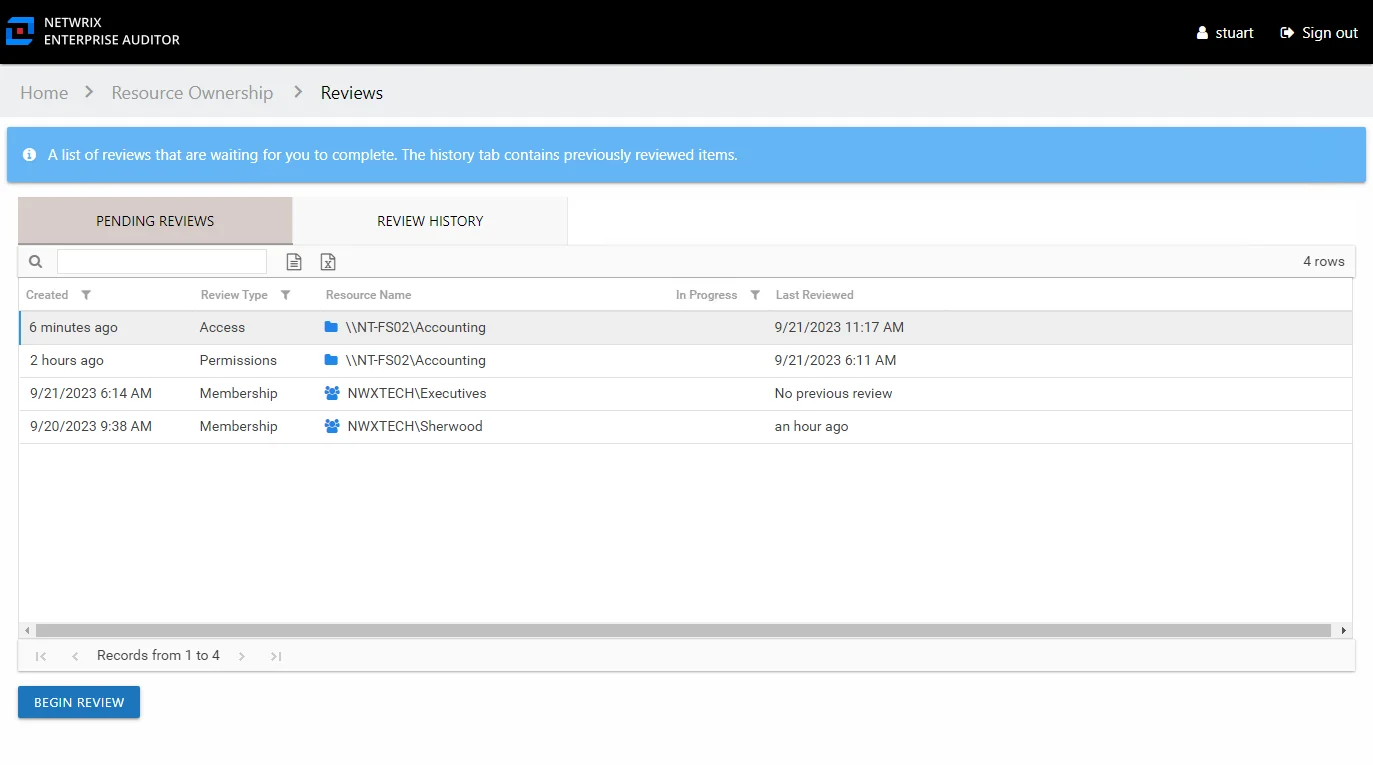
The information displayed in the table includes:
- Created — Date timestamp for when the review was creation. If it has been run multiple times, this is the date timestamp of the last instance.
- Review Type – Type of review:
- Access – Review user access rights to resources
- Membership – Review group membership
- Permissions – Review trustee permissions to resources
- Sensitive Data – Review files containing potentially sensitive data stored within resources
- Resource Name — The icon indicates the type of resource. The resource name includes its location, such as the UNC path for a file system resource, the URL for SharePoint resource, or Group name (e.g., [Domain][Group]).
- Resource Description — Description or explanation of the resource as supplied by either the Ownership Administrator or the assigned owner
- In Progress — Displays a clock icon for an in-progress review
- Last Reviewed — Date timestamp when the last review took place for the resource.
The table data grid functions the same way as other table grids. See the Data Grid Features topic for additional information.
Performing a review means you are evaluating the resources. You can leave the resource unchanged or make recommendations for changes. Consider the following examples:
- In an Access or a Permissions review, you can recommend changes to the type of access granted to the resource.
- In a Membership Review, you can recommend removing group membership from specific users.
- In a Sensitive Data review, you can choose between keeping the file as is, recommend that a file be removed from its current location, or indicate that the file is not sensitive and flag it as a false positive.
Remember, any proposed changes are not committed until the Review Administrator approves the recommendation and processes those changes.
Resource Review Page
The Begin Review button opens the Resource Review page to start the review.
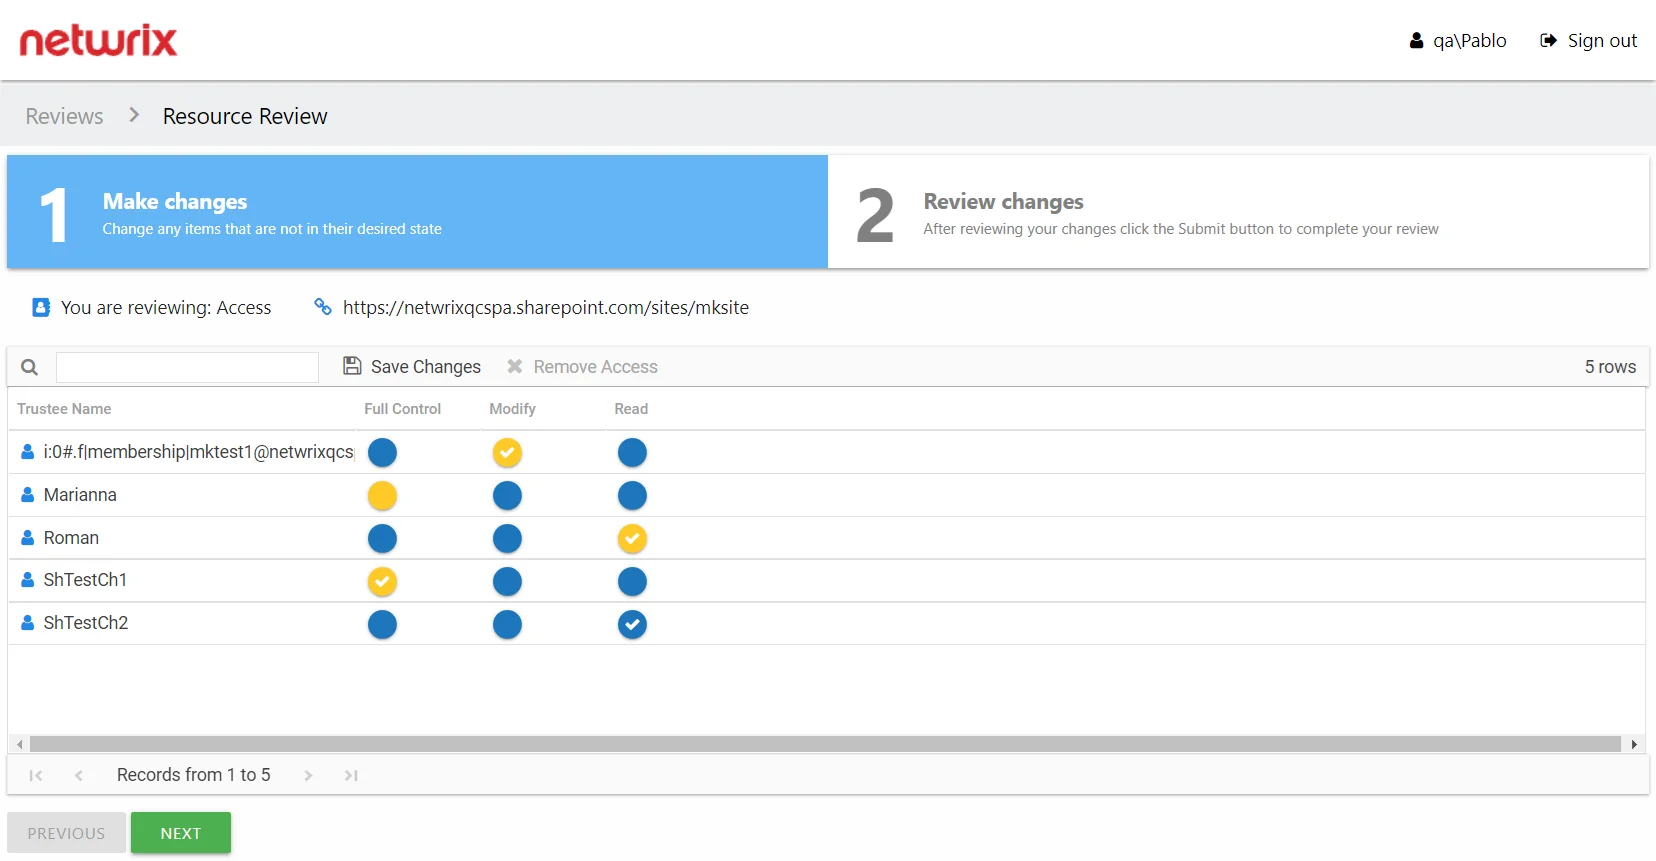
The Resource Review page varies based on the type of review; however, there are several common features:
-
Tabs — This page has two tabs:
- 1 Make changes — Displays current access for the resource. For a Sensitive Data review, this tab displays a list of files on your resource where potentially sensitive content has been identified.
- 2 Review changes — Displays changes you recommend making for your review prior to submission
-
You are reviewing — Indicates the type of review, the resource being reviewed, and the date timestamp for when the review instance was started
-
Search — Filters the table for matches to the typed value
-
Save Changes — Saves all recommended changes, enabling you to leave the review in progress and return at a later time to complete it. It opens the Saving review window, which displays a status for the action.
-
Remove Access — On the 1 Make changes tab, removes access from the selected trustee(s). Ctrl-click can be used for multi-select. Current access blue icon with a checkmark will turn to an empty yellow icon.
-
Only show changes since last review — Scopes the table to only display those items that have been modified since the last review instance
-
Previous / Next buttons — Moves between the two tabs
-
Submit button — On the 2 Review changes tab, the Next button becomes a Submit button. This submits your review to the Review Administrator.
The content within the table varies, and additional options may appear depending on the type of review being conducted. See the following sections for step by step instructions:
- Perform an Access Review
- Perform a Membership Review
- Perform a Permissions Review
- Perform a Sensitive Data Review
Review Instances
After a review has been completed, it can be run again, which creates multiple instances of the review. Each instance is identified by date timestamps indicating its start and end times.
RECOMMENDED: Prior to running another review instance, ensure the most up to date information is available to owners for review.
On the Manage Reviews page in the Resource Reviews interface, a review with a Completed status can be started again. Select the review and click Run Again. The Create Review wizard opens without the Review Type page. The review can be run as-is by navigating through the wizard with the Next buttons, or you can modify as desired. Completing the wizard process restarts the review. See the Create Review Wizard topic for additional information.
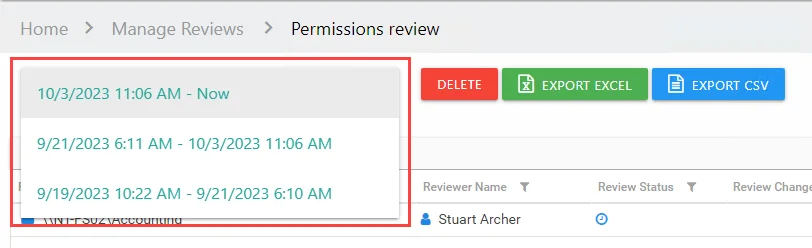
Previous instances for a review can be viewed on the Review Details page. Select the instance from the drop-down menu to show the details for it. See the Review Details Page topic for additional information.
Sensitive Data Review Instances
If a file was marked as false positive during a previous review and approved by the Review Administrator, then the file was removed from the sensitive data reports and reviews for that criteria type. The file can reappear in reports and reviews if it matches the other sensitive data criteria.
Also, a file marked as a false positive in a previous review instance may appear in future review instances if Netwrix Enterprise Auditor finds that it has been modified and matches the selected criteria.
Delete Review Window
The Delete Review window opens from either the Manage Reviews Page or the Review Details Page of the Resource Reviews interface:
- Delete Entire Review — Deleting a review from the Manage Reviews page will delete all instances of the selected review
- Delete Review Instance — Deleting a review from the Review Details page will delete the selected review instance
Delete Entire Review
Select the desired review on the Manage Reviews page and click Delete. The Delete Review window opens to confirm the action.

CAUTION: This will delete all instances of the selected review and all historical data associated with it.
Click Yes to complete the deletion. Click No to cancel it. The Delete Review window closes.
Delete Review Instance
Select the desired review instance from the drop-down menu on the Review Details page and click Delete. The Delete Review window opens to confirm the action.

CAUTION: This will delete all historical data associated to the selected review instance.
Click Yes to complete the deletion. Click No to cancel it. The Delete Review window closes.
Rename Review Window
The Rename Review window opens from the Manage Reviews Page of the Resource Reviews interface. Follow the steps to rename a review.
Step 1 – Select the review and click Rename. The Rename Review window opens.

Step 2 – Edit the review name in the textbox.
Step 3 – Click OK when finished. The Rename Review window closes.
The renamed review will display in the table on the Manage Reviews page.
Send Reminders Window
The Send Reminders window opens from the Manage Reviews Page of the Resource Reviews interface. Select the desired active review(s) and click Send Reminders to send immediate reminder notifications. The Send Reminders window opens to display an action status.

The window displays the action status. When a successful status is indicated, assigned owners were sent a reminder email. Click OK to close the Send Reminders window.
Remember, automatic weekly reminders can be configured on the Notifications Page of the Configuration interface.
Stop Review Window
The Stop Review window opens from the Manage Reviews Page of the Resource Reviews interface. Select the desired active review(s) and click Stop. The Stop Review window opens to confirm the action.

CAUTION: This will prevent owners from completing the review, removing associated resources from their Pending Reviews list.
Click Yes to stop the review. Click No to cancel the action. The Stop Review window closes.
View Responses Window
The View Responses window opens from the View Response button on the Review Details Page of the Resource Reviews interface. It displays all owner-recommended changes and notes for the selected resource.
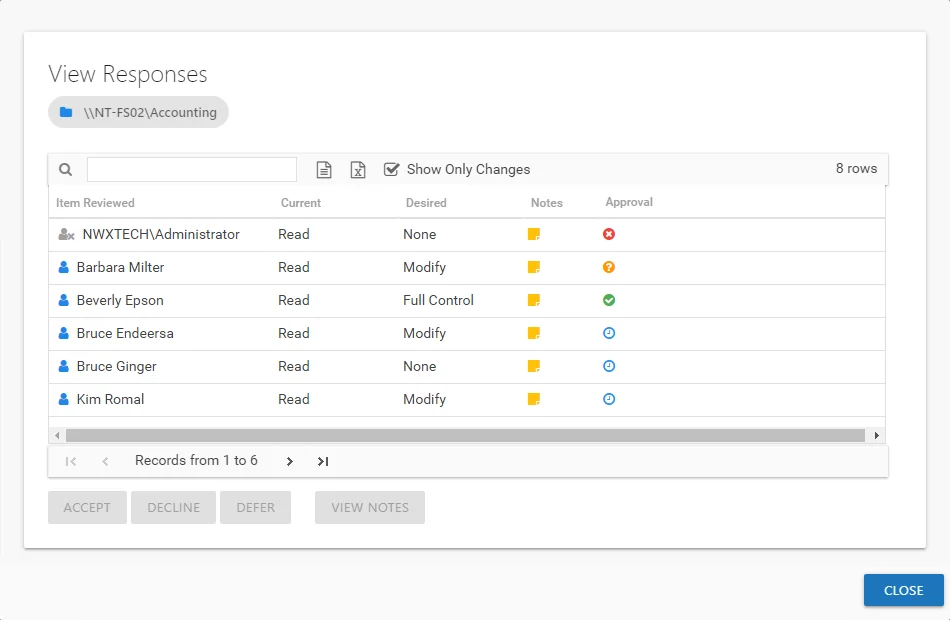
The information displayed in the table includes:
-
Item Reviewed — Item upon which changes were suggested by the owner
-
Current — Current state of the item at the time of the review
-
Desired — Change suggested by the owner
-
Notes — Icon indicates a Note has been added. Click on the icon to read the attached note(s).
-
Approval — Status of the Review Administrator's approval
- Clock — Indicates waiting on the Review Administrator to make an official decision
- Green Checkmark — Indicates the Review Administrator has approved the request
- Red X — Indicates the Review Administrator has declined the request
- Yellow Question mark — Indicates the Review Administrator has deferred taking action until a later time
The Show Only Changes checkbox is selected by default to show only the items with owner-recommended changes. If deselected, all items included in the review are displayed. When selecting the items with no changes in the grid, the change buttons at the bottom of the page are disabled.
CAUTION: If the Access Information Center has been configured to commit Active Directory changes, clicking Accept will commit the changes if all prerequisite for the review type have been met.
If the Access Information Center has been configured to commit Active Directory changes, the icon at the front of the Item Reviewed column is yellow. The selected action is automatically committed according to the type of review:
- Membership — Clicking accept removes group membership from the trustee
- Access and Permissions — If the prerequisite of resource based groups are set up for the resources, click accept will change group membership for the trustee. If the desire is to change access, the trustee is moved to the group with the desired access or permissions and removed from the group granting the current access or permissions. If the desire is to remove access, the trustee is removed from the group granting the current access or permissions.
- Sensitive Data — The only action that can be committed is to flag a file as a false positive for the selected criteria
See the Data Collection & Automation Prerequisites topic for additional information.
The table data grid functions the same way as other table grids. See the Data Grid Features topic for additional information.
Select an item in the table, and use the action buttons at the bottom to identify the decision:
![]()
| Button | Description |
|---|---|
| Accept | Accepts the selected owner-recommended change. If the Access Information Center has been configured to commit changes to Active Directory and the automation prerequisites have been met for the type of review, this change will be committed when you click the Accept button. |
| Decline | Declines, or rejects, the owner-recommended change. |
| Defer | Defers the owner-recommended change to a later time. |
| View Notes | Opens the Notes window for the selected item. |
Criteria Matches Window
The criteria type listed in a Sensitive Data review appears as a blue hyperlink. Click the hyperlink to open the Criteria Matches window.
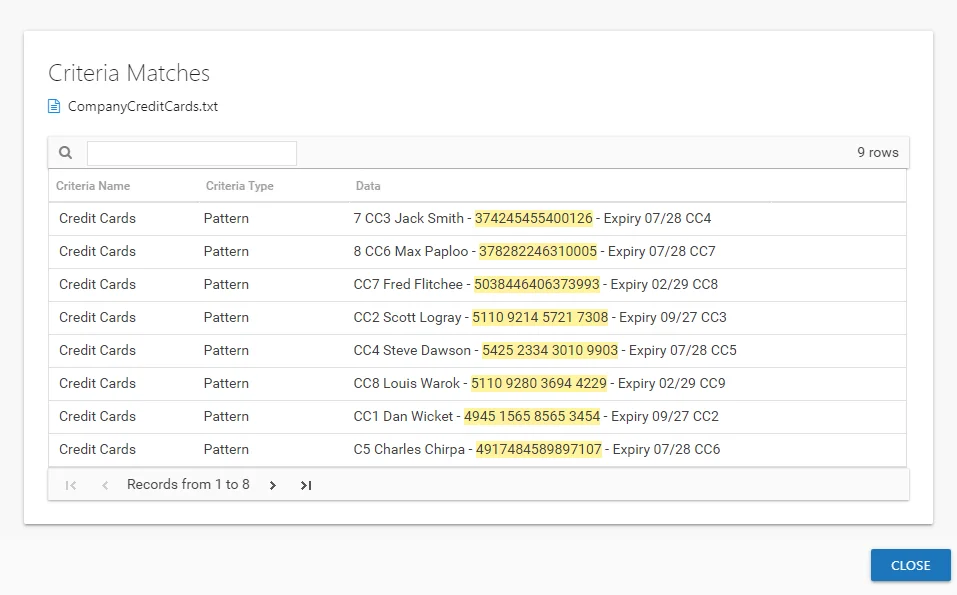
The table displays the following information for each match found on the selected file:
-
Criteria Name — Name of the criteria with match hits found within the file
-
Criteria Type — Displays Pattern for pattern based matches (System Criteria), or the subject type based on Subject Profile matches (for example, Customer or Employee)
-
Data — Displays the file content that contains the criteria match. This includes the 19 characters immediately preceding and following the criteria. The match is highlighted yellow.
- If it's a Subject Profile criteria match, then it shows the attributes found (for example, Address or Phone)
Click Close to return to the review.
Missing Items Window
The Some items could not be found message displays when importing a resource list in the Create Review or Edit Review wizards if items specified in the CSV file can not be found or are not valid for the review.

Click Yes to open the Missing Items window or click No to complete the import without viewing the missing items.

Review the list of resources. Items can be listed for multiple reasons:
-
Resources that do not exist in the resource owners list
-
Resources that exist in the resources owners list but the ownership has been declined
-
Resources that are not valid selections for the selected review type
- Membership – Resources that are not groups
- Access / Permissions / Sensitive Data – Resources that are not file system, SharePoint, or DFS
-
For Sensitive Data reviews, resources that do not have scan data available. This includes resources that only have sensitive data at a child folder level.
Click OK to close the window and complete the import of any valid resources.
Selected Resources Window
The Selected Resources window opens from the View Selections button in the Create Review Wizard.
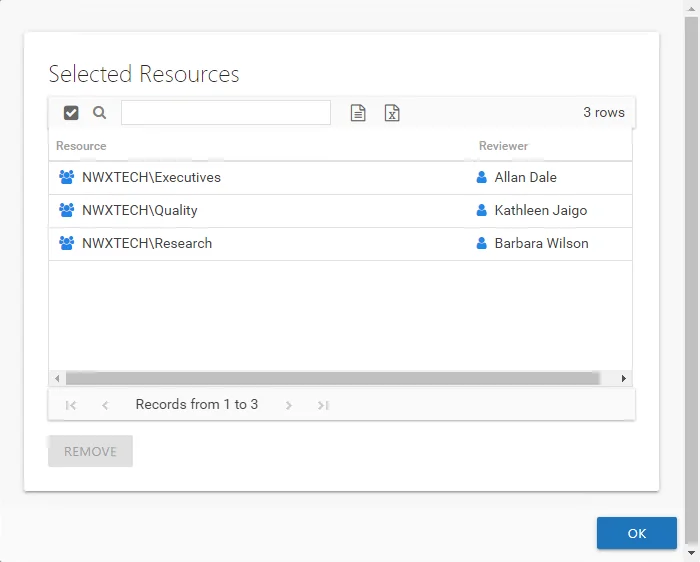
The table displays:
- Resource — The icon indicates the type of resource. The resource name includes its location, such as the UNC path for a file system resource, the URL for SharePoint resource, or Group name (e.g., [Domain][Group]).
- Reviewer — Primary owner assigned to the resource
Use the Remove button to remove a resource from this review. Click OK to close the window and complete the review creation.
Perform an Access Review
An Access review can be conducted for various types of data repository resources. Follow the steps to perform an Access review.
Step 1 – On the Pending Reviews page, select the resource with a pending Access review and click Begin Review. The Resource Review page opens to the 1 Make changes tab.
The table displays access information for the resource being reviewed:
- Trustee Name — Name of the trustee with access to this resource. If the trustee is a group, click the hyperlink to open the Group Membership window. See the Group Membership Window topic for additional information.
- User Title — Trustee's title as read from Active Directory
- User Department — Trustee's department as read from Active Directory
- User E-mail — Trustee's email address as read from Active Directory
- User Employee ID — Trustee's employee ID as read from Active Directory
- User Manager — Trustee's manager as read from Active Directory
- Access Level (Full Control, Modify, and Read) columns — Blue checkmark icon indicates current access level
- Recommendation — Any information known to the Access Information Center that might be helpful during this review is listed in this column
Step 2 – Recommend access changes for a trustee by clicking the icon for the desired access level (Full Control, Modify, or Read columns). A yellow checkmark icon indicates the new level of access you are recommending.
Step 3 – Recommend removing access by selecting one or more trustees and clicking the Remove Access button or by clicking on a checkmark icon. A blank yellow icon indicates you are recommending all access be removed; it appears in the column for the current level of access.
Remember, at any time you can save your recommendations and exit the review. It will remain pending until you submit all recommendations for this resource.
Step 4 – When the recommended changes are set as desired, click Next. The 2 Review changes tab opens in the Resource Review page.
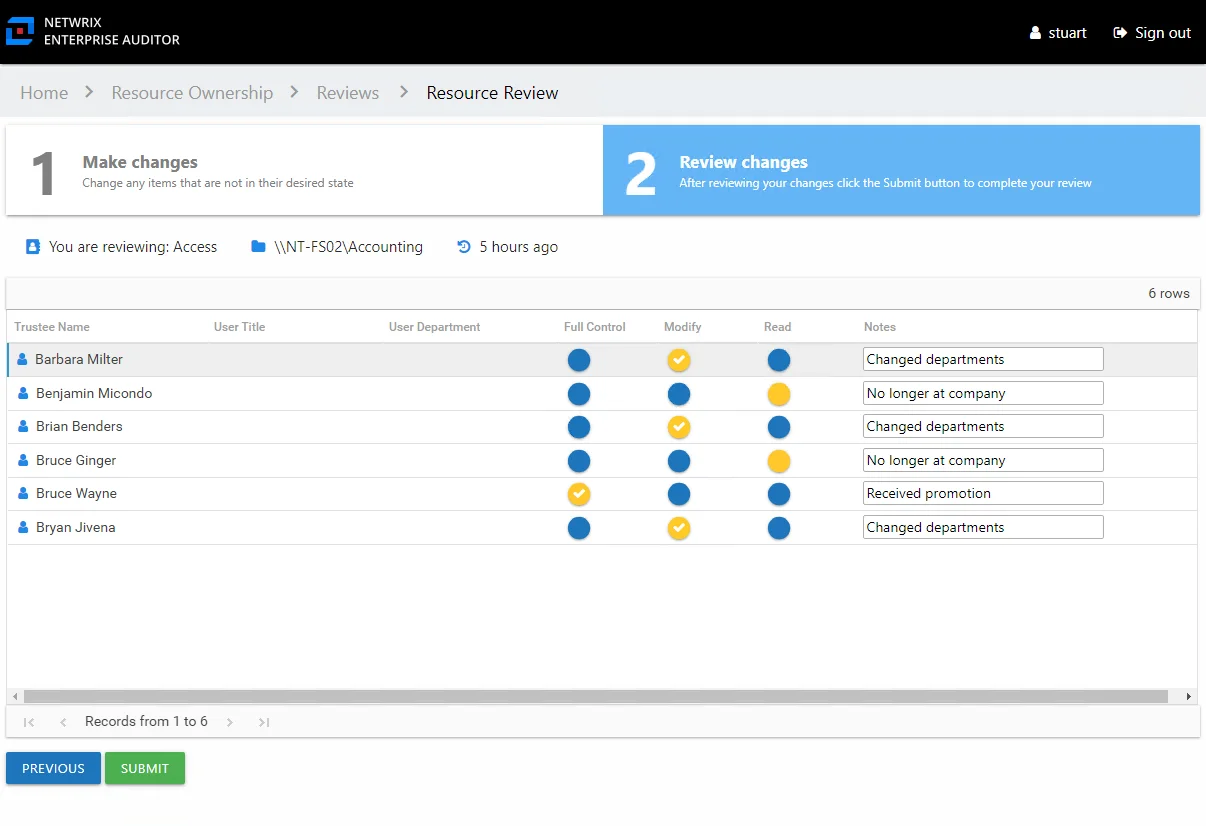
Step 5 – This tab displays a filtered table of trustees with recommended changes. Confirm your recommendations and optionally add notes to the Review Administrator. Owners are encouraged to leave notes explaining why the change is recommended.
NOTE: To make changes to your recommendations, you must return to the first tab. Click Previous.
Step 6 – When all recommendations are confirmed and the desire notes added, click Submit. A message displays stating that the review is complete. Click OK to close the message window.
The review for this resource is now complete. You will be redirected to the Pending Reviews page. Your recommended changes have been sent to the Review Administrator for approval and processing.
Perform a Membership Review
A Membership review is an evaluation of group membership. Follow the steps to perform a Membership review.
Step 1 – On the Pending Reviews page, select the resource with a pending Membership review and click Begin Review. The Resource Review page opens to the 1 Make changes tab.
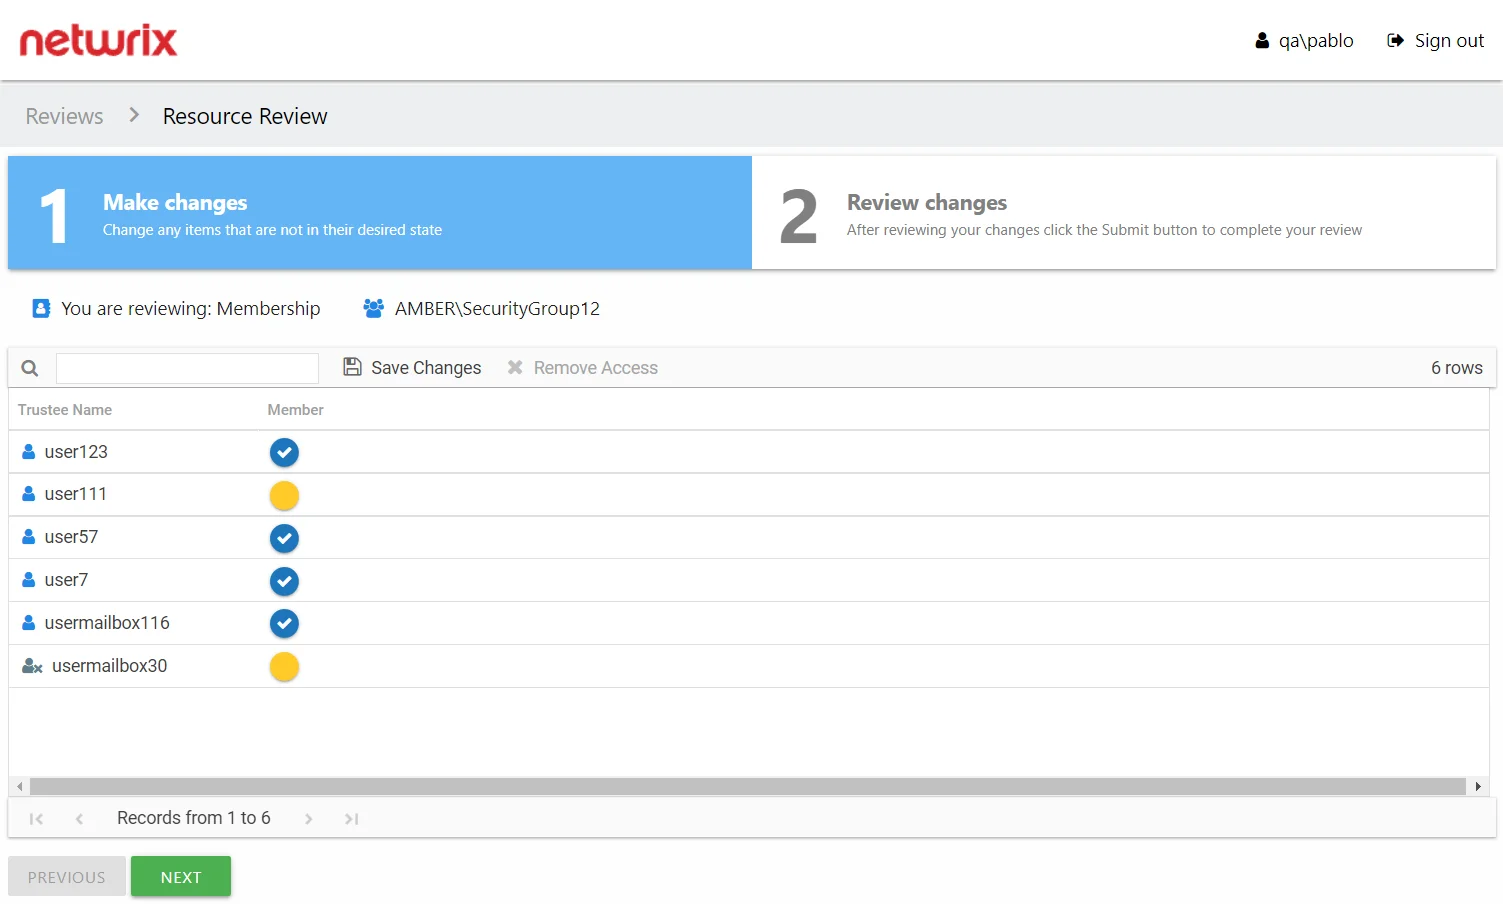
The table displays membership information for the group being reviewed:
- Trustee Name — Name of the trustee with group membership. If the trustee is a group, click the hyperlink to open the Group Membership window. See the Group Membership Window topic for additional information.
- User Title — Trustee's title as read from Active Directory
- User Department — Trustee's department as read from Active Directory
- User E-mail — Trustee's email address as read from Active Directory
- User Employee ID — Trustee's employee ID as read from Active Directory
- User Manager — Trustee's manager as read from Active Directory
- Description — Trustee's description as read from Active Directory
- Member — Blue checkmark icon indicates current membership
- Recommendation — Any information known to the Access Information Center that might be helpful during this review is listed in this column
Step 2 – Recommend removing membership by selecting one or more trustees and clicking the Remove Access button or by clicking on a checkmark icon. A blank yellow icon indicates you are recommending the trustee be removed from the group.
Remember, at any time you can save your recommendations and exit the review. It will remain pending until you submit all recommendations for this resource.
Step 3 – When the recommended changes are set as desired, click Next. The 2 Review changes tab opens in the Resource Review page.
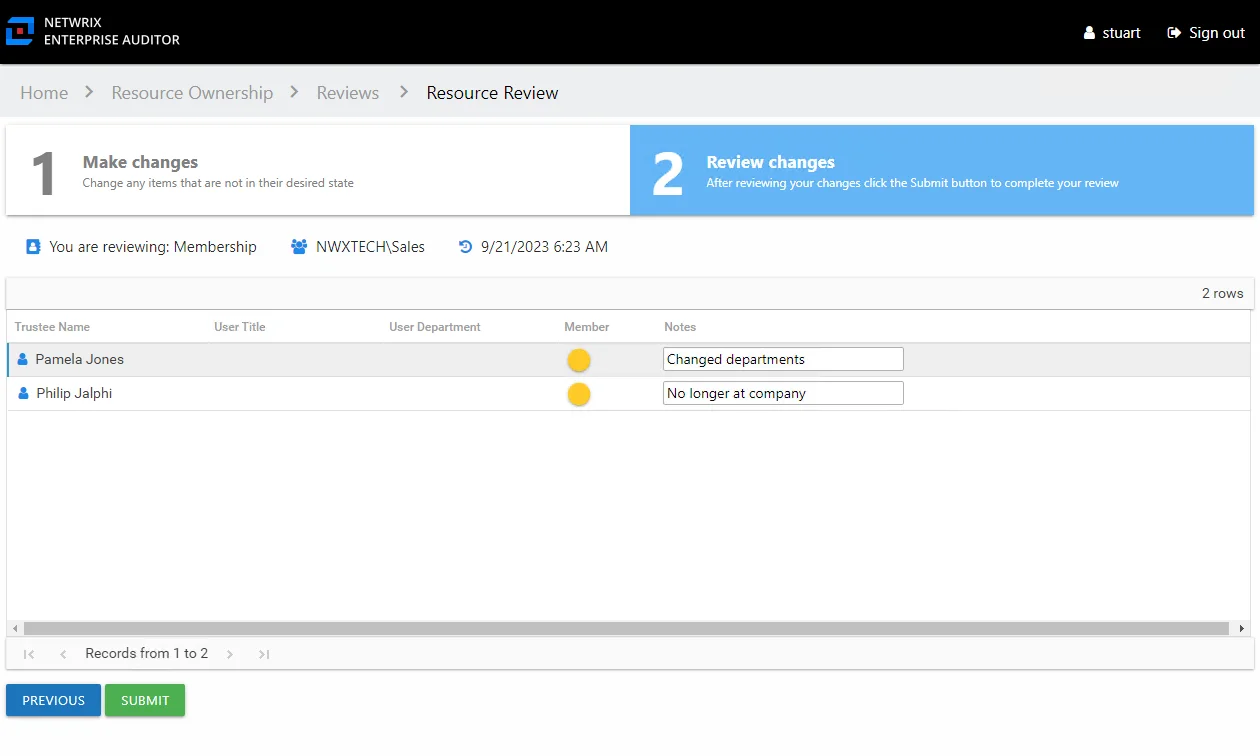
Step 4 – This tab displays a filtered table of trustees with recommended changes. Confirm your recommendations and optionally add notes to the Review Administrator. Owners are encouraged to leave notes explaining why the change is recommended.
NOTE: To make changes to your recommendations, you must return to the first tab. Click Previous.
Step 5 – When all recommendations are confirmed and the desire notes added, click Submit. A message displays stating that the review is complete. Click OK to close the message window.
The review for this resource is now complete. You will be redirected to the Pending Reviews page. Your recommended changes have been sent to the Review Administrator for approval and processing.
Perform a Permissions Review
A Permissions review can be conducted for various types of data repository resources. Follow the steps to perform a Permissions review.
Step 1 – On the Pending Reviews page, select the resource with a pending Permissions review and click Begin Review. The Resource Review page opens to the 1 Make Changes tab.
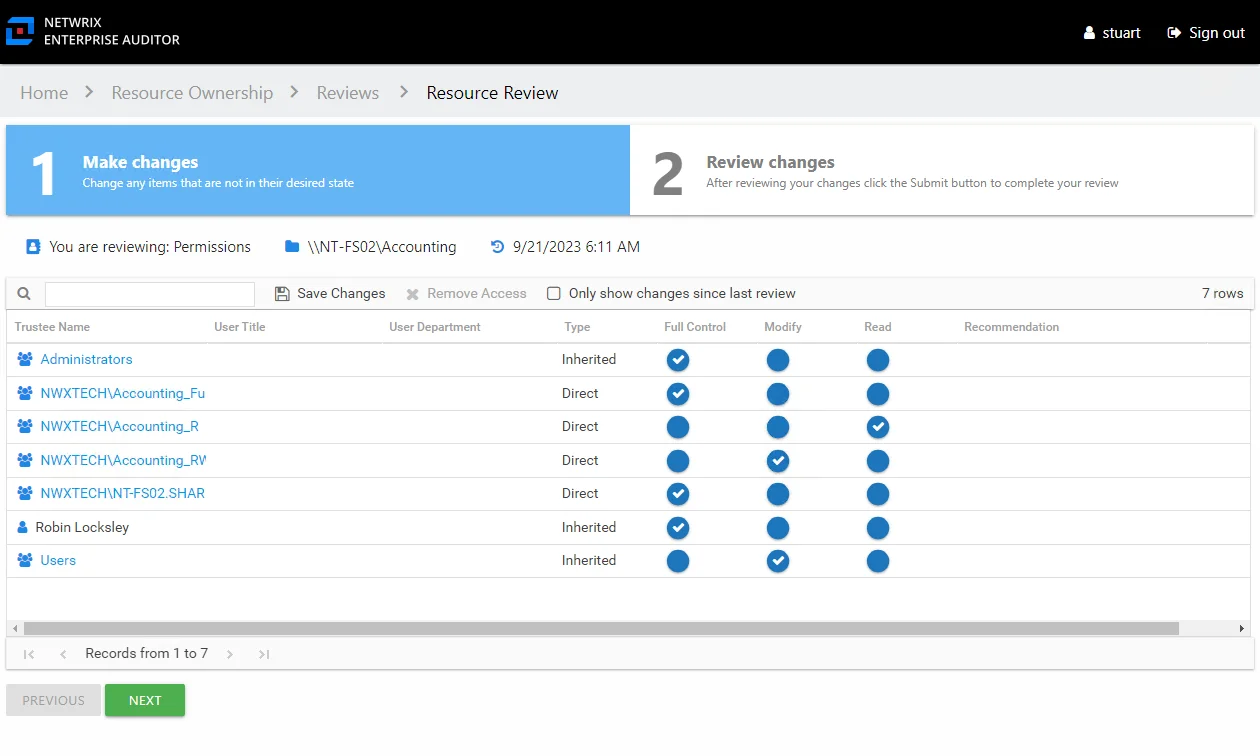
The table displays permission information for the resource being reviewed:
- Trustee Name — Name of the trustee. If the trustee is a group, click the hyperlink to open the Group Membership window. See the Group Membership Window topic for additional information.
- User Title — Trustee's title as read from Active Directory
- User Department — Trustee's department as read from Active Directory
- User E-mail — Trustee's email address as read from Active Directory
- User Employee ID — Trustee's employee ID as read from Active Directory
- User Manager — Trustee's manager as read from Active Directory
- Description — Trustee's description as read from Active Directory
- Managed By — Account that controls permissions on the trustee or group object
- Type — Indicates if the permission is inherited or directly applied
- Permission Level (Full Control, Modify, and Read) columns — Blue checkmark icon indicates current permission level
- Recommendation column — Any information known to the Access Information Center that might be helpful during this review is listed in this column
Step 2 – Recommend permission changes for a trustee by clicking the icon for the desired permission level (Full Control, Modify, or Read columns). A yellow checkmark icon indicates the new level of permission you are recommending.
Step 3 – Recommend removing permissions by selecting one or more trustees and clicking the Remove Access button or by clicking on a checkmark icon. A blank yellow icon indicates you are recommending all permissions be removed; it appears in the column for the current level of access.
Remember, at any time you can save your recommendations and exit the review. It will remain pending until you submit all recommendations for this resource.
Step 4 – When the recommended changes are set as desired, click Next. The 2 Review changes tab opens in the Resource Review page.
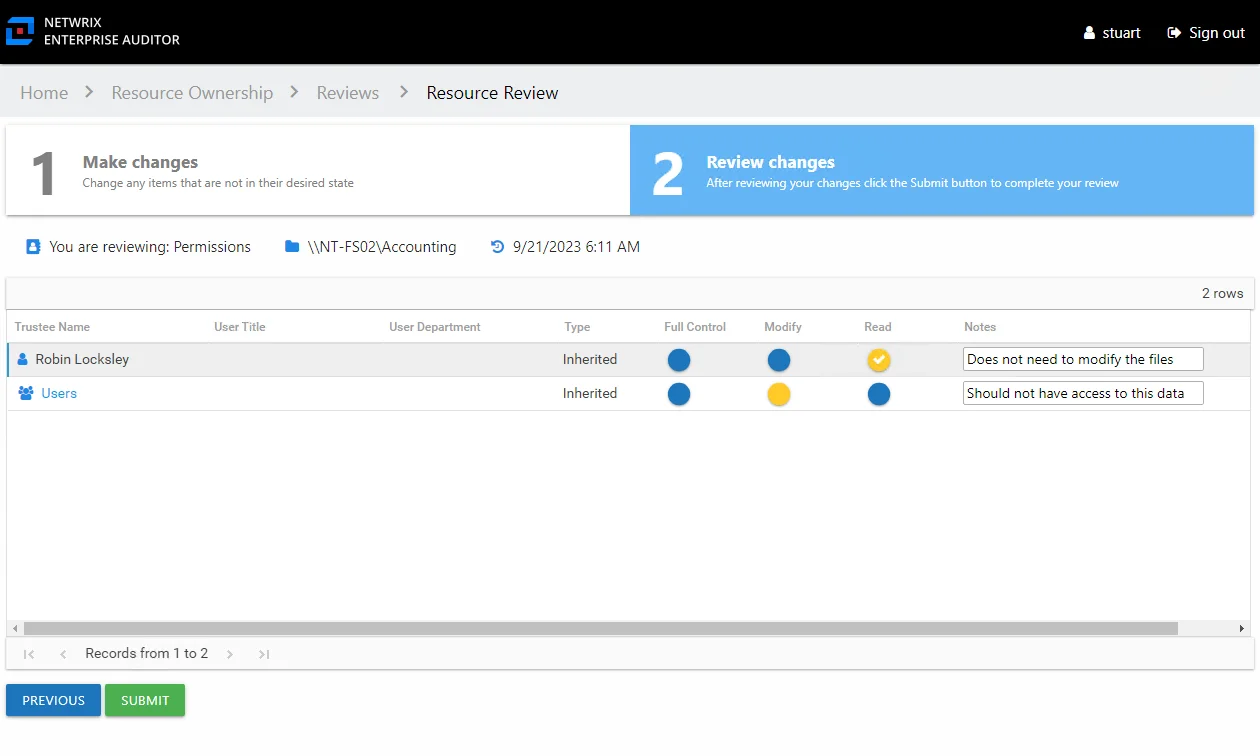
Step 5 – This tab displays a filtered table of trustees with recommended changes. Confirm your recommendations and optionally add notes to the Review Administrator. Owners are encouraged to leave notes explaining why the change is recommended.
NOTE: To make changes to your recommendations, you must return to the first tab. Click Previous.
Step 6 – When all recommendations are confirmed and the desire notes added, click Submit. A message displays stating that the review is complete. Click OK to close the message window.
The review for this resource is now complete. You will be redirected to the Pending Reviews page. Your recommended changes have been sent to the Review Administrator for approval and processing.
Perform a Sensitive Data Review
A Sensitive Data review can be conducted for various types of data repository resources. Follow the steps to perform a Sensitive Data review.
Step 1 – On the Pending Reviews page, select the resource with a pending Sensitive Data review and click Begin Review. The Resource Review page opens to the 1 Make Changes tab.
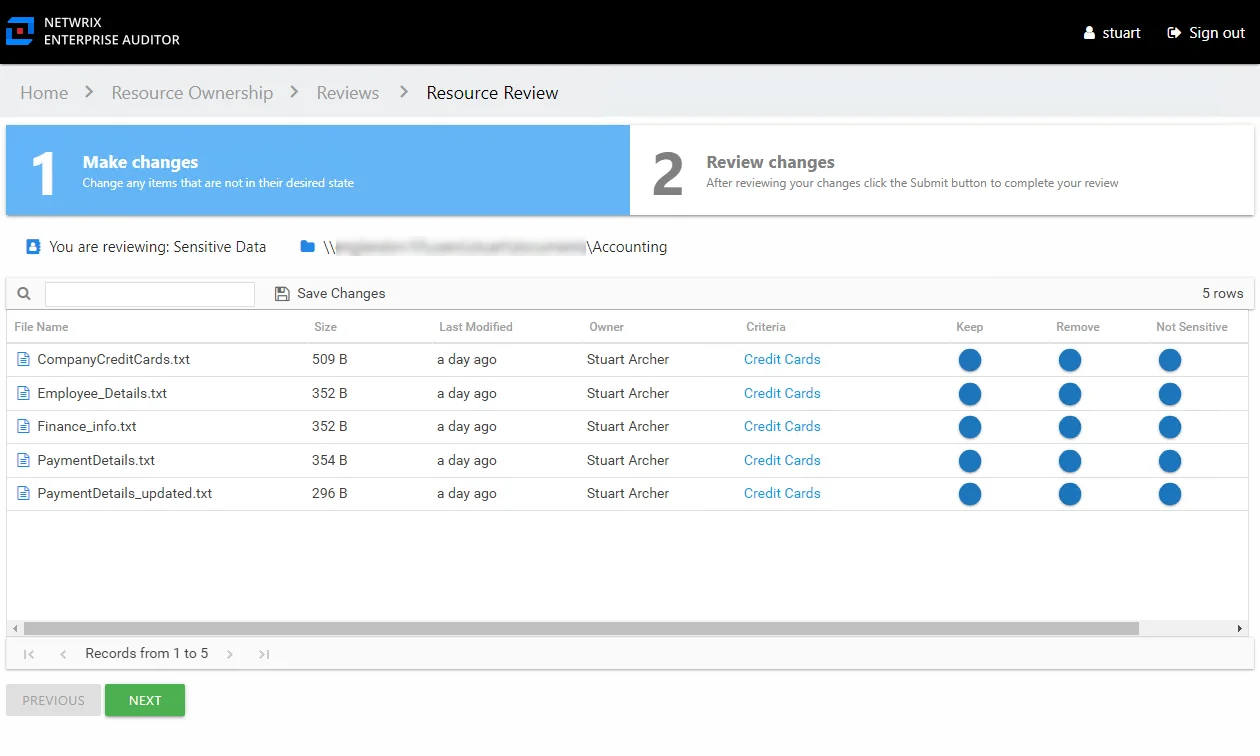
The table displays files where potentially sensitive data has been found on the resource being reviewed:
- File Name – Name of file with extension
- Size – Size of the file
- Last Modified – Last modified date timestamp of the file from scanned the file details
- Owner – Owner of the file from scanned the file details
- Criteria – Name of the criteria with match hits found within the file. The hyperlink opens the Criteria Matches window. See the Criteria Matches Window topic for additional information.
Step 2 – For each file listed, make a recommendation by clicking on the icon in either the Keep, Remove, or Not Sensitive column. Your selection is indicated by a yellow checkmark.
- Keep – Recommend no action should be taken
- Remove – Recommend that the file should be removed from the resource
- Not Sensitive – Recommend that the file does not contain sensitive data for the designated criteria
Remember, at any time you can save your recommendations and exit the review. It will remain pending until you submit all recommendations for this resource.
Step 3 – When the recommended changes are set as desired, click Next. The 2 Review changes tab opens in the Resource Review page.
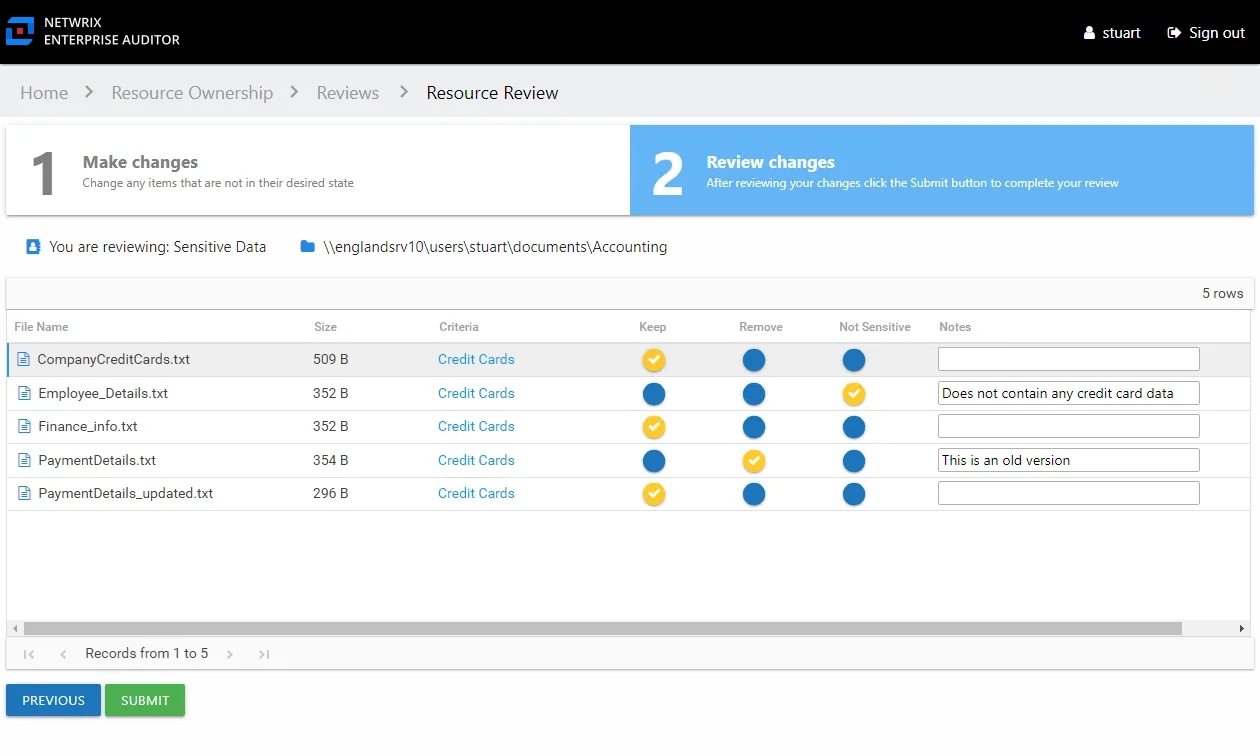
Step 4 – This tab displays the table of files with your recommendations. Confirm your recommendations and optionally add notes to the Review Administrator. Owners are encouraged to leave notes explaining why the change is recommended.
NOTE: To make changes to your recommendations, you must return to the first tab. Click Previous.
Step 5 – When all recommendations are confirmed and the desire notes added, click Submit. A message displays stating that the review is complete. Click OK to close the message window.
The review for this resource is now complete. You will be redirected to the Pending Reviews page. Your recommended changes have been sent to the Review Administrator for approval and processing.