Owner Portal Overview
The Owner portal is where owners manage their assigned resources. You should log into the Access Information Center with domain credentials. Where it opens is dependent on whether or not you have been assigned a user role beyond owner.
- For an owner with an assigned user role, the Access Information Center will open to the Home page. You will use the Manage Your Resources link in the Your Links section to open the Owner portal. If resources assigned to you have pending resource reviews or pending access requests, the Pending Tasks notification displays next to the link.
- For an owner without an assigned user role, the Access Information Center will open directly to the Owner portal.
The Owner portal has three sections:
-
Actions Panel — provides access to the Resource Reviews and Self-Service Access Requests workflow features
- Access Requests— Navigates to the Access Requests page where you can view both pending and historical access requests for your resources
- Reviews — Navigates to the Reviews page where you can view your pending reviews and history of previously reviewed items
- My Access — Navigates to the Your Access portal where you can submit access requests, view pending requests, and view the history of your access requests
-
Assigned Resources — A table of assigned resources with action buttons below
-
Ownership Status — Displays a graphical representation of confirmed ownership for assigned resources
Ownership Status
The Ownership Status section contains a confirmation chart.

It displays a graphical representation of the percentage of resources assigned to you that have been confirmed.
Actions Panel
The Actions panel provides access to the Resource Reviews and the Self-Service Access Requests workflow features.

Resource Review Workflow Features
The Reviews link in the Actions panel is part of the Resource Review feature.
- Reviews — Opens the Reviews page. If any of your resources have pending reviews, a count of pending reviews displays next to the link. The Reviews page allows you to view both pending and historical resource reviews. See the Owners & Resource Reviews topic for additional information.
Self-Service Access Requests Workflow Features
The Access Requests and My Access links in the Actions panel are part of the Self-Service Access Requests feature.
-
Access Requests — Opens the Access Requests page. If any of your resources have pending access requests, a count of pending requests displays next to the link. The Access Requests page allows you to view pending and historical access requests for you resources. See the Owners & Access Requests topic for additional information.
-
My Access — Opens the Your Access portal. The Your Access portal allows you to see your existing access, request access to resources, and view your access request history. See the Your Access Portal Overview topic for additional information.
NOTE: If you have an assigned user role, you can access the Your Access portal with the Manage Your Access link on the Home page.
Assigned Resources
The Assigned Resources section lists all resources assigned to you.
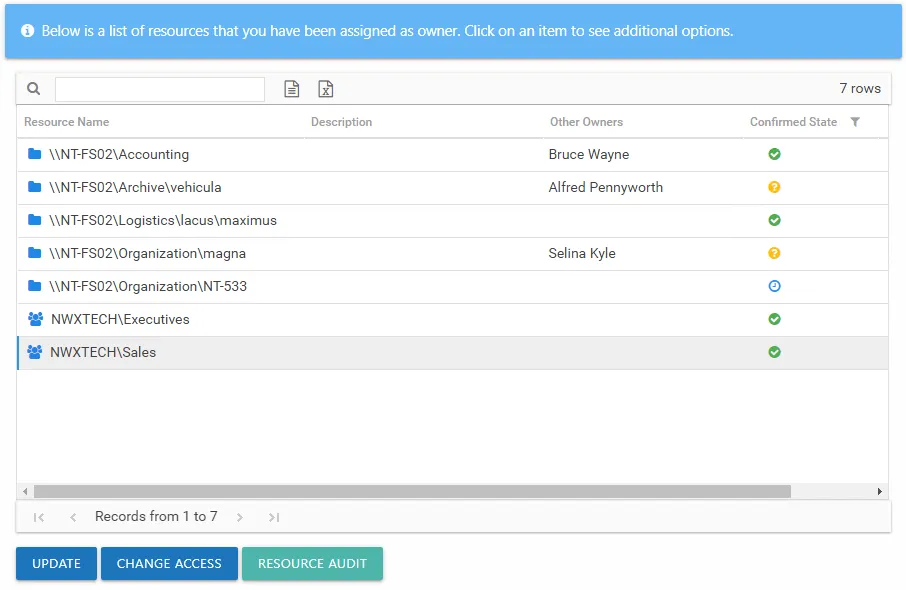
The table contains one row per assigned resource. The information in this table includes:
-
Resource Name – The icon indicates the type of resource. The resource name includes its location, such as the UNC path for a file system resource, the URL for SharePoint resource, or Group name (e.g., [Domain][Group]).
-
Description – Description or explanation of the resource as supplied by either the Ownership Administrator or the assigned owner
-
Other Owners – Shows all owners assigned for each resource. The current owner and assigned owners who declined ownership will not show.
-
Confirmed State – Indicates whether or not the assigned owner has confirmed ownership of that resource. Tool-tips display when hovering over the icons indicating whether the resource ownership has been confirmed, declined, pending response, or that a confirmation has not been requested. Hover over the icon to display a description of the state and a date timestamp of the last update:
- Yellow question mark icon – Indicates ownership confirmation has not been requested, and there is no ownership status at this time
- Blue clock icon – Indicates a request for confirmation has been sent, and you are waiting for a response from the assigned owner.
- Green check mark icon – Indicates the assigned owner confirmed ownership of the resource.
- Red X icon – Indicates ownership has been declined, and the resource has not yet been reassigned by the Ownership Administrator. This resource will not be included in the list after the owner leaves the Owner portal or logs out.
The table data grid functions the same way as other table grids. See the Data Grid Features topic for additional information.
The buttons at the bottom enable you to conduct the following actions:
| Button | Function |
|---|---|
| Update | Opens the Update Resource Window for the selected resource, which allows you to confirm or decline ownership of the resource and to add a description. |
| Change Access | Opens the Change Resource Access Wizard for the selected resource, which allows you to make ad hoc changes to access and group membership. This button is only enabled if the feature was enabled for the selected resource by the Ownership Administrators. |
| Resource Audit | Opens the Resource Audit interface or Group Audit interface directly to the selected resource. See the Audit Interfaces topic for additional information. |
Update Resource Window
The Update button on the Owner portal opens the Update Resource window for the selected resource. You can confirm ownership, decline ownership, and optionally enter a description for the resource.

There are two options for ownership confirmation:
- I am the owner of this resource — Select this radio button to confirm ownership of the resource. The Resource Description field enables you to optionally provide a description for this resource. This description will be visible to domain users requesting access as well as Ownership Administrators, Resource Review Administrators, and Self-Service Access Request Administrators.
- I do not own this resource — Select this radio button to deny ownership of the resource. The Do you know who the owner is? field enables you to enter the name of an individual who might be the owner.
Click OK to save any changes or Cancel to close the window without saving changes.
Change Resource Access Wizard
The Change Access button on the Owner portal opens the Change Resource Access wizard for the selected resource. You can make ad hoc changes to resource access when this feature is enabled for the resource by the Ownership Administrators.

This wizard has four pages, but you will only be directed to the pages applicable to your selection on the first page:
-
- Select Change — Choose between adding access for a new user and changing access for an existing user
-
- Add Access — Select new user and identify access level. See the Add Access topic for additional information.
- New users can be imported in bulk from a CSV file. See the Import Users CSV File topic for additional information.
-
- Change Access — Select users and indicate a new access level. See the Change Access topic for additional information.
-
- Add Notes — Enter notes that will be included in the notification sent to the user (if selected) and recorded with the historical record of this change
Add Access
Follow the steps to add new user access to the selected resource.
Step 1 – Select the desired resource in the Owner portal and click Change Access. The Change Resource Access wizard opens.
Step 2 – On the Select Change page, select the Add access for a new user option. If selected, the Notify users about their change in access option will send an email to the users who have been granted access to the resource. Click Next.

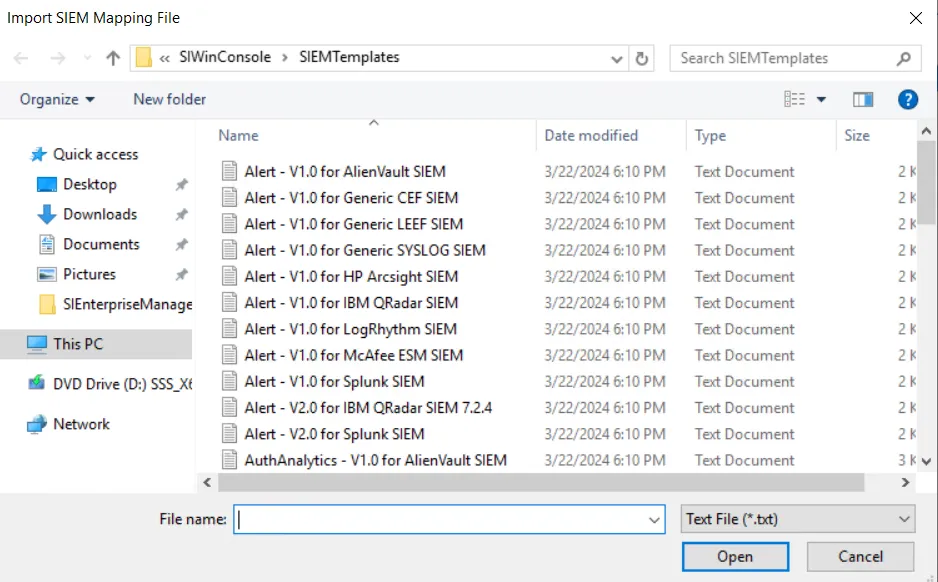
Step 3 – On the Add Access page, indicate the new users. Entering a name or email address in the search field to find and select users from Active Directory, which populate in a drop-down menu as you type. You can also import a list of users by clicking Import, navigating to the CSV file, and clicking Open to select the file. See the Import Users CSV File topic for additional information.
NOTE: All users in the list will be given the same level of access. Use the Remove button to remove a selected user from the list.
Step 4 – When the user list is complete, select the desired access level from the drop-down menu.
- For File System or SharePoint resources – The options available are dependent upon how the Ownership Administrator configured the resource. Options may include Read, Modify, and Full Control.
- For groups – The only option available is Member, which means to grant membership in the group
Step 5 – Click Next to continue. The wizard advances to the Add Notes page.
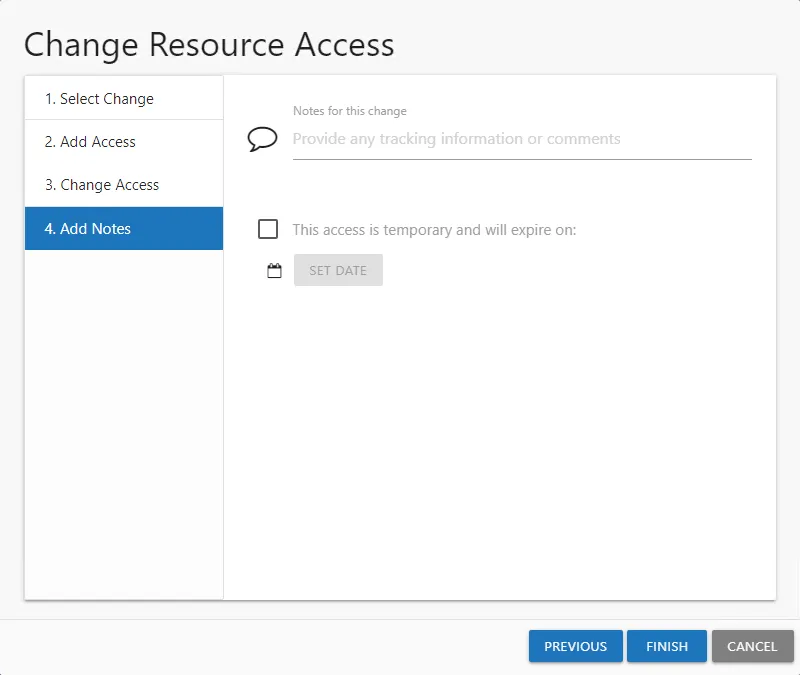
Step 6 – On the Add Notes page, optionally enter the following information:
- Notes for this change — Enter any useful tracking information or description explaining the reason for the change
- Temporary Access — To grant only temporary access, check the box, click Set Date, and select an expiration date. The user will be automatically removed from the resource after the expiration date.
Step 7 – Click Next. The Access Information Center will begin to process the updates.
Remember, Notes are included in the notification sent to the user (if selected) and recorded with the historical record of this change.

Step 8 – The action status displays on the page. When the update has completed (100%), click Finish. The Change Resource Access wizard closes.
NOTE: If an error is reported on the Commit page, it indicates the access changes could not be made. Reach out to the Ownership Administrator. If an existing request is pending, approve the request on the Pending Requests tab of the Access Requests page via the Access Requests link on the Actions panel.
The access changes that completed successfully can be viewed in the History tab of the Access Requests page via the Access Requests link on the Actions panel.
Import Users CSV File
A CSV file can be created to import a list of users.
The CSV file must contain one user per row. Use the NTAccount [Domain\SamAccountName] format for the
user name, for example NWXTECH\JSmith.
Change Access
Follow the steps to change or remove access for the selected resource.
Step 1 – Select the desired resource in the Owner portal and click Change Access. The Change Resource Access wizard opens.

Step 2 – On the Select Change page, select the Change access for an existing user option. If checked, the Notify users about their change in access option will send an email to the users having access to the resource changed. Click Next.
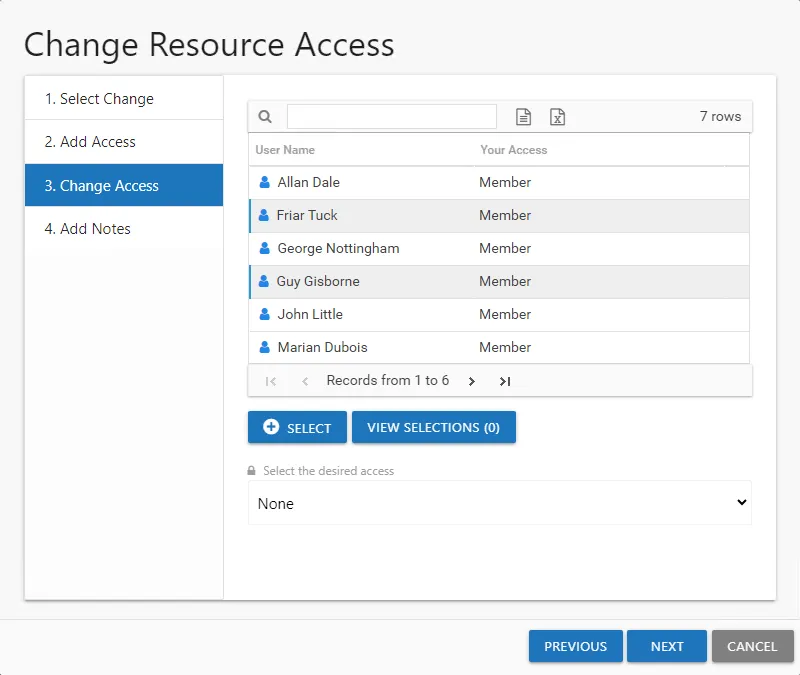
Step 3 – On the Change Access page, select the users from the list and click Select. Use the Windows ctrl-left-click key command to select multiple users. The View Selections button shows a count of selected users and opens the Users selected for access change panel listing the selections.
Step 4 – When the user selection list is complete, select the desired access level from the drop-down menu.
- For File System or SharePoint resources – The options available are dependent upon how the Ownership Administrator configured the resource. Options can include Read, Modify, and Full Control.
- For groups – The only option available is None, which means to remove group membership.
Step 5 – Click Next to continue.

Step 6 – On the Add Notes page, optionally enter any useful tracking information or description explaining the reason for the change. Click Next. The Access Information Center will begin to process the updates.
Remember, Notes are included in the notification sent to the user (if selected) and recorded with the historical record of this change.
Step 7 – The action status displays on the page. When the update has completed (100%), click Finish. The Change Resource Access wizard closes.
NOTE: If an error is reported on the Commit page, it indicates the access changes could not be made. Reach out to the Ownership Administrator. If an existing request is pending, process the request on the Pending Requests tab of the Access Requests page via the Access Requests link on the Actions panel.
The access changes that completed successfully can be viewed in the History tab of the Access Requests page via the Access Requests link on the Actions panel.