Manually Setting Up SharePoint Online Auditing
Question
How do I set up SharePoint Online auditing without using the SP_RegisterAzureAppAuth instant job?
Answer
Always use the SP_RegisterAzureAppAuth instant job to set up the Entra app for auditing.
However, you can complete the process manually if necessary — for example, if you cannot temporarily disable MFA for a Global Admin account.
SPAA/SPSEEK Scans
-
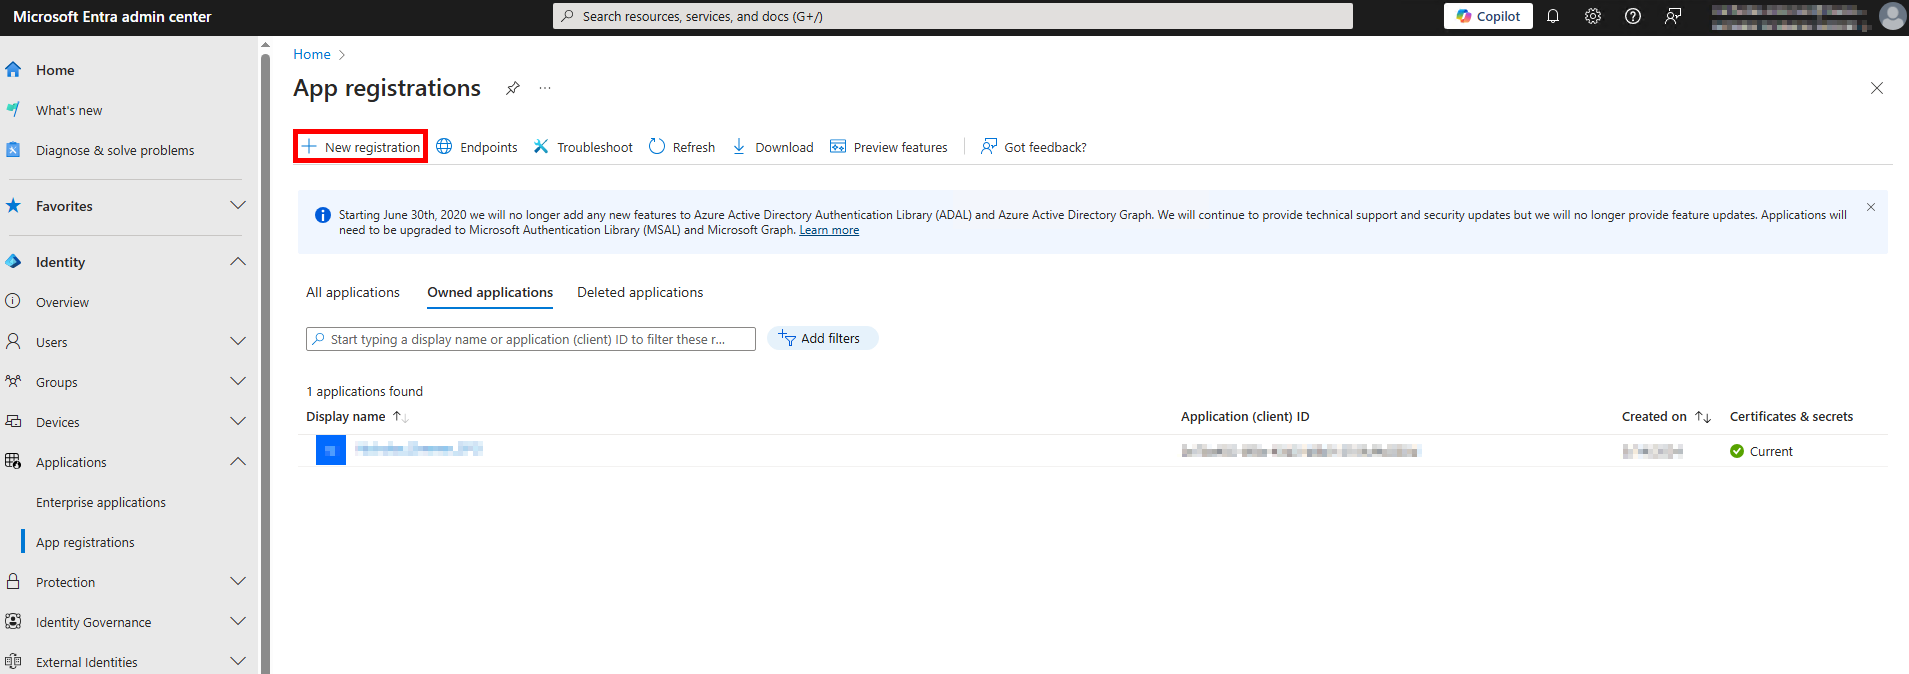
Open the Microsoft Entra admin center: https://entra.microsoft.com/#home.
-
Navigate to Identity > Applications > App registrations.
-
Select + New registration.
-
On the Register an application page, set the following:
- Name: Enter a meaningful name, such as
NetwrixAccessAnalyzer_SharePoint. - Supported account types: Choose Accounts in this organizational directory only.
- Name: Enter a meaningful name, such as
-
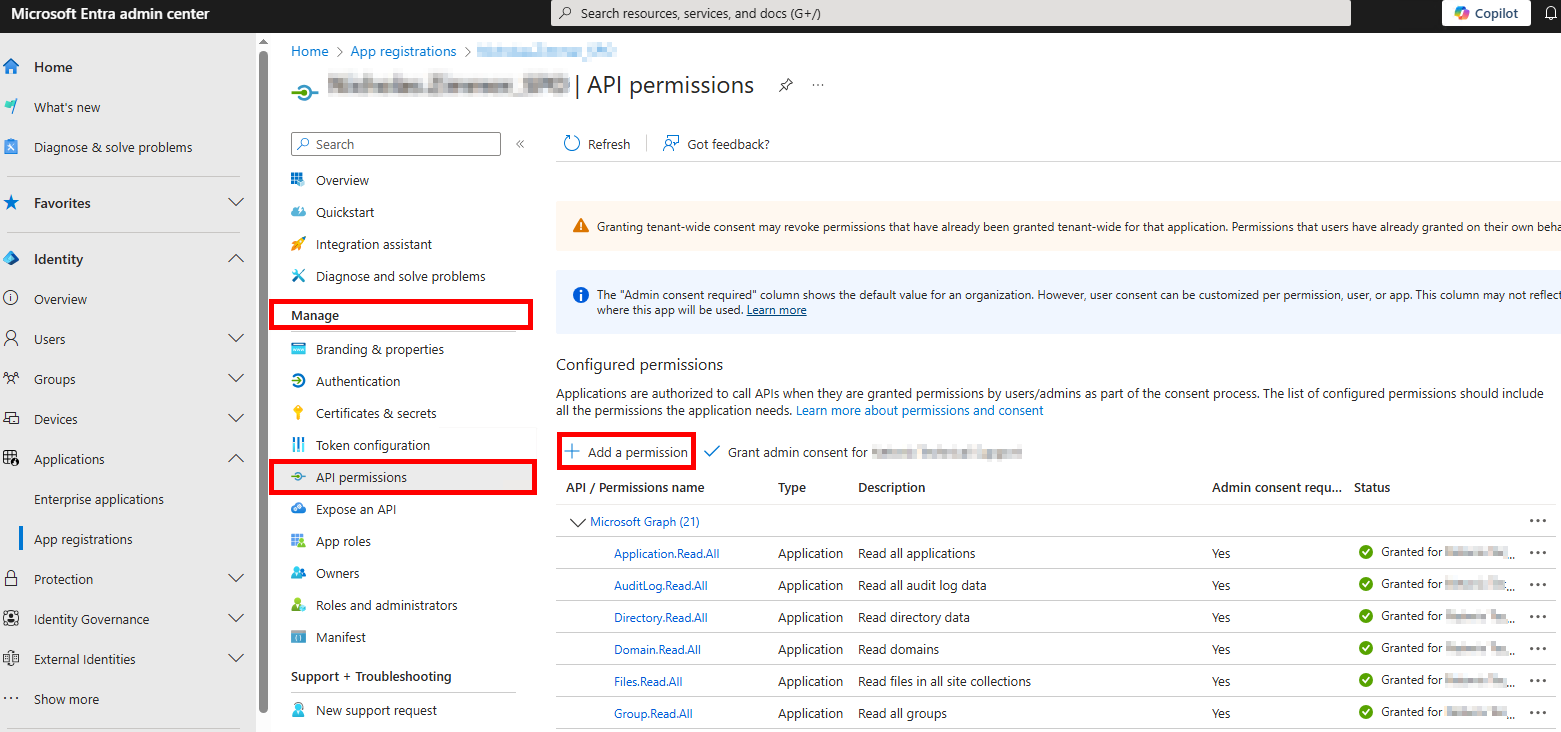
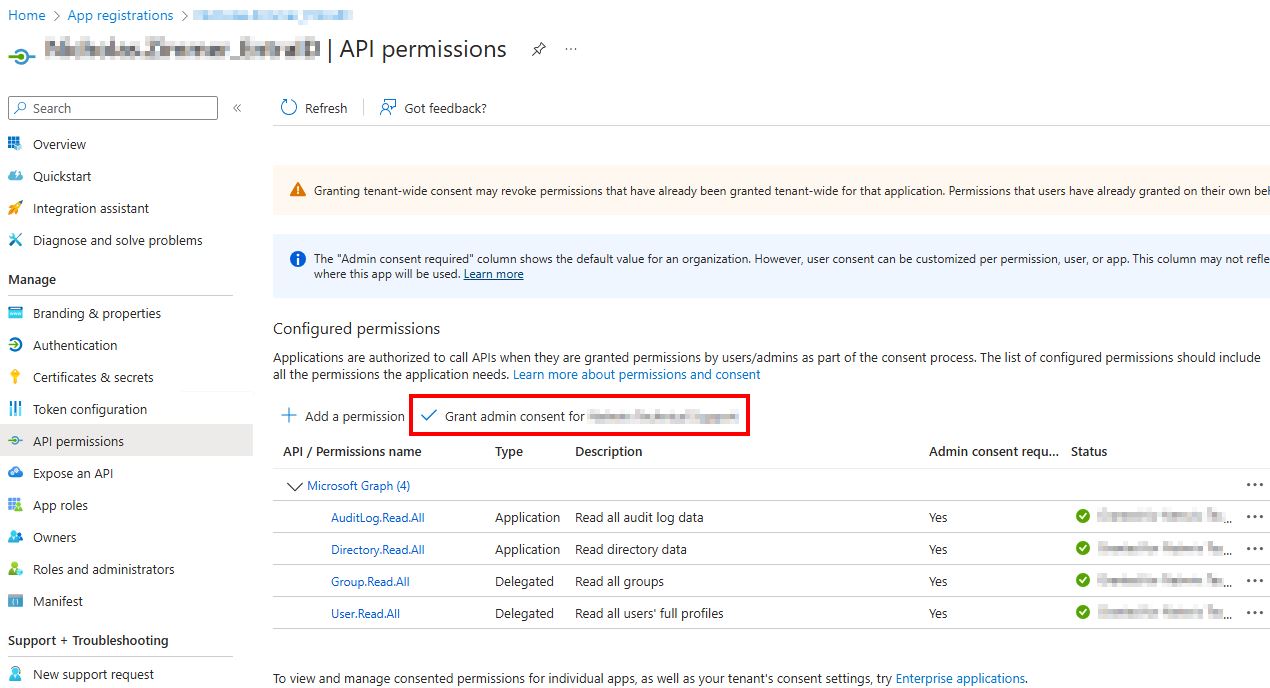
From the Application Overview page, navigate to Manage > API Permissions and select Add a permission.
-
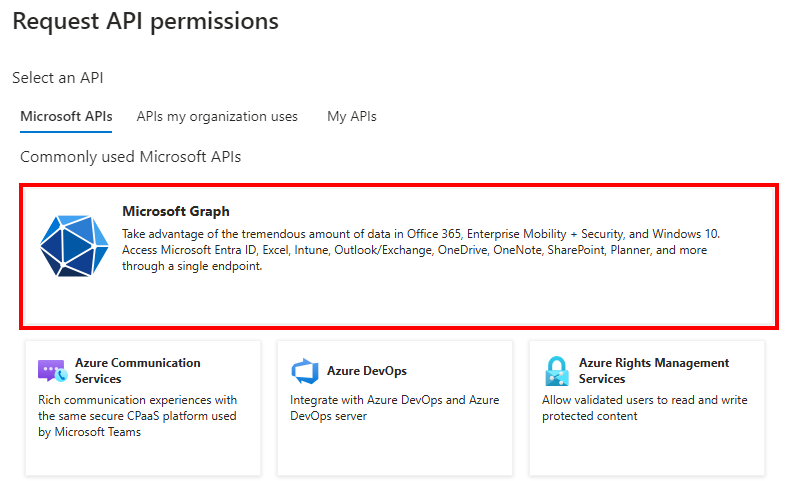
From the Request API permissions page, select Microsoft Graph and add the following permissions:
- Delegated Permissions:
Group.Read.All– Read all groupsUser.Read.All– Read all users' full profiles
- Application Permissions:
Application.Read.All– Read all applicationsAuditLog.Read.All– Read all audit log dataDirectory.Read.All– Read directory dataFiles.Read.All– Read files in all site collections
- Delegated Permissions:
-
From the Request API permissions page, select Office 365 Management APIs and add the following permissions:
ActivityFeed.Read– Read activity data for your organizationActivityFeed.ReadDlp– Read DLP policy events, including detected sensitive dataServiceHealth.Read– Read service health information for your organization
-
From the Request API permissions page, select SharePoint and add the following permissions:
Sites.FullControl.All– Have full control of all site collectionsSites.Read.All– Read items in all site collectionsTermStore.Read.All– Read managed metadataUser.Read.All– Read user profiles
-
After adding the permissions, grant admin consent by selecting Grant admin consent for {TENANT NAME}.

-
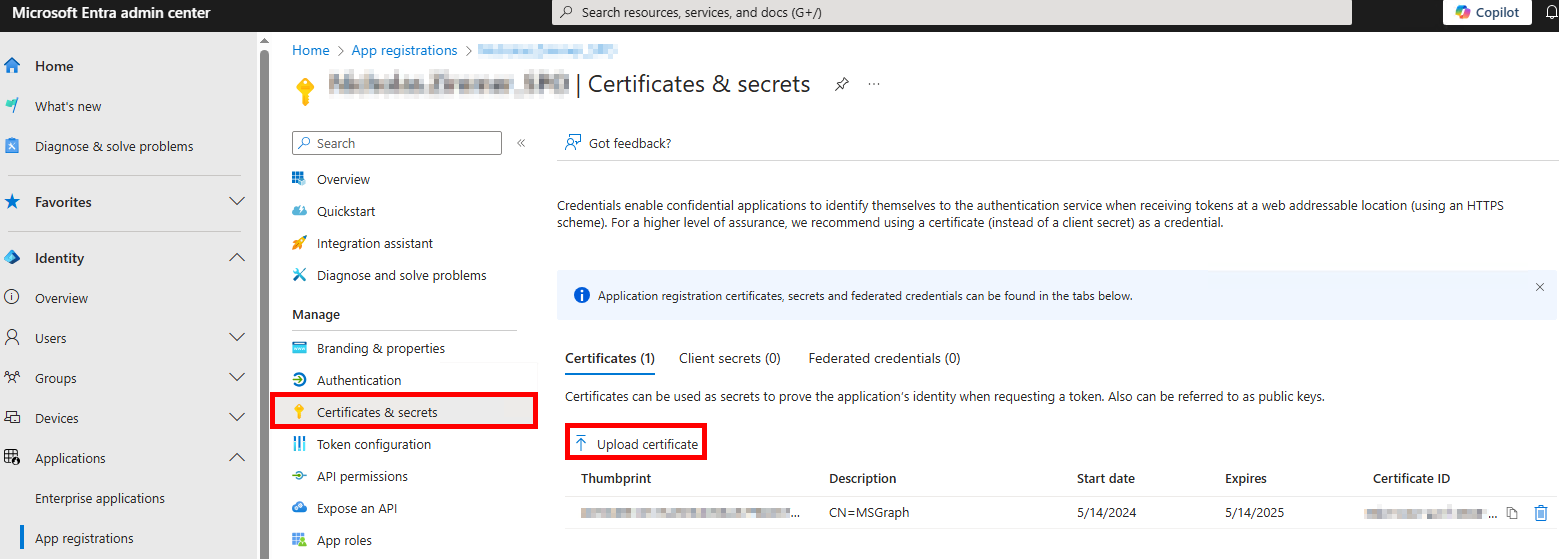
On the Netwrix Access Analyzer server, import a certificate and PFX file to the
%SAInstallDir%PrivateAssemblieslocation:-
If necessary, create a self-signed certificate with the following PowerShell commands:
$cert=New-SelfSignedCertificate -CertStoreLocation Cert:\CurrentUser\My -DnsName stealthbits.com -Subject "CN=StealthAUDIT SharePoint Auditor" -FriendlyName "StealthAUDIT SharePoint Auditor" -KeyAlgorithm RSA -KeyLength 2048 -KeyExportPolicy Exportable -Provider "Microsoft Enhanced RSA and AES Cryptographic Provider" -NotAfter (Get-Date).AddYears(11)- Change the DNS Name to match your domain.
- Change the Subject and FriendlyName to match the App Registration name in Entra (formerly Azure).
Export-Certificate -Cert $cert -FilePath "$($env:SAINSTALLDIR)PrivateAssemblies\spaa_cert_domain.cer" -Type CERT- Ensure the certificate name includes the domain (e.g.,
spaa_cert_NWXSUPPORT.cer).
Export-PfxCertificate -Cert $cert -FilePath "$($env:SAINSTALLDIR)PrivateAssemblies\spaa_cert_domain.pfx" -Password (ConvertTo-SecureString -String "PasswordGoesHere" -Force -AsPlainText)- Ensure the PFX file name includes the domain (e.g.,
spaa_cert_NWXSUPPORT.pfx). - Replace
PasswordGoesHerewith a secure password.
-
-
Navigate back to the SharePoint App registrations page, and on the Certificates & Secrets page, click ↑ Upload certificate to upload the
spaa_cert_domain.certfile.
-
Navigate to the Overview tab and copy the Application (client) ID. Use this as the Access Analyzer connection profile identifier.
-
In Netwrix Access Analyzer, navigate to Global Options > Connection and create a connection profile with the same name as the SharePoint app registration, using the following:
- Account Type: Azure Active Directory
- Client ID: Application (client) ID from SharePoint App Registration
- Key: CertLocation, CertPassword, NumericDesignator
- Numeric Designator:
0is the default. Other options are:1for pre-production environments2for China3for Germany4for USGovernment
- Example:
C:\Program Files (x86)\STEALTHbits\StealthAUDIT\PrivateAssemblies\spaa_cert_domain.pfx,YourPasswordHere,0
- Numeric Designator:
-
Create a host list with the SharePoint site, for example:
YourOrganization.SharePoint.com. -
Set the SharePoint job group to run against the SharePoint host list.
-
Set the SharePoint job group to use the new SharePoint Connection Profile. SharePoint Access Auditing (SPAA) and Sensitive Data Discovery Auditing (SPSEEK) are now configured for auditing.
SPAC Scans
The SharePoint Activity Auditing (SPAC) scan can use the same app registration as SPAA/SPSEEK. If you have not already created an app, follow steps 1–4 from the SPAA/SPSEEK Scans section.
-
From the Application Overview page, navigate to Manage > API Permissions and select Add a permission.

-
From the Request API permissions page, select Microsoft Graph.
Add the following Application Permissions:Directory.Read.All– Read directory dataSites.Read.All– Read items in all site collectionsUser.Read.All– Read all users' full profiles
-
From the Request API permissions page, select Office 365 Management APIs.
Add the following Application Permissions:ActivityFeed.Read– Read activity data for your organizationActivityFeed.ReadDlp– Read DLP policy events, including detected sensitive data
-
After adding these permissions, grant admin consent by selecting Grant admin consent for {TENANT NAME}.
-
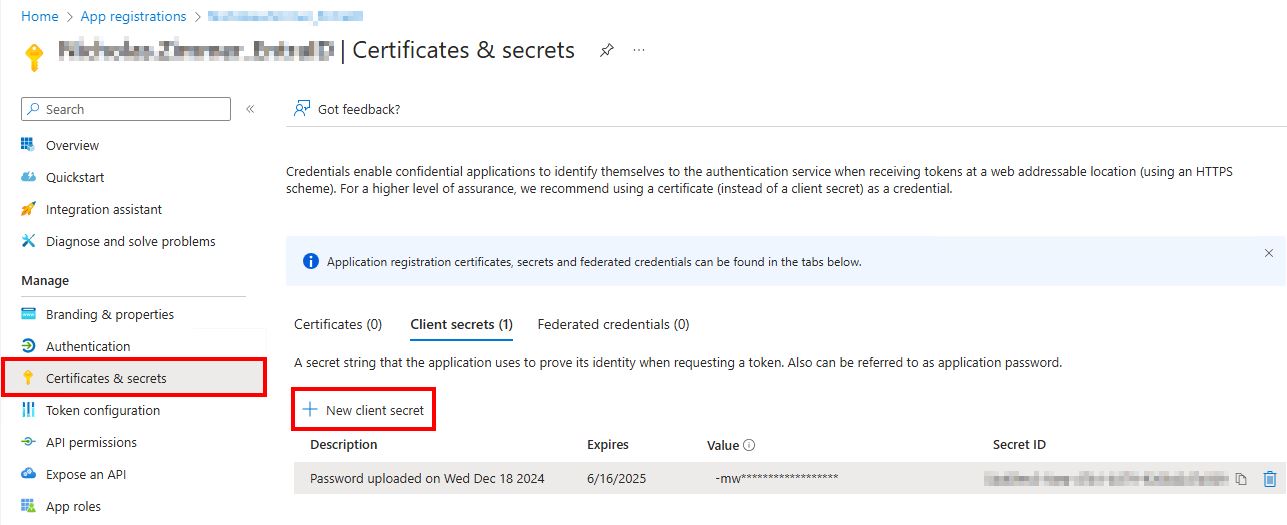
Navigate to Manage > Certificates & Secrets and select + New client secret.
-
On the Add a client secret page, set the following:
- Description: Enter something meaningful, for example:
NAM SharePoint. - Expires: Set this to the longest option or per your organization's internal policy.
- Description: Enter something meaningful, for example:
-
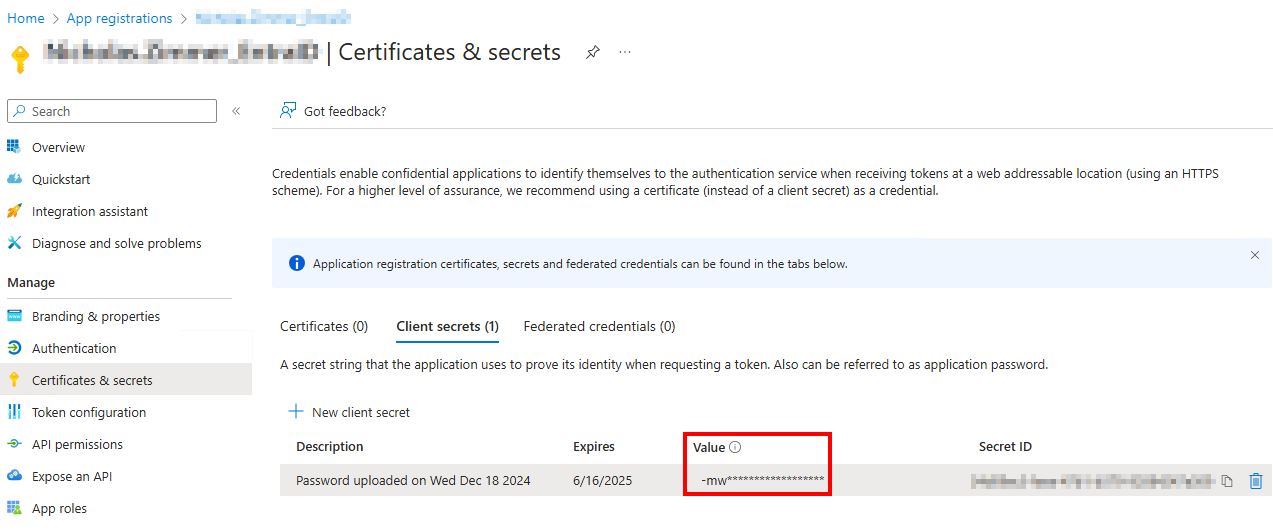
After creating the client secret, copy the Secret Value to a secure location.
NOTE: This value will obfuscate. Make sure you copy it immediately or you will need to create a new client secret.
-
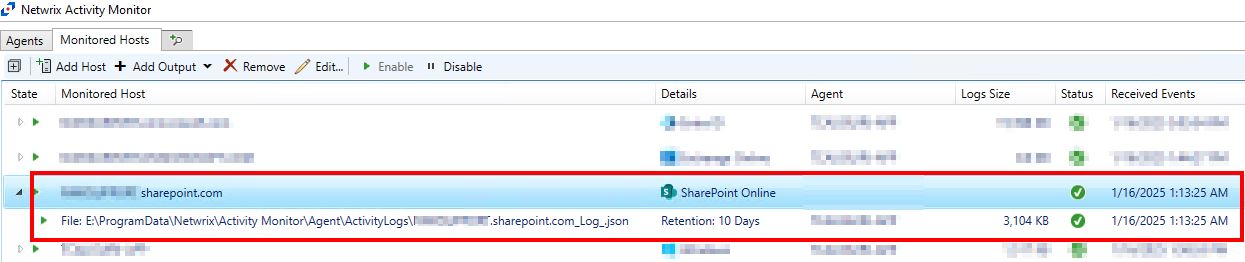
In Netwrix Activity Monitor, navigate to the Monitored Hosts tab and select Add Host.
- Choose Agent: Specify the agent you would like to use for collecting SharePoint activity logs.
- Add Host: Select SharePoint Online and add the SharePoint site as the Domain Name, for example:
YourOrganization.SharePoint.com. - Entra AD / Azure ID Connection:
- Domain: Use the same domain name as before (if it does not auto-populate).
- Azure Cloud: Leave set to Azure unless it is a government organization.
- Client ID: Entra Application (client) ID from the manually created app.
- Client Secret: This is the Secret Value copied earlier.
- Region: Optional – leave blank if not applicable.
- SharePoint Online Operations: Select what SharePoint activity to collect (all options are selected by default).
- Users to Exclude: Add any users you do not want to collect SharePoint activity for.
- Where to log the activity: Select Log File.
- File Output: Select a log file path, set the retention period for activity logs, and select the This log file is for Netwrix Access Analyzer checkbox.
-
After completing the above steps, the SharePoint Online host appears in the Monitored Hosts tab with green checkmarks, confirming a successful connection.
-
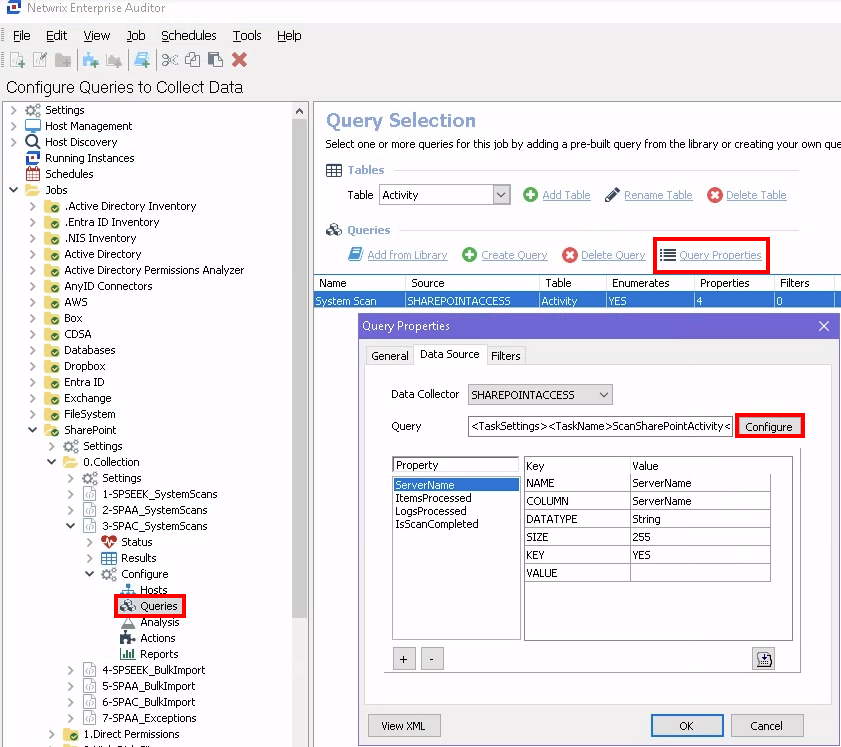
In Netwrix Access Analyzer, navigate to SharePoint > 0.Collection > 3-SPAC_SystemScans > Configure > Queries > Query Properties > Configure.
-
On the Activity Date Scope, set how long to retain the SharePoint activity in the Access Analyzer database.
-
On the Activity Log Locations, select Add and configure the following:
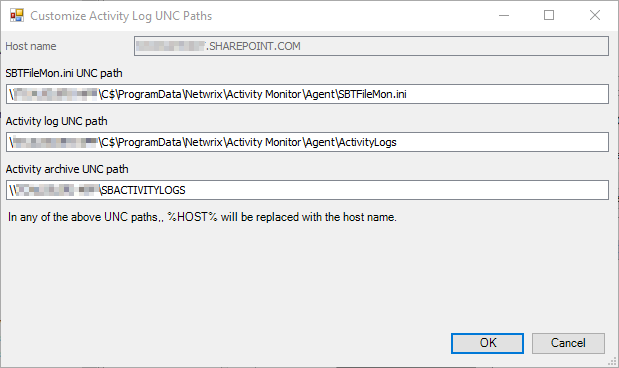
-
Host name: This should match the monitored host name in Activity Monitor, e.g.,
YourOrganization.SharePoint.com. -
Activity log UNC path: This is the file output path in Universal Naming Convention (UNC) format, e.g.,
\AgentHost\C$\ProgramData\Netwrix\Activity Monitor\Agent\ActivityLogs.- To get this value, convert the file output path from the SharePoint monitored host in Activity Monitor to UNC format.
- To get this value, convert the file output path from the SharePoint monitored host in Activity Monitor to UNC format.
-
Activity archive UNC path: UNC Path of agent's archive (on the Agents tab), if applicable.
-