Configure Audit Settings for CIFS File Shares on Dell Data Storage
Dell VNX, VNXe, Celerra, and Unity NAS devices are collectively referred to as Dell Data Storage.
Auditor can be configured to audit all access types, review the table below and select options that you want to track:
| Option | Description | |
|---|---|---|
| Changes | Successful | Use this option to track changes to your data. Helps find out who made changes to your files, including their creation and deletion. |
| Failed | Use this option to detect suspicious activity on your file server. Helps identify potential intruders who tried to modify or delete files, etc., but failed to do it. | |
| Read access | Successful | Use this option to supervise access to files containing confidential data intended for privileged users. Helps identify who accessed important files besides your trusted users. Enabling this option on public shares will result in high number of events generated on your file server and the amount of data written to the Audit Archive. |
| Failed | Use this option to track suspicious activity. Helps find out who was trying to access your private data without proper justification. Enabling this option on public shares will result in high number of events generated on your file server and the amount of data written to the Audit Archive. |
Actions reported by Auditor vary depending on the file server type and the audited object (file, folder, or share). The changes include creation, modification, deletion, moving, renaming, and copying. See the Dell Data Storage topic for additional information.
Configure Audit Settings for the CIFS File Shares Pre-Windows Server 2012
Perform the following steps:
Step 1 – Navigate to the target file share, right-click it and select Properties.
Step 2 – In the <Share_Name> Properties dialog, select the Security tab and click
Advanced.
Step 3 – In the Advanced Security Settings for <Share_Name> dialog, navigate to the
Auditing tab, click Edit.
Step 4 – In a separate Advanced Security Settings for <Share_Name> dialog, click Add to
add a principal. You can select Everyone (or another user-defined group containing users that
are granted special permissions) and click Edit.
Step 5 – You can specify any other user group, but in this case Netwrix Auditor will send emails with errors on incorrect audit configuration. This will not affect the reports or data searches performed in the Auditor client and the product will only audit user accounts that belong to the selected group.
Step 6 – Apply settings to your Auditing Entries depending on the access types that you want to audit. If you want to audit all access types (successful reads and changes as well as failed read and change attempts), you need to add separate Auditing Entries for each file share. Otherwise, reports will contain limited data and warning messages. Review the following for additional information:
- Successful reads
- Successful changes
- Failed read attempts
- Failed change attempts
| Auditing Entry |
|---|
| Successful reads |
| The Auditing Entry below shows Advanced Permissions for auditing successful reads only: - Apply onto—Select "Files only". - Check "Successful" and "Failed" next to List folder / read data. - Make sure that the Apply these auditing entries to objects and/or containers within this container only checkbox is cleared. |
| Successful changes |
| The Auditing Entry below shows Advanced Permissions for auditing successful changes only: - Apply onto—Select "This folder, subfolders and files". - Check "Successful" next to the following permissions: - Create files / write data - Create folders / append data - Write extended attributes - Delete subfolders and files - Delete - Change permissions - Take ownership - Make sure that the Apply these auditing entries to objects and/or containers within this container only checkbox is cleared. |
| Failed read attempts |
| The Auditing Entry below shows Advanced Permissions for auditing failed read attempts only: - Apply onto—Select "This folder, subfolders and files". - Check "Failed" next to List folder / read data. - Make sure that the Apply these auditing entries to objects and/or containers within this container only checkbox is cleared. |
| Failed change attempts |
| The Auditing Entry below shows Advanced Permissions for auditing failed change attempts only: - Apply onto—Select "This folder, subfolders and files". - Check "Failed" next to the following permissions: - Create files / write data - Create folders / append data - Write extended attributes - Delete subfolders and files - Delete - Change permissions - Take ownership - Make sure that the Apply these auditing entries to objects and/or containers within this container only checkbox is cleared. |
Configure Audit Settings for the CIFS File Shares Windows Server 2012 and Above
Follow the steps to configure audit settings.
Step 7 – Navigate to the target file share, right-click it and select Properties.
Step 8 – In the <Share_Name> Properties dialog, select the Security tab and click
Advanced.
Step 9 – In the Advanced Security Settings for <Share_Name> dialog, navigate to the
Auditing tab.
Step 10 – Click Add to add a new principal. You can select Everyone (or another user-defined group containing users that are granted special permissions) and click Edit.
Step 11 – In the Auditing Entry for <Folder_Name> dialog, click the Select a principal link
and specify Everyone.
Step 12 – You can specify any other user group, but in this case Netwrix Auditor will send emails with warnings on incorrect audit configuration. The product will audit only user accounts that belong to the selected group.
Step 13 – Apply settings to your Auditing Entries depending on the access types that you want to audit. If you want to audit all access types (successful reads, modification as well as failed read and modification attempts), you need to add separate Auditing Entries for each file share. Otherwise, reports will contain limited data and warning messages. Review the following for additional information:
- Successful reads
- Successful changes
- Failed read attempts
- Failed change attempts
| Auditing Entry | |
| -------------------------------------------------------------------------------------------------------------------------------------------------------------------------------------------------------------------------------------------------------------------------------------------------------------------------------------------------------------------------------------------------------------------------------------------------------------------------------------------------------------------------------------------------------------------------------------------------------------------------------------------------------------------------------------------------------------------- | ---------------- | ------------------------ | -------------------- | ----------------------------- | --- | --- | --- | --- | --- | --- | ---------- | --- | --- | --- | --- | ---------- | --------------------------------- | --------------------------------- | --------------------------------- | --- | ---- | --- | --- | --- | --- | ------- | ------- | ---- | ---- | --- | -------------------- | --- | --- | --- | --- | ------------------------- | -------------------------------------------------------------------------------------------------------------------------------------------------------------------------------------- | ------------------------- | -------------------------------------------------------------------------------------------------------------------------------------------------------------------------------------- | --- | --- |
| Successful reads | |
| The Auditing Entry below shows Advanced Permissions for auditing successful reads only: 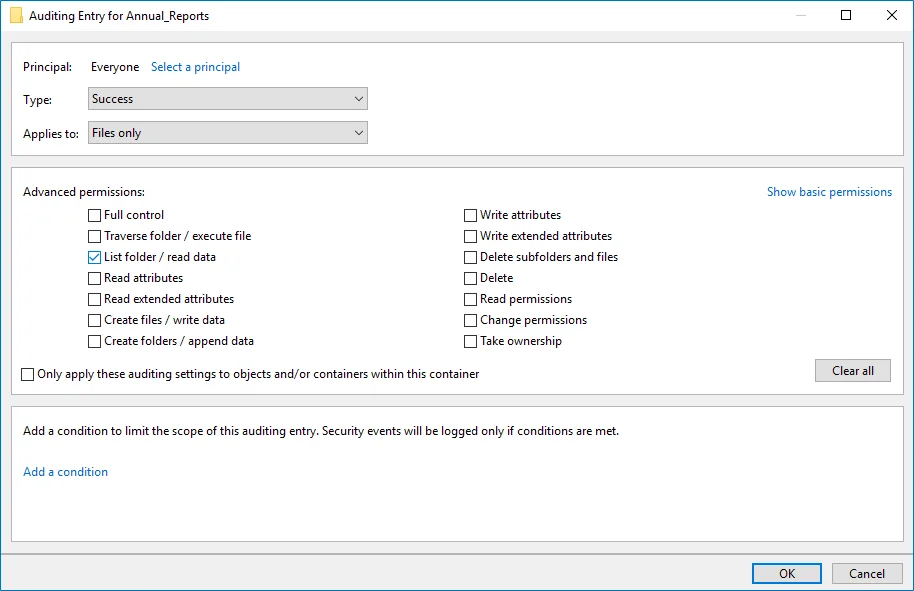 - Type—Set to "Success". - Applies to—Set to "Files only". - Advanced permissions—Select List folder / read data. - Make sure that the Only apply these auditing settings to objects and/or containers within this container checkbox is cleared. | |
| Successful changes | |
| The Auditing Entry below shows Advanced Permissions for auditing successful changes only:
- Type—Set to "Success". - Applies to—Set to "Files only". - Advanced permissions—Select List folder / read data. - Make sure that the Only apply these auditing settings to objects and/or containers within this container checkbox is cleared. | |
| Successful changes | |
| The Auditing Entry below shows Advanced Permissions for auditing successful changes only: 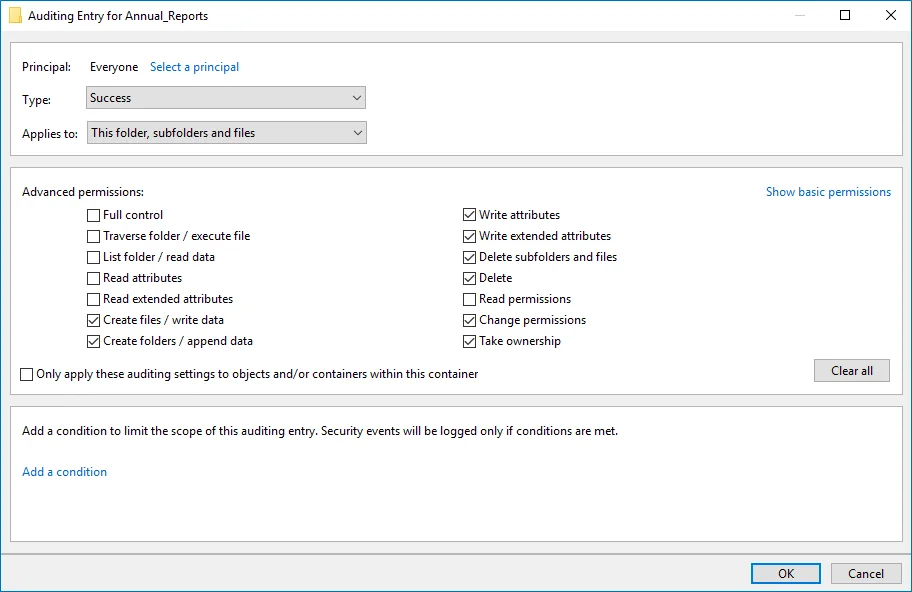 - Type—Set to "Success". - Applies to—Set to "This folder, subfolders and files". - Advanced permissions: - Create files / write data - Create folders / append data - Write attributes - Write extended attributes - Delete subfolders and files - Delete - Change permissions - Take ownership - Make sure that the Only apply these auditing settings to objects and/or containers within this container checkbox is cleared. | |
| Failed read attempts | |
| The Auditing Entry below shows Advanced Permissions for auditing failed read attempts:
- Type—Set to "Success". - Applies to—Set to "This folder, subfolders and files". - Advanced permissions: - Create files / write data - Create folders / append data - Write attributes - Write extended attributes - Delete subfolders and files - Delete - Change permissions - Take ownership - Make sure that the Only apply these auditing settings to objects and/or containers within this container checkbox is cleared. | |
| Failed read attempts | |
| The Auditing Entry below shows Advanced Permissions for auditing failed read attempts: 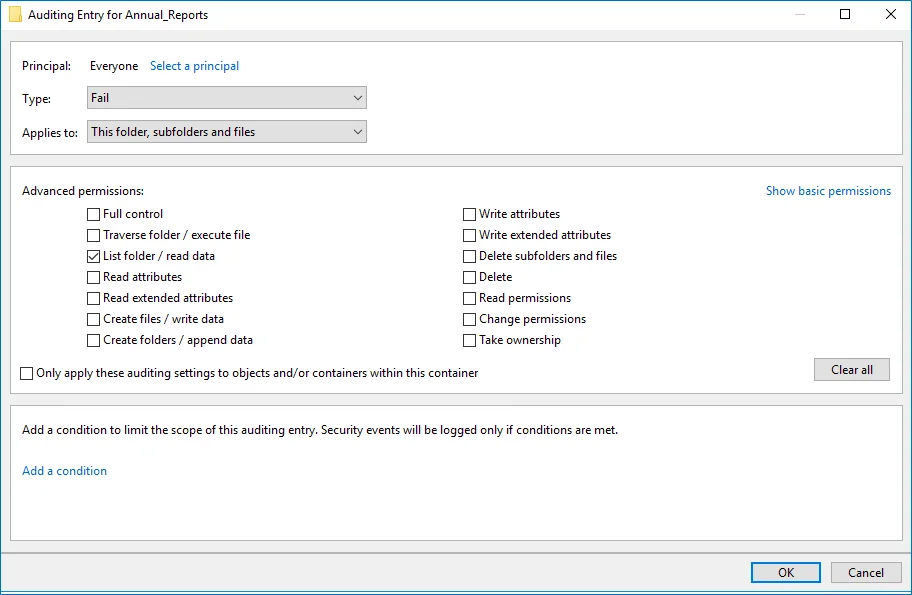 - Type—Set to "Fail". - Applies to—Set to "This folder, subfolders and files". - Advanced permissions—Select List folder / read data. - Make sure that the Only apply these auditing settings to objects and/or containers within this container checkbox is cleared. | |
| Failed change attempts | |
| The Auditing Entry below shows Advanced Permissions for auditing failed change attempts:
- Type—Set to "Fail". - Applies to—Set to "This folder, subfolders and files". - Advanced permissions—Select List folder / read data. - Make sure that the Only apply these auditing settings to objects and/or containers within this container checkbox is cleared. | |
| Failed change attempts | |
| The Auditing Entry below shows Advanced Permissions for auditing failed change attempts:  - Type—Set to "Fail". - Applies to—Set to "This folder, subfolders and files". - Advanced permissions: - Create files / write data - Create folders / append data - Write attributes - Write extended attributes - Delete subfolders and files - Delete - Change permissions - Take ownership - Make sure that the Only apply these auditing settings to objects and/or containers within this container checkbox is cleared. | Successful reads | Successful modifications | Failed read attempts | Failed modifications attempts | | --- | --- | --- | --- | | Applies to | | | | | Files only | This folder, subfolders and files | This folder, subfolders and files | This folder, subfolders and files | | Type | | | | | Success | Success | Fail | Fail | | Advanced permissions | | | | | - List Folder / Read Data | - Create Files / Write Data - Create Folders / Append Data - Write Attributes - Write Extended Attributes - Delete Subfolders and Files - Delete - Change Permissions - Take Ownership | - List Folder / Read Data | - Create Files / Write Data - Create Folders / Append Data - Write Attributes - Write Extended Attributes - Delete Subfolders and Files - Delete - Change Permissions - Take Ownership | | |
Configure Audit Object Access Policy
Netwrixrecommends you to avoid linking a GPO to the top level of the domain due to the potential impact. Instead, create a new organization unit for your file servers within your domain and assign GPO there. For detailed instructions on how to create a new OU, refer to the following Microsoft article: Create a New Organizational Unit.
Follow the steps to configure Audit Object Access Policy:
Step 1 – Open the Group Policy Management console on any domain controller in the target domain: navigate to Start > Windows Administrative Tools**→ Group Policy Management.**
Step 2 – In the left pane, navigate to Forest: <forest_name> → Domains →
<domain_name>, right-click <OU_name> and select Create a GPO in this domain and Link it
here.
Step 3 – Enter the name for the new GPO.
Step 4 – Right-click the newly created GPO and select Edit.
Step 5 – In the Group Policy Management Editor dialog, expand the Computer Configuration node on the left and navigate to Policies → Windows Settings → Security Settings → Local Policies → Audit Policy.
| Policy Subnode | Policy Name | Audit Events |
|---|---|---|
| Audit Policy | Audit object access | "Success" and "Failure" |

Step 6 – To update the group policies, execute the following command:
-
For Dell Unity:
svc_cifssupport
<NAS Server Name>-gpo -updatewhere
<NAS Server Name>is the name of the target Unity\VNX server. -
For Dell VNX:
server_security
<NAS Server Name>-update -policy gpowhere
<NAS Server Name>is the name of the target Unity\VNX server.To update group policies for Dell VNX you must be logged in as the 'nasadmin' user.
You can configure advanced audit policy to narrow the range of events tracked and recorded by the product, thus preventing your AuditArchive and the Security event log from overfilling. See the Configure Security Event Log Maximum Size topic for additional information.
Dell Data Storage
NOTE: Dell VNX, VNXe, Celerra, and Unity NAS devices are collectively referred to as Dell Data Storage.
Netwrix Auditor relies on native logs for collecting audit data. Therefore, successful change and access auditing requires a certain configuration of native audit settings in the audited environment and on the Auditor console computer. Configuring your IT infrastructure may also include enabling certain built-in Windows services, etc. Proper audit configuration is required to ensure audit data integrity, otherwise your change reports may contain warnings, errors or incomplete audit data.
CAUTION: Folder associated with Netwrix Auditor must be excluded from antivirus scanning. See the Antivirus Exclusions for Netwrix Auditor knowledge base article for additional information.
You can configure your IT Infrastructure for monitoring in one of the following ways:
-
Automatically through a monitoring plan – This is a recommended method. If you select to automatically configure audit in the target environment, your current audit settings will be checked on each data collection and adjusted if necessary.
-
Manually – Native audit settings must be adjusted manually to ensure collecting comprehensive and reliable audit data. You can enable Auditor to continually enforce the relevant audit policies or configure them manually:
-
On the Dell Data Storage device:
-
CIFS Network Protocol support is required
-
Security Event Log Maximum Size must be set to 4GB.
-
The Audit object access policy must be set to "Success" and "Failure" in the Group Policy of the OU where the audited Dell VNX/VNXe/Unity/Celerra appliance belongs to.
-
Audit settings must be configured for CIFS File Shares. For a security principal (e.g., Everyone), the following options must be set to "Success" and "Fail" in the Advanced Security > Auditing settings for the audited shared folders:
- List Folder / Read Data (Files only)
- Create Files / Write Data
- Create Folders / Append Data
- Write Attributes
- Write Extended Attributes
- Delete Subfolders and Files
- Delete
- Change Permissions
- Take Ownership
-
-
On the Auditor console computer:
- If your file shares contain symbolic links and you want to collect state-in-time data for these shares, the local-to-local, local-to-remote, remote-to-local, and remote-to-remote symbolic link evaluations must be enabled on the computer that hosts Auditor Server.
-
First, you should decide on the objects and actions you want to track. Consider the following:
- Actions reported by Auditor vary depending on the file server type and the audited object (file, folder, or share).
- Besides, monitoring and reporting of the Dell Data Storage systems may not provide the results you expect — due to native Dell audit peculiarities. See the File Servers topic for additional information.
For example, the change operation (in Auditor terminology) includes creation, modification, and deletion.
Manual Configuration
To collect comprehensive audit data, you must configure your file shares for monitoring. Consider the following:
Step 1 – Configure Security Event Log Maximum Size to avoid overwriting of the security logs; it is recommended to set security log size to a maximum (4GB). Auditor does not clean Dell Unity logs automatically, the log will start overwriting when it goes beyond the limit. See the Unity Family Security Configuration Guide for additional information on how to set logs roll over manually.
Step 2 – By default, the security log is set to overwrite events that are older than 10 days, and its size is set to 512 KB. The default location for the security.evt log is C:\security.evt, which corresponds to the root partition of the Data Mover. To be able to increase the security log size, you must move it from the Data Mover root folder.
Step 3 – Configure Audit Object Access Policy. Set the Audit object access policy to "Success" and "Failure" in the Group Policy of the OU where your Dell VNX/VNXe/Unity/Celerra appliance belongs to. For more information on VNX/VNXe/Unity/Celerra GPO support, refer to documentation provided by Dell.
Step 4 – Configure Audit Settings for CIFS File Shares on Dell Data Storage
Permissions for Dell Data Storage Auditing
Dell VNX, VNXe, Celerra, and Unity NAS devices are collectively referred to as Dell Data Storage.
Before you start creating a monitoring plan to audit your Dell VNX/VNXe/Unity file storage system, plan for the account that will be used for data collection – it should meet the requirements listed below. Then you will provide this account in the monitoring plan wizard.
On the target server:
- The account must be a member of the local Administrators group.
- The account requires Read permissions on the audited shared folders.
Configure Security Event Log Maximum Size
Follow the steps to configure Event Log maximum size:
Step 1 – On your file server, create a new file system where the security log will be stored.
Step 2 – Mount this file system on a mount point, e.g., /events.
Step 3 – Make sure that it is accessible via the \<file_server_name>\C$\events UNC path.
Step 4 – On the computer where Auditor Server is installed, open Registry Editor: navigate to Start → Run and type "regedit".
Step 5 – Navigate to File → Connect Network Registry and specify the file server name.
Step 6 – Navigate to HKEY_LOCAL_MACHINE\SYSTEM\CurrentControlSet\Services\EventLog\Security and set the File value to "C:\events\security.evt".
Step 7 – Set the MaxSize value to "4 000 000 000 (decimal)".
Compliance Mode
You can configure your cluster for monitoring in one of the following ways:
- Using the configure_ifs.sh shell script that comes with Netwrix Auditor. See the Configure Dell Isilon/PowerScale Cluster in Compliance Mode Via Shell Script topic for additional information.
- Manual configuration. See the Configure Dell Isilon/PowerScale Cluster in Compliance Mode Manually topic for additional information.
Configure Dell Isilon/PowerScale Cluster in Compliance Mode Via Shell Script
Follow the steps to configure Dell Isilon/PowerScale cluster in Compliance mode via the shell script:
Step 1 – On the computer where Auditor Server resides, navigate to C:\Program Files (x86)\Netwrix Auditor\File Server Auditing and copy the configure*ifs.sh shell script to */ifs/data_ catalog on your cluster.
Step 2 – Navigate to your cluster command prompt through the SSH connection.
Step 3 – Log in to your cluster as a compadmin user.
Step 4 – Run the shell script by executing the following command:
sh /ifs/data/configure_ifs.sh -z zone1 -a 1
where
zone1 is the name of the audited access zone on your file server.
1 is a combination of the bitwise flags. The table below shows the example combination of 4 flags:
Successful changes | 1 |
Failed change attempts | 2 |
Successful reads | 4 |
Failed read attempts | 8 |
Total: | 15 |
Step 5 – Create a shared folder named netwrix*audit$ on a system zone. This folder points to */ifs_:
isi smb shares create --name=netwrix_audit$ --path=/ifs/ --zone=system --browsable=true
Step 6 – Add the BUILTIN\Administrators group in the share permissions for netwrix*audit$ folder with *"full access"_ rights:
isi smb shares permission create --share=netwrix_audit$ --group="BUILTIN\Administrators" --permission-type=allow --permission=full --zone=system
Step 7 – Grant your data collection account the "read access" rights to the catalog /ifs/.ifsvar/audit :
isi zone modify system --add-user-mapping-rules="Enterprise\Administrator ++ compadmin [group]"
Where Enterprise\Administrator is your account name.
Configure Dell Isilon/PowerScale Cluster in Compliance Mode Manually
Follow the steps to configure Dell Isilon/PowerScale cluster in Compliance mode manually:
Step 1 – Navigate to your cluster command prompt through the SSH connection.
Step 2 – Log in to your cluster as a compadmin user.
Step 3 – Create a shared folder named netwrix*audit$ on a system zone. This folder points to */ifs_:
isi smb shares create --name=netwrix_audit$ --path=/ifs/ --zone=system --browsable=true
Step 4 – Add the BUILTIN\Administrators group in the share permissions for netwrix*audit$ folder with *"full access"_ rights:
isi smb shares permission create --share=netwrix_audit$ --group="BUILTIN\Administrators" --permission-type=allow --permission=full --zone=system
Step 5 – Grant your data collecting account the "read access" rights to the catalog /ifs/.ifsvar/audit :
isi zone modify system --add-user-mapping-rules="Enterprise\Administrator ++ compadmin [group]"
Where Enterprise\Administrator is your account name.
Step 6 – Enable protocol auditing for a selected zone (for example, "zone1"). Do one of the following, depending on your Dell Isilon/PowerScale version:
| EMC Isilon/PowerScale 7.x | EMC Isilon/PowerScale 8.x |
|---|---|
isi audit settings modify --add-audited-zones=zone1 --protocol -auditing-enabled=true | isi audit settings global modify --add-audited-zones=zone1 --protocol -auditing-enabled=true |
Enable filters for auditing protocol operations that succeeded / failed for audited access zones on your cluster.
| EMC Isilon/PowerScale 7.x | EMC Isilon/PowerScale 8.2 and above |
|---|---|
| Successful changes | |
isi zone zones modify zone1 --audit-success =write,delete,set_security,rename | isi audit settings modify --zone=zone1 --audit-success =write,delete,set_security,rename, create |
| Failed change attempts | |
isi zone zones modify zone1 --audit-failure =create,write,delete,set_security,rename | isi audit settings modify --zone=zone1 --audit-failure =create,write,delete,set_security,rename,open |
| Successful reads | |
isi zone zones modify zone1 --audit-success=read | isi audit settings modify -- zone=zone1 --audit-success=read |
| Failed read attempts | |
isi zone zones modify zone1 --audit-failure= create,read | isi audit settings modify --zone=zone1 --audit-failure=create,read, open |
Step 7 – Create the "netwrix_audit" role and add the required privileges to this role. For example:
isi auth roles modify netwrix_audit --add-group="BUILTIN\Administrators"
Normal and Enterprise Modes for Clusters
You can configure your cluster for monitoring in one of the following ways:
- Using the configure_ifs.sh shell script that comes with Netwrix Auditor. See the Configure Dell Isilon/PowerScale Cluster in Normal or Enterprise Mode via Shell Script topic for additional information.
- Manual configuration. See the Configure Dell Isilon/PowerScale Cluster in Normal or Enterprise Mode Manually topic for additional information.
Configure Dell Isilon/PowerScale Cluster in Normal or Enterprise Mode via Shell Script
Follow the steps to configure Dell Isilon/PowerScale cluster in Normal or Enterprise mode using shell script:
Step 1 – On the computer where Auditor Server resides, navigate to C:\Program Files (x86)\Netwrix Auditor\File Server Auditing and copy the configure*ifs.sh shell script to */ifs/data_ catalog on your cluster.
Step 2 – Navigate to your cluster command prompt through the SSH connection.
Step 3 – Log in to your cluster as a root user.
Step 4 – Run the shell script by executing the following command:
sh /ifs/data/configure_ifs.sh -z zone1 -a 1
where
zone1 is the name of the audited access zone on your file server.
1 is a combination of the bitwise flags. The table below shows the example combination of 4 flags:
Successful changes | 1 |
Failed change attempts | 2 |
Successful reads | 4 |
Failed read attempts | 8 |
Total: | 15 |
Configure Dell Isilon/PowerScale Cluster in Normal or Enterprise Mode Manually
Follow the steps to configure Dell Isilon/PowerScale cluster in Normal or Enterprise mode manually:
Step 1 – Navigate to your cluster command prompt through the SSH connection.
Step 2 – Log in to your cluster as a root user.
Step 3 – Grant full access to the catalog /ifs/.ifsvar/audit/ for BUILTIN\Administrators:
chmod -R +a group "BUILTIN\Administrators" allow dir_gen_all,object_inherit,container_inherit, inherited /ifs/.ifsvar/audit/
chmod -a group "BUILTIN\Administrators" allow dir_gen_all,object_inherit,container_inherit, inherited /ifs/.ifsvar/audit/
chmod +a group "BUILTIN\Administrators" allow dir_gen_all,object_inherit,container_inherit /ifs/.ifsvar/audit/
chmod +a user root allow dir_gen_read /ifs/.ifsvar/audit/
Step 4 – Create a shared folder named netwrix*audit$ on a system zone. This folder points to */ifs/.ifsvar/audit/_:
/usr/likewise/bin/lwnet share add "netwrix_audit$"="c:\\ifs\\.ifsvar\\audit\\"
isi smb shares modify netwrix_audit$ --new-zone=system
Starting from Dell Isilon/PowerScale 9.2.0 and above, the lwnet command is considered as
deprecated. When configuring audit manually, you see the following warning:
WARNING: lwnet has been deprecated.
Please use isi smb ... equivalents instead.
See isi smb --help for more information.
This command is required to create a shared folder pointed to /ifs/.ifsvar/audit/. Please ignore the warning.
Step 5 – Add the BUILTIN\Administrators group in the share permissions for the netwrix*audit$ folder with *"full access"_ rights:
isi smb shares permission create --share=netwrix_audit$ --group="BUILTIN\Administrators"
--permission-type=allow --permission=full --zone=system
NOTE: Please verify the correctness of the path to the Isilon audit log files in "Monitoring
Plans -> <MP name> -> <Isilon item name> -> Edit item -> General -> File share UNC path to audit
logs"
It must follow the format:
\\<FQDN, NETBIOS, or IP for Isilon "system" zone>\netwrix_audit$\logs
Step 6 – Enable protocol auditing for a selected zone (for example, "zone1"). Do one of the following, depending on your Dell Isilon/PowerScale storage version:
| Dell Isilon/PowerScale 7.x | Dell Isilon/PowerScale 8.x |
|---|---|
isi audit settings modify --add-audited-zones=zone1 --protocol -auditing-enabled=true | isi audit settings global modify --add-audited-zones=zone1 --protocol -auditing-enabled=true |
Enable filters for auditing protocol operations that succeeded / failed for audited access zones on your cluster.
| Dell Isilon/PowerScale 7.x | Dell Isilon/PowerScale 8.2 and above |
|---|---|
| Successful changes | |
isi zone zones modify zone1 --audit-success =write,delete,set_security,rename | isi audit settings modify --zone=zone1 --audit-success =write,delete,set_security,rename, create |
| Failed change attempts | |
isi zone zones modify zone1 --audit-failure =create,write,delete,set_security,rename | isi audit settings modify --zone=zone1 --audit-failure =create,write,delete,set_security,rename,open |
| Successful reads | |
isi zone zones modify zone1 --audit-success=read | isi audit settings modify --zone=zone1 --audit-success=read |
| Failed read attempts | |
isi zone zones modify zone1 --audit-failure= create,read | isi audit settings modify --zone=zone1 --audit-failure=create,read, open |
Step 7 – Create the "netwrix_audit" role in your access zone (for example, "zone1") and add the required privileges to this role:
isi auth roles create --name=netwrix_audit --zone=zone1
isi auth roles modify netwrix_audit --add-priv-ro="ISI_PRIV_LOGIN_PAPI,ISI_PRIV_AUTH,ISI_PRIV_AUDIT, ISI_PRIV_IFS_BACKUP" --zone=zone1
isi auth roles modify netwrix_audit --add-group="BUILTIN\Administrators" --zone=zone1
Considerations and Recommendations
When preparing to audit your Dell Isilon/PowerScale storage system, consider the following:
-
If you plan to configure audit settings for Dell Isilon/PowerScale storage below the version 8.2 manually (without using theconfigure_ifs.sh script), make sure that auditing of the
success createevents is disabled.For Dell Isilon/PowerScale storage below the version 8.2, the storage system logging will become too verbose, which may lead to data collector overload with excessive events, decrease its performance and result in data collection errors with the "Timeout expired" message issued.
For Dell Isilon/PowerScale storage 8.2 and above, this option for manual audit configuration can be safely enabled.
-
Auditing of the System zone is not supported. As stated by Dell, this zone should be reserved for configuration access only. Current data should be stored in other access zones. See the Isilon OneFS 8.2.1 CLI Administration Guide topic for additional information.
Dell Isilon/PowerScale
Netwrix Auditor relies on native logs for collecting audit data. Therefore, successful change and access auditing requires a certain configuration of native audit settings in the audited environment and on the Auditor console computer. Configuring your IT infrastructure may also include enabling certain built-in Windows services, etc. Proper audit configuration is required to ensure audit data integrity, otherwise your change reports may contain warnings, errors or incomplete audit data.
CAUTION: Folder associated with Netwrix Auditor must be excluded from antivirus scanning. See the Antivirus Exclusions for Netwrix Auditor knowledge base article for additional information.
You can configure your IT Infrastructure for monitoring in one of the following ways:
-
Automatically through a monitoring plan – This is a recommended method. If you select to automatically configure audit in the target environment, your current audit settings will be checked on each data collection and adjusted if necessary.
-
Manually – Native audit settings must be adjusted manually to ensure collecting comprehensive and reliable audit data. You can enable Auditor to continually enforce the relevant audit policies or configure them manually:
-
CIFS Network Protocol support is required.
-
Create a shared directory /ifs/.ifsvar/audit/ on your cluster.
Use SMB (CIFS) protocol for sharing.
-
The following filters for auditing protocol operations that succeeded/failed must be enabled for audited access zones on your cluster:
For Dell Isilon/PowerScale 7x:
- Audit Success: read, write, delete, set_security, rename
- Audit Failure: read, create, write, delete, set_security, rename
For Dell Isilon/PowerScale 8.2 and above:
- Audit Success: read, create, write, delete, set_security, rename
- Audit Failure: read, create, write, open, delete, set_security, rename
-
To configure your Dell Isilon/PowerScale appliance for monitoring perform the following procedures:
If your file shares contain symbolic links and you want to collect state-in-time data for these shares, the local-to-local, local-to-remote, remote-to-local, and remote-to-remote symbolic link evaluations must be enabled on the computer that hosts AuditorServer.
The following table lists actions that can be performed on Dell Isilon/PowerScale:
| File | Folder | Share | |
|---|---|---|---|
| Added | + | + | + |
| Add (failed attempt) | +* | +* | – |
| Modified | + | + | + |
| Modify (failed attempt) | + | + | – |
| Moved | +* | +* | – |
| Move (failed attempt) | +* | +* | – |
| Read | + | – | – |
| Read (failed attempt) | + | +* | – |
| Renamed | +* | +* | – |
| Renamed (failed attempt) | +* | +* | – |
| Removed | + | + | + |
| Remove (failed attempt) | +* | +* | – |
| Copied | – | – | – |
NOTE: For Dell Isilon/PowerScale storage, auditing of System zone is not supported. As stated by Dell, this zone should be reserved for configuration access only. Current data should be stored in other access zones. See the Dell Upsilon CLI Administration Guide for additional information.
Actions marked with an asterisk (*) are reported for Dell Isilon/PowerScale only. Consider that monitoring and reporting of other Dell Data Storage systems may not provide the results you expect due to native Dell audit peculiarities.
Permissions for Dell Isilon/PowerScale Auditing
Before you start creating a monitoring plan to audit your Dell Isilon/PowerScale file storage system, plan for the account that will be used for data collection. See the Configuring Your Dell Isilon/PowerScale Cluster for Auditing section for additional information. The following scenarios are possible:
- Automatic configuration: you can use a special shell script for configuring an audited Dell Isilon/PowerScale cluster and granting necessary privileges to the account used to collect audit data. See the following topics for additional information:
- Manual configuration: you can grant all the necessary permissions to data collecting account manually. See the following topics for additional information:
For manual configuration, ensure the account meets the requirements listed below.
On the target server:
Step 1 – The account must be a member of the local Administrators group.
Step 2 – The account requires Read permissions on the audited shared folders.
Step 3 – The account requires Read permissions on the folder where audit events are logged (/ifs/.ifsvar/audit/)
Step 4 – To connect to Dell Isilon/PowerScale storage cluster, an account must be assigned a custom role (e.g., netwrix_audit) that has the following privileges:
| Platform API (ISI_PRIV_LOGIN_PAPI) | readonly |
| Auth (ISI_PRIV_AUTH) | readonly |
| Audit (ISI_PRIV_AUDIT) | readonly |
| Backup (ISI_PRIV_IFS_BACKUP) | readonly |
NOTE: If you plan to connect to a cluster that works in the compliance mode, the account must meet additional requirements.
Configuring Your Dell Isilon/PowerScale Cluster for Auditing
A Dell Isilon/PowerScale cluster can operate in one of the following modes:
- Standard or Normal mode
- Smartlock Enterprise mode
- Smartlock Compliance mode
For your convenience, Netwrix provides a special shell script for configuring an audited Dell Isilon/PowerScale cluster and granting necessary privileges to the account that is used to collect audit data.
To grant the necessary permissions to Isilon/PowerScale data collecting account manually, you need to perform all steps for manual audit configuration, otherwise the product will not function properly.
See the Normal and Enterprise Modes for Clusters topic for additional information.