Configure Advanced Audit Policies
Configuring advanced audit will help you limit the range of events tracked and recorded by the product, thus preventing your AuditArchive and the Security event log from overfilling. Perform procedures below instead of the Configure Local Audit Policies.
Configure Security Options
Using both basic and advanced audit policies settings may lead to incorrect audit reporting. To force basic audit policies to be ignored and prevent conflicts, enable the Audit: Force audit policy subcategory settings to override audit policy category settings option.
Follow the steps to configure security options.
Step 1 – On the audited server, open the Local Security Policy snap-in and navigate to Start > Windows Administrative Tools > Local Security Policy.
Step 2 – Navigate to Security Settings > Local Policies > Security Options and locate the Audit: Force audit policy subcategory settings policy.
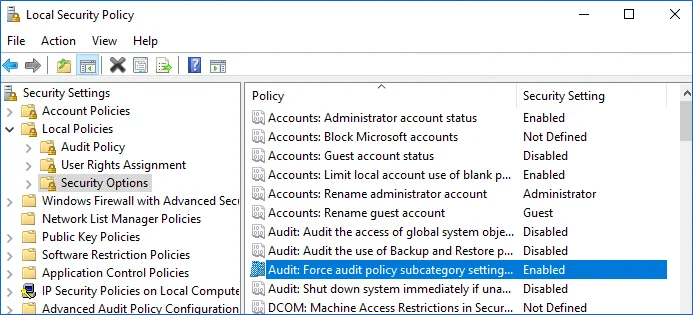
Step 3 – Double-click the policy and enable it.
Configure Advanced Audit Policy on Windows Server 2016 and Above
In Windows Server 2016 audit policies are not integrated with the Group Policies and can only be deployed using logon scripts generated with the native Windows auditpol.exe command line tool. Therefore, these settings are not permanent and will be lost after server reboot.
The procedure below explains how to configure Advanced audit policy for a single server. If you audit multiple servers, you may want to create logon scripts and distribute them to all target machines via Group Policy. Refer to the Create System Startup / Shutdown and User Logon / Logoff Scripts Microsoft article for more information.
Step 1 – On an audited server, navigate to Start > Run and type "cmd".
Step 2 – Disable the Object Access, Account Management, and Policy Change categories by executing the following command in the command line interface:
auditpol /set /category:"Object Access" /success:disable /failure:disable
auditpol /set /category:"Account Management" /success:disable /failure:disable
auditpol /set /category:"Policy Change" /success:disable /failure:disable
Step 3 – Enable the following audit subcategories:
| Audit subcategory | Command |
|---|---|
| Handle Manipulation | auditpol /set /subcategory:"Handle Manipulation" /success:enable /failure:enable |
| File System | auditpol /set /subcategory:"File System" /success:enable /failure:enable |
| File Share | auditpol /set /subcategory:"File Share" /success:enable /failure:disable |
| Audit Policy Change | auditpol /set /subcategory:"Audit Policy Change" /success:enable /failure:disable |
| Security State Change | auditpol /set /subcategory:"Security State Change" /success:enable |
| Logon | auditpol /set /subcategory:"Logon" /success:enable |
| Logoff | auditpol /set /subcategory:"Logoff" /success:enable |
It is recommended to disable all other subcategories unless you need them for other purposes. You can check your current effective settings by executing the following commands:
auditpol /set /category:"Object Access"
auditpol /set /category:"Account Management"
auditpol /set /category:"Policy Change"
Configure Advanced Audit Policy on Windows Server 2016 and Above
In Windows Server 2016 and above, Advanced audit policies are integrated with Group Policies, so they can be applied via Group Policy Object or Local Security Policies. The procedure below describes how to apply Advanced policies via Local Security Policy console.
Step 1 – On the audited server, open the Local Security Policy snap-in and navigate to Start > Windows Administrative Tools > Local Security Policy.
Step 2 – In the left pane, navigate to Security Settings > Advanced Audit Policy Configuration > System Audit Policies.
Step 3 – Configure the following audit policies.
| Policy Subnode | Policy Name | Audit Events |
|---|---|---|
| Object Access | - Audit File System - Audit Handle Manipulation | "Success" and/or "Failure" depending on the type of events you want to track. |
| - Audit Detailed File Share | "Failure" | |
| - Audit File Share | "Success" | |
| Policy Change | - Audit Policy Change | "Success" |
| Logon/Logoff | - Logon | "Success" |
| - Logoff | "Success" | |
| System | - Security State Change | "Success" |
Configure the Back up Files and Directories Policy
Configure this Back up Files and Directories policy via the Local Security Policy Snap-in or using the Group Policy Management Console.
Follow the steps to configure the Back up Files and Directories policy via the Local Security Policy Snap-in.
Step 1 – On any domain controller in the target domain, open the Local Security Policy snap-in: navigate to Start > Windows Administrative Tools > Local Security Policy.
Step 2 – Navigate to Security Settings > Local Policies > User right Assignment.
Step 3 – Locate the Back up files and directories policy and double-click it.
Step 4 – In the Back up files and directories Properties dialog, click Add User or Group, specify the user that you want to define this policy for.
The policy is now configured.
Follow the steps to configure the Back up Files and Directories policy using the Group Policy Management Console.
NOTE: Perform this procedure only if the account selected for data collection is not a member of the Domain Admins group.
Step 1 – Open the Group Policy Management console on any domain controller in the target domain: navigate to Start > Windows Administrative Tools (Windows Server 2016/2019) or Administrative Tools (Windows 2012 R2 and below) > Group Policy Management.
Step 2 – In the left pane, navigate to Forest: <forest name> > Domains > <domain name> >
Domain Controllers. Right-click the effective domain controllers policy (by default, it is the
Default Domain Controllers Policy), and select Edit.
Step 3 – In the Group Policy Management Editor dialog, expand the Computer Configuration node on the left and navigate to Policies > Windows Settings > Security Settings > Local Policies.
Step 4 – On the right, double-click the User Rights Assignment policy.
Step 5 – Locate the Back up files and directories policy and double-click it.
Step 6 – In the Back up files and directories Properties dialog, click Add User or Group and specify the user that you want to define this policy for.
Step 7 – Navigate to Start > Run and type cmd. Input the gpupdate /force command and press
Enter. The group policy will be updated.
Step 8 – Type repadmin /syncall command and press Enter for replicate GPO changes to other
domain controllers.
Step 9 – Ensure that new GPO settings applied on any audited domain controller.
The policy is now configured.
Configure Event Log Size and Retention Settings
The procedure below describes one of the possible ways to adjust event log settings. If you have multiple target computers, you need to perform this procedure on each of them.
If you move security log files from the default system folder to a non-default one, you must reboot your target server for the reports and search functionality to work properly.
Follow the steps to configure Event Log Size and Retention Settings.
Step 1 – On a target server, navigate to Start > Windows Administrative Tools > Event Viewer.
Step 2 – Navigate to Event Viewer tree > Windows Logs, right-click Security and select Properties.
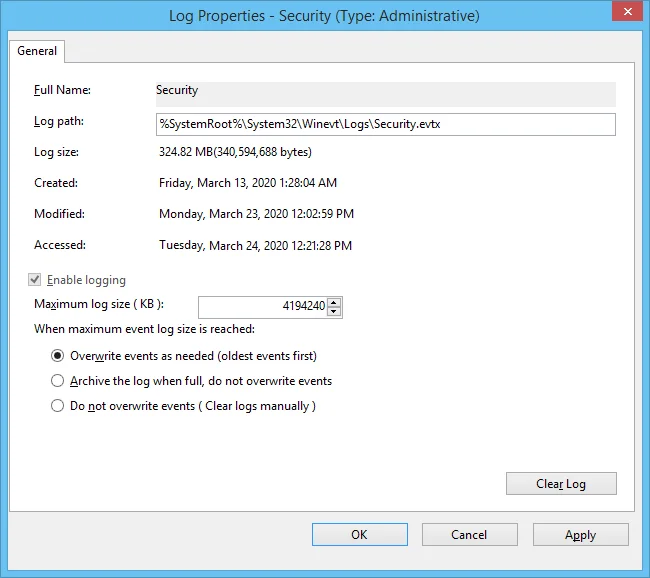
Step 3 – Make sure Enable logging is selected.
Step 4 – In the Maximum log size field specify the size you need.
Step 5 – Make sure Do not overwrite events (Clear logs manually) is cleared. If selected, change the retention method to Overwrite events as needed (oldest events first).
Make sure that the Maximum security log size group policy does not overwrite your log settings. To check this, start the Group Policy Management console, proceed to the GPO that affects your server, and navigate to Computer Configuration > Policies > Windows Settings > Security Settings > Event Log.
Configure Local Audit Policies
You can choose whether to configure legacy policies as described below or to configure advanced policies. See the Configure Advanced Audit Policies topic for more information.
Follow the steps to configure local audit policies.
Step 1 – On the audited server, open the Local Security Policy snap-in: navigate to Start > Windows Administrative Tools**>**Local Security Policy.
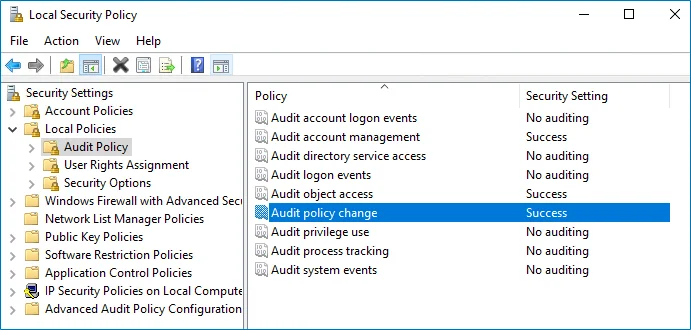
Step 2 – Navigate to Security Settings > Local Policies > Audit Policy.
| Policy Name | Audit Events |
|---|---|
| Audit account management | "Success" |
| Audit object access | "Success" |
| Audit policy change | "Success" |
Local audit policy is configured and can be changed in the same location:
Configure Object-Level Access Auditing
Netwrix Auditor can be configured to audit all access types, review the table below and select options that you want to track:
| Option | Description | |
|---|---|---|
| Changes | Successful | Use this option to track changes to your data. Helps find out who made changes to your files, including their creation and deletion. |
| Failed | Use this option to detect suspicious activity on your file server. Helps identify potential intruders who tried to modify or delete files, etc., but failed to do it. | |
| Read access | Successful | Use this option to supervise access to files containing confidential data intended for privileged users. Helps identify who accessed important files besides your trusted users. Enabling this option on public shares will result in high number of events generated on your file server and the amount of data written to the AuditArchive. |
| Failed | Use this option to track suspicious activity. Helps find out who was trying to access your private data without proper justification. Enabling this option on public shares will result in high number of events generated on your file server and the amount of data written to the AuditArchive. |
Actions reported by Netwrix Auditor vary depending on the file server type and the audited object (file, folder, or share). The changes include creation, modification, deletion, moving, renaming, and copying. To track the copy action, enable successful read access and change auditing. See the File Servers topic for additional information.
Perform one of the following procedures depending on the OS version you are using:
- Configure Object-level Access Auditing on Windows Server 2012 and Above
- Configure Object-level access auditing on pre-Windows Server 2012 versions
Configure Object-level Access Auditing on Windows Server 2012 and Above
Follow the steps to configure Object-level access auditing on Windows Server 2012 and above.
Step 1 – Navigate to the target file share, right-click it and select Properties.
Step 2 – In the <Share_Name> Properties dialog, select the Security tab and click
Advanced.
Step 3 – In the Advanced Security Settings for <Share_Name> dialog, navigate to the
Auditing tab.
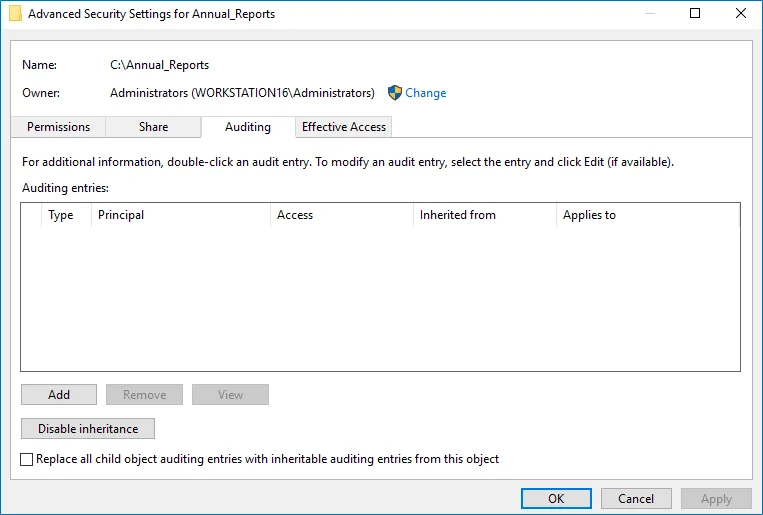
Step 4 – Click Add to add a new principal. You can select Everyone (or another user-defined group containing users that are granted special permissions) and click Edit.
Step 5 – In the Auditing Entry for <Folder_Name> dialog, click the Select a principal link and
specify Everyone.
NOTE: You can specify any other user group, but in this case the emails will be sent with warnings on incorrect audit configuration. The product will audit only user accounts that belong to the selected group.
Step 6 – Apply settings to your Auditing Entries depending on the access types that you want to audit. If you want to audit all access types (successful reads, modification as well as failed read and modification attempts), you need to add separate Auditing Entries for each file share. Otherwise, reports will contain limited data and warning messages.
Review the following for additional information:
| Auditing Entry | |
|---|---|
| Successful reads | |
The Auditing Entry below shows Advanced Permissions for auditing successful reads only: 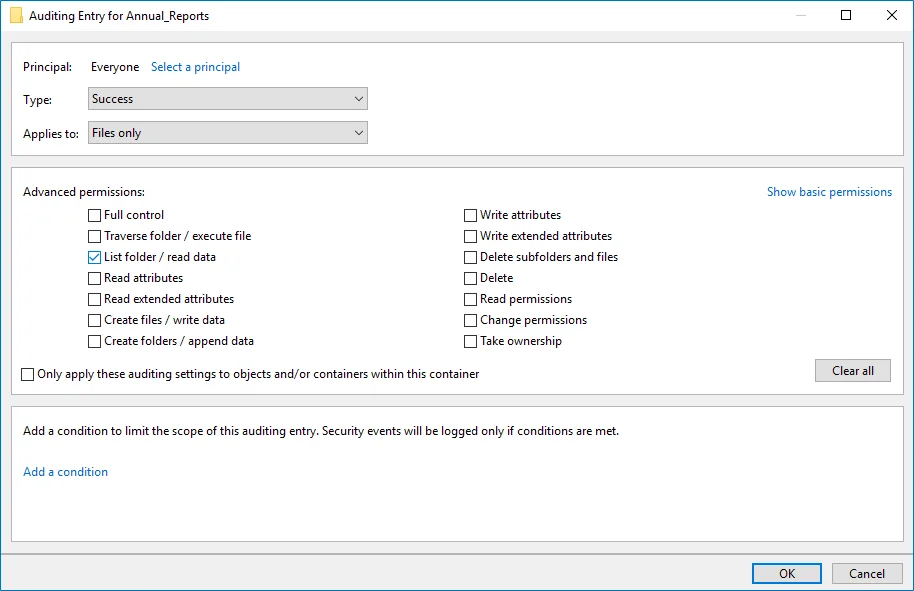 - Type—Set to "Success". - Applies to—Set to "Files only". - Advanced permissions—Select List folder / read data. - Make sure that the Only apply these auditing settings to objects and/or containers within this container checkbox is cleared. - Type—Set to "Success". - Applies to—Set to "Files only". - Advanced permissions—Select List folder / read data. - Make sure that the Only apply these auditing settings to objects and/or containers within this container checkbox is cleared. | |
| Successful changes | |
The Auditing Entry below shows Advanced Permissions for auditing successful changes only: 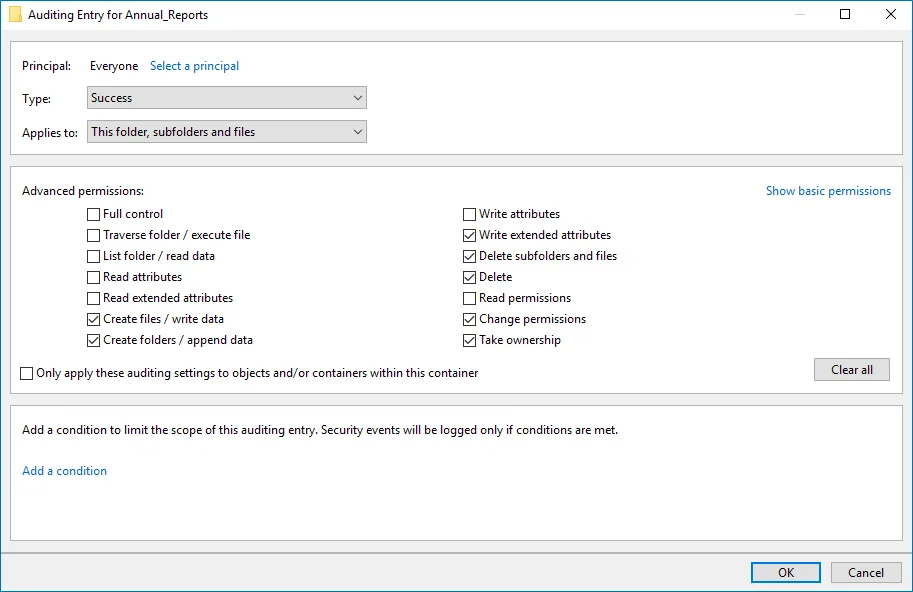 - Type—Set to "Success". - Applies to—Set to "This folder, subfolders and files". - Advanced permissions: - Create files / write data - Create folders / append data - Write extended attributes - Delete subfolders and files - Delete - Change permissions - Take ownership - Make sure that the Only apply these auditing settings to objects and/or containers within this container checkbox is cleared. - Type—Set to "Success". - Applies to—Set to "This folder, subfolders and files". - Advanced permissions: - Create files / write data - Create folders / append data - Write extended attributes - Delete subfolders and files - Delete - Change permissions - Take ownership - Make sure that the Only apply these auditing settings to objects and/or containers within this container checkbox is cleared. | |
| Failed read attempts | |
The Auditing Entry below shows Advanced Permissions for auditing failed read attempts:  - Type—Set to "Fail". - Applies to—Set to "This folder, subfolders and files". - Advanced permissions—Select List folder / read data. - Make sure that the Only apply these auditing settings to objects and/or containers within this container checkbox is cleared. - Type—Set to "Fail". - Applies to—Set to "This folder, subfolders and files". - Advanced permissions—Select List folder / read data. - Make sure that the Only apply these auditing settings to objects and/or containers within this container checkbox is cleared. | |
| Failed change attempts | |
The Auditing Entry below shows Advanced Permissions for auditing failed change attempts:  - Type—Set to "Fail". - Applies to—Set to "This folder, subfolders and files". - Advanced permissions: - Create files / write data - Create folders / append data - Write extended attributes - Delete subfolders and files - Delete - Change permissions - Take ownership - Make sure that the Only apply these auditing settings to objects and/or containers within this container checkbox is cleared. - Type—Set to "Fail". - Applies to—Set to "This folder, subfolders and files". - Advanced permissions: - Create files / write data - Create folders / append data - Write extended attributes - Delete subfolders and files - Delete - Change permissions - Take ownership - Make sure that the Only apply these auditing settings to objects and/or containers within this container checkbox is cleared. |
Configure Object-level access auditing on pre-Windows Server 2012 versions
Step 1 – Navigate to the target file share, right-click it and select Properties.
Step 2 – In the <Share_Name> Properties dialog, select the Security tab and click
Advanced.
Step 3 – In the Advanced Security Settings for <Share_Name> dialog, navigate to the
Auditing tab, click Edit.
Step 4 – In a separate Advanced Security Settings for <Share_Name> dialog, click Add to
add a principal. You can select Everyone (or another user-defined group containing users that
are granted special permissions) and click Edit.
Step 5 – You can specify any other user group, but in this case Netwrix Auditor will send emails with errors on incorrect audit configuration. This will not affect the reports or data searches performed in the Auditor client and the product will only audit user accounts that belong to the selected group.
Step 6 – Apply settings to your Auditing Entries depending on the access types that you want to audit. If you want to audit all access types (successful reads and changes as well as failed read and change attempts), you need to add separate Auditing Entries for each file share. Otherwise, reports will contain limited data and warning messages. Review the following for additional information:
- Successful reads
- Successful changes
- Failed read attempts
- Failed change attempts
| Auditing Entry |
|---|
| Successful reads |
| The Auditing Entry below shows Advanced Permissions for auditing successful reads only: - Apply onto—Select "Files only". - Check "Successful" and "Failed" next to List folder / read data. - Make sure that the Apply these auditing entries to objects and/or containers within this container only checkbox is cleared. |
| Successful changes |
| The Auditing Entry below shows Advanced Permissions for auditing successful changes only: - Apply onto—Select "This folder, subfolders and files". - Check "Successful" next to the following permissions: - Create files / write data - Create folders / append data - Write extended attributes - Delete subfolders and files - Delete - Change permissions - Take ownership - Make sure that the Apply these auditing entries to objects and/or containers within this container only checkbox is cleared. |
| Failed read attempts |
| The Auditing Entry below shows Advanced Permissions for auditing failed read attempts only: - Apply onto—Select "This folder, subfolders and files". - Check "Failed" next to List folder / read data. - Make sure that the Apply these auditing entries to objects and/or containers within this container only checkbox is cleared. |
| Failed change attempts |
| The Auditing Entry below shows Advanced Permissions for auditing failed change attempts only: - Apply onto—Select "This folder, subfolders and files". - Check "Failed" next to the following permissions: - Create files / write data - Create folders / append data - Write extended attributes - Delete subfolders and files - Delete - Change permissions - Take ownership - Make sure that the Apply these auditing entries to objects and/or containers within this container only checkbox is cleared. |
Windows File Servers
Netwrix Auditor relies on native logs for collecting audit data. Therefore, successful change and access auditing requires a certain configuration of native audit settings in the audited environment and on the Auditor console computer. Configuring your IT infrastructure may also include enabling certain built-in Windows services, etc. Proper audit configuration is required to ensure audit data integrity, otherwise your change reports may contain warnings, errors or incomplete audit data.
CAUTION: Folder associated with Netwrix Auditor must be excluded from antivirus scanning. See the Antivirus Exclusions for Netwrix Auditor knowledge base article for additional information.
Configuration Overview
You can configure your IT Infrastructure for monitoring in one of the following ways:
-
Automatically through a monitoring plan – This is a recommended method. If you select to automatically configure audit in the target environment, your current audit settings will be checked on each data collection and adjusted if necessary.
-
Manually – Native audit settings must be adjusted manually to ensure collecting comprehensive and reliable audit data. You can enable Auditor to continually enforce the relevant audit policies or configure them manually:
-
On the Windows file server:
-
For a security principal (e.g., Everyone), the following options must be configured in the Advanced Security > Auditing settings for the audited shared folders:
Advanced Security Option Setting List Folder / Read Data (Files only) "Success" and "Fail" List Folder / Read Data (This folder, subfolders and files) "Fail" Create Files / Write Data* "Success" and "Fail" Create Folders / Append Data* "Success" and "Fail" Write Extended Attributes* "Success" and "Fail" Delete Subfolders and Files* "Success" and "Fail" Delete* "Success" and "Fail" Change Permissions* "Success" and "Fail" Take Ownership* "Success" and "Fail" * Select "Fail" only if you want to track failure events, it is not required for success events monitoring.
NOTE: If you want to get only state-in-time snapshots of your system configuration, limit your settings to the permissions marked with * and set it to "Success" (Apply onto: This folder, subfolders and files).
-
The following Advanced audit policy settings must be configured:
-
The Audit: Force audit policy subcategory settings (Windows 7 or later) security option must be enabled.
-
Depending on your OS version, configure the categories as follows:
Windows Operating System Advanced Audit Policy Setting Windows Server 2008 R2 / Windows 7 and above Object Access > Audit File Share "Success" Windows Server 2008 R2 / Windows 7 and above Object Access > Audit File System "Success" and "Failure" Windows Server 2008 R2 / Windows 7 and above Object Access > Audit Handle Manipulation "Success" and "Failure" Windows Server 2008 R2 / Windows 7 and above Object Access > Audit Detailed file share "Failure" Windows Server 2008 R2 / Windows 7 and above Logon/Logoff > Logon "Success" Windows Server 2008 R2 / Windows 7 and above Logon/Logoff > Logoff "Success" Windows Server 2008 R2 / Windows 7 and above Policy Change > Audit Audit Policy Change "Success" Windows Server 2008 R2 / Windows 7 and above System > Security State Change "Success" Windows Server 2008 Object Access > Audit File Share "Success" Windows Server 2008 Object Access > Audit File System "Success" and "Failure" Windows Server 2008 Object Access > Audit Handle Manipulation "Success" and "Failure" Windows Server 2008 Logon/Logoff > Logon "Success" Windows Server 2008 Logon/Logoff > Logoff "Success" Windows Server 2008 Policy Change > Audit Audit Policy Change "Success" Windows Server 2008 System > Security State Change "Success" NOTE: If you want to get only state-in-time snapshots of your system configuration, limit your audit settings to the following policies:
Advanced Audit Policy Setting Object Access > Audit File Share "Success" Object Access > Audit Handle Manipulation "Success" Policy Change > Audit Audit Policy Change "Success"
-
-
The following legacy policies can be configured instead of advanced:
- Audit object access policy must set to "Success" and "Failure."
- Audit logon events policy must be set to "Success."
- Audit system events policy must be set to "Success."
- Audit policy change must be set to "Success."
-
The Security event log maximum size must be set to 4GB. The retention method of the Security event log must be set to “Overwrite events as needed”.
-
The Remote Registry service must be started.
-
The following inbound Firewall rules must be enabled:
-
Remote Event Log Management (NP-In)*
-
Remote Event Log Management (RPC)*
-
Remote Event Log Management (RPC-EPMAP)*
-
Windows Management Instrumentation (ASync-In)
-
Windows Management Instrumentation (DCOM-In)
-
Windows Management Instrumentation (WMI-In)
-
Network Discovery (NB-Name-In)
-
File and Printer Sharing (NB-Name-In)
-
File and Printer Sharing (Echo Request - ICMPv4-In)
-
File and Printer Sharing (Echo Request - ICMPv6-In)
NOTE: The rules marked with * are required only if you do not want to use network traffic compression for auditing.
-
If you plan to audit Windows Server 2019 or Windows 10 Update 1803 without network compression service, make sure the following inbound connection rules are enabled:
- Remote Scheduled Tasks Management (RPC)
- Remote Scheduled Tasks Management (RPC-EMAP)
-
-
-
On the Auditor console computer:
- If your file shares contain symbolic links and you want to collect state-in-time data for these shares, the local-to-local, local-to-remote, remote-to-local, and remote-to-remote symbolic link evaluations must be enabled on the computer that hosts Auditor Server.
-
Consider the following:
- To collect data from 32-bit operating systems, network traffic compression must be disabled.
- To collect data from Windows Failover Cluster, network traffic compression must be enabled.
- Scale-Out File Server (SOFS) cluster is not supported.
- Auditing of files and folders placed directly into the DFS namespace root is not supported, as such configuration is not recommended by Microsoft. (See the Microsoft Placing files directly in the namespace share article for additional information.) Make sure the UNC path of a shared folder is placed within a share targeted by a DFS folder.
Configuration Steps
Follow the steps to configure Windows File Servers for auditing:
Step 1 – Check requirements. Make sure the Windows File Servers you want to monitor meet the requirements.
Step 2 – Decide on audit data to collect.
- Review the list of objects and attributes that can be monitored by Auditor: See the File Serverstopic for additional information.
- Plan for the file servers and shares you want to audit:
-
- If you have multiple file shares frequently accessed by a significant number of users, it is reasonable to audit object changes only. Tracking all events may result in too much data written to the audit logs, whereas only some part of it may be of any interest.
- Audit flags must be set on every file share you want to audit.
- If your file shares are stored within one folder (or disk drive), you can configure audit settings for this folder only. As a result, you will receive reports on all required access types applied to all file shares within this folder. It is not recommended to configure audit settings for system disks.
- By default, Auditor will monitor all shares stored in the specified location, except for hidden shares (both default and user-defined). If you want to monitor user-defined hidden shares, select the related option in the monitored item settings.
- Administrative hidden shares like default system root or Windows directory (ADMIN$), default drive shares (D$, E$), etc. will not be monitored.
Step 3 – Review considerations and limitations:
The following considerations and limitations refer to data collection:
- To collect data from 32-bit operating systems, network traffic compression must be disabled.
- To collect data from Windows Failover Cluster, network traffic compression must be enabled.
- Scale-Out File Server (SOFS) cluster is not supported.
- Several constraints apply to DFS auditing. See the DFS-Related Constraints topic for additional information.
The following considerations and limitations refer to reporting:
- For Windows File Servers running Windows Server 2008, changes to the file shares will be reported without exact initiator's account in the who field— instead, system is reported.
- If a file server is running Windows Server 2008 SP2, Auditor may be unable to retrieve workstation name for the failed read attempts.
- In the reports and search results, in some cases, Auditor displays not the actual time when the event occurred but data collection time.
- Auditor may report on several unexpected changes with who (initiator's account) reported as system due to the native Windows File Servers audit peculiarities. If you do not want to see these changes, exclude them from the audit. See the File Servers topic for additional information. For example - mass file removals, when target Windows server generates too many events at a time and the product is unable to parse their sequences correctly.
- Due to Windows limitations, the copy/rename/move actions on remote file shares may be reported as two sequential actions: copying – as adding a new file and reading the initial file; renaming/moving – as removing the initial file and adding a new file with the same name.
- To report on copy actions on remote file shares, make sure that audit of successful read operations is enabled. See the Configure Object-Level Access Auditing topic for additional information.
Step 4 – Apply required audit settings.
Depending on your auditing requirements, you may need to audit your file server objects for:
- Successful read attempts
- Successful modifications
- Failed read and modification attempts
- Failed modification attempts
For that, object-level audit settings and appropriate audit policies should be set up. Besides, the following should be configured for your Windows file servers:
- Windows Event log size and retention settings
- Remote registry service
- Inbound connection rules for Windows firewall
You can apply required audit settings to your Windows file servers in one of the following ways:
-
Automatically when creating a monitoring plan.
In this case, the audit settings will be applied automatically, then they will be periodically checked and adjusted if necessary. See the Create a New Monitoring Plan topic for additional information.
-
Manually. To configure your Windows File Servers for monitoring manually, perform the following procedures:
With automatically applied settings, initial SACL configuration for DFS replication links may take longer than with manual configuration — however, automatic configuration will help to minimize the impact on the DFS backlog and replication process in general.
Step 5 – Configure Data Collecting Account. See the Data Collecting Account topic for additional information.
Step 6 – Configure required protocols and ports. Set up protocols and ports. See the Dell Data Storage Ports topic for additional information.
DFS-Related Constraints
Perform the following steps if planning to audit DFS files and folders:
Step 1 – Auditor supports auditing of DFS and clustered file servers if Object Access Auditing is enabled on DFS file shares or on every cluster node.
Step 2 – When adding a cluster file server for auditing, it is recommended to specify a server name of the Role server or a UNC path of the shared folder located on the Role server.
Step 3 – When adding a DFS file share for auditing, specify a Windows file share item and provide the UNC path of the whole namespace or UNC path of the DFS link (folder). For example:
- "\domain\dfsnamespace" (domain-based namespace)
- "\server\dfsnamespace" (in case of stand-alone namespace);
Auditing of files and folders placed directly into the DFS namespace root is not supported, as such configuration is not recommended by Microsoft. See the Placing files directly in the namespace share section of the Microsoft article for additional information. Make sure the UNC path of a shared folder is placed within a share targeted by a DFS folder.
For recommendations on configuring DFS replication, refer to the following Netwrix knowledge base article: Why did loss of performance occur when configuring audit settings for Windows File Servers?. Remember that replication of namespace roots is not supported.
File Servers and Antivirus
It is strongly recommended that you add the following executables to the list of exclusions for your antivirus:
- C:\Windows\SysWOW64\NwxExeSvc\NwxExeSvc.exe
- C:\Windows\SysWOW64\NwxExeSvc\NwxEventCollectorAgent.exe
- C:\Windows\SysWOW64\NwxExeSvc\NwxFsAgent.exe
- C:\Windows\SysWOW64\NwxExeSvc\NwxSaclTunerAgent.exe
Otherwise, significant delays and performance issues may occur while collecting data.
This happens because these executables access a large number of file server objects (files, folders), fetching audit data — and your antivirus may treat this as a suspicious behavior.
For some antiviruses (for example, Trend Micro) you may need to specify the folders to exclude, that is, C:\Windows\SysWOW64\NwxExeSvc. Refer to your antivirus documentation for details.
Monitored Objects
The following table lists the actions that can be performed with Windows-Based File Shares:
| File | Folder | Share | |
|---|---|---|---|
| Added | + | + | + |
| Add (failed attempt) | + | + | – |
| Modified | + | + | + |
| Modify (failed attempt) | + | + | + |
| Moved | + | + | – |
| Move (failed attempt) | – | – | – |
| Read | + | – | – |
| Read (failed attempt) | + | + | + |
| Renamed | + | + | – |
| Renamed (failed attempt) | – | – | – |
| Removed | + | + | + |
| Remove (failed attempt) | + | + | – |
| Copied | + | – | – |
Permissions for Windows File Server Auditing
Before creating a monitoring plan to audit your Windows file servers, plan for the account that will be used for data collection . This account should meet the requirements listed below. You will provide this account in the monitoring plan wizard or monitored item settings.
Data Collection Accounts should meet the following policies and permissions:
- Data collecting account on the target server must be a member of the local Administrators group.
- The Manage auditing and security log and Backup files and directories policies must be defined for this account. See the Permissions for Active Directory Auditing and topics for additional more information.
- The Read share permission on the audited shared folders.
- The Read NTFS permission on all objects in the audited folders.
Starting with version 9.96, you can use group Managed Service Accounts (gMSA) as data collecting accounts.
NOTE: On the Netwrix Auditor Server, the gMSA account must be a member of the local Administrators group.
For more information on gMSA, see the following:
-
Microsoft article: Group Managed Service Accounts Overview
Enable Remote Registry Service
Follow the steps to enable the Remote Registry service.
Step 1 – Navigate to Start > Windows Administrative Tools > Services.
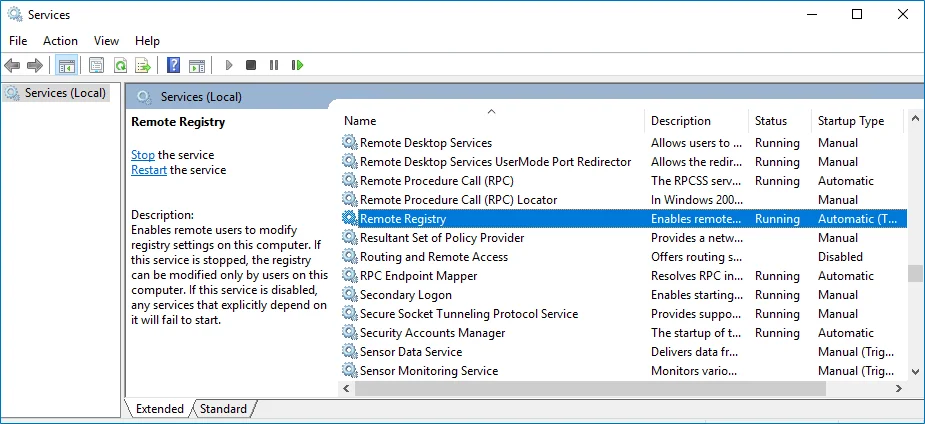
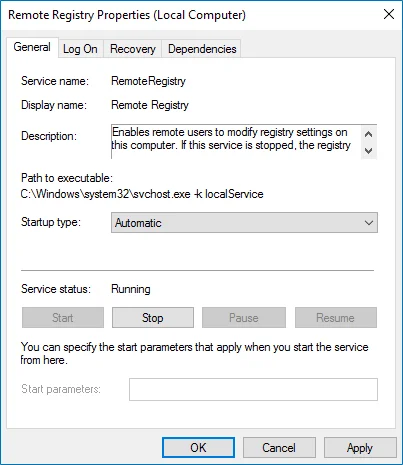
Step 2 – In the Services dialog, locate the Remote Registry service, right-click it and select Properties.
Step 3 – In the Remote Registry Properties dialog, make sure that the Startup type parameter is set to "Automatic" and click Start.
Step 4 – In the Services dialog, ensure that Remote Registry has the "Started" (on pre-Windows Server 2012 versions) or the "Running" (on Windows Server 2012 and above) status.
NOTE: The Remote Registry should be enabled on the target server.