Configure Advanced Audit Policies
Advanced audit policies can be configured instead of local policies. Any of them are required if you want to get the "Who" and "When" values for the changes to the following monitored system components:
- Audit policies
- File shares
- Hardware and system drivers
- General computer settings
- Local users and groups
- Services
- Scheduled tasks
- Windows registry
- Removable storage media
Configure Security Options
Using both basic and advanced audit policies settings may lead to incorrect audit reporting. To force basic audit policies to be ignored and prevent conflicts, enable the Audit: Force audit policy subcategory settings to override audit policy category settings option.
Follow the steps to configure security options.
Step 1 – On the audited server, open the Local Security Policy snap-in and navigate to Start > Windows Administrative Tools > Local Security Policy.
Step 2 – Navigate to Security Settings > Local Policies > Security Options and locate the Audit: Force audit policy subcategory settings policy.
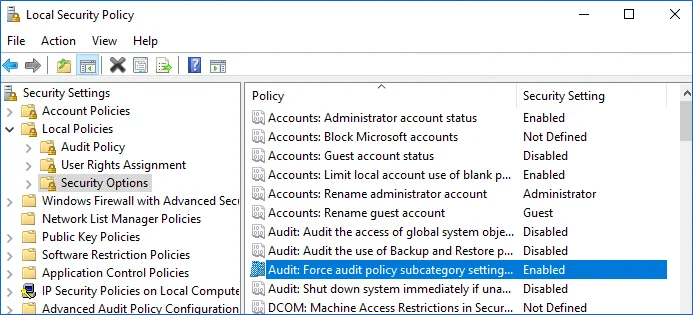
Step 3 – Double-click the policy and enable it.
Configure Advanced Audit Policy on Windows Server 2016
In Windows Server 2016 audit policies are not integrated with the Group Policies and can only be deployed using logon scripts generated with the native Windows auditpol.exe command line tool. Therefore, these settings are not permanent and will be lost after server reboot.
The procedure below explains how to configure Advanced audit policy for a single server. If you audit multiple servers, you may want to create logon scripts and distribute them to all target machines via Group Policy. Refer to the Create System Startup / Shutdown and User Logon / Logoff Scripts Microsoft article for more information.
Step 1 – On an audited server, navigate to Start > Run and type "cmd".
Step 2 – Disable the Object Access, Account Management, and Policy Change categories by executing the following command in the command line interface:
auditpol /set /category:"Object Access" /success:disable /failure:disable
auditpol /set /category:"Account Management" /success:disable /failure:disable
auditpol /set /category:"Policy Change" /success:disable /failure:disable
Step 3 – Enable the following audit subcategories:
| Audit subcategory | Command |
|---|---|
| Security Group Management | auditpol /set /subcategory:"Security Group Management" /success:enable /failure:disable |
| User Account Management | auditpol /set /subcategory:"User Account Management" /success:enable /failure:disable |
| Handle Manipulation | auditpol /set /subcategory:"Handle Manipulation" /success:enable /failure:disable |
| Other Object Access Events | auditpol /set /subcategory:"Other Object Access Events" /success:enable /failure:disable |
| Registry | auditpol /set /subcategory:"Registry" /success:enable /failure:disable |
| File Share | auditpol /set /subcategory:"File Share" /success:enable /failure:disable |
| Audit Policy Change | auditpol /set /subcategory:"Audit Policy Change" /success:enable /failure:disable |
It is recommended to disable all other subcategories unless you need them for other purposes. You can check your current effective settings by executing the following commands:
auditpol /set /category:"Object Access"
auditpol /set /category:"Account Management"
auditpol /set /category:"Policy Change"
Configure Advanced Audit Policy on Windows Server 2016 and Above
In Windows Server 2016 and above, Advanced audit policies are integrated with Group Policies, so they can be applied via Group Policy Object or Local Security Policies. The procedure below describes how to apply Advanced policies via Local Security Policy console.
Step 1 – On the audited server, open the Local Security Policy snap-in and navigate to Start > Windows Administrative Tools >Local Security Policy.
Step 2 – In the left pane, navigate to Security Settings > Advanced Audit Policy Configuration > System Audit Policies.
Step 3 – Configure the following audit policies.
| Policy Subnode | Policy Name | Audit Events |
|---|---|---|
| Account Management | - Audit Security Group Management - Audit User Account Management | "Success" |
| Object Access | - Audit Handle Manipulation - Audit Other Object Access Events - Audit Registry - Audit File Share | "Success" |
| Policy Change | - Audit Audit Policy Change | "Success" |
Adjust DHCP Server Operational Log Settings
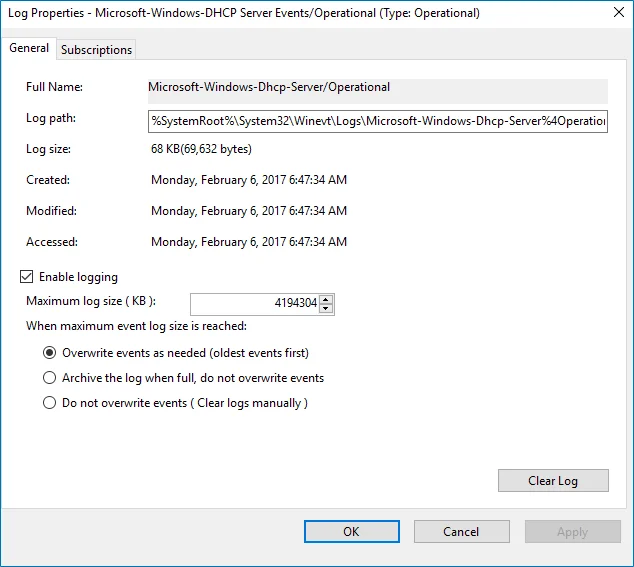
If you plan to monitor DHCP changes, you may need to adjust your DHCP Server Operational log settings (size and retention method). For that, take the steps described below.
-
On the DHCP server, navigate to Event Viewer.
-
Navigate to Event Viewer tree → Applications and Services Logs → Microsoft → Windows and expand the DHCP-Server node.
-
Right-click the Operational log and select Properties.
-
Make sure the Enable logging option is selected.
-
Set Maximum log size to 4 GB.
-
Set the retention method to Overwrite events as needed (oldest events first). Click OK to save the settings and close the dialog.
Adjusting Event Log Size and Retention Settings
Consider that if the event log size is insufficient, overwrites may occur before data is written to the Long-Term Archive and the Audit Database, and some audit data may be lost.
To prevent overwrites, you can increase the maximum size of the event logs and set retention method for these logs to "Overwrite events as needed". This refers to the following event logs:
- Application
- Security
- Setup
- System
- Applications and Services logs > Microsoft>Windows > TaskScheduler > Operational
- Applications and Services logs > Microsoft > Windows > DNS-Server > Audit (only for DCs running Windows Server 2012 R2 and above)
- Applications and Services logs > AD FS > Admin log (for AD FS servers )
Refer to the following Microsoft article to read about the recommended event log settings.
The procedure below provides a possible way to specify the event log settings manually. However, if you have multiple target computers, consider configuring these settings via Group Policy as also described in this section
Configure the Event Log Size Manually
Follow the steps to configure Event Log Size and Retention Settings.
Step 1 – On a target server, navigate to Start > Windows Administrative Tools > Event Viewer.
Step 2 – Navigate to Event Viewer tree > Windows Logs, right-click Security and select Properties.
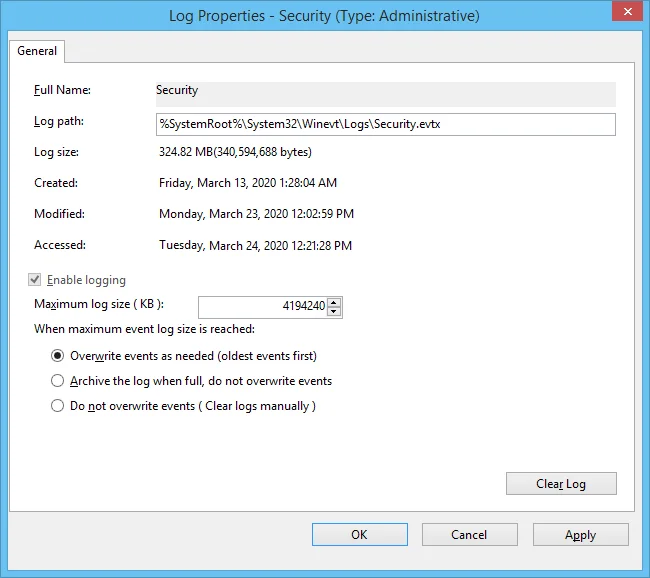
Step 3 – Make sure Enable logging is selected.
Step 4 – In the Maximum log size field specify the size you need.
Step 5 – Make sure Do not overwrite events (Clear logs manually) is cleared. If selected, change the retention method to Overwrite events as needed (oldest events first).
Make sure that the Maximum security log size group policy does not overwrite your log settings. To check this, start the Group Policy Management console, proceed to the GPO that affects your server, and navigate to Computer Configuration > Policies > Windows Settings > Security Settings > Event Log.
Repeat these steps for the following event logs:
-
Windows Logs > Application
-
Windows Logs > System
-
Applications and Services Logs > Microsoft > Windows > TaskScheduler > Operational
Configure setting for TaskScheduler/Operational log only if you want to monitor scheduled tasks.
-
Applications and Services Logs > Microsoft > Windows > DNS-Server > Audit
Configure setting for DNS log only if you want to monitor DNS changes. The log is available on Windows Server 2012 R2 and above and is not enabled by default. See Microsoft documentation for more information on how to enable this log.
-
Applications and Services Logs > AD FS > Admin
Applies to the AD FS servers.
Configure the Event Log Size Using Group Policy
Personnel with administrative rights can use Group Policy Objects to apply configuration settings to multiple servers in bulk.
Follow the steps to configure settings for Application, System and Security event logs.
Step 1 – Open the Group Policy Management Editor on the domain controller and go to Computer Configuration > Policies > Administrative Templates > Windows Components > Event Log Service.
Step 2 – Select the log you need.
Step 3 – Edit Specify the maximum log file size setting; the value is usually set to 4194240 KB.
Step 4 – Specify retention settings for the log; usually it is Overwrite as needed.
Follow the steps to configure settings for other logs.
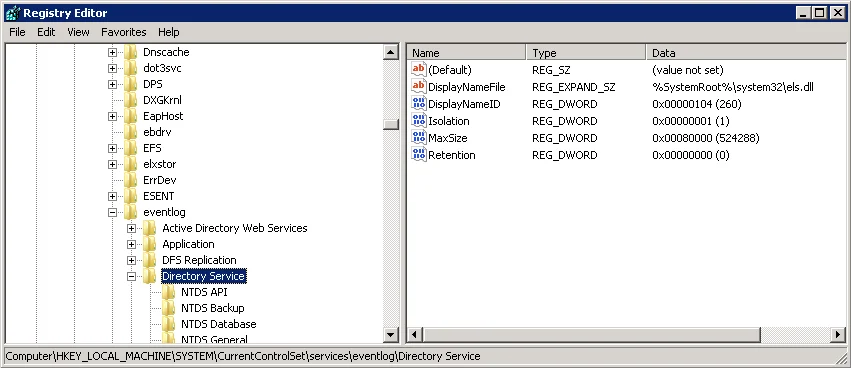
Step 1 – Open the registry editor and go to HKEY_LOCAL_MACHINE\SYSTEM\CurrentControlSet\Services\EventLog<log_name>. For example: HKEY_LOCAL_MACHINE\SYSTEM\CurrentControlSet\Services\EventLog\Directory Service
Step 2 – Set the MaxSize to the required decimal value (in bytes).
 _regedit.webp)
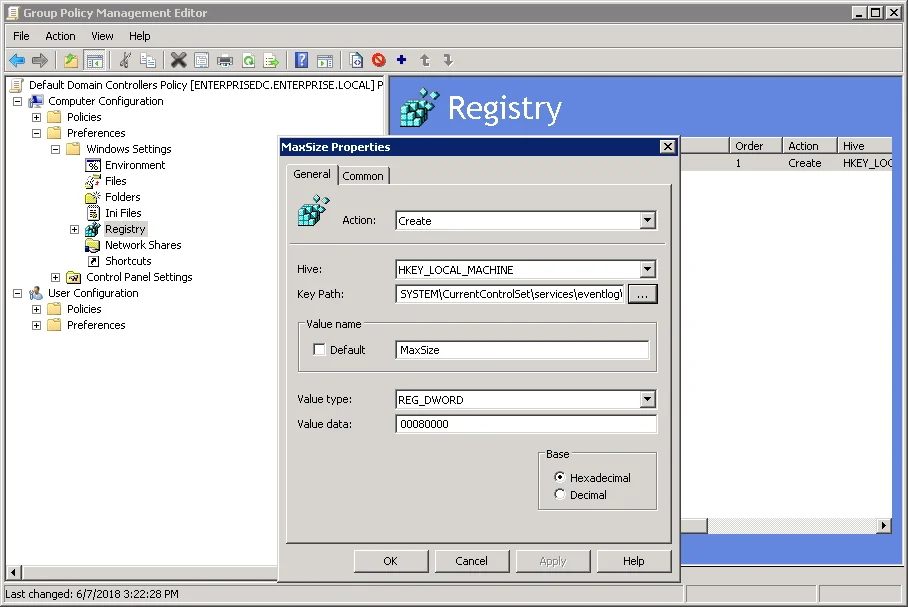
You can configure Group Policy Preferences to push registry changes to the target domain computers. For the example above (Directory Service Log), perform the following steps.
Step 1 – In Group Policy Management Console on the domain controller go to Computer > Preferences > Windows Settings > Registry.
Step 2 – Right-click Registry and select New > Registry Item.
Step 3 – In the Properties window on the General tab select the following:
- Action > Create
- Hive > HKEY_LOCAL_MACHINE
- Key Path – browse to MaxSize value at the SYSTEM\CurrentControlSet\Services\EventLog\Directory
Service
 png)
png)
Step 4 – Change the MaxSize REG_DWORD to the required decimal value (in bytes).
Step 5 – Save the preferences and link them to the necessary servers (OUs).
When finished, run the gpupdate /force command to force group policy update.
Internet Information Services (IIS)
To be able to process Internet Information Services (IIS) events, you must enable the Remote Registry service on the target computers. Windows Server
To configure the Operational log size and retention method
-
On the computer where IIS is installed, navigate to Start > Windows Administrative Tools → Event Viewer.
-
Navigate to Event Viewer tree → Applications and Services Logs → Microsoft → Windows and expand the IIS-Configuration node.
-
Right-click the Operational log and select Properties.
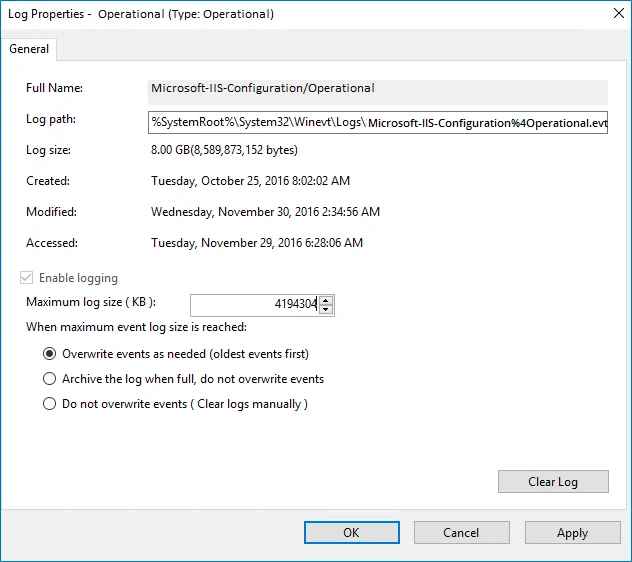
-
Make sure Enable logging is enabled.
-
Set Maximum log size to 4 GB.
-
Make sure Do not overwrite events (Clear logs manually) is cleared. If selected, change the retention method to Overwrite events as needed (oldest events first).
Configure Local Audit Policies
Local audit policies must be configured on the target servers to get the "Who" and "When" values for the changes to the following monitored system components:
- Audit policies
- File shares
- Hardware and system drivers
- General computer settings
- Local users and groups
- Services
- Scheduled tasks
- Windows registry
- Removable media
You can also configure advanced audit policies for same purpose. See the Configure Advanced Audit Policies topic for more information.
Manual Configuration
While there are several methods to configure local audit policies, this topic covers just one of them: how to configure policies locally with the Local Security Policy snap-in. To apply settings to the whole domain, use the Group Policy but consider the possible impact on your environment.
Follow the steps to configure local audit policies.
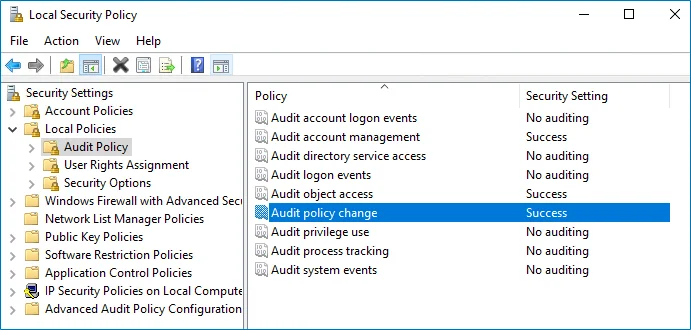
Step 1 – On the audited server, open the Local Security Policy snap-in: navigate to Start > Windows Administrative Tools**>**Local Security Policy.
Step 2 – Navigate to Security Settings > Local Policies > Audit Policy.
| Policy Name | Audit Events |
|---|---|
| Audit account management | "Success" |
| Audit object access | "Success" |
| Audit policy change | "Success" |
Local audit policy is configured and can be changed in the same location:
Windows Server
Netwrix Auditor relies on native logs for collecting audit data. Therefore, successful change and access auditing requires a certain configuration of native audit settings in the audited environment and on the Auditor console computer. Configuring your IT infrastructure may also include enabling certain built-in Windows services, etc. Proper audit configuration is required to ensure audit data integrity, otherwise your change reports may contain warnings, errors or incomplete audit data.
CAUTION: Folder associated with Netwrix Auditor must be excluded from antivirus scanning. See the Antivirus Exclusions for Netwrix Auditor knowledge base article for additional information.
You can configure your IT Infrastructure for monitoring in one of the following ways:
-
Automatically through a monitoring plan – This is a recommended method. If you select to automatically configure audit in the target environment, your current audit settings will be checked on each data collection and adjusted if necessary.
-
Manually – Native audit settings must be adjusted manually to ensure collecting comprehensive and reliable audit data. You can enable Auditor to continually enforce the relevant audit policies or configure them manually:
-
The Remote Registry and the Windows Management Instrumentation (WMI) service must be started. See the Enable Remote Registry and Windows Management Instrumentation Services topic and the Configure Windows Registry Audit Settings topic for additional information.
-
The following advanced audit policy settings must be configured:
- The Audit: Force audit policy subcategory settings (Windows 7 or later) security option must be enabled.
- For Windows Server 2008—The Object Access, Account Management, and Policy Change categories must be disabled while the Security Group Management, User Account Management, Handle Manipulation, Other Object Access Events, Registry, File Share, and Audit Policy Change subcategories must be enabled for "Success".
- For Windows Server 2008 R2 / Windows 7 and above—Audit Security Group Management, Audit User Account Management, Audit Handle Manipulation, Audit Other Object Access Events, Audit Registry, Audit File Share, and Audit Audit Policy Changeadvanced audit policies must be set to "Success".
- See the Configure Local Audit Policies topic and the Configure Advanced Audit Policies topic for additional information.
-
The following legacy audit policies can be configured instead of advanced: Audit object access, Audit policy change, and Audit account management must be set to "Success".
-
The Enable Persistent Time Stamp local group policy must be enabled. This policy should be configured manually since Auditor does not enable it automatically. See the Configure Enable Persistent Time Stamp Policy topic for additional information.
-
The Application, Security, and System event log maximum size must be set to 4 GB. The retention method must be set to “Overwrite events as needed”. See the Adjusting Event Log Size and Retention Settings topic for additional information.
-
For auditing scheduled tasks, the Microsoft-Windows-TaskScheduler/Operational event log must be enabled and its maximum size must be set to 4 GB. The retention method of the log must be set to “Overwrite events as needed”.
-
For auditing DHCP, the Microsoft-Windows-Dhcp-Server/Operational event log must be enabled and its maximum size must be set to 4 GB. The retention method of the log must be set to “Overwrite events as needed”. See the Adjust DHCP Server Operational Log Settings topic for additional information.
-
For auditing DNS, the Microsoft-Windows-DNS-Server/Audit event log must be enabled and its maximum size must be set to 4 GB. The retention method of the log must be set to “Overwrite events as needed”.
-
The following inbound Firewall rules must be enabled:
- Remote Event Log Management (NP-In)
- Remote Event Log Management (RPC)
- Remote Event Log Management (RPC-EPMAP)
- Windows Management Instrumentation (ASync-In)
- Windows Management Instrumentation (DCOM-In)
- Windows Management Instrumentation (WMI-In)
- Network Discovery (NB-Name-In)
- File and Printer Sharing (NB-Name-In)
- Remote Service Management (NP-In)
- Remote Service Management (RPC)
- Remote Service Management (RPC-EPMAP)
- Performance Logs and Alerts (DCOM-In)
- Performance Logs and Alerts (TCP-In)
-
If the audited servers are behind the Firewall, review the list of protocols and ports required for Netwrix Auditor and make sure that these ports are opened. See the Windows Server Ports topic for additional information.
-
For auditing removable storage media, two Event Trace Session objects must be created. See the Configure Removable Storage Media for Monitoring topic for additional information.
-
If you want to use Network traffic compression, make sure that the Auditor console computer is accessible by its FQDN name.
-
For auditing IIS:
- The Remote Registry service must be running and its Startup Type must be set to "Automatic".
- The Microsoft-IIS-Configuration/Operational log must be enabled and its maximum size must be set to 4 GB. The retention method of the log must be set to “Overwrite events as needed”.
-
Whatever method you choose to configure Windows Server for auditing (manual or automated), also remember to do the following:
- Configure Data Collecting Account, as described in the Data Collecting Account topic.
- Configure required protocols and ports, as described in the Windows Server Ports topic.
Exclude Monitored Objects
You can fine-tune Netwrix Auditor by specifying data that you want to exclude from the Windows Server monitoring scope.
Follow the steps to exclude data from the Windows Server monitoring scope:
Step 1 – Navigate to the %Netwrix Auditor installation folder%\Windows Server Auditing folder.
Step 2 – Edit the *.txt files, based on the following guidelines:
- Each entry must be a separate line.
- Wildcards (* and ?) are supported. A backslash () must be put in front of (*), (?), (,), and () if they are a part of an entry value.
- Lines that start with the # sign are treated as comments and are ignored.
| File | Description | Syntax |
|---|---|---|
| omitcollectlist.txt | Contains a list of objects and their properties to be excluded from being monitored. If you want to restart monitoring these objects, remove them from the omitcollectlist.txt and run data collection at least twice. | monitoring plan name,server name,class name,property name,property value class name is a mandatory parameter, it cannot be replaced with a wildcard. property name and property value are optional, but cannot be replaced with wildcards either. For example: #*,server,MicrosoftDNS_Server `````` #*,*,StdServerRegProv |
| omiterrors.txt | Contains a list of errors/warnings to be omitted from logging to the Netwrix Auditor System Health event log. | monitoring plan name,server name,error text For example: *,productionserver1.corp.local,*Access is denied* |
| omitreportlist.txt | Contains a list of objects to be excluded from reports and Activity Summary emails. In this case audit data is still being collected. | monitoring plan name,who,where,object type,what,property name For example: *,CORP\\jsmith,*,*,*,* |
| omitsitcollectlist.txt | Contains a list of objects to be excluded from State-in-time reports. | monitoring planname,server name,class name,property name,property value class name is a mandatory parameter, it cannot be replaced with a wildcard. property name and property value are optional, but cannot be replaced with wildcards either. For example: *,server,MicrosoftDNS_Server *,*,StdServerRegProv |
| omitstorelist.txt | Contains a list of objects to be excluded from being stored to the Audit Archive and showing up in reports. In this case audit data is still being collected. | monitoring plan name,who,where,object type,what,property name For example: *,*,*,Scheduled task,Scheduled Tasks\\User_Feed_Synchronization*,* |
Monitored Objects
This section lists Windows Server components and settings whose changes Netwrix Auditor can monitor.
When monitoring a Windows Server, Netwrix Auditor needs to audit some registry settings. See the Windows Server Registry Keys section for additional information. If you want Netwrix Auditor to audit custom registry keys, see the Monitoring Custom Registry KeysMonitoring Custom Registry Keystopic for additional information.
In the table below, double asterisks (**) indicates the components and settings for which the Who value is reported as “Not Applicable”.
| Object type | Attributes |
|---|---|
| General Computer Settings | |
| Computer | - System state changed to Started - System state changed to Stopped. Reason: Reason type - System state changed to Stopped. Reason: unexpected shutdown or system failure |
| Computer Name | - Computer Description - Name - Domain |
| Environment Variables | - Type - Value |
| Event Log | - Event Log Cleared |
| General | - Caption - Organization - Registered User - Serial Number - Service Pack** - Version** |
| Remote | - Enable Remote Desktop on this computer |
| Startup and Recovery | - Automatically Restart - Dump File - Dump Type - Overwrite any existing file - Send Alert - System Startup Delay - Write an Event |
| System Time | - System time changed from ... to ... - Time zone changed Not supported on Windows Server 2008 SP2 and Windows Server 2008 R2. |
| Add / Remove Programs | |
| Add or Remove Programs | - Installed For** - Version |
| Services | |
| System Service | - Action in case of failed service startup - Action in case of service stopping - Allow service to interact with desktop - Caption - Created - Deleted - Description - Name - Path to executable - Service Account - Service Type - Start Mode - Error Control |
| Audit Policies | |
| Local Audit Policy | - Added Audit settings Only for the Global Object Access Auditing advanced policies. - Successful audit enabled/disabled - Failure audit enabled/disabled |
| Per-User Local Audit Policy | - Success audit include added - Success audit include removed - Failure audit include added - Failure audit include removed - Success audit exclude added - Success audit exclude removed - Failure audit exclude added - Failure audit exclude remove |
| Hardware | |
| Base Board** | - Hosting Board - Status - Manufacturer - Product - Version - Serial Number |
| BIOS** | - Manufacturer - Version |
| Bus** | - Bus Type - Status |
| Cache Memory** | - Configuration Manager Error Code - Last Error Description - Last Error Code - Purpose - Status |
| CD-ROM Drive** | - Configuration Manager Error Code - Last Error Description - Last Error Code - Media Type - Name - SCSI Bus - SCSI Logical Unit - SCSI Port - SCSI Target ID - Status |
| Disk Partition** | - Primary Partition - Size (bytes) - Starting offset (bytes) |
| Display Adapter** | - Adapter RAM (bytes) - Adapter Type - Bits/Pixel - Configuration Manager Error Code - Driver Version - Installed Drivers - Last Error Description - Last Error Code - Refresh Rate - Resolution - Status |
| DMA** | - Status |
| Floppy Drive** | - Configuration Manager Error Code - Last Error Description - Last Error Code - Status |
| Hard Drive** | - Bytes/Sector - Configuration Manager Error Code - Interface Type - Last Error Description - Last Error Code - Media Loaded - Media Type - Model - Partitions - SCSI Bus - SCSI Logical Unit - SCSI Port - SCSI Target ID - Sectors/Track - Size (bytes) - Status - Total Cylinders - Total Heads - Total Sectors - Total Tracks - Tracks/Cylinder |
| IDE** | - Configuration Manager Error Code - Description - Last Error Description - Last Error Code - Status |
| Infrared** | - Configuration Manager Error Code - Last Error Description - Last Error Code - Status |
| Keyboard** | - Configuration Manager Error Code - Description - Last Error Description - Last Error Code - Layout - Name - Status |
| Logical Disk** | - Description - File System - Size (bytes) - Status |
| Monitor** | - Configuration Manager Error Code - Last Error Description - Last Error Code - Monitor Type - Status |
| Network Adapter | - Adapter Type * - Configuration Manager Error Code - Default IP Gateway * - DHCP Enabled* - DHCP Server - DNS Server Search Order - IP Address * - Last Error Description - Last Error Code - MAC Address - Network Connection Name - Network Connection Status - Service Name - Status * — indicates the properties whose changes may not be reported correctly, displaying "Who" (i.e. initiator's account) as System. |
| Network Protocol** | - Description - Status |
| Parallel Ports** | - Configuration Manager Error Code - Last Error Description - Last Error Code - Status |
| PCMCIA Controller** | - Configuration Manager Error Code - Last Error Description - Last Error Code - Status |
| Physical Memory** | - Capacity (bytes) - Status - Manufacturer - Memory Type - Speed - Part Number - Serial Number |
| Pointing Device** | - Configuration Manager Error Code - Double Click Threshold - Handedness - Hardware Type - Last Error Description - Last Error Code - Number of buttons - Status |
| Printing | - Comment** - Hidden** - Local** - Location** - Name** - Network** - Port Name** - Printer error information - Published** - Shared** - Share Name** - Status |
| Processor** | - Configuration Manager Error Code - Last Error Description - Last Error Code - Max Clock Speed (MHz) - Name - Status |
| SCSI** | - Configuration Manager Error Code - Description - Last Error Description - Last Error Code - Status |
| Serial Ports** | - Configuration Manager Error Code - Last Error Description - Last Error Code - Maximum Bits/Second - Name - Status |
| Sound Device** | - Configuration Manager Error Code - Last Error Description - Last Error Code - Status |
| System Slot** | - Slot Designation - Status |
| USB Controller** | - Configuration Manager Error Code - Last Error Description - Last Error Code - Name - Status |
| USB Hub** | - Configuration Manager Error Code - Last Error Description - Last Error Code - Name - Status |
| DHCP configuration | |
| If the DHCP server runs on Windows Server 2008 (or below), then the Who value for DHCP server configuration events is reported as “Not Applicable”. | |
| Server role | - Added - Removed |
| Server settings | - Type: - IPv4 - IPv4 Filters - IPv6 - Action: - Modified |
| DHCP scope | - Type: - IPv4 - Multicast IPv4 - Superscope for IPv4 - IPv6 - Action: - Added - Removed - Modified - Moved |
| DHCP Reservation | - Type: - IPv4 - IPv6 - Action: - Added - Removed - Modified |
| DHCP Policy | - Type: - IPv4 - IPv4 server-wide - Action: - Added - Removed - Modified - Renamed |
| Removable media | |
| Removable Storage Media** | Netwrix Auditor does not report on floppy/optical disk and memory card storage medias. For removable storages, the When value reports actual time when a change was made and/or a target server was started. - Device class: - CD and DVD - Floppy Drives - Removable Disk - Tape Drives - Windows Portable Devices When the Audit Object Access local audit policy and/or the Audit Central Access Policy Staging \ Audit Removable Storage advanced audit policies are enabled on the target server, the gpupdate /force command execution issues removable storage restart. These actions are disclosed in Netwrix Auditor reports, search, and activity summaries. Note that these actions are system, not user-effected. |
| Scheduled Tasks | |
| Scheduled Task | - Account Name - Application - Comment - Creator - Enabled - Parameters - Triggers |
| Local Users and Groups | |
| Local Group | - Description - Name - Members |
| Local User | - Description - Disabled/Enabled - Full Name - Name - User cannot change password - Password Never Expires - User must change password at next logon |
| DNS Configuration | |
| The Who value will be reported for DNS configuration settings only if the DNS server runs on Windows Server 2012 R2. See the following Microsoft article for additional information: Update adds query logging and change auditing to Windows DNS servers. | |
| DNS Server | - Address Answer Limit - Allow Update - Auto Cache Update - Auto Config File Zones - Bind Secondaries - Boot Method - Default Aging State - Default No Refresh Interval - Default Refresh Interval - Disable Auto Reverse Zones - Disjoint Nets - Ds Available - Ds Polling Interval - Ds Tombstone Interval - EDns Cache Timeout - Enable Directory Partitions - Enable Dns Sec - Enable EDns Probes - CD-ROM D Enable Netmask Ordering - Event Log Level - Fail On Load If Bad Zone Data - Forward Delegations - Forwarders - Forwarding Timeout - Is Slave - Listen Addresses - Log File Max Size - Log File Path - Log Level - Loose Wildcarding - Max Cache TTL - Max Negative Cache TTL - Name Check Flag - No Recursion - Recursion Retry - Recursion Timeout - Round Robin - Rpc Protocol - Scavenging Interval - Secure Cache Against Pollution - Send Port - Server Addresses |
| DNS Zone | - Aging State - Allow update - Auto created - Data file name - Ds integrated - Expires after - Forwarder slave - Forwarder timeout - Master servers - Minimum TTL - No refresh interval - Notify - Notify servers - Owner name - Paused - Primary server - Refresh interval - Responsible person - Retry interval - Reverse - Scavenge servers - Secondary servers - Secure secondaries - Shutdown - TTL - User NB stat - Use WINS - Zone type |
| DNS Resource Records | |
| The Who value will be reported for DNS Resource Records only if the DNS server runs Windows Server 2012 R2. See the following Microsoft article for additional information: Update adds query logging and change auditing to Windows DNS servers. | |
| DNS AAAA | - Container name - IPv6 Address - Owner name - Record class - TTL - Zone type |
| DNS AFSDB | - Container name - Owner name - Server name - Server subtype - Record class - TTL - Zone type |
| DNS ATM A | - ATM Address - Container name - Format - Owner name - Record class - TTL - Value - Zone type |
| DNS A | - Container name - IP Address - Owner name - Record class - TTL - Zone type |
| DNS CNAME | - Container name - FQDN for target host - Owner name - Record class - TTL - Zone type |
| DNS DHCID | - Container name - DHCID (base 64) - Owner name - Record class - TTL - Zone type |
| DNS DNAME | - Container name - FQDN for target domain - Owner name - Record class - TTL - Zone type |
| DNS DNSKEY | - Algorithm - Container name - Key type - Key (base 64) - Name type - Owner name - Protocol - Record class - Signatory field - TTL - Zone type |
| DNS DS | - Algorithm - Container name - Data - DigestType - Key tag - Owner name - Record class - TTL - Zone type |
| DNS HINFO | - Container name - CPU type - Operating system - Owner name - Record class - TTL - Zone type |
| DNS ISDN | - Container name - ISDN phone number and DDI - ISDN subaddress - Owner name - Record class - TTL - Zone type |
| DNS KEY | - Algorithm - Container name - Key type - Key (base 64) - Name type - Owner name - Protocol - Record class - Signatory field - TTL - Zone type |
| DNS MB*** | - Container name - Mailbox host - Owner name - Record class - TTL - Zone type |
| DNS MD | - Container name - MD host - Owner name - Record class - TTL - Zone type |
| DNS MF | - Container name - MF host - Owner name - Record class - TTL - Zone type |
| DNS MG | - Container name - Member mailbox - Owner name - Record class - TTL - Zone type |
| DNS MINFO | - Container name - Error mailbox - Owner name - Responsible mailbox - Record class - TTL - Zone type |
| DNS MR | - Container name - Owner name - Replacement mailbox - Record class - TTL - Zone type |
| DNS MX | - Container name - FQDN of mail server - Mail server priority - Owner name - Record class - TTL - Zone type |
| DNS NAPTR | - Container name - Flag string - Order - Owner name - Preference - Record class - Regular expression string - Replacement domain - Service string - TTL - Zone type |
| DNS NS | - Container name - Name servers - Owner name - TTL |
| DNS NXT | - Container name - Next domain name - Owner name - Record class - Record types - TTL - Zone type |
| DNS PTR | - Container name - Owner name - PTR domain name - Record class - TTL - Zone type |
| DNS RP | - Container name - Mailbox of responsible person - Optional associated text (TXT) record - Owner name - Record class - TTL - Zone type |
| DNS RRSIG | - Algorithm - Container name - Key tag - Labels - Original TTL - Owner name - Record class - Signature expiration (GMT) - Signature inception (GMT) - Signature (base 64) - Signer's name - TTL - Type covered - Zone type |
| DNS RT | - Container name - Intermediate host - Owner name - Preference - Record class - TTL - Zone type |
| DNS SIG | - Algorithm - Container name - Key tag - Labels - Original TTL - Owner name - Record class - Signature expiration (GMT) - Signature inception (GMT) - Signature (base 64) - Signer's name - TTL - Type covered - Zone type |
| DNS SRV | - Container name - Host offering this service - Owner name - Port number - Priority - Record class - TTL - Weight - Zone type |
| DNS TEXT | - Container name - Owner name - Record class - Text - TTL - Zone type |
| DNS WINS | - Cache time-out - Container name - Do not replicate this record - Lookup time-out - Owner name - Record class - Wins servers - Zone type |
| DNS WKS | - Container name - IP address - Owner name - Protocol - Record class - Services - TTL - Zone type |
| DNS X25 | - Container name - Owner name - Record - Record class - TTL - X.121 PSDN address - Zone type |
| File Shares | |
| Share | - Access-based enumeration - Caching - Description - Enable BranchCache - Encrypt data access - Folder path - Share permissions - User limit |
Windows Server Registry Keys
If you want to monitor changes to system components on a Windows Server, make sure that Windows Registry audit settings are configured on that Windows server.
This refers to the following keys:
- HKEY_LOCAL_MACHINE\SOFTWARE
- HKEY_LOCAL_MACHINE\SYSTEM
- HKEY_USERS.DEFAULT
For these keys and subkeys, the following advanced permissions must be audited ("Successful" audit type required):
- Set Value
- Create Subkey
- Delete
- Write DAC
- Write Owner
The below is the full list of keys (and subkeys) involved in Windows Server auditing.
| | | | -------------- | ------------------------------------------------------------------------------------- | ----------------------------------------------------------------------------------------------------------- | --------------------------------------------------------------------------------------------------------- | ------------------------------------------------------------------------------------ | ------------------------------------------------------------------------ | ----- | | Hardware | - HKEY_LOCAL_MACHINE\SYSTEM\CurrentControlSet\Services\Tcpip\Parameters\Interfaces( | .*) - HKEY_LOCAL_MACHINE\SYSTEM\CurrentControlSet\Control\Network{4D36E972-E325-11CE-BFC1-08002BE10318}( | .*) - HKEY_LOCAL_MACHINE\SYSTEM\CurrentControlSet\Control\Class{4D36E972-E325-11CE-BFC1-08002BE10318}( | .*) - HKEY_LOCAL_MACHINE\SYSTEM\CurrentControlSet\Services( | .*) | | General | - HKEY_LOCAL_MACHINE\SYSTEM\CurrentControlSet\Control\CrashControl( | .*) - HKEY_LOCAL_MACHINE\SYSTEM\ControlSet001\Control\CrashControl( | .*) - HKEY_LOCAL_MACHINE\SYSTEM\ControlSet002\Control\CrashControl( | .*) - HKEY_LOCAL_MACHINE\Software\WOW6432NODE\Microsoft\Windows NT\CurrentVersion( | .*) - HKEY_LOCAL_MACHINE\Software\Microsoft\Windows NT\CurrentVersion( | .*) | | Software | - HKEY_LOCAL_MACHINE\SOFTWARE\WOW6432NODE\MICROSOFT\WINDOWS\CURRENTVERSION\UNINSTALL( | .*) - HKEY_LOCAL_MACHINE\SOFTWARE\MICROSOFT\WINDOWS\CURRENTVERSION\UNINSTALL( | .*) | | Services | - HKEY_LOCAL_MACHINE\SYSTEM\CurrentControlSet\Services( | .*) - HKEY_LOCAL_MACHINE\SYSTEM\ControlSet001\Services( | .*) - HKEY_LOCAL_MACHINE\SYSTEM\ControlSet002\Services( | .*) | | RemovableMedia | - SYSTEM\CurrentControlSet\Enum |
Consider that audit data for the registry keys themselves will not appear in Netwrix Auditor reports, alerts or search results, as it is only used as one of the sources for the Activity Records formation.
- You can configure these settings automatically using Netwrix Auditor, as described in the Settings for Data Collection topic. Corresponding audit settings will be also applied automatically after you select a checkbox under Monitor changes to system components on the General tab in the Windows Server data source properties.
Audit settings will be automatically adjusted only for the keys/subkeys involved in the monitoring of selected components (granular adjustment). For example, if you selected Services, the program will adjust the audit settings for the following subkeys:
-
HKEY_LOCAL_MACHINE\SYSTEM\CurrentControlSet\Services(|\.*)
-
HKEY_LOCAL_MACHINE\SYSTEM\ControlSet001\Services(|\.*)
-
HKEY_LOCAL_MACHINE\SYSTEM\ControlSet002\Services(|\.*)
-
To configure the audit settings manually, refer to the Configure Windows Registry Audit Settings topic for additional information.
Monitoring Custom Registry Keys
Follow the steps to monitor custom registry keys.
Step 1 – On the computer where Auditor Server resides, navigate to %Netwrix Auditor installation folder%\Windows Server Auditing.
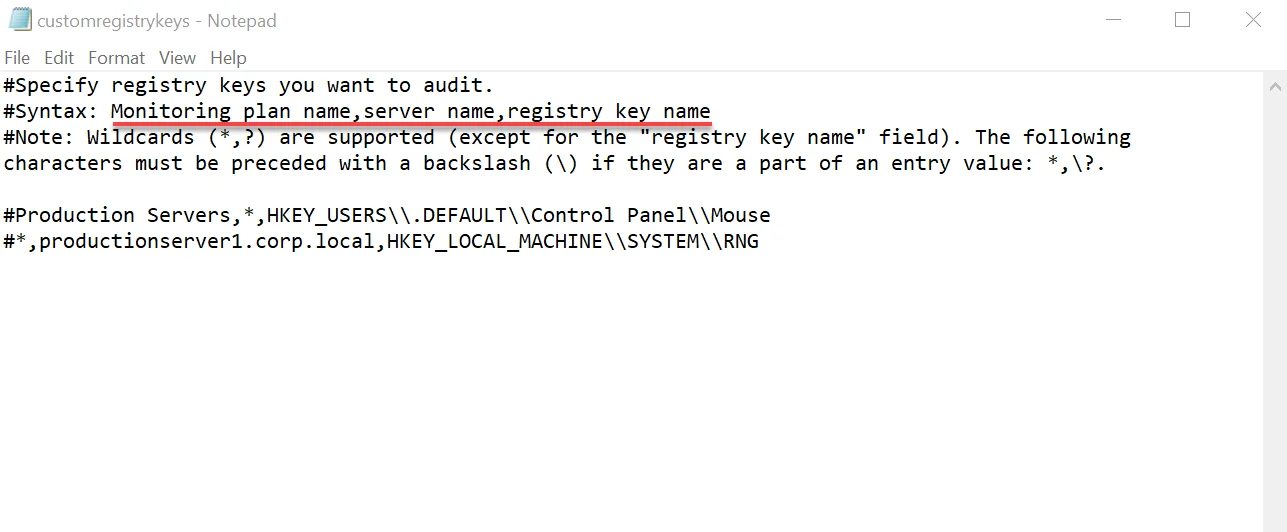
Step 2 – Edit the following parameters of the customregistrykeys.txt file:
monitoring plan name,server name,registry key name
For example:
#*,productionserver1.corp.local,HKEY_LOCAL_MACHINE\\SYSTEM\\RNG
Step 3 – Consider the following:
- Each entry must be a separate line.
- Wildcards (* and ?) are supported (except for the
registry key namefield). A backslash () must be put in front of (*), (?), (,), and () if they are a part of an entry value. - Lines that start with the # sign are treated as comments and are ignored.
NOTE: In some cases, Who will be the system and When will be collection time, because there is no necessary event in the Security log with this path.
VM Template Cloning
While VM cloning is supported by Netwrix Auditor, an additional setup process should be taken into consideration before the deployment process.
Every monitored VM instance gets a unique ID assigned for monitoring and data collection purposes. To ensure proper operation, the VM template must be excluded from the monitoring scope beforehand. Omitting the VM template will allow Netwrix Auditor to assign unique IDs correctly and collect data as intended.
Follow the steps to add the template server to exclusions.
Step 1 – In main Netwrix Auditor menu, select Monitoring plans.
Step 2 – Select your Windows Server monitoring plan and click Edit.
Step 3 – Choose the AD Container containing the template VM and click Edit data source in the right pane.
Step 4 – In the left pane, select Containers and Computers.
Step 5 – Check the Exclude these objects checkbox and add the template VM by clicking Add Computer.
VM template server is added to exclusions and ready to use.
Permissions for Windows Server Auditing
Before you start creating a monitoring plan to audit your Windows servers (including DNS and DHCP servers), plan for the account that will be used for data collection – it should meet the requirements listed below. Then you will provide this account in the monitoring plan wizard (or in the monitored item settings).
Starting with version 9.96, you can use group Managed Service Accounts (gMSA) as data collecting accounts.
The account used for data collection must meet the following requirements on the target servers:
- The "Manage auditing and security log" policy must be defined for this account. See the Permissions for Active Directory Auditing topic for additional information.
- This account must be a member of the local Administrators group.
Assign Permission To Read the Registry Key
NOTE: This permission is required only if the account selected for data collection is not a member of the Domain Admins group.
This permission should be assigned on each domain controller in the audited domain, so if your domain contains multiple domain controllers, it is recommended to assign permissions through Group Policy.
To assign permissions manually, use the Registry Editor snap-in or the Group Policy Management console.
Assign Permission via the Registry Editor Snap-in
Follow the steps to assign permission via the Registry Editor snap-in:
Step 1 – On your target server, open Registry Editor: navigate to Start > Run and type "regedit".
Step 2 – In the left pane, navigate to HKEY_LOCAL_MACHINE\SYSTEM\CurrentControl Set\Services\EventLog\Security.
Step 3 – Right-click the Security node and select Permissions from the pop-up menu.
Step 4 – Click Add and enter the name of the user that you want to grant permissions to.
Step 5 – Check Allow next to the Read permission.
NOTE: For auditing Logon Activity, you also need to assign the Read permission to the HKEY_LOCAL_MACHINE\SECURITY\Policy\PolAdtEv registry key.
Assign Permission using the Group Policy Management Console
Follow the steps to assign permission using the Group Policy Management console;
Step 1 – Open the Group Policy Management console on any domain controller in the target domain: navigate to Start > Windows Administrative Tools (Windows Server 2016/2019) or Administrative Tools (Windows 2012 R2 and below) > Group Policy Management.
Step 2 – In the left pane, navigate to Forest: <forest name> > Domains > <domain name> >
Domain Controllers. Right-click the effective domain controllers policy (by default, it is the
Default Domain Controllers Policy), and select Edit.
Step 3 – In the Group Policy Management Editor dialog, expand the Computer Configuration node on the left and navigate to Policies > Windows Settings > Security Settings > Registry.
Step 4 – Right-click in the pane and select Add Key.
Step 5 – Navigate to HKEY_LOCAL_MACHINE\SECURITY\Policy\PolAdtEv and click OK.
Step 6 – Click Add and enter the name of the user that you want to grant permissions to and press Enter.
Step 7 – Check Allow next to the "Read" permission and click OK.
In the pop-up window, select Propagate inheritable permissions to all subkeys and click OK.
Repeat the steps 4-7 for keys below:
HKEY_LOCAL_MACHINE\SYSTEM\CurrentControlSet\Control\SecurePipeServers\winreg;HKEY_LOCAL_MACHINE\SYSTEM\CurrentControlSet\Services\EventLog\Security.
Step 8 – Close Group Policy Management console.
Step 9 – Open command prompt and input the gpupdate /force command and press Enter. The group
policy will be updated.
Step 10 – Type repadmin /syncall command and press Enter for replicate GPO changes to other
domain controllers.
Step 11 – Ensure that new GPO settings were applied to the domain controllers.
Configure Enable Persistent Time Stamp Policy
The Enable Persistent Time Stamp policy must be enabled on the target servers to track the shutdowns.
Manual Configuation
This section explains how to configure policies locally with the Local Group Policy Editor snap-in.
To enable the policy
-
On the audited server, open the Local Group Policy Editor snap-in: navigate to Start → Run and type "gpedit.msc".
-
Navigate to Computer Configuration → Administrative Templates → System and locate the policy.
Policy Name State Enable Persistent Time Stamp "Enabled"
Configuration via Group Policy
To apply settings to the whole domain, you can use Group Policy. Remember to consider the possible impact on your environment.
To enable the policy
- Open the Group Policy Management console on the domain controller, browse to Computer Configuration → Policies → Administrative Templates → System.
- Locate the Enable Persistent Time Stamp policy in the right pane, right-click it and select Edit.
- Switch policy state to Enabled.
When finished, run the gpupdate /force command to force group policy update
Windows Server Registry Keys
Review the basic registry keys that you may need to configure for monitoring Windows Server with Netwrix Auditor. Navigate to Start → Run and type "regedit".
| Registry key (REG_DWORD type) | Description / Value |
|---|---|
| HKEY_LOCAL_MACHINE\SOFTWARE\WOW6432Node\Netwrix Auditor\Windows Server Change Reporter | |
| CleanAutoBackupLogs | Defines the retention period for the security log backups: - 0—Backups are never deleted from Domain controllers - [X]— Backups are deleted after [X] hours |
| ProcessBackupLogs | Defines whether to process security log backups: - 0—No - 1—Yes Even if this key is set to "0", the security log backups will not be deleted regardless of the value of the CleanAutoBackupLogs key. |
Event Log
Review the basic registry keys that you may need to configure for monitoring event logs with Netwrix Auditor. Navigate to Start → Run and type "regedit".
| Registry key (REG_DWORD type) | Description / Value |
|---|---|
| HKEY_LOCAL_MACHINE\SOFTWARE\WOW6432NODE\Netwrix Auditor\Event Log Manager<monitoring plan name>\Database Settings | |
| ConnectionTimeout | Defines SQL database connection timeout (in seconds). |
| BatchTimeOut | Defines batch writing timeout (in seconds). |
| DeadLockErrorCount | Defines the number of write attempts to a SQL database. |
| HKEY_LOCAL_MACHINE\SOFTWARE\WOW6432NODE\Netwrix Auditor\Event Log Manager | |
| CleanAutoBackupLogs | Defines the retention period for the security log backups: - 0—Backups are never deleted from Domain controllers - [X]— Backups are deleted after [X] hours |
| ProcessBackupLogs | Defines whether to process security log backups: - 0—No - 1—Yes Even if this key is set to "0", the security log backups will not be deleted regardless of the value of the CleanAutoBackupLogs key. |
| WriteAgentsToApplicationLog | Defines whether to write the events produced by the Netwrix Auditor Event Log Compression Service to the Application Log of a monitored machine: - 0—Disabled - 1—Enabled |
| WriteToApplicationLog | Defines whether to write events produced by Netwrix Auditor to the Application Log of the machine where the product is installed: - 0—No - 1—Yes |
Enable Remote Registry and Windows Management Instrumentation Services
Follow the steps to enable the Remote Registry service.
Step 1 – Navigate to Start > Windows Administrative Tools > Services.
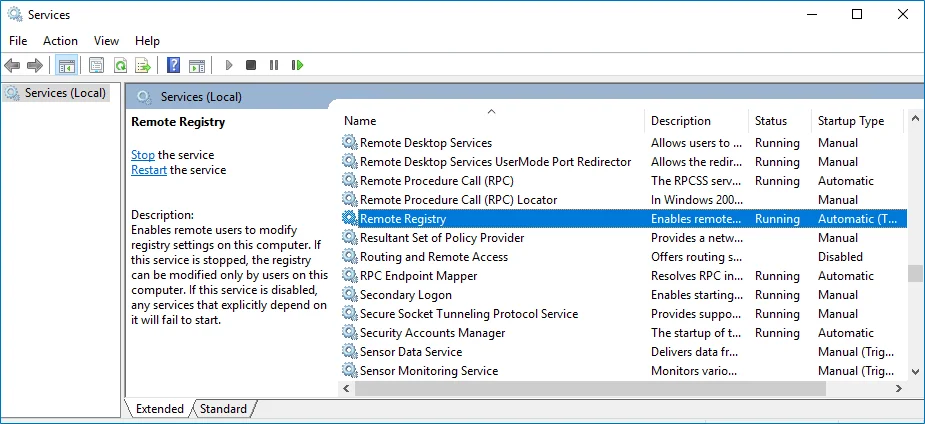
Step 2 – In the Services dialog, locate the Remote Registry service, right-click it and select Properties.
Step 3 – In the Remote Registry Properties dialog, make sure that the Startup type parameter is set to "Automatic" and click Start.
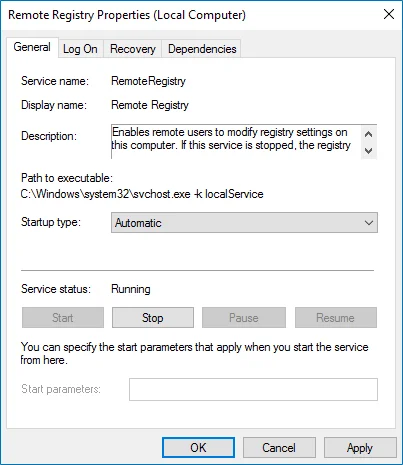
Step 4 – In the Services dialog, ensure that Remote Registry has the "Started" (on pre-Windows Server 2012 versions) or the "Running" (on Windows Server 2012 and above) status.
NOTE: The Remote Registry should be enabled on the target server.
- Locate the Windows Management Instrumentation service and repeat these steps.
Configure Removable Storage Media for Monitoring
You can configure IT infrastructure for monitoring removable storage media both locally and remotely.
Review the following:
To configure removable storage media monitoring on the local server
-
On the target server, create the following catalog: “%ALLUSERSPROFILE%\Netwrix Auditor\Windows Server Audit\ETS\” to store event logs. To review Event Trace Session objects' configurationhow to modify the root directory.
If you do not want to use the Netwrix Auditor for Windows Server Compression Service for data collection, make sure that this path is readable via any shared resource.
After environment variable substitution, the path shall be as follows:
C:\ProgramData\Netwrix Auditor\Windows Server Audit\ETS
If your environment variable accesses another directory, update the path.
-
Run the Command Prompt as Administrator.
-
Execute the commands below.
-
To create the Event Trace Session object:
logman import -n "Session\NetwrixAuditorForWindowsServer" -xml "<path to the EventTraceSessionTemplate.xml file>" -
To start the Event Trace Session object automatically every time the server starts:
logman import -n "AutoSession\NetwrixAuditorForWindowsServer" -xml "<path to the EventTraceSessionTemplate.xml file>"where:
NetwrixAuditorForWindowsServer—Fixed name the product uses to identify the Event Trace Session object. The name cannot be changed.<path to the EventTraceSessionTemplate.xml file>—Path to the Event Trace Session template file that comes with Netwrix Auditor. The default path is "C:\Program Files (x86)\Netwrix Auditor\Windows Server Auditing\EventTraceSessionTemplate.xml".
-
To configure removable storage media monitoring remotely
-
On the target server, create the following catalog: “%ALLUSERSPROFILE%\Netwrix Auditor\Windows Server Audit\ETS\” to write data to. To review Event Trace Session objects' configurationhow to modify the root directory.
If you do not want to use the Netwrix Auditor for Windows Server Compression Service for data collection, make sure that this path is readable via any shared resource.
After environment variable substitution, the path shall be as follows:
\
<target_server_name>\c$\ProgramData\Netwrix Auditor\Windows Server Audit\ETSIf your environment variable accesses another directory, update the path.
-
Run the Command Prompt under the target server Administrator's account.
-
Execute the commands below.
-
To create the Event Trace Session object:
logman import -n "Session\NetwrixAuditorForWindowsServer" -xml "<path to the EventTraceSessionTemplate.xml file>" -s <target server name> -
To create the Event Trace Session object automatically every time the server starts:
logman import -n "AutoSession\NetwrixAuditorForWindowsServer" -xml "<path to the EventTraceSessionTemplate.xml file>" -s <target server name>where:
NetwrixAuditorForWindowsServer—Fixed name the product uses to identify the Event Trace Session object. The name cannot be changed.<path to the EventTraceSessionTemplate.xml file>—Path to the Event Trace Session template file that comes with Netwrix Auditor. The default path is "C:\Program Files (x86)\Netwrix Auditor\Windows Server Auditing\EventTraceSessionTemplate.xml".<target server name>—Name of the target server. Provide a server name by entering its FQDN, NETBIOS or IPv4 address.
-
To review Event Trace Session objects' configuration
An Administrator can only modify the root directory and log file name. Other configurations are not supported by Netwrix Auditor.
-
On the target server, navigate to Start → Administrative Tools → Performance Monitor.
-
In the Performance Monitor snap-in, navigate to Performance → Data Collectors Set → Event Trace Sessions.
-
Stop the NetwrixAuditorForWindowsServer object.
-
Locate the NetwrixAuditorForWindowsServer object, right-click it and select Properties. Complete the following fields:
Option Description Directory → Root Directory Path to the directory where event log is stored. If you want to change root directory, do the following: 1. Under the Root directory option, click Browse and select a new root directory. 2. Navigate to C:\ProgramData\Netwrix Auditor\Windows Server Audit and copy the ETS folder to a new location. File → Log file name Name of the event log where the events will be stored. -
Start the NetwrixAuditorForWindowsServer object.
-
In the Performance Monitor snap-in, navigate to Performance → Data Collectors Set → Startup Event Trace Sessions.
-
Locate the NetwrixAuditorForWindowsServer object, right-click it and select Properties. Complete the following fields:
Option Description Directory → Root Directory Path to the directory where event log is stored. Under the Root directory option, click Browse and select a new root directory. File → Log file name Name of the event log where the events will be stored.
Configure Windows Registry Audit Settings
Windows Registry audit permissions must be configured on each Windows server you want to audit so that the “Who” and “When” values are reported correctly for each change. For test environment, PoC or evaluation you can use automatic audit configuration. If you want to configure Windows Registry manually, follow the instructions below.
The following audit permissions must be set to "Successful" for the
HKEY_LOCAL_MACHINE\SOFTWARE and HKEY_LOCAL_MACHINE\SYSTEM keys:
- Set Value
- Create Subkey
- Delete
- Write DAC
- Write Owner
Perform one of the following procedures depending on the OS version:
- Configuring Windows registry audit settings on pre-Windows Server 2012 versions
- Configuring Windows registry audit settings on Windows Server 2012 and above
Configuring Windows registry audit settings on pre-Windows Server 2012 versions
Step 1 – On your target server, open Registry Editor: navigate to Start → Run and type "regedit".
Step 2 – In the registry tree, expand the HKEY_LOCAL_MACHINE key, right-click SOFTWARE and select Permissions from the pop-up menu.
Step 3 – In the Permissions for SOFTWARE dialog, click Advanced.
Step 4 – In the Advanced Security Settings for SOFTWARE dialog, select the Auditing tab and click Add.
Step 5 – Select the Everyone group.
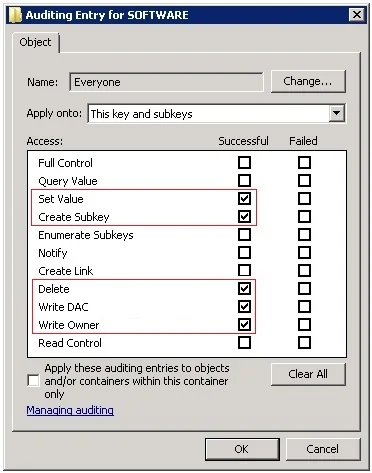
Step 6 – In the Auditing Entry for SOFTWARE dialog, select "Successful" for the following access types:
- Set Value
- Create Subkey
- Delete
- Write DAC
- Write Owner
Repeat the same steps for the HKEY_LOCAL_MACHINE\SYSTEM key.
Configuring Windows registry audit settings on Windows Server 2012 and above
Step 1 – On your target server, open Registry Editor: navigate to Start → Run and type "regedit".
Step 2 – In the registry tree, expand the HKEY_LOCAL_MACHINE key, right-click SOFTWARE and select Permissions from the pop-up menu.
Step 3 – In the Permissions for SOFTWARE dialog, click Advanced.
Step 4 – In the Advanced Security Settings for SOFTWARE dialog, select the Auditing tab and click Add.
Step 5 – Click Select a principal link and specify the Everyone group in the Enter the object name to select field.
Step 6 – Set Type to "Success" and Applies to to "This key and subkeys.
Step 7 – Click Show advanced permissions and select the following access types:
- Set Value
- Create Subkey
- Delete
- Write DAC
- Write Owner
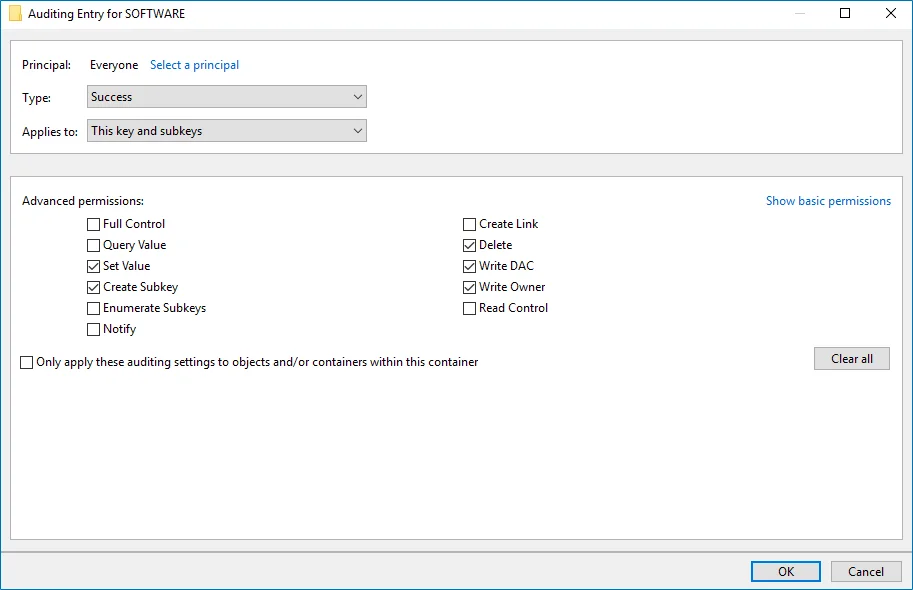
Repeat the same steps for the HKEY_LOCAL_MACHINE\SYSTEM key.
Using Group Policy for configuring registry audit is not recommended, as registry DACL settings may be lost.