Data Grid Features
The data grids within various tables have several features to improve your experience.
Search & Filter
There is a Search box above a table's header row that can be used to filter the table data.
Begin typing in the Search box. The filter acts as a wildcard, filtering the table data as you type.
Column Filters
There is a filter icon to the right of each column name that can be used to apply a column specific filter. You can apply filters to multiple columns simultaneously.
Click the filter icon for the column you want to filter. Select the values you want to filter for from the list, and click Apply.
NOTE: Hold the Shift key and click the first and last values to select a group of adjacent values, or hold the Ctrl key and click each value to select multiple values individually.
The filter icon is highlighted orange for a column where a filter is applied. To clear an applied filter, click the filter icon and click Clear.
Resize Columns
Table column widths can be resized to change the width.
Simply select the edges of the column headers and drag to the desired width.
Sort
Data within a table can be sorted alphanumerically for a column.
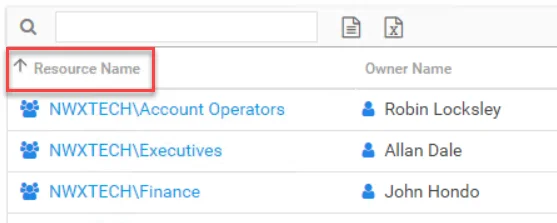
Click on any column header. An arrow will appear next to the column name indicating the sort to be ascending or descending order.
Columns Selector
Columns can be hidden or unhidden. Available columns for a table are listed in the column selector menu that appears when you right-click on a column header.
The column selector menu shows all available columns for the table. Check columns are visible. Unchecked columns are hidden.
Exports
There are two export buttons above a table's header row that can be used to export the data currently displayed within the table.
- CSV Export – Downloads the data within the table in a CSV file format
- Excel Export – Downloads the data within the table in an Excel file format
The export mimics the table with any sort, filter, or column modifications. The Excel or CSV file can then be distributed as desired. The Excel file presents an easy to read format, including information about the selected table and resource at the top. The CSV file displays column headers in the first row.
Edit Notes Window
The Edit Note window can be opened from a variety of interfaces. Follow the steps to add or edit a note.
Step 1 – Select the item in the interface and click Edit Notes. The Edit Notes window opens.
Step 2 – Type or edit the note in the textbox.
Step 3 – Click OK when finished. The Edit Notes window closes.
The user name and a date timestamp will appear at the beginning of each note added.
Group Membership Window
When a group trustee appears in the Trustee Name column of a review, it appears as a blue hyperlink in addition to the group icon displayed in front of the name.
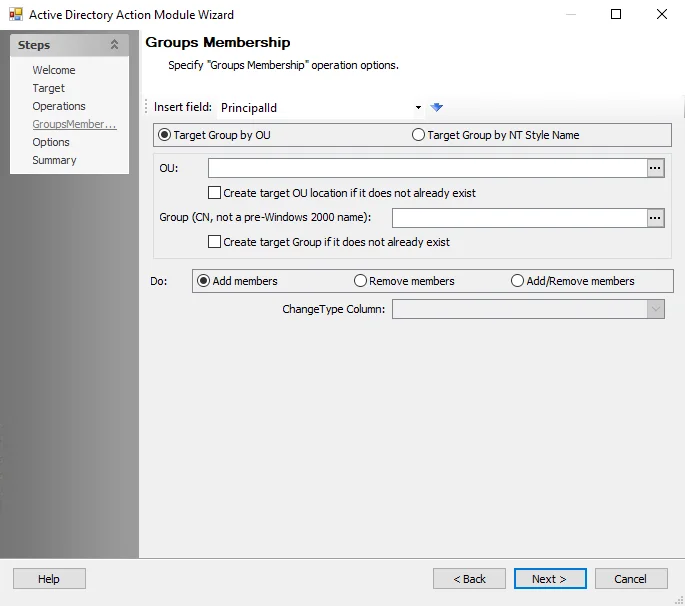
Click the hyperlink to open the Group Membership window. The group’s direct membership is listed for review. Click Close to return to the review.
Remove Changes Window
Select the desired resource on a Review Details page and click Remove Changes. The Remove changes window opens to confirm the action.
CAUTION: This will clear all owner-recommended changes and notes for the resource. The owner will be required to complete the review again.
Click Yes to clear owner-recommended changes. Click No to cancel it. The Remove changes window closes.
Approval Process
After all owners assigned to a specific review have submitted their review, its status on the Manage Reviews page of the Entitlement Reviews interface changes to Responses awaiting review.
In the approval process, the Review Administrator looks at the owner-recommended changes and chooses to approve, deny, or defer the changes.
See the Process Owner Responses topic for instructions on how to perform a granular review of owner-recommended changes. See the Batch Processing topic for instructions on how to approve, decline, or defer all owner-recommended changes for a review.
Process Owner Responses
Follow the steps to perform a granular review of a resource owner's recommended changes.
Step 1 – On the Manage Reviews page, select a review and click View Details. The Review Details page opens.
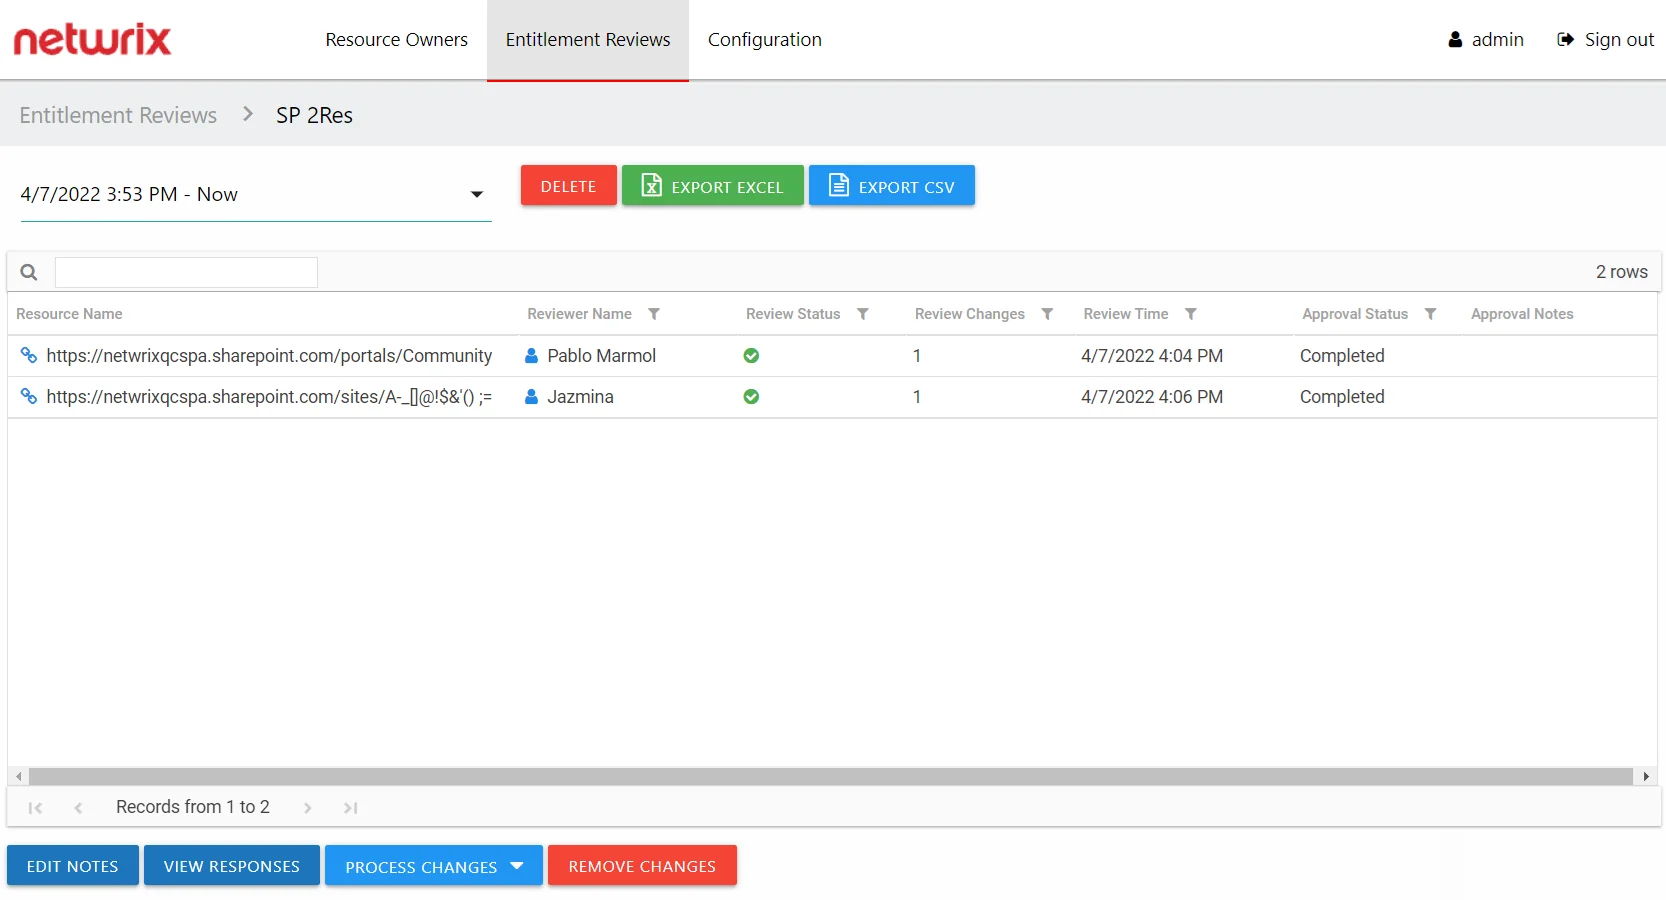
Step 2 – Select a resource in the list and click View Responses. The View Responses window opens.
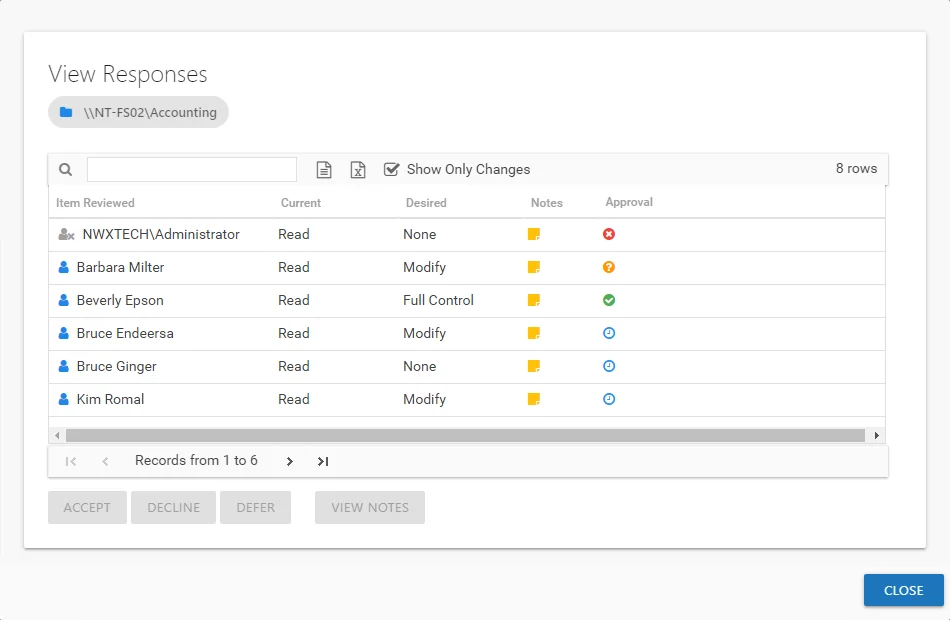
Step 3 – By default, the table displays only the recommended changes. Select an item and click the desired action button: Accept, Decline, or Defer. The Approval column icon updates. See the View Responses Window topic for additional information.
Step 4 – Repeat Step 3 until all changes have been processed. Then click Close. The View Responses window closes.
Step 5 – Repeat Steps 2-4 for each resource included in the review.
Step 6 – Remediation of the accepted changes must be done manually. Accepted changes must be implemented outside of the application by your IT department. Use the Export Excel or Export CSV buttons to generate and download an export of accepted changes.
Step 7 – When remediation is complete, return to the Mange Reviews page (click on the breadcrumb). Select the review in the list and click Mark Completed.
The review remains marked as Completed until the next instance is started.
Batch Processing
Follow the steps to perform a batch processing of a resource owner's recommended changes.
Step 1 – On the Manage Reviews page, select a review and click View Details. The Review Details page opens. .

Step 2 – Select a resource in the list and open the Process Changes drop-down menu.
Step 3 – Select the desired action for all recommended changes: Accept, Decline, or Defer.
Remember, all recommended changes for the selected resource will be processed with the same resolution.
Step 4 – Repeat Steps 2-3 for each resource included in the review.
Step 5 – Remediation of the accepted changes must be done manually. Accepted changes must be implemented outside of the application by your IT department. Use the Export Excel or Export CSV buttons to generate and download an export of accepted changes.
Step 6 – When remediation is complete, return to the Mange Reviews page (click on the breadcrumb). Select the review in the list and click Mark Completed.
The review remains marked as Completed until the next instance is started.
Entitlement Reviews Interface
The Entitlement Reviews interface opened by the Entitlement Reviews tab is where Review Administrators perform many operations around managing reviews. This interface has multiple pages:
- Manage Reviews Page — Create and manage all reviews
- Review Details Page — Manage and view all instances for a specific review
Manage Reviews Page
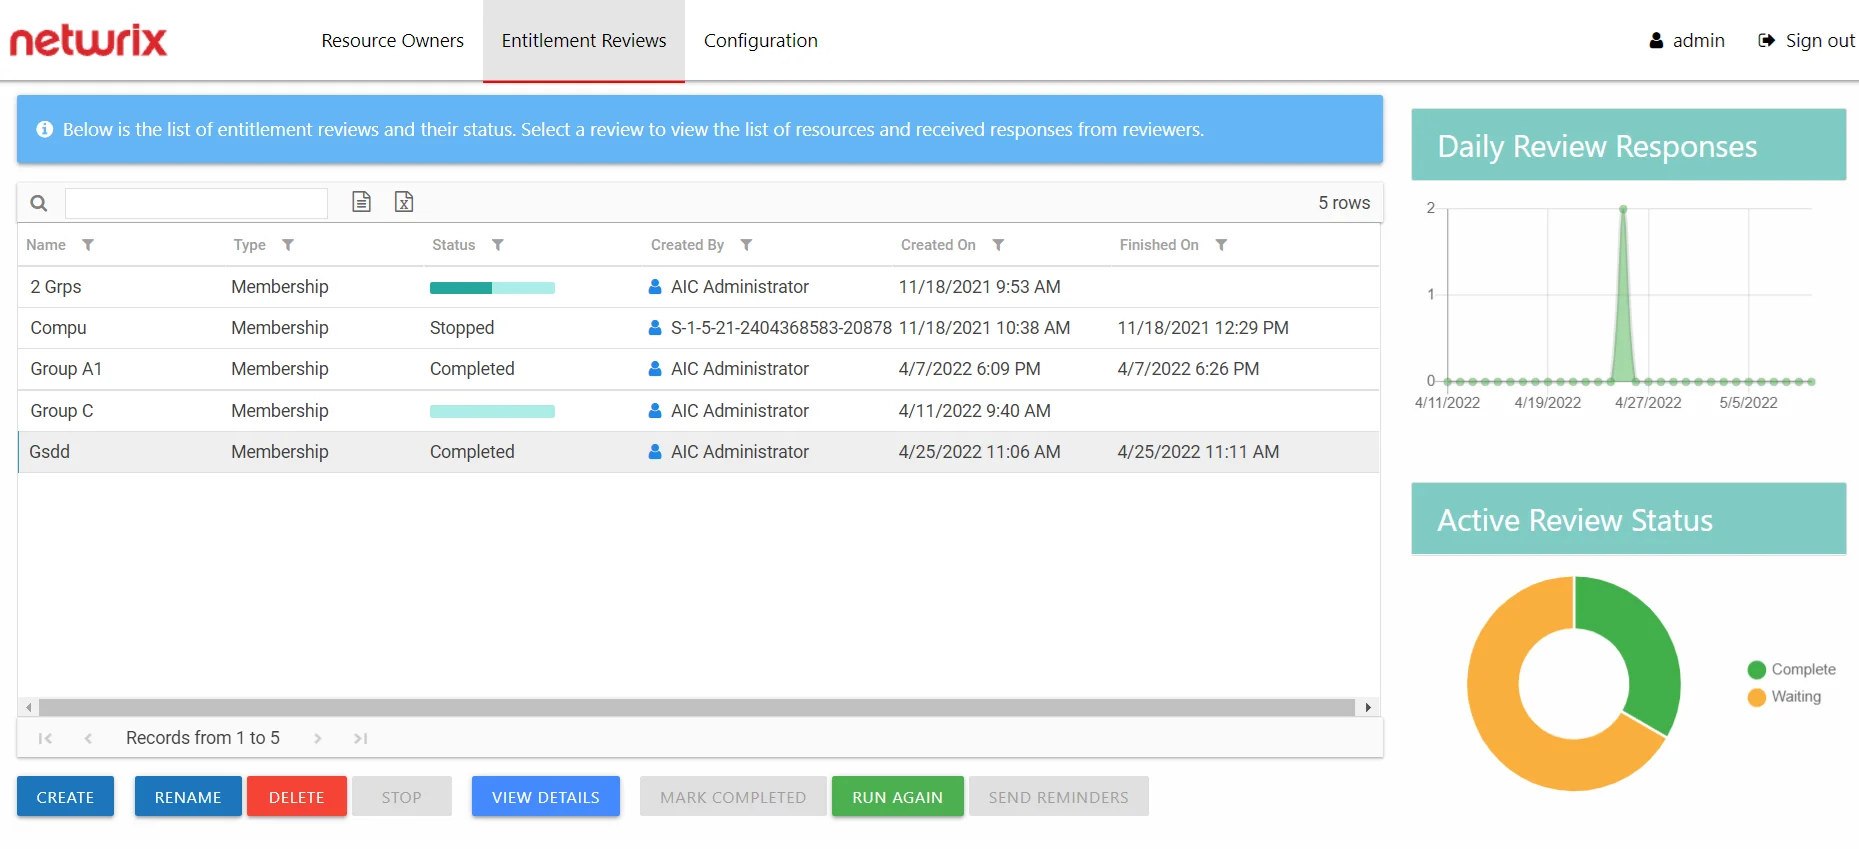
The Manage Reviews page is the first page in the Entitlement Reviews interface. It displays high-level information for reviews.

The interface includes:
- Table of reviews
- Daily Review Responses line graph
- Active Review Status donut graph
The information displayed in the table includes:
-
Name — Name of the review, as provided by the Review Administrator
-
Type — Type of review:
- Access – Review user access rights to resources
- Membership – Review group membership
-
Status — Status of the review:
-
Status bar with specified percentage completed
- [Empty bar] 0% – Indicates not started. Hovering over the bar will display the number of items included.
- [Partially filled bar] with a non-zero% – Indicates the specific percentage of items completed. Hovering over the bar displays the number of items completed out of the total number of items.
-
Responses awaiting review — Owner(s) completed reviews. Waiting on Review Administrator's approval.
-
All responses processed — Reviews have been approved by Review Administrators. The review can be marked as completed.
-
Stopped — Indicates that the review was stopped and is considered complete even if all of the responses have not been received or processed. The review remains static until it is run again.
-
Completed — Indicates the Review Administrator has processed the owners' responses. The review remains static until it is run again. This status can appear by accepting the review as-is with the Mark Completed button.
-
-
Created By — Name of the Review Administrator who create the review
-
Created On — Date timestamp for when the review was creation. If it has been run multiple times, this is the date timestamp of the last instance.
-
Finished On — Date timestamp when the review is marked complete by the Review Administrator. If it has been run multiple times, this is the date timestamp of the last instance.
The table data grid functions the same way as other table grids. See the Data Grid Features topic for additional information.
The buttons at the bottom enable you to conduct the following actions:
| Button | Description |
|---|---|
| Create | Launches the Create Review wizard for creating a new review. See the Create Review Wizard topic for additional information. |
| Rename | Opens the Rename Review window for modifying the review name. See the Rename Review Window topic for additional information. |
| Delete | Opens the Delete Review window to delete review and its instance history, which asks for confirmation of the action. See the Delete Review Window topic for additional information. |
| Stop | Opens the Stop Review window, which asks for confirmation of the action. See the Stop Review Window topic for additional information. |
| View Details | Opens the Review Details page for the selected review. See the Review Details Page topic for additional information. |
| Mark Completed | Closes the selected review as-is and marks it as completed. Requires the owner(s) to have responded. CAUTION: No confirmation is requested for this action. |
| Run Again | Opens the Create Review wizard for the selected review without the option to change the review type. Modify as desired and relaunch the review. See the Review Instances topic for additional information. |
| Send Reminders | Sends a notification email to the assigned owner(s), reminding of the pending review. Opens the Send Reminders window, which indicates an action status. See the Send Reminders Window topic for additional information. |
Review Details Page
The Review Details page displays information for all instances of the selected review, which is named in the page breadcrumb. This page is opened by selecting a review on the Manage Reviews page and clicking View Details.

Instances are selected from the drop-down menu. By default the most current instance will be displayed. Instances are named with date timestamps indicating the start and end times for the review instance.
The information displayed in the table includes:
-
Resource Name — The icon indicates the type of resource. The resource name includes its location, such as the UNC path for a file system resource, the URL for SharePoint resource, or Group name (e.g., [Domain][Group]).
-
Reviewer Name — Primary owner assigned to the resource
-
Review Status — Indicates whether or not the assigned owner has submitted the review. Tool-tips display when hovering over the icons.
-
Review Changes — Displays a count of items that have recommended changes for the resource
-
Review Time — Date timestamp for when the owner submitted the review
-
Approval Status — Status of the Review Administrator's approval:
-
Blank — Indicates the owner has not completed the review for the resource
-
Status bar with specified percentage completed
- [Empty bar] 0% – Indicates not started. Hovering over the bar will display the number of items included.
- [Partially filled bar] with a non-zero% – Indicates the specific percentage of items completed. Hovering over the bar displays the number of items completed out of the total number of items.
-
Completed — Indicates the Review Administrator has processed the owners' responses. The review remains static until it is run again.
-
-
Approval Notes – Icon indicates a Note has been added. Click on the icon to read the attached note(s). Notes displayed here can only be added or viewed by the Review Administrator. See the Edit Notes Window topic for additional information.
The table data grid functions the same way as other table grids. See the Data Grid Features topic for additional information.
The buttons at the top and bottom enable you to conduct the following actions:
| Button | Description |
|---|---|
| Delete | Opens the Delete Review window to delete selected review instance, which asks for confirmation of the action. See the Delete Review Window topic for additional information. |
| Export Excel | Exports the selected review instance information to an Excel spreadsheet. This automatically downloads the spreadsheet. See the Data Grid Features topic for additional information. |
| Export CSV | Exports the selected review instance information to a CSV file. This automatically downloads the file. See the Data Grid Features topic for additional information. |
| Edit Notes | Opens the Edit Notes window for the selected resource and allows free-text editing of the notes. See the Edit Notes Window topic for additional information. |
| View Responses | Opens the View Responses window, which is only available if the owner has recommended changes for the resource. This window displays all recommended changes, notes provided by the owner for the recommended change, and action buttons to Accept, Decline, or Defer the recommended change. See the View Responses Window topic for additional information. |
| Process Changes | Opens a drop-down menu to Accept, Decline, or Defer all owner-recommended changes for the selected resource. This option allows the Review Administrator to process responses in batches, so all owner-recommended changes for the selected resource will be processed with the same action. |
| Remove Changes | Opens the Remove changes window. Clears all requested changes for the selected resource. The resource is returned to a ‘Waiting’ status, requiring the owner to review the resource again. See the Remove Changes Window topic for additional information. |
Reviews Overview
The Entitlement Reviews interface is where users with either the Security Team or Administrator role (to be referred to as Review Administrators) can manage reviews. The workflow provides a way for business users or data custodians (to be referred to as Owners) to attest to the access and privileges users have to their resources.
For the purpose of the Access Reviewsapplication, a “resource” refers to the file system shared folders, SharePoint Online site collections, and Active Directory (AD) groups. All data available within the Access Reviews application is collected by Netwrix Auditor according to the synchronized monitoring plans.
Remember, Owners are assigned to resources in the Resource Owners interface. Only resources with assigned Owners can be included in a reviews.
Who Can Run Reviews (Review Administrators)?
-
Console Users with Administrator role
-
Can complete the Review Administrator's approval process without impacting the visibility into the review created by a Review Administrator with the Security Team role
CAUTION: Visibility into a review created by a Review Administrator with the Security Team role is blocked if a Review Administrator with the Administrator role starts a new instance.
-
-
Console Users with Security Team role
- Visibility into only those reviews personally created
Who Participates in Reviews?
- Review Administrators — Create / start reviews and approve / process owner recommended changes
- Owners — Perform reviews and recommend changes
Types of Reviews
There are two types of reviews:
- Access – Review user access rights to resources
- Membership – Review group membership
See the Entitlement Reviews Interface topic for additional information.
Workflow of Reviews
Prerequisite:
-
The Access Reviews application is configured to send Notifications. See the Notifications Page topic for additional information.
NOTE: By default, the application is configured to send notifications only to the primary owner. However, this can be customized on the Configuration > Notifications page to send notifications to all assigned owners.
-
Owners assigned to resources within the Resource Owners interface. See the Resource Owners Overview topic for additional information.
Workflow:
RECOMMENDED: When deploying the Access Reviews application in an organization to process reviews, owners should be notified prior to launching the first set of reviews. See the Notification to Owners topic for additional information.
- Review Administrator creates a review or starts a new review instance. See the Create Review Wizard topic for additional information.
- Owner performs a review. See the Pending Reviews topic for additional information.
- Review Administrator approves owner recommendations. See the Approval Process topic for additional information.
- Implement approved changes in your organization. Manually, export a list of approved changes and deliver it to your IT department.
When desired, the Review Administrator runs another instance of the review and the workflow starts again. See the Review Instances topic for additional information.
Pending Reviews
When your organization performs a review on a resource for which you are the assigned owner, it means you, the business user or data custodian, need to attest to the access and privileges users have to your resource. When the Review Administrator creates a new review or starts a new instance of an existing review, you receive an email notification that includes a link to the your pending reviews.
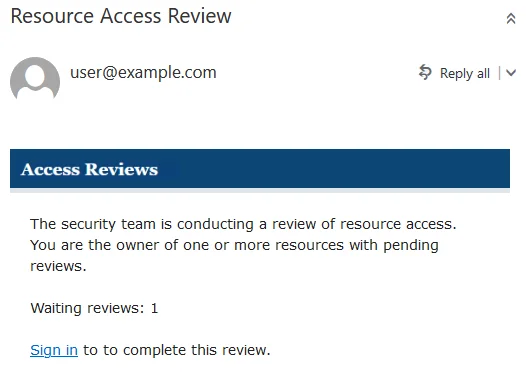
Use the Sign in link at the bottom to open the My Reviews interface in the Access Reviews Console.
Remember, your company domain credentials are used to log in.
The My Reviews interface has two pages: Pending Reviews and Review History. See the Review History Page topic for additional information.
Pending Reviews Page
The Pending Reviews page lists all of your resources included in pending reviews.
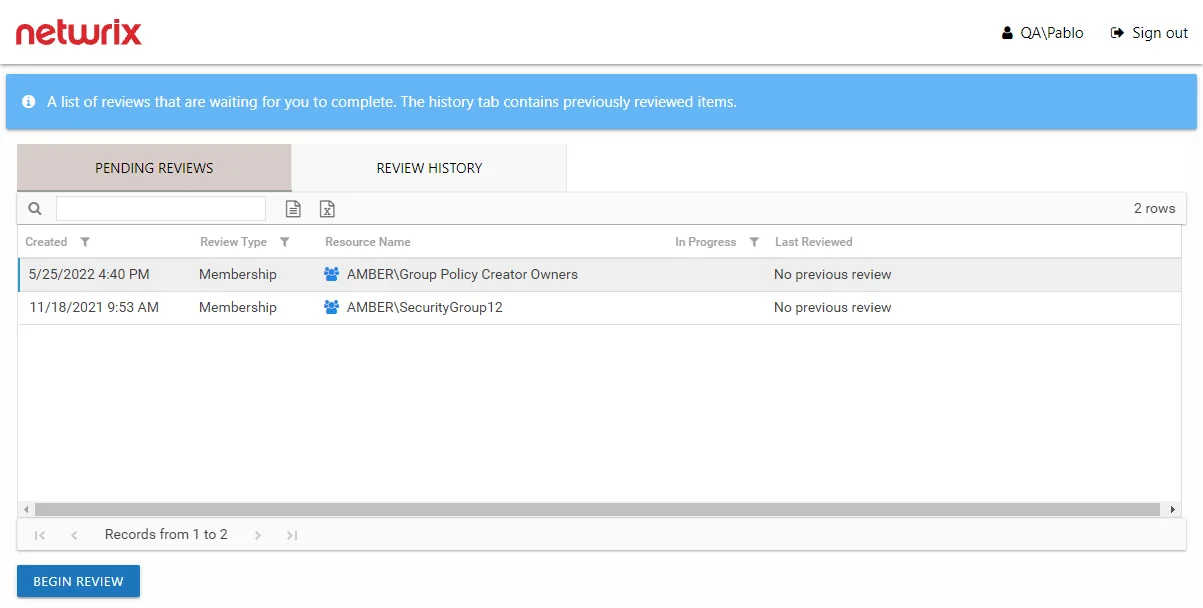
The information displayed in the table includes:
- Created — Date timestamp for when the review was creation. If it has been run multiple times, this is the date timestamp of the last instance.
- Review Type – Type of review:
- Access – Review user access rights to resources
- Membership – Review group membership
- Resource Name — The icon indicates the type of resource. The resource name includes its location, such as the UNC path for a file system resource, the URL for SharePoint resource, or Group name (e.g., [Domain][Group]).
- In Progress — Displays a clock icon for an in-progress review
- Last Reviewed — Date timestamp when the last review took place for the resource.
The table data grid functions the same way as other table grids. See the Data Grid Features topic for additional information.
Performing a review means you are evaluating the resources. You can leave the resource unchanged or make recommendations for changes. Consider the following examples:
- In an Access review, you can recommend changes to the type of access granted to the resource.
- In a Membership Review, you can recommend removing group membership from specific users.
Remember, any proposed changes are not committed until the Review Administrator approves the recommendation and processes those changes.
Resource Review Page
The Begin Review button opens the Resource Review page to start the review.
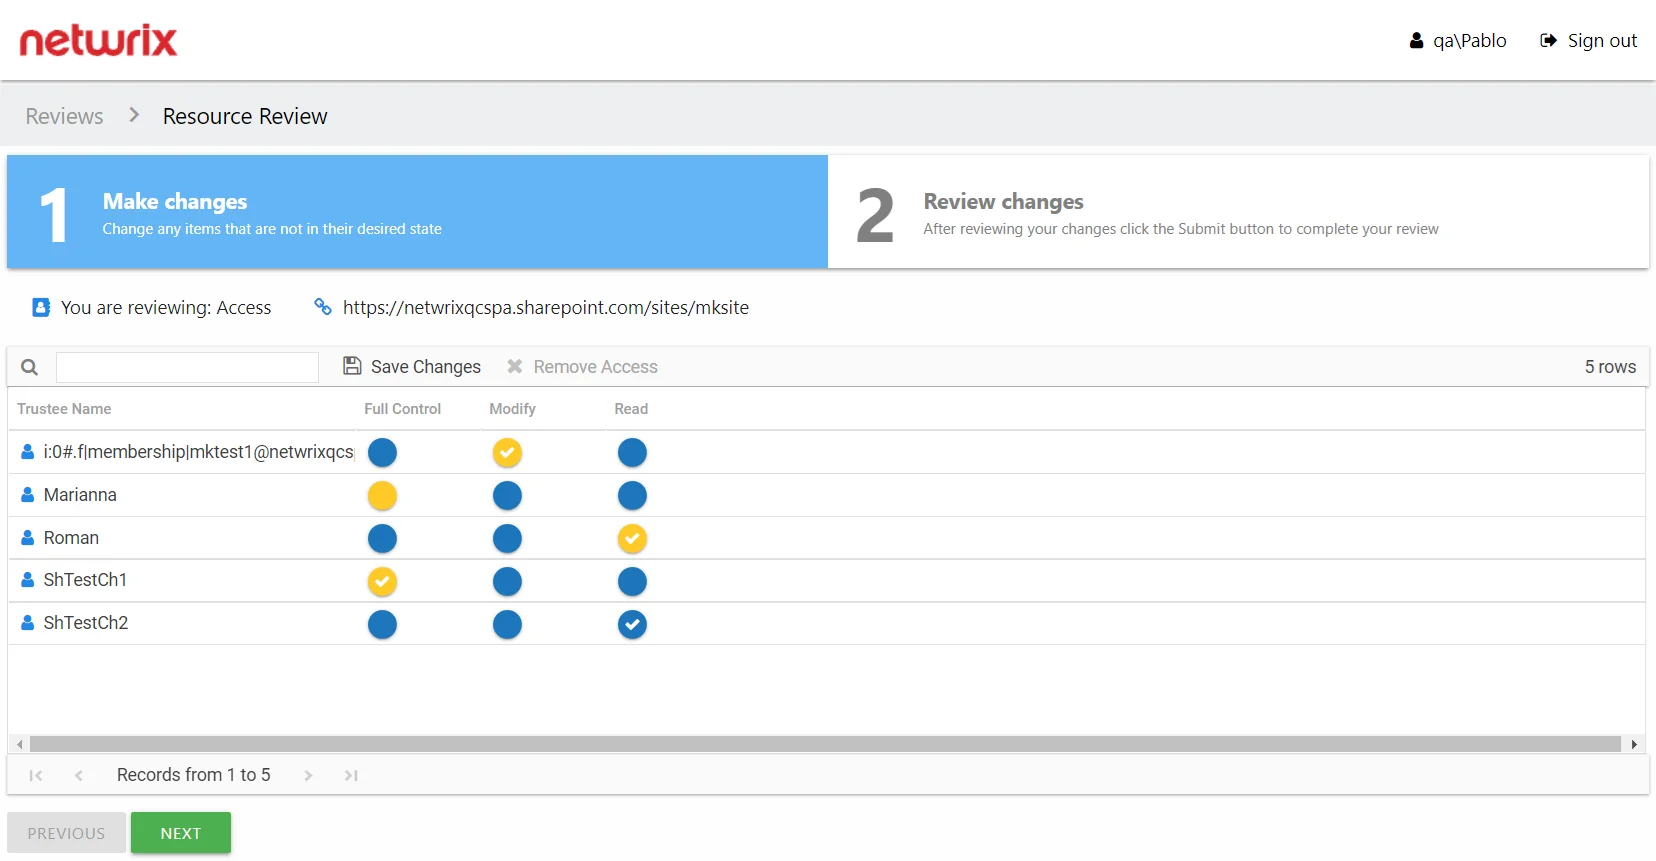
The Resource Review page varies based on the type of review; however, there are several common features:
-
Tabs — This page has two tabs:
- 1 Make changes — Displays current access for the resource.
- 2 Review changes — Displays changes you recommend making for your review prior to submission
-
You are reviewing — Indicates the type of review, the resource being reviewed, and the date timestamp for when the review instance was started
-
Search — Filters the table for matches to the typed value
-
Save Changes — Saves all recommended changes, enabling you to leave the review in progress and return at a later time to complete it. It opens the Saving review window, which displays a status for the action.
-
Remove Access — On the 1 Make changes tab, removes access from the selected trustee(s). Ctrl-click can be used for multi-select. Current access blue icon with a checkmark will turn to an empty yellow icon.
-
Only show changes since last review — Scopes the table to only display those items that have been modified since the last review instance
-
Previous / Next buttons — Moves between the two tabs
-
Submit button — On the 2 Review changes tab, the Next button becomes a Submit button. This submits your review to the Review Administrator.
The content within the table varies, and additional options may appear depending on the type of review being conducted. See the following sections for step by step instructions:
Perform an Access Review
An Access review can be conducted for various types of data repository resources. Follow the steps to perform an Access review.
Step 1 – On the Pending Reviews page, select the resource with a pending Access review and click Begin Review. The Resource Review page opens to the 1 Make changes tab.

The table displays access information for the resource being reviewed:
- Trustee Name — Name of the trustee with access to this resource. If the trustee is a group, click the hyperlink to open the Group Membership window. See the Group Membership Window topic for additional information.
- Access Level (Full Control, Modify, and Read) columns — Blue checkmark icon indicates current access level
Step 2 – Recommend access changes for a trustee by clicking the icon for the desired access level (Full Control, Modify, or Read columns). A yellow checkmark icon indicates the new level of access you are recommending.
Step 3 – Recommend removing access by selecting one or more trustees and clicking the Remove Access button or by clicking on a checkmark icon. A blank yellow icon indicates you are recommending all access be removed; it appears in the column for the current level of access.
Remember, at any time you can save your recommendations and exit the review. It will remain pending until you submit all recommendations for this resource.
Step 4 – When the recommended changes are set as desired, click Next. The 2 Review changes tab opens in the Resource Review page.
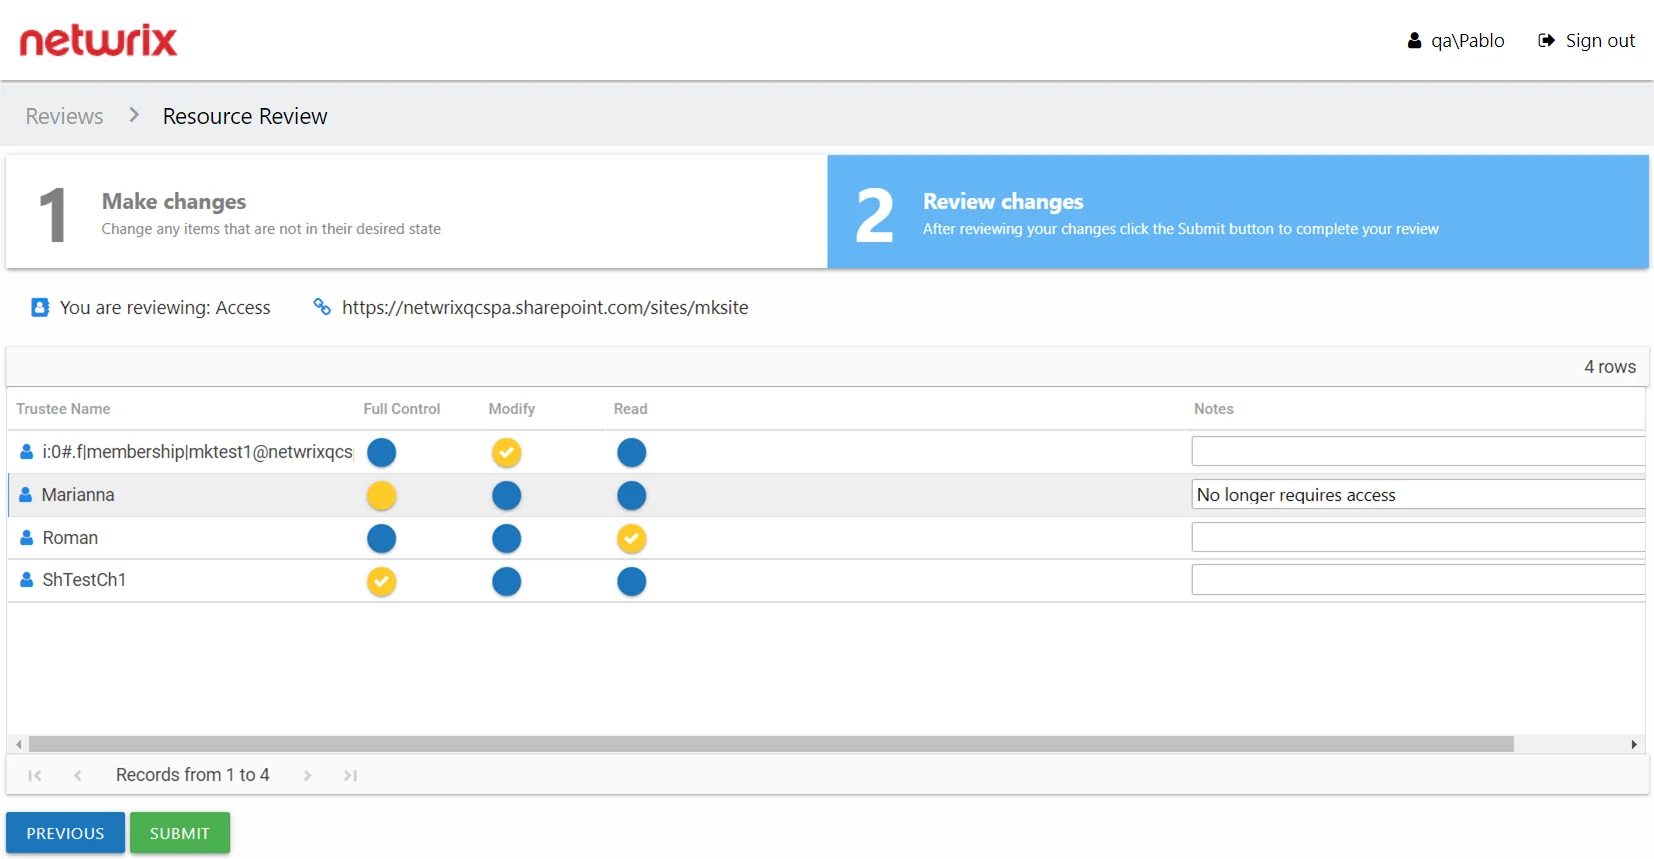
Step 5 – This tab displays a filtered table of trustees with recommended changes. Confirm your recommendations and optionally add notes to the Review Administrator. Owners are encouraged to leave notes explaining why the change is recommended.
NOTE: To make changes to your recommendations, you must return to the first tab. Click Previous.
Step 6 – When all recommendations are confirmed and the desire notes added, click Submit. A message displays stating that the review is complete. Click OK to close the message window.
The review for this resource is now complete. You will be redirected to the Pending Reviews page. Your recommended changes have been sent to the Review Administrator for approval and processing.
Perform a Membership Review
A Membership review is an evaluation of group membership. Follow the steps to perform a Membership review.
Step 1 – On the Pending Reviews page, select the resource with a pending Membership review and click Begin Review. The Resource Review page opens to the 1 Make changes tab.
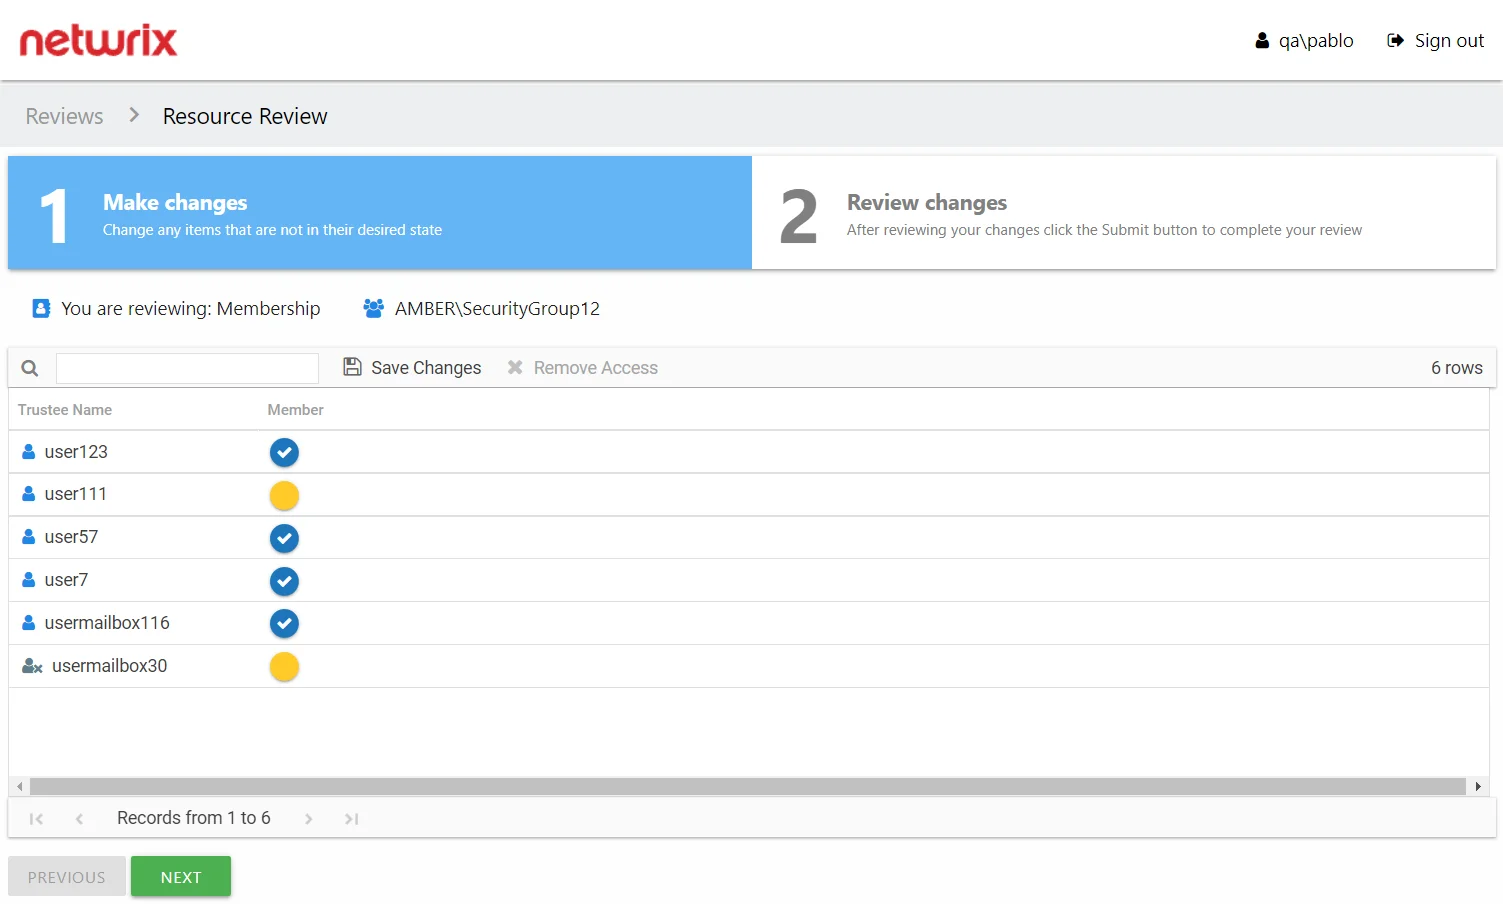
The table displays membership information for the group being reviewed:
- Trustee Name — Name of the trustee with group membership. If the trustee is a group, click the hyperlink to open the Group Membership window. See the Group Membership Window topic for additional information.
- Member — Blue checkmark icon indicates current membership
Step 2 – Recommend removing membership by selecting one or more trustees and clicking the Remove Access button or by clicking on a checkmark icon. A blank yellow icon indicates you are recommending the trustee be removed from the group.
Remember, at any time you can save your recommendations and exit the review. It will remain pending until you submit all recommendations for this resource.
Step 3 – When the recommended changes are set as desired, click Next. The 2 Review changes tab opens in the Resource Review page.
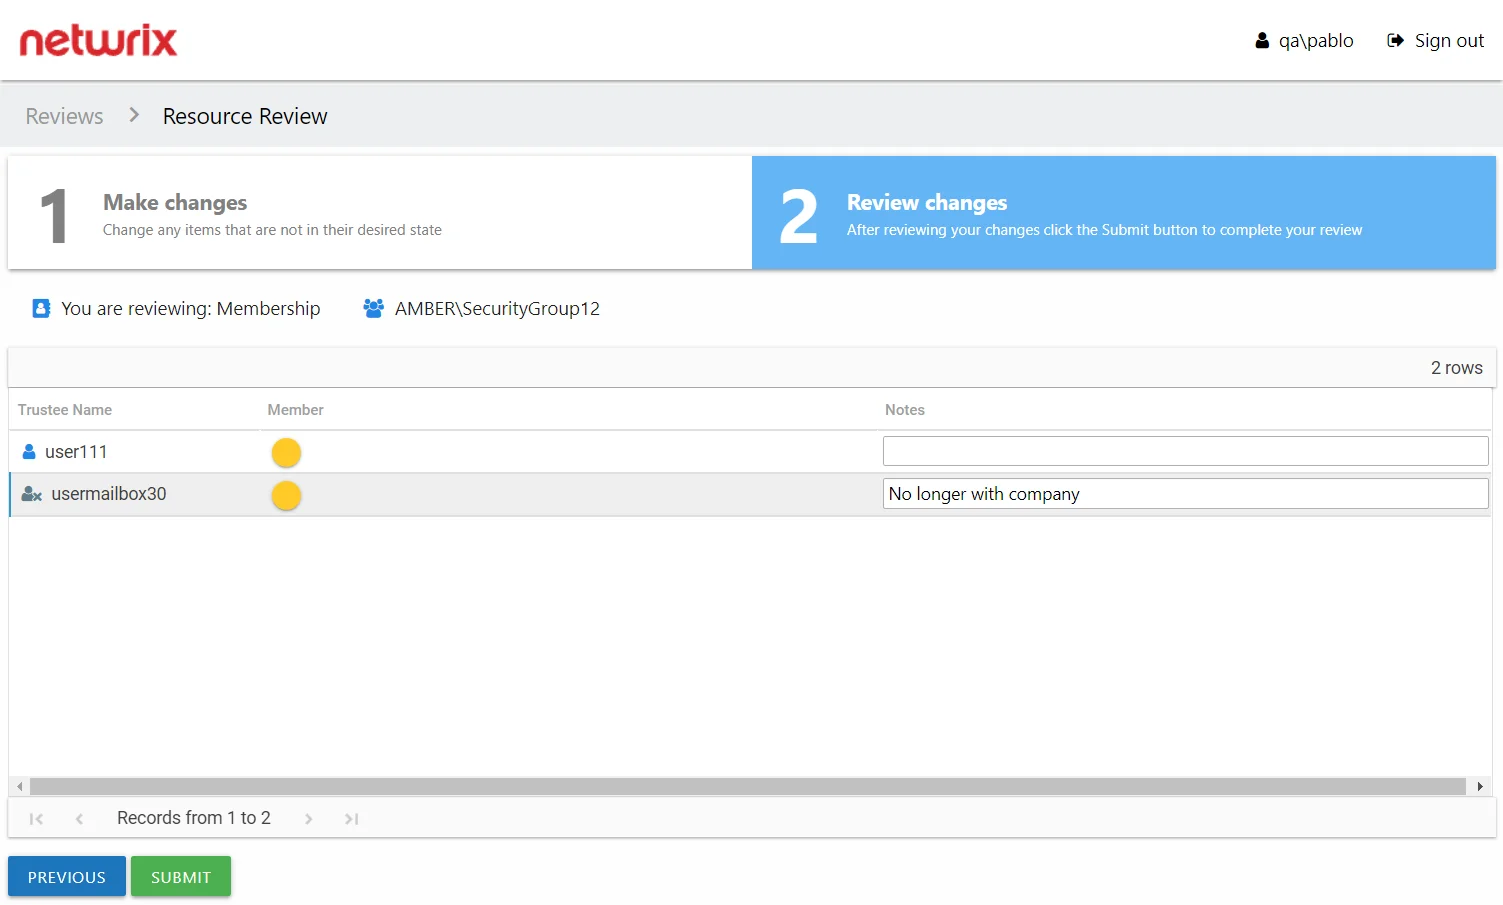
Step 4 – This tab displays a filtered table of trustees with recommended changes. Confirm your recommendations and optionally add notes to the Review Administrator. Owners are encouraged to leave notes explaining why the change is recommended.
NOTE: To make changes to your recommendations, you must return to the first tab. Click Previous.
Step 5 – When all recommendations are confirmed and the desire notes added, click Submit. A message displays stating that the review is complete. Click OK to close the message window.
The review for this resource is now complete. You will be redirected to the Pending Reviews page. Your recommended changes have been sent to the Review Administrator for approval and processing.
Review History Page
The Review History page lists all completed review instances for your resources.
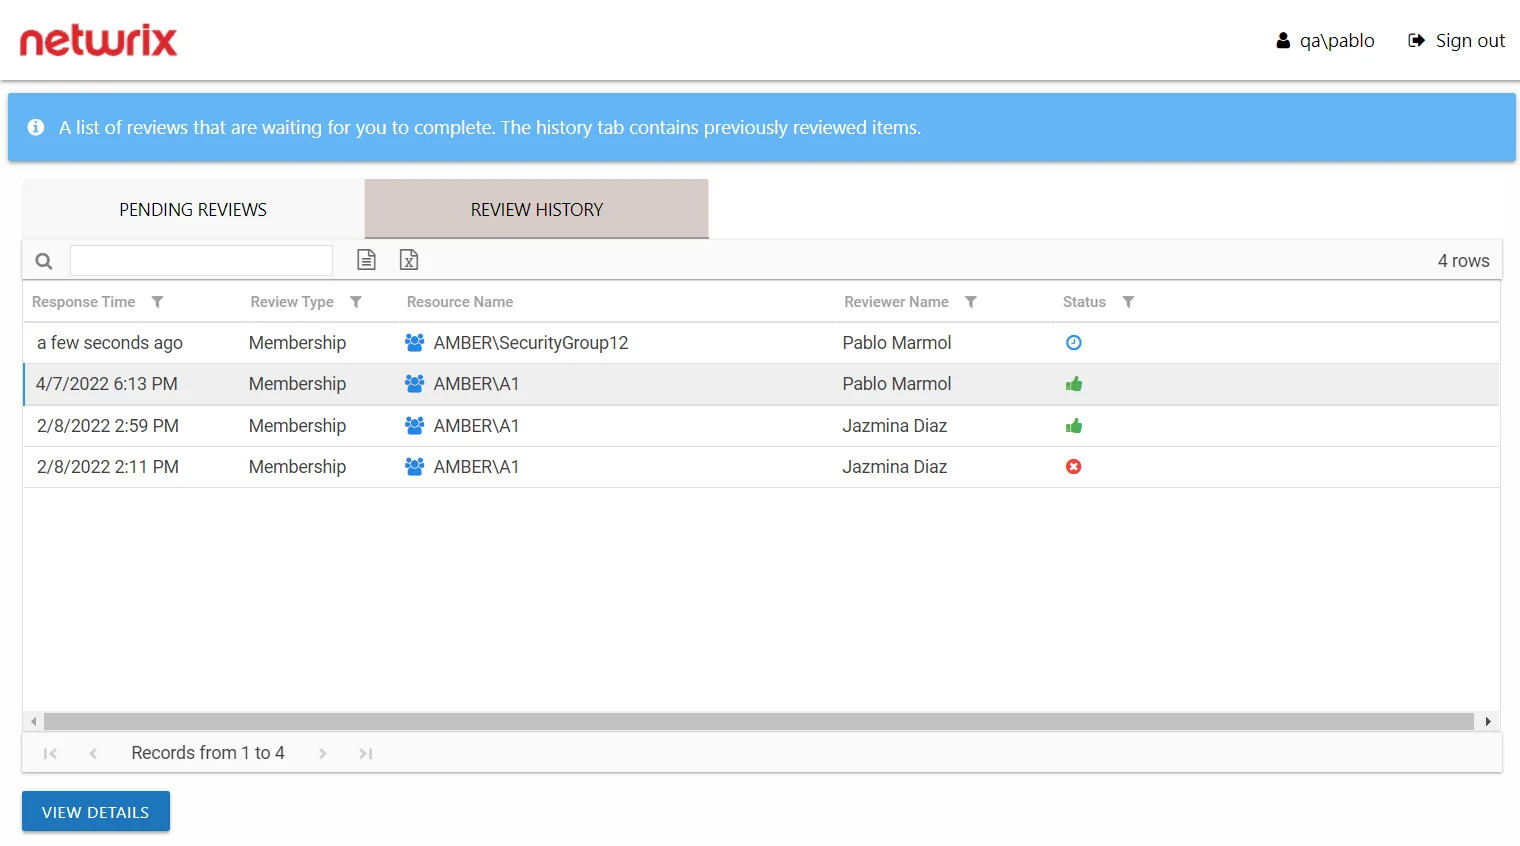
The information displayed in the table includes:
- Response Time – Date timestamp when the last review took place for the resource.
- Review Type – Type of review
- Resource Name – The icon indicates the type of resource. The resource name includes its location, such as the UNC path for a file system resource, the URL for SharePoint resource, or Group name (e.g., [Domain][Group]).
- Reviewer Name – Name of the assigned owner who performed the review
- Status – Icon indicates the decision provided by the Review Administrator: Accept, Decline, Defer, or Waiting. Hover over a status icon to display its tooltip.
The table data grid functions the same way as other table grids. See the Data Grid Features topic for additional information.
Review Details Window
The View Details button at the bottom of the Review History page opens the Review Details window for a resource where changes were recommended.
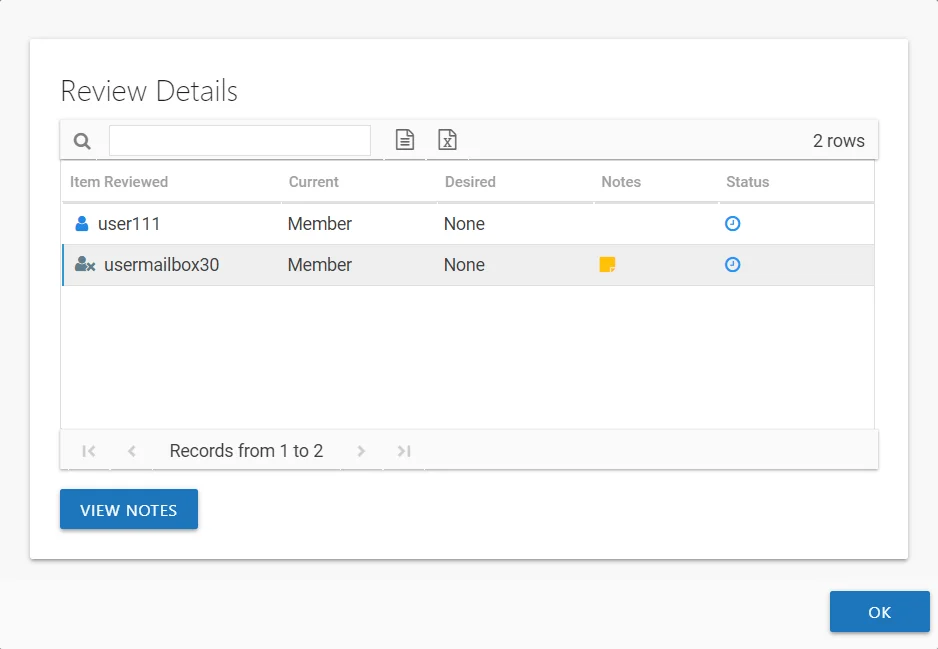
The information displayed in the table includes:
- Item Reviewed – Item upon which changes were suggested by the owner
- Current – Current state of the item at the time of the review. It could be the type of access (for Access reviews) or being a member (for Membership reviews).
- Desired – Change suggested by the owner. It could be the new type of access (for Access reviews) or removing membership (for Membership reviews).
- Notes – An icon here indicates notes were entered by the owner. Select the item and click the View Notes button to open the View Notes window.
- Status – Icon indicates the decision provided by the Review Administrator: Accept, Decline, Defer, or Waiting. Hover over a status icon to display its tooltip.
Click OK to close the window.
Review Instances
After a review has been completed, it can be run again, which creates multiple instances of the review. Each instance is identified by date timestamps indicating its start and end times.
RECOMMENDED: Prior to running another review instance, ensure the most up to date information is available to owners for review.

On the Manage Reviews page in the Entitlement Reviews interface, a review with a Completed status can be started again. Select the review and click Run Again. The Create Review wizard opens without the Review Type page. The review can be run as-is by navigating through the wizard with the Next buttons, or you can modify as desired. Completing the wizard process restarts the review. See the Create Review Wizard topic for additional information.
Delete Review Window
The Delete Review window opens from either the Manage Reviews Page or the Review Details Page of the Entitlement Reviews interface:
- Delete Entire Review — Deleting a review from the Manage Reviews page will delete all instances of the selected review
- Delete Review Instance — Deleting a review from the Review Details page will delete the selected review instance
Delete Entire Review
Select the desired review on the Manage Reviews page and click Delete. The Delete Review window opens to confirm the action.
CAUTION: This will delete all instances of the selected review and all historical data associated with it.
Click Yes to complete the deletion. Click No to cancel it. The Delete Review window closes.
Delete Review Instance
Select the desired review instance from the drop-down menu on the Review Details page and click Delete. The Delete Review window opens to confirm the action.
CAUTION: This will delete all historical data associated to the selected review instance.
Click Yes to complete the deletion. Click No to cancel it. The Delete Review window closes.
Rename Review Window
The Rename Review window opens from the Manage Reviews Page of the Entitlement Reviews interface. Follow the steps to rename a review.
Step 1 – Select the review and click Rename. The Rename Review window opens.
Step 2 – Edit the review name in the textbox.
Step 3 – Click OK when finished. The Rename Review window closes.
The renamed review will display in the table on the Manage Reviews page.
Selected Resources Window
The Selected Resources window opens from the View Selections button in the Create Review Wizard.
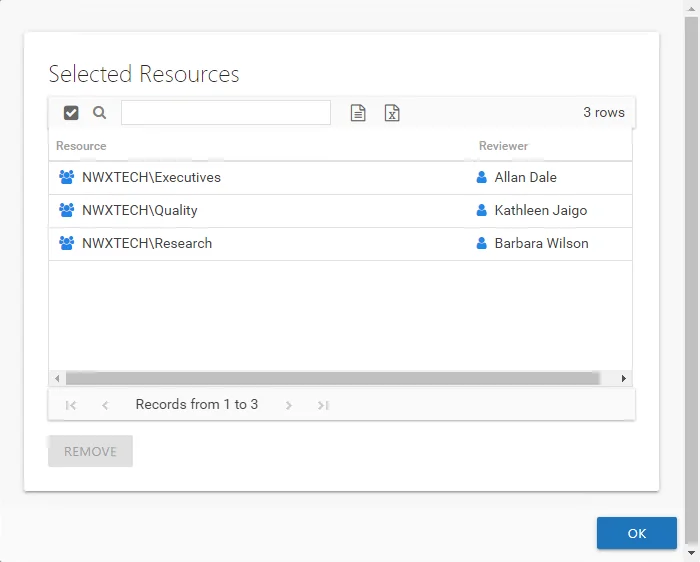
The table displays:
- Resource — The icon indicates the type of resource. The resource name includes its location, such as the UNC path for a file system resource, the URL for SharePoint resource, or Group name (e.g., [Domain][Group]).
- Reviewer — Primary owner assigned to the resource
Use the Remove button to remove a resource from this review. Click OK to close the window and complete the review creation.
Send Reminders Window
The Send Reminders window opens from the Manage Reviews Page of the Entitlement Reviews interface. Select the desired active review(s) and click Send Reminders to send immediate reminder notifications. The Send Reminders window opens to display an action status.
The window displays the action status. When a successful status is indicated, assigned owners were sent a reminder email. Click OK to close the Send Reminders window.
Remember, automatic weekly reminders can be configured on the Notifications Page of the Configuration interface.
Stop Review Window
The Stop Review window opens from the Manage Reviews Page of the Entitlement Reviews interface. Select the desired active review(s) and click Stop. The Stop Review window opens to confirm the action.
CAUTION: This will prevent owners from completing the review, removing associated resources from their Pending Reviews list.
Click Yes to stop the review. Click No to cancel the action. The Stop Review window closes.
View Responses Window
The View Responses window opens from the View Response button on the Review Details Page of the Entitlement Reviews interface. It displays all owner-recommended changes and notes for the selected resource.

The information displayed in the table includes:
-
Item Reviewed — Item upon which changes were suggested by the owner
-
Current — Current state of the item at the time of the review
-
Desired — Change suggested by the owner
-
Notes — Icon indicates a Note has been added. Click on the icon to read the attached note(s).
-
Approval — Status of the Review Administrator's approval
- Clock — Indicates waiting on the Review Administrator to make an official decision
- Green Checkmark — Indicates the Review Administrator has approved the request
- Red X — Indicates the Review Administrator has declined the request
- Yellow Question mark — Indicates the Review Administrator has deferred taking action until a later time
The Show Only Changes checkbox is selected by default to show only the items with owner-recommended changes. If deselected, all items included in the review are displayed. When selecting the items with no changes in the grid, the change buttons at the bottom of the page are disabled.
The table data grid functions the same way as other table grids. See the Data Grid Features topic for additional information.
Select an item in the table, and use the action buttons at the bottom to identify the decision:
| Button | Description |
|---|---|
| Accept | Accepts the selected owner-recommended change. |
| Decline | Declines, or rejects, the owner-recommended change. |
| Defer | Defers the owner-recommended change to a later time. |
| View Notes | Opens the Notes window for the selected item. |
Create Review Wizard
The Create Review wizard is opened with the Create button on the Entitlement Reviews interface. See the Manage Reviews Page topic for additional information.
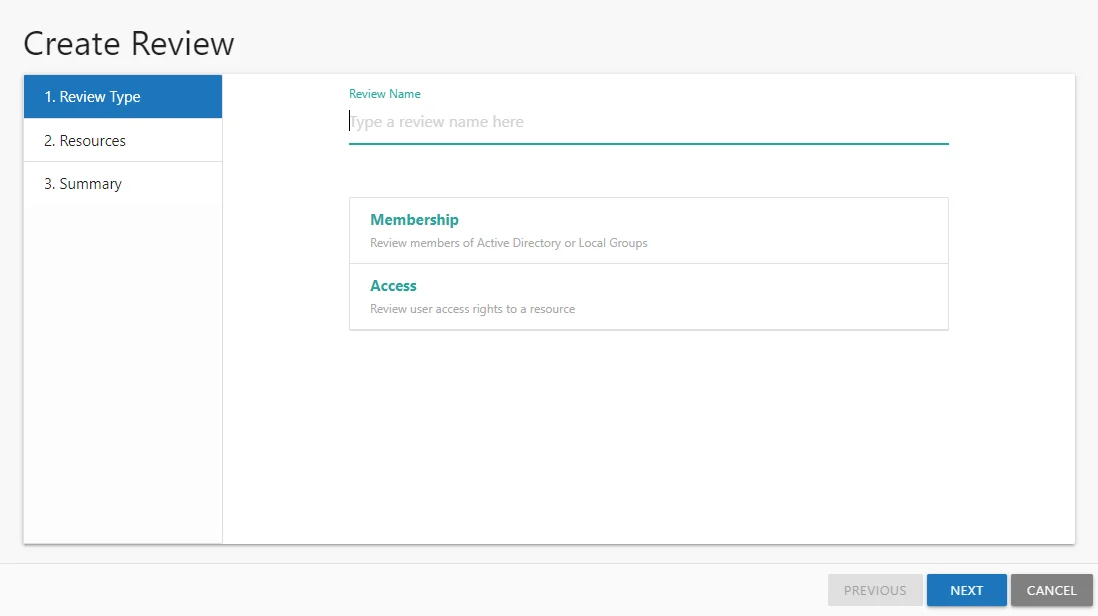
It contains three pages:
-
- Review Type
-
Review Name — Visible only to Review Administrators
-
Select the type of review to be created:
- Membership – Review group membership
- Access – Review user access rights to resources
-
- Resources — Select resources to be included in the review
-
- Summary
- Preview of the review selections
- Provides a status of the action being committed. Action includes creating the review and sending notifications to owners.
See the Create a Review topic for additional information.
Create a Review
Follow the steps to create a review.
Step 1 – On the Manage Reviews page, click Create. The Create Review wizard opens.

Step 2 – On the Review Type page, provide the following information and click Next:
-
Review Name — Enter a unique, descriptive name for the review. The review name is only visible to Review Administrators.
-
Select Type — Reviews are limited to one type. Select the type of review from the buttons provided:
- Membership – Review group membership
- Access – Review user access rights to resources
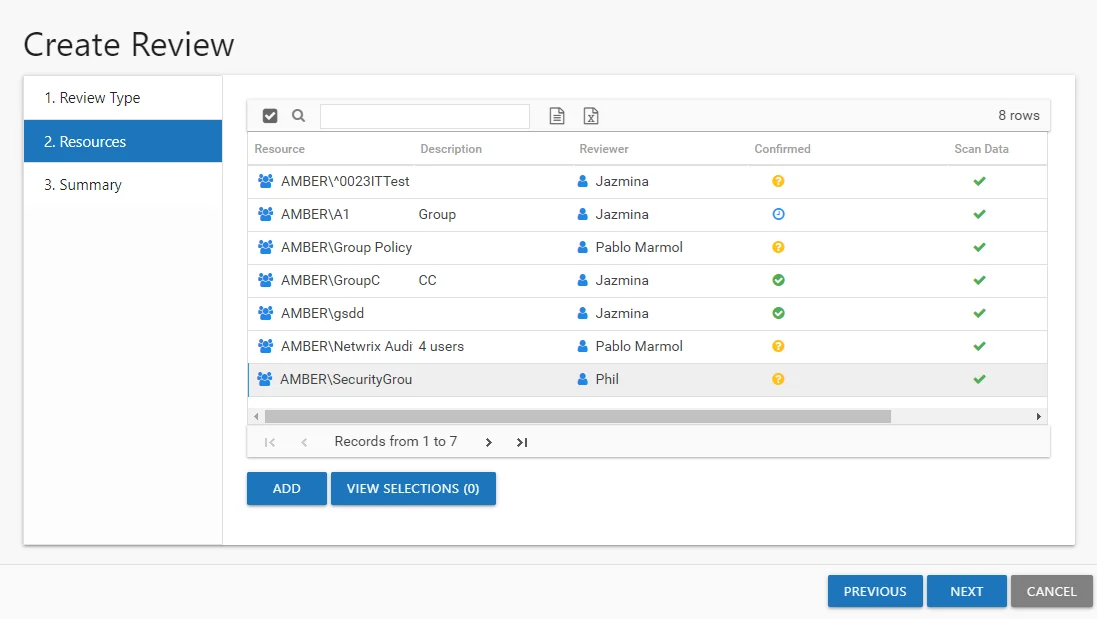
Step 3 – On the Resources page, select the resources to be included in the review. The Search feature is available to filter the list of available resource that match the type of review being created.
-
The table displays the following information:
- Resources — The icon indicates the type of resource. The resource name includes its location, such as the UNC path for a file system resource, the URL for SharePoint resource, or Group name (e.g., [Domain][Group]).
- Description — Description or explanation of the resource as supplied by either the Ownership Administrator or the assigned owner
- Reviewer — Primary owner assigned to the resource
- Confirmed — Indicates whether or not the assigned owner has confirmed ownership of that resource. Tool-tips display when hovering over the icons indicating whether the resource ownership has been confirmed, declined, pending response, or that a confirmation has not been requested.
- Scan Data — A checkmark indicates the resource has been scanned. Only resources with scan data can be included in a review.
-
Select the desired resource(s) and click Add. The View Selections button indicates how many resources have been selected. Click the button to open the Selected Resources window, where you can view and modify the selections. See the Selected Resources Window topic for additional information.
-
Once the desired resources have been selected, click Next.
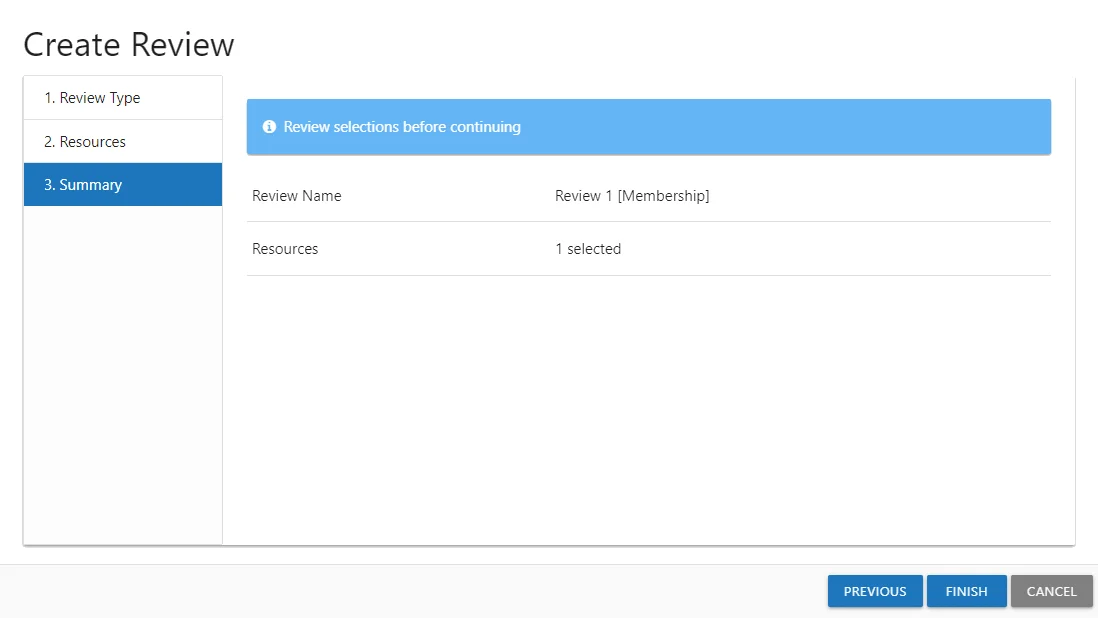
Step 4 – On the Summary page, review the settings and click Finish. The Access Reviews begins to create the review. Action status displays on the page. When the update has completed (100%), click Close. The Create Review wizard closes.
The new review displays in the table on the Manage Reviews page. An email was sent to the primary owner assigned to the resource(s) in this review. By default, the application is configured to send notifications only to the primary owner. However, this can be customized on the Configuration > Notifications page to send notifications to all assigned owners. See the Notifications Page topic for additional information.