Ownership Confirmation
The reason for assigning owners to resources is to enable those resources to be included in reviews, or attestations, conducted through the application. In order for this to work, the assigned owner needs to claim that ownership responsibility. Resources that do not have confirmed owners may fall through the cracks.
NOTE: This does require the Notification settings to be configured for the Access Reviews application. See the Notifications Page topic for additional information.
The table in the Resource Owners interface includes a Status column. The following icons appear in this column to indicate the owner confirmation status:
| Icon | Meaning | Description |
|---|---|---|
| No Status | Indicates ownership confirmation has not been requested, and there is no ownership status at this time | |
| Waiting | Indicates a request for confirmation has been sent, and you are waiting for a response from the assigned owner. Hover over the icon to view the date timestamp of the request. | |
| Confirmed | Indicates the assigned owner confirmed ownership of the resource. Hover over the icon to view the date timestamp of the confirmation. | |
| Declined | Indicates the assigned owner declined ownership of the resource. These individuals would have been asked to suggest an alternative owner. Check the Notes for the resource to view this information. Hover over the icon to view the date timestamp of the decline. Remember, a resource with declined ownership needs to be updated to assign a new owner. See the Update Resource Wizard topic for additional information. |
If multiple owners have been assigned, there is a choice for which assigned owner(s) should receive the confirmation. If multiple owners were sent the request, the column remains as a waiting symbol until the assigned Primary owner replies.
See the Confirm Ownership Wizard topic for additional information.
Ownership Confirmation Request Email
The Ownership Administrator may request ownership confirmation for a resource being managed through the Access Reviews application. As an assigned owner, you will receive the following email.
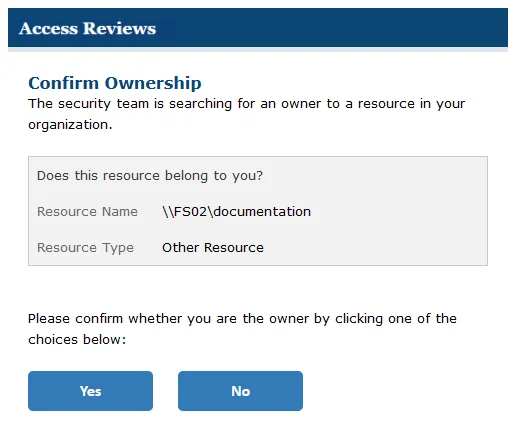
The Ownership Confirmation Request email provides buttons for confirming (Yes) or declining (No) ownership of the listed resource. You will be asked to authenticate for your response to be processed. The application will launch in your default browser. Enter your domain credentials to complete the process. One of two messages will appear according to if you confirmed or declined.
Confirmed Ownership Message
If you have accepted ownership for the assigned resource, the browser will display the following message after authentication:
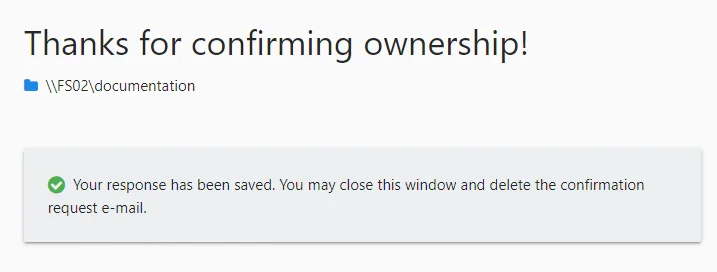
"Your response has been saved. You may close this window and delete the confirmation request e-mail."
Declined Ownership Message
If you have declined ownership for the assigned resource, the browser will display the following message after authentication:

"Before we update ownership can you suggest another owner?" Enter possible owners in the textbox. Click Submit to complete the process.
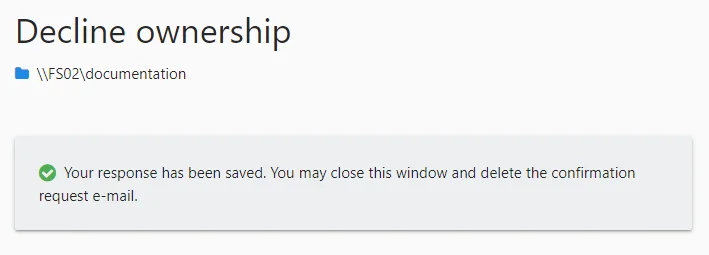
"Your response has been saved. You may close this window and delete the confirmation request e-mail."
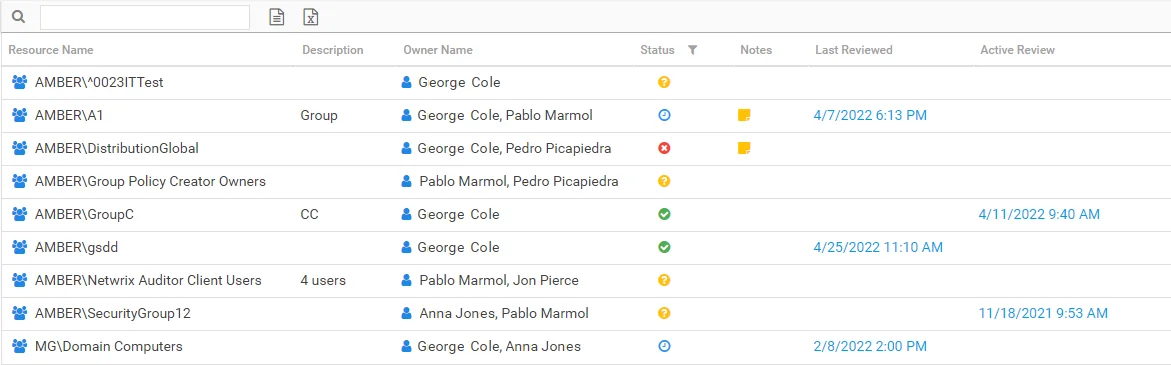
Resource Owners Interface
The Resource Owners interface opened by the Resource Owners tab is where Ownership Administrators perform many operations around assigning and managing ownership.
The information displayed in the table includes:
- Resource Name – The icon indicates the type of resource. The resource name includes its location, such as the UNC path for a file system resource, the URL for SharePoint resource, or Group name (e.g., [Domain][Group]).
- Description – Description or explanation of the resource as supplied by either the Ownership Administrator or the assigned owner. See the Notes & Descriptions topic for additional information.
- Owner Name – Name of the assigned owner. If there are several owners of a resource, the list is comma-separated.
- Status – Indicates whether or not the assigned owner has confirmed ownership of that resource. Tool-tips display when hovering over the icons indicating whether the resource ownership has been confirmed, declined, pending response, or that a confirmation has not been requested. See the Ownership Confirmation topic for additional information.
- Notes – Icon indicates a Note has been added. Click on the icon to read the attached note(s). Notes can be added by Ownership Administrators or populated with alternative owners by individuals who declined ownership. See the Edit Notes Window and the Notes & Descriptions topics for additional information.
- Last Reviewed – Date timestamp when the last review took place for the resource. The hyperlink will open the Entitlement Reviews interface to that Review Details page displaying the historical review instance. See the Review Details Page topic for additional information.
- Active Review – Indicates whether or not there is a pending review. The hyperlink will open the Entitlement Reviews interface to that Review Details page displaying the active review instance. See the Review Details Page topic for additional information.
The table data grid functions the same way as other table grids. See the Data Grid Features topic for additional information.
The buttons at the bottom enable you to conduct the following actions:

| Button | Function |
|---|---|
| Add | Launches the Add new resource wizard to add a new resource to the list. This allows you to add one resource at a time and assign an owner. See the Add New Resource Wizard topic for additional information. |
| Update | Launches the Update resource wizard for the selected resource. This allows you to make changes to the assigned owners or add/edit the resource description. See the Update Resource Wizard topic for additional information. |
| Remove | Opens the Confirm removal window to removes the selected resource from being managed through the application. Remember, only resources with an assigned owner will be visible in the table. Removing a resource from this table does not delete the resource from the application database. See the Confirm Removal Window topic for additional information. |
| Request Confirmation | Opens the Confirm Ownership wizard. Sends an email to the assigned owner(s) for the selected resource requesting ownership confirmation. See theConfirm Ownership Wizard topic for additional information. |
| Edit Notes | Opens the Edit Notes window for the selected resource and allows free-text editing of the notes. See the Edit Notes Window topic for additional information. |
Notes & Descriptions
A note entered by an Ownership Administrator in the Resource Owners interface is only visible to those with access to this interface. This note can also be populated with alternative owners suggested by an individual who declined ownership.
A resource description can be supplied by either the Ownership Administrator or the assigned owner, and is visible during Resource Review creation.
Resource Owners Overview
The Resource Owners interface is where Access Reviews Console users with either the Security Team or Administrator role (to be referred to as Ownership Administrators) can assign ownership of resources to be managed through the application. Assigned owners do not require a console user role. Resources to be included in the Access Reviews workflow must first be assigned owners within the Resource Owners interface.
RECOMMENDED: The Access Reviews application is configured to send Notifications.
Remember, a “resource” refers to the file system shared folders, SharePoint Online site collections, and Active Directory (AD) groups. All data available within the Access Reviews application is collected by Netwrix Auditor according to the synchronized monitoring plans.
“Owners” are the users who are responsible for reviewing access to the resources to which they are assigned.
The My Reviews interface provides owners with access to historical and pending reviews. The My Reviews interface is only accessible to users who have been assigned ownership of at least one resource. Owners without a console user role are directed to the My Reviews interface at login. Owners with a console user role access the pending and historical reviews for their resources by clicking the My Reviews tab. See the Pending Reviews topic for additional information.
Who Can Assign Ownership (Ownership Administrators)?
-
Console Users with Administrator role
-
Can complete the Review Administrator's approval process without impacting the visibility into the review created by a Review Administrator with the Security Team role
CAUTION: Visibility into a review created by a Review Administrator with the Security Team role is blocked if a Review Administrator with the Administrator role starts a new instance.
-
-
Console Users with Security Team role
- Visibility into only those reviews personally created
What Can Resource Owners Do?
- Perform an access review (when there is a pending review)
- View historical information on access reviews
See the Resource Owners Interface topic for additional information.
Workflow of Ownership Assignment
Prerequisite:
-
Optional: The Access Reviews application is configured to send Notifications. See the Notifications Page topic for additional information.
NOTE: By default, the application is configured to send notifications only to the primary owner. However, this can be customized on the Configuration > Notifications page to send notifications to all assigned owners.
-
Owners assigned to resources must have:
- Email address to receive notifications
- Credentials for a domain known to the application
-
Resources and groups must be known to the application
Workflow:
NOTE: This workflow is not numbered because the Notification piece can occur at any time in the workflow.
- Add resources to be managed by associating a business data owner with a resource. See the Add New Resource Wizard topic for additional information.
- Confirm resource ownership. See the Ownership Confirmation topic for additional information.
- Notify owners of their responsibilities. See the Notification to Owners topic for additional information.
Notification to Owners
Let your owners know what their responsibilities are by notifying them with the following information:
- An explanation of what a review is and why your organization is conducting them through the Netwrix Auditor Access Reviews application.
- How owners should log into the application console, specifically what URL and credentials to use.
- Expectation on response times
- How to access instructions on how to complete a review. You can link to the Owners & Access Reviews topic or download that topic and its subtopics as a PDF and make it available within your corporate resources.
Owners & Access Reviews
This topic and its subtopics are written for users who have been assigned resource ownership.
When your organization performs an access review on a resource for which you are the assigned owner, it means you, the business user or data custodian, need to attest to the access and privileges users have to your resource.
NOTE: For the Netwrix Auditor Access Reviews application, a “resource” refers to the file system shared folders, SharePoint Online site collections, and Active Directory (AD) groups.
Your organization's Ownership Administrator and/or Review Administrator will let you know what URL to use for logging in as well as what credentials to use. The URL will require you to be connected to your organization's network. Upon login, you will be directed to the My Reviews page where you can view pending and historical reviews for your resources.
You may receive email notifications requesting ownership confirmation from your organization's Ownership Administrators. You will receive email notifications when you have a pending access review to perform.
Add Owner Window
The Add Owner window opens from either the Add New Resource Wizard of the Update Resource Wizard. This window is used to search for a user account by browsing Active Directory.

Enter a name in the search field to find and select users from Active Directory, which populates in a drop-down menu as you type. If multiple domains are known to the application, ensure the correct domain is selected from the drop-down menu. Click OK and the Add Owner window closes. The selected user appears in the Owner list.
Confirm Removal Window
The process of removing a resource from the Resource Owners interface disassociates the owner(s) from the resource, it does not remove the resource from the database or from the available reports. Any history of actions performed by the owner for that resource will be maintained, but pending actions will be canceled. Pending actions may include s outstanding reviews.
Follow the steps to remove a resource from being managed through the application.
Step 1 – In the Resource Owners interface, select the resource and click Remove. The Confirm Removal window opens.

Step 2 – Click Yes to complete the removal process or No to cancel it.
The resource no longer appears in the Resource Owners interface.
Add New Resource Wizard
The Add new resource wizard is opened with the Add button in the Resource Owners interface.
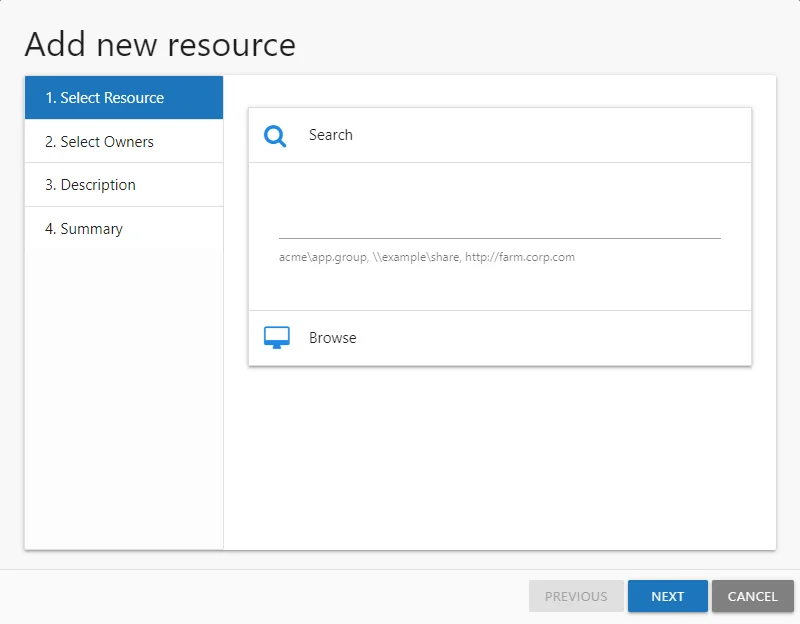
It contains four pages:
-
- Select Resource — Select the resource or group to be managed by the owner
-
- Select Owners — Select Owners from Active Directory
-
- Description — Optionally enter a note describing the resource
-
- Summary — This page provides a preview of the settings selected within the wizard
See the Add a Resource topic for additional information.
Add a Resource
Follow the steps to add resources one at a time and assign owners.
Step 1 – In the Resource Owners interface, click Add. The Add new resource wizard opens.
Step 2 – On the Select Resource page, select the resource to be managed. Then click Next.
- Search field – Begin typing the name of the resource:
- For File System, enter a share UNC path starting with “\”
- For example, \example\share
- For SharePoint, enter the site URL starting with “http://”
- For example, http://farm.corp.com
- For groups, enter the group name in NTAccount format [DOMAIN\GROUP]
- For example, acme\app.group
- For File System, enter a share UNC path starting with “\”
- Browse option – Navigate through the resource tree to select the desired File System or SharePoint resource.
Step 3 – On the Select Owners page, click Add to browse for an owner. Repeat this Step to add multiple owners. See the Add Owner Window topic for additional information.

Step 4 – When only one owner is assigned, the owner will be the Primary by default. When multiple owners are assigned, the first owner in the list is the Primary owner. Use the arrow buttons to order the owners. Use the Add and Remove buttons to modify the list of owners. When the owners list is complete, click Next.The table has several columns with information on the owners:
- Owner Name — Name of the assigned owner
- Owner Account — sAMAccountName associated with the owner, as read from Active Directory
- Owner Mail — Trustee's email address as read from Active Directory
- Owner Title — Trustee's title as read from Active Directory
- Owner Department — Trustee's department as read from Active Directory
- Confirmed — Indicates whether or not the assigned owner has confirmed ownership of that resource. Tool-tips display when hovering over the icons indicating whether the resource ownership has been confirmed, declined, pending response, or that a confirmation has not been requested.
Step 5 – On the Description page, optionally add a description for the resource in the textbox. Then click Next.
Step 6 – On the Summary page, review the settings and click Finish. The Access Reviews application begins to process the ownership configuration.

Step 7 – The action status displays on the page. When the task has completed (100%), click Close. The Add new resource wizard closes.
This resource is now being managed through the Access Reviews application.
Confirm Ownership Wizard
The Confirm Ownership wizard is opened with the Request Confirmation button in the Resource Owners interface. It can be opened for one or multiple resources.
It contains one page:
-
- Select Owners — Lists the current owner(s) for each selected resource and confirmation status
Request Ownership Confirmation
Follow the steps to request ownership confirmation.
Step 1 – In the Resource Owners interface, select the desired resource or resources and click Request Confirmation. The Confirm Ownership wizard opens.
Step 2 – On the Select Owners page, you can optionally remove owners you do not want or need ownership confirmation from. Select those owners and click Remove. Those owners will not receive the confirmation email. Once the list is set as desired, click Finish. The Access Reviews application begins to send the confirmation email. The table provides the following information:
- Resource Name — The icon indicates the type of resource. The resource name includes its location, such as the UNC path for a file system resource, the URL for SharePoint resource, or Group name (e.g., [Domain][Group]).
- Owner Name — Name of the assigned owner
- Confirmed — Indicates whether or not the assigned owner has confirmed ownership of that resource. Tool-tips display when hovering over the icons indicating whether the resource ownership has been confirmed, declined, pending response, or that a confirmation has not been requested.

Step 3 – The action status displays on the page. When the owner confirmation notification has completed (100%), click Close. The Confirm Ownership wizard closes.
The selected owners receive an email from the Access Reviews application asking if they are the owner of the assigned resource. See the Ownership Confirmation Request Email topic for additional information.
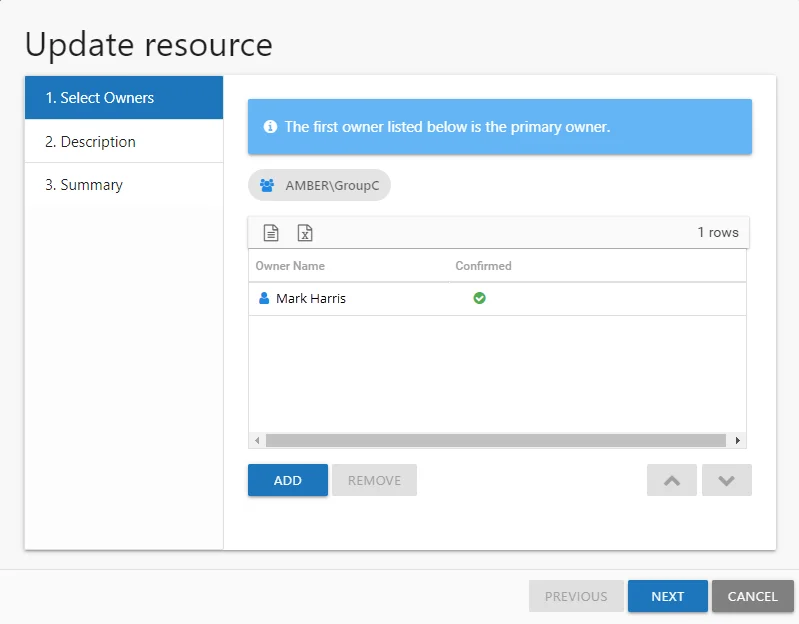
Update Resource Wizard
The Update resource wizard is opened with the Update button in the Resource Owners interface.
It contains three pages:
-
- Select Owners — Lists the current owner(s). Modify by adding new owners, removing owners, or changing owner priority order (primary, secondary, etc.)
-
- Description — Enter or modify a note describing the resource
-
- Summary — Provides a preview of the settings selected within the wizard
See the Update a Resource topic for additional information.
Update a Resource
Follow the steps to update ownership configuration for a resource.
Step 1 – In the Resource Owners interface, select the desired resource and click Update. The Update resource wizard opens.
Step 2 – The Select Owners page lists the currently assigned owner(s). Modify as desired and click Next to continue.
- Add new owners — Click Add to browse for a new owner. See the Add Owner Window topic for additional information.
- Remove an owner — Select an owner and click Remove
- Change owner priority — Select an owner and use the arrow buttons to change the order
Remember, the first owner in the list is the primary owner. The table has several columns with information on the owners:
- Owner Name — Name of the assigned owner
- Owner Account — sAMAccountName associated with the owner, as read from Active Directory
- Owner Mail — Trustee's email address as read from Active Directory
- Owner Title — Trustee's title as read from Active Directory
- Owner Department — Trustee's department as read from Active Directory
- Confirmed — Indicates whether or not the assigned owner has confirmed ownership of that resource. Tool-tips display when hovering over the icons indicating whether the resource ownership has been confirmed, declined, pending response, or that a confirmation has not been requested.
Step 3 – The Description page displays any description that has been provided by either the Ownership Administrator or the assigned owner(s) for the resource. Modify as desired by typing in the textbox. Then click Next to continue.
Step 4 – On the Summary page, review the settings and click Finish. The Access Reviews application begins to process the ownership changes.
Step 5 – The action status displays on the page. When the update has completed (100%), click Close. The Update resource wizard closes.
This updates to ownership configuration have been processed.