Create Alerts
To create new alerts and modify existing alerts, the account used to connect to Auditor Server via must be assigned the Global administrator or Global reviewer role in the product.
To set up a response action, this account must also be a member of the local Administrators group on Auditor Server.
See the Role-Based Access and Delegation topic for additional information.
Create a Custom Alert
Follow the steps to create a custom alert.
Step 1 – On the main Auditor page, click the Alert settings link under the Configuration section on the left:

See the Navigation topic for additional information.
Step 2 – In the All Alerts window, click Add. Configure the following:
| Option | Description |
|---|---|
| General | - Specify a name and enter the description for the new alert. Make sure that the Send alert when the action occurs option is enabled. Otherwise, the new alert will be disabled. - Apply tags—Create a set of tags to more efficiently identify and sort your alerts. Select Edit under Apply tags to associate tags with your alert. Later, you can quickly find an alert of interest using Filter by tags in the upper part of the All Alerts window. To see a full list of alerts ever created in the product, navigate to Settings > Tags. |
| Recipients | Select alert recipients. Click Add Recipient and select alert delivery type: - Email—Specify the email address where notifications will be delivered. You can add as many recipients as necessary. RECOMMENDED: click Send Test Email. The system will send a test message to the specified email address and inform you if any problems are detected. - SMS-enabled email—Netwrix uses the sms gateway technology to deliver notifications to a phone number assigned to a dedicated email address. Specify email address to receive SMS notifications. Make sure that your carrier supports sms to email gateway technology. |
| Filters | Apply a set of filters to narrow events that trigger a new alert. Alerts use the same interface and logic as search. - Filter—Select general type of filter (e.g., "Who", "Data Source", "Monitoring plan", etc.) - Operator—Configure match types for selected filter (e.g., "Equals", "Does not contain", etc.) - Value—Specify filter value. See the View and Search Collected Data topic for additional information on how to create and modify filters. The Filters section contains required fields highlighted with red. Once you completed all filters, click Preview on the right pane to see search-based list of events that will trigger your alert. 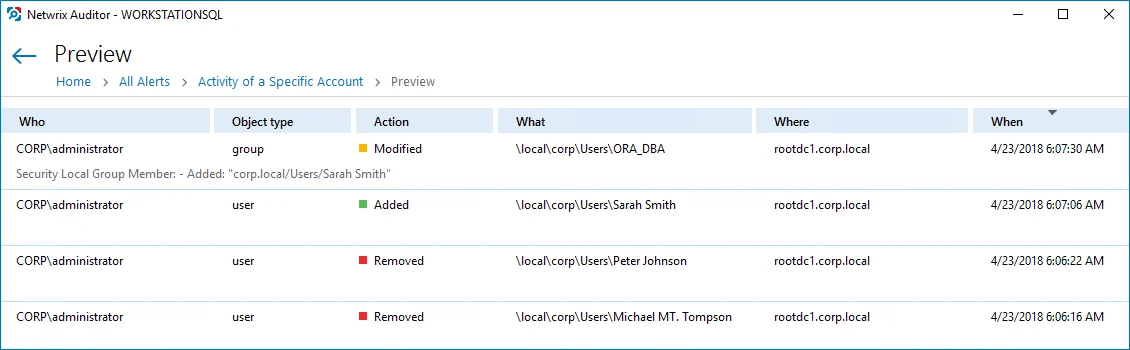 |
| Thresholds | If necessary, enable threshold to trigger the new alert. In this case, a single alert will be sent instead of many alerts. This can be helpful when Auditor detects many activity records matching the filters you specified. Slide the switch under the Send alert when the threshold is exceeded option and configure the following: - Limit alerting to activity records with the same...—Select a filter in the drop-down list (e.g., who). Note that, Auditor will search for activity records with the same value in the filter you selected. Only alerts grouped by the Who parameter can be included in the Behavior Anomalies list. Mind that in this case, the product does not summarize risk scores and shows the value you associated with this alert. This may significantly reduce risk score accuracy. - Send alert for <...> activity records within <...> seconds—Select a number of changes that occurred in a given period (in seconds). For example, you want to receive an alert on suspicious activity. You select "Action" in the Limit alerting to activity records with the same list and specify a number of actions to be considered an unexpected behavior: 1000 changes in 60 seconds. When the selected threshold exceeded, an alert will be delivered to the specified recipients: one for every 1000 removals in 60 seconds, one for every 1000 failed removals in 60 seconds. So you can easily discover what is going on in your IT infrastructure. |
| Risk Score | - Slide the switch to On under Include this alert in Behavior Anomalies assessment. See the Behavior Anomalies topic for additional information. - Associate a risk score with the alert—Assign a risk score based on the type of anomaly and the severity of the deviation from the normal behavior. An action's risk score is a numerical value from 1 (Low) to 100 (High) that designates the level of risk with 100 being the riskiest and 1 the least risky. These are general guidelines you can adopt when setting a risk score: - High score—Assign to an action that requires your immediate response (e.g., adding account to a privileged group). Configure a non-threshold alert with email recipients. - Above medium score—Assign to a repetitive action occurring during a short period of time. While a standalone action is not suspicious, multiple actions merit your attention (e.g., mass deletions from a SharePoint site). Configure a threshold-based alert with email recipients. - Low score—Assign to an infrequent action. While a single action is safe, multiple occurrences aggregated over a long period of time may indicate a potential in-house bad actor (e.g., creation of potentially harmful files on a file share). Configure a non-threshold alert, email recipients are optional but make sure to regularly review the Behavior Anomalies dashboard. - Low score—Assign to a repetitive action that does not occur too often (e.g., rapid logons). Multiple occurrences of action sets may indicate a potential in-house bad actor or account compromise. Configure a threshold-based alert, email recipients are optional but make sure to regularly review the Behavior Anomalies dashboard. |
| Response Action | You can instruct Auditor to perform a response action when the alert occurs — for example, start an executable file (command, batch file, or other) that will remediate the issue, or open a ticket with the help desk, and so on. For that, you will need an executable file stored locally on the Auditor server. Slide the switch to turn the feature ON, and see the Configure a Response Action for Alert topic for additional information. |
Create Alerts for Event Log
Alerts are configurable notifications triggered by certain events and sent to the specified recipients. You can enable or disable, and modify existing alerts, and create new alerts. To do it, click Configure next to Alerts.
Follow the steps to create new alert.
Step 1 – In the Alerts window, click Add to start new alert.
Step 2 – On the Alert Properties step, specify the alert name and enter alert description (optional). Specify the number alerts per email. Grouped alerts for different computers will be delivered in separate email messages. This value is set to 1 by default, which means that each alert will be delivered as a separate email message.
Step 3 – On the Notifications step, configure email notifications and customize the notification template, if needed. Click Edit next to Customize notifications template. Edit the template by deleting or inserting information fields.
The %ManagedObjectName% variable will be replaced with your monitoring plan name.
Step 4 – On the Event filters step, specify an event that will trigger the alert.
Step 5 – Complete the Event Filters wizard. Complete the following fields:
-
In the Event tab:
Option Description Name Specify the filter name. Description Enter the description for this filter (optional). Event Log Select an event log from the drop-down list. You will be alerted on events from this event log. You can also input a different event log. To find out a log’s name, navigate to Start > Windows Administrative Tools > Event Viewer > Applications and Services Logs > Microsoft > Windows and expand the required Log_Name node, right-click the file under it and select Properties. Find the event log’s name in the Full Name field. Auditor does not collect the Analytic and Debug logs, so you cannot configure alerts for these logs. You can use a wildcard (*). In this case you will be alerted on events from all Windows logs except for the ones mentioned above. -
In the Event Fields tab:
Option Description Event ID Enter the identifier of a specific event that you want to be alerted on. You can add several IDs separated by comma. Event Level Select the event types that you want to be alerted on. If the Event Level checkbox is cleared, you will be alerted on all event types of the specified log. Computer Specify a computer. You will only be alerted on events from this computer. If you want to specify several computers, you can define a mask for this parameter. Below is an example of a mask: - * - any machine - computer – a machine named ‘computer’ - *computer* - machines with names like ‘xXxcomputerxXx’ or ‘newcomputer’ - computer? – machines with names like ‘computer1’ or ‘computerV’ - co?puter - machines with names like ‘computer’ or ‘coXputer’ - ????? – any machine with a 5-character name - ???* - any machine with a 3-character name or longer User Enter a user’s name. You will be alerted only on the events generated under this account. If you need to specify several users, you can define a mask for this parameter in the same way as described above. Source Specify this parameter if you want to be alerted on the events from a specific source. If you need to specify several users, you can define a mask for this parameter in the same way as described above. Category Specify this parameter if you want to be alerted on a specific event category. 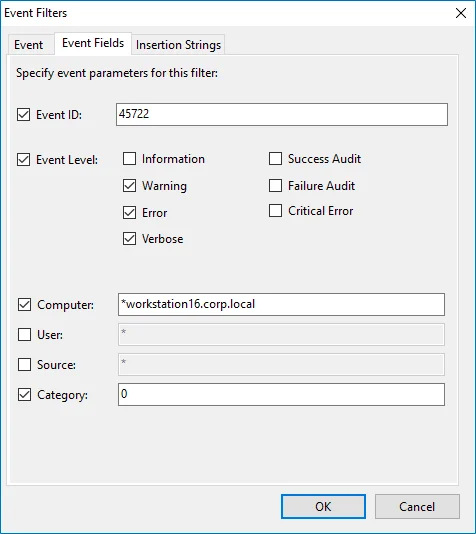
-
In the Insertion Strings tab:
Option Description Consider the following event Insertion Strings Specify this parameter if you want to receive alerts on events containing a specific string in the EventData. You can use a wildcard (*). Click Add and specify Insertion String.
Step 6 – Click OK to save the changes and close the Event Filters dialog.
Create Alerts on Health Status
You can configure alerts to be triggered by important events in the Netwrix AuditorSystem Health log.
To create alerts to be notified on Auditor Health Status.
Follow the basic steps, required for creation of the monitoring plan that will be used to collect data on Auditor health status events. See the topic for additional information.
Step 1 – Start Netwrix Auditor Event Log Manager and create the new monitoring plan.
Step 2 – Make sure that the Enable event log collection checkbox is selected. Specify the name for the new plan, for example, "_Netwrix Auditor _Health Status".
Step 3 – Navigate to the Monitored computers list and add a server where the Auditor server resides.
Step 4 – On the General tab, click Configure next to Alerts. Make sure the predefined alerts are disabled. Click Add to create anew alert.
Step 5 – In the Alert Properties wizard, specify the alert name and enter alert description (optional). Specify the number alerts per email. Grouped alerts for different computers will be delivered in separate email messages. This value is set to 1 by default, which means that each alert will be delivered as a separate email message.
Step 6 – Specify alert recipient if you want the alert to be delivered to a non-default email.
Step 7 – Navigate to Event Filters and click Add to specify an event that will trigger the alert.
Step 8 – Complete the Event Filter dialog.
- In the Event tab, specify the filter name and description. In the Event Log field select the Netwrix Auditor System Health log.
- In the Event Fields tab, select event levels that will trigger the alert.
Step 9 – Click OK to save the changes and close the Event Filters dialog.
Step 10 – In the Netwrix Auditor Event Log Manager wizard, navigate to the Notifications section and specify the email address where notifications will be delivered.
RECOMMENDED: click Send Test Email. The system will send a test message to the specified email address and inform you if any problems are detected.
Step 11 – In the Audit Archiving filters, select the Netwrix Auditor System Health as the inclusive filter.
Step 12 – Click Save to save your changes.
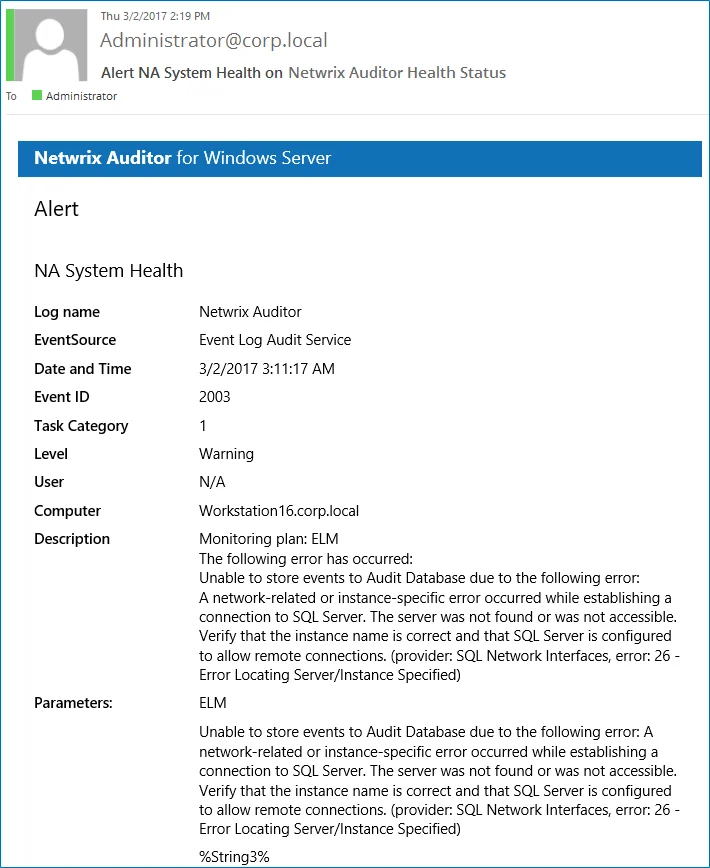
If an event occurs that triggers an alert, an email notification will be sent immediately to the specified recipients.
Create Alerts for Non-Owner Mailbox Access Events
If you have a monitoring plan configured to audit Exchange, you can configure alerts to be triggered by non-owner mailbox access events (e.g., opening a message folder, opening/modifying/deleting a message) using the event log alerts. To enable monitoring of non-owner mailbox access events, you need to create a monitoring plan for auditing event logs.
Create Alerts for Non-Owner Mailbox Access Events
The procedure below describes the basic steps, required for creation of a monitoring plan that will be used to collect data on non-owner mailbox access events. See Event Log Manager topic for additional information.
Follow the steps to create alert for non-owner mailbox access events.
Step 1 – Create a monitoring plan in Netwrix Auditor Event Log Manager.
Step 2 – Make sure that the Enable event log collection checkbox is selected. Specify the name for the new plan, for example, "Non-owner mailbox access auditing".
Step 3 – Navigate to the Monitored computers list and add a server where your Exchange organization resides.
Step 4 – On the General tab, click Configure next to Alerts. Make sure the predefined alerts are disabled. Click Add to create an alert for non-owner mailbox access event.
Step 5 – In the Alert Properties wizard, specify the alert name and enter alert description (optional). Specify the number alerts per email. Grouped alerts for different computers will be delivered in separate email messages. This value is set to 1 by default, which means that each alert will be delivered as a separate email message.
Step 6 – Specify alert recipient if you want the alert to be delivered to a non-default email.
Step 7 – Navigate to Event Filters and click Add to specify an event that will trigger the alert.
Step 8 – Complete the Event Filter dialog.
-
In the Event tab, specify the filter name and description. In the Event Log field enter "Netwrix Non-Owner Mailbox Access Agent".
-
In the Event Fields tab, complete the following fields:
-
Event ID—Enter the identifier of a specific event that you want to be alerted on. You can add several IDs separated by comma. Review the event IDs available in the Netwrix Non-Owner Mailbox Access Agent event log:
ID Description Access Type (as displayed in XML view of event details) 1 A folder was opened actFolderOpen 2 A message was opened actMessageOpened 3 A message was sent actMessageSubmit 4 A message was changed and saved actChangedMessageSaved 5 A message was deleted actMessageDeleted 6 A folder was deleted actFolderDeleted 7 The entire contents of a folder was deleted actAllFolderContentsDeleted 8 A message was created and saved actMessageCreatedAndSaved 9 A message was moved or/and copied actMessageMoveCopy 10 A folder was moved or/and copied actFolderMoveCopy 14 A folder was created actFolderCreated -
Source—Enter "Netwrix Non-Owner Mailbox Access Agent".
-
-
In the Insertion Strings tab, select Consider the following event Insertion Strings to receive alerts on events containing a specific string in the EventData. Click Add and specify the Insertion String.
Step 9 – Click OK to save the changes and close the Event Filters dialog.
Step 10 – In the Netwrix Auditor Event Log Manager wizard, navigate to Notifications and specify the email address where notifications will be delivered.
RECOMMENDED: click Send Test Email. The system will send a test message to the specified email address and inform you if any problems are detected.
Step 11 – Click Edit next to Audit Archiving Filters step, in the Inclusive Filters section clear the filters you do not need, click Add and specify the following information:
- The filter name and description (e.g., Non-owner mailbox access event)
- In Event Log, enter "Netwrix Non-Owner Mailbox Access Agent".
- In Write to, select Long-Term Archive. The events will be saved into the local repository.
Step 12 – Click Save. If an event occurs that triggers an alert, an email notification will be sent immediately to the specified recipients.
Review Event Description
Review the example of the MessageOpened event in the XML view:
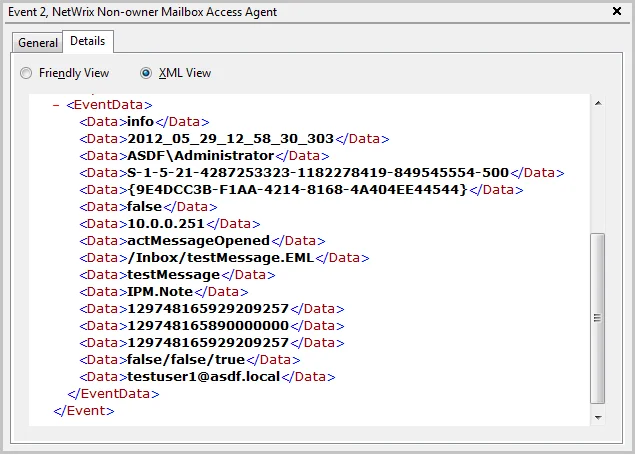
Depending on the event, the strings in the description may vary. The first eight strings are common for all events:
| String | Description |
|---|---|
| String1 | The event type: info or warning |
| String2 | The event date and time in the following format: YYYY_MM_DD_hh_mm_ss_000 |
| String3 | The name of the user accessing mailbox |
| String4 | The SID of the user accessing mailbox |
| String5 | The GUID of the mailbox being accessed |
| String6 | Shows whether the user accessing mailbox is the owner: it is always false |
| String7 | The IP of the computer accessing the mailbox |
| String8 | The access type |
The following strings depend on the non-owner access type, represented by different Event IDs:
| Event ID | Access type (String 8) | Strings | Description |
|---|---|---|---|
| 1 | actFolderOpen | String9 | The internal folder URL |
| 2 | actMessageOpened | String9 | The internal message URL |
| String10 | The message subject | ||
| String11 | The message type: IPM.Note—Email, IPM.Contact – contact, etc. | ||
| 3 | actMessageSubmit | String9 | The internal message URL |
| String10 | The message subject | ||
| String11 | Email addresses of the message recipients, separated by a semicolon | ||
| String12 | The message type: IPM.Note—Email, IPM.Contact – contact, etc. | ||
| 4 | actChangedMessageSaved | String9 | The internal message URL |
| String10 | The message subject | ||
| String11 | The message type: IPM.Note – Email, IPM.Contact – contact, etc. | ||
| 5 | actMessageDeleted | String9 | The internal message URL |
| String10 | The message subject | ||
| String11 | The message type: IPM.Note—Email, IPM.Contact – contact, etc. | ||
| 6 | actFolderDeleted | String9 | The internal folder URL |
| 7 | actAllFolderContentsDeleted | String9 | The internal folder URL |
| 8 | actMessageCreatedAndSaved | String9 | The internal message URL |
| 9 | actMessageMoveCopy | String9 | The message being moved/copied—the final part of the message URL, e.g., /Inbox/testMessage.EML |
| String10 | The action – copy or move | ||
| String11 | The folder URL the message is copied/moved from | ||
| String12 | The destination folder URL | ||
| String13 | The message type: IPM.Note—Email, IPM.Contact – contact, etc. | ||
| 10 | actFolderMoveCopy | Strings 9 -13 | The string descriptions for the folder are similar to those for messages. |
| 14 | actFolderCreated | String9 | The new folder URL |
With different Exchange versions and/or different email clients, the same non-owner action (e.g., copying a message) may generate different events: e.g., actMessageMoveCopy with one server/client or actMessageCreatedAndSaved with another.
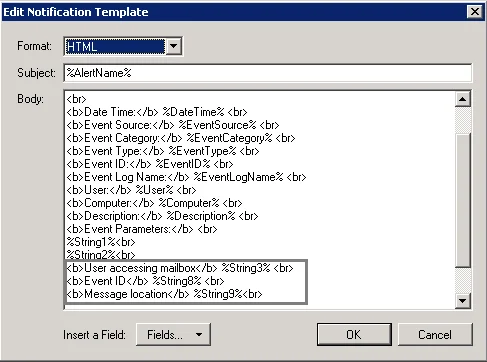
You can add the required strings contained in % symbols for your own custom alert separated by
a <br> tag in <b>Event Parameters:</b>. Event parameter descriptions can also be added.
In the example below, the following information has been added:
- The description for String 3—User accessing mailbox
- String 8 with the description
- String 9 with the description
Manage Alerts
For your convenience, Netwrix provides you with a set of predefined alerts that are commonly used for IT infrastructure monitoring. The out-of-the-box alerts include those that help you detect suspicious activity and inform you on critical changes to your environment. The alerts contain pre-configured filters and in most cases you only need to enable an alert and select who will receive notifications.
You can add any elements (a dashboard, report, alert, risk, etc.) to the Auditor Home screen to access them instantly. See the Navigation and Customize Home Screen topics for additional information.
| To... | Follow the steps... |
|---|---|
| Enable / disable an existing alert | Step 1 – Select an alert from the list and enable it using the slider in the Mode column. Step 2 – Double-click the selected alert and specify alert recipients or set a risk score want to include an alert in Behavior Anomalies assessment. You can go on with a score suggested by Netwrix industry experts or fine-tune it to fit your organization's priorities. See the Create Alerts topic for additional information on how to configure scoring settings. Step 3 – Review and update filters. For some alerts you should provide filter values, such as group name or user. |
| Modify an existing alert | Select an alert from the list and click Edit. |
| Create a new alert from existing | Select an alert from the list and click Duplicate at the bottom of the window. |
| Remove an alert | Select an alert from the list and click  in the right pane. in the right pane. |
| Find an alert | Use the Filter by tags option to find an alert by tags associated with this alert. OR Use a search bar in the upper part of All Alerts window to find an alert by its name or tag. |