Resource Owners Interface
The Resource Owners interface opened by the Resource Owners tab is where Ownership Administrators perform many operations around assigning and managing ownership.
The information displayed in the table includes:
- Resource Name – The icon indicates the type of resource. The resource name includes its location, such as the UNC path for a file system resource, the URL for SharePoint resource, or Group name (e.g., [Domain][Group]).
- Description – Description or explanation of the resource as supplied by either the Ownership Administrator or the assigned owner. See the Notes & Descriptions topic for additional information.
- Owner Name – Name of the assigned owner. If there are several owners of a resource, the list is comma-separated.
- Status – Indicates whether or not the assigned owner has confirmed ownership of that resource. Tool-tips display when hovering over the icons indicating whether the resource ownership has been confirmed, declined, pending response, or that a confirmation has not been requested. See the Ownership Confirmation topic for additional information.
- Notes – Icon indicates a Note has been added. Click on the icon to read the attached note(s). Notes can be added by Ownership Administrators or populated with alternative owners by individuals who declined ownership. See the Edit Notes Window and the Notes & Descriptions topics for additional information.
- Last Reviewed – Date timestamp when the last review took place for the resource. The hyperlink will open the Entitlement Reviews interface to that Review Details page displaying the historical review instance. See the Review Details Page topic for additional information.
- Active Review – Indicates whether or not there is a pending review. The hyperlink will open the Entitlement Reviews interface to that Review Details page displaying the active review instance. See the Review Details Page topic for additional information.
The table data grid functions the same way as other table grids. See the Data Grid Features topic for additional information.
The buttons at the bottom enable you to conduct the following actions:

| Button | Function |
|---|---|
| Add | Launches the Add new resource wizard to add a new resource to the list. This allows you to add one resource at a time and assign an owner. See the Add New Resource Wizard topic for additional information. |
| Update | Launches the Update resource wizard for the selected resource. This allows you to make changes to the assigned owners or add/edit the resource description. See the Update Resource Wizard topic for additional information. |
| Remove | Opens the Confirm removal window to removes the selected resource from being managed through the application. Remember, only resources with an assigned owner will be visible in the table. Removing a resource from this table does not delete the resource from the application database. See the Confirm Removal Window topic for additional information. |
| Request Confirmation | Opens the Confirm Ownership wizard. Sends an email to the assigned owner(s) for the selected resource requesting ownership confirmation. See theConfirm Ownership Wizard topic for additional information. |
| Edit Notes | Opens the Edit Notes window for the selected resource and allows free-text editing of the notes. See the Edit Notes Window topic for additional information. |
Notes & Descriptions
A note entered by an Ownership Administrator in the Resource Owners interface is only visible to those with access to this interface. This note can also be populated with alternative owners suggested by an individual who declined ownership.
A resource description can be supplied by either the Ownership Administrator or the assigned owner, and is visible during Resource Review creation.
Add Owner Window
The Add Owner window opens from either the Add New Resource Wizard of the Update Resource Wizard. This window is used to search for a user account by browsing Active Directory.

Enter a name in the search field to find and select users from Active Directory, which populates in a drop-down menu as you type. If multiple domains are known to the application, ensure the correct domain is selected from the drop-down menu. Click OK and the Add Owner window closes. The selected user appears in the Owner list.
Confirm Removal Window
The process of removing a resource from the Resource Owners interface disassociates the owner(s) from the resource, it does not remove the resource from the database or from the available reports. Any history of actions performed by the owner for that resource will be maintained, but pending actions will be canceled. Pending actions may include s outstanding reviews.
Follow the steps to remove a resource from being managed through the application.
Step 1 – In the Resource Owners interface, select the resource and click Remove. The Confirm Removal window opens.

Step 2 – Click Yes to complete the removal process or No to cancel it.
The resource no longer appears in the Resource Owners interface.
Add New Resource Wizard
The Add new resource wizard is opened with the Add button in the Resource Owners interface.
It contains four pages:
-
- Select Resource — Select the resource or group to be managed by the owner
-
- Select Owners — Select Owners from Active Directory
-
- Description — Optionally enter a note describing the resource
-
- Summary — This page provides a preview of the settings selected within the wizard
See the Add a Resource topic for additional information.
Add a Resource
Follow the steps to add resources one at a time and assign owners.
Step 1 – In the Resource Owners interface, click Add. The Add new resource wizard opens.
Step 2 – On the Select Resource page, select the resource to be managed. Then click Next.
- Search field – Begin typing the name of the resource:
- For File System, enter a share UNC path starting with “\”
- For example, \example\share
- For SharePoint, enter the site URL starting with “http://”
- For example, http://farm.corp.com
- For groups, enter the group name in NTAccount format [DOMAIN\GROUP]
- For example, acme\app.group
- For File System, enter a share UNC path starting with “\”
- Browse option – Navigate through the resource tree to select the desired File System or SharePoint resource.
Step 3 – On the Select Owners page, click Add to browse for an owner. Repeat this Step to add multiple owners. See the Add Owner Window topic for additional information.
Step 4 – When only one owner is assigned, the owner will be the Primary by default. When multiple owners are assigned, the first owner in the list is the Primary owner. Use the arrow buttons to order the owners. Use the Add and Remove buttons to modify the list of owners. When the owners list is complete, click Next.The table has several columns with information on the owners:
- Owner Name — Name of the assigned owner
- Owner Account — sAMAccountName associated with the owner, as read from Active Directory
- Owner Mail — Trustee's email address as read from Active Directory
- Owner Title — Trustee's title as read from Active Directory
- Owner Department — Trustee's department as read from Active Directory
- Confirmed — Indicates whether or not the assigned owner has confirmed ownership of that resource. Tool-tips display when hovering over the icons indicating whether the resource ownership has been confirmed, declined, pending response, or that a confirmation has not been requested.
Step 5 – On the Description page, optionally add a description for the resource in the textbox. Then click Next.
Step 6 – On the Summary page, review the settings and click Finish. The Access Reviews application begins to process the ownership configuration.

Step 7 – The action status displays on the page. When the task has completed (100%), click Close. The Add new resource wizard closes.
This resource is now being managed through the Access Reviews application.
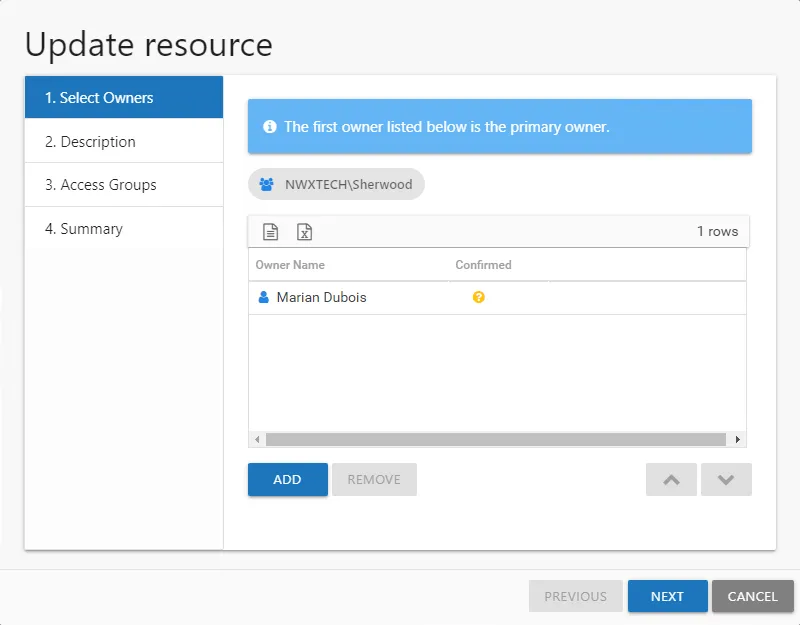
Update Resource Wizard
The Update resource wizard is opened with the Update button in the Resource Owners interface.
It contains three pages:
-
- Select Owners — Lists the current owner(s). Modify by adding new owners, removing owners, or changing owner priority order (primary, secondary, etc.)
-
- Description — Enter or modify a note describing the resource
-
- Summary — Provides a preview of the settings selected within the wizard
See the Update a Resource topic for additional information.
Update a Resource
Follow the steps to update ownership configuration for a resource.
Step 1 – In the Resource Owners interface, select the desired resource and click Update. The Update resource wizard opens.
Step 2 – The Select Owners page lists the currently assigned owner(s). Modify as desired and click Next to continue.
- Add new owners — Click Add to browse for a new owner. See the Add Owner Window topic for additional information.
- Remove an owner — Select an owner and click Remove
- Change owner priority — Select an owner and use the arrow buttons to change the order
Remember, the first owner in the list is the primary owner. The table has several columns with information on the owners:
- Owner Name — Name of the assigned owner
- Owner Account — sAMAccountName associated with the owner, as read from Active Directory
- Owner Mail — Trustee's email address as read from Active Directory
- Owner Title — Trustee's title as read from Active Directory
- Owner Department — Trustee's department as read from Active Directory
- Confirmed — Indicates whether or not the assigned owner has confirmed ownership of that resource. Tool-tips display when hovering over the icons indicating whether the resource ownership has been confirmed, declined, pending response, or that a confirmation has not been requested.
Step 3 – The Description page displays any description that has been provided by either the Ownership Administrator or the assigned owner(s) for the resource. Modify as desired by typing in the textbox. Then click Next to continue.
Step 4 – On the Summary page, review the settings and click Finish. The Access Reviews application begins to process the ownership changes.
Step 5 – The action status displays on the page. When the update has completed (100%), click Close. The Update resource wizard closes.
This updates to ownership configuration have been processed.