Health Summary Email
Auditor Health Summary email includes all statistics on the product operations and health for the last 24 hours; it also notifies you about license status. By default, this email is generated daily at 7:00 AM and delivered to the recipient specified in the Notifications settings. Email content is very similar to data presented in the Health Status Dashboard.
For greater usability, to depict overall product health state, the email includes a color indicator in the topmost section: green means Auditor had no issues while auditing your IT infrastructure, and red means there were some problems that require your attention.
The email looks like shown below:
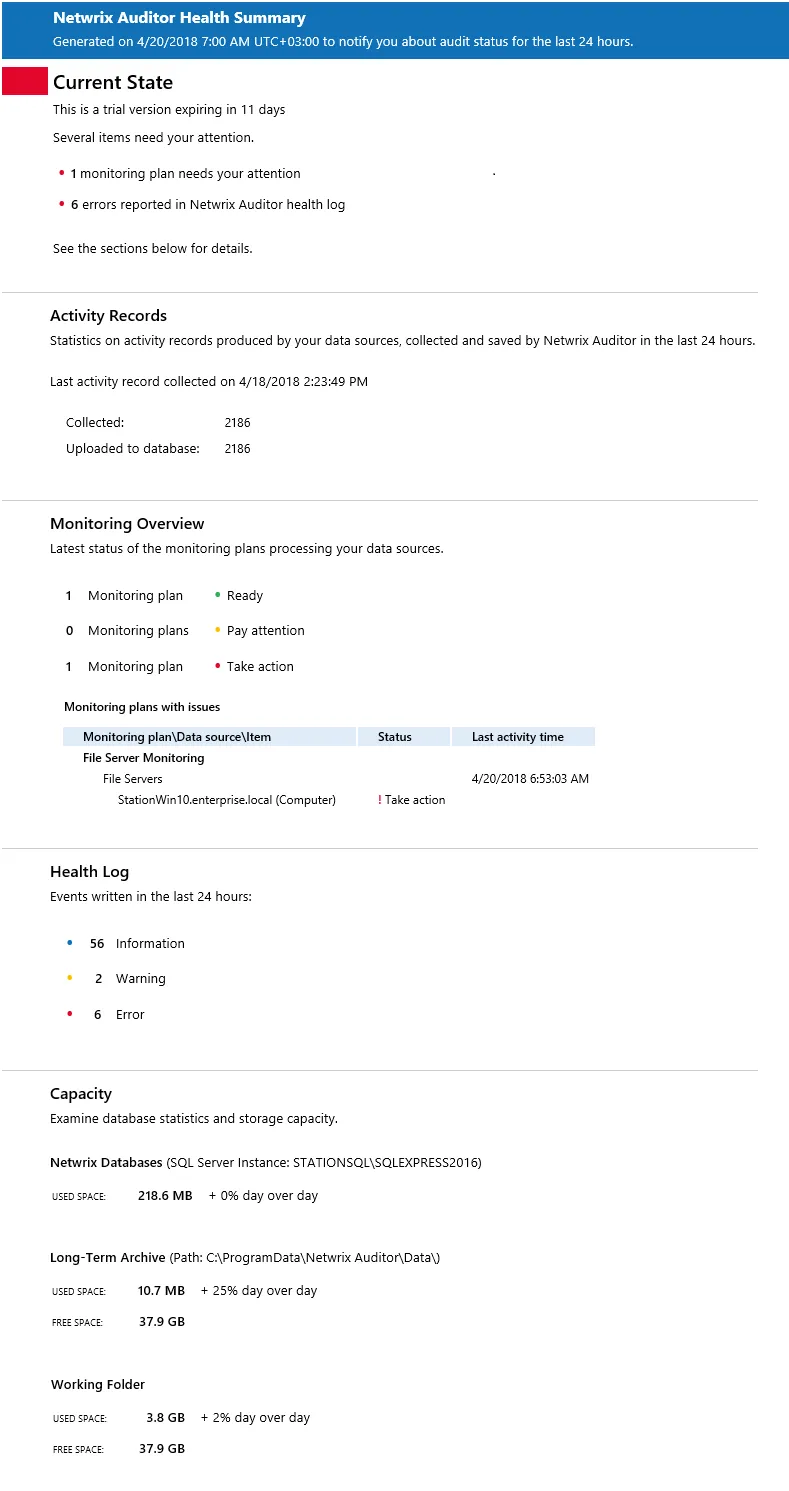
The Monitoring Overview section of the email provides detail information only for the monitoring plans with issues. Successfully completed monitoring plans are not included.
Activity Summary Email
Activity Summary email is generated automatically by Netwrix Auditor and lists all changes / recorded user sessions that occurred since the last Activity Summary delivery. By default, for most data sources an Activity Summary is generated daily at 3:00 AM and delivered to the specified recipients. You can also launch data collection and Activity Summary generation manually.
Notifications on user activity and event log collection (Event Log Collection Status) are a bit different and do not show changes.
The following Activity Summary example applies to Active Directory. Other Activity Summaries generated and delivered by Netwrix Auditor will vary slightly depending on the data source.
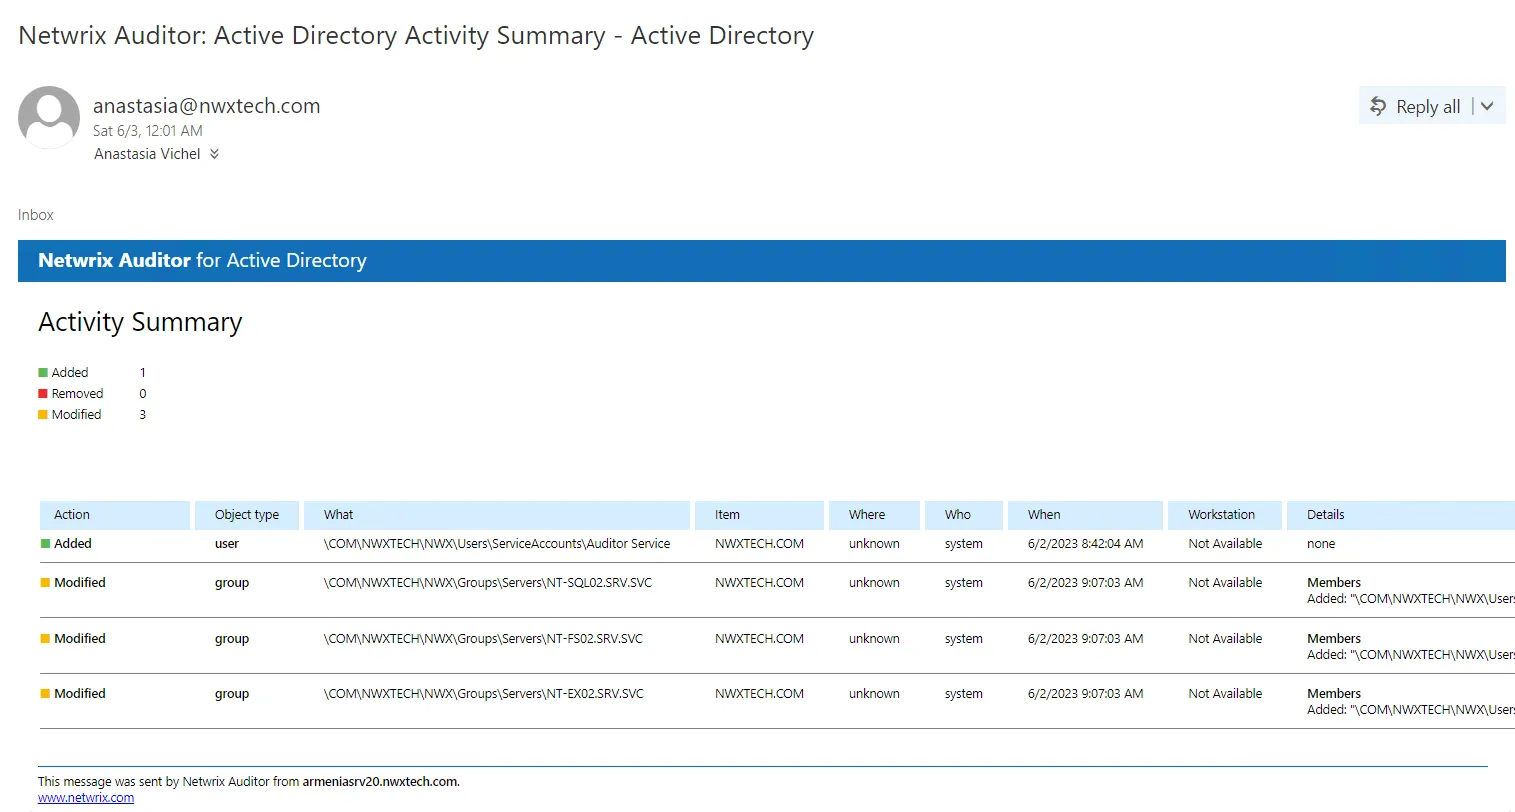
The example Activity Summary provides the following information on Active Directory changes:
| Column | Description |
|---|---|
| Action | Shows the type of action that was performed on the object. - Added - Removed - Modified - Activated (User Activity) |
| Object Type | Shows the type of the modified AD object, for example, 'user'. |
| What | Shows the path to the modified AD object. |
| Item | Shows the item associated with the selected monitoring plan. |
| Where | Shows the name of the domain controller where the change was made. |
| Who | Shows the name of the account under which the change was made. |
| When | Shows the exact time when the change occurred. |
| Workstation | Shows the name / IP address of the computer where the user was logged on when the change was made. |
| Details | Shows the before and after values of the modified AD object. |
To initiate an on-demand Activity Summary delivery, navigate to the Monitoring Plans section, select a plan, click Edit, and then select Update. A summary will be delivered to the specified recipient, listing all activity that occurred since the last data collection.
To disable Activity Summary Emails, you need to disable notifications in the settings. See the Notifications topic for additional information.
Notifications
Notification settings are configured when you create the first monitoring plan in the New monitoring plan wizard.
You can update notification settings at any time in the Settings > Notifications. To disable notifications, go to Settings > Notifications > Modify and select No notifications options.
Review the following for additional information:
- Enable Notifications via Exchange Online
- Enable Notifications via SMTP
- Summary Emails and Notifications about Critical Events
Enable Notifications via Exchange Online
To enable Netwrix Auditor to send email notifications via Exchange Online using modern authentication, configure an application. To do this, follow the steps below.
Step 1 – Register a new application in the Microsoft Entra admin center.
Step 1 – Under Identity go to Applications > App registrations and choose New registration.
Step 2 – Enter the name for your application, choose "Accounts in this organizational directory only". Redirect URL is optional.
Step 3 – Save Client ID and Tenant ID.
Step 4 – Create a new client secret and save it.
Step 5 – Under Microsoft Graph API, go to Manage > API permissions, and perform the following steps:
- Click Add
- In the Request API permissions window, click Microsoft Graph.
- Select Application Permissions.
- In the search box, type Mail.ReadWrite and Mail.Send to add these permissions to the application.
Step 6 – Grant admin consent for these permissions.
Step 7 – In Netwrix Auditor, go to Notification Settings, click Modify, and under Exchange Online enter Tenant name, Application ID and Application secret.
After the application configuration, you can restrict permission so only the specified accounts could use the application to send email. To do this, the following actions required:
- Create a Group
- Add Email to a Group
- Apply Restriction Using PowerShell Commands
Create a Group
Follow the steps to create a group.
Step 1 – Log in to the Exchange admin center with your administrator account.
Step 2 – Under Groupsclick on the Mail-enabled security tab.
Step 3 – Click Add a group.
Step 4 – Select Mail-enabled security and click Next.
Step 5 – Set a name and click Next.
Step 6 – Set group name and select Approval. Its needed to require owner approval to join the group.
Step 7 – Click Next.
Step 8 – Click Create.
Add Email to a Group
Follow the steps to add emails to group.
Step 1 – In the Exchange admin cente go to Groupsand click on the [Mail-enabled security] tab.
Step 2 – Click on the group you have created and add emails you want to allow APIs to access.
Apply Restriction Using PowerShell Commands
Follow the steps to run following commands using PowerShell.
Step 1 – Open PowerShell
Step 2 – Run the following commands in order:
Set-ExecutionPolicy -ExecutionPolicy RemoteSigned
Run: Install-Module PowerShellGet -Force
Install-Module -Name ExchangeOnlineManagement -Force
Get-Module ExchangeOnlineManagement
Connect-ExchangeOnline -UserPrincipalName {ADMIN_EMAIL_ADDRESS_HERE}
Step 3 – Sign in as Admin in the pop-up window.
Step 4 – Run the following command:
New-ApplicationAccessPolicy
-AppId {APPLICATION_ID_HERE}
-PolicyScopeGroupId {GROUP_EMAIL_ADDRESS_HERE}
-AccessRight RestrictAccess
-Description "YOUR DESCRIPTION HERE."
Enable Notifications via SMTP
To enable notifications via SMTP, first select SMTP in the Method column, then navigate to Default SMTP settings below to review settings used to deliver email notifications, reports, etc., and click Modify to adjust them if necessary.
| Option | Description |
|---|---|
| SMTP server | Enter your SMTP server address. It can be your company's Exchange server or any public mail server (e.g., Gmail, Yahoo). |
| Port number | Specify your SMTP server port number. |
| Sender address | Enter the address that will appear in the From field. RECOMMENDED: click Send Test Email. The system will send a test message to the specified email address and inform you if any problems are detected. |
| SMTP authentication | Select this checkbox if your mail server requires the SMTP authentication. |
| Sender email (from) | Enter the address that will appear in the "From" field in email notifications. This option does not affect notifications sent to users' managers and administrators. Before configuring the "From" field for user email notifications, make sure that your Exchange supports this option. |
| User name | Enter a user name for the SMTP authentication. |
| Password | Enter a password for SMTP authentication. |
| Use Secure Sockets Layer encrypted connection (SSL/TLS) | Select this checkbox if your SMTP server requires SSL to be enabled. |
| Use implicit SSL anthentification | Select this checkbox if the implicit SSL mode is used, which means that an SSL connection is established before any meaningful data is sent. |
| Enforce certificate validation to ensure security | Select this checkbox if you want to verify security certificate on every email transmission. The option is not available for auditing User Activity as well Netwrix Auditor tools. |
You can configure Activity Summary frequency, format and delivery time for each monitoring plan individually. See the Fine-Tune Your Plan and Edit Settings topic for more information.
After that, you can specify the recipient who will receive product activity and health summary emails.
Summary Emails and Notifications about Critical Events
Follow the steps to send summary emails and notifications about critical events.
Step 1 – Navigate to the Summary email recipient and click Modify.
Step 2 – Specify recipient address:
- To send to a single recipient, enter personal mailbox address.
- To send to multiple recipients, make sure they are added to a distribution group, and enter the group address. Entering multiple individual addresses is not supported.
To learn more about product health, you can also navigate to the Health status tile in the main window. It will take you to the Health Status dashboard that contains information on the product activity and system health state. See the Health Status Dashboard topic for additional information.