Configure Advanced Audit Policies
You can configure advanced audit policies instead of basic domain policies to collect Active Directory changes with more granularity. Either basic or advanced audit policies must be configured to track changes to accounts and groups, and to identify workstations where changes were made.
Perform the following procedures:
- To configure security options
- To configure advanced audit policies
To configure security options
Setting up both basic and advanced audit policies may lead to incorrect audit reporting. To force basic audit policies to be ignored and prevent conflicts, enable the Audit: Force audit policy subcategory settings policy.
To do it, perform the following steps:
-
Open the Group Policy Management console on any domain controller in the target domain: navigate to Start > Windows Administrative Tools (Windows Server 2016 and higher) or Administrative Tools (Windows 2012) Group Policy Management.
-
In the left pane, navigate to Forest:
<forest_name>> Domains ><domain_name>> Domain Controllers. Right-click the effective domain controllers policy (by default, it is the Default Domain Controllers Policy), and select Edit from the pop-up menu. -
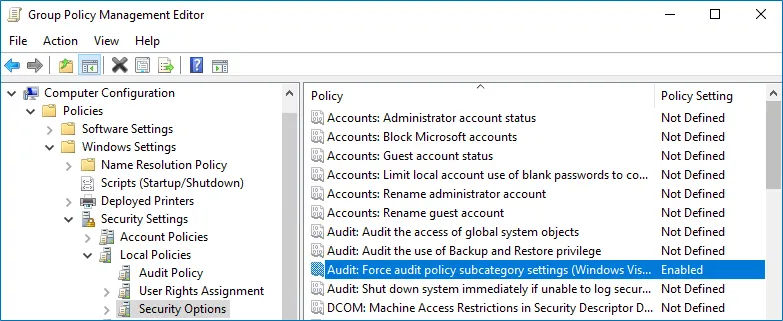
In the Group Policy Management Editor dialog, expand the Computer Configuration node on the left and navigate to Policies → Windows Settings → Security Settings → Local Policies → Security Options.
-
Locate the Audit: Force audit policy subcategory settings to override audit policy category settings and make sure that policy setting is set to "Enabled".
-
Run the following command to update group policy:
gpupdate /force
To configure advanced audit policies
-
Open the Group Policy Management console on any domain controller in the target domain: navigate to Start > Windows Administrative Tools (Windows Server 2016 and higher) or Administrative Tools (Windows 2012) Group Policy Management.
-
In the left pane, navigate to Forest:
<forest_name>> Domains ><domain_name>> Domain Controllers. Right-click the effective domain controllers policy (by default, it is the Default Domain Controllers Policy), and select Edit from the pop-up menu. -
In the Group Policy Management Editor dialog, expand the Computer Configuration node on the left and navigate to Policies → Windows Settings → Security Settings → Advanced Audit Policy Configuration → Audit Policies.
-
Configure the following audit policies.
Policy Subnode Policy Name Audit Events Account Management - Audit Computer Account Management - Audit Distribution Group Management - Audit Security Group Management - Audit User Account Management "Success" DS Access Audit Directory Service Access "Success" Logon/Logoff - Audit Logoff - Audit Logon These policies are only required to collect the information on the originating workstation, i.e., the computer from which a change was made. "Success" 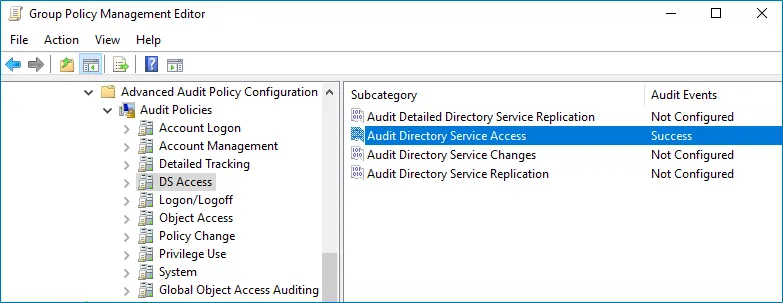
-
Run the following command to update group policy:
gpupdate /force
Configure Basic Domain Audit Policies
Basic audit policies allow tracking changes to user accounts and groups and identifying originating workstations. You can configure advanced audit policies for the same purpose too. See the Configure Advanced Audit Policiestopic for additional information.
-
Open the Group Policy Management console on any domain controller in the target domain: navigate to Start > Windows Administrative Tools (Windows Server 2016 and higher) or Administrative Tools (Windows 2012) Group Policy Management.
-
In the left pane, navigate to Forest:
<forest_name>> Domains ><domain_name>> Domain Controllers. Right-click the effective domain controllers policy (by default, it is the Default Domain Controllers Policy), and select Edit from the pop-up menu. -
In the Group Policy Management Editor dialog, expand the Computer Configuration node on the left and navigate to Policies → Windows Settings → Security Settings → Local Policies → Audit Policy.
-
Configure the following audit policies.
Policy Audit Events Audit account management "Success" Audit directory service access "Success" Audit logon events "Success" 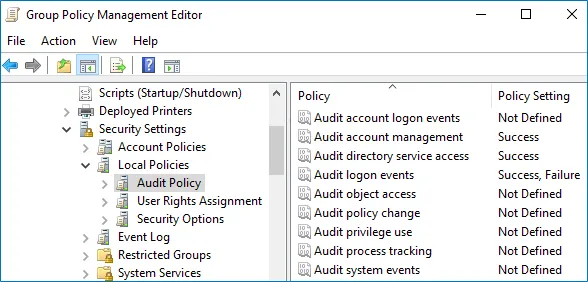
The Audit logon events policy is only required to collect the information on the originating workstation, i.e., the computer from which a change was made. This functionality is optional and can be disabled.
-
Run the following command to update group policy:
gpupdate /force
Configure Object-Level Auditing
Object-level auditing must be configured for the Domain partition if you want to collect information on user activity in the domain. If you also want to audit changes to AD configuration and schema, you must enable object-level auditing for Configuration and Schema partitions.
Auditing of the Configuration partition is enabled by default. See the Active Directory topic for detailed instructions on how to enable monitoring of changes to the Schema partition in the target AD domain.
Perform the following procedures to configure object-level auditing for the Domain, Configuration and Schema partitions:
- Configuring object-level auditing for the Domain partition
- Enabling object-level auditing for the Configuration and Schema partitions
Configuring object-level auditing for the Domain partition
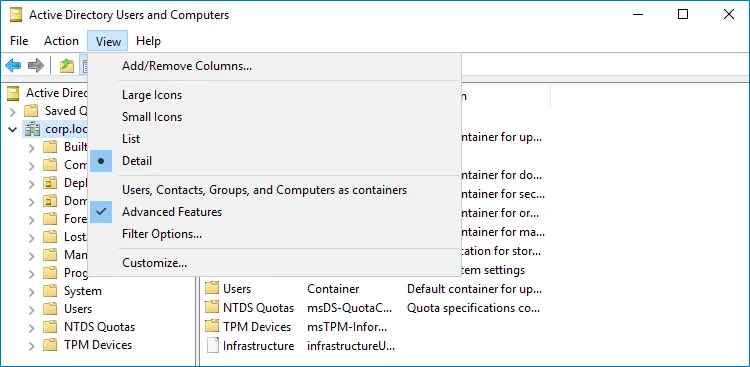
Step 1 – Open the Active Directory Users and Computers console on any domain controller in the target domain: navigate to Start > Windows Administrative Tools → Active Directory Users and Computers.
Step 2 – In the Active Directory Users and Computers dialog, click View in the main menu and ensure that the Advanced Features are enabled.
Step 3 – Right-click the <domain_name> node and select Properties. Select the
Security tab and click Advanced. In the Advanced Security Settings for <domain_name>
dialog, select the Auditing tab.
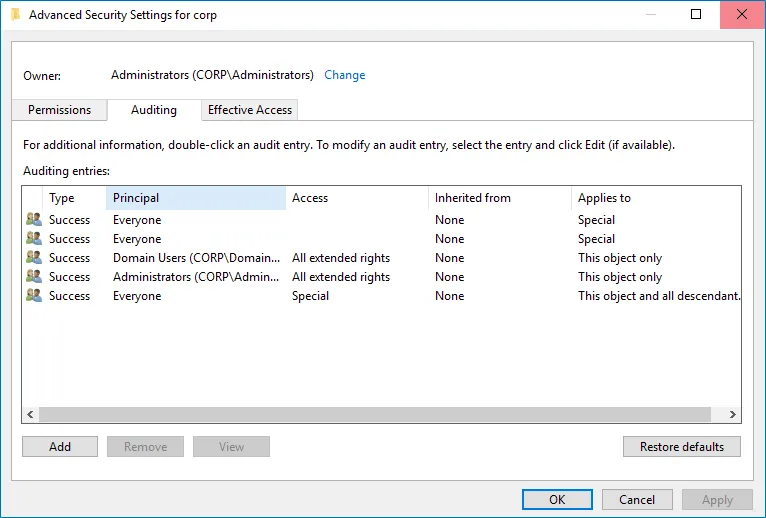
Step 4 – Perform the following actions on the Windows Server 2012 and above:
-
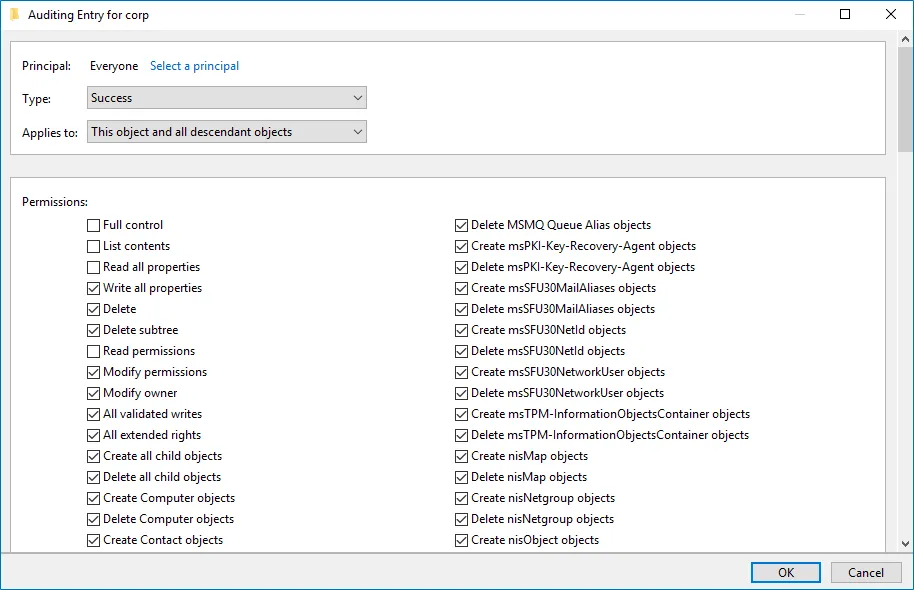
Click Add. In the Auditing Entry dialog, click the Select a principal link.
-
In the Select user, Computer, Service account, or Group dialog, type "Everyone" in the Enter the object name to select field.
-
Set Type to "Success" and Applies to to "This object and all descendant objects".
-
Under Permissions, select all checkboxes except the following: Full Control, List Contents, Read All Properties and Read Permissions.
-
Scroll to the bottom of the list and make sure that the Only apply these auditing settings to objects and/or containers within this container checkbox is cleared.
Enabling object-level auditing for the Configuration and Schema partitions
To perform this procedure, you will need the ADSI Edit utility. Follow the steps to enable object-level auditing for the Configuration and Schema partitions.
Step 1 – On any domain controller in the target domain, navigate to Start > Windows Administrative Tools > ADSI Edit.
Step 2 – Right-click the ADSI Edit node and select Connect To. In the Connection Settings dialog, enable Select a well-known Naming Context and select Configuration from the drop-down list.

Step 3 – Expand the Configuration <Your_Root_Domain_Name> node. Right-click the
CN=Configuration, DC=<name>,DC=<name>… node and select Properties.
Step 4 – In the CN=Configuration, DC=<name>, DC=<name> Properties dialog select the
Security tab and click Advanced. In the Advanced Security Settings for Configuration
dialog, open the Auditing tab.
Step 5 – Perform the following actions on the Windows Server 2012 and above:
-
Click Add. In the Auditing Entry dialog, click the Select a principal link.
-
In the Select user, Computer, Service account, or Group dialog, type "Everyone" in the Enter the object name to select field.
-
Set Type to "Success" and Applies to to "This object and all descendant objects".
-
Under Permissions, select all checkboxes except the following: Full Control, List Contents, Read All Properties and Read Permissions.
-
Scroll to the bottom of the list and make sure that the Only apply these auditing settings to objects and/or containers within this container checkbox is cleared.
Repeat these steps for the Schema container if necessary.
Adjust Security Event Log Size and Retention
Defining the Security event log size is essential for change auditing. If the log size is insufficient, overwrites may occur before data is written to the Long-Term Archive and the Audit Database, and some audit data may be lost.
To prevent overwrites, you can increase the maximum size of the Security event log and set retention method for this log to “Overwrite events as needed”.
To adjust your Security event log size and retention method, follow the procedure described below.
To read about event log settings recommended by Microsoft, refer to the following article: Event Log.
To increase the maximum size of the Security event log and set its retention method
-
Open the Group Policy Management console on any domain controller in the target domain: navigate to Start > Windows Administrative Tools (Windows Server 2016 and higher) or Administrative Tools (Windows 2012) Group Policy Management.
-
In the left pane, navigate to Forest:
<forest_name>> Domains ><domain_name>> Domain Controllers. Right-click the effective domain controllers policy (by default, it is the Default Domain Controllers Policy), and select Edit from the pop-up menu. -
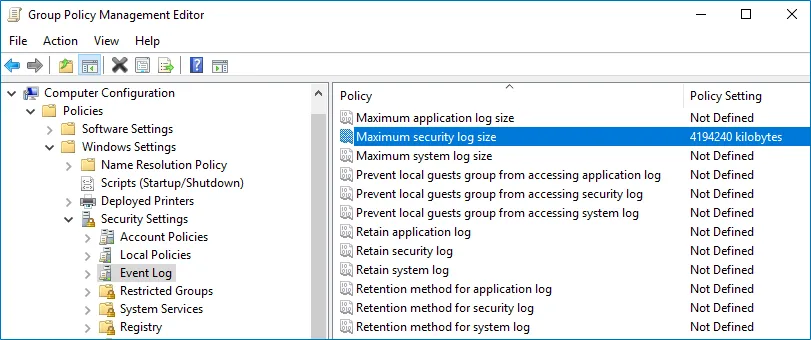
Navigate to Computer Configuration > Policies > Windows Settings > Security Settings > Event Log and double-click the Maximum security log size policy.
-
In the Maximum security log size Properties dialog, select Define this policy setting and set maximum security log size to 4194240 kilobytes (4GB).
-
Select the Retention method for security log policy. In the Retention method for security log Properties dialog, check Define this policy and select Overwrite events as needed.
-
Run the following command to update group policy:
gpupdate /force
If "Overwrite" option is not enough to meet your data retention requirements, you can use auto-archiving option for Security event log to preserve historical event data in the archive files. With that option enabled, you may want to adjust the retention settings for log archives (backups). Related procedures are described in the Auto-archiving Windows Security log Netwrix Knowledge Base article.