Configure Advanced Audit Policies
You can configure advanced audit policies instead of basic domain policies to collect Logon Activity changes with more granularity.
Perform the following procedures:
- Configuring security options
- Configuring advanced audit policies
Configuring security options
Setting up both basic and advanced audit policies may lead to incorrect audit reporting. To force basic audit policies to be ignored and prevent conflicts, enable the Audit: Force audit policy subcategory settings policy.
To do it, perform the following steps:
-
Open the Group Policy Management console on any domain controller in the target domain: navigate to Start > Windows Administrative Tools (Windows Server 2016 and higher) or Administrative Tools (Windows 2012) Group Policy Management.
-
In the left pane, navigate to Forest:
<forest_name>> Domains ><domain_name>> Domain Controllers. Right-click the effective domain controllers policy (by default, it is the Default Domain Controllers Policy), and select Edit from the pop-up menu. -
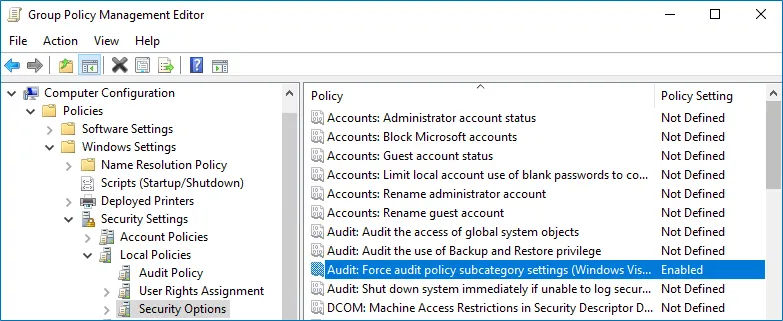
In the Group Policy Management Editor dialog, expand the Computer Configuration node on the left and navigate to Policies → Windows Settings → Security Settings → Local Policies → Security Options.
-
Locate the Audit: Force audit policy subcategory settings to override audit policy category settings and make sure that policy setting is set to "Enabled".
-
Run the following command to update group policy:
gpupdate /force
Configuring advanced audit policies
-
Open the Group Policy Management console on any domain controller in the target domain: navigate to Start > Windows Administrative Tools (Windows Server 2016 and higher) or Administrative Tools (Windows 2012) Group Policy Management.
-
In the left pane, navigate to Forest:
<forest_name>> Domains ><domain_name>> Domain Controllers. Right-click the effective domain controllers policy (by default, it is the Default Domain Controllers Policy), and select Edit from the pop-up menu. -
In the Group Policy Management Editor dialog, expand the Computer Configuration node on the left and navigate to Policies → Windows Settings → Security Settings → Advanced Audit Policy Configuration → Audit Policies .
-
Configure the following audit policies.
Policy Subnode Policy Name Audit Events Account Logon - Audit Kerberos Service Ticket Operations - Audit Kerberos Authentication Service - Audit Credential Validation "Success" and "Failure" - Audit Other Account Logon Events "Success" and "Failure" Logon/Logoff - Audit Logoff - Audit Other Logon/Logoff Events "Success" - Audit Logon "Success" and "Failure" System - Audit Security State Change "Success" 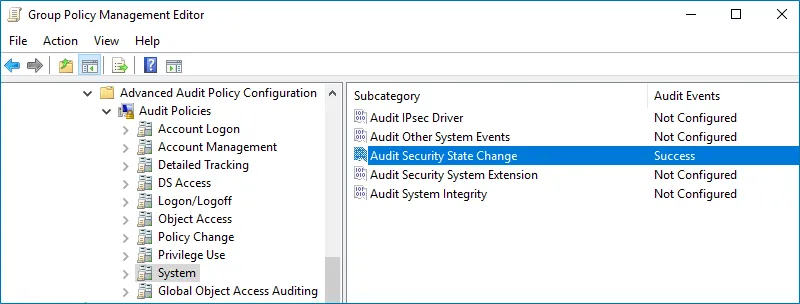
-
Run the following command to update group policy:
gpupdate /force
Configure Basic Domain Audit Policies
Basic local audit policies allow tracking changes to user accounts and groups and identifying originating workstations. You can configure advanced audit policies for the same purpose too. See the Configure Advanced Audit Policies topic for additional information.
-
Open the Group Policy Management console on any domain controller in the target domain: navigate to Start > Windows Administrative Tools (Windows Server 2016 and higher) or Administrative Tools (Windows 2012) Group Policy Management.
-
In the left pane, navigate to Forest:
<forest_name>> Domains ><domain_name>> Domain Controllers. Right-click the effective domain controllers policy (by default, it is the Default Domain Controllers Policy), and select Edit from the pop-up menu. -
In the Group Policy Management Editor dialog, expand the Computer Configuration node on the left and navigate to Policies → Windows Settings → Security Settings → Local Policies → Audit Policy.
-
Configure the following audit policies.
Policy Audit Events Audit logon events "Success" and "Failure" Audit account logon events "Success" and "Failure" Audit system events "Success" 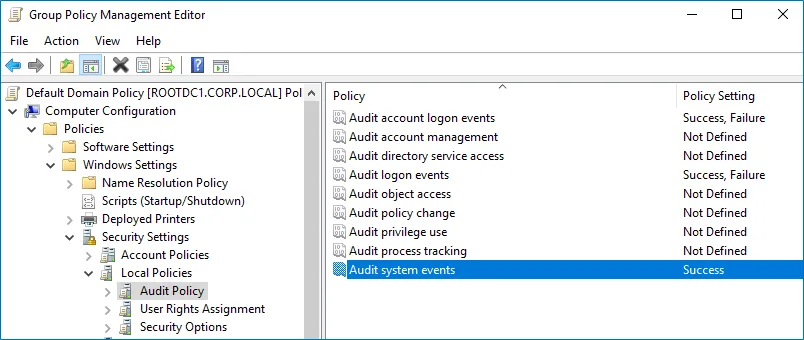
-
Run the following command to update group policy:
gpupdate /force
Logon Activity
Netwrix Auditor relies on native logs for collecting audit data. Therefore, successful change and access auditing requires a certain configuration of native audit settings in the audited environment and on the Auditor console computer. Configuring your IT infrastructure may also include enabling certain built-in Windows services, etc. Proper audit configuration is required to ensure audit data integrity, otherwise your change reports may contain warnings, errors or incomplete audit data.
CAUTION: Folder associated with Netwrix Auditor must be excluded from antivirus scanning. See the Antivirus Exclusions for Netwrix Auditor knowledge base article for additional information.
You can configure your IT Infrastructure for monitoring in one of the following ways:
-
Automatically through a monitoring plan – This is a recommended method. If you select to automatically configure audit in the target environment, your current audit settings will be checked on each data collection and adjusted if necessary.
- For both new and existing monitoring plans, you can click Launch Audit Configuration Assistant (in the wizard step or in the plan settings, respectively) to launch a special tool that can detect current infrastructure settings and adjust them as needed for monitoring. See the Audit Configuration Assistant topic for additional information.
-
Manually – Native audit settings must be adjusted manually to ensure collecting comprehensive and reliable audit data. You can enable Auditor to continually enforce the relevant audit policies or configure them manually:
-
The following policies must be set to "Success" and "Failure" for the effective domain controllers policy:
- Audit Logon Events
- Audit Account Logon Events
-
The Audit system events policy must be set to "Success" for the effective domain controllers policy.
-
The Advanced audit policy settings can be configured instead of basic.
-
The Maximum Security event log size must be set to 4GB. The retention method of the Security event log must be set to “Overwrite events as needed” or "Archive the log when full".
-
The following Windows Firewall inbound rules must be enabled:
- Remote Event Log Management (NP-In)
- Remote Event Log Management (RPC)
- Remote Event Log Management (RPC-EPMAP)
-
See the following topics for additional information:
- Configure Basic Domain Audit Policies
- Configure Advanced Audit Policies
- Configure Security Event Log Size and Retention Settings
- Logon Activity Ports
Logon Activity Actions
Review a full list of actions captured when monitoring Logon Activity with Netwrix Auditor.
NOTE: Please consider the following:
- Logon activity by local accounts is not reported
- Logoff activity from workstations is not reported
- Logoff activity from Domain Controllers is reported
For the attributes marked with asterisk (*) what changed is not reported.
| Action | Object Type | Attributes |
|---|---|---|
| Successful Logon | Logon | — |
| Interactive Logon | A session was reconnected. | |
| Failed Logon | Logon* | Cause description. The number of matching events if the logon attempt failed several times during a short period of time. |
| Interactive Logon | ||
| Logoff | Interactive Logon | A session was disconnected. Session duration (if the corresponding logon was found). |
Permissions for Logon Activity Auditing
Before you start creating a monitoring plan to audit the logon activity in your domain, determine the domain account that will be used for data collection.
Depending on the network traffic compression setting you need to use, one of the following is required:
- If network traffic compression is enabled, then the account must belong to the Domain Admins group;
- If network traffic compression is disabled, then you can choose between account which belongs to the Domain Admins group or non-administrative account. See the Configure Non-Administrative Account to Collect Logon Activity topic below for additional information.
Afterward, include this account in the monitoring plan wizard.
Please consider the following:
- For the data collecting account, you should use a different account than the one Auditor is using to access the database.
- If gMSA is being used, data collecting account should be a member of the local Administrators group on the Netwrix Auditor host.
Configure Non-Administrative Account to Collect Logon Activity
This section contains instructions on how to configure an account to collect Logon Activity with minimum rights assignment. The instructions below apply only if you are going create a monitoring plan with disabled network traffic compression and do not want to adjust audit settings automatically.
Before creating an account, grant the Read permission on the SECURITY registry key
(HKEY_LOCAL_MACHINE\SECURITY) for an admin account under which you will make changes in Group
Policy.
Follow the steps to configure non-administrative account to collect logon activity:
Step 1 – Create a domain user with the following privileges:
- Back up files and directories. See the Configure the Back up Files and Directories Policy topic for additional information.
- Log on as a batch job. See the Permissions for Active Directory Auditing topic for additional information.
- Manage auditing and security log. See the Configure the Manage Auditing and Security Log Policy topic for additional information.
Step 2 – Grant the Read permission on the following registry keys to this user:
HKEY_LOCAL_MACHINE\SECURITY\Policy\PolAdtEvHKEY_LOCAL_MACHINE\SYSTEM\CurrentControlSet\Control\SecurePipeServers\winregHKEY_LOCAL_MACHINE\SYSTEM\CurrentControlSet\Services\EventLog\Security
See the Assign Permission To Read the Registry Key topic for additional information on how to do it using Registry Editor.
Configure Security Event Log Size and Retention Settings
Follow the steps to configure Security Event Log settings:
Step 1 – Open the Group Policy Management console on any domain controller in the target domain: navigate to Start > Windows Administrative Tools (Windows Server 2016 and higher) or Administrative Tools (Windows 2012) Group Policy Management.
Step 2 – In the left pane, navigate to Forest: <forest_name> > Domains > <domain_name>
> Domain Controllers. Right-click the effective domain controllers policy (by default, it is the
Default Domain Controllers Policy), and select Edit from the pop-up menu.
Step 3 – Navigate to Computer Configuration > Policies > Windows Settings > Security Settings > Event Log and double-click the Maximum security log size policy.
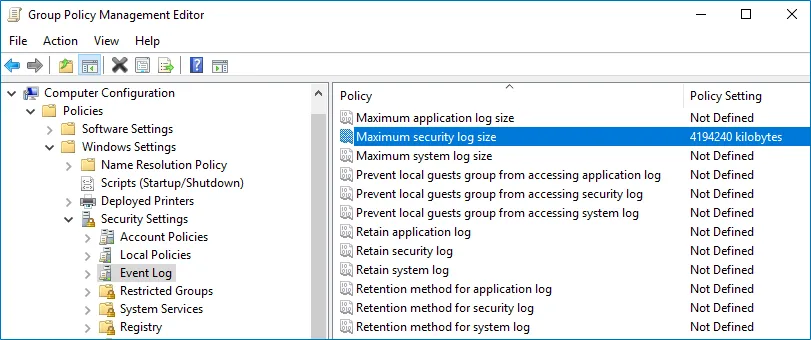
Step 4 – In the Maximum security log size Properties dialog, select Define this policy setting and set maximum security log size to 4194240 kilobytes (4GB).
Step 5 – Select the Retention method for security log policy. In the Retention method for security log Properties dialog, check Define this policy and select Overwrite events as needed.
Step 6 – Run the following command to update group policy: gpupdate /force
NOTE: After configuring security event settings via Group Policy, you may notice that the log size on a specific computer is not set correctly. In this case, follow the resolution steps from the Netwrix Knowledge base article to fix the issue: Security log settings do not apply via GPO.