Configure Data Collection Settings
To successfully track user activity, make sure that the following settings are configured on the audited computers and on the computer where Netwrix Auditor Server is installed:
- The Windows Management Instrumentation and the Remote Registry services are running and their Startup Type is set to "Automatic". See the Check the Windows Services Status topic for additional information.
- The File and Printer Sharing and the Windows Management Instrumentation features are allowed to communicate through Windows Firewall. See the Windows Features Communication topic for additional information.
- Local TCP Port 9004 is opened for inbound connections on the computer where Netwrix Auditor Server is installed. This is done automatically on the product installation. See the Open Local TCP Port 9004 topic for additional information.
- Local TCP Port 9003 is opened for inbound connections on the audited computers. See the Open Local TCP Port 9003 topic for additional information.
- Remote TCP Port 9004 is opened for outbound connections on the audited computers. See the Open Remote TCP Port 9004 topic for additional information.
Check the Windows Services Status
Follow the steps to check the status and startup type of Windows services.
Step 1 – Navigate to Start > Windows Administrative Tools > Services.
Step 2 – In the Services snap-in, locate the Remote Registry service and make sure that its status is "Started" (on pre-Windows Server 2012 versions) and "Running" (on Windows Server 2012 and above). If it is not, right-click the service and select Start from the pop-up menu.
Step 3 – Check that the Startup Type is set to "Automatic". If it is not, double-click the service. In the Remote Registry Properties dialog, in the General tab, select "Automatic" from the drop-down list.
Step 4 – Perform the steps above for the Windows Management Instrumentation service.
Windows Features Communication
Follow the steps to allow Windows features to communicate through Firewall.
Step 1 – Navigate to Start → Control Panel and select Windows Firewall.
Step 2 – In the Help Protect your computer with Windows Firewall page, click Allow a program or feature through Windows Firewall on the left.
Step 3 – In the Allow an app or feature through Windows Firewall page that opens, locate the File and Printer Sharing feature and make sure that the corresponding checkbox is selected under Domain.
Step 4 – Repeat step 3 for the Windows Management Instrumentation (WMI) feature.
Open Local TCP Port 9004
Follow the steps to open Local TCP Port 9004 for inbound connections.
Step 1 – On the computer where Netwrix Auditor is installed, navigate to Start → Control Panel and select Windows Firewall.
Step 2 – In the Help Protect your computer with Windows Firewall page, click Advanced settings on the left.
Step 3 – In the Windows Firewall with Advanced Security dialog, select Inbound Rules on the left.
Step 4 – Click New Rule. In the New Inbound Rule wizard, complete the steps as described below:
- On the Rule Type step, select Program.
- On the Program step, specify the path: %Netwrix Auditor installation folder%/Netwrix Auditor/User Activity Video Recording/UAVRServer.exe.
- On the Action step, select the Allow the connection action.
- On the Profile step, make sure that the rule applies to Domain.
- On the Name step, specify the rule's name, for example UA Server inbound rule.
Step 5 – Double-click the newly created rule and open the Protocols and Ports tab.
Step 6 – In the Protocols and Ports tab, complete the steps as described below:
- Set Protocol type to "TCP".
- Set Local port to "Specific Ports" and specify to "9004".
Open Local TCP Port 9003
Follow the steps to open Local TCP Port 9003 for inbound connections.
Step 1 – On a target computer navigate to Start → Control Panel and select Windows Firewall.
Step 2 – In the Help Protect your computer with Windows Firewall page, click Advanced settings on the left.
Step 3 – In the Windows Firewall with Advanced Security dialog, select Inbound Rules on the left.
Step 4 – Click New Rule. In the New Inbound Rule wizard, complete the steps as described below.
| Option | Setting |
|---|---|
| Rule Type | Program |
| Program | Specify the path to the Core Service. By default, %ProgramFiles% (x86)\Netwrix Auditor\User Activity Core Service\UAVRAgent.exe. |
| Action | Allow the connection |
| Profile | Applies to Domain |
| Name | Rule name, for example UA Core Service inbound rule. |
Step 5 – Double-click the newly created rule and open the Protocols and Ports tab.
Step 6 – In the Protocols and Ports tab, complete the steps as described below:
- Set Protocol type to "TCP".
- Set Local port to "Specific Ports" and specify to "9003".
Open Remote TCP Port 9004
Follow the steps to open Remote TCP Port 9004 for outbound connections.
Step 1 – On a target computer, navigate to Start → Control Panel and select Windows Firewall.
Step 2 – In the Help Protect your computer with Windows Firewall page, click Advanced settings on the left.
Step 3 – In the Windows Firewall with Advanced Security dialog, select Outbound Rules on the left.
Step 4 – Click New Rule. In the New Outbound Rule wizard, complete the steps as described below.
| Option | Setting |
|---|---|
| Rule Type | Program |
| Program | Specify the path to the Core Service. By default, %ProgramFiles% (x86)\Netwrix Auditor\User Activity Core Service\UAVRAgent.exe. |
| Action | Allow the connection |
| Profile | Applies to Domain |
| Name | Rule name, for example UA Core Service outbound rule. |
Step 5 – Double-click the newly created rule and open the Protocols and Ports tab.
Step 6 – In the Protocols and Ports tab, complete the steps as described below:
- Set Protocol type to "TCP".
- Set Remote port to "Specific Ports" and specify to "9004".
User Activity
Netwrix Auditor relies on native logs for collecting audit data. Therefore, successful change and access auditing requires a certain configuration of native audit settings in the audited environment and on the Auditor console computer. Configuring your IT infrastructure may also include enabling certain built-in Windows services, etc. Proper audit configuration is required to ensure audit data integrity, otherwise your change reports may contain warnings, errors or incomplete audit data.
CAUTION: Folder associated with Netwrix Auditor must be excluded from antivirus scanning. See the Antivirus Exclusions for Netwrix Auditor knowledge base article for additional information.
You can use group Managed Service Accounts (gMSA) as data collecting accounts.
You can configure your IT Infrastructure for monitoring in one of the following ways:
-
Automatically through a monitoring plan – This is a recommended method. If you select to automatically configure audit in the target environment, your current audit settings will be checked on each data collection and adjusted if necessary.
-
Manually – Native audit settings must be adjusted manually to ensure collecting comprehensive and reliable audit data. You can enable Auditor to continually enforce the relevant audit policies or configure them manually:
-
On the audited system(s):
- The Windows Management Instrumentation and the Remote Registry services must be running and their Startup Type must be set to "Automatic".
- The File and Printer Sharing and the Windows Management Instrumentation features must be allowed to communicate through the Windows Firewall.
- Local TCP Port 9003 must be opened for inbound connections.
- Remote TCP Port 9004 must be opened for outbound connections.
- The User Activity Core Service is installed on the monitored computers. See the Install Netwrix Auditor Agent to Audit User Activity topic for additional information.
- .NET 4.8 must be installed.
-
On the Netwrix Auditor host system/server:
- The Windows Management Instrumentation and the Remote Registry services must be running and their Startup Type must be set to "Automatic".
- The File and Printer Sharing and the Windows Management Instrumentation features must be allowed to communicate through Windows Firewall.
- Local TCP Port 9004 must be opened for inbound connections.
- .NET 4.8 must be installed.
-
See the following topics for additional information:
User Sessions
Review a full list of all session actions when auditing user sessions with Netwrix Auditor.
| Object type | Action | What | Description |
|---|---|---|---|
| User session | Session start | Monitoring start | - Logon (session creation) - Start of monitoring (after service install or deploy) |
| Session start | Local session start | — | |
| Session end | Sign-out | - User initiated sign-out / logoff | |
| Session end | Shutdown | - Computer shutdown - Service stop / crash (appears after one starts service again) | |
| Session start / Session end | Screensaver off / Screensaver on | — | |
| Session start / Session end | Unlock / Lock | — | |
| Session start | Console connection | - Connect locally to existing session | |
| Session end | Console disconnection | - Switch user - Remote connect to existing session | |
| Session start | Remote connection | - Connect through RDP | |
| Session end | Remote disconnection | - Disconnect in RDP or just close RDP session |
Run As Monitoring
Netwrix Auditor for User Activity can monitor programs executed under different user accounts. Review the table below to discover how different "run as" scenarios are reflected in the product.
| Object type | Details | Description |
|---|---|---|
| Window | None | User runs the application. |
| Window | Application Run As: <account_name> | Standard user runs an application under credentials of another standard user. |
| Elevated Window | Application Run As: <account_name> | User runs program through Run As Administrator or Accepts UAC (User Account Control) elevation prompts. |
| Elevated Window | None | Administrator needs to run the program with Run as Administrator enabled. Server Manager is one of the main examples for this case. |
Install Netwrix Auditor Agent to Audit User Activity
By default, the agent is installed automatically on the audited computers upon the New Managed Object wizard completion. If, for some reason, installation has failed, you must install the agent manually on each of the audited computers.
Before installing Netwrix Auditor agent to audit user activity, make sure that:
- The audit settings are configured properly.
- The Data Processing Account has access to the administrative shares.
Follow the steps to install Netwrix Auditor agent to audit user activity.
Step 1 – Navigate to %Netwrix Auditor Installation Folder%\User Activity Video Recording and copy the UACoreSvcSetup.msi file to the audited computer.
NOTE: This is the default location. However, it may be changed because users can move this folder.
Step 2 – Run the installation package.
Step 3 – Follow the instructions of the setup wizard. When prompted, accept the license agreement and specify the installation folder.
Step 4 – On the Agent Settings page, specify the host server (i.e., the name of the computer where Netwrix Auditor is installed) and the server TCP port.
Netwrix Auditor agent is installed and ready to audit user activity.
Configure Video Recordings Playback Settings
Video recordings of users' activity can be watched in any Netwrix Auditor client. Also, recordings are available as links in web-based reports and email-based Activity Summaries.
You can use group Managed Service Accounts (gMSA) as data collecting accounts.
To be able to watch video files captured by Netwrix Auditor via console, the following settings must be configured:
- The user must have read permissions (resultant set) to the Netwrix_UAVR$ shared folder where video files are stored. By default, all members of the Netwrix Auditor Client Users group can access this shared folder. Both the group and the folder are created automatically by Netwrix Auditor. Make sure to grant sufficient permissions on folder or explicitly add user to the group (regardless his or her role delegated in the product). See the To Add an Account to Netwrix Auditor Client Users Group topic for additional information.
- A dedicated codec must be installed. This codec is installed automatically on the computer where Netwrix Auditor is deployed, and on the monitored computers. To install it on a different computer, download it from https://www.netwrix.com/download/ScreenPressorNetwrix.zip.
- The Ink and Handwriting Services, Media Foundation, and Desktop Experience Windows features must be installed on the computer where Netwrix Auditor Server is deployed. These features allow enabling Windows Media Player and sharing video recordings via DLNA. See the To Enable Windows Features topic for additional information.
To be able to watch video files captured by Netwrix Auditor via direct links, the following settings must be configured:
- Microsoft Internet Explorer 7.0 and above must be installed and ActiveX must be enabled.
- Internet Explorer security settings must be configured properly. See the To Configure Internet Explorer Security Settings topic for additional information.
- JavaScript must be enabled. See the To Enable JavaScript topic for additional information.
- Internet Explorer Enhanced Security Configuration (IE ESC) must be disabled. See the To Disable Internet Explorer Enhanced Security Configuration (IE ESC) topic for additional information.
All Internet Explorer-related settings are relevant only for those who watch videos not in Netwrix Auditor console.
NOTE: Microsoft is in the process of deprecating Internet Explorer. However, if you are trying to access the video recordings from browser via direct links (reports on SSRS portal, subscriptions, activity summaries, search export results), IE engine should be present on the client machine. IE might be disabled with GPO, but it should not be removed completely. Recommended option is to use Edge with "IE mode" option enabled.
To Configure Internet Explorer Security Settings
Follow the steps to configure Internet Explorer security settings.
Step 1 – In Internet Explorer, navigate to Tools > Internet Options.
Step 2 – Switch to the Security tab and select Local Intranet. Click Custom Level.
Step 3 – In the Security Settings - Local Intranet Zone dialog, scroll down to Downloads and verify that File download is set to Enable.
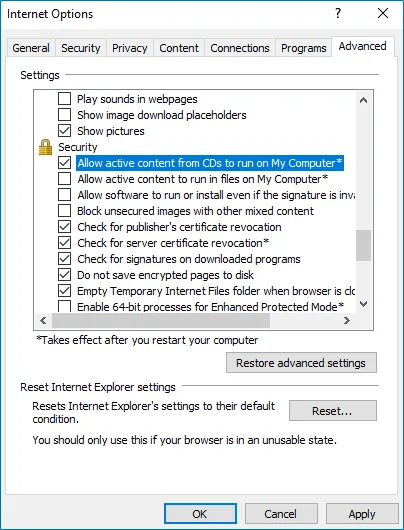
Step 4 – In the Internet Options dialog, switch to the Advanced tab.
Step 5 – Local Security and select the Allow active content to run in files on My Computer checkbox.
To Enable JavaScript
Follow the steps to enable JavaScript.
Step 1 – In Internet Explorer, navigate to Tools > Internet Options.
Step 2 – Switch to the Security tab and select Internet. Click Custom Level.
Step 3 – In the Security Settings - Internet Zone dialog, scroll down to Scripting and verify that Active scripting is set to Enable.
To Disable Internet Explorer Enhanced Security Configuration (IE ESC)
Follow the steps to disable Internet Explorer enhanced security configuration.
Step 1 – Navigate to Start > Windows Administrative Tools > Server Manager.
Step 2 – In the Security Information section, click Configure IE ESC link on the right to disable it.
To Add an Account to Netwrix Auditor Client Users Group
All members of the Netwrix Auditor Client Users group are granted the Global reviewer role in Netwrix Auditor and have access to all collected data.
Follow the steps to add an account to the Netwrix Auditor Client Users group.
Step 1 – On the computer where Netwrix Auditor Server is installed, start the Local Users and Computers snap-in.
Step 2 – Navigate to the Groups node and locate the Netwrix Auditor Client Users group.
Step 3 – In the Netwrix Auditor Client Users Properties dialog, click Add.
Step 4 – Specify the users you want to be included in this group.
To Enable Windows Features
Follow the steps if Netwrix Auditor Server is installed on the Windows Server 2012 and later.
Step 1 – Navigate to Start > Server Manager.
Step 2 – In the Server Manager window, click Add roles and features.
Step 3 – On the Select Features step, select one of the following Windows features and the follow the installation prompts:
- Ink and Handwriting Services
- Media Foundation
- User Interface and Infrastructure > Desktop Experience
NOTE: If you have Windows corruption errors when installing Windows Media Foundation, run the Deployment Image Servicing and Management (DISM) tool from the command prompt with administrative rights. For detailed information, refer to the Microsoft article: Fix Windows corruption errors by using the DISM or System Update Readiness tool.
Step 4 – Restart your computer to complete features installation.
Install for SharePoint Core Service
This section contains instructions on how to install Netwrix Auditor for SharePoint Core Service.
During the Netwrix Auditor for SharePoint Core Service installation / uninstallation your SharePoint sites may be unavailable.
Prior to the Netwrix Auditor for SharePoint Core Service installation, review the following prerequisites and make sure that:
- Netwrix Auditor for SharePoint Core Service is going to be installed on the computer that hosts SharePoint Central Administration in the audited SharePoint farm.
- .Net Framework 3.5 SP1 is installed on the computer that hosts SharePoint Central Administration in the audited SharePoint farm.
- The SharePoint Administration (SPAdminV4) service is started on the target computer. See SharePoint for more information.
- The user that is going to run the Core Service installation:
- Is a member of the local Administrators group on SharePoint server, where the Core Service will be deployed.
- Is granted the SharePoint_Shell_Access role on SharePoint SQL Server configuration database. See Permissions for SharePoint Auditing topic for more information.
Follow the steps to install Netwrix Auditor for SharePoint Core Service manually.
Step 1 – On the computer where Auditor Server resides,navigate to %Netwrix Auditor installation
folder%\SharePoint Auditing__\SharePointPackage and copy SpaPackage_<version>.msi to the
computer where Central Administration is installed.
Step 2 – Run the installation package.
Step 3 – Follow the instructions of the setup wizard. When prompted, accept the license agreement and specify the installation folder.
Install for User Activity Core Service
By default, the Core Service is installed automatically on the audited computers when setting up auditing in Netwrix Auditor. If, for some reason, installation has failed, you must install the Core Service manually on each audited computer.
Follow the steps to install Netwrix Auditor User Activity Core Service.
Step 1 – On the computer where Auditor Server resides, navigate to %ProgramFiles% (x86)\Netwrix Auditor\User Activity Video Recording and copy the UACoreSvcSetup.msi file to the audited computer.
Step 2 – Run the installation package.
Step 3 – Follow the instructions of the setup wizard. When prompted, accept the license agreement and specify the installation folder.
Step 4 – On the Core Service Settings page, specify the host server (i.e., the name of the computer where Netwrix Auditor is installed) and the server TCP port.
Install User Activity Core Service with the Command Prompt
Follow the steps to perform a silent installation of the User Activity Core Service with the command prompt.
Step 1 – On the computer where Auditor Server resides,, navigate to %ProgramFiles% (x86)\Netwrix Auditor\User Activity Video Recording and copy the UACoreSvcSetup.msi file to the audited computer or to a file share the target server(s) can access.
Step 2 – Run the following commands on target servers:
CD %PathToInstaller%msiexec.exe /i "UACoreSvcSetup.msi" ALLUSERS=1 /qn /norestart /log output.log UAVR_SERVERNAME=%NAServer% UAVR_SERVERPORT=9004
Step 3 – Replace %PathToInstaller% with the path to the folder you copied the UACoreSvcSetup.msi file.
Step 4 – Replace %NAServer% with the name of your Netwrix Auditor server.