Work with Collected Data
To leverage data collected with the add-on, you can do the following in Auditor:
- Search for required data. For that, start Auditor client and navigate to Search. After specifying the criteria you need, click Search. You will get a list of activity records with detailed information on who did what in the reported time period.
You might want to apply a filter to narrow down your search results to the Netwrix API data source only.
- Also, you can click Tools in the upper-right corner and select the command you need. For
example:
- If you want to periodically receive the report on the results of search with the specified criteria, click Subscribe. Then specify how you want the report to be delivered – as an email or as a file stored to the file share.
- To create an alert on the specific occurrences, click Create alert.
- To export filtered data to PDF or CSV, click Export data.
- You can also configure and receive alerts on the events you are interested in. See the Administration topic for additional information.
Deployment Scenarios
The add-on can be deployed on any computer in your environment. For example, you can run the add-on on the computer where Auditor is installed, or on a remote server. Also, consider different SCVMM deployment scenarios. Possible deployment options are as follows (here it is assumed that the add-on is installed together with Auditor server):
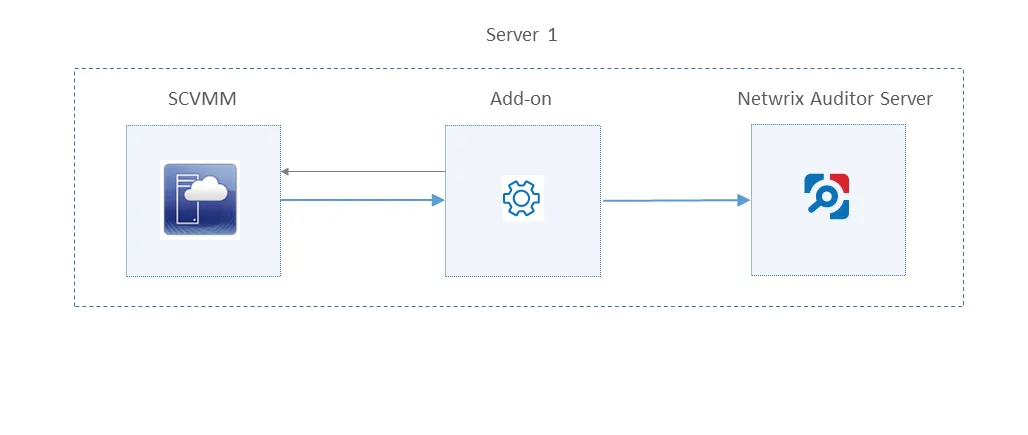
- Add-on running on the same machine as SCVMM server (with Management Console):
- Add-on and SCVMM server (with Management Console) running on different machines:
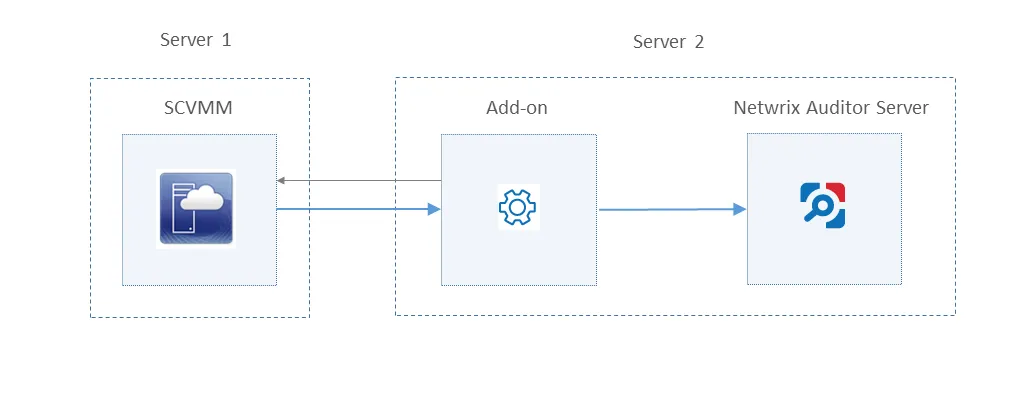
In this scenario, the account used to access SCVMM server must be a member of the Remote Management Users local group on the SCVMM server.
- Add-on running on the same machine as SCVMM Management Console; SCVMM server running on the remote machine:
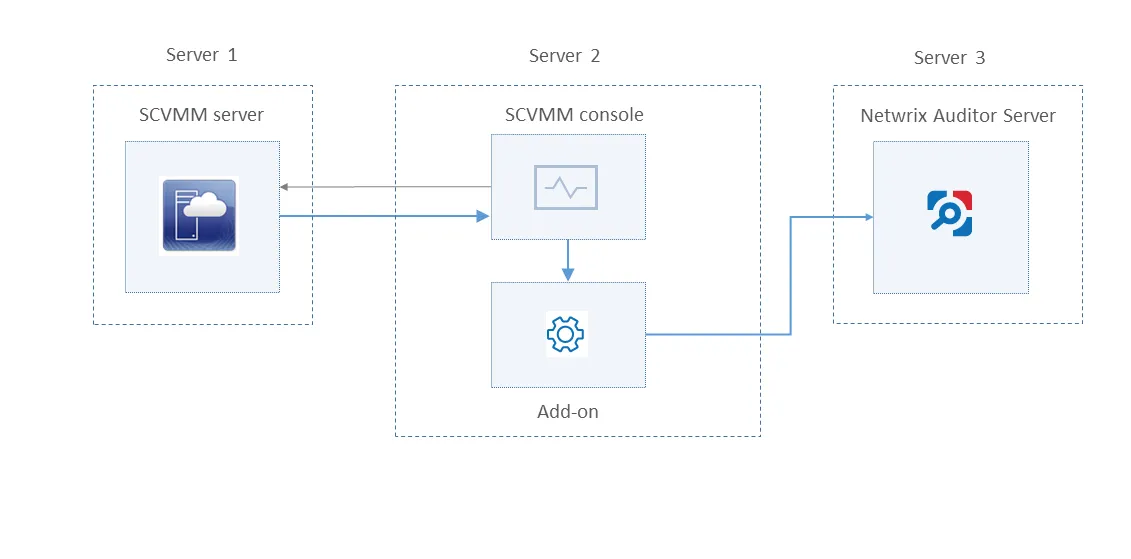
In this scenario, make sure to specify SCVMM server address in the DataCollectionServer parameter (not the machine where SCVMM console runs) in the settings.xml configuration file. See the Add-On Parameterstopic for additional information.
Depending on the deployment scenario you choose, you will need to define a set of the add-on parameters. Several examples are provided below.
In the certain scenarios you may need to configure not all parameters but only some of them.
Example 1
- The add-on runs on the Auditor server.
- The System account is used to launch the add-on via Task Scheduler (default configuration).
- Configuration parameters to specify in settings.xml (sample values):
https://172.28.6.19:9699/netwrix/api/v1/activity_records</NetwrixAuditorEndpoint>```

```<NetwrixAuditorUserName/>```

```<NetrixAuditorPassword/>```

Configuration parameters __NetwrixAuditorUserName__ and __NetrixAuditorPassword__ are not required.

## Example 2

- The add-on runs on the Auditor server with the explicitly specified user credentials.
- Configuration parameters to specify in __settings.xml__ (sample values):

  ```<NetwrixAuditorEndpoint>
  https://172.28.6.19:9699/netwrix/api/v1/activity_records</NetwrixAuditorEndpoint>```

  ```<NetwrixAuditorUserName>SecurityOfficer```
  ```</NetwrixAuditorUserName>```

  ```<NetwrixAuditorPassword>NetwrixUser```
  ```</NetwrixAuditorPassword>```

## Example 3

- The add-on runs on the machine with SCVMM.
- The _System_ account is used to launch the add-on via Task Scheduler (default configuration).
- Configuration parameters to specify in __settings.xml__:

```<DataCollectionServer/>
<DataCollectionUserName/>
<DataCollectionPassword/>
Credentials for Data Collection Server (that is, SCVMM) are not required.
Example 4
-
SCVMM and/or Auditor run on the machines other than the add-on server.
-
In this case, the corresponding set of credentials (for Data Collection Server and/or Netwrix Auditor) must be specified explicitly.
-
Configuration parameters to specify in settings.xml (sample values):
<NetwrixAuditorEndpoint>https://172.28.6.19:9699/netwrix/api/v1/activity_records</NetwrixAuditorEndpoint>
<NetwrixAuditorUserName>SecurityOfficer</NetwrixAuditorUserName>
<NetrixAuditorPassword>NetwrixUser</NetrixAuditorPassword>
<DataCollectionServer>SCVMMServer</DataCollectionServer>
<DataCollectionUserName>SCVMMAdmin</DataCollectionUserName>
<DataCollectionPassword>Password</DataCollectionPassword>
Deploy the Add-On
Follow the step to deploy the Add-On:
Step 1 – Prepare Netwrix Auditor for Data Processing.
Step 2 – Download the Add-On.
Step 3 – Configure Parameters for Data Collection.
Step 4 – Register Windows Scheduled Task.
Prepare Netwrix Auditor for Data Processing
In Auditor client, go to the Integrations section and verify Integration API settings:
- Make sure the Leverage Integration API is switched to ON.
- Check the TCP communication port number – default is 9699.
See the Prerequisites topic for additional information.
By default, activity records are written to Netwrix_Auditor_API database which is not associated with a specific monitoring plan.
Optionally, you can create a dedicated monitoring plan in Auditor. In this case, data will be written to a database linked to this plan. Target it at Netwrix API data source and enable for monitoring. Add a dedicated item of Integration type to the plan for data to be filtered by item name. See the Integration API topic for additional information.
In such scenario, you will need to specify this monitoring plan in the NetwrixAuditorPlan and NetwrixAuditorPlanItem parameters in the settings.xml file. See the Add-On Parameters topic for additional information.
Download the Add-On
- Download the distribution package Netwrix_Auditor_Add-on_for_Microsoft_SCVMM.zip.
- Unpack it to a folder on the computer where you plan to deploy the add-on.
Configure Parameters for Data Collection
In the add-on folder, open the settings.xml file and configure the add-on parameters for data collection, as listed below.
See the Add-On Parameterstopic for the full list of configuration parameters.
| Parameter | Default value | Description |
|---|---|---|
| DataCollectionServer | (empty) | Specify SCVMM server to collect data from. You can use IP address, FQDN or NETBIOS name. For localhost, leave this parameter empty. |
| DataCollectionUserName | (empty) | Specify user account that will be used for data collection from SCVMM server. To use the account currently logged in, leave this parameter empty.s Make sure the account has administrative rights on that server (see the Accounts and Rights topic for additional information). |
| DataCollectionPassword | Specify user account password. | |
| ShortTermFolder | ShortTerm | Specify path to the short-term archive (Netwrix Auditor working folder). You can use full or relative path. |
Save the settings.xml file. New configuration settings will be applied automatically at the next data collection.
For the full list of parameters, see the Add-On Parameters topic for additional information.
Register Windows Scheduled Task
Run the install.ps1 PowerShell script from the add-on folder. It will configure and register a Windows scheduled task that will run periodically every 15 min to retrieve audit data from SCVMM.
Monitoring Scope
Review a full list of the events that can be monitored using the add-on.
| Object Type | Reported Action | Reported Properties |
|---|---|---|
| Virtual Machine | • Create/Delete • Clone • Migrate • Rename • Create/Delete Checkpoint • Hardware Configuration change | • Name • Checkpoint Name & Description • Number Of Processors • Memory Size (Allocated, Max) • VHD Location, Max size • Network Name • Switch Name |
| Hypervisor (Host) | • Create/Delete • Move • Hardware Configuration change • State change | • Name • Number Of Processors • RAM Memory Size • Host Disk Capacity |
| Host Cluster | • Create/Delete • Move | • Name |
| Host Group | • Create/Delete • Move • Rename | • Name |
| Private Cloud | • Create/Delete • Rename | • Name |
| VM Network | • Create/Delete • Rename | • Name |
| User Role | • Rename • Add/Remove Members • Add/Remove Scopes • Permissions change | • Name • Scope • Permissions • Members |
Hyper-V SCVMM
Netwrix Auditor is a visibility platform for user behavior analysis and risk mitigation that enables control over changes, configurations and access in hybrid IT environments to protect data regardless of its location. The platform provides security analytic to detect anomalies in user behavior and investigate threat patterns before a data breach occurs.
Microsoft System Center Virtual Machine Manager (SCVMM) is a solution for configuring and managing virtualized infrastructure components across on-premises, service provider, and the Azure cloud environment. These components include virtualization servers, networking components and storage resources.
Virtualization teams, Managed Service Providers and other IT professionals need to detect who does what in the SCVMM-managed virtual infrastructure. For that, a unified audit trail is required, supporting detailed SCVMM monitoring and effective response to changes.
For that purpose, you can use a specially designed add-on. It works in collaboration with Netwrix Auditor, supplying data about operations on your SCVMM server to Netwrix database. Aggregating data into a single audit trail simplifies the analysis, makes activity monitoring more cost-effective, and helps you keep tabs on your virtual infrastructure.
Major benefits:
- Gain a high-level view of the data you store
- Detect unauthorized activity that might threaten your data
How It Works
The add-on is implemented as a stand-alone application that collects activity data from Virtual Machine Manager and sends it to Auditor using the Integration API.
On a high level, the solution works as follows:
-
An IT administrator configures the Integration API settings to enable data collection and storage to the Netwrix database for further reporting, search, etc.
It is recommended to create a dedicated monitoring plan in Auditor and add a dedicated item of Integration type to it — then you will be able to filter data in reports and search results by monitoring plan or item name.
-
On SCVMM side, the IT administrator prepares a dedicated user account for accessing SCVMM server. This account requires administrative rights.
-
Then the IT administrator opens the settings.xml configuration file and specifies the necessary parameters for add-on operation, including Netwrix Auditor server settings, etc.
-
The IT administrator selects the deployment scenario and runs install.ps1 PowerShell script file to deploy and configure the add-on components on the target server.
-
This script creates a Windows scheduled task that will run periodically (every 15 minutes) to collect audit data from VMM server.
See the Monitoring Scope for additional information on the default list of the events supported out-of-the box.
-
The add-on component HVARunner.exe starts collecting activity data from VMM. Data communication is performed using TCP protocol.
-
The add-on processes this data into Auditor-compatible format (Activity Records). Each Activity Record contains the Who-What-When-Where-Action information (that is, initiator's account, time, action, and other details).
See the Integration API topic for additional information on the structure of the Activity Record and the capabilities of the Integration API.
- The add-on uses the Integration API to send the Activity Records to Auditor Server, where this data becomes available for search, reporting and alerting.
- Users open Auditor Client to work with collected data:
- Search for file changes using certain criteria
- Export data to PDF or CSV files
- Save search results as reports
- Subscribe to search results
- Configure and receive alerts
Add-on Delivery Package
The add-on delivery package is a ZIP archive comprising several files, including DLLs, configuration and executable files. The latter ones are listed in the table below.
| File name | Description |
|---|---|
| install.ps1 | PowerShell script that installs the add-on components and creates a scheduled task for data collection. |
| settings.xml | Contains parameters for the add-on service operation. |
| HVARunner.exe | Main add-on component, responsible for audit data collection from SCVMM. |
Prerequisites
Before running the add-on, ensure that all the necessary components and policies are configured as follows:
| On... | Ensure that... |
|---|---|
| Auditor Server | - Integration API and Audit Database settings are configured in Auditor Server settings. See the Prerequisites and Audit Database topics for additional information. - The TCP 9699 port must be open on Windows firewall for inbound connections. - User account under which data will be written to the Audit Database requires the Contributor role in Netwrix Auditor. See the Role-Based Access and Delegation topic for additional information. Alternatively, you can grant it the Global administrator role, or add that account to the Netwrix Auditor Administrators group. |
| Add-on installation server, i.e. the machine where the add-on will be installed | - The TCP 5985 port must be open on Windows firewall for inbound connections. - NET Framework 4.5 or later. |
| Microsoft System Center Virtual Machine Manager | SCVMM versions: - 2019 - 2016 |
| Virtualization hosts | - Microsoft Hyper-V (hardware and nested-virtualization) - VMware ESXi |
Accounts and Rights
It is recommended to create a dedicated account for running the add-on.
This account should have the following minimal rights and permissions:
- Administrator role in SCVMM
- Contributor role in Auditor. See the Role-Based Access and Delegation topic for additional information.
Considerations and Limitations
-
By default, the add-on is targeted at a single SCVMM server.
-
If Auditor Server becomes unavailable for some time, the add-on will reset the last data collection and will run it anew during the next scheduled interval.
Compatibility Notice
The add-on is compatible with:
- Microsoft System Center Virtual Machine Manager 2019 and 2016
- Netwrix Auditor 9.9 and later
Add-On Parameters
To configure the add-on parameters, you need to edit the settings.xml file in the add-on folder. You must define connection details: Auditor Server host, user credentials, etc.
Most parameters are optional, the service uses the default values unless parameters are explicitly
defined (<parameter>\*\*\_value_\*\*</parameter>). You can skip or define parameters depending on
your execution scenario and security policies.
| Parameter | Default value | Description |
|---|---|---|
| NetwrixIntegration | ||
| NetwrixAuditorEndpoint | https://localhost: 9699/netwrix/api/ v1/activity_records | Auditor Server IP address and port number followed by endpoint for posting Activity Records. Assumes that the add-on runs on the computer hosting Auditor Server and uses default port 9699. If you want to run the add-on on another machine, provide a name of the computer where Auditor Server resides (e.g., 172.28.6.15, EnterpriseNAServer, WKS.enterprise.local). To specify a non-default port, provide a server name followed by the port number (e.g., WKS.enterprise.local:9999). Do not modify the endpoint part (/netwrix/api . . . . ) |
| NetwrixAuditor CertificateThumbprint | NOCHECK | Auditor Certificate Thumbprint Property. Possible values: - AB:BB:CC.—Check Auditor server certificate thumbprint identifier. - NOCHECK—Do not check Auditor certificate. Make sure to select this parameter if you plan to specify servers by their IP. |
| NetwrixAuditorDateTimeFormat | yyyy-MM-ddTHH:mm:ssZ | Auditor time format. By default, set to zero offset. |
| NetwrixAuditorPlan | — | Unless specified, data is written to Netwrix_Auditor_API database and is not associated with a specific monitoring plan. Specify a name of associated monitoring plan in Auditor. In this case, data will be written to a database linked to this plan. If you select a plan name in the add-on, make sure a dedicated plan is created in Auditor, the Netwrix API data source is added to the plan and enabled for monitoring. Otherwise, the add-on will not be able to write data to the Audit Database. |
| NetwrixAuditorPlanItem | — | Unless specified, data is not associated with a specific plan and, thus, cannot be filtered by item name. Specify an item name. Make sure to create a dedicated item in Auditor in advance. |
| NetwrixAuditorUserName | Current user credentials | Unless specified, the add-on runs with the current user credentials. If you want the add-on to use another account to connect to Auditor Server, specify the account name in the DOMAIN\username format. The account must be assigned the Contributor role in Netwrix Auditor. |
| NetwrixAuditorUserPassword | Current user credentials | Unless specified, the add-on runs with the current user credentials. Provide a different password if necessary. |
| DataCollection | ||
| DataCollectionServer | (empty) | Specify SCVMM server to collect data from. You can use IP address, FQDN or NETBIOS name. For localhost, leave this parameter empty. |
| DataCollectionUserName | (empty) | Specify user account that will be used for data collection from SCVMM server. To use the account currently logged in, leave this parameter empty. Make sure the account has administrative rights on that server (see the Accounts and Rights topic for additional information). |
| DataCollectionPassword | Specify user account password. | |
| ShortTermFolder | ShortTerm | Specify path to the short-term archive (Netwrix Auditor working folder). You can use full or relative path. |
Remember to save settings.xml after editing is complete.
Maintenance and Troubleshooting
If you cannot see collected data in Auditor, check the following:
- Add-on account has sufficient rights to access SCVMM and Auditor.
- In Netwrix Auditor settings, go to the Integrations section and make sure the Leverage Integration API is switched to ON. Check the communication port number – default is 9699.
- If you configured a dedicated monitoring plan, make sure data source monitoring is enabled.
- Verify the parameters you provided in settings.xml.
Monitor Several SCVMM
Follow the steps If you need to monitor more than one SCVMM:
Step 1 – Deploy one more add-on instance to the server where the first add-on instance is already installed. Be sure to use a different installation folder.
Step 2 – Open the settings.xml file and configure the new add-on instance to work with the second SCVMM server.
Step 3 – Open the install.ps1 file for the new add-on for edit.
Step 4 – Modify the default scheduled task name:
$name = "NetwrixAuditor Add-on for Microsoft SCVMM"
Step 5 – Save and then launch the updated install.ps1 file.
Modify Task Schedule
Follow the steps if you need to modify the task schedule:
Step 1 – Open install.ps1 for edit.
Step 2 – Modify the default scheduled task schedule:
$task.Triggers.Repetition.Interval = "PT15M"
Step 3 – Save and then launch the updated install.ps1 file.
Alternatively, you can use Windows Task Scheduler.
- If the solution was deployed using the third scenario (that is, SCVMM server and add-on are running on different machines), then the following error may be written in the solution log:
The WinRM client cannot process the request.
See the Deployment Scenariostopic for additional information.
If the authentication scheme is different from Kerberos, or if the client computer is not joined to a domain, then HTTPS transport must be used or the destination machine must be added to the TrustedHosts list. To configure this list, use winrm.cmd.
Computers included in the TrustedHosts list might not be authenticated. To get more information about their settings, you can run the following command:
winrm help config
For details on remote troubleshooting and authentication issues, see the following Microsoft article: about_Remote_Troubleshooting.
To work around, add the remote SCVMM server to the TrustedHosts list on the machine were the add-on runs. For that, use the following commands:
winrm quickconfig
Set-Item WSMan:\localhost\Client\TrustedHosts -Value "ServerNameOrIP"
here:
ServerNameOrIP – SCVMM server name or IP address.