Configure ConnectWise
This section describes how to configure settings of the main add-on component, Netwrix Auditor ConnectWise Manage Integration Service that is required for connection to ConnectWise Manage and service ticket creation.
Follow the steps to configure ConnectWise.
Step 1 – To connect to ConnectWise Manage REST API, the API keys will be required. To obtain them, you will need an API Member account. See this article for details.
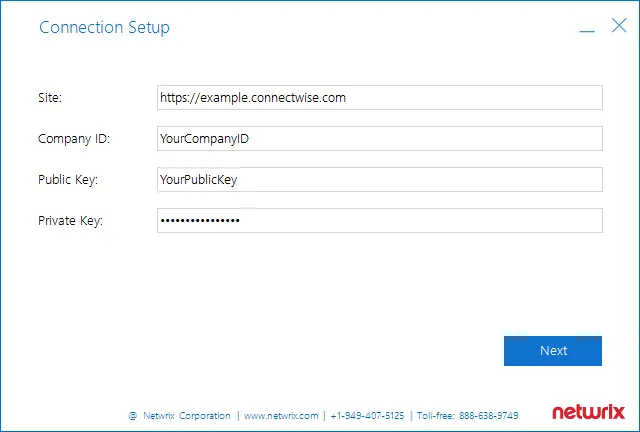
Step 2 – Navigate to the add-on folder and run ConfigureConnection.exe. Follow the steps of the wizard to configure connection to ConnectWise Manage and ticketing options. At the Connection Setup step, specify the following:
| Parameter | Description |
|---|---|
| Site | URL of ConnectWise Manage system. |
| Company ID | The ID of ConnectWise Manage subscriber (Managed Service Provider). |
| PublicKey | Public key you obtained for the API Member — it will be used to access ConnectWise REST API. |
| PrivateKey | Private key you obtained for the API Member — it will be used to access ConnectWise REST API. |
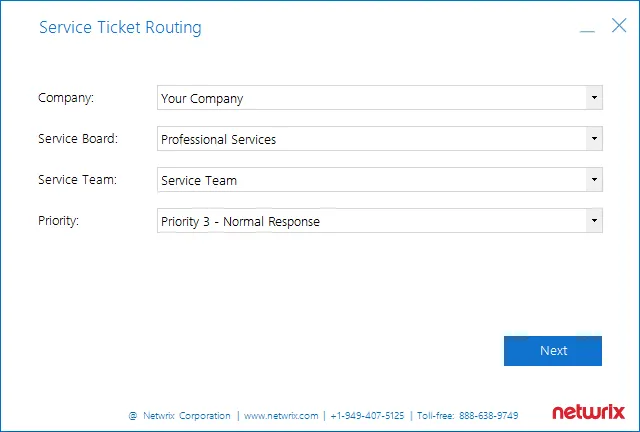
Step 3 – At the Service Ticket Routing step, specify the following:
| Parameter | Description |
|---|---|
| Company | Organization that will be recorded as ticket originator — this can be a company or MSP's managed client. |
| Service Board | Service board where the tickets will be processed. Service tickets created by the add-on will be assigned the default ticket status for the selected service board. |
| Service Team | Service team that will be responsible for tickets handling. |
| Priority | Priority for ticket handling. Default is Priority 3 — Normal Response. |
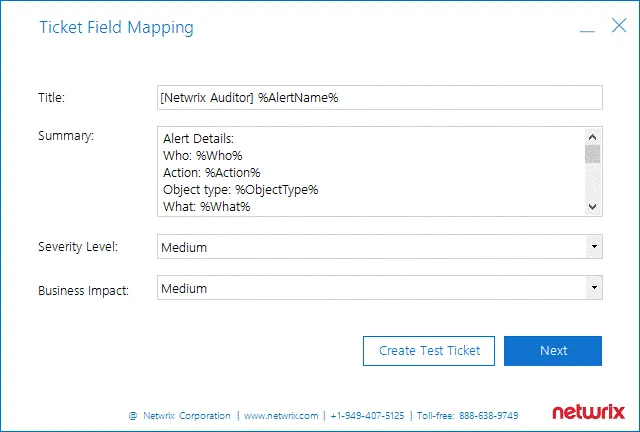
Step 4 – Configure how Auditor activity record fields will be mapped with ConnectWise Manage ticket fields.
| Parameter | Description |
|---|---|
| Title | Specify how the Title field of the service ticket will be filled in. Default: [Netwrix Auditor] %AlertName% That is, the Title field for tickets originating from Netwrix alerts will include the alert name with [Netwrix Auditor] prefix (e.g., [Netwrix Auditor] Password Reset). |
| Summary | Specify how the Summary field of the service ticket will be filled in. By default, it will contain the following detailed information received from the corresponding Auditor alert and activity record: Alert Details: Who: %Who% Action: %Action% Object type: %ObjectType% What: %What% When: %When% Where: %Where% Workstation: %Workstation% Details: %Details% Data source: %DataSource% Monitoring plan: %MonitoringPlanName% Item: %Item% Sent by Netwrix Auditor from %Computer% |
| Severity Level | Specify what severity level will be assigned to the service tickets. Default is Medium. |
| Business Impact | Specify what business impact level will be assigned to the service tickets. Default is Medium. |
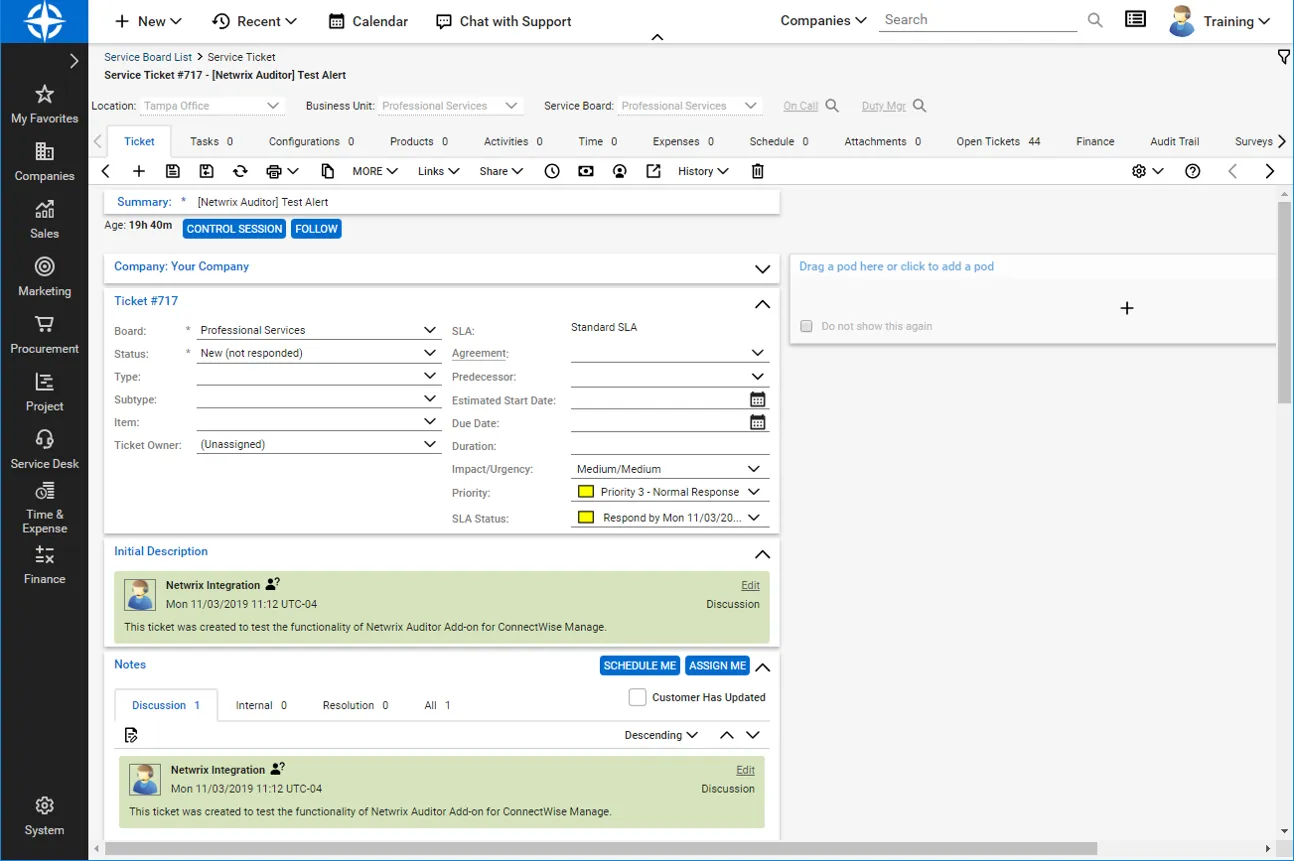
Optionally, you can click the Create Test Ticket button — then a test ticket will be created in
ConnectWise Manage to help you verify the connection and ticketing settings you configured.
Its Summary field will contain [Netwrix Auditor] Test Alert; its Initial Description field will
contain This ticket was created to test the functionality of Netwrix Auditor Add-on for ConnectWise
Manage. Also, the test ticket will have a sample attachment (TestAttachment.txt).
Step 5 – Finally, at the Summary step, review the location of configuration file with the settings you specified: C:\Addon\ITSM_CW\ConnectWiseSettings.xml.
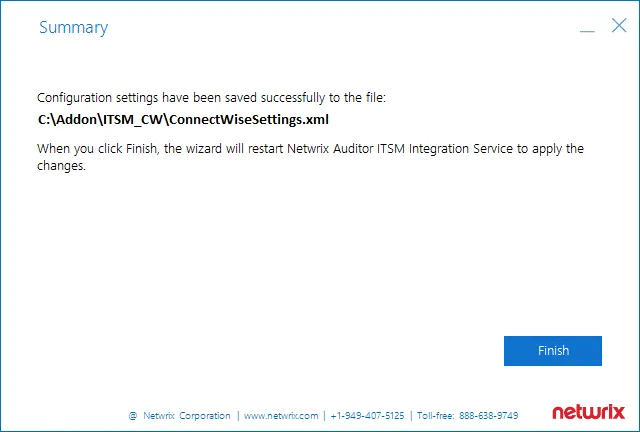
If needed, you can edit the configuration file manually. See the Connection and Ticketing Settings topic for additional information.
Click Finish to restart the add-on service so that the changes can take effect.
Transferring Configuration
If necessary, you can use configuration file created with this wizard as a template for multiple managed clients. Perform the following steps:
Step 1 – Open the file path provided at the Summary step of the wizard.
Step 2 – Locate the ConnectWiseSettings.xml file and copy it to the add-on folder on another client's server.
Step 3 – Then run ConfigureConnection.exe on that server to launch the configuration wizard and specify the necessary settings — for example, provide the managed client company name at the Service Ticket Routing step, and so on.
Connection and Ticketing Settings
It is recommended that you use configuration wizard to specify connection and ticketing settings. However, you can adjust them manually, using the information provided in this section.
Settings for ConnectWise Ticket Creation
Specify how data arriving from Auditor should be used to fill in ConnectWise ticket fields. For
that, review <TicketParameters> section of the ConnectWiseSettings.xml file. The parameters inside
this section correspond to ConnectWise ticket fields and use the same naming (e.g., priority,
urgency).
Each <TicketParameter> includes the <Name></Name> and <Value></Value> pair that defines a
ConnectWise ticket field and a value that will be assigned to it. For most parameters, default
values are provided. Add more ticket parameters or update values if necessary.
<Name> | <Value> | Description |
|---|---|---|
| Summary | [Netwrix Auditor] %AlertName% | Instructs the system to fill in the Summary ticket field with the Auditor alert name (e.g., [Netwrix Auditor] Password Reset). |
| InitialDescription | Alert Details: Who: %Who% Action: %Action% Object type: %ObjectType% What: %What% When: %When% Where: %Where% Workstation: %Workstation% Details: %Details% Data source: %DataSource% Monitoring plan: %MonitoringPlanName% Item: %Item% Sent by Netwrix Auditor from %Computer% | Instructs the system to fill in the InitialDescription ticket field with the Auditor activity record data. To read more about activity records, see the Reference for Creating Activity Records topic for additional information. You may need to fill in the internal description intended for use by MSP only (this description will not be visible to managed clients), perform the following steps: Step 1 – Run the configuration wizard (or modify ConnectWiseSettings.xml) to specify the settings you need. Step 2 – Then open ConnectWiseSettings.xml for edit. Step 3 – Locate the InitialDescription parameter and change the Name attribute to initialInternalAnalysis. |
| Impact/Urgency | Medium | Instructs the system to set ticket Impact/Urgency to Medium. |
Parameters for Handling Related Tickets
Review the <CorrelationTicketFormat> section. It shows what information about related tickets will
be included in your current ticket. Update the template if necessary.
| CorrelationTicketFormat | Description |
|---|---|
| Previous incident for the same alert type: Id: %id% | The service will automatically substitute parameters from this section with values from a related ticket. |
Parameters for Reopening Tickets
Review the <ReopenTicketOptions> section. It defines the tickets the add-on can reopen
automatically.
| Name | Description |
|---|---|
| ClosedTicketStates TicketState | Lists closed ticket statuses. By default, resolved, closed, and canceled tickets can be reopened. To specify a new status, provide its ID in the <TicketState> tag (e.g., 8 for canceled). |
| NewState | Defines a ticket status once it is reopened. By default, is set to new. To specify another status, provide its ID in the <NewState> tag (e.g., 1 for new). |
When finished, save your changes to configuration file.
Remember to restart the add-on service every time you update any of configuration files.
Review Other Parameters
You can update other parameters with your own values if necessary; however, it is recommended that you contact Netwrixbefore modifying this section.
| Name | Description |
|---|---|
| IgnoreUploadAttachmentError | Instructs the add on to ignore the attachment upload errors. - If false, a corresponding error message will be displayed. - If true, the file that failed to upload will be stored to the MissingAttachments subfolder in the add-on folder. Error message will not appear on the screen; instead, the following record will be written to the add-on log: Attached files for ticket id: {0} dumped: '{attachmentPath}' Default parameter value is true. |
You can also review the <TicketParameterRefs> section. It shows information related to ConnectWise
Manage objects.
Example:
<TicketParameterRefs>
  <TicketParameterRef>
    <Name>company</Name>
    <TicketParameters>
      <TicketParameter>
        <Name>id</Name>
        <!--My.Sample.Company-->
        <Value>42</Value> <!-- enter ID of the company-ticket originator -->
      </TicketParameter>
    </TicketParameters>
  </TicketParameterRef>

  <TicketParameterRef>
    <Name>board</Name>
    <TicketParameters>
      <TicketParameter>
        <Name>id</Name>
        <!--Professional Services-->
        <Value>1</Value> <!-- enter ID of the service board for the tickets -->
      </TicketParameter>
    </TicketParameters>
  </TicketParameterRef>

  <TicketParameterRef>
    <Name>priority</Name>
    <TicketParameters>
      <TicketParameter>
        <Name>id</Name>
        <!--Priority 3 - Normal Response-->
        <Value>4</Value>
      </TicketParameter>
    </TicketParameters>
  </TicketParameterRef>

  <TicketParameterRef>
    <Name>team</Name>
    <TicketParameters>
      <TicketParameter>
        <Name>id</Name>
        <!--Service Team-->
        <Value>25</Value> <!-- enter ID of the service team responsible for resolution -->
      </TicketParameter>
    </TicketParameters>
  </TicketParameterRef>
</TicketParameterRefs>
Deploy the Add-On
Follow the steps to deploy the Add-On for ConnectWise.
Step 1 – Prepare Auditor for using the add-on:
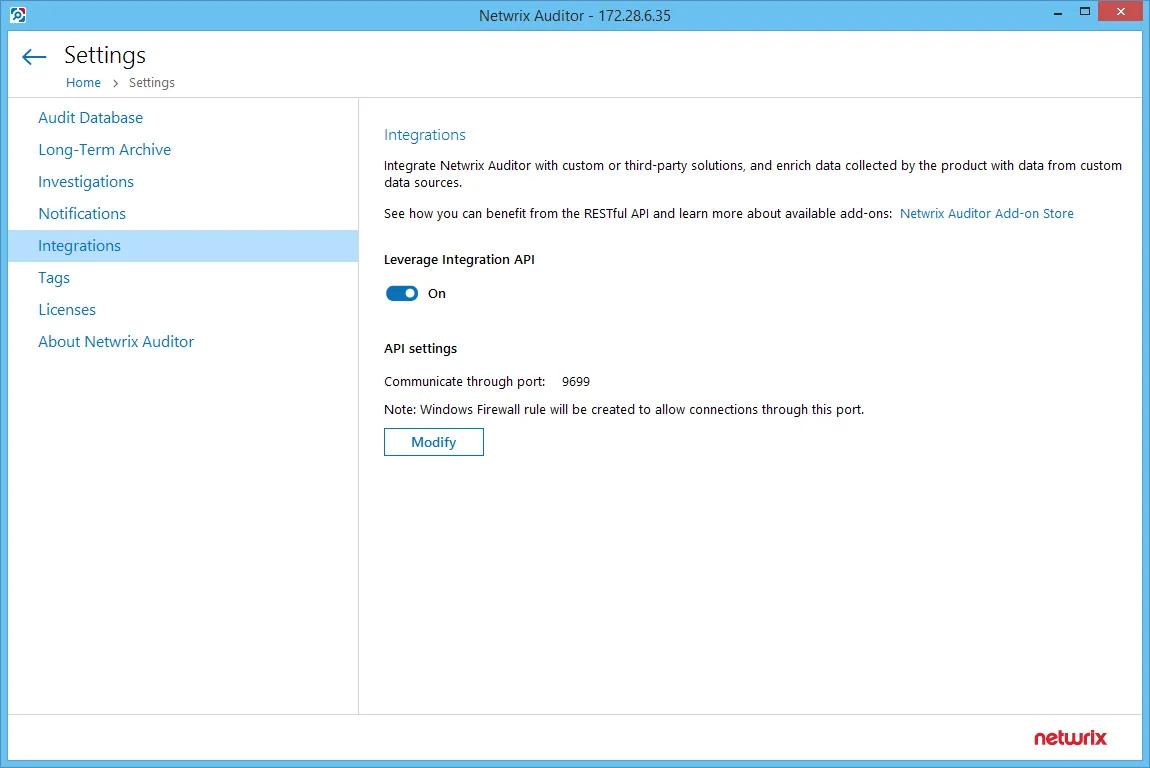
- In the Auditor settings, enable Integration API and specify connection port. See the Integrations topic for additional information.
- Make sure your monitoring plans set up in Auditor are using Audit Databases to store collected data. See the Audit Database topic for additional information.
Step 2 – Download the add-on package and copy it to the computer where Auditor Server resides.
Step 3 – Unpack the ZIP archive to a folder of your choice; by default, it will be unpacked to the Netwrix Auditor Add-On for ConnectWise Manage folder.
Step 4 – Run the install.cmd file. It will deploy and enable the Netwrix Auditor ConnectWise Manage Integration Service.
Step 5 – Run the ConfigureConnection.exe and follow the steps of the wizard to configure connection and ticketing settings for ConectWise Manage. See the Configure ConnectWise topic for additional information.
Step 6 – (optional) To adjust the add-on operation and data flow settings, edit the ITSMSettings.xml file. See the Operational Settings topic for additional information.
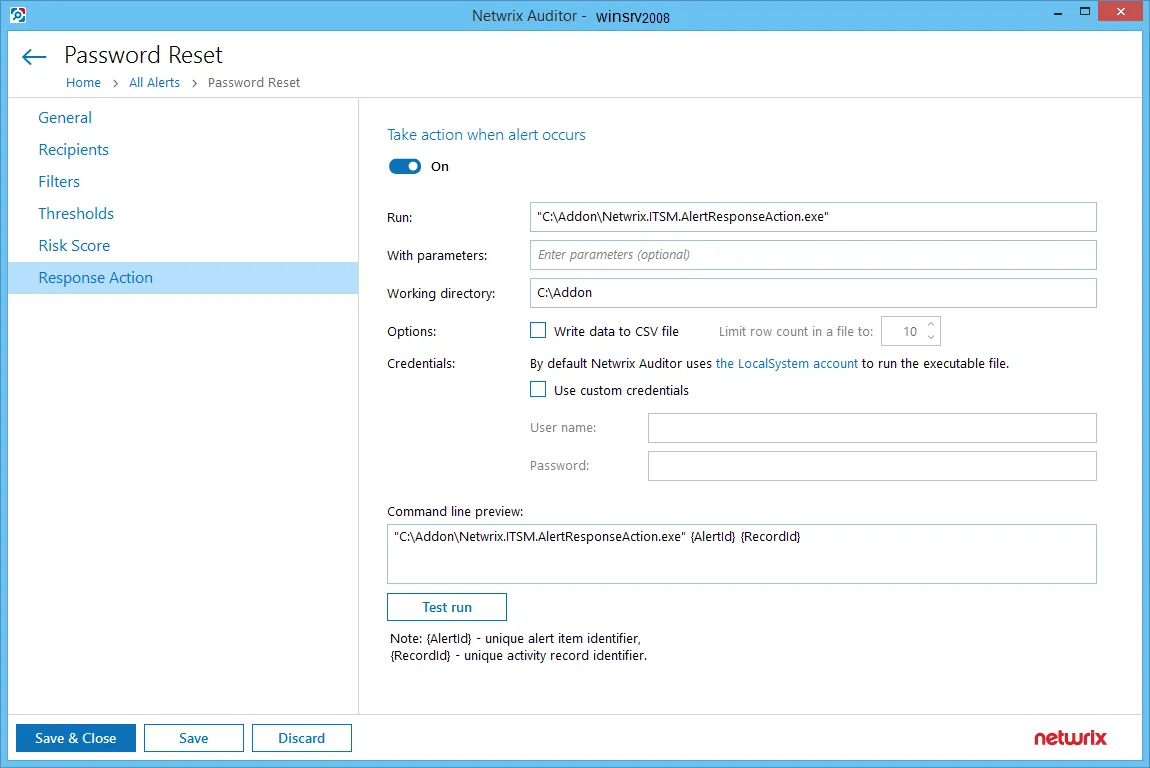
Step 7 – In Auditor, go to Alerts, select the required alerts, click Edit, and in the Response Action section of the alert properties specify the full path to Netwrix.ITSM.AlertResponseAction.exe file (the add-on component responsible for alert handling), for example, C:\Addon\ITSM_CW\Netwrix.ITSM.AlertResponseAction.exe.
Enabling TLS 1.2 Usage
The add-on supports Transport Layer Security (TLS) 1.2 security protocol. By default, this
capability is disabled. To enable it, in the ConnectWiseSettings.xml, locate the
<EnableTls12> parameter and set its value to TRUE.
MSP Usage Example
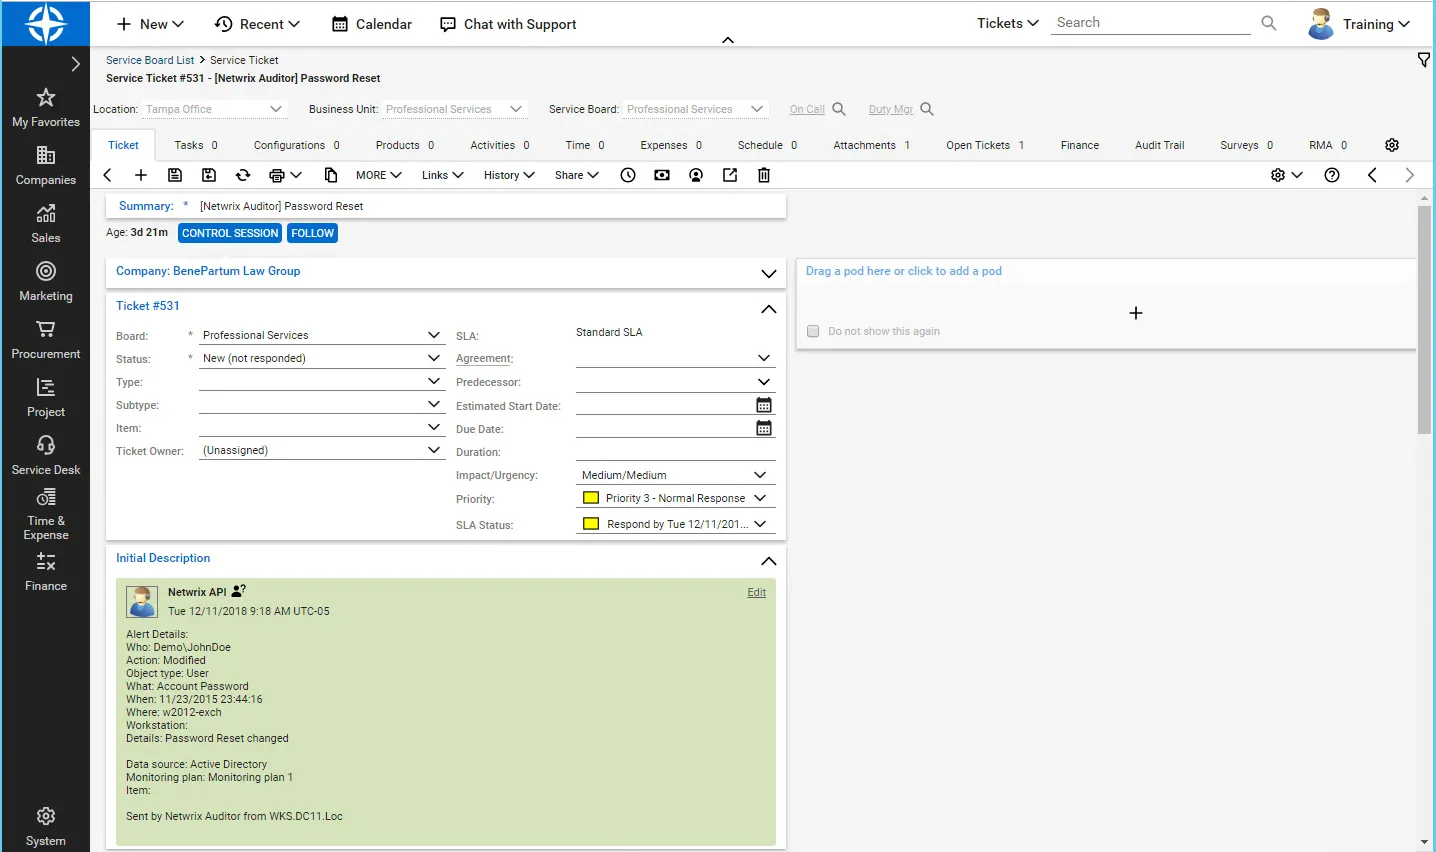
Consider a situation when a password is reset for a user, computer, or inetOrgPerson account.
After deploying and configuring the add-on as described in this guide, the MSP (Managed Service Providers) staff member enabled Auditor integration feature:
Also, she enabled the ‘Password Reset’ alert from the Auditor predefined set of alerts and specified the add-on launch as response action.
Then a new ticket is automatically created shortly after any account password is reset.
All necessary details about the case are automatically entered into the ConnectWise ticket (Initial Description field), including the name of the workstation, the name of the account in question, and the time when the event occurred:
Operational Settings
This section describes how to configure settings of the main add-on component, Netwrix Auditor ConnectWise Manage Integration Service, required for its operation, including connection to Auditor Server, activity records processing, queuing and forwarding, ticket creation, and so on.
For that, follow the steps:
Step 1 – Navigate to the add-on folder and select ITSMSettings.xml.
Step 2 – Define operational parameters such as Auditor connection settings, the number of
tickets the service can create per hour, ability to reopen closed tickets, etc. For most parameters,
default values are provided. You can adjust them depending on your execution scenario and security
policies. Use the following format: <parameter>value</parameter>.
| Parameter | Default value | Description |
|---|---|---|
| NetwrixAuditorHost | https://localhost:9699 | The add-on runs on the computer where Auditor Server resides and uses the default Integration API port (TCP port 9699). To specify a non-default port, provide a new port number (e.g., https://localhost:8788). The add-on must always run locally, on the computer where Auditor Server resides. |
| NetwrixAuditorUserName | — | Unless specified, the Netwrix Auditor ConnectWise Manage Integration Service runs under the LocalSystem account. If you want this service to use another account to connect to Auditor Server, specify the account name in the DOMAIN\username format in this parameter value. The user account for running the service and connecting to Auditor Server must be granted the Global administrator role in Auditor or be a member of the Netwrix Auditor Administrators group. It must also have sufficient permissions to create files on the local computer. |
| NetwrixAuditorPassword | — | Provide a password for the account. Unless an account is specified, the service runs under the LocalSystem account and does not require a password. |
| TicketFloodLimit | 10 | Specify the maximum number of standalone tickets the service can create during TicketFloodInterval. If a ticket flood limit is reached, the service writes all new alerts into a single ticket. |
| TicketFloodInterval | 3600 | Specify the time period, in seconds. During this time period, the service can create as many tickets as specified in TicketFloodLimit. The default value is 3600 seconds, i.e., 1 hour. |
| ConsolidationInterval | 900 | Specify the time period, in seconds. During this time period, the service does not process similar alerts as they happen but consolidates them before updating open tickets. The default values is 900 seconds, i.e., 15 minutes. This option works in combination with UpdateTicketOnRepetitiveAlertsand is helpful if you want to reduce the number of ticket updates on ConnectWise Manage side. I.e., this option defines the maximum delay for processing alerts and updating existing tickets. Tickets for new alert types are created immediately. For example, a new alert is triggered—the service opens a new ticket. The alert keeps firing 20 times more within 10 minutes. Instead of updating the ticket every time, the service consolidates alerts for 15 minutes, and then updates a ticket just once with all collected data. |
| CheckAlertQueueInterval | 5 | Internal parameter. Check and process the alert queue every N seconds; in seconds. |
| UpdateTicketOnRepetitiveAlerts | true | Instead of creating a new ticket, update an existing active ticket if a similar alert occurs within UpdateInterval. To open a new ticket for every alert, set the parameter to "false". |
| ReopenTicketOnRepetitiveAlerts | true | Instead of creating a new ticket, reopen an existing ticket that is in a closed state (be default, closed, canceled, and resolved) if a similar alert occurs within UpdateInterval. This option works only when UpdateTicketOnRepetitiveAlerts is set to "true". If you want to reopen closed tickets, you must be granted the right to perform Write operations on inactive tickets. |
| UpdateInterval | 86400 | Specify the time period, in seconds. If a similar alert occurs in less than N seconds, it is treated as a part of an existing ticket. The default value is 86400 seconds, i.e., 24 hours. If an alerts is triggered after the UpdateInterval is over, a new ticket is created. |
| EnableTicketCorrelation | true | Review history and complement new tickets with information about similar tickets created previously. This information is written to the Description field. This option is helpful if you want to see if there is any correlation between past tickets (from the last month, by default) and a current ticket. |
| CorrelationInterval | 2592000 | Specify the time period, in seconds. During this time period, the service treats similar tickets as related and complements a new ticket with data from a previous ticket. The default value is 2592000 seconds, i.e., 1 month. Information on alerts that are older than 1 month is removed from internal service storage. |
| ProcessActivityRecord QueueInterval | 5 | Internal parameter. Process activity record queue every N seconds; in seconds. |
| DisplayOnlyFirstActivityRecord | true | Add only the first activity record in the work notes, activity records that update this ticket will be added as attachments to this ticket. If false, all activity records will be displayed in the ticket work notes. |
| ActivityRecordRequestsRetention | ||
| RequestLimit | 5000 | Internal parameter. The maximum number of activity record requests the service can store in its internal memory. Once the limit is reached, the service clears activity record requests starting with older ones. |
| RequestLimitInterval | 604800 | Internal parameter. The service can store the activity record requests not older than N seconds; in seconds. Older activity record requests are cleared. |
| ActivityRecordWebRequests | ||
| RequestLimit | 200 | Internal parameter. The maximum number of activity records the service can retrieve in a single request. |
| RequestTimeout | 180 | Internal parameter. By default, 3 minutes. Defines the connection timeout. |
| TicketRequestsRetention | ||
| RequestLimit | 300000 | Internal parameter. The maximum number of ticket requests the service can store in its internal memory. Once the limit is reached, the service clears ticket requests starting with older ones. |
| RequestLimitInterval | 604800 | Internal parameter. The service can store the ticket requests not older than N seconds; in seconds. Older tickets requests are cleared. |
Step 3 – Restart the service every time you update ITSMSettings.xml configuration file.
ConnectWise Manage
Managed Service Providers (MSP) need to effectively utilize and standardize IT service management tools. Those who use for that purpose the ConnectWise Manage solution usually have similar processes in place:
- When an incident or a problem occurs in the IT environment, managed client sends (usually by email) a request to the MSP’s service desk. A service ticket is then created manually or automatically in ConnectWise Manage.
- Each ticket is assigned to authorized personnel for investigation and resolution in accordance with the existing workflow.
- To control ticket handling and report on statistics, ConnectWise service boards are used.
Netwrix has built a ready-to-use add-on that automates incident management, automatically creating service tickets for security alerts triggered by Netwrix Auditor This integration brings in the following benefits:
- Seamless integration with the existing MSP service process
- Speeding up the process of restoring secure, normal business service
- Minimizing the gap between incident detection and the start of a resolution process
- Automating ticket handling and reducing human errors that could impact its quality
- Meeting or exceeding service level agreements (SLAs) while saving time and effort
To implement the solution, Managed Service Provider does the following on the client side:
- Deploys and maintains Netwrix Auditor that monitors users’ activity and configuration changes
- Installs and configures integration solution (add-on) on Netwrix Auditor Server
- Controls ticket resolution and corrective measures
On a high level, the workflow is as follows:
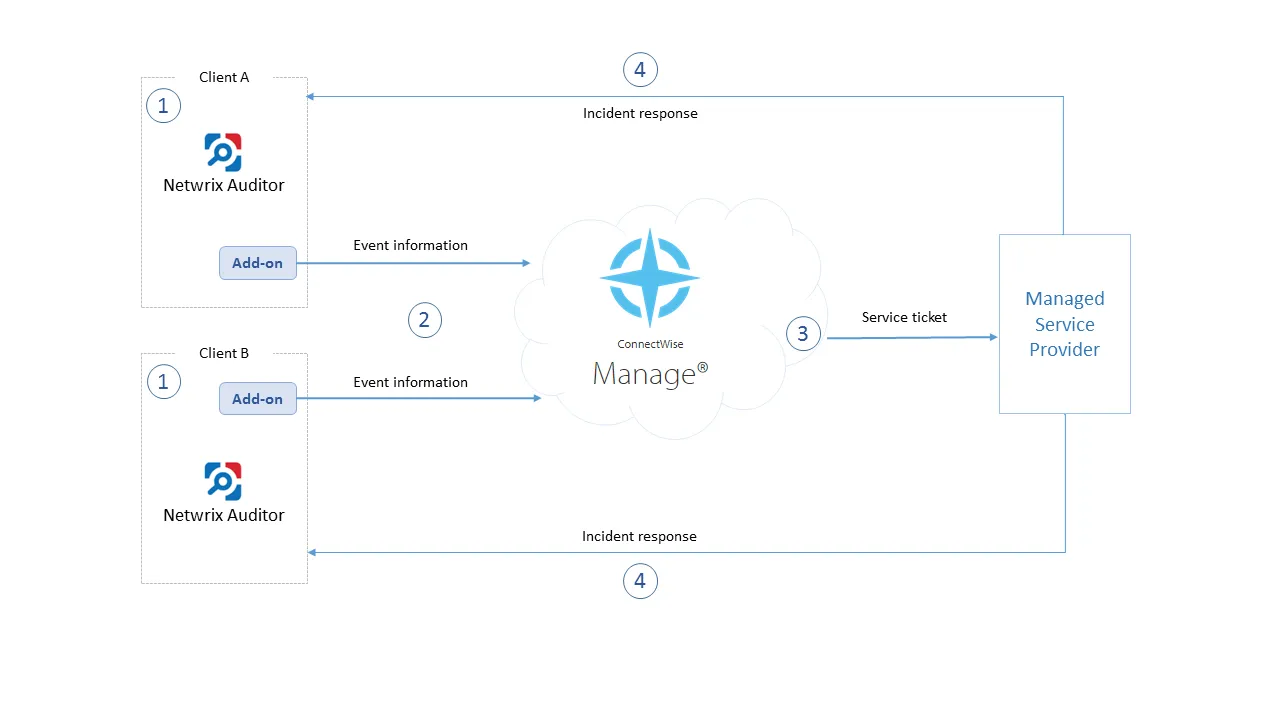
- Managed Service Provider installs and configures the add-on on AuditorServer. MSP also enables the necessary alerts in Netwrix Auditor, specifying add-on launch as the response action in the alert settings.
- Whenever the alert is triggered, the add-on uses the Integration API to retrieve activity record for the original event from the audit store. An activity record contains the user account, action, time, and other details. The add-on creates a service ticket in ConnectWise Manage, populates it with data from the activity record, and assigns Impact, Priority and SLA status to the ticket.
- The designated service team performs data analysis and root cause detection to resolve the ticket; MSP is notified of the results and possible response actions to take on the client side.
- MSP performs actions for incident response.
Solution architecture and key components are shown in the figure below:
- Alert Handler (Netwrix.ITSM.AlertResponseAction.exe) — the executable that is specified in the
Auditor alerts as the response action. Alert Handler:
- Receives the IDs of the alert and associated activity record.
- Forwards them to the Netwrix AuditorConnectWise Manage Integration Service over RPC, putting the alert into the service queue.
For details on the alert response action, see the Configure a Response Action for Alert topic for additional information.
- Netwrix Auditor ConnectWise Manage Integration Service (Netwrix.ITSM.IntegrationServiceCW.exe)
— the main component of the solution, implemented as Windows service. It does the following:
- Interacts with Auditor via its Integration API to retrieve the activity records from the Audit Database by record ID.
- Forwards activity record data to ConnectWise Manage via its REST API, creates a new service ticket and populates its properties, as specified by user in the add-on configuration.
Prerequisites
Before running the add-on, ensure that all the necessary components and policies are configured as follows:
| Location | Prerequisites |
|---|---|
| Auditor Server | - The add-on supports Auditor version 9.96. - The add-on will run on the computer where Auditor Server works, so the add-on package should be copied to that machine. - For add-on operation, NET 4.5 framework is required on Auditor Server. - Starting with add-on build 1.0.12.0, TLS 1.2 protocol is supported. By default, this capability is disabled. For detailed information on enabling it, see the Deploy the Add-On topic for additional information. Auditor settings - The Audit Database settings should be configured in Auditor Server. - Monitoring plans should be configured to store data to the Audit Database. - The TCP 9699 port (default Integration API port) should be open for inbound connections. Required permissions - Unless specified, the Netwrix.ITSM.IntegrationServiceCW.exe Windows service (main add-on co mponent) will run under the LocalSystem account. - The account that will be used by Netwrix.ITSM.IntegrationServiceCW.exe component to access Auditor Server must be granted the Global administrator role in Auditor. -OR- be a member of the Netwrix Auditor Administrators group. |
| ConnectWise Manage | - By default, the add-on connects to the latest version of the ConnectWise Manage application (v4_6_release). Required permissions - To connect to ConnectWise Manage via its REST API, you will require an API Member account — it is needed to log in to ConnectWise Manage. See this article for details. - It is recommended to assign the API Member account to a limited security role with the following permissions: - System – Table Setup – Inquire Level = All - Companies – Company Maintenance – Add(all), Inquire(all) - Companies – Manage Attachments – Add(all), Inquire(all) - Service Desk – Service Tickets – Add(all), Inquire(all) |