Manage Data Sources
You can fine-tune data collection for each data source. Settings that you configure for the data source will be applied to all items belonging to that data source. Using data source settings, you can, for example:
- Enable state-in-time data collection (currently supported for several data sources)
- Depending on the data source, customize the monitoring scope (e.g., enable read access auditing, monitoring of failed attempts)
To add, modify and remove data sources, enable or disable monitoring, you must be assigned the Global administrator role in the product or the Configurator role on the plan. See the Role-Based Access and Delegation topic for additional information.
Modify Data Source Settings
Follow the steps to modify data source settings.
Step 1 – Select the monitoring plan you need and click Edit.
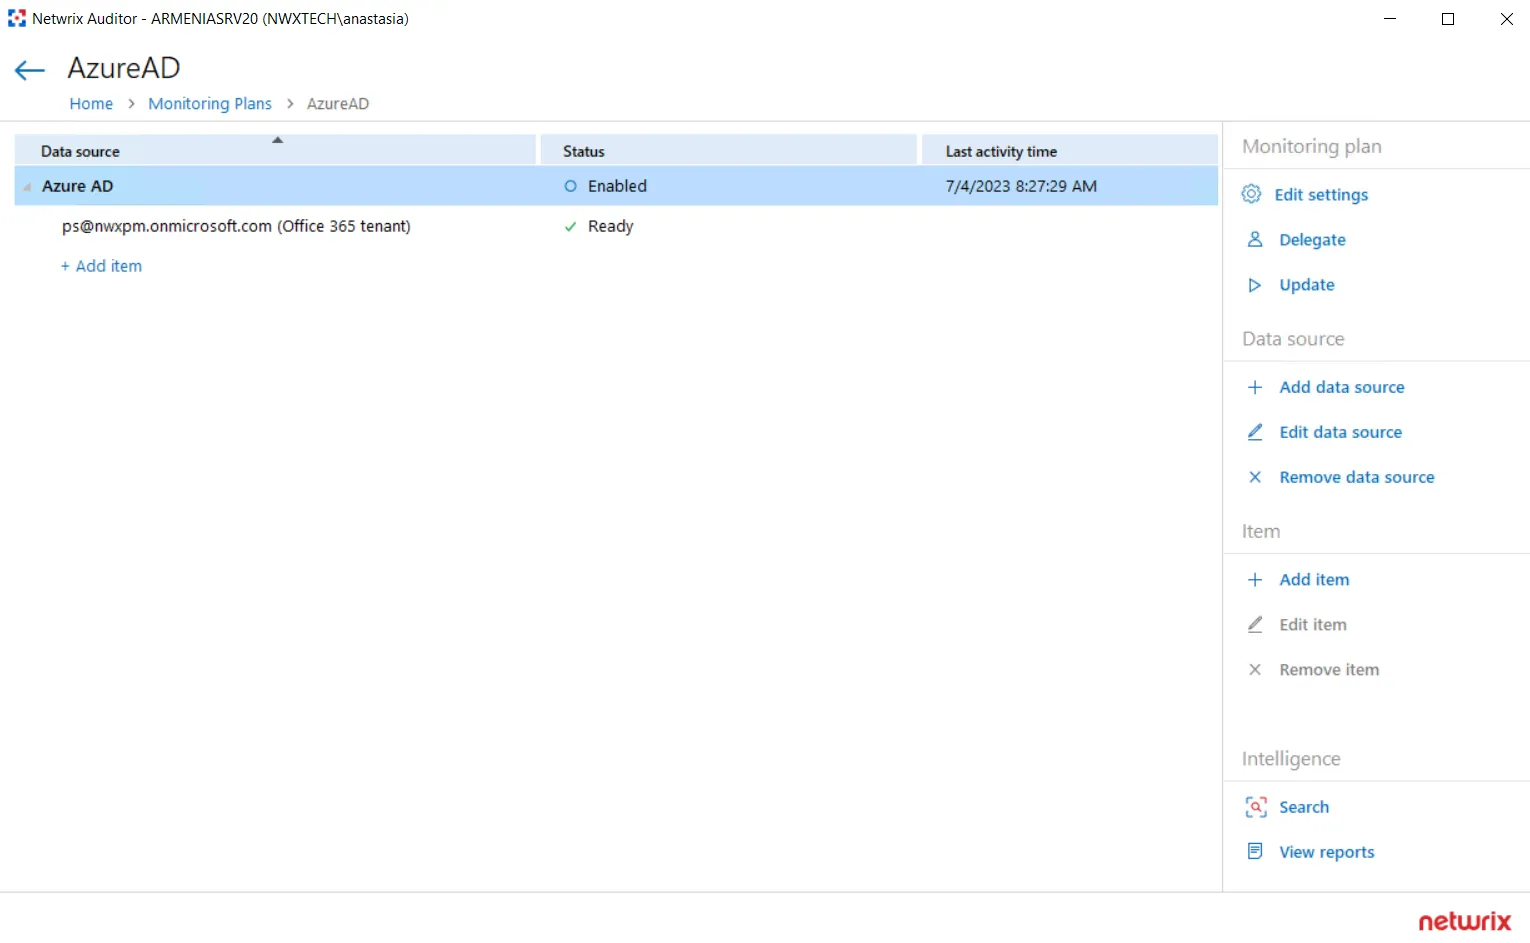
Step 2 – Within the monitoring plan window, highlight the data source (the first one is the row right under the blue table header) and click Edit data source on the right:
Step 3 – Modify data source settings as you need.
Step 4 – When finished, click Save.
Review the following for additional information:
- Active Directory
- Active Directory Federation Services
- Microsoft Entra ID
- Exchange
- Exchange Online
- File Servers
- Group Policy
- Logon Activity
- MS Teams
- Network Devices
- Oracle Database
- SharePoint
- SharePoint Online
- SQL Server
- User Activity
- VMware
- Windows File Share
Also, you can add a data source to the monitoring plan, or remove a data source that is no longer needed.
Add a Data Source to an Existing Plan
Follow the steps to add a data source to existing plan.
Step 1 – Select the monitoring plan you need and click Edit.
Step 2 – In the right pane, select Add data source.
Step 3 – Specify a data source.
Step 4 – Configure settings specific to your data source.
Step 5 – When finished, click the Add button to save the settings.
Add Items for Monitoring
Once you completed monitoring plan wizard and specified data sources, add items for monitoring. You can add as many items for a data source as you want. In this case, all items will share settings you specified for this data source.
Each data source has a dedicated item type. Netwrix Auditor automatically suggests item types associated with your data source.
| Data Source | Item |
|---|---|
| Active Directory Group Policy Exchange Logon Activity | Domain |
| Active Directory Federation Services | Federation Server |
| Microsoft Entra ID Exchange Online SharePoint Online Microsoft Teams | Microsoft Entra ID |
| File Servers (including Windows file server, Dell, NetApp, Nutanix File server, Synology, and Qumulo) | AD Container File Servers Dell Isilon Dell VNX VNXe File Servers NetApp Windows File Share Nutanix SMB Shares Qumulo Synology By default, Auditor will monitor all shares stored in the specified location, except for hidden shares (both default and user-defined). If you want to monitor user-defined hidden shares, select the related option in the monitored item settings. Remember that administrative hidden shares like default system root or Windows directory (ADMIN$), default drive shares (D$, E$), etc. will not be monitored. See the topics on the monitored items for details. |
| Network Devices | Syslog Device Cisco Meraki Dashboard |
| Oracle Database | Oracle Database Instance |
| SharePoint | SharePoint Farm |
| SQL Server | SQL Server Instance SQL Server Availability Group |
| VMware | VMware ESX/ESXi/vCenter |
| Windows Server User Activity | File Servers AD Container File Servers |
| Netwrix API | Integration API |
To add, modify and remove items, you must be assigned the Global administrator role in the product or the Configurator role on the plan. See the Role-Based Access and Delegationtopic for additional information.
Follow the steps to add a new item to a data source:
Step 6 – Navigate to your plan settings.
Step 7 – Click Add item under the data source.
Step 8 – Provide the object name and configure item settings.
You can fine-tune data collection for each item individually. To do it, select an item within your monitoring plan and click Edit item. For each item, you can:
- Specify a custom account for data collection
- Customize settings specific your item (e.g., specify SharePoint site collections)
Configure Monitoring Scope
In some environments, it may not be necessary to monitor the entire IT infrastructure. Netwrix monitoring scope can be configured on the Data Source and/or Item levels. the section below contains examples on how to use omit functionality in Auditor.
In addition to the restrictions for a monitoring plan, you can use the *.txt files to collect more granular audit data. Note that the new monitoring scope restrictions apply together with previous exclusion settings configured in the *.txt files. See the Monitoring Planstopic for additional information.
| Use case | Related documentation |
|---|---|
| Active Directory | |
| I want to omit all activity by a specific service account or service accounts with specific naming pattern. | Active Directory |
| If Netwrix user is responsible just for a limited scope within corporate AD, s/he needs to omit everything else. | Active Directory - Always both activity and state in time data are omitted. - In group/Not in group filters don't not process groups from omitted OUs. |
| Logon Activity | |
| I want to omit domain logons by a specific service account or service accounts with specific naming pattern. | Logon Activity |
| File Servers (including Windows file server, Dell, NetApp, Nutanix File server) | |
| I have a server named StationWin16 where I can't install .Net 4.5 in OU where I keep all member servers. I want to suppress errors from this server by excluding it from the Netwrix auditing scope. | AD Container |
| A Security Officer wants to monitor a file share but s/he does not have access to a certain folder on this share. Then, s/he does not want the product to monitor this folder at all. | File Servers Dell Isilon Dell VNX VNXe NetApp Windows File Share Nutanix SMB Shares |
| A Security Officer wants to monitor a file share but s/he does not have access to a certain folder on this share. Then, s/he does not want the product to monitor this folder at all. | File Servers Dell Isilon Dell VNX VNXe NetApp Windows File Share Nutanix SMB Shares |
| A Security Officer wants to monitor a file share, but it contains a folder with a huge amount of objects, so s/he does not want Netwrix Auditor to collect State-in-Time data for this folder. | File Servers Dell Isilon Dell VNX VNXe NetApp Windows File Share Nutanix SMB Shares |
| I want to exclude specific computers within an IP range from the Netwrix auditing scope. | File Servers |
| SQL Server | |
| I want to know if corp\administrator user is messing with SQL data. | SQL Server Instance |
| As a Auditor administrator I want to exclude the domain\nwxserviceaccount service account activity from SQL server audit so that I get reports without changes made by automatic systems. | SQL Server Instance |
| As a Auditor administrator I want to exclude all changes performed by MyCustomTool. | SQL Server Instance |
| SharePoint | |
| I want to exclude the domain\nwxserviceaccount account from data collection as it produces standard activity that doesn't require monitoring. | SharePoint Farm |
| As a Auditor Administrator I want to exclude shared PublicList from read audit. | SharePoint Farm |
| Windows Server | |
| I have a server named StationWin16 where I can't install .Net 4.5 in OU where I keep all member servers. I want to suppress errors from this server by excluding it from the Netwrix auditing scope. | AD Container |
| I want to exclude specific computers within an IP range from the Netwrix auditing scope. | File Servers |
| VMware | |
| I have a virtual machine named "testvm" I use for testing purposes, so I want to exclude it from being monitored. | VMware ESX/ESXi/vCenter |
Monitoring Plans
NOTE: Prior to configuring your monitoring plan, please read and complete the instructions in the following topics:
-
Protocols and Ports Required – To ensure successful data collection and activity monitoring configure necessary protocols and ports for inbound and outbound connections
-
Data Collecting Account – Configure data collecting accounts as required to audit your IT systems
-
Supported Data Sources – Configure data source as required to be monitored
To start auditing your environment and analyzing user behavior with Netwrix Auditor, create a monitoring plan.
A monitoring plan defines data collection, notification, and storage settings.
To start collecting data, and add items to its scope.
Follow the steps to collect data from your environment.
Step 1 – Create a monitoring plan with the wizard. Select the data source when you start the monitoring plan wizard, and its initial settings are configured at the wizard steps. See the Create a New Monitoring Plan topic for additional information.
Step 2 – Fine-tune data source settings, if necessary: use the data source properties to modify data collection settings, customize the monitoring scope, and more.
Step 3 – Add items to be monitored. An item is a specific object you want to audit, e.g., a VMware server or a SharePoint farm. As soon as the item is added, to the monitoring plan, Auditor starts collecting data from it. See the Add Items for Monitoring topic for additional information.
Step 4 – To view and modify your plans, in the main Auditor window click the Monitoring Plans tile, then expand the All Monitoring Plans tree.
| To.. | Do.. |
|---|---|
| See how data collection goes on | Click on a plan name. You will see all data sources included in the plan and data collection status for each data source. |
| Start data collection manually | 1. Select a plan and click Edit. 2. In the monitoring plan window, click Update in the right pane. Data collection will be started (status for the data sources will be displayed as Working). Do the same if you need to generate Activity Summary with the latest changes. |
| View collected data | 1. Select a plan and click Edit. 2. In the right pane, go to the Intelligence section (in the bottom) and click Search. The search page will appear, displaying the collected data filtered out accordingly (i.e. provided by this monitoring plan). |
| Modify plan settings, add or delete data sources, add or delete items | Select a plan and click Edit. On the page that opens, review your plan settings. Then follow the instructions described in these sections: - Add Items for Monitoring - Fine-Tune Your Plan and Edit Settings |
| Assign roles | Click Delegate to review current delegations and assign roles. You can delegate control over a monitoring plan to another administrator, or grant read access—Reviewer role—to the data collected by this plan. To simplify delegation, you can further organize the monitoring plans into folders. See the Role-Based Access and Delegation topic for additional information. |
Using historical data
For many data sources, you can instruct Netwrix Auditor to collect state-in-time data along with event data. For that, Netwrix Auditor uses state-in-time snapshots of the relevant system (for example, see VMware).
To keep users up-to-date on actual system state, Auditor updates the latest snapshot on the regular basis. Thus, only the latest snapshot is available for ongoing reporting in the product.
However, you may need to generate reports based on the historical data. For that, you must import the historical snapshots to the database.
To import snapshots, you must be assigned the Global administrator or the Global reviewer role.
Follow the steps to import historical snapshots.
Step 1 – Select the monitoring plan you need.
Step 2 – Select the required data source and click Edit data source on the right to open its properties.
Step 3 – Click General on the left.
Step 4 – In the Manage historical snapshots section, click Manage.
Step 5 – In the Manage Snapshots window, select the snapshots that you want to import — use the arrows to move the selected snapshots to the Snapshots available for reporting list. When finished, click OK.
See the Role-Based Access and Delegation topic for additional information.