Windows Server
NOTE: Read and complete the instructions in the following topics before configuring your monitoring plan:
- Protocols and Ports Required – To ensure successful data collection and activity monitoring configure necessary protocols and ports for inbound and outbound connections
- Data Collecting Account – Configure data collecting accounts as required to audit your IT systems
- Windows Server – Configure data source as required to be monitored
Complete the following fields:
| Option | Description |
|---|---|
| General | |
| Monitor this data source and collect activity data | Enable monitoring of the selected data source and configure Auditor to collect and store audit data. |
| Monitor changes to system components | Select the system components that you want to audit for changes. Review the following for additional information:
|
| Specify data collection method | You can enable network traffic compression. If enabled, the product automatically launches a Compression Service on the audited computer to collect and prefilter data. This significantly improves data transfer and minimizes the impact on the target computer performance. |
| Configure audit settings | You can adjust audit settings automatically. Auditor checks your current audit settings on each data collection and adjusts them if necessary. Netwrix recommends this method for evaluation purposes in test environments. If Auditor detects conflicts with your current audit settings, it doesn't perform automatic audit configuration. Don't select the checkbox if you want to configure audit settings manually. See the Windows Server configuration topic for additional information about audit settings required to collect comprehensive audit data and the instructions on how to configure them. |
| Collect data for state-in-time reports | Configure Auditor to store daily snapshots of your system configuration required for further state-in-time reports generation. See the State–In–Time Reports topic for additional information. In the Manage historical snapshots section, you can click Manage and select the snapshots that you want to import to the Audit Database to generate a report on the data source's state at the specific moment in the past. You must have the Global administrator or the Global reviewer role to import snapshots. Move the selected snapshots to the Snapshots available for reporting list using the arrow button. The product updates the latest snapshot regularly to keep users up to date on the actual system state. Users can also configure Only the latest snapshot is available for reporting in Auditor. If you want to generate reports based on different snapshots, you must import snapshots to the Audit Database. |
| Activity | |
| Specify monitoring restrictions | Specify restriction filters to narrow your Windows Server monitoring scope (search results, reports, and Activity Summaries). For example, you can exclude system activity on a particular objects on all computers. The product applies all filters using AND logic. Click Add and complete the following fields:
|
Review your data source settings and click Add to go back to your plan. The newly created data source will appear in the Data source list. As a next step, click Add item to specify an object for monitoring. See the Add Items for Monitoring topic for additional information.
Computer
Select the account you want to use to collect data for this item. If you want to use a specific account (other than the one you specified during monitoring plan creation), select account type you want to use and enter credentials. The following choices are available:
- User/password. The account must have the same permissions and access rights as the default account used for data collection. See the Data Collecting Account topic for additional information.
- Group Managed Service Account (gMSA). You should specify only the account name in the domain\account$ format. See the Use Group Managed Service Account (gMSA) topic for additional information.
- Netwrix Privilege Secure. Starting with version 10.7, you can implement the integration between Netwrix Auditor and Netwrix Privilege Secure. See the Netwrix Privilege Secure topic for additional information.
IP Range
Complete the following fields:
| Option | Description |
|---|---|
| General | |
| Specify IP range | Specify an IP range for the audited computers. To exclude computers from within the specified range, click Exclude. Enter the IP subrange you want to exclude, and click Add. |
| Specify the account for collecting data | Select the account the same way as for the Computer item. |
AD Container
Complete the following fields:
| Option | Description |
|---|---|
| General | |
| Specify AD container | Specify a whole AD domain, OU, or container. Click Browse to select from the list of containers in your network. You can also:
|
| Specify the account for collecting data | Select the account the same way as for the Computer item. |
| Specify monitoring restrictions | Specify restriction filters to narrow your monitoring scope (search results, reports, and Activity Summaries). The product applies all filters using AND logic. Depending on the type of the object you want to exclude, select one of the following:
|
Use Netwrix Privilege Secure as a Data Collecting Account
Starting with version 10.7, you can use Netwrix Privilege Secure to manage the account for collecting data, after configuring the integration. See the Netwrix Privilege Secure topic for additional information about integration and supported data sources. In this case, Netwrix Auditor doesn't store the credentials. Instead, Netwrix Privilege Secure manages them and provides them on demand, ensuring password rotation or using temporary accounts for data collection.
To use Netwrix Privilege Secure as an account for data collection.
Step 1 – Select the item you want to configure.
Step 2 – In the item configuration menu, select Netwrix Privilege Secure as an option for data collection.
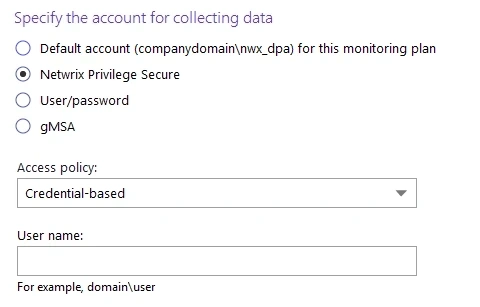
Step 3 – Select the type of the Access Policy you want to use in Netwrix Privilege Secure. Credential-based is the default option. Refer to the Netwrix Privilege Secure Access Policies documentation for details.
In this case, provide the username of the account that Netwrix Privilege Secure manages and that Netwrix Auditor can access through a Credential-based access policy.
NOTE: Netwrix recommends using different credentials for different monitoring plans and data sources.
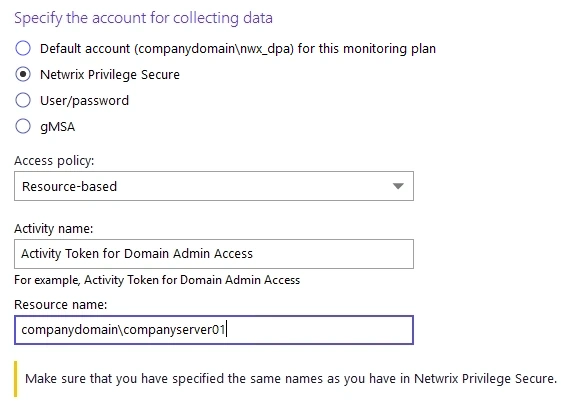
The second option is Resource-based. To use this option, you need to provide the Activity and Resource names, assigned to Netwrix Auditor in the corresponding Resource-based policy. Ensure that you specified the same names as in Netwrix Privilege Secure.
The Resource name in this case is where the activity takes place. For example, if you grant the data collecting account the access to a local Administrators group - the resource is the server where you grant the permission.
Netwrix Privilege Secure is ready to use as an account for data collection.