Configure Video Recordings Playback Settings
You can watch video recordings of users' activity in any Netwrix Auditor client. Also, recordings are available as links in web-based reports and email-based Activity Summaries.
You can use group Managed Service Accounts (gMSA) as data collecting accounts.
To watch video files captured by Netwrix Auditor via console, configure the following settings:
- The user must have read permissions (resultant set) to the Netwrix_UAVR$ shared folder where video files are stored. By default, all members of the Netwrix Auditor Client Users group can access this shared folder. Netwrix Auditor creates both the group and the folder automatically. Grant sufficient permissions on the folder or explicitly add the user to the group, regardless of the role delegated to them in the product. See the To Add an Account to Netwrix Auditor Client Users Group topic for additional information.
- A dedicated codec must be installed. Netwrix Auditor installs this codec automatically on the computer where you deploy it, and on the monitored computers. To install it on a different computer, download it from https://www.netwrix.com/download/ScreenPressorNetwrix.zip.
- The Ink and Handwriting Services, Media Foundation, and Desktop Experience Windows features must be installed on the computer where Netwrix Auditor Server is deployed. These features allow enabling Windows Media Player and sharing video recordings via DLNA. See the To Enable Windows Features topic for additional information.
To watch video files captured by Netwrix Auditor via direct links, configure the following settings:
- Microsoft Internet Explorer 7.0 and above must be installed and ActiveX must be enabled.
- Internet Explorer security settings must be configured properly. See the To Configure Internet Explorer Security Settings topic for additional information.
- JavaScript must be enabled. See the To Enable JavaScript topic for additional information.
- Internet Explorer Enhanced Security Configuration (IE ESC) must be disabled. See the To Disable Internet Explorer Enhanced Security Configuration (IE ESC) topic for additional information.
All Internet Explorer-related settings are relevant only for those who watch videos outside the Netwrix Auditor console.
NOTE: Microsoft is deprecating Internet Explorer. However, if you access the video recordings from a browser via direct links (reports on SSRS portal, subscriptions, activity summaries, search export results), the IE engine must be present on the client machine. You can disable IE with GPO, but don't remove it completely. Netwrix recommends using Edge with the "IE mode" option enabled.
To Configure Internet Explorer Security Settings
Step 1 – In Internet Explorer, navigate to Tools > Internet Options.
Step 2 – Switch to the Security tab and select Local Intranet. Click Custom Level.
Step 3 – In the Security Settings - Local Intranet Zone dialog, scroll down to Downloads and verify that File download is set to Enable.
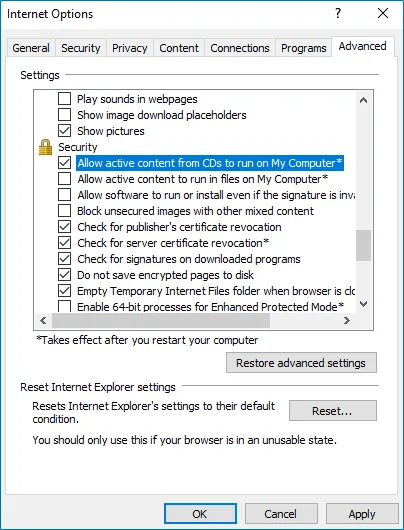
Step 4 – In the Internet Options dialog, switch to the Advanced tab.
Step 5 – Local Security and select the Allow active content to run in files on My Computer checkbox.
To Enable JavaScript
Step 1 – In Internet Explorer, navigate to Tools > Internet Options.
Step 2 – Switch to the Security tab and select Internet. Click Custom Level.
Step 3 – In the Security Settings - Internet Zone dialog, scroll down to Scripting and verify that Active scripting is set to Enable.
To Disable Internet Explorer Enhanced Security Configuration (IE ESC)
Step 1 – Navigate to Start > Windows Administrative Tools > Server Manager.
Step 2 – In the Security Information section, click Configure IE ESC link on the right to disable it.
To Add an Account to Netwrix Auditor Client Users Group
Netwrix Auditor grants all members of the Netwrix Auditor Client Users group the Global reviewer role and access to all collected data.
Step 1 – On the computer where Netwrix Auditor Server is installed, start the Local Users and Computers snap-in.
Step 2 – Navigate to the Groups node and locate the Netwrix Auditor Client Users group.
Step 3 – In the Netwrix Auditor Client Users Properties dialog, click Add.
Step 4 – Specify the users you want to add to this group.
To Enable Windows Features
Follow these steps if Netwrix Auditor Server runs on Windows Server 2012 or later.
Step 1 – Navigate to Start > Server Manager.
Step 2 – In the Server Manager window, click Add roles and features.
Step 3 – On the Select Features step, select one of the following Windows features and the follow the installation prompts:
- Ink and Handwriting Services
- Media Foundation
- User Interface and Infrastructure > Desktop Experience
NOTE: If you have Windows corruption errors when installing Windows Media Foundation, run the Deployment Image Servicing and Management (DISM) tool from the command prompt with administrative rights. For detailed information, refer to the Microsoft article: Fix Windows corruption errors by using the DISM or System Update Readiness tool.
Step 4 – Restart your computer to complete features installation.