Deploy and Configure Add-On
This guide provides step-by-step instructions for deploying and configuring the Azure SQL Managed Instance add-on for Netwrix Auditor.
Step 1: Configure Microsoft Entra ID Application
To integrate with Microsoft Entra ID, you need to create a separate application registration in the Azure portal.
1.1 Register a New Application
- Navigate to the Azure Portal
- Go to Microsoft Entra ID (formerly Azure Active Directory)
- Select App registrations from the left-hand menu
- Click + New registration
- Configure the application:
- Name: Choose a descriptive name (e.g.,
NetwrixSQLMIIntegration) - Supported account types: Accounts in this organizational directory only
- Redirect URI: Leave blank for this scenario
- Name: Choose a descriptive name (e.g.,
- Click Register
1.2 Create a Client Secret
- After registration, navigate to Certificates & secrets
- Under Client secrets, click + New client secret
- Configure the secret:
- Description: "Netwrix Integration Secret"
- Expires: Choose appropriate expiration period (recommended: 12-24 months)
- Click Add
- Important: Copy the secret value - you can't retrieve it later
1.3 Configure API Permissions (Optional)
If your setup requires specific Azure resource access:
- Go to API permissions
- Click + Add a permission
- Select appropriate Microsoft APIs based on your requirements
- Grant admin consent if needed
1.4 Collect Required Information
Record the following values for later configuration:
- Application (client) ID
- Directory (tenant) ID
- Client secret value
- Application name
Step 2: Configure Azure Storage Account for Log Storage
Azure SQL Managed Instance requires an Azure Storage Account with Blob container for audit log storage.
2.1 Create a Resource Group (if needed)
- In Azure Portal, search for Resource groups
- Click + Create
- Configure:
- Subscription: Your Azure subscription
- Resource group name:
rg-netwrix-sqlmi(or your naming convention) - Region: Same region as your SQL Managed Instance
- Click Review + Create, then Create
2.2 Create a Storage Account
- Search for Storage accounts and click + Create
- On the Basics tab:
- Subscription: Your subscription
- Resource group: Select the created resource group
- Storage account name: Must be globally unique (e.g.,
stnetwrixsqlmi001) - Region: Same as SQL Managed Instance for optimal performance
- Performance: Standard (sufficient for audit logs)
- Redundancy: Locally-redundant storage (LRS) or higher based on requirements
- On the Advanced tab (optional):
- Secure transfer required: Enabled
- Minimum TLS version: Version 1.2
- Click Review + Create, then Create
2.3 Create a Blob Container
- Navigate to the deployed storage account
- In the left menu, select Containers (under Data storage)
- Click + Container
- Configure:
- Name:
audit-logs(consistent naming) - Public access level: Private (no anonymous access)
- Name:
- Click Create
2.4 Enable System-Assigned Managed Identity for SQL MI
- Navigate to your SQL Managed Instance
- Go to Identity under Settings
- On the System-assigned tab:
- Set Status to On
- Click Save
- Note the Object ID for the managed identity
2.5 Assign Storage Permissions
Assign the Storage Blob Data Owner role to the SQL Managed Instance:
- In the storage account, go to Access Control (IAM)
- Click + Add > Add role assignment
- On the Role tab:
- Search and select Storage Blob Data Owner
- Click Next to the Members tab
- Select Assign access to: Managed Identity
- Click + Select members
- Choose SQL Server and select your SQL Managed Instance
- Click Select, then Review + assign
Step 3: Configure Authentication in Azure SQL Managed Instance
Create a login for the Entra ID application to access audit configuration.
3.1 Connect to SQL Managed Instance
Use SQL Server Management Studio (SSMS) or Azure Data Studio with an account that has:
- Microsoft Entra ID admin privileges on the SQL MI
sysadminserver role or equivalent permissions
3.2 Create Login from External Provider
Execute the following T-SQL commands:
-- Create login using the exact Display Name from Entra ID
CREATE LOGIN [NetwrixSQLMIIntegration] FROM EXTERNAL PROVIDER;

-- Grant basic connection permission
GRANT CONNECT SQL TO [NetwrixSQLMIIntegration];

-- Grant permissions for audit configuration and monitoring
GRANT ALTER ANY SERVER AUDIT TO [NetwrixSQLMIIntegration];
GRANT VIEW ANY DATABASE TO [NetwrixSQLMIIntegration];
GRANT VIEW SERVER STATE TO [NetwrixSQLMIIntegration];
GRANT VIEW SERVER SECURITY AUDIT TO [NetwrixSQLMIIntegration];
Note: Replace
NetwrixSQLMIIntegrationwith your actual Azure AD application name. The name must match exactly as shown in Entra ID.
Step 4: Configure Server-Level Audit
Set up comprehensive server-level auditing for login events and security changes.
4.1 Create Storage Credential
USE master;
GO

-- Create credential for Azure Blob Storage using Managed Identity
IF NOT EXISTS (SELECT * FROM sys.credentials
               WHERE name = 'https://stnetwrixsqlmi001.blob.core.windows.net/audit-logs')
BEGIN
    CREATE CREDENTIAL [https://stnetwrixsqlmi001.blob.core.windows.net/audit-logs]
    WITH IDENTITY = 'Managed Identity';
    PRINT 'Created Managed Identity credential for audit-logs container';
END
ELSE
BEGIN
    PRINT 'Credential already exists for audit-logs container';
END
GO
4.2 Create Server Audit
USE master;
GO

-- Drop existing audit if it exists (for redeployment scenarios)
IF EXISTS (SELECT * FROM sys.server_audits WHERE name = 'SERVER_AUDIT')
BEGIN
    ALTER SERVER AUDIT [SERVER_AUDIT] WITH (STATE = OFF);
    DROP SERVER AUDIT [SERVER_AUDIT];
    PRINT 'Existing server audit dropped';
END

-- Create the server audit
PRINT 'Creating server audit...';
CREATE SERVER AUDIT [SERVER_AUDIT]
TO URL (
    PATH = 'https://stnetwrixsqlmi001.blob.core.windows.net/audit-logs',
    RETENTION_DAYS = 2  -- Adjust based on your retention requirements
)
WITH (
    QUEUE_DELAY = 1000,         -- 1 second delay for better performance
    ON_FAILURE = CONTINUE,      -- Continue operation if audit fails
    AUDIT_GUID = NEWID()        -- Unique identifier for audit
);
GO
4.3 Create Server Audit Specification
-- Drop existing specification if it exists
IF EXISTS (SELECT * FROM sys.server_audit_specifications WHERE name = 'SERVER_AUDIT_SPEC')
BEGIN
    ALTER SERVER AUDIT SPECIFICATION [SERVER_AUDIT_SPEC] WITH (STATE = OFF);
    DROP SERVER AUDIT SPECIFICATION [SERVER_AUDIT_SPEC];
    PRINT 'Existing server audit specification dropped';
END

-- Create comprehensive server audit specification
CREATE SERVER AUDIT SPECIFICATION [SERVER_AUDIT_SPEC]
FOR SERVER AUDIT [SERVER_AUDIT]
    ADD (FAILED_LOGIN_GROUP),                    -- Failed login attempts
    ADD (SUCCESSFUL_LOGIN_GROUP),                -- Successful logins
    ADD (SERVER_ROLE_MEMBER_CHANGE_GROUP),       -- Server role membership changes
    ADD (SERVER_PRINCIPAL_CHANGE_GROUP),         -- Server principal changes (logins)
    ADD (LOGIN_CHANGE_PASSWORD_GROUP),           -- Password changes
    ADD (SERVER_STATE_CHANGE_GROUP),             -- Server state changes
    ADD (SERVER_OBJECT_CHANGE_GROUP),            -- Server object changes
    ADD (SERVER_PERMISSION_CHANGE_GROUP),        -- Server permission changes
    ADD (AUDIT_CHANGE_GROUP),                    -- Audit configuration changes
    ADD (SERVER_OBJECT_OWNERSHIP_CHANGE_GROUP)   -- Ownership changes
WITH (STATE = OFF);
GO

-- Enable audit specification first, then audit
ALTER SERVER AUDIT SPECIFICATION [SERVER_AUDIT_SPEC] WITH (STATE = ON);
PRINT 'Server audit specification enabled';

ALTER SERVER AUDIT [SERVER_AUDIT] WITH (STATE = ON);
PRINT 'Server audit enabled successfully!';
GO
Step 5: Configure Database-Level Audit
Set up database-specific auditing for comprehensive monitoring.
5.1 Database Audit Configuration Script
-- Variables - modify these for your environment
DECLARE @DatabaseName NVARCHAR(128) = 'YourDatabaseName'; -- Change to your database name
DECLARE @ServerAuditName NVARCHAR(128) = 'SERVER_AUDIT'; -- Must match your server audit name
DECLARE @DatabaseAuditSpecName NVARCHAR(128) = 'DATABASE_AUDIT_SPEC';

-- Validate database exists
IF NOT EXISTS (SELECT * FROM sys.databases WHERE name = @DatabaseName)
BEGIN
    PRINT 'Database ' + @DatabaseName + ' does not exist!';
    RETURN;
END

DECLARE @SQL NVARCHAR(MAX);

-- Switch to target database and create audit specification
SET @SQL = N'
USE [' + @DatabaseName + N'];

-- Drop existing database audit specification if it exists
IF EXISTS (SELECT * FROM sys.database_audit_specifications
           WHERE name = ''' + @DatabaseAuditSpecName + N''')
BEGIN
    PRINT ''Dropping existing database audit specification...'';
    ALTER DATABASE AUDIT SPECIFICATION [' + @DatabaseAuditSpecName + N'] WITH (STATE = OFF);
    DROP DATABASE AUDIT SPECIFICATION [' + @DatabaseAuditSpecName + N'];
END

PRINT ''Creating database audit specification for: ' + @DatabaseName + N''';

CREATE DATABASE AUDIT SPECIFICATION [' + @DatabaseAuditSpecName + N']
FOR SERVER AUDIT [' + @ServerAuditName + N']
    -- User and Role Management (CreateUserStatement, DropUserStatement, AlterUserStatement)
    ADD (DATABASE_PRINCIPAL_CHANGE_GROUP),

    -- Role Operations (CreateRoleStatement, DropRoleStatement, AlterRoleStatement)
    ADD (DATABASE_ROLE_MEMBER_CHANGE_GROUP),

    -- Permission Changes (GrantStatement, RevokeStatement, DenyStatement)
    ADD (DATABASE_PERMISSION_CHANGE_GROUP),

    -- Schema Operations (CreateSchemaStatement, DropSchemaStatement)
    ADD (SCHEMA_OBJECT_CHANGE_GROUP),

    -- Table Operations (CreateTableStatement, DropTableStatement, AlterTableStatement and etc)
    ADD (DATABASE_OBJECT_CHANGE_GROUP),

    -- Ownership Changes (AlterAuthorizationStatement)
    ADD (DATABASE_OBJECT_OWNERSHIP_CHANGE_GROUP),

    -- Backup/Restore Operations (BackupStatement, RestoreStatement)
    ADD (BACKUP_RESTORE_GROUP),

WITH (STATE = OFF);

-- Enable the database audit specification
ALTER DATABASE AUDIT SPECIFICATION [' + @DatabaseAuditSpecName + N'] WITH (STATE = ON);
PRINT ''Database audit specification enabled for: ' + @DatabaseName + N''';
';

EXEC sp_executesql @SQL;
Step 6: Install and Configure Netwrix Add-on
6.1 Launch Add-on Setup Wizard
Run the Netwrix Auditor Add-on Setup Wizard and follow these configuration steps:
6.2 Netwrix Auditor Server Connection
First Screen Configuration:
- Endpoint URL: URL of your Netwrix Auditor Server
- Credentials: Valid credentials with sufficient privileges to register and manage data sources
6.3 Application Settings
Microsoft Entra ID Authentication:
- Tenant ID: Directory (tenant) ID from Step 1
- Client ID: Application (client) ID from Step 1
- Client Secret: The secret value you copied in Step 1
6.4 Target SQL Settings
Azure SQL Managed Instance Connection:
- Azure SQL Server URL:
your-sql-instance.public.<region>.database.windows.net,1433
- Database Name:
master(for audit collection) - Authentication: Microsoft Entra ID
- Blob Path: Full path to audit logs container:
https://stnetwrixsqlmi001.blob.core.windows.net/audit-logs/<managed-instance-name>
6.5 Finalize Setup
- Review all configuration parameters
- Click Run to complete the setup
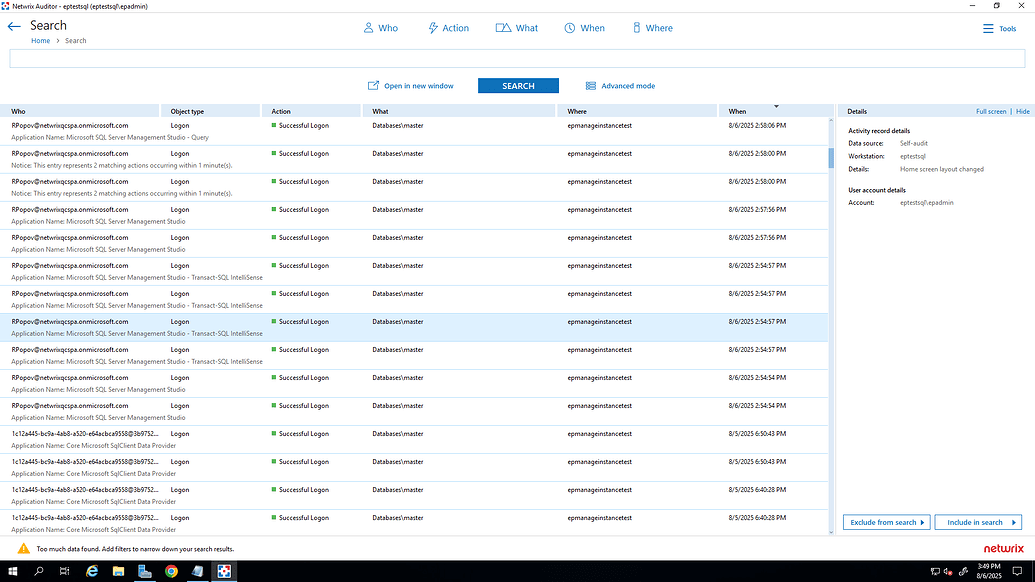
- Monitor the initial synchronization process

Limitations and Considerations
Current Limitations
- Single Instance Support: This add-on version supports monitoring one Azure SQL Managed Instance per installation
- Processing Delay: There may be a delay between events occurring and appearing in Netwrix Auditor
Future Enhancements
- Support for multiple SQL Managed Instances
- Advanced filtering and categorization options
- Real-time event processing capabilities
- Enhanced reporting and analytics features
Support and Feedback
This Azure SQL Managed Instance add-on is a free integration solution for Netwrix Auditor.
Your feedback helps improve the add-on. Share your feedback on:
- Functionality and features
- Documentation and setup process
- Additional requirements or use cases