Permissions for Exchange Auditing
Before creating a monitoring plan to audit your Exchange server, plan for the account you'll use for data collection. This account must meet the following requirements. You specify this account in the monitoring plan wizard, or in the monitored item settings.
Account Requirements
Directory Permissions
The account used for data collection must meet the following requirements:
-
The Manage auditing and security log policy must be defined for this account. See the Permissions for Active Directory Auditing topic for additional information.
-
If you plan to process the Active Directory Deleted Objects container, Read permission on this container is required. See the Permissions for Active Directory Auditing topic for additional information.
-
Additional configuration if auto-backup is enabled for the domain controller event logs. See the Additional Configuration for Domain Controller's Event Logs Auto-backup section.
OR
-
Member of the Domain Admins group on the target server.
NOTE: This covers all the permissions required in the preceding list and is mandatory if you want to use network traffic compression for data collection.
Exchange Permissions
The account must also have one of the following:
-
The following management roles assigned: Audit Logs role, View-only Configuration role, Mail Recipients role, and Monitoring role. See the Assign Management Roles topic for additional information.
OR
-
Membership in the Organization Management or Records Management group. See the Add Account to the Organization Management Group topic for additional information.
Additional Configuration for Domain Controller's Event Logs Auto-backup
The following is required if auto-backup is enabled for the domain controller event logs:
- Permissions to access the HKEY_LOCAL_MACHINE\System\CurrentControlSet\Services\EventLog\Security registry key on the domain controllers in the target domain. See the Assign Permission to Read the Registry Key topic for additional information.
- Membership in one of the following groups: Administrators, Print Operators, Server Operators
- Read/Write share permission and Full control security permission on the logs backup folder
Add Account to the Organization Management Group
Step 1 – Navigate to Start > Active Directory Users and Computers on any domain controller in the root domain of the forest where Microsoft Exchange 2019, 2016, or 2013 is installed.
Step 2 – In the left pane, navigate to <domain_name> > Microsoft Exchange Security Groups.
Step 3 – On the right, locate the Organization Management group and double-click it.
Step 4 – In the Organization Management Properties dialog that opens, select the Members tab and click Add.
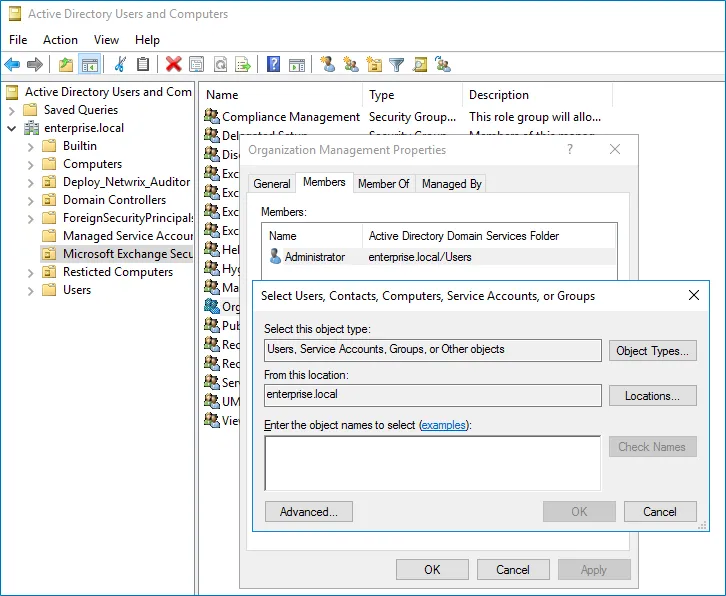
If for some reason you don't want this account to belong to the Organization Management group, you can add it to the Records Management group in the same way. The Records Management group is less powerful, and accounts belonging to it have fewer rights and permissions.
Assign Management Roles
Perform this procedure only if the account selected for data collection isn't a member of the Organization Management or the Records Management group.
Step 1 – On the computer where Microsoft Exchange 2019, 2016, or 2013 is installed, open the Exchange Management Shell under an account that belongs to the Organization Management group.
Step 2 – Use the following syntax to assign the required management role to a user:
New-ManagementRoleAssignment -Name <assignment name> -User <UserName> -Role <role name>
For example:
New-ManagementRoleAssignment -Name "AuditLogsNetwrixRole" -User Corp\jsmith -Role "Audit Logs"
In this example, the command assigns the Audit Logs role to the user CORP\jsmith.
Assign Permission to Read the Registry Key
You need this permission only if the account you select for data collection isn't a member of the Domain Admins group.
Assign this permission on each domain controller in the audited domain. If your domain contains multiple domain controllers, assign permissions through Group Policy, or use the Audit Configuration Assistant to assign them automatically.
To assign permissions manually, use the Registry Editor snap-in or the Group Policy Management console.
Assign Permission Via the Registry Editor Snap-in
Step 1 – On your target server, open Registry Editor: navigate to Start > Run and type "regedit".
Step 2 – In the left pane, navigate to HKEY_LOCAL_MACHINE\SYSTEM\CurrentControl Set\Services\EventLog\Security.
Step 3 – Right-click the Security node and select Permissions from the pop-up menu.
Step 4 – Click Add and enter the name of the user that you want to grant permissions to.
Step 5 – Check Allow next to the Read permission.
Step 6 – For auditing Logon Activity, you also need to assign the Read permission to the HKEY_LOCAL_MACHINE\SECURITY\Policy\PolAdtEv registry key.
Assign Permission Using the Group Policy Management Console
Step 1 – Open the Group Policy Management console on any domain controller in the target domain: navigate to Start > Windows Administrative Tools (Windows Server 2016/2019) or Administrative Tools (Windows 2012 R2 and below) > Group Policy Management.
Step 2 – In the left pane, navigate to Forest: <forest name> > Domains > <domain name> >
Domain Controllers. Right-click the effective domain controllers policy (by default, it is the
Default Domain Controllers Policy), and select Edit .
Step 3 – In the Group Policy Management Editor dialog, expand the Computer Configuration node on the left and navigate to Policies > Windows Settings > Security Settings > Registry.
Step 4 – Right-click in the pane and select Add Key.
Step 5 – Navigate to HKEY_LOCAL_MACHINE\SECURITY\Policy\PolAdtEv and click OK.
Step 6 – Click Add and enter the name of the user that you want to grant permissions to and press Enter.
Step 7 – Check Allow next to the "Read" permission and click OK
Step 8 – In the pop-up window, select Propagate inheritable permissions to all subkeys and click OK.
Step 9 – Repeat the steps 4-8 for keys below:
HKEY_LOCAL_MACHINE\SYSTEM\CurrentControlSet\Control\SecurePipeServers\winreg;HKEY_LOCAL_MACHINE\SYSTEM\CurrentControlSet\Services\EventLog\Security.
Step 10 – Close Group Policy Management console.
Step 11 – Navigate to Start > Run and type "cmd". Run the gpupdate /force command and press
Enter to update the group policy.
Step 12 – Type repadmin /syncall command and press Enter for replicate GPO changes to other
domain controllers.
Step 13 – Ensure that new GPO settings were applied to the domain controllers.