Configure Windows Registry Audit Settings
You must configure Windows Registry audit permissions on each Windows server you want to audit so that Netwrix Auditor reports the "Who" and "When" values correctly for each change. For a test environment, PoC, or evaluation, you can use automatic audit configuration. If you want to configure Windows Registry manually, follow these instructions.
Set the following audit permissions to "Successful" for the
HKEY_LOCAL_MACHINE\SOFTWARE and HKEY_LOCAL_MACHINE\SYSTEM keys:
- Set Value
- Create Subkey
- Delete
- Write DAC
- Write Owner
Perform one of the following procedures depending on the OS version:
- Configuring Windows registry audit settings on pre-Windows Server 2012 versions
- Configuring Windows registry audit settings on Windows Server 2012 and above
Configuring Windows registry audit settings on pre-Windows Server 2012 versions
Step 1 – On your target server, open Registry Editor: navigate to Start → Run and type "regedit".
Step 2 – In the registry tree, expand the HKEY_LOCAL_MACHINE key, right-click SOFTWARE and select Permissions from the pop-up menu.
Step 3 – In the Permissions for SOFTWARE dialog, click Advanced.
Step 4 – In the Advanced Security Settings for SOFTWARE dialog, select the Auditing tab and click Add.
Step 5 – Select the Everyone group.
Step 6 – In the Auditing Entry for SOFTWARE dialog, select "Successful" for the following access types:
- Set Value
- Create Subkey
- Delete
- Write DAC
- Write Owner
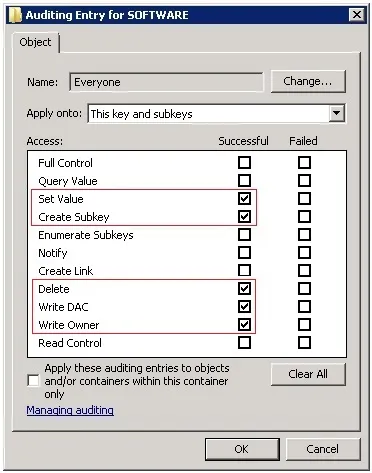
Repeat the same steps for the HKEY_LOCAL_MACHINE\SYSTEM key.
Configuring Windows registry audit settings on Windows Server 2012 and above
Step 1 – On your target server, open Registry Editor: navigate to Start → Run and type "regedit".
Step 2 – In the registry tree, expand the HKEY_LOCAL_MACHINE key, right-click SOFTWARE and select Permissions from the pop-up menu.
Step 3 – In the Permissions for SOFTWARE dialog, click Advanced.
Step 4 – In the Advanced Security Settings for SOFTWARE dialog, select the Auditing tab and click Add.
Step 5 – Click Select a principal link and specify the Everyone group in the Enter the object name to select field.
Step 6 – For Type, select "Success". For Applies to, select "This key and subkeys".
Step 7 – Click Show advanced permissions and select the following access types:
- Set Value
- Create Subkey
- Delete
- Write DAC
- Write Owner
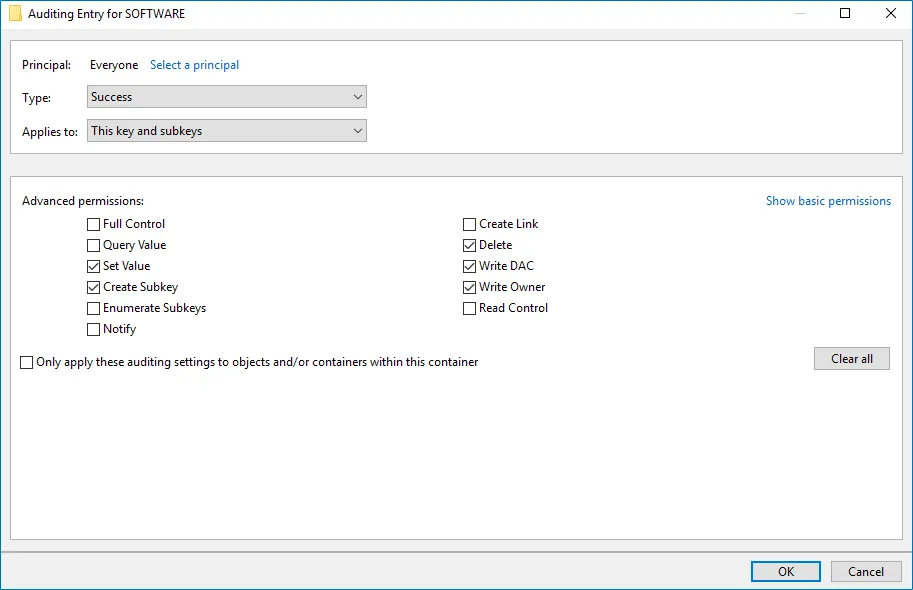
Repeat the same steps for the HKEY_LOCAL_MACHINE\SYSTEM key.
Netwrix doesn't recommend using Group Policy to configure registry audit, as registry DACL settings may be lost.