Use Group Managed Service Account (gMSA)
Auditor supports using Group Managed Service Accounts (gMSA) for data collection and storage. This can help you to simplify product administration, providing the following benefits:
- There is no password to manage for this account: Windows handles the password management for it. You don't need to update the password regularly.
- Using the gMSA also eliminates a need in service accounts with static passwords that are set upon creation and then never cycled.
- The gMSA also helps to ensure that service account is only used to run a service (gMSA accounts can't be used to log on interactively to domain computers).
- The gMSA is allowed to audit trusted domains using configured and validated gMSA from the target domain.
gMSA is supported:
-
As a data collecting account for the following data sources:
- Active Directory (including Group Policy and Logon Activity)
-
File Server (for Windows File Servers)
- SQL Server
- SharePoint
- User Activity (including User Activity Video Recording)
- Windows Server
See the Data Collecting Account topic for additional information about supported data sources.
NOTE: If you are using a gMSA account for Active Directory collection consider that the Active Directory Object Restore tool will not work.
-
As an account for accessing Long-Term archive. See the File-Based Repository for Long-Term Archive topic for additional information.
-
As an account for accessing Audit Databases. See Requirements for SQL Server to Store Audit Data topic for additional information.
NOTE: If you use a Group Managed Service Account (gMSA) to access the SQL Server instance that hosts the Netwrix Auditor database, you can't generate SSRS-based reports.
This limitation occurs because SQL Server Reporting Services doesn't support using gMSA for the Unattended Execution Account. For more details, see the Microsoft documentation: Configure the Unattended Execution Account (Report Server Configuration Manager)
RECOMMENDED: Prepare a dedicated gMSA for these purposes.
The gMSA works only within one domain — both the parent domain and Netwrix Auditor must be joined to the same domain. This is because gMSAs are designed to be scoped within a single Active Directory domain or subdomain.
See the following Microsoft article for more information: Get started with Group Managed Service Accounts
By default, the gMSA account isn't a member of any domain groups. After creating gMSA account, you need to add this account to one of the domain groups as required for the data source you are going to audit.
Check for a KDS Root Key
To generate password for gMSA accounts, domain controllers require a Key Distribution Services (KDS) root key. You create this key only once, so if any gMSA accounts already exist in your domain, the root key already exists too.
To check whether the root key exists in your domain:
Step 1 – Open the Active Directory Sites and Services Console and select View > Show Services Node.
Step 2 – Browse to Services > Group Key Distribution Services > Master Root Keys.
Step 3 – Alternatively, you can run the Get-KdsRootKey cmdlet. If the key doesn't exist, it
will not return any output.
Create a KDS Root Key
If the KDS root key doesn't exist, then you can create one using the following steps, or contact your Active Directory administrator.
To create a KDS key (on a domain controller running Windows Server 2012 or later):
Step 1 – On the domain controller, run Windows PowerShell.
Step 2 – In the command prompt of Windows PowerShell Active Directory module, run the following cmdlet:
Add-KdsRootKey -EffectiveImmediately
Step 3 – This adds a root key to the target DC, which the KDS service uses immediately.
NOTE: This requires waiting 10 hours, as other domain controllers will be able to use the root key only after a successful replication. See the Create the Key Distribution Services KDS Root Key Microsoft article for additional information.
Step 4 – Alternatively, you can use the following cmdlet:
Add-KdsRootKey -EffectiveTime MM/DD/YYYY
This cmdlet generates a KDS root key that will take effect on the specified date. Use the
mm/dd/yyyy format, for example: Add-KdsRootKey -EffectiveTime 02/27/21
CAUTION: This approach, however, should be used with care. Waiting up to 10 hours is a safety measure to prevent password generation from occurring before all DCs in the environment are capable of answering gMSA requests. For more information, see the Create the Key Distribution Services KDS Root Key Microsoft article.
To make the KDS Root Key work immediately you can use the following powershell command:
Add-KDSRootKey -Effectivetime ((get-date).addhours(-10))
This command will make the KDS Root Key work immediately.
NOTE: This is recommended only for small environments. In large environments, it is required to wait 10 hours for replication.
Create a gMSA
To create a new gMSA, you will need to specify:
-
New account name and FQDN
-
Computer accounts allowed to use that gMSA — in this case, your Auditor Server
- The account must be a member of the Administrators group on the Auditor Server.
For example, you can create a gMSA using the New-ADServiceAccount PowerShell cmdlet. If so, you
should specify your Auditor Server account in the -PrincipalsAllowedToRetrieveManagedPassword
attribute.
Ensure you specify a valid computer object in this attribute.
If you have multiple Auditor servers, you can specify the computer accounts using a comma separated list, or specify a security group and add the required computer accounts to that security group.
To create a new gMSA in the root domain using PowerShell:
-
If you are using a single Netwrix Auditor Server, run the command as follows:
New-ADServiceAccount -name nagmsa -DNSHostName nagmsa.mydomain.local -PrincipalsAllowedToRetrieveManagedPassword NASrv$here:
- name — new gMSA name, here nagmsa. Ensure the name refers to a valid computer objects.
- DNSHostName — FQDN of the new gMSA account, here nagmsa.mydomain.local
- PrincipalsAllowedToRetrieveManagedPassword — your Netwrix Auditor Server NETBIOS name ended with $, here __NASrv$__
-
If you want to specify a security group that comprises multiple Auditor servers, run the command as follows:
New-ADServiceAccount -Name gmsagroup -DNSHostName gmsagroup.mydomain.local -PrincipalsAllowedToRetrieveManagedPassword NAServershere NAServers — a security group with your Auditor servers.
Assign Required Roles and Permissions to a gMSA
After you prepare a new gMSA account, assign the required roles and permissions to it, depending on what purpose the gMSA account will be used for.
-
If you are going to use a gMSA as a data collecting account in Auditor, add this account to the Local Admins group on the Auditor Server and assign the following rights and permissions, depending on the data source you want to collect data from:
-
If you are going to use a gMSA to access Long-Term archive, assign the roles and permissions required for a custom account:
-
File-Based Repository for Long-Term Archive
Remember, that you can use custom (gMSA) account only if your Long-Term archive stored on a file share.
-
-
If you are going to use a gMSA to access Audit Database, assign the required roles:
-
Requirements for SQL Server to Store Audit Data
Remember, that a gMSA account can't access SSRS due to Microsoft restrictions.
-
-
If you are going to use a gMSA as a data collection account for User Activity or User Activity Video Recording, see the following topics:
Now you can use a gMSA account as one of the Auditor Service Account.
Apply a gMSA
This topic contains instructions on how to apply a gMSA as one of the Auditor Service Accounts.
- Apply a gMSA as a Data Collecting Account
- Apply gMSA to Access Long-Term Archive
- Apply gMSA to Access Audit Database
Apply a gMSA as a Data Collecting Account
To process the corresponding monitored items using gMSA, you can specify this account in the monitored plan properties. See the Create a New Monitoring Plan topic for additional information.
To set a custom account in the monitored item properties:
Step 1 – Open the monitored item properties for editing.
Step 2 – On the General tab, under Specify account for collecting data, select gMSA option.
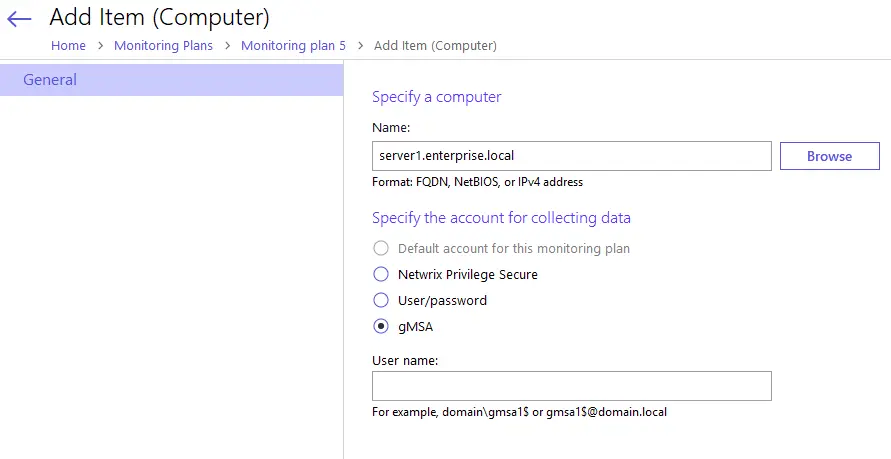
See the Add Items for Monitoring topic for additional information.
Apply gMSA to Access Long-Term Archive
To write data to the Long-Term Archive and upload report subscriptions to shared folders, you can specify this account as a custom account in the Long-Term Archive settings. See the Long-Term Archive topic for additional information.
NOTE: For a custom account or a gMSA one, consider that you can use the account for the Long-Term Archive based on a file share
Apply gMSA to Access Audit Database
To access Audit Database, generate reports and run interactive search queries, you can specify this account under the 'Specify custom connection parameters in your common database plan settings. See the Fine-Tune Your Plan and Edit Settings topic for additional information.