Configure Dropbox for Crawling
Netwrix Data Classification connects to and crawls a Dropbox source via a custom Dropbox app, created within Dropbox management console.
You will need to create a Dropbox App and authorize it. Do the following:
- Create a new App
- Generate Access token
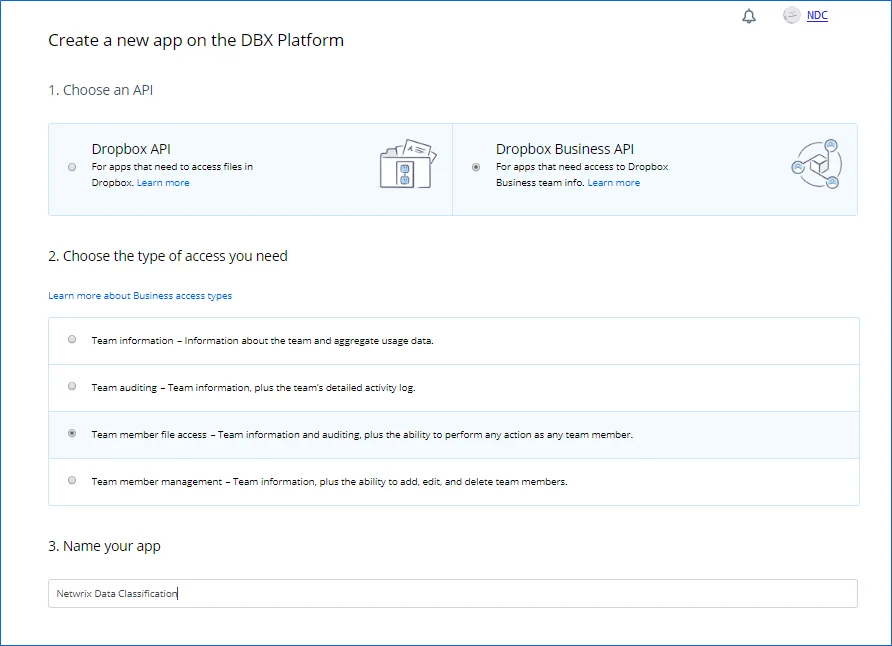
To create a new app
To create a new app, you should sign in to Dropbox cloud using a Dropbox Business account with administrative rights. Refer to Dropbox documentation for more information on the accounts and rights.
-
Navigate to https://www.dropbox.com/developers/apps/create
-
On the Choose an API step, select Scoped Access.
-
On the Choose the type of access you need step, select Full Dropbox type.
-
Provide a name for your App. For example, Netwrix Data Classification.
NOTE: Remember to agree with Dropbox API Terms and Conditions.
-
Click Create app.
To authorize your app
-
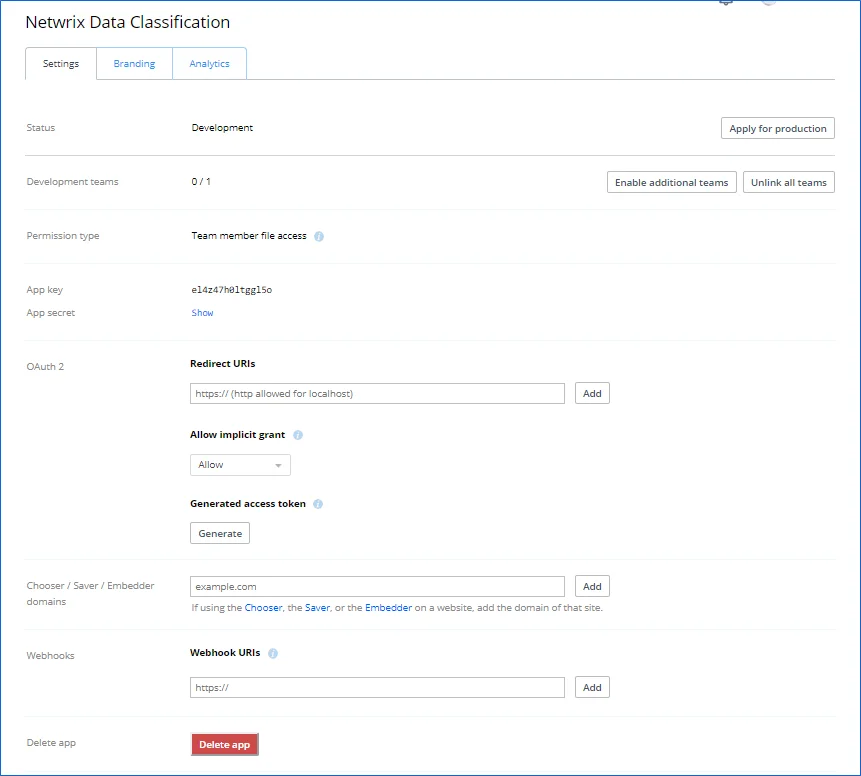
Once your App has been created, navigate to the Permissions tab.
-
Select the following permissions and click submit.
- account_info.read
- files.metadata.write
- files.metadata.read
- files.content.write
- files.content.read
- sharing.read
- team_info.read
- team_data.member
- team_data.team_space
- files.team_metadata.write
- members.read
-
Navigate to the Settings tab then scroll down to OAuth2 option and set the members.read Access token expiration to ‘No expiration’ then click Generate under Generated access token.
NOTE: If you change the app’s permissions you will need to regenerate this token.
-
Copy the token to a clipboard. You will need it later when adding a Dropbox source in Netwrix Data Classificationadministrative web console.
Configure IT Infrastructure
Successful crawling requires a certain configuration of native audit settings in the audited environment. Configuring your IT infrastructure may also include enabling certain built-in Windows services, etc. Proper audit configuration is required to ensure audit data integrity, otherwise your change reports may contain warnings, errors or incomplete audit data.
Review the following for additional information:
- Configure Box for Crawling
- Configure Dropbox for Crawling
- Configure Microsoft Exchange for Crawling and Classification
- Configure NFS File Share for Crawling
- Configure G Suite and Google Drive for Crawling
- Set Up MIP Integration
Configure Box for Crawling
Netwrix Data Classification connects to and crawls a Box source via a custom Box app, created within Box management portal.
Prerequisites
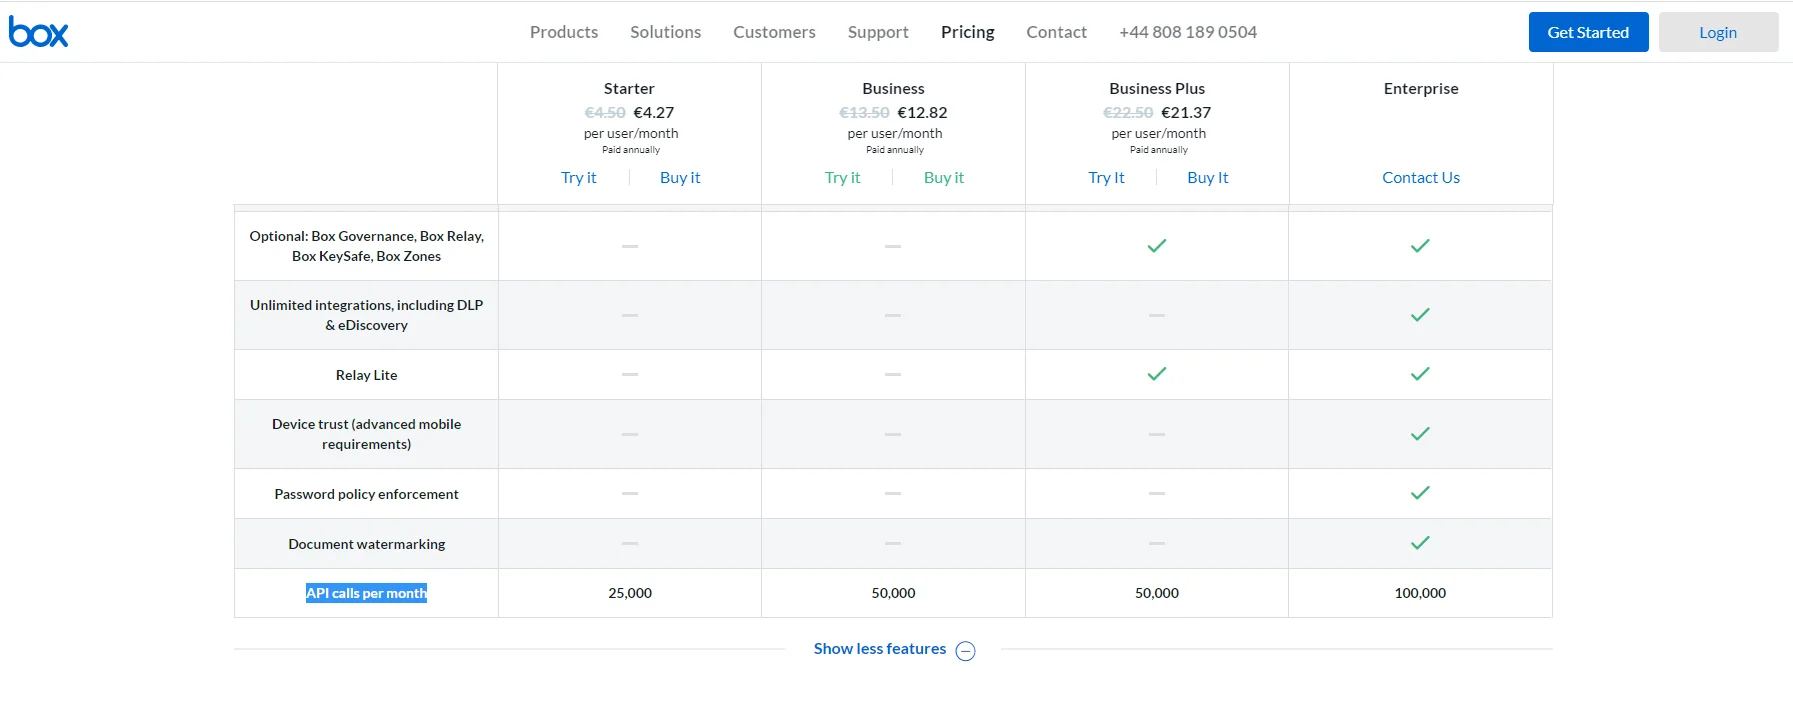
- Check if your Box license plan provides the capacity you need. Netwrix Data Classification uses API calls for content crawling (min one API call for a single file). Therefore, if you need to store and crawl a large amount of files in Box (e.g. 100, 000 files), then your selected plan should support a sufficient number of API calls per month. Otherwise, the solution will not be able to crawl your content in one month due to limited number of allowed API calls (e.g. with a Starter plan that provides only 25 000 calls per month). So, when selecting a Business subscription plan at https://www.box.com/pricing, remember to click Show more features in the bottom and examine the information on API calls per month supported by each plan.
- Make sure you have configured a valid Google account (with multi-factor authentication supported) and registered it as a Box Developer Account. This account is needed to create an app that Netwrix Data Classification will use for interaction with Box API. For more information on the custom apps and Box API, refer to this article.
NOTE: Account with multi-factor authentication will be required for private/public keys creation and usage, so if such authentication is not enabled, the program will display a warning message and suggest to configure the necessary settings.
Procedure Steps
There are four key stages in this procedure:
- Create an app.
- Authorize the app to access your organization’s data.
- Register the source with Netwrix Data Classification.
- Configure content for crawling within Box.
This section describes steps 1 and 2 that are performed on the Box side. Steps 3 and 4 are performed on the Netwrix Data Classification side and described in the Boxsection.
Step 1. Create the App
-
Log into your Box cloud-based storage facility using your Box Developer Account.
-
Open the Box developer's console endpoint:
https://app.box.com/developers/console. -
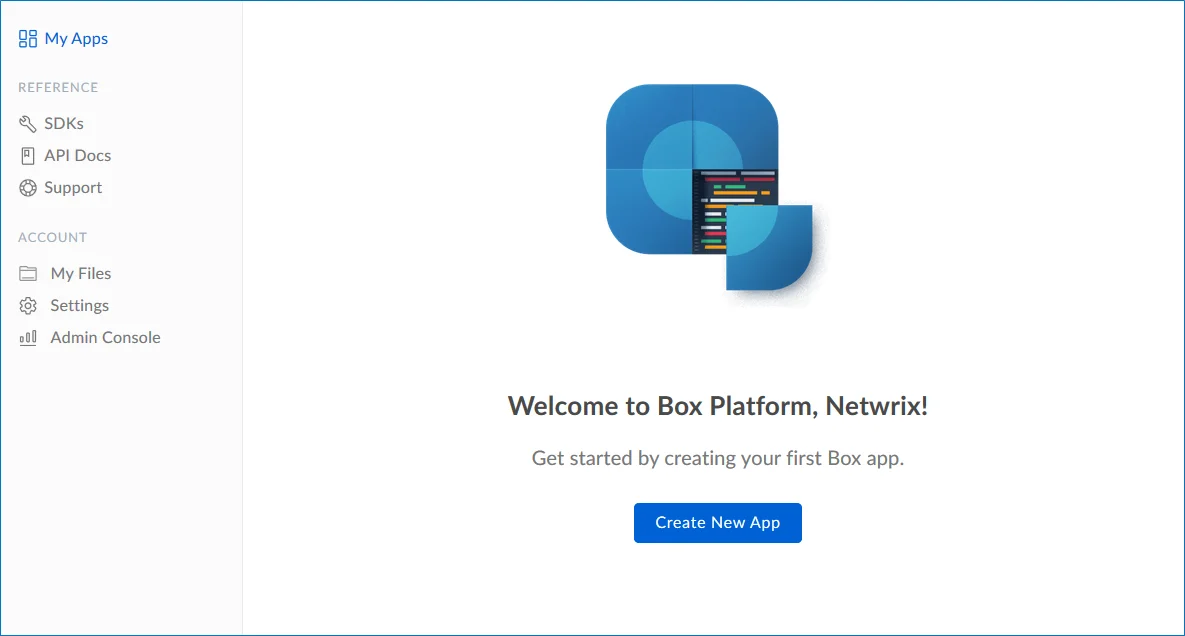
If you have not created an app before, you will see a screen similar to the one below:
-
Click Create New App.
-
Select Custom App.
-
Ensure that the Authentication Method is selected as OAuth 2.0 with JWT (Server Authentication).
-
Name the app appropriately, typically Netwrix Data Classification.
-
Select View Your App on the confirmation screen.
-
Open the Configuration window by clicking the related item on the left.
Navigate to Application Access and make sure that level is set to Enterprise. Click Save changes.
-
Navigate to Advanced Features and turn ON both switches: Perform Actions as User and Create User Access Token.
-
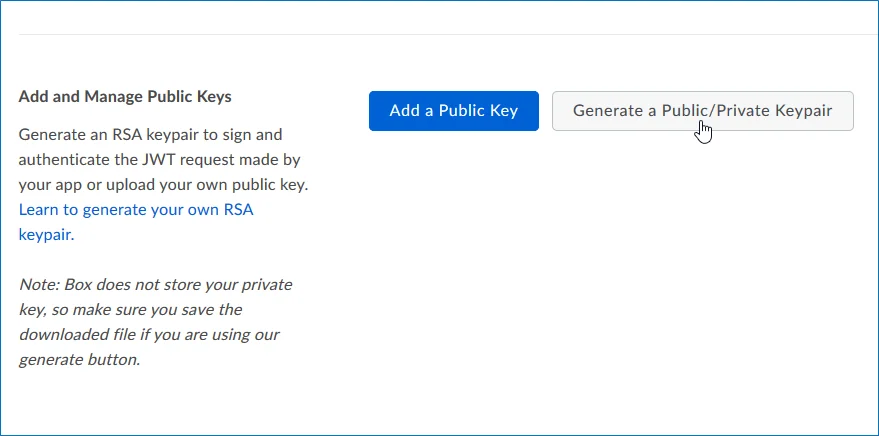
Then you should create a public/private key pair to authenticate the JWT requests made by your app. Navigate to Add and Manage Public Keys and select Generate a Public/Private Keypair.
NOTE: If you have not enabled two-factor authentication for the app account in advance, you will be prompted to do it. Click Settings, then in the Account Settings, navigate to Authentication. Select Require 2-step verification to protect your account, then provide the necessary information in the Enable Login Verification dialog and complete the verification. When finished, get back to the Configuration section, clicking the related item in the left pane.
-
You will be notified about downloading a JSON file with all configuration settings of your app.
IMPORTANT! Since Box does not store any private keys, this file contains the only copy of your private key, so store it securely.
Step 2. Authorize the App
- Go to the General section by clicking the item in the left pane.
- Navigate to App Authorization and click Submit for Authorization. In the dialog displayed, review the settings.
NOTE: If you are a Box administrator, copy the Client ID and store it to a safe location.
- Click Submit to send a request to Box administrator.
IMPORTANT! If any changes are made to the app configuration later, you will need to re-authorise the app.
If you are a Box administrator, you will receive an email with submitted request. Authorize it, as decribed in Box documentation. For instance, you can take these steps:
- Navigate to box.com and open the Admin Console.
- Click Apps on the left.
- Navigate to Custom Apps and select Authorise New App:
- Enter the Client ID of the app you received (the API Key in email).
- Click Authorize.
See also:
Box documentation at https://developer.box.com/guides/authentication/#section-advanced-features
Configure G Suite and Google Drive for Crawling
Netwrix Data Classification can crawl both: Personal Google Drives and G Suite domains. Netwrix Data Classification for Google Drive uses the OAuth 2.0 protocol to authenticate to your G Suite domain. You will need to create a service account and authorize it to access data in individual and shared Drives on behalf of users using the Google Drive API. Depending on your drive type, do the following:
Сonfiguring G Suite for Crawling
In Google Cloud Platform web console:
- Create a new project
- Select Application type
- Create a new service account
- Create a service account key (JSON, save a copy for the data source configuration)
- Enable G Suite domain-wide delegation for the service account (write down the Client ID)
- Enable Google Drive API
In G Suite Admin Console:
- Authorize service account to access the Google Drive API
To configure G Suite for crawling
IMPORTANT! Google administrative interfaces tend to change over time, so refer to the following guide for up-to-data instructions on creating OAuth 2.0 service accounts: Using OAuth 2.0 for Server to Server Applications.
Review the following for additional information:
| To... | Do... |
|---|---|
| Create a new project | 1. Navigate to https://console.developers.google.com (Google Cloud Platform web console) while logged in as a G-Suite administrator within the domain to be crawled (if the user is not added within the correct domain then the correct data will not be identified). 2. Create a new project. |
| Select Application type | 1. Once a new project has been created, navigate to APIs&Services → OAuth consent screen. 2. Set User type to "Internal". 3. Provide the name for new application. 4. Click Save. |
| Create a new service account | 1. In Google Cloud Platform web console, navigate to Credentials and click Create Credentials. 2. Then, click Service account. 3. Create service account as described in Google official article. 4. On the Grant this service account access to project (optional) step, do not select any roles. 5. On the Grant users access to this service account (optional) step, do not grant any user access. Click Done. |
| Create a service account key | 1. On the Service accounts section, click edit on the account you want to create a key for. 2. Click <Service account name> dialog, select JSON format, and download the file to a known location as it will be required later. NOTE: Your new public / private keypair is generated and downloaded to your machine; it serves as the only copy of this key. You are responsible for storing it securely. If you lose this keypair, you will need to generate a new one. |
| Delegate domain-wide authority to the service account | 1. On the Service accounts section, select your service account and click Edit. 2. Click the Show Domain-Wide Delegation link and tick the Enable G Suite Domain-wide Delegation checkbox. 3. Click Save. 4. Once completed, review the "Domain wide delegation" column for this account and make sure that the delegation enabled. 5. Click the View Client ID link. 6. Copy your Client ID, you will need it later. |
| Enable Google Drive API | 1. In Google Cloud Platform web console, navigate to the API Dashboard and select Enable APIs and Services (if APIs have not previously been enabled). 2. Search for Google Drive API and click Enable (or Manage). 3. Search for Admin SDK API and click Enable (or Manage). 4. Switch to G Suite Admin Console. 5. Navigate to Security → API Controls → Manage Domain-wide Delegation within the Google admin portal. 6. Set the client name to the Client ID you copied on the previous step. 7. Set the API scopes and select Authorize: - https://www.googleapis.com/auth/drive - https://www.googleapis.com/auth/admin.directory.user |
Configuring Personal Google Drive for Crawling
In Google Cloud Platform web console:
- Create a new project
- Select Application type
- Create a new service account
- Create a service account key (JSON, save a copy for the data source configuration)
- Enable Google Drive API
In your Google Drive:
- Allow sharing for your files and folders
Review the following for additional information:
| To... | Do... |
|---|---|
| Create a new project | 1. Navigate to https://console.developers.google.com Google Cloud Platform web console) while logged in as a G-Suite administrator within the domain to be crawled (if the user is not added within the correct domain then the correct data will not be identified). 2. Create a new project. |
| Select Application type | 1. Once a new project has been created, navigate to APIs&Services → OAuth consent screen. 2. Set User type to "Internal". 3. Provide the name for new application. 4. Click Save. |
| Create a new service account | 1. In Google Cloud Platform web console, navigate to IAM & Admin→Service Accounts. 2. Create service account as described in Google official article. 3. On the Grant this service account access to project (optional) step, do not select any roles. 4. On the Grant users access to this service account (optional) step, do not grant any user access. Click Done. |
| Create a service account key | 1. On the Service accounts page, select the account you want to create a key for. 2. Click <Service account name> dialog, select JSON format, and download the file to a known location as it will be required later. NOTE: Your new public/private keypair is generated and downloaded to your machine; it serves as the only copy of this key. You are responsible for storing it securely. If you lose this keypair, you will need to generate a new one. |
| Enable Google Drive API | 1. In Google Cloud Platform web console, navigate to the API Dashboard and select Enable APIs and Services (if APIs have not previously been enabled). 2. Search for Google Drive API and click Enable (or Manage). |
| Allow sharing for your files and folders | 1. Navigate to each Google Drive account that you wish to crawl 2. Right click each file / folder you wish to crawl and select Share… 3. Enter email address of the service account you created on the Create a new service account step. To view email address, do the following: - In Google API console, navigate to IAM & Admin → Service Accounts. - Select your service account and click Edit. - Review email address in the Email field. 4. If you wish to write classifications or apply workflows, ensure that Can organize, add, &edit option is selected (expand the menu to the right of People field). |