Microsoft Entra ID Identity Store
Once you have registered GroupID and created a user with required directory role in Microsoft Entra ID, you can now create an Microsoft Entra ID identity store in GroupID. This topic walks you through the steps to create an Microsoft Entra ID identity store and assign a role to the Microsoft Entra ID user in GroupID.
To create an Microsoft Entra ID Identity Store
See the Create an Identity Store for Microsoft Entra ID topic for creating an Microsoft Entra ID identity store.
NOTE: If you intend to use a service account user with Global Administrator directory role, then no change is required in the default GroupID security roles settings of Microsoft Entra ID identity store. And if you intend to use a service account user with any role, other than Global administrator directory role (i.e. User Administrator + Exchange Administrator), then the GroupID Administrator security role criteria group must be changed to User Account Administrator.
GroupID Security Role Setting
If you want to use a service account user with a role other than Global administrator role for Microsoft Entra ID identity store, you have to assign it User Account Administrator role in GroupID.
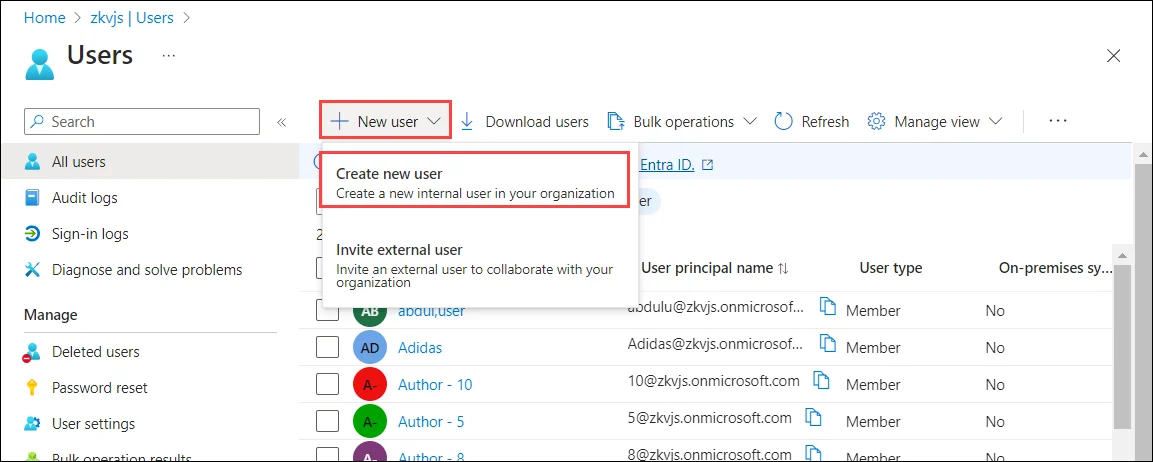
- In Admin Center, click Identity Stores in the left pane.
- On the Identity Stores page, click the ellipsis button for Microsoft Entra ID identity store and select Edit.
- Click Security Roles under Settings in the left pane.
- On the Security Roles page, click Edit for the administrator security role.
- On the Edit Security Role page, the Criteria area displays the role criteria. Click Add Criteria to change it. On the Add Criteria dialog box, delete the existing criteria and search for User account administrator. Click Save.
- Click Update Security Role.
- On the Security Roles page, click Save.
Limitations of Minimum Service Account Permissions
If you are using a service account with minimum directory role assignments, the following limitations apply:
-
Only the User role can be assigned to newly created users and mailboxes objects from GroupID. The same applies to existing users and mailboxes, as Directory Roles cannot be changed, using a service account with minimum directory role assignments.
-
The password reset functionality would be limited to objects falling in the User role, User Administrator role, and Helpdesk role.
See Also
Configure in Microsoft Entra ID
In GroupID, you can create an identity store for an identity provider and perform different functions in that provider using its identity store. These functions include group management tasks, such as creating groups, scheduling group updates, and expiring groups; user management tasks, such as creating users and mailboxes, managing users’ profiles, and more.
GroupID supports multiple identity providers for creating an identity store, including Microsoft Entra ID, formerly Azure Active Directory. This section provides information that will help configure GroupID in Microsoft Entra ID.
See Also
Microsoft Entra ID Permissions
While using a Microsoft Entra ID identity store with GroupID, the user must have certain role assignments and application permissions on the registered app in Microsoft Entra ID.
This topic lists those roles and permissions GroupID needs to perform operations in a Microsoft Entra ID provider.
See the License GroupID topic for additional information on GroupID licensing.
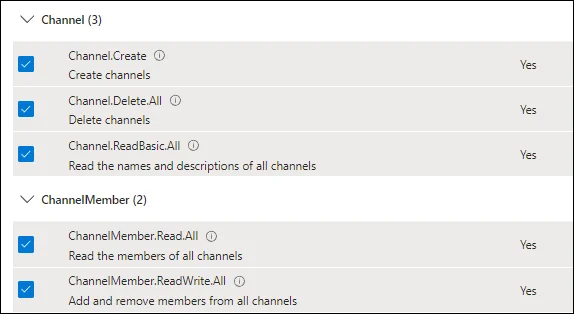
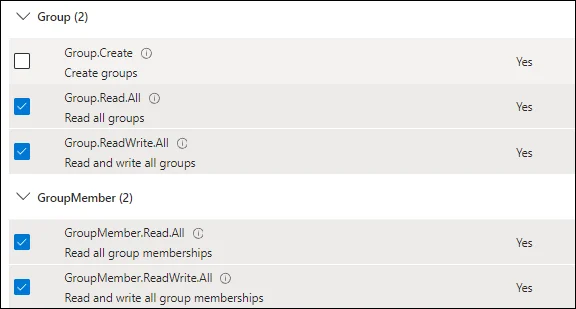
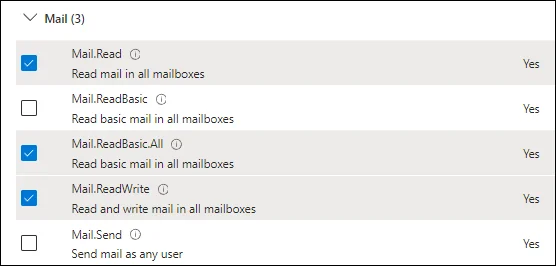
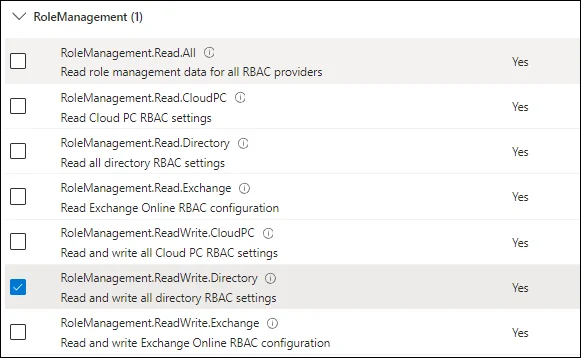
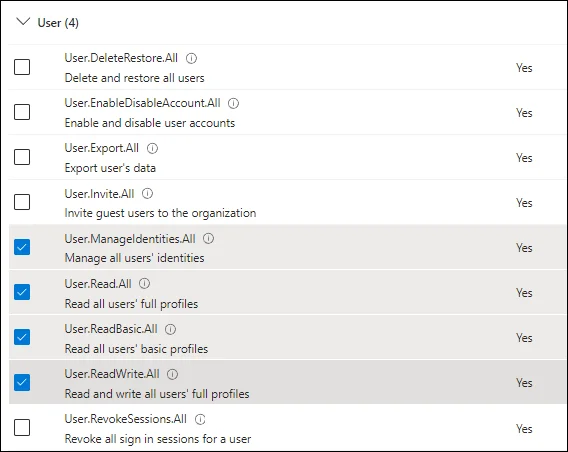
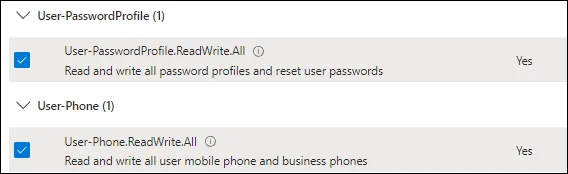
Graph API Application Permissions
The following application permissions are required.

Office 365 Exchange Online Permissions

SharePoint Delegated Permissions

Registration and Permissions Assignment
This section discusses the GroupID application registration and permission assignment procedure.
-
Login to Microsoft Entra Admin Center (https://portal.azure.com/) with a user that is part of the “Global Administrator” role or any role that has rights to register an app, such as the “Application administrator” role. This is required in order to give consent to certain permissions in the application.
-
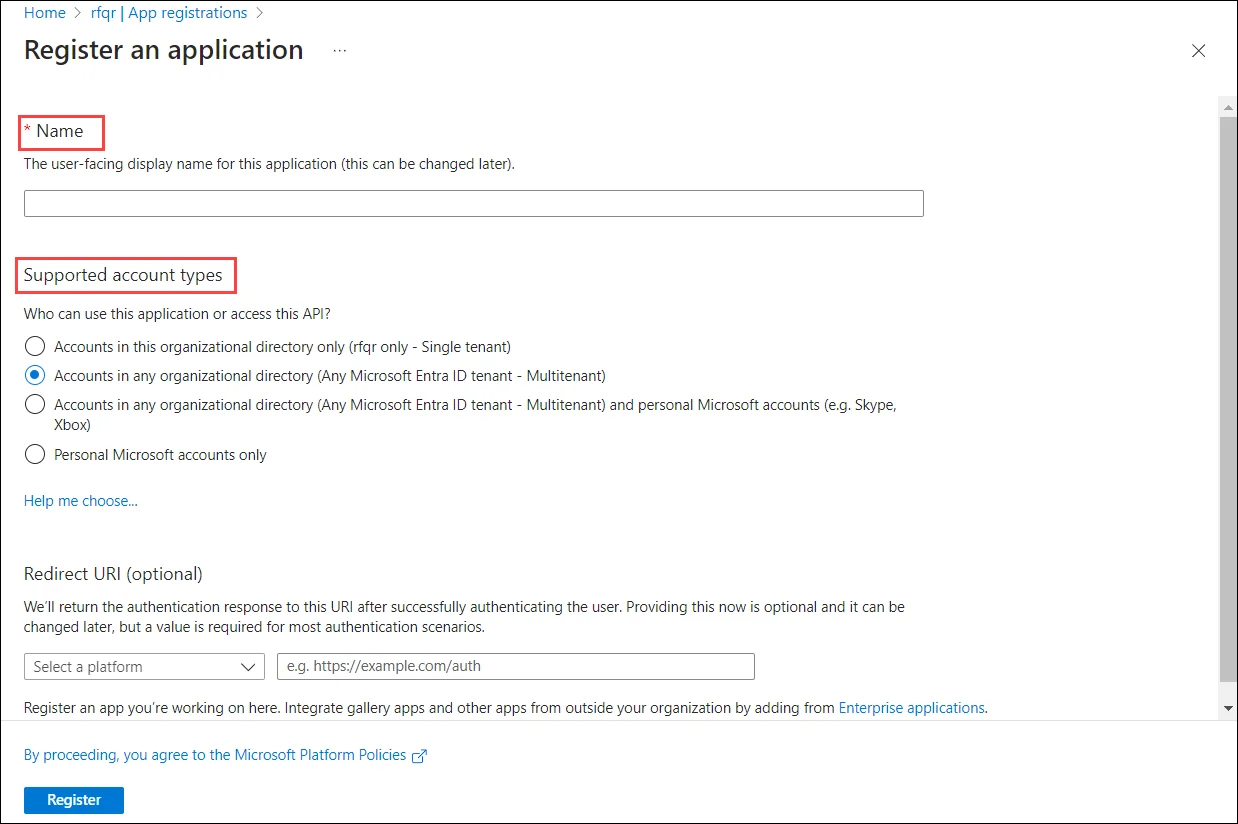
In the Microsoft Entra Admin Center, go to Microsoft Entra ID > App registration and click New registration.

-
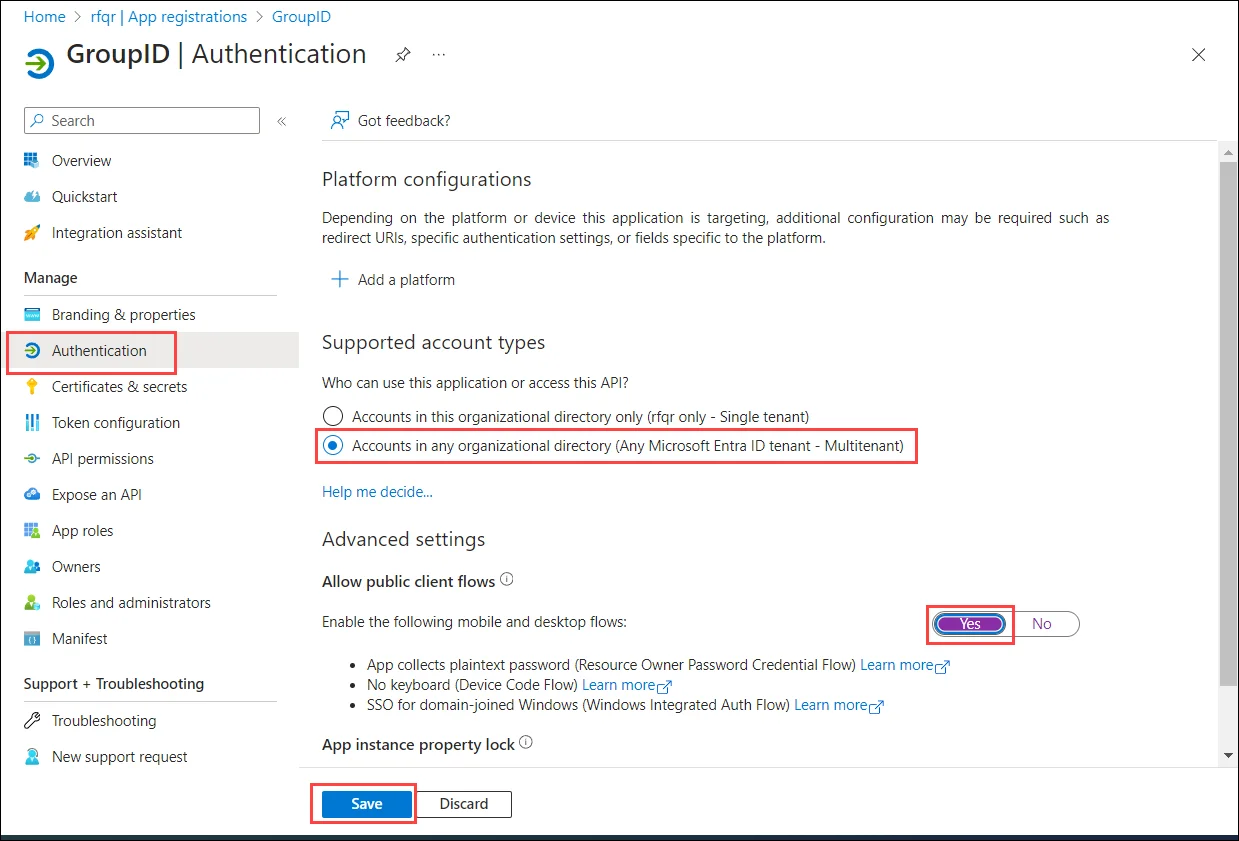
On the Register an application page, specify a name for the app. Select Supported account types as Accounts in any organizational directory (Any Microsoft Entra ID – Multitenant). Leave the Redirect URI as is and click Register.
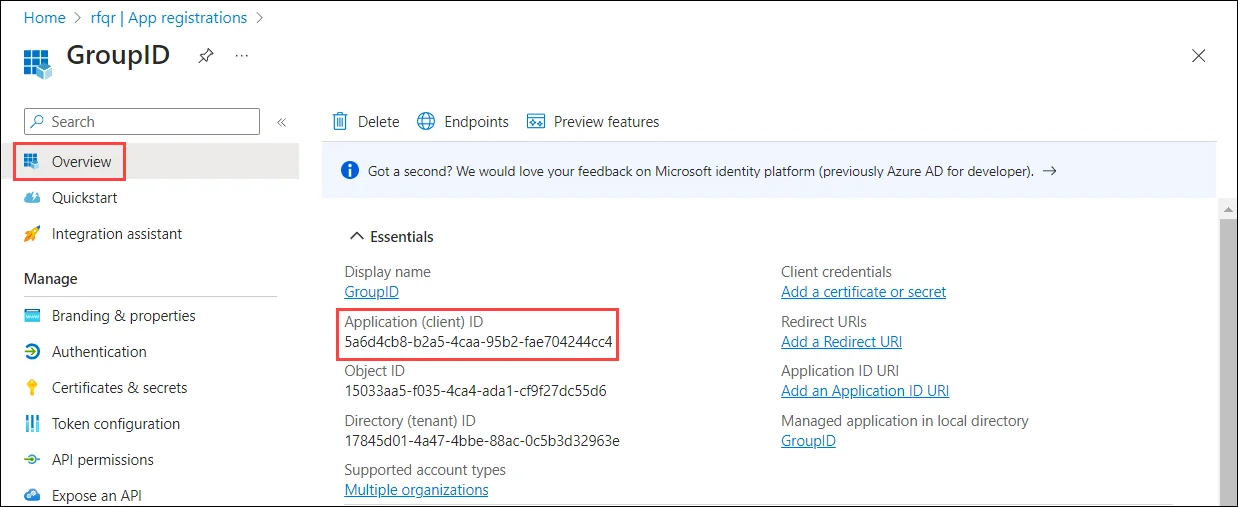
-
The Overview page is displayed. Copy the Application (client) ID and keep it safe.
-
Go to the Authentication node and set it as follows:
-
Click Save.
-
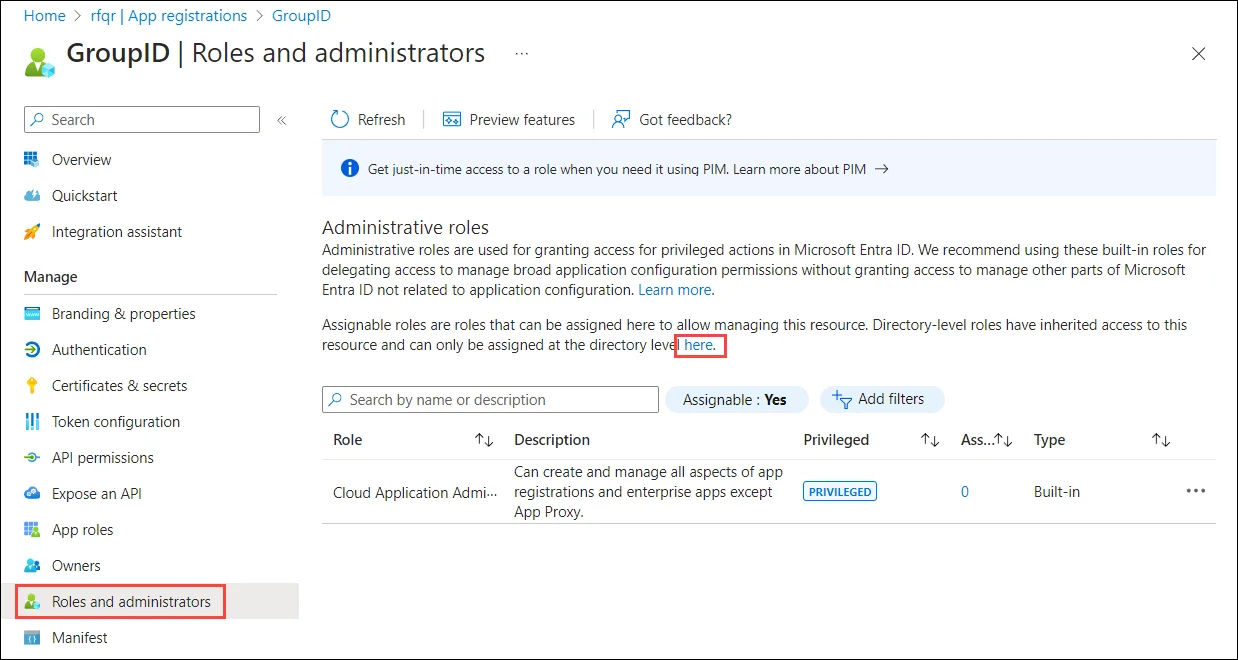
Click Roles and administrators node.
-
On the All roles page, add your registered application to a directory role.
-
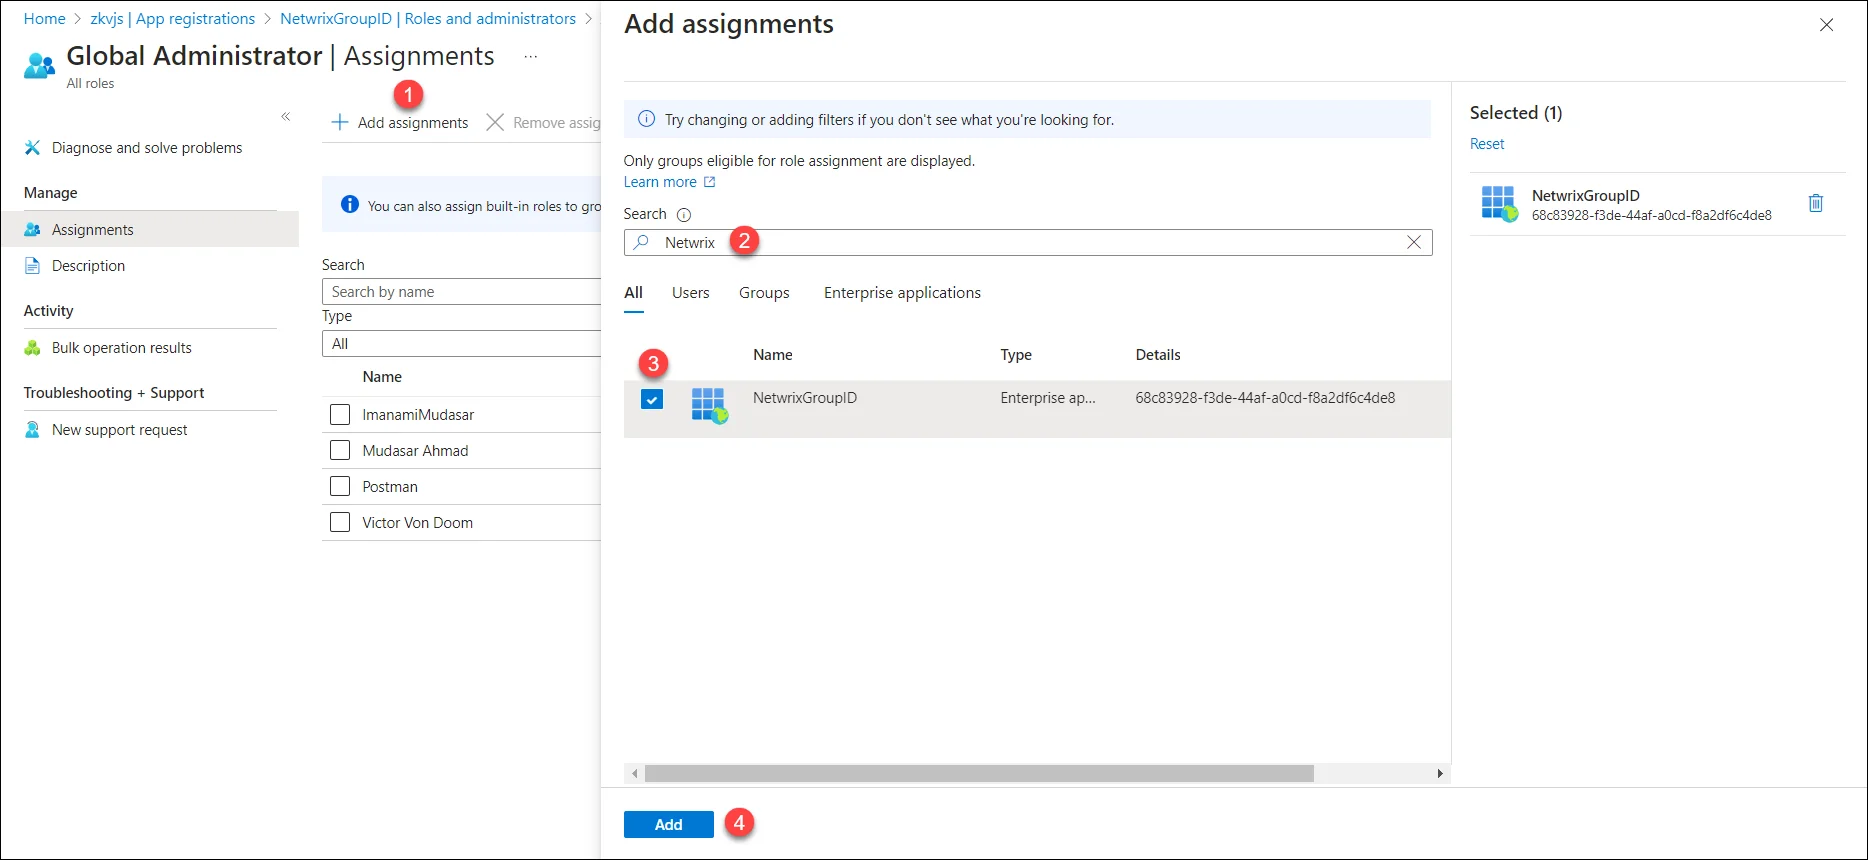
Global administrator: For Global administrator, type global to filter out the Global administrator role. Click Global administrator.

Click Add assignments. On the Add assignment page, search your application and select it. Click the Add button. The application will be listed on the Assignments page.
-
For any role other than Global administrator, add the registered application to the following two directory roles:
-
Exchange administrators: can manage all aspects of the Exchange product
-
User administrators: (User Account Administrator) can manage all aspects of users and groups, including resetting passwords for limited administrators.
For example, this role does not allow deleting a global administrator. User Account Administrators can change passwords for users, Helpdesk administrators, and other User Account Administrators only.
NOTE: By default, the GroupID Administrator security role in a Microsoft Entra IDidentity store binds to Global Administrator. If minimum role assignment for the service account is used, the default Admin Security role criteria should also be changed to the User Account Administrators group.
-
-
-
Click Add.
-
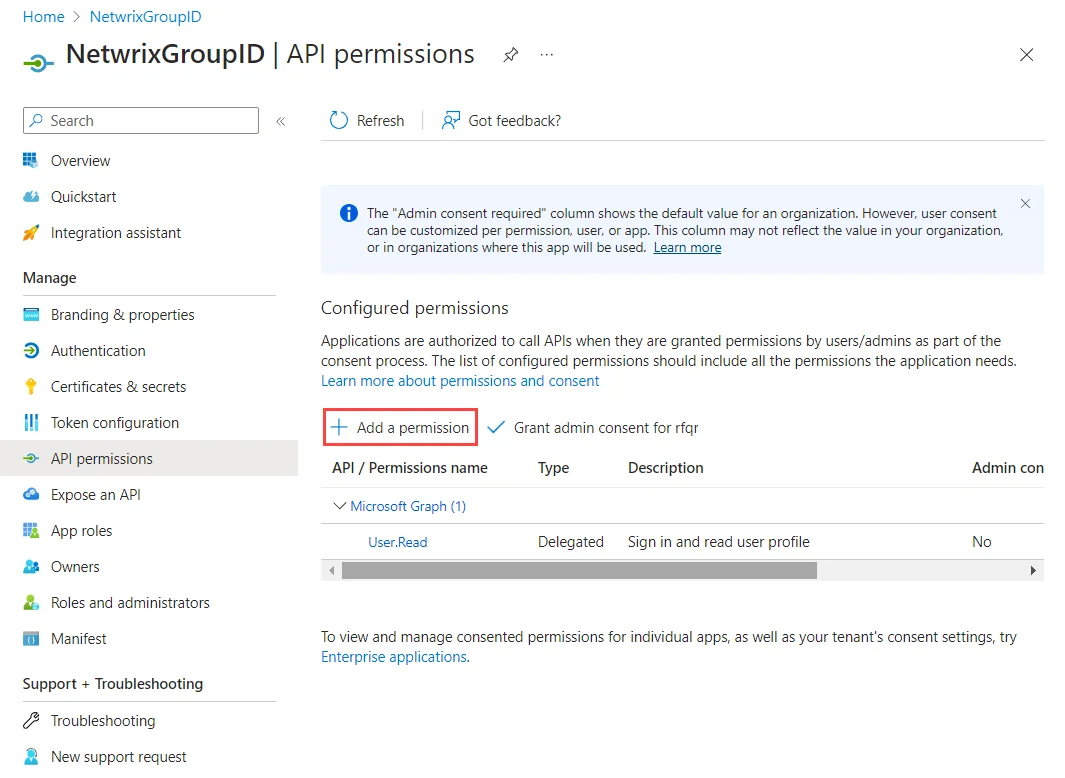
Go to the API permissions node and select Add a permission.
-
The Request API permissions page opens. Click the Microsoft Graph API tab.
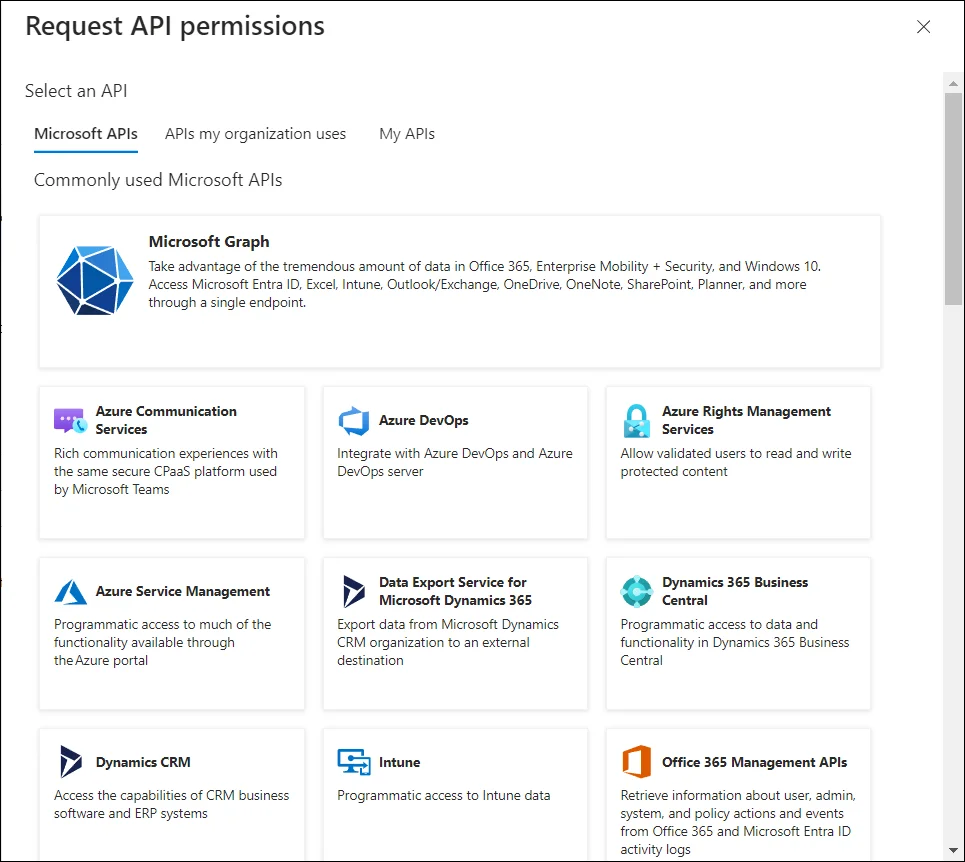
-
Click the Application permissions tab:
Permissions get listed on the page. See the Microsoft Entra ID Permissions topic for the mandatory permissions that are required for creating the desired directory object.
-
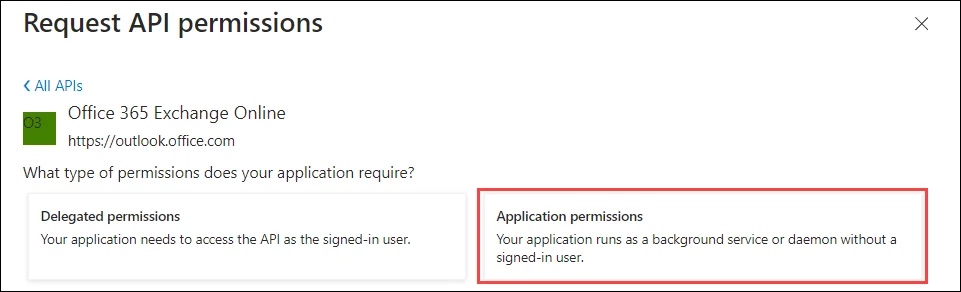
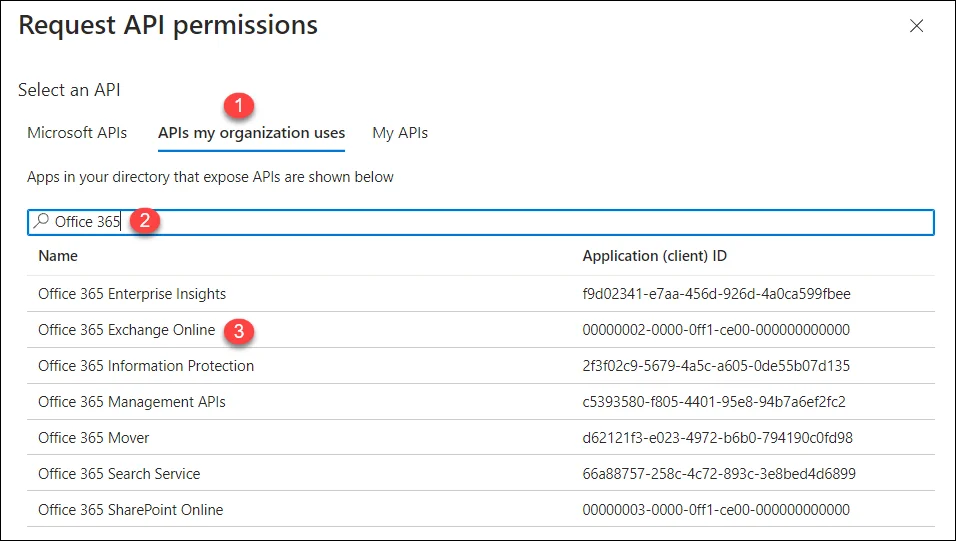
[Optional] To add a permission from Office 365 Exchange Online API, click the Add a permission button (before the Grant admin consent for
<username>button in the snapshot given in point # 14.Follow the steps shown on the following snapshot:
-
[Optional] To access the SharePoint API for Entitlement management, click the Add a permission button (before the Grant admin consent for
<username>button in the snapshot given in point # 14). Select the SharePoint API:
-
Select the Delegated permissions tab:
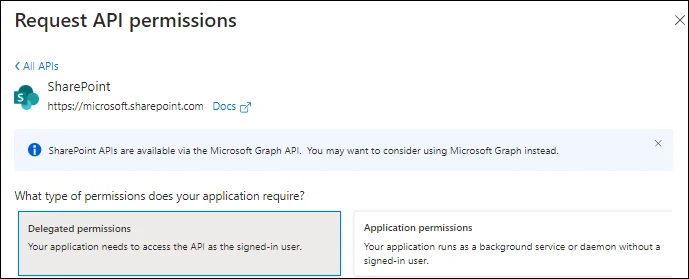
See SharePoint Delegated Permissions section of the Microsoft Entra ID Permissions topic for the required permission name.
This completes the registration process of GroupID in Microsoft Entra ID.
See Also
Microsoft Entra ID User
Once your application has been registered with Microsoft Entra ID, formerly Azure Active Directory, create a user that will be set as a service account while creating an identity store for in Microsoft Entra ID GroupID.
To create a user in Microsoft Entra ID:
-
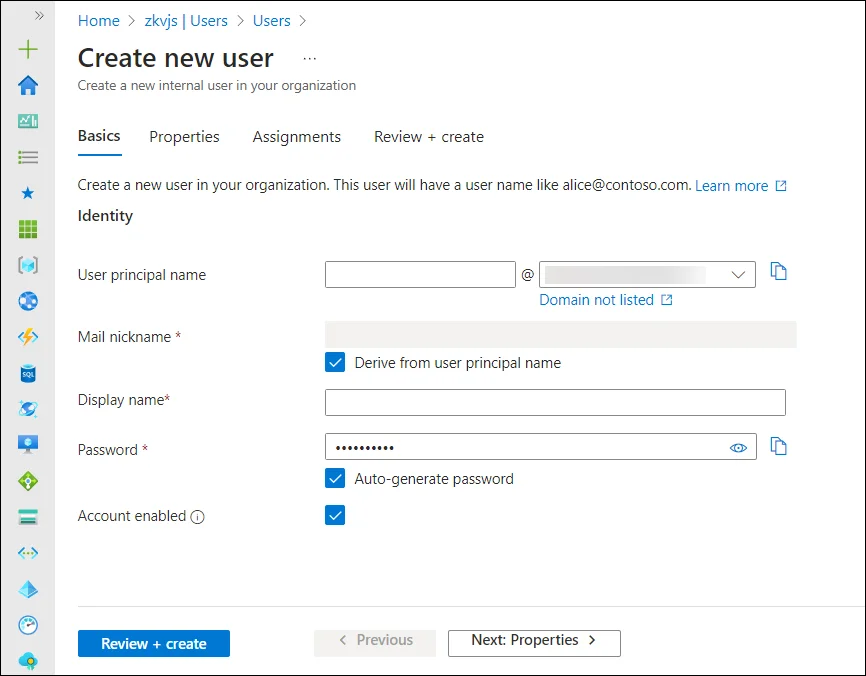
In the Microsoft Entra Admin Center, go to Microsoft Entra ID> Users and click New User > Create new user.
-
On the User page:
-
The Basics tab contains the core fields required to create a new user.
- User principal name: Enter a unique username and select a domain from the menu after the @ symbol. Select Domain not listed if you need to create a new domain. For more information, see Add your custom domain name.
- Mail nickname: If you need to enter an email nickname that is different from the user principal name you entered, uncheck the Derive from user principal name option, then enter the mail nickname.
- Display name: Enter the user's name.
- Password: Provide a password for the user to use during their initial sign-in. Uncheck the Auto-generate password option to enter a different password.
- Account enabled: This option is checked by default. Uncheck to prevent the new user from being able to sign-in. You can change this setting after the user is created.
Either select the Review + create button to create the new user or Next: Properties to complete the next section.
-
The Properties tab has some categories of user properties you can provide. These properties can be added or updated after the user is created. The properties are:
- Identity: Enter the user's first and last name. Set the User type as either Member or Guest.
- Job information: Add any job-related information, such as the user's job title, department, or manager.
- Contact information: Add any relevant contact information for the user.
- Settings: Specify the user's global location.
Either select the Review + create button to create the new user or Next: Assignments to complete the next section.
-
The Assignments tab. You can assign the user:
- an administrative unit
- group(s), select a group if you want to add the user to one or more existing groups
- role(s), assign the user a Global administrator role
Members of this role can create/manage groups, create/manage groups settings like naming and expiration policies, and view groups activity and audit reports.
Select the Review + create button.
By default, the GroupID Administrator security role in a Microsoft Entra ID identity store binds to Global Administrator. If minimum role assignment for the service account is used, the default Admin Security role criteria should also be changed to the User Account Administrators group.
-
The user is created and added to your Microsoft Entra ID tenant.
You can now create an identity store for Microsoft Entra ID GroupID.
Make sure you copy the application ID which is generated by Microsoft Entra ID when the application is registered. This application ID will be required while creating an identity store for Microsoft Entra ID.
See Also
Certificate for Modern Authentication
While configuring GroupID application in Microsoft Entra ID you must provide a certificate. You can generate this certificate using GroupID PowerShell or any other third-party application.
To generate a certificate using GroupID PowerShell:
-
Login to GroupID server and run GroupID PowerShell as an administrator.
-
Run the following command:
   $mycert = New-SelfSignedCertificate -DnsName "contoso.org" -CertStoreLocation "cert:\LocalMachine\My" -NotAfter (Get-Date).AddYears(1) -KeySpec KeyExchange
   $mycert | Export-Certificate -FilePath c:\mycert.cer
The generated certificate will be saved at the root level of Drive C:.
In Microsoft Entra Admin Center portal, while configuring the GroupID application, upload this certificate using the Certificate & secrets node.
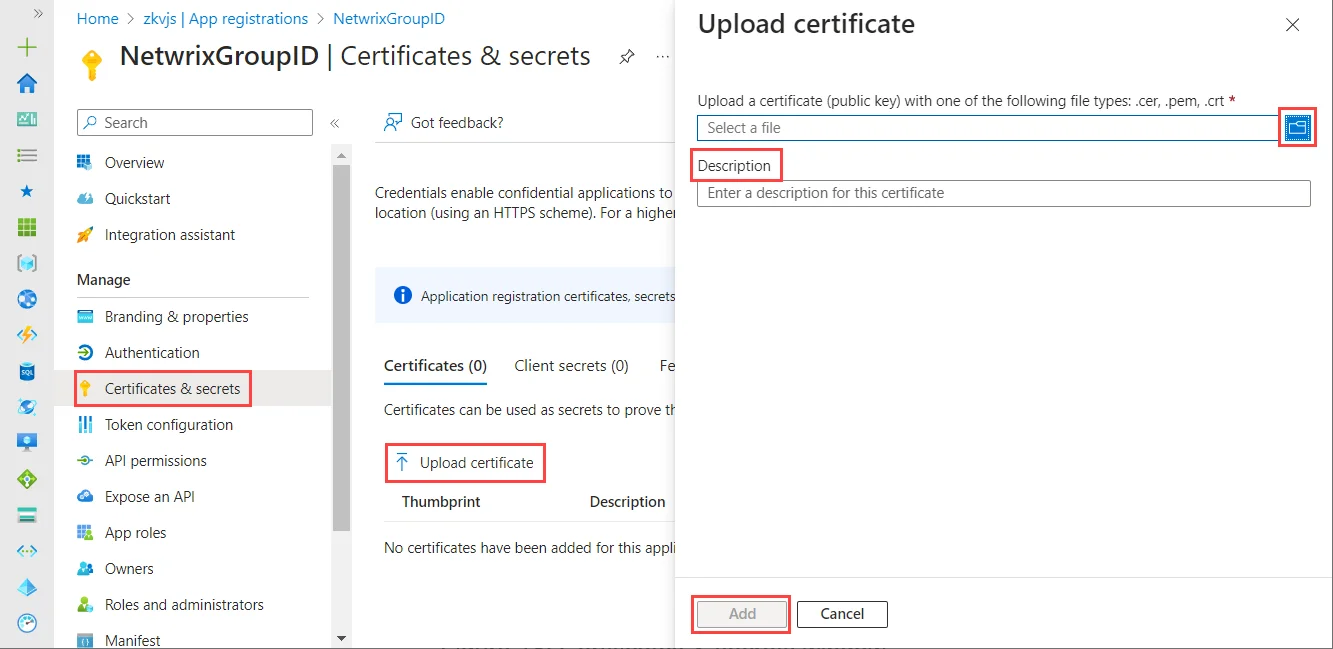
On the Upload certificate page:
- Click browse to select the generated certificate, mycert.cer, from Drive C.
- Provide a brief description for the certificate in the Description box.
- Click Add.
-
After uploading the certificate successfully, Certificate Thumbprint is displayed. Copy it and keep it safe.
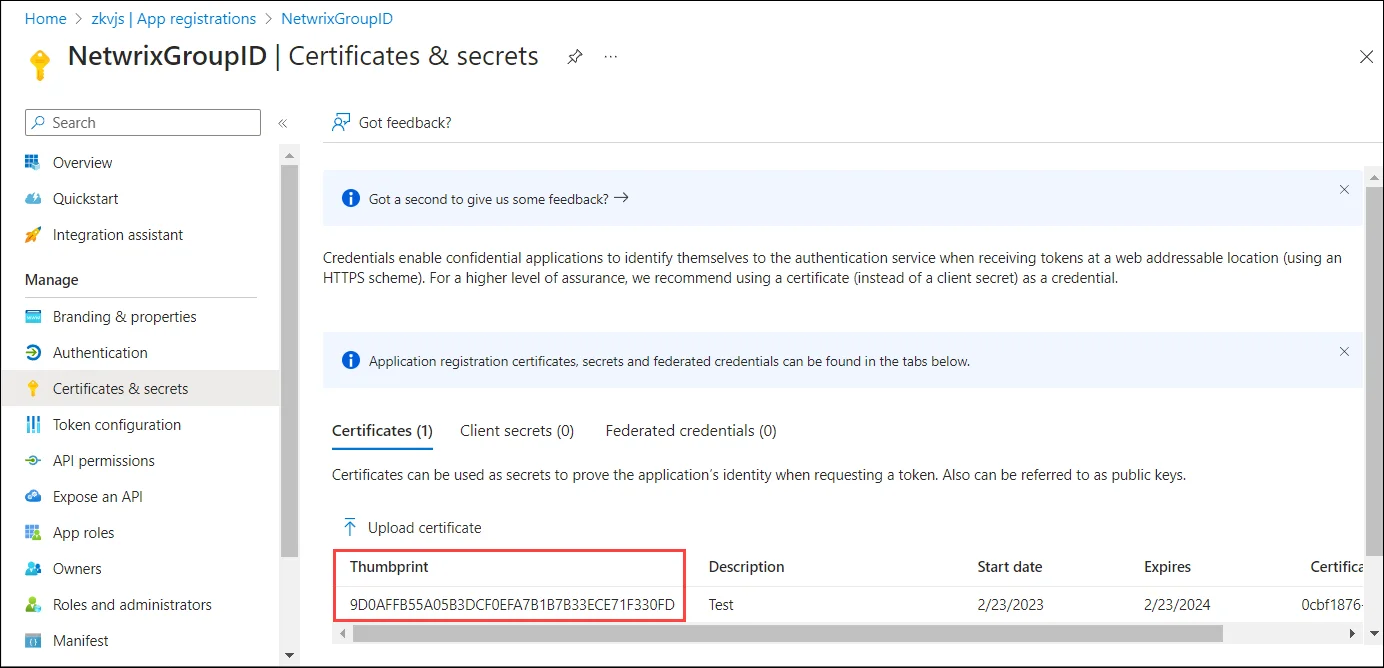
The certificate Thumbprint will be used:
- While creating a Microsoft Entra ID identity store (on the Identity Store Details page of new identity store creation wizard).
- On the Messaging System page in identity store properties when Exchange Online/Office 365 is set as a messaging provider.
- In Synchronize, in a Synchronize job, when you select AD as destination, and Office 365 as a messaging provider on the Sync Object page, you must provide the certificate Thumbprint.
Verify Modern Authentication
You can test Modern Authentication from GroupID Powershell in your tenant. First, verify that Exchange Online module is installed on your GroupID server using the following cmdlet:
Get-InstallModule -name exchangeonlinemanagement
Connect to Exchange Online using the cmdlet shown below and fetch some data:
NOTE: For that you need Certificate Thumbprint and Application ID of the registered app.
Connect-ExchangeOnline -certificateThumbprint Thumbprint -AppId App ID -organization organization name
To disconnect the Exchange Online session, use the following cmdlet:
Disconnect-ExchangeOnline
After this verification process, you can use the certificate Thumbprint in GroupID.
See Also
Register in Microsoft Entra ID
To use Microsoft Entra ID, formerly Azure Active Directory, identity provider, GroupID must first be registered in Microsoft Entra Admin Center portal. The registration grants GroupID access to a particular Microsoft Entra ID Directory and its data, such as Microsoft Entra ID groups and users.
GroupID requires:
-
An application registered for GroupID in Microsoft Entra ID (with the Microsoft Graph API and Exchange API permissions).
-
A Microsoft Entra ID Directory Role for the service account for the Microsoft Entra ID identity store.
NOTE: See the All Role section for User Administrator and Exchange Administrator role permissions in Microsoft Entra built-in roles.
See Also