Admin Center
Admin Center enables administrators to configure settings that are used by different functions of the application and manage GroupID clients.
When multiple instances of GroupID are deployed, a separate Admin Center application is created for each instance in native IIS.
What do you want to do?
- View Admin Center Hosting Details
- Launch Admin Center
- Change the Application Display Name
- View Deployment Settings
- Configure Event Logging
View Admin Center Hosting Details
-
In Admin Center, click Applications in the left pane.
-
On the Applications page, click the Admin Center tab.
The tab displays Admin Center hosted in native IIS. When multiple GroupID instances have been deployed, you will find multiple Admin Center cards on this tab page, each card representing a separate instance. See the Elasticsearch Clusters, Nodes, and GroupID topic.
For details displayed on an Admin Center card, see the table in the View Data Service Details topic.You cannot create an Admin Center application or delete an existing one from Admin Center.
Launch Admin Center
- In Admin Center, click Applications in the left pane.
- On the Admin Center tab, click Launch Application on an Admin Center card.
Provide the Admin Center URL to admin and helpdesk users so they can access it. You can either copy the URL from the address bar or from Admin Center deployment settings. See the See the View the Launch URL for a Service topic.
Change the Application Display Name
To change the display name of the Admin Center application, see the Change a Service’s Display Name topic. Replace references to the service with Admin Center.
View Deployment Settings
You can view deployment settings for Admin Center, such as the IIS site that hosts it, the IIS Application name given to it, and the URL to launch it.
To view deployment settings:
- In Admin Center, click Applications in the left pane.
- On the Admin Center tab, click the ellipsis button on an Admin Center card and select Settings.
- Click Deployments under Server Settings. The Deployment Settings page is displayed, where you can view Admin Center deployment details in native IIS.
Configure Event Logging
To configure file logging and Windows logging for Admin Center, see the Specify Log Settings for a Service topic.
See Also
Create a Data Service
You can create a Data service in native IIS, remote IIS, and Docker.
What do you want to do?
- Create a Data Service in Native IIS
- Create a Data Service in Remote IIS
- Create a Data Service in Docker
Create a Data Service in Native IIS
When you deploy a Data service in native IIS, GroupID does the following:
- It creates a directory with the Data service’s name at the following physical path on the GroupID
server, and copies the service files from its template directory to the new service directory:
X:\Program Files\Imanami\GroupID 11.0\GroupIDDataService\Inetpub\
(X represents the GroupID installation drive) - It also creates a virtual directory for the service in your desired IIS site.
The Data service runs within a virtual directory in IIS while the service files are physically located on disk.
To create a Data service:
-
In Admin Center, click Applications in the left pane.
-
Click Add Application.
-
On the next page, select Data Service and click Next step.
-
On the Create GroupID Application page, make sure the IIS tile is selected.
-
In the Application Name box, enter a unique name for the service or use the default name. The service is displayed with this name in GroupID.
-
In the Deployment Name box, enter a deployment name for the service.
The application name and deployment name are displayed on the service card. It is as:
-
In the IIS Application Name box, enter an IIS deployment name for the service. The name should be unique for each Data service deployed in IIS.
The IIS application name is used to name the service’s directory in IIS and its physical directory under X:\Program Files\Imanami\GroupID 11.0\GroupIDDataService\Inetpub\ on the GroupID server.
(X represents the GroupID installation drive) -
In the IIS Site drop-down list, select a website to host the service files.
The list displays the websites defined on the local IIS server. GroupIDSite11 is the default selection. -
In the Service Endpoints area, bind an Elasticsearch service, Replication service, and Scheduler service with the Data service.
- In the Elasticsearch Service drop-down list, select an Elasticsearch service to bind to
this Data service.
The list displays the Elasticsearch services running in the environment. Requests sent to the Data service for performing a search in the Elasticsearch repository will be carried out through the Elasticsearch service you select here. - On selecting an Elasticsearch service, the Replication Service drop-down list displays
the Replication services running on the same machine as the Elasticsearch service. Select a
Replication service to bind to this Data service.
When a user force runs the replication service (whether globally or for a specific identity store), a request is sent to the Data service, that is then passed on to the Replication service bound to that Data service. - In the Scheduler Service drop-down list, select a scheduler service to bind to this Data
service. The number of services displayed in the list depend on the number of GroupID
clusters, as each cluster has its own Scheduler service.
This Data service will send requests to the selected Schedular service to trigger schedule runs.
- In the Elasticsearch Service drop-down list, select an Elasticsearch service to bind to
this Data service.
-
Click Create Application.
The Data service is created and displayed on the Data Service tab.
Create a Data Service in Remote IIS
You can deploy a Data service within a site in remote IIS. For this, you need to connect with the Microsoft IIS Administration API running on the remote IIS machine.
When you create a Data service in remote IIS, GroupID does the following:
- It creates a virtual directory for the service in a preconfigured site in remote IIS.
- It creates a physical directory for the service in the folder that is mapped to this preconfigured site.
The Data service runs within a virtual directory in remote IIS while the service files are physically located on disk.
To learn about the remote IIS settings and configurations before deploying a service there, see the Prerequisites for Deployments in Remote IIS topic.
To create a Data service:
- In Admin Center, click Applications in the left pane.
- Click Add Application.
- On the next page, select Data Service and click Next step.
- On the Create GroupID Application page, select the Remote IIS tile.
- In the Application Name box, enter a unique name for the Data service or use the default name. The Data service is displayed in GroupID with this name.
- In the Deployment Name box, enter a deployment name for the service. The application name and deployment name are displayed on the service card.
- To enter information for API URL, Access Token, Username, Password, IIS Application Name, and Website, refer to steps 7-11 in the Create a Portal in Remote IIS topic. Replace any reference to the portal with the Data service.
- For entering information in the Service Endpoints area, follow steps 9 in the Create a Data Service in Native IIS topic.
- Click Create Application.
The new Data service is displayed on the Data Service tab.
Create a Data Service in Docker
GroupID enables you to deploy a Data service in Docker. For this, you need to connect with the API running on a Docker deamon in your environment, so that GroupID can create a container for the service there and run the service from within that container.
For an overview on application deployment in Docker, see the Prerequisites for Deployments in Docker topic.
NOTE: To host the Data service, Docker daemon should be configured to run Windows containers.
To create a Data service:
- In Admin Center, click Applications in the left pane.
- Click Add Application.
- On the next page, select Data Service and click Next step.
- On the Create GroupID Application page, select the Docker tile.
- In the Application Name box, enter a unique name for the Data service or use the default name. The Data service is displayed in GroupID with this name.
- In the Deployment Name box, enter a deployment name for the service. The application name and deployment name are displayed on the service card.
- To enter information for Port, Service URL, and Container Name, refer to steps 7-9 in the Create a Portal in Docker topic. Replace any reference to the portal with the Data service.
- For entering information in the Service Endpoints area, follow step 9 in the Create a Data Service in Native IIS topic.
- Click Create Application.
The Data service is created and displayed on the Data Service tab.
See Also
Manage Data Service Settings
Data services in GroupID are displayed on the Data Service tab. A card for a service displays information such as its name and status.
You can manage several settings for a service, such as:
- Change the display name of a service
- Start or stop a service
- Configure file logging for a service
- Delete a service
What do you want to do?
- View Data Service Details
- Change a Service’s Display Name
- Start or Stop a Service
- View the Launch URL for a Service
- View the Deployment Settings for a Service
- Specify Log Settings for a Service
- Delete a Data Service
View Data Service Details
-
In Admin Center, click Applications in the left pane.
-
On the Applications page, click the Data Service tab. The Data Service tab page is displayed, that lists the default Data service created while configuring GroupID and any other Data service that you have created.
When multiple GroupID instances have been deployed, you will find multiple default Data services on this tab page, as each instance has its own default Data service. See the Elasticsearch Clusters, Nodes, and GroupID topic. -
The card for a Data service displays the following information:
Info Description Name The name given to the service. For a Mobile service, the identity stores associated with the service are also displayed. Deployment Instances Displays the deployment name of the service and the web server where it is deployed. For a Mobile service, this area may display multiple deployment instance(s) of a service. Each instance is represented by a tile that shows the deployment name of the instance and the target web server. Status A service has one of the following statuses: - Running: Indicates that the service is up and running. - Stopped: Indicates that GroupID is unable to communicate with the service. To troubleshoot, go to the web server where the service is deployed (IIS, remote IIS, or Docker) and make sure the service is running. - Error: Any issue other than stopped is categorized as error. Contact your system administrator to resolve it. Launch Application Click it to launch the service page. - For a Data service, Replication service, Email service, and Scheduler service, a page is displayed that simply shows the status of the service as running, stopped, or error. - For a Security service, the GroupID Applications page is displayed. Performing an action on this page will be carried out through the respective Security service. See the Access your Applications topic. - For Admin Center, this link launches the Admin Center application. - For Mobile service, it launches the GroupIDMobileService page that enables users to configure the GroupID mobile app on a phone. Ellipsis Click it to launch a shortcut menu with the following options: - Settings: launches the service settings page, where you can manage deployment settings and log settings. - Delete: deletes the service. This option is not available for the default services. For Mobile service, this shortcut menu also displays the following options: - Deploy Another Instance: enables you to deploy another instance of the service. - Copy: enables you to create a new Mobile service by copying the settings of this service.
Change a Service’s Display Name
A service is assigned an application name during creation, which is used as it's display name in GroupID. On changing it, the service is displayed with the new name.
To change the display name:
- In Admin Center, select Applications in the left pane.
- On the Applications page, click the tab for the desired service. For example, click the Data Service tab.
- Click the ellipsis button for a service and select Settings.
- In the Application Name box on the General Settings page, enter a new name for the service.
- Click Save.
Start or Stop a Service
You can start and stop a service deployed in native IIS, remote IIS, and Docker. When you stop a service, the following happens:
- For a native IIS deployment, GroupID stops the service’s application pool.
- For a remote IIS deployment, GroupID stops the site that hosts the service.
- For a Docker deployment, GroupID stops the container where the service is deployed.
To start or stop a service:
-
In Admin Center, select Applications in the left pane.
-
On the Applications page, click the tab for the desired service. For example, click the Data Service tab.
-
Click the ellipsis button for a service and select Settings.
-
Click Deployments under Server Settings.
The Deployment Settings page displays the web server (IIS, remote IIS, or Docker) where the service is deployed. -
The Select Application Deployment drop-down list displays the deployment name of the service.
- When the service is running, Stop is displayed next to it. Click it to stop the service.
- When the service is stopped, Start is displayed next to it. Click it to start the service.
View the Launch URL for a Service
- In Admin Center, select Applications in the left pane.
- On the Applications page, click the tab for the desired service. For example, click the Data Service tab.
- Click the ellipsis button for a service and select Settings.
- Click Deployments under Server Settings.
The Deployment Settings page displays the web server (IIS, remote IIS, or Docker) where the service is deployed. The Select Application Deployment drop-down list displays the deployment name of the service. - The Launch URL box on the Deployment Configurations tab displays the URL. Copy and paste it in the browser to launch the service. See the table in the View Data Service Details topic to understand what is displayed with this URL.
View the Deployment Settings for a Service
-
n Admin Center, select Applications in the left pane.
-
On the Applications page, click the tab for the desired service. For example, click the Data Service tab.
-
Click the ellipsis button for a service and select Settings.
-
Click Deployments under Server Settings.
The Deployment Settings page displays the web server (IIS, remote IIS, or Docker) where the service is deployed. The Select Application Deployment drop-down list displays the deployment name of the service. -
On the Deployment Configurations tab:
- For a native IIS deployment, you can view the name of the service application in IIS, the site where it is hosted, the URL to launch the service page, and any other services that this service uses.
- For a remote IIS deployment, you can view the Microsoft IIS Administration API URL, access token, and credentials. You can also view the name of the service application in remote IIS, the site where it is hosted, the URL to launch the service page, and any other services that this service uses.
- For a Docker deployment, you can view the port and service URL used to communicate with Docker engine. You can also view the URL to launch the service page, and any other services that this service uses.
Specify Log Settings for a Service
GroupID uses file logging and Windows logging to monitor events from a service. You can set the logging level for a service to track a specific set of information for it.
For details on file logging and Windows logging, see the File Logging and Windows Logging topics. Replace references to the portal with the respective service.
NOTE: Windows logging is not available for Data service and Security service.
Change the File Logging Level for a Service
- In Admin Center, click Applications in the left pane.
- On the Applications page, click the tab for the desired service. For example, click the Data Service tab.
- Click the ellipsis button for a service and select Settings.
- Click Deployments under Server Settings.
The Deployment Settings page displays the web server (IIS, remote IIS, or Docker) where the service is deployed. The Select Application Deployment drop-down list displays the deployment name of the service. - Click the Logging tab.
- In the File Logging area, select a logging level for the service in the Log Events
drop-down list.
File logging groups events into different levels, based on the type of information captured. See the table in the Change the File Logging Level for a Portal Instancetopic for information on the logging levels. Replace references to the portal with the respective service. - Click Save.
Turn off File Logging for a Service
- In Admin Center, click Applications in the left pane.
- On the Applications page, click the tab for the desired service. For example, click the Data Service tab.
- Click the ellipsis button for a service and select Settings.
- Click Deployments under Server Settings.
The Deployment Settings page displays the web server (IIS, remote IIS, or Docker) where the service is deployed. The Select Application Deployment drop-down list displays the deployment name of the service. - Click the Logging tab.
- In the File Logging area, select Off in the Log Events drop-down list.
- Click Save.
Change the Windows Logging Level for a Service
- In Admin Center, click Applications in the left pane.
- On the Applications page, click the tab for the desired service. For example, click the Replication Service tab.
- Click the ellipsis button for a service and select Settings.
- Click Deployments under Server Settings.
The Deployment Settings page displays the web server (IIS, remote IIS, or Docker) where the service is deployed. The Select Application Deployment drop-down list displays the deployment name of the service. - Click the Logging tab.
- In the Windows Logging area, select a logging level for the service in the Log Events
drop-down list.
Windows logging groups events into different levels, based on the type of information captured. See the table in the Change the File Logging Level for a Portal Instancetopic for information on the logging levels. Replace references to the portal with the respective service. - Click Save.
Turn Off Windows Logging for a Service
- In Admin Center, click Applications in the left pane.
- On the Applications page, click the tab for the desired service. For example, click the Replication Service tab.
- Click the ellipsis button for a service and select Settings.
- Click Deployments under Server Settings.
The Deployment Settings page displays the web server (IIS, remote IIS, or Docker) where the service is deployed. The Select Application Deployment drop-down list displays the deployment name of the service. - Click the Logging tab.
- In the Windows Logging area, select Off in the Log Events drop-down list.
- Click Save.
Delete a Data Service
Deleting a Data service removes the following:
-
For a native IIS deployment:
- The Data service directory under the following location on the GroupID server:
X:\Program Files\Imanami\GroupID 11.0\GroupIDDataService\Inetpub\
(X represents the GroupID installation drive) - The Data service directory from the website in IIS
- The Data service directory under the following location on the GroupID server:
-
For a remote IIS deployment:
- The service's directory in the remote IIS site
- The service's physical directory under the folder mapped to the remote IIS site
-
For a Docker deployment:
The container created in Docker Engine for the Data service
To delete a Data service:
- In Admin Center, click Applications in the left pane.
- On the Applications page, click the Data Service tab.
- On the Data Service tab page, click the ellipsis button for a Data service and select Delete.
NOTE: You cannot delete the default Data service. You cannot also delete a Data service that has been linked with a GroupID client, such as the GroupID portal or a Mobile service.
See Also
Data Service
Admin Center lets you quickly create and deploy a Data service. This service is responsible for core GroupID operations, such as communication with identity providers, communications with the GroupID database, object creation and update, and more.
You can create multiple Data services; the default service is created while configuring GroupID.
The Default Data Service
While configuring GroupID using the Configuration Tool, the administrator can create a Data service and a Security service in native IIS.
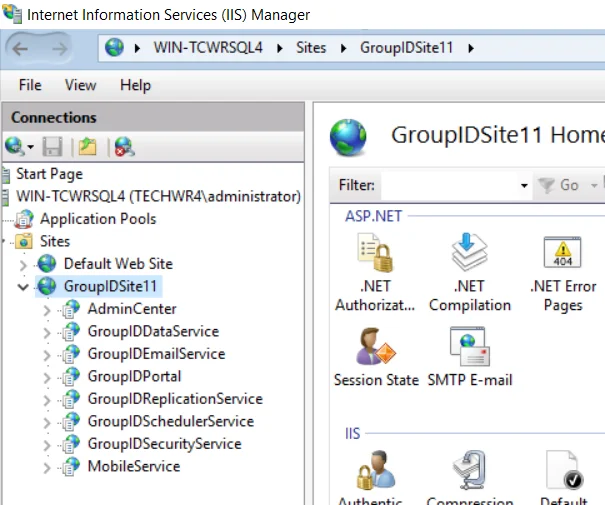
To deploy these services in native IIS, the Configuration Tool creates and configures a new website named GroupIDSite11 in IIS. By default, it binds this site to any of the available ports; the administrator can change it if required. The Data service and Security service directories are created within GroupIDSite11.
Admin Center uses the default Data service and Security service; you cannot change this binding.
To view the default services, see the View Data Service Details topic.
Why Create Multiple Data Services?
For load balancing and high availability, GroupID facilitates you to create and maintain multiple Data services. While creating a GroupID portal or a Mobile service, you can choose a Data service to bind to it. In this way, different portals and Mobile services can use different Data services for improved response times and load balancing.
GroupID enables you to create and deploy a Data service in any of these web servers: native IIS, remote IIS, and Docker.
See Also
Email Service
The Email service maintains a queue of all email notification generated by the identity stores in GroupID, and sends them one by one through the SMTP server configured for the respective identity store.
When the SMTP server for an identity store is down, notifications stay in the queue, until they are delivered when the server is up again. Successfully delivered emails are removed from the queue.
For more on the notification queue, see the Manage the Notification Queue topic.
What do you want to do?
View Email Service Details
-
In Admin Center, click Applications in the left pane.
-
On the Applications page, click the Email Service tab.
The tab displays the default Email service(s) hosted in native IIS. The number of services displayed on the tab depend on the number of Elasticsearch clusters in your environment, as each cluster has its own Email service. See the Elasticsearch Clusters, Nodes, and GroupID topic.
For details displayed on a service card, see the table in the View Data Service Details topic.You cannot create a new Email service or delete the existing one
Manage Email Service Settings
You can manage the following settings for the Email service:
- Change a Service’s Display Name
- Start or Stop a Service
- View the Deployment Settings for a Service
- Specify Log Settings for a Service
See Also
Services
GroupID services are long-running, non-UI software applications that operate in the background and run in their own Windows sessions. They are usually started when you boot the machine they are hosted on, and are scheduled to run in the background to execute some tasks. You can also start, pause, and stop them manually.
GroupID relies on a few of its own services and third-party services for different functions.
GroupID Services
The following table discusses GroupID services.
| Service | Description |
|---|---|
| Data service | GroupID uses it to perform core operations and to communicate with Microsoft SQL Server for storing and fetching data in the database. |
| Security service | - Authenticates and authorizes users on different GroupID functions in accordance with their roles. - Encrypts and decrypts data that GroupID Data service stores and fetches from the SQL database. |
| Replication service | Replicates attributes of the group, user, contact, computer, and organizational unit object from the provider (such as Active Directory) to the Elasticsearch repository. In case of multiple Elasticsearch clusters, this service is also responsible for syncing data between clusters. |
| Mobile service | Enables the GroupID app to communicate with the GroupID server. |
| Email service | Maintains a queue of all notification requests generated by identity stores, and sends them one by one. |
| Scheduler service | Initiates schedule runs for scheduled jobs defined in GroupID. |
These services run in the context of specific accounts that are different from the logged-on user or the default computer account. See the Accounts to Run the Servicestopic for details.
Where are these Services Hosted?
GroupID services are hosted on a web server, that could be native IIS, remote IIS, and Docker.
You can create multiple Data services, Security services, and Mobile services while hosting them on different web servers. For example, you can host one Data service in native IIS and another in Docker.
To launch IIS on a machine, see Opening IIS Manager.
To open Docker Desktop on Windows, search for Docker and select Docker Desktop in the search results

Third-party Services
GroupID requires the following third-party services:
| Service | Description |
|---|---|
| SQL Server Browser service | This service fetches the SQL servers present in the environment and displays them on the Database Settings page of the GroupID Configuration Tool, where you configure a database for GroupID. Moreover, GroupID stops when this service stops. |
| Key Distribution Service (KDS) | You must enable the Key Distribution Service (KDS) on the GroupID server if you want to use Group Managed Service Accounts (gMSA) in GroupID. GroupID supports a gMSA in various contexts, such as for the GroupID app pool and as service account for an identity store. |
| Elasticsearch service | This service is responsible for searching the Elasticsearch repository to display object listings and search results in GroupID. If this service stops, GroupID will not work. |
Where are these Services Hosted?
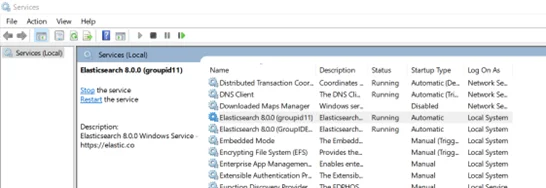
Third-party services are created as Windows services in Windows Services Manager:
To launch the Services Manager, type ‘ services.msc’ in the Run dialog box and click OK. Here is an example of services in Windows Services Manager. You can start, stop, disable, and delay a service.
Accounts to Run the Services
The GroupID Configuration Tool enables you to specify the service accounts to use for the GroupID app pool and Windows services.
| Services | Service Account Description |
|---|---|
| GroupID App Pool in IIS | Use a domain account or a Group Managed Service Account (gMSA). The account must be a member of the Administrators group or both the Backup Operators and IIS_IUSRS groups. The account is used to manage the GroupID app pool in IIS. Data service, Mobile service, Security service, and the portals run under the app pool. For a Microsoft Entra ID identity store, you can specify a local account (with local administrator rights) in app pool for a machine that is not joined to any domain. |
| Windows services | Use a domain account, system user account, or gMSA. The account must be a member of the Backup Operators group. The account is used to run the Windows services for GroupID, as discussed in the Third-party Services topic. |
Elasticsearch Clusters, Nodes, and GroupID
When you have multiple Elasticsearch clusters in your environment and each cluster has multiple nodes, you will notice the following:
- A separate Admin Center, Data service, Security service, and Replication service is created for each node in a cluster. Hence you will have as many Admin Centers and default services as the number of nodes in all the clusters.
- A separate Email service and Scheduler service is created for each cluster, where one Email
service and Scheduler service serve all nodes in the cluster.
Hence you will have as many Email services and Scheduler services as the number of clusters.
Cluster syncing
Elasticsearch has its own mechanism to sync data between nodes in a cluster.
To sync data between clusters, GroupID uses the Replication service. You have to enable data sync for a Replication service within a cluster to sync th cluster's data to other clusters. See the Enable Elastic Cluster Syncing topic for details.
See Also
Replication Service
The Replication service replicates the attributes of the following objects from the provider (such as Active Directory) to the Elasticsearch repository.
- Group
- User
- Contact
- Computers
- Organizational Unit
For more on the Replication service, see the Elasticsearch and Replication topic.
The service is also responsible for syncing data between the Elasticsearch clusters in your environment.
What do you want to do?
View Replication Service Details
-
In Admin Center, click Applications in the left pane.
-
On the Applications page, click the Service tab.
The tab displays the default Replication service hosted in native IIS. When multiple GroupID instances have been deployed, you will find multiple default Replication services on this tab page, as each instance has its own default Replication service. See the Elasticsearch Clusters, Nodes, and GroupID topic.
For details displayed on a service card, see the table in the View Data Service Details topic.You cannot create a Replication Service or delete an existing one from Admin Center.
Manage Replication Service Settings
You can manage the following settings for a Replication service:
- Change a Service’s Display Name
- Start or Stop a Service
- View the Deployment Settings for a Service
- Specify Log Settings for a Service
Enable Elastic Cluster Syncing
In an environment with multiple Elasticsearch clusters, you can choose to sync data between clusters. You can also specify an interval for syncing.
NOTE: In GroupID, a separate Replication service is created for each node in a cluster. To enable data syncing between clusters, simply enable the sync option for one Replications service within each cluster.
To sync data:
- In Admin Center, select Applications in the left pane.
- On the Applications page, click the Replication Service tab.
- Click the ellipsis button for a service and select Settings.
- Click Configurations under Server Settings.
- On the Configurations page, enable the Elastic Cluster Syncing toggle button to sync data
from all other clusters to the cluster that uses this Replication service.
If this toggle button is disabled for a cluster (say, ClusterA), data from other clusters will not be synced to ClusterA.
Suppose syncing is disabled for ClusterA but enabled for ClusterB and ClusterC. This means that (a) data from ClusterB and ClusterC will not be synced to ClusterA (b) data from ClusterA will be synced to ClusterB and ClusterC. - You can specify an interval for syncing data. Click Edit under Elastic Cluster Syncing
Interval, specify an interval (in seconds) and click the check mark.
By default, the interval is set to 5 seconds. You can specify a maximum interval of 900 seconds. - Click Save.
See Also
Scheduler Service
In GroupID, schedules perform different tasks in an identity store. They run at a specified frequency to auto execute their respective functions. The Scheduler service is responsible for triggering these schedules at their respective frequency.
What do you want to do?
View Scheduler Service Details
-
In Admin Center, click Applications in the left pane.
-
On the Applications page, click the Scheduler Service tab.
The tab displays the default Scheduler service(s) hosted in native IIS. The number of services displayed on the tab depend on the number of Elasticsearch clusters in your environment, as each cluster has its own Scheduler service. See the Elasticsearch Clusters, Nodes, and GroupID topic.
For details displayed on a service card, see the table in the View Data Service Details topic.You cannot create a new Scheduler service or delete the existing one
Manage Scheduler Service Settings
You can manage the following settings for the Scheduler service:
- Change a Service’s Display Name
- Start or Stop a Service
- View the Deployment Settings for a Service
- Specify Log Settings for a Service
See Also
Create a Security Service
You can create a Security service in native IIS, remote IIS, and Docker.
What do you want to do?
- Create a Security Service in Native IIS
- Create a Security Service in Remote IIS
- Create a Security Service in Docker
- Launch a Security Service
Create a Security Service in Native IIS
When you deploy a Security service in native IIS, GroupID does the following:
- It creates a directory with the Security service’s name at the following physical path on the
GroupID server, and copies the service files from its template directory to the new service
directory:
X:\Program Files\Imanami\GroupID 11.0\GroupIDSecurityService\Inetpub\
(X represents the GroupID installation drive) - It also creates a virtual directory for the service in your desired IIS site.
The Security service runs within a virtual directory in IIS while the service files are physically located on disk.
To create a Security service:
-
In Admin Center, click Applications in the left pane.
-
Click Add Application.
-
On the next page, select Security Service and click Next step.
-
On the Create GroupID Application page, make sure the IIS tile is selected.
-
In the Application Name box, enter a name for the service or use the default name. The Security service is displayed with this name in GroupID.
-
In the Deployment Name box, enter a deployment name for the service. The application name and deployment name are displayed on the service card, as shown below:

-
In the IIS Application Name box, enter an IIS deployment name for the service. This name is used to name the service’s directory in IIS and its physical directory under X:\Program Files\Imanami\GroupID 11.0\GroupIDSecurityService\Inetpub\ on the GroupID server.
(X represents the GroupID installation drive)
The IIS application name should be unique for each Security service deployed in IIS. -
In the IIS Site drop-down list, select a website to host the service files.
The list displays the websites defined on the local IIS server. GroupIDSite11 is the default selection. -
In the Data Service drop-down list, select a Data service to bind to this Security service.
A Security service needs a Data service to perform various tasks, such as authentication and multifactor authentication. -
Click Create Application.
The Security service is created and displayed on the Security Service tab.
Create a Security Service in Remote IIS
You can deploy a Security service within a site in remote IIS. For this, you need to connect with the Microsoft IIS Administration API running on the remote IIS machine.
When you create a Data service in remote IIS, GroupID does the following:
- It creates a virtual directory for the service in a preconfigured site in remote IIS.
- It creates a physical directory for the service in the folder that is mapped to this preconfigured site.
The Security service runs within a virtual directory in remote IIS while the service files are physically located on disk.
To learn about the remote IIS settings and configurations before deploying a service there, see the Prerequisites for Deployments in Remote IIS topic.
To create a Security service:
- In Admin Center, click Applications in the left pane.
- Click Add Application.
- On the next page select Security Service and click Next step.
- On the Create GroupID Application page, select the Remote IIS tile.
- In the Application Name box, enter a name for the service or use the default name. The Security service is displayed in GroupID with this name.
- In the Deployment Name box, enter a deployment name for the service. The application name and deployment name are displayed on the service card.
- To enter information for API URL, Access Token, Username, Password, IIS Application Name, and Website, refer to steps 7-11 in the Create a Portal in Remote IIS topic. Replace any reference to the portal with the Security service.
- In the Data Service drop-down list, select a Data service to bind to this Security service.
A Security service needs a Data service to perform various tasks, such as authentication and multifactor authentication. - Click Create Application.
The Security service is displayed on the Security Service tab.
Create a Security Service in Docker
GroupID enables you to deploy a Security service in Docker. For this, you need to connect with the API running on a Docker deamon in your environment, so that GroupID can create a container for the service there and run the service from within that container.
For an overview on application deployment in Docker, see the Prerequisites for Deployments in Docker topic.
NOTE: To host the Security service, Docker daemon should be configured to run Windows containers.
To create a Security service:
- In Admin Center, click Applications in the left pane.
- Click Add Application.
- On the next page, select Security Service and click Next step.
- On the Create GroupID Application page, select the Docker tile.
- In the Application Name box, enter a name for the Security service or use the default name. The service is displayed in GroupID with this name.
- In the Deployment Name box, enter a deployment name for the service. The application name and deployment name are displayed on the service card.
- To enter information for Port, Service URL, and Container Name, refer to steps 7-9 in the Create a Portal in Docker topic. Replace any reference to the portal with the Security service.
- In the Data Service drop-down list, select a Data service to bind to this Security service.
A Security service needs a Data service to perform various tasks, such as authentication and multifactor authentication. - Click Create Application.
The Security service is created and displayed on the Security Service tab.
Launch a Security Service
- In Admin Center, select Applications in the left pane.
- On the Security Service tab, click Launch Application for a service. The GroupID Applications page is displayed. Options on this page are discussed in the Access your Applications topic. Any actions you perform will be carried out through the respective Security service.
See Also
Manage Security Service Settings
Security services in GroupID are displayed on the Security Service tab. A card for a service displays information such as its name and status.
You can manage several settings for a service, such as:
- Change the name of a service
- Start or stop a service
- Configure file logging for a service
- Delete a service
What do you want to do?
- View Service Details
- Manage Security Service Settings
- Delete a Security Service
View Service Details
- In Admin Center, click Applications in the left pane.
- On the Applications page, click the Security Service tab.
The tab displays the default Security service created while configuring GroupID and any other Security service that you have created. When multiple GroupID instances have been deployed, you will find multiple default Security services on this tab page, as each instance has its own default Security service. See the Elasticsearch Clusters, Nodes, and GroupID topic.
For details displayed on a service card, see the table in the View Data Service Details topic.
Manage Security Service Settings
See the Manage Data Service Settings topic to manage settings for a Security service, such as deployment and log settings.
Delete a Security Service
Deleting a Security service removes the following:
-
For a native IIS deployment:
- The Security service directory under the following location on the GroupID server:
X:\Program Files\Imanami\GroupID 11.0\GroupIDSecurityService\Inetpub\
(X represents the GroupID installation drive) - The Security service directory from the website in IIS
- The Security service directory under the following location on the GroupID server:
-
For a remote IIS deployment:
- The service's directory in the remote IIS site
- The service's physical directory under the folder mapped to the remote IIS site
-
For a Docker deployment:
The container created in Docker Engine for the Security service
To delete a Security service:
- In Admin Center, click Applications in the left pane.
- On the Applications page, click the Security Service tab.
- Click the ellipsis button for a Security service and select Delete.
NOTE: You cannot delete the default Security service. You cannot also delete a Security service that has been linked with a GroupID client, such as the GroupID portal or a Mobile service.
See Also
Security Service
Admin Center lets you quickly create and deploy a Security service. This web-based service is a single sign-on implantation for GroupID clients. It is responsible for authenticating and authorizing users on different GroupID clients and functionalities in accordance with their roles. The service also encrypts and decrypts data that Data service stores and fetches from the GroupID database on SQL Server.
You can create multiple Security services; the default service is created while configuring GroupID.
The Default Security Service
See Data Service topic.
Why Create Multiple Security Services?
See the Why Create Multiple Data Services? topic while replacing references to Data service with Security service.
See Also