Back Up and Restore GroupID Data
This topic provides instructions for backing up and restoring the data from previous versions of GroupID. While upgrading to GroupID 11.0.
- GroupID database on SQL Server
- Elasticsearch data
- GroupID Self-Service Portals
- GroupID Password Center Portals
- GroupID Synchronize Jobs
- GroupID Reports
GroupID database on SQL Server
Take a backup of the GroupID database that you will use to upgrade to GroupID 11.0.
Follow Microsoft standards to back up this SQL Server database.
Whenever this database is restored, any changes you made using GroupID 11 would be lost.
Elasticsearch data
Before you upgrade from GroupID 10 to 11.0, take a backup of the Elasticsearch data folder. The default folder location is:
C:/ProgramData/Imanami/GroupID 10.0/Replication/data/
ldifde -f c:\groupinfobeforedirectorymanager.ldf -r "(&(objectClass=group)(objectCategory=group)(|(extensionData=*)(extensionAttribute15=*)(extensionAttribute14=*)(extensionAttribute13=*)(extensionAttribute12=*)" -p Subtree -l extensionData,extensionAttribute15,extensionAttribute14,extensionAttribute13,extensionAttribute12
GroupID Self-Service Portals
Back Up
Follow these steps to back up the Self-Service portals created using GroupID 9.0, and 10.0:
-
Go to the Inetpub folder of the product for which you want to take a backup.
- GroupID 9 — X:\Program Files\Imanami\GroupID 9.0\SelfService\Inetpub
- GroupID 10 — X:\Program Files\Imanami\GroupID 10.0\SelfService\Inetpub
-
Copy the folders for each virtual server or portal.
-
Create a new folder (ideally on a different drive) and paste the copied data into that folder.
Restore
Follow these steps to restore GroupID Self-Service portals:
-
Copy the folders containing the portals from the backup folder you created in the previous steps.
-
Go to the Inetpub\ folder of the product’s installation directory:
- GroupID 9 — X:\Program Files\Imanami\GroupID 9.0\SelfService\Inetpub
- GroupID 10 — X:\Program Files\Imanami\GroupID 10.0\SelfService\Inetpub
-
Paste the copied data in the location, replacing any existing files.
GroupID Password Center Portals
Back Up
Follow these steps to back up Password Center User and Helpdesk portals created using GroupID 9.0 and 10.0:
-
Go to the PasswordCenter\ folder of the product’s installation directory:
- GroupID 9 — X:\Program Files\Imanami\GroupID 9.0\PasswordCenter\Inetpub
(for Password Center User portals) - GroupID 9 — X:\Program Files\Imanami\GroupID 9.0\PasswordCenter\Helpdesk\Inetpub
(for Password Center Helpdesk portals) - GroupID 10 — X:\Program Files\Imanami\GroupID 10.0\PasswordCenter\Inetpub
(for Password Center User portals) - GroupID 10 — X:\Program Files\Imanami\GroupID 10.0\PasswordCenter\Helpdesk\Inetpub
(for Password Center Helpdesk portals)
- GroupID 9 — X:\Program Files\Imanami\GroupID 9.0\PasswordCenter\Inetpub
-
Copy the folders of each portal.
-
Create a new folder (on a different drive) and paste the copied data into that folder.
Restore
Follow these steps to restore Password Center portals to GroupID:
-
Copy the folders containing the Password Center portals from the backup folder you created in the previous steps.
-
Go to the PasswordCenter\ folder of the product’s installation directory:
- GroupID 9 — X:\Program Files\Imanami\GroupID 9.0\PasswordCenter\Inetpub
(for Password Center User portals) - GroupID 9 — X:\Program Files\Imanami\GroupID 9.0\PasswordCenter\Helpdesk\Inetpub
(for Password Center Helpdesk portals) - GroupID 10 — X:\Program Files\Imanami\GroupID 10.0\PasswordCenter\Inetpub
(for Password Center User portals) - GroupID 10 — X:\Program Files\Imanami\GroupID 10.0\PasswordCenter\Helpdesk\Inetpub
(for Password Center Helpdesk portals)
- GroupID 9 — X:\Program Files\Imanami\GroupID 9.0\PasswordCenter\Inetpub
-
Paste the copied data into the location, replacing any existing files.
GroupID Synchronize Jobs
Back Up
Follow these steps to create a backup of jobs created with GroupID 9.0 and 10.0 Synchronize:
-
On the Windows Run dialog box, type one of the following paths and run the command:
- GroupID 9 — %ALLUSERSPROFILE%\Imanami\GroupID 9.0\Synchronize
- GroupID 10 — %ALLUSERSPROFILE%\Imanami\GroupID 10.0\Synchronize
-
Copy the Jobs folder.
-
Create a new folder (ideally on a different drive) and paste the Jobs folder into it.
NOTE: If some scheduled tasks are defined for Synchronize jobs, you do not need to create their backup. On restoring, the scheduled tasks remain functional for Synchronize jobs.
Restore
Follow these steps to restore jobs from GroupID 9.0 and 9.0:
-
Copy the Jobs folder from the backup folder you created in the preceding steps.
-
On the Windows Run dialog box, type one of the following paths and run the command:
- GroupID 9 — %ALLUSERSPROFILE%\Imanami\GroupID 9.0\Synchronize
- GroupID 10 — %ALLUSERSPROFILE%\Imanami\GroupID 10.0\Synchronize
-
Paste the Jobs folder into the location, replacing any existing files.
GroupID Reports
Back Up
Follow these steps to create a backup of GroupID 9.0 and 10.0 Reports:
-
Browse to the location where the reports generated by these products are saved. The default locations are:
- GroupID 9 — X:\ProgramData\Imanami\GroupID 9.0\Reports
- GroupID 10 — X:\ProgramData\Imanami\GroupID 10.0\Reports
-
Copy all data at the location.
-
Create a new folder (ideally on a different drive) and paste the copied data into that folder.
NOTE: Note: You do not need to create a backup of scheduled tasks that include report criteria. On restoring, the scheduled tasks remain functional for these reports.
Restore
Follow these steps to restore GroupID 9.0 and 10.0 Reports:
-
Copy the data from the backup folder you created in the previous steps.
-
On the Windows Run dialog box, type the path of the location where the reports are saved and run the command:
- GroupID 9 — X:\ProgramData\Imanami\GroupID 9.0\Reports
- GroupID 10 — X:\ProgramData\Imanami\GroupID 10.0\Reports
-
Paste the copied data in the location, replacing any existing file.
See Also
Configuration Tool
You can configure GroupID immediately after installing it or later.
-
Run the Configuration Tool in one of the following ways:
- To configure GroupID right after installation, click Next on the Run Configuration Tool page. See the Installation Tool topic.
- When GroupID is installed, the Configuration Tool is also installed as a separate program on the machine. Launch the GroupID Configuration Tool from the Windows Start screen.
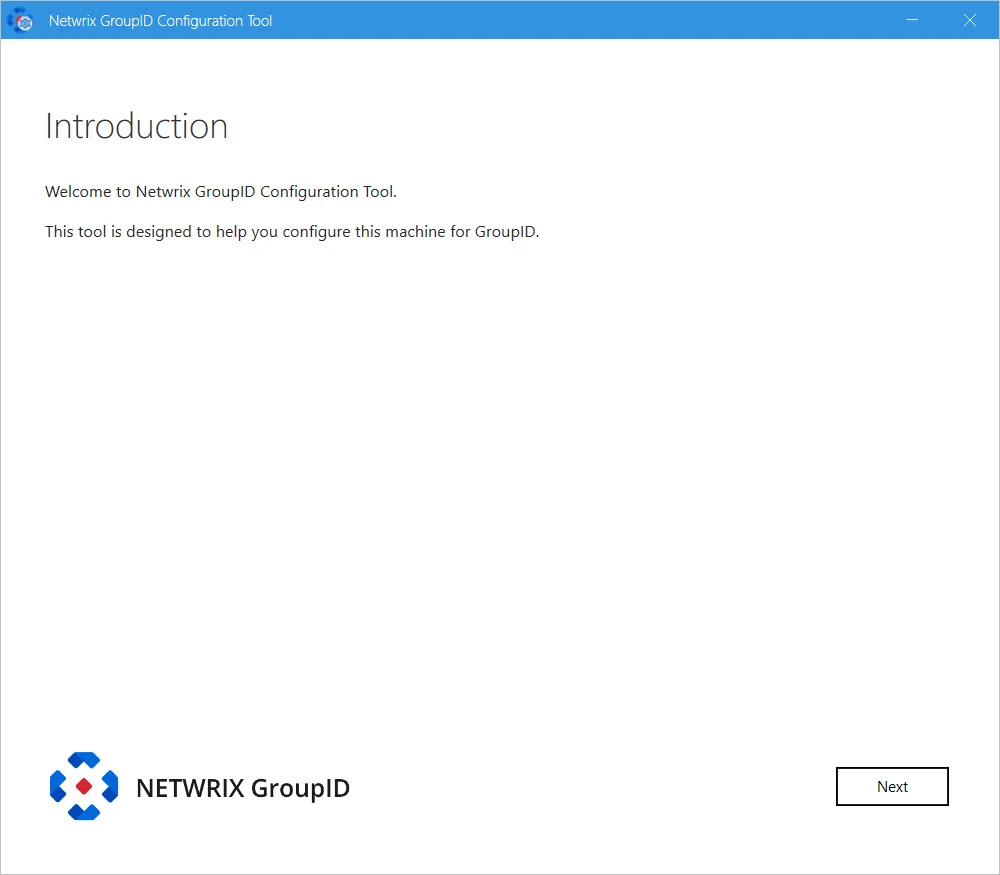
In either case, the tool opens to the Introduction page.
-
Read the welcome message and click Next.
-
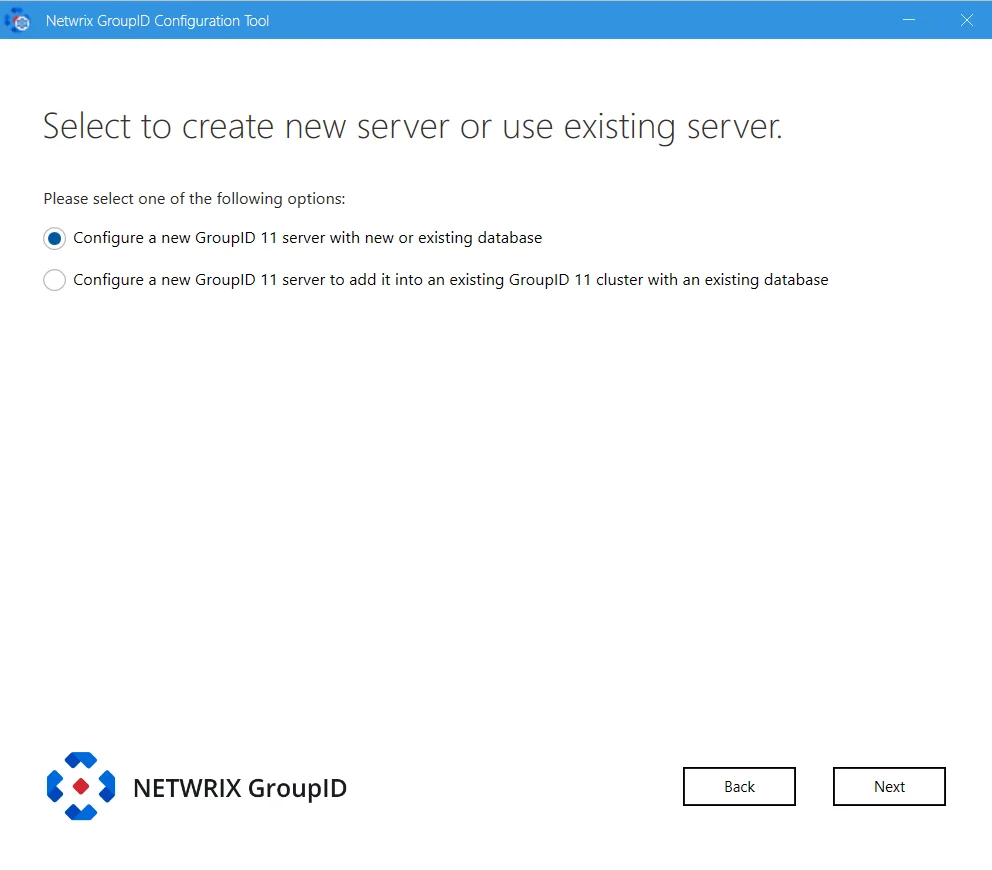
To configure a GroupID server or a GroupID client, select the relevant option.
-
Configure a new GroupID server with new or existing database – configures the GroupID server and the GroupID Data Service on the machine where GroupID is being installed.
It also configures the GroupID Elasticsearch Service as a master node for the Elasticsearch service cluster to support load balancing.
See the Configure a new GroupID server with a new or an existing database topic for additional information.
-
Configure a new GroupID 11 server to add it into an existing GroupID 11 cluster with an existing database – configures a GroupID server that has its own Data Service. This data service gets the configurations (paraphrase and database settings) of the Data Service deployed for another GroupID server in your environment.
This option also configures the GroupID Elasticsearch Service as a slave node to the master node for the Elasticsearch Service cluster configured on the GroupID server.
See the Configure a new GroupID server to add it into an existing GroupID 11 cluster with an existing database topic for additional information.
-
See Also
Configure a new GroupID server to add it into an existing GroupID 11 cluster with an existing database
While installing GroupID, you can choose to create a GroupID server with load balancing support, where load will be balanced in real time with multiple Data Services, portals and Elasticsearch instances.
This option also configures the GroupID Elasticsearch Service as a slave node to the master node for the Elasticsearch Service cluster configured on the GroupID server.
To configure a GroupID server with existing database:
-
On the Select to create new server or use existing server page of the Configuration Tool, select Configure a new GroupID server with a new or an existing database option. See point # 2 on the Configuration Tool topic.
-
Click Next.
-
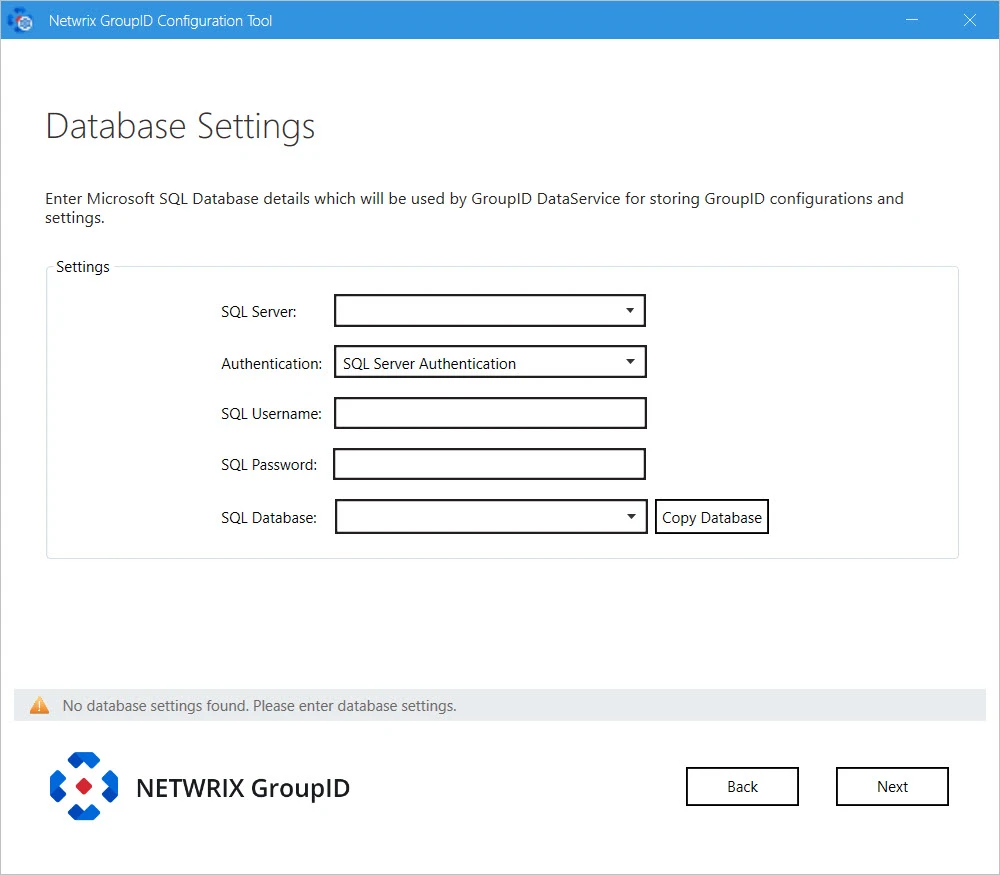
In the SQL Server list, select the SQL Server to use with this new GroupID Server. The SQL Server must be the same used with the master node of GroupID.
If the required server does not appear in the list, make sure that the SQL Server Browser service is running on the SQL Server machine and then click the Refresh button.
-
In the Authentication list, select an authentication mode to be used when connecting to the SQL Server database. Modes are:
- SQL Server Authentication - To set SQL Server to work with GroupID using an SQL Server account. See the Authentication Modes topic for additional information.
- Windows Authentication - To set SQL Server to work with GroupID using a Windows user account. See the Authentication Modes topic for additional details.
-
Depending on the authentication mode selected, do the following:
- For SQL Server Authentication: enter the user name and password of the selected SQL Server in the SQL Username and SQL Password boxes.
- For Windows Authentication: User name and password fields will be disabled with Windows Authentication. The logged-in user credentials will be populated here.
-
In the SQL Database box, specify name of the SQL database being used by the master GroupID node. This new GroupID instance will use the same database.
NOTE: While configuring a new GroupID machine with an existing database option, the Copy Database button has no relevance here.
-
Click Next.
-
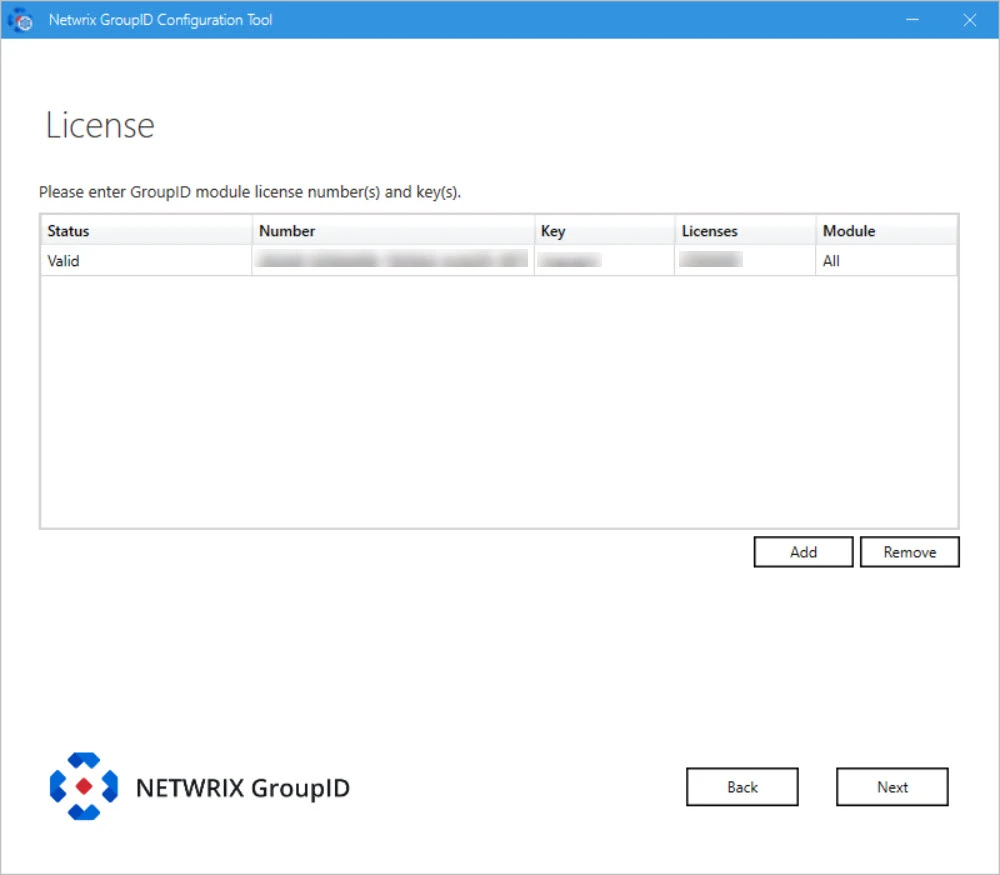
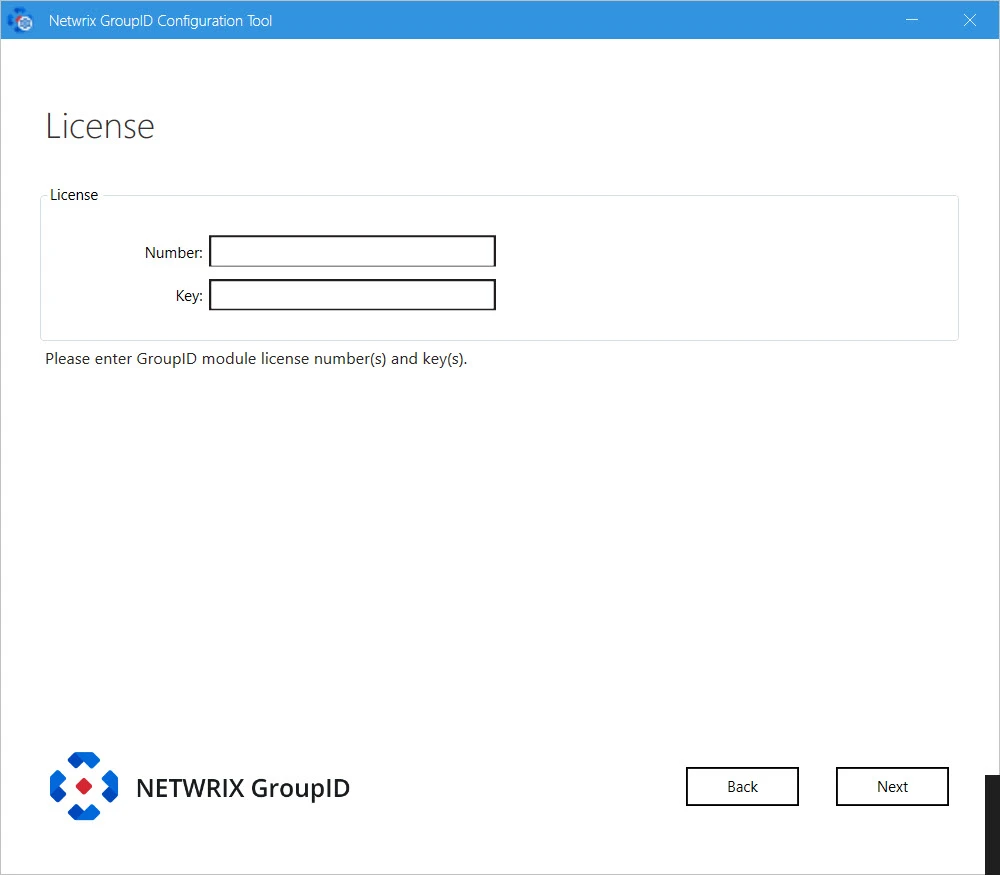
On the License page, license information of GroupID installed on the master node is displayed. A valid license and key enable the Next button. If the Next button remains disabled, check your entries for errors.
-
Click Next.
-
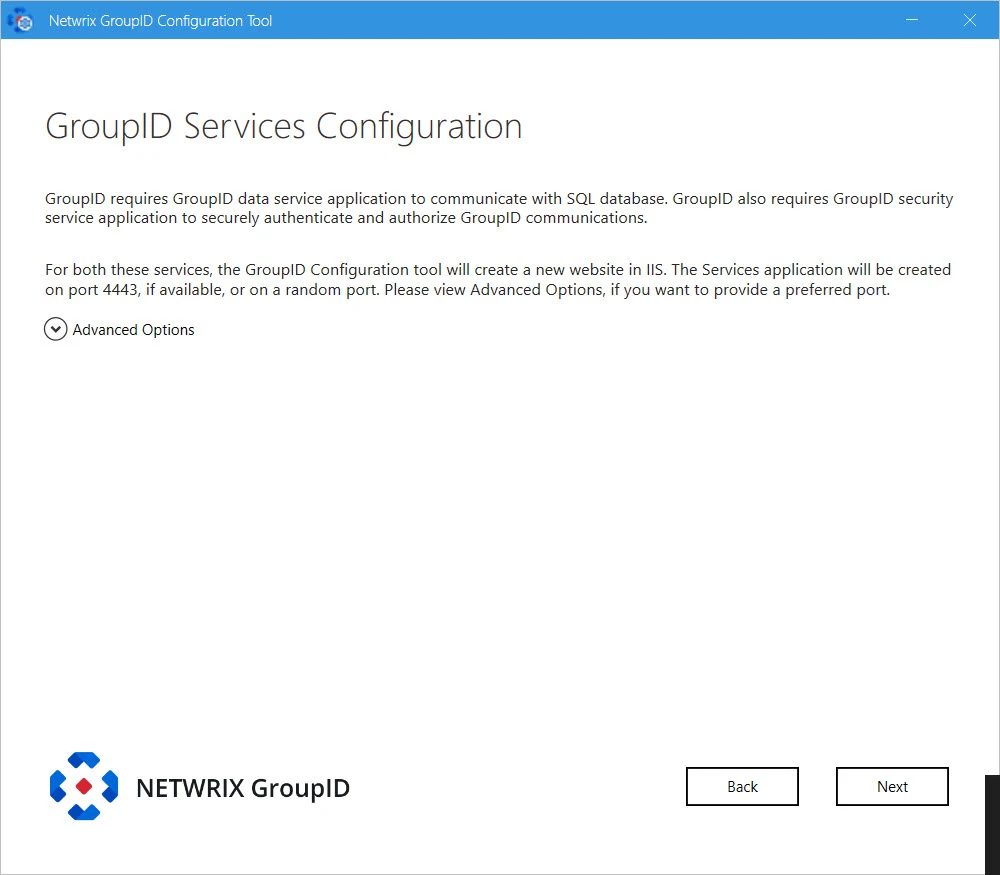
GroupID requires two services:
-
GroupID Data Service: This is a web-based service that GroupID uses to communicate with Microsoft SQL Server for storing and fetching data in the database.
-
GroupID Security Service: This is also a web-based service that GroupID uses to:
- Authenticate and authorize users on different GroupID functionalities in accordance with their roles.
- Encrypt and decrypt data that GroupID Data Service stores and fetches from the SQL database.
To deploy these services, the Configuration Tool creates and configures a new website in IIS with the name GroupIDSite11. By default, it binds this site to any of the available ports. However, if you have a different preference, you can change the port.
Click Advanced Options and enter the port in the Port Number box.
-
Replication service: This service replicates object attributes from the provider (such as Active Directory) to Elasticsearch.
-
Admin Center: Admin Center is a web-based application that can be accessed over the Internet and Intranet.
NOTE: This GroupID instance will use Email and Scheduler services of the selected cluster.
-
-
Click Next.
-
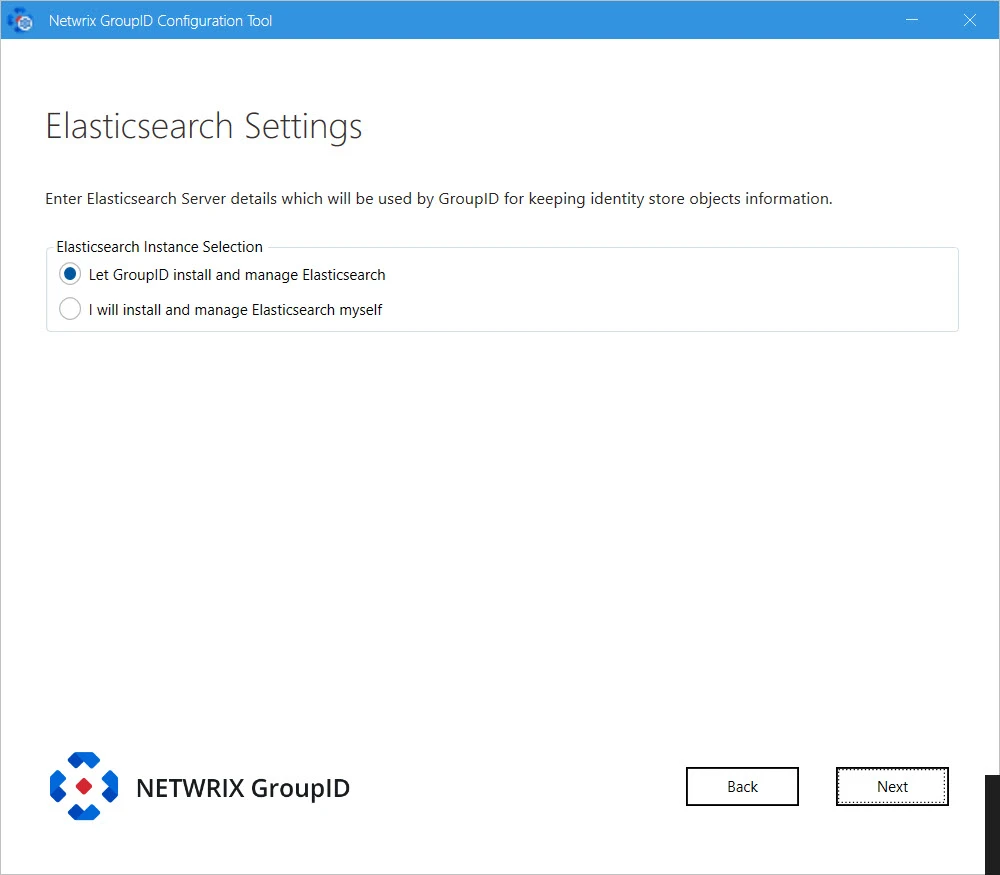
GroupID provides the following two options for Elasticsearch configuration. Select the relevant option:
-
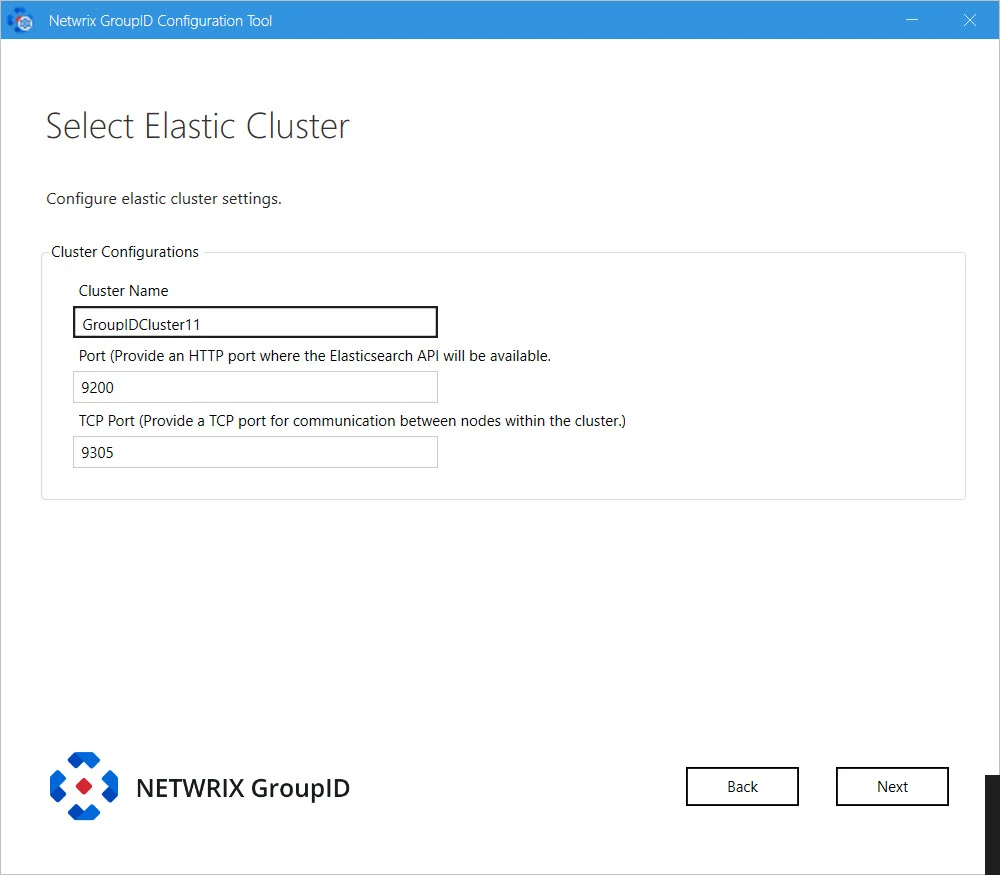
Let GroupID install and manage Elasticsearch: If you select this option, GroupID Configuration Tool will install Elasticsearch. It presents you default configuration of Elasticsearch cluster it will create:

-
Cluster Name: lists all the clusters defined so far. Select one to create an Elasticsearch node within the selected cluster.
-
Port: the default port for Elasticsearch API communication. Modify the port number if the mentioned default port is not available.
-
TCP Port: the default port for communication between nodes within the cluster. Modify the port number if the mentioned default port is not available.
NOTE: Make sure that the specified ports are available and unblocked.
-
-
I will install and manage Elasticsearch myself: If you select this option, the following page is displayed:
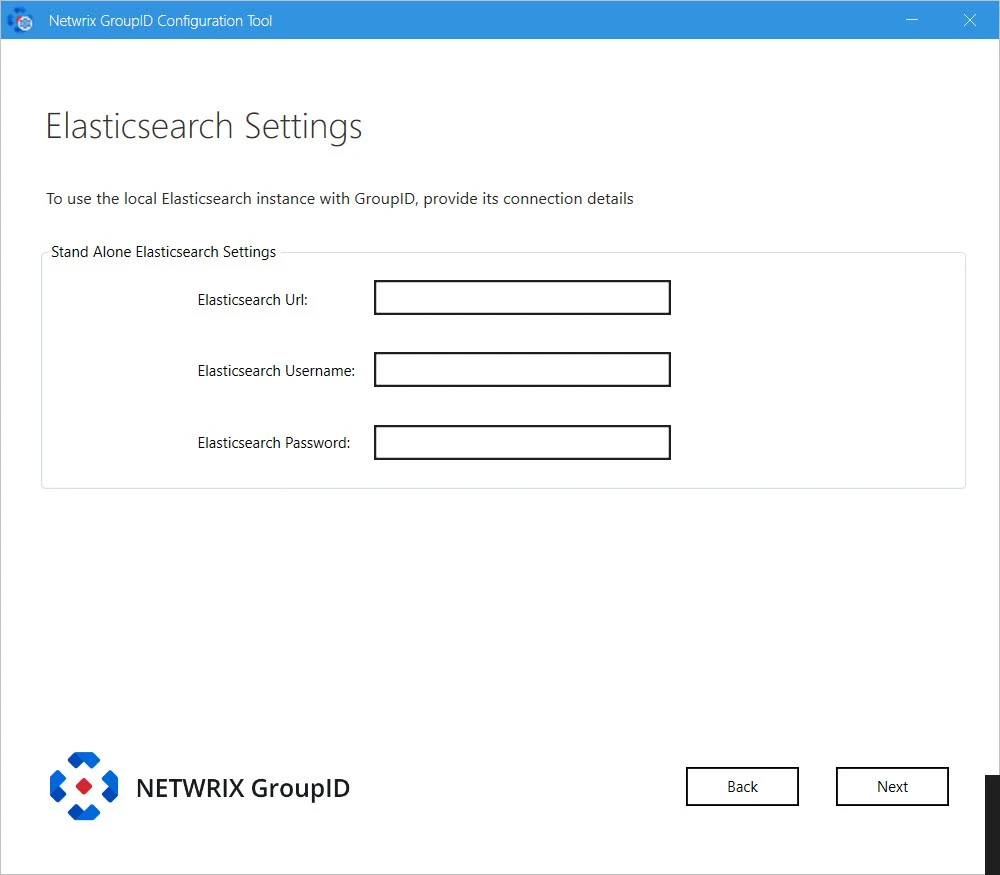
Provide configurations of Elasticsearch you want to use with GroupID:
- Elasticsearch URL: URL for accessing the Elasticsearch.
- Elasticsearch Username: service account for Elasticsearch.
- Elasticsearch Password: password of the Elasticsearch service account.
-
-
Click Next.
NOTE: If you configure a Group Managed Service Account (gMSA) as an App Pool service account then the GroupID Configuration tool will add this account in the local administrators and IIS_IUSRS groups.
NOTE: If you configure a normal user account as an App Pool service account and an AD identity store is created with a gMSA service account, then the App Pool service account must have the PrincipalsAllowedToRetrieveManagedPassword property. The App Pool service account also must be a member of Backup Operators and IIS_IUSRS groups.
-
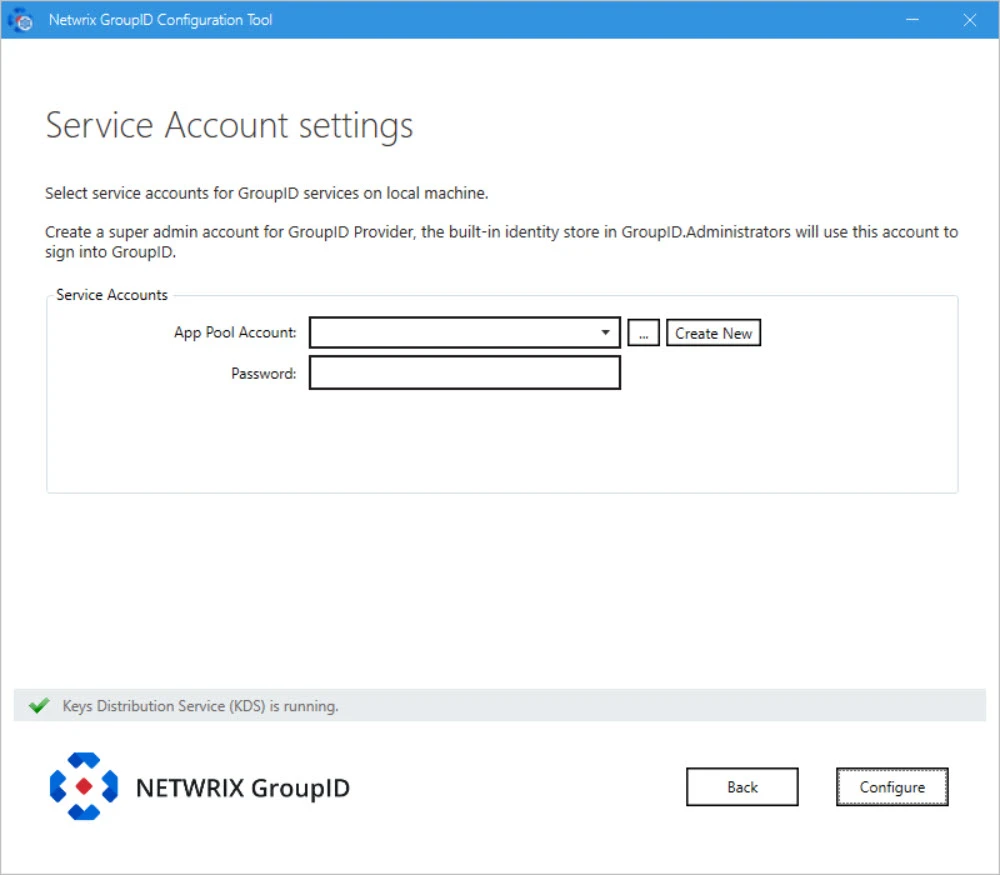
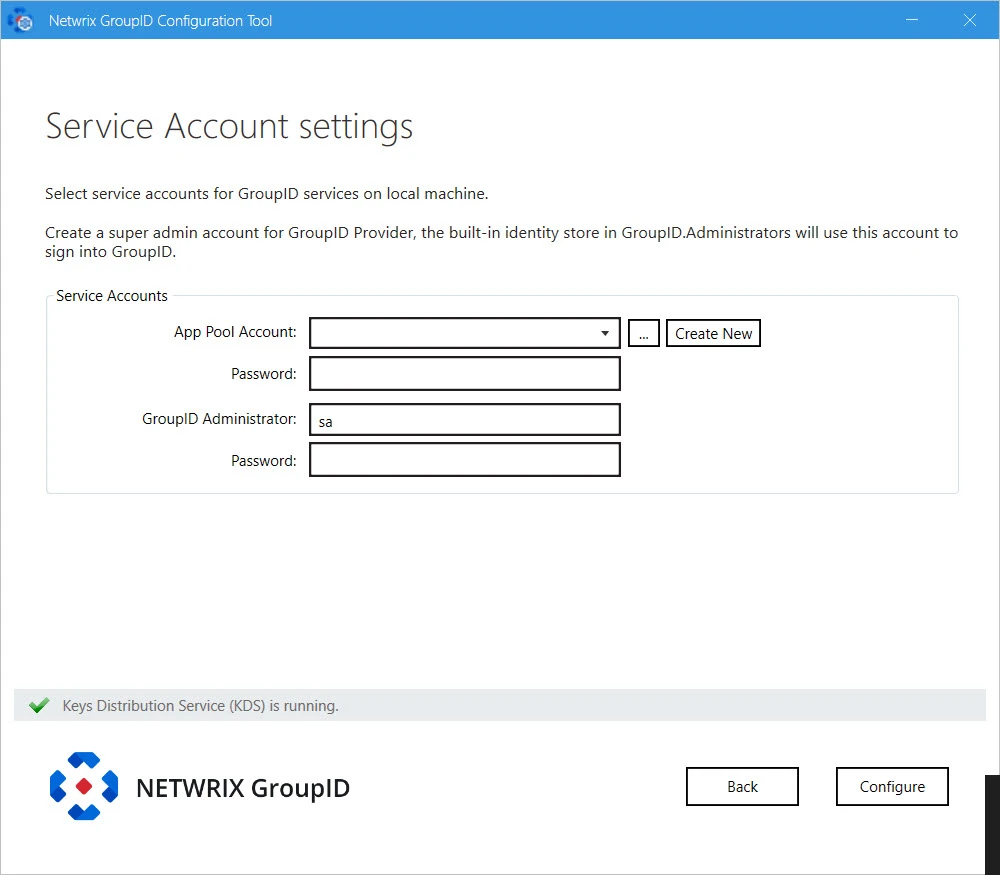
The Service Account Settings page, specify the service account to use for the GroupID app pool in IIS and Windows services.
-
Use a domain account or a Group Managed Service Account (gMSA).
-
The account must be a member of the Administrators group or both the Backup Operators and IIS_IUSRS groups.
-
The account you specify will be used to manage the GroupID app pool in IIS. GroupID Data Service, Mobile Service, Security Service, and the portals run under the app pool.
-
By default, a local account, GroupIDSSuser, is set for the GroupID app pool, but you cannot proceed unless you change it to a domain account or gMSA.
-
You can specify a local account (with local administrator rights) in app pool for a machine that is not joined to any domain (this applies to an Microsoft Entra ID identity store only).
NOTE: For GroupID App Pool, a domain account can be used for a machine joined to a domain.
NOTE: Before you use a Group Managed Service Account, make sure that:
- Key Distribution Service (KDS) is enabled on the GroupID machine.
- Microsoft AD module for PowerShell is installed on the machine.
-
-
You can specify a service accounts for the app pool in any of the following ways:
-
Use an existing account: Click Browse.
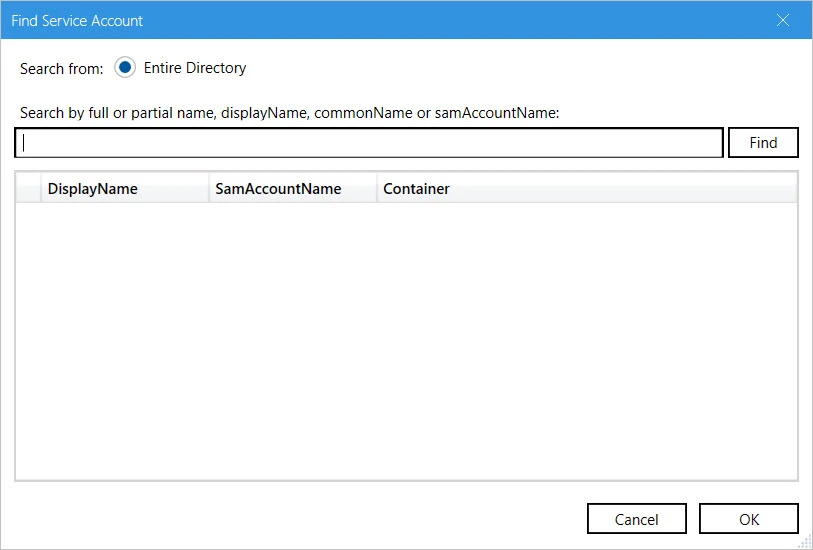
On the Find Service Account dialog box, search and select the required account and click OK.
-
Create a new service account: Click the Create New button on the Service Account Setting page.
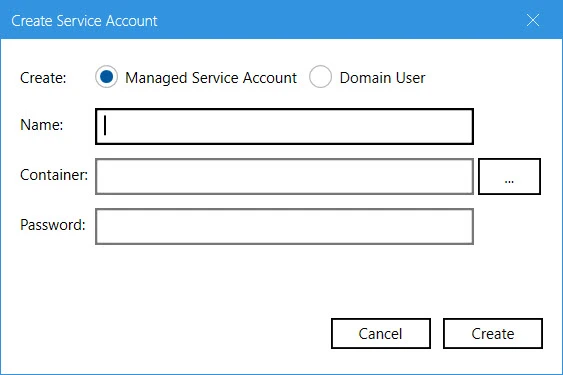
On the Create Service Account dialog box, select the kind of account you want to create. Enter a name, container and password for the account. Click Create.
NOTE: The logged-in user must have appropriate rights to create a new account.
NOTE: If Key Distribution Service (KDS) is not configured in the environment, a warning will be displayed that you cannot use a Group Managed Service Account.
-
-
Provide password for the App Pool service account (except for a Group Managed Service Account) in the Password box.
-
Click Configure.
-
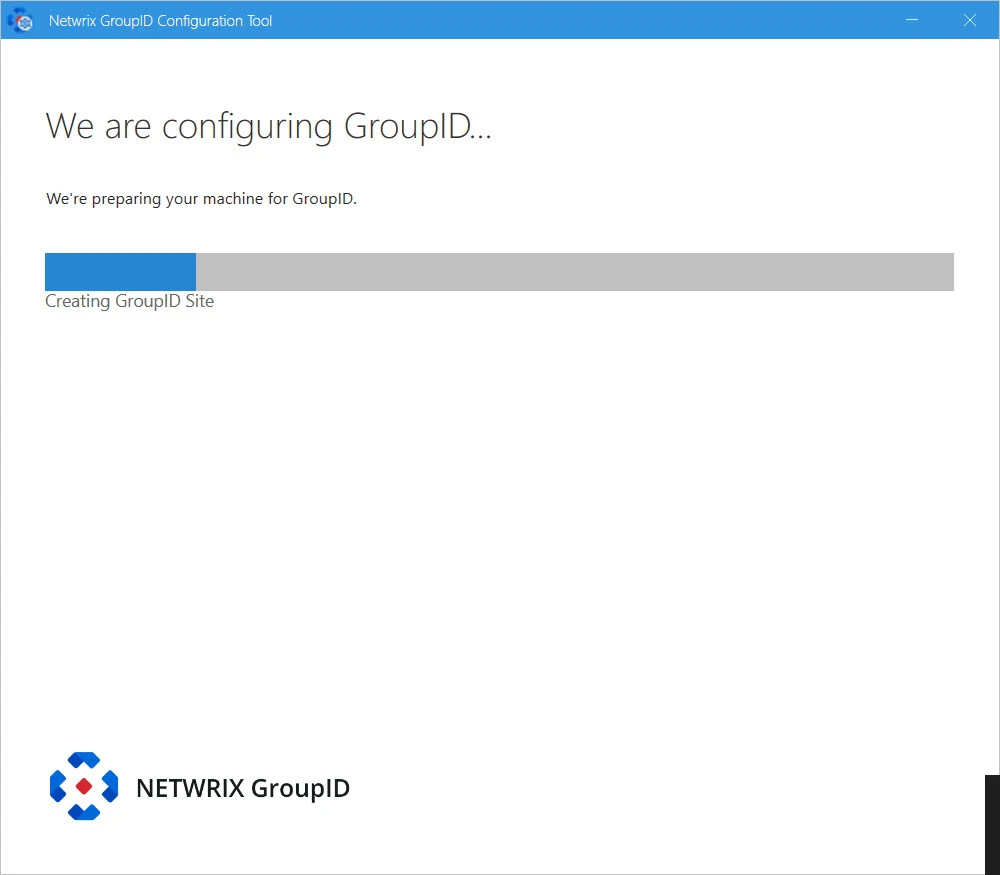
The next page displays the progress while a GroupID server is configured on the machine.

-
This completes the configuration of GroupID as a slave node on your machine.
Click Launch GroupID to start using GroupID. The Sign In page opens:
To login in to GroupID Admin Center for the first time, provide GroupID Administrator user name and password.
or
click Next to launch the Upgrade wizard for upgrading GroupID.
See Also
Configure a new GroupID server with a new or an existing database
This option configures the GroupID server and the GroupID Data Service on the machine where GroupID is being installed. It also configures the GroupID Elasticsearch Service as a master node for the Elasticsearch service cluster to support load balancing.
To configure GroupID server on the machine where the Configuration Tool is being run:
-
Select the Configure a new GroupID server with new or existing database option on the Select to create new server or use existing server page of the Configuration Tool and select Next.
-
In the SQL Server list, select the SQL Server to use with GroupID.
If the required server does not appear in the list, make sure that the SQL Server Browser service is running on the SQL Server machine and then click the Refresh button.
-
In the Authentication list, select an authentication mode to be used when connecting to the SQL Server database. Modes are:
- SQL Server Authentication - To set SQL Server to work with GroupID using an SQL Server account. See SQL Authentication in Authentication Modes topic.
- Windows Authentication - To set SQL Server to work with GroupID using a Windows user account. See Windows Authentication in in Authentication Modes topic.
-
Depending on the authentication mode selected, do the following:
- For SQL Server Authentication: enter the user name and password of the selected SQL Server in the SQL Username and SQL Password boxes.
- For Windows Authentication: provide the credentials of a domain account or a Windows local account that GroupID will use to connect with SQL Server. On clicking OK, the system authenticates with that account on SQL Server via Windows authentication.
-
In the SQL Database box, specify name of a new SQL database to use for GroupID.
NOTE: For GroupID 11.0 Beta, you have to create a new database. You cannot use an existing database or a copy of an existing database.
A message is displayed to inform that the database does not exist. Click Yes to create it.
-
Click Next.
-
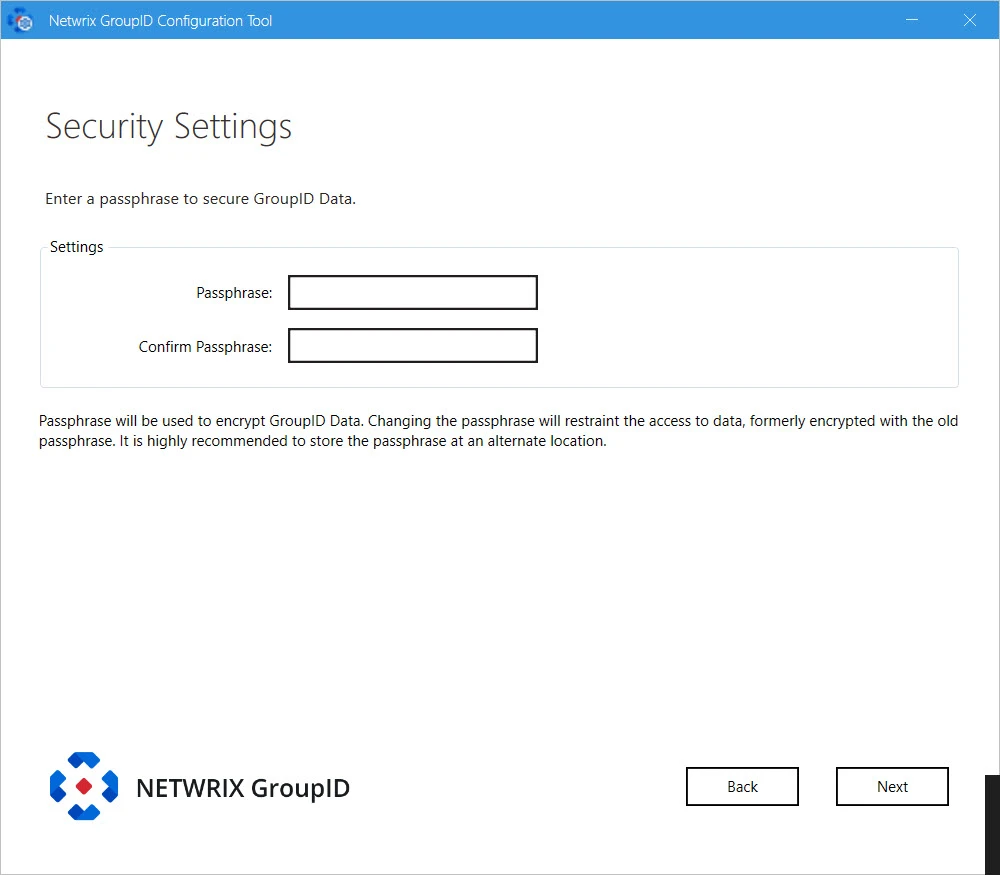
On the Security Settings page, enter an encryption key in the Passphrase and Confirm Passphrase boxes to secure GroupID data.
GroupID Data Service uses this key to encrypt and decrypt the data that it stores in, and retrieves from, the SQL Server database.
- The passphrase must have at least eight characters.
- Be sure to save this passphrase with you. Providing an incorrect passphrase at any later point will result in the loss of GroupID data.
-
Click Next.
-
On the License page, enter a valid license number and key in the respective boxes. A valid license and key enable the Next button. If the Next button remains disabled, check your entries for errors.
-
Click Next.
-
GroupID provides the following two options for Elasticsearch configuration. Select the relevant option:
-
Let GroupID install and manage Elasticsearch: If you select this option, GroupID Configuration Tool will install Elasticsearch. It presents you default configuration of Elasticsearch cluster it will create:
-
Cluster Name: for Elasticsearch node(s) within the cluster. You can modify the name.
-
Port: the default port for Elasticsearch API communication. Modify the port number if the mentioned default port is not available.
-
TCP Port: the default port for communication between nodes within the cluster. Modify the port number if the mentioned default port is not available.
NOTE: Make sure that the specified ports are available and unblocked.
-
-
I will install and manage Elasticsearch myself: If you select this option, the following page is displayed:
Provide configurations of Elasticsearch you want to use with GroupID:
- Elasticsearch URL: URL for accessing the Elasticsearch.
- Elasticsearch Username: service account for Elasticsearch.
- Elasticsearch Password: password of the Elasticsearch service account.
-
-
Click Next.
-
At this point, GroupID configures the following:
-
GroupID Data Service: This is a web-based service that GroupID uses to communicate with Microsoft SQL Server for storing and fetching data in the database.
-
GroupID Security Service: This is also a web-based service that GroupID uses to:
- Authenticate and authorize users on different GroupID functionalities in accordance with their roles.
- Encrypt and decrypt data that GroupID Data Service stores and fetches from the SQL database.
To deploy these services, the Configuration Tool creates and configures a new website in IIS with the name GroupIDSite11. By default, it binds this site to any of the available ports. However, if you have a different preference, you can change the port.
Click Advanced Options and enter the port in the Port Number box.
-
Replication service: This service replicates object attributes from the provider (such as Active Directory) to Elasticsearch.
-
Admin Center: Admin Center is a web-based application that can be accessed over the Internet and Intranet.
-
Email service: It maintains a queue of all notification requests generated by identity stores, and sends them one by one. This service is deployed for each cluster.
-
Scheduler service: This service initiates schedule runs for scheduled jobs defined in GroupID. GroupID configures this service for each cluster.
-
-
Click Next.
NOTE: If you configure a Group Managed Service Account (gMSA) as an App Pool service account then the GroupID Configuration tool will add this account in the local administrators and IIS_IUSRS groups.
NOTE: If you configure a normal user account as an App Pool service account and an AD identity store is created with a gMSA service account, then the App Pool service account must have the PrincipalsAllowedToRetrieveManagedPassword property. The App Pool service account also must be a member of Backup Operators and IIS_IUSRS groups.
-
GroupID enables you to specify the service accounts to use for the GroupID App Pool and a default Administrative account for GroupID Admin Center.
Service Service Account Description GroupID App Pool Use a domain account or a Group Managed Service Account (gMSA). The account must be a member of the Administrators group or both the Backup Operators and IIS_IUSRS groups. The account you specify will be used to manage the GroupID app pool in IIS. GroupID Data Service, Mobile Service, Security Service, and the portals run under the app pool. By default, a local account, GroupIDSSuser, is set for the GroupID app pool, but you cannot proceed unless you change it to a domain account or gMSA. NOTE: You can specify a local account (with local administrator rights) in app pool for a machine that is not joined to any domain (this applies to an Microsoft Entra ID identity store only). GroupID Administrator Use this account as default Administrative account for first time login to GroupID Admin Center. This account is not associated with any identity store, but one that is specific to GroupID. This account works as an Admin of all Admin accounts of defined identity stores in Admin Center. NOTE: For GroupID App Pool, a domain account can be used for a machine joined to a domain.
NOTE: Before you use a Group Managed Service Account, make sure that:
- Key Distribution Service (KDS) is enabled on the GroupID machine.
- Microsoft AD module for PowerShell is installed on the machine.
-
You can specify a service accounts for the app pool in any of the following ways:
-
Use an existing account: Click Browse.
On the Find Service Account dialog box, search and select the required account and click OK.
-
Create a new service account: Click the Create New button on the Service Account Setting page.
On the Create Service Account dialog box, select the kind of account you want to create. Enter a name, container and password for the account. Click Create.
NOTE: The logged-in user must have appropriate rights to create a new account.
NOTE: If Key Distribution Service (KDS) is not configured in the environment, a warning will be displayed that you cannot use a Group Managed Service Account.
-
-
Provide password for the App Pool service account (except for a Group Managed Service Account) in the Password box.
-
Provide password for the GroupID Administrator account in the Password box.
-
Click Configure.
We are configuring GroupID page displays the progress while a GroupID server is configured on the machine. On successful configuration, the GroupID is successfully configured page opens.
-
GroupID is configured on your machine.
Click Launch GroupID to start using GroupID. The Sign In page opens:
To login in to GroupID Admin Center for the first time, provide GroupID Administrator user name and password.
or
click Next to launch the Upgrade wizard for upgrading GroupID
See Also
Configuration
Use the Configuration Tool to configure a new GroupID server. The tool configures:
- A valid license for GroupID
- Scheduling, Email and Replication services
- Elasticsearch settings
- An encryption key to encrypt GroupID data
- An SQL Server and database
- Service account for GroupID App Pool
- Admin Center
- A default account for Admin Center
See Also
Authentication Modes
While setting up GroupID, you must select an authentication mode for connecting to SQL Server (that hosts the GroupID database). There are two possible modes:
SQL Server Authentication
It is recommended that you create a new SQL Server account for GroupID. You must add the account to the db_creator server role so that it can create and maintain the GroupID database.
The account must also be part of the db_owner database role, so that it can execute DDL (Data Definition Language) and DML (Data Manipulation Language) commands. However, unlike Windows Authentication mode setup, you do not need to add the account to the db_owner role because SQL Server db_creator is mapped to the db_owner database role by default.
NOTE: Note: For SQL Server 2016, 2017, 2019 and 2022 families, every SQL Server account is assigned the public role. Therefore, the GroupID SQL account belongs to two server roles: db_creator and public.
To add the GroupID SQL account to the db_creator role:
-
Launch SQL Server Management Console.
-
Create a new account for GroupID 11, if needed.
-
Connect to the server using your new GroupID SQL account.
-
Right-click the database server node and click Properties.
-
On the Properties dialog box, select the Permissions page.
-
Scroll down on the Explicit tab to the Connect SQL permission and select the Grant check box for it.
-
Click the Effective tab. You should have the following permissions listed here:
- Connect SQL
- Create any database
- View any database
-
Click OK.
Windows Authentication
GroupID works with SQL Server (which hosts the GroupID database) using the Windows Authentication mode in context of the account configured in GroupIDAppPool11 (when SQL Server is available locally or remotely). GroupID detects this account and authenticates with it on SQL Server via Windows authentication.
You can configure a domain account in GroupIDAppPool11 and use it to connect GroupID to SQL Server, provided that it has the following permissions on SQL Server.
- The user account type on SQL Server must be a Windows account with db_owner permissions on the GroupID database.
- For creating a new database, the user account must have the db_creator role and db_owner permissions on the master database.
Use a domain account when SQL Server is available remotely or locally. A local Windows account will work only when GroupID and SQL Server are running on the same machine).
The domain account used to connect GroupID with SQL Server must:
- Be a member of the IIS_IUSR and Backup Operators groups.
- Have read/write permissions on the GroupID 11 installation folder: [GroupID installation drive]:\Program Files\Imanami\GroupID 11.0.
See Also