Manage the Bad Words List
Directory Manager enables you to restrict portal users from saving data containing words that might be offensive. You can maintain a list of undesired words for a portal. When a user enters a value that contains a word on the list, the portal does not save the entry until the word is removed or corrected.
The bad words check applies to the following:
- Fields with the ‘Filter Bad Words’ option enabled in field properties
- History notes that a user enters for a logged history action
Add a Bad Word to the List
- In Admin Center, select Applications in the left pane.
On the GroupID Portal tab, a portal's card displays its info. - Click the ellipsis button for a portal and select Settings.
- Select an identity store under Design Settings to customize the portal for it.
All identity stores linked with the portal are listed under Design Settings. You can design a different portal for each of these. - Click Bad Words List in the left pane.
- On the Bad Words List page, click Add.
- In the Value box on the New Bad Word dialog box, enter a word that you want to prevent
users from typing in the portal and click OK.
The bad word is displayed in the Name list on the Bad Words List page. - Make sure to enable the toggle button at the top of the page to apply the bad words filter to the portal.
- Click Save.
Update a Bad Word
- In Admin Center, select Applications in the left pane.
On the GroupID Portal tab, a portal's card displays its info. - Click the ellipsis button for a portal and select Settings.
- Select an identity store under Design Settings to customize the portal for it.
All identity stores linked with the portal are listed under Design Settings. You can design a different portal for each of these. - Click Bad Words List in the left pane.
- On the Bad Words List page, click Edit for a bad word.
- On the Edit Bad Word dialog box, update the bad word and click OK.
- Click Save on the Bad Words List page.
Remove a Bad Word from the List
- In Admin Center, select Applications in the left pane.
On the GroupID Portal tab, a portal's card displays its info. - Click the ellipsis button for a portal and select Settings.
- Select an identity store under Design Settings to customize the portal for it.
All identity stores linked with the portal are listed under Design Settings. You can design a different portal for each of these. - Click Bad Words List in the left pane.
- On the Bad Words List page, click Remove for a bad word to remove it.
- Click Save.
Enable/Disable the Bad Words Check
- In Admin Center, select Applications in the left pane.
On the GroupID Portal tab, a portal's card displays its info. - Click the ellipsis button for a portal and select Settings.
- Select an identity store under Design Settings to customize the portal for it.
All identity stores linked with the portal are listed under Design Settings. You can design a different portal for each of these. - Click Bad Words List in the left pane.
- On the Bad Words List page, disable the toggle button at the top of the page to disable the
bad word check in the portal.
You can apply the check any time by enabling the toggle button. - Click Save.
See Also
Customize the Create Object Wizards
Using a portal, users can create different directory objects, namely:
- User
- Mailbox
- Contact
- Static Group
- Smart Group
- Organizational Dynasty
- Geographical Dynasty
- Managerial Dynasty
- Custom Dynasty
The portal provides a separate wizard for creating each of these objects. You can customize a wizard as needed.
NOTE: In the portal, the Create Group wizard starts with the Group Type page, where users can select the type of group they want to create. Options on this page vary, depending on the permissions assigned to the user in the identity store. (See the Security Role – Permissions topic.)
- If a user has the Create Static Group permission and is denied the Create Smart Group permission, only the Static Group option is displayed on the Group Type page.
- If a user has the Create Smart Group permission and is denied the Create Static Group
permission, all options except Static Group are displayed on the Group Type page.

NOTE: You can customize the Group Type page individually for static group, Smart Group, and each of the Dynasty types. However:
- If a user has permissions to create both static groups and Smart Groups, the Group Type page created for Static Group would be displayed to the user in the portal.
- If a user does not have permission to create static groups, but has permission to create Smart Groups, the Group Type page created for Smart Group would be displayed to the user in the portal for Smart Groups and Dynasties.
What do you want to do?
- Add a Page to a Wizard
- Update a Wizard Page
- Rearrange the Pages on a Wizard
- Remove a Page from a Wizard
- Add a Field to a Wizard Page
- Update a Field
- Rearrange the Fields on a Wizard Page
- Remove a Field from a Wizard Page
Add a Page to a Wizard
- In Admin Center, select Applications in the left pane.
On the GroupID Portal tab, a portal's card displays its info. - Click the ellipsis button for a portal and select Settings.
- Select an identity store under Design Settings to customize the portal for it.
All identity stores linked with the portal are listed under Design Settings. You can design a different portal for each of these. - Click Create Object in the left pane. The Create Object page is displayed.
- In the Select Directory Object drop-down list, select a directory object.
The Name list displays the pages on the object’s creation wizard. - Click Add. The Add Category pane is displayed.
- In the Name box, enter a name for the page. The page will be displayed in the wizard with this name.
- In the Visibility Level drop-down list, select a security role. The page would be visible to
users of this role and roles with a priority value higher than this role. See
Priority.
Select Never to hide the page from all users. - To add fields to the page, see the Add a Field to a Wizard Page topic.
- Click OK.
- Click Save on the Create Object page.
Update a Wizard Page
You can update the following for a page:
- Name
- Visibility level
To update a wizard page:
- In Admin Center, select Applications in the left pane.
On the GroupID Portal tab, a portal's card displays its info. - Click the ellipsis button for a portal and select Settings.
- Select an identity store under Design Settings to customize the portal for it.
All identity stores linked with the portal are listed under Design Settings. You can design a different portal for each of these. - Click Create Object in the left pane.
- On the Create Object page, select a directory object in the Select Directory Object drop-down list.
- In the Name list, click Edit for a page.
- On the Edit Category pane, update the name and visibility level for the page. Follow steps 7-11 in the Add a Page to a Wizard topic for details.
Rearrange the Pages on a Wizard
- In Admin Center, select Applications in the left pane.
On the GroupID Portal tab, a portal's card displays its info. - Click the ellipsis button for a portal and select Settings.
- Select an identity store under Design Settings to customize the portal for it.
All identity stores linked with the portal are listed under Design Settings. You can design a different portal for each of these. - Click Create Object in the left pane.
- On the Create Object page, select a directory object in the Select Directory Object
drop-down list.
The Name list displays the pages on the object’s creation wizard. - To change the order that pages are displayed on the wizard, click the equal sign for a page and drag to change its position.
- Click Save.
Remove a Page from a Wizard
- In Admin Center, select Applications in the left pane.
On the GroupID Portal tab, a portal's card displays its info. - Click the ellipsis button for a portal and select Settings.
- Select an identity store under Design Settings to customize the portal for it.
All identity stores linked with the portal are listed under Design Settings. You can design a different portal for each of these. - Click Create Object in the left pane.
- On the Create Object page, select a directory object in the Select Directory Object
drop-down list.
The Name list displays the pages on the object’s creation wizard. - Click Remove for a page to remove it.
- Click Save.
Add a Field to a Wizard Page
-
In Admin Center, select Applications in the left pane.
On the GroupID Portal tab, a portal's card displays its info. -
Click the ellipsis button for a portal and select Settings.
-
Select an identity store under Design Settings to customize the portal for it.
All identity stores linked with the portal are listed under Design Settings. You can design a different portal for each of these. -
Click Create Object in the left pane.
-
On the Create Object page, select a directory object in the Select Directory Object drop-down list.
The Name list displays the pages on the object’s creation wizard. -
Click Edit for the page you want to add a field to.
-
On the Edit Category pane, click **Add Field.**The Add Field pane is displayed.
-
In the Field drop-down list, select a schema attribute to link to this field.
-
In the Display Name box, enter a display name for the field. This name is the field’s label on the wizard.
-
In the Display Type drop-down list, select a display type to use for rendering this field on the wizard.
The list contains basic display types and custom display types defined on the Custom Display Types page. See the Display Type Categories topic. -
In the Visibility Level drop-down list, select a security role. The field would be visible to users of the selected role and roles with a priority value higher than the selected role. See Priority.
Select Never to hide the field from all users. -
As mentioned for visibility level, the field is visible to members of the selected role and roles with a priority value higher than the selected role.
In the Exclude Roles area, select the check boxes for the higher priority role(s) you want to hide the field from. -
In the Tooltip Text box, enter the text to display when a user hovers the mouse over the field.
-
In the Max Length box, enter a number that represents the maximum number of characters that users can enter as value for this field.
Entering 0 indicates that users can enter an unlimited number of characters as value. -
Use the Search Object Types area to specify the object types (User, Contact, and/or Group) that can be searched on the portal’s Find dialog box, to set as value for the field.
The following display types support the Find dialog box:- DN
- DNs
- Custom display types created with the Grid type
When you select any of these display types, Directory Manager identifies that the value for the field has to be searched using the Find dialog box. The Search Object Types area is displayed, where you can select the required object type(s). For example, if you select Group, only groups can be searched and selected as value for the field.
You can launch the Find dialog box from multiple portal pages to search for objects to designate as owners, managers, additional owners, members, and more. While specifying the searchable object type(s), you must be aware of the kind of value the field requires. -
In the Default Value box, enter the default value that would be displayed in the field on the portal.
Users can update this value, provided that the Is Read Only check box is not selected. -
Select the Is Required check box to make it mandatory for users to provide a value for the field.
-
Select the Is Read Only check box to make the field read-only.
-
Select the Filter Bad Words check box to ensure that users do not enter any bad word in this field.
A value entered for the field is checked against the words listed on the Bad Words List page. Matched values cannot be saved. See the Manage the Bad Words List topic. -
Click OK. The field is displayed in the Fields area on the Edit Category pane. You can rearrange the fields, update field properties, and even remove a field from the wizard page.
-
Click OK.
-
Click Save on the Create Object page.
Update a Field
You can change the following for a field:
- The name of the field (this is the field label in the portal)
- The schema attribute linked with the field
- The display type used to render the field in the portal
- Visibility level
- Tooltip
The following field properties vary from field to field. You can:
- Set a default value for the field
- Specify the maximum characters that a user can enter as value for the field
- Make the field editable or read–only
- Prevent users from using certain words as value for the field
- Make it optional or mandatory for users to provide a value for the field
- For search fields, you can specify the object types (groups, users, contacts) that can be searched and set as field value
To update field properties:
- In Admin Center, select Applications in the left pane.
On the GroupID Portal tab, a portal's card displays its info. - Click the ellipsis button for a portal and select Settings.
- Select an identity store under Design Settings to customize the portal for it.
All identity stores linked with the portal are listed under Design Settings. You can design a different portal for each of these. - Click Create Object in the left pane.
- On the Create Object page, select a directory object in the Select Directory Object
drop-down list.
The Name list displays the pages on the object’s creation wizard. - Click Edit for the page you want to edit a field for.
- On the Edit Category pane, click Edit for a field to update its properties.
- The Edit Field pane is displayed. Follow steps 8-22 in the Add a Field to a Wizard Page topic to update and save the information.
Rearrange the Fields on a Wizard Page
- In Admin Center, select Applications in the left pane.
On the GroupID Portal tab, a portal's card displays its info. - Click the ellipsis button for a portal and select Settings.
- Select an identity store under Design Settings to customize the portal for it.
All identity stores linked with the portal are listed under Design Settings. You can design a different portal for each of these. - Click Create Object in the left pane.
- On the Create Object page, select a directory object in the Select Directory Object
drop-down list.
The Name list displays the pages on the object’s creation wizard. - Click Edit for the page you want to rearrange the fields for.
- On the Edit Category pane, the fields on the wizard page are listed in the Fields area.
To rearrange the fields on the page, click the equal sign for a field and drag to change its position. - Click OK.
- Click Save on the Create Object page.
Remove a Field from a Wizard Page
- In Admin Center, select Applications in the left pane.
On the GroupID Portal tab, a portal's card displays its info. - Click the ellipsis button for a portal and select Settings.
- Select an identity store under Design Settings to customize the portal for it.
All identity stores linked with the portal are listed under Design Settings. You can design a different portal for each of these. - Click Create Object in the left pane.
- On the Create Object page, select a directory object in the Select Directory Object
drop-down list.
The Name list displays the pages on the object’s creation wizard. - Click Edit for the page you want to remove a field from.
- On the Edit Category pane, the fields on the wizard page are listed in the Fields area.
Click Remove for a field to remove it. - Click OK.
- Click Save on the Create Object page.
See Also
Customize Quick Search
In a Directory Manager portal, the quick search box is available at the top of each page. You can specify the schema attributes that quick search runs on, and the objects (group, user, contact) that can be searched. When a user enters a search string, the values of all specified attributes are matched to return the results (allowed objects).
You can also specify a search operator that determines what part of the attribute value should match the search string.
What do you want to do?
- Specify Attributes for Quick Search
- Change the Search Operator
- Specify Searchable Objects
Specify Attributes for Quick Search
- In Admin Center, select Applications in the left pane.
On the GroupID Portal tab, a portal's card displays its info. - Click the ellipsis button for a portal and select Settings.
- Select an identity store under Design Settings to customize the portal for it.
All identity stores linked with the portal are listed under Design Settings. You can design a different portal for each of these. - Click Search Forms in the left pane. Then click the Quick Search Attributes tab.
- On the Quick Search Attributes tab, the Name column lists the schema attributes whose
values will be matched when portal users perform a search using the quick search box.
Click Add to add an attribute to this list. - On the Add Search Attribute dialog box, select a schema attribute in the Attribute
drop-down list and click OK.
The attribute is displayed in the Name column on the Quick Search Attributes tab.
To remove an attribute, click Remove for it. - Click Save.
Change the Search Operator
-
In Admin Center, select Applications in the left pane.
On the GroupID Portal tab, a portal's card displays its info. -
Click the ellipsis button for a portal and select Settings.
-
Select an identity store under Design Settings to customize the portal for it.
All identity stores linked with the portal are listed under Design Settings. You can design a different portal for each of these. -
Click Search Forms in the left pane. Then click the Quick Search Attributes tab.
-
In the Quick Search Operator drop-down list, select an option.
- Equal - looks up the values of the attributes listed in the Name column and returns records with values that exactly match the search string.
- Contains - looks up the values of all attributes listed in the Name column and returns records that contain the string anywhere in their values.
- Starts with - looks up the values of the attributes listed in the Name column and returns records with values starting with the search string.
- Ends with - looks up the values of all attributes listed in the Name column and returns records with values ending with the search string.
-
Click Save.
Specify Searchable Objects
- In Admin Center, select Applications in the left pane.
On the GroupID Portal tab, a portal's card displays its info. - Click the ellipsis button for a portal and select Settings.
- Select an identity store under Design Settings to customize the portal for it.
All identity stores linked with the portal are listed under Design Settings. You can design a different portal for each of these. - Click Search Forms in the left pane. Then click the Quick Search Attributes tab.
- You can specify the object type(s) to be searched when users perform a search using the quick
search function in the portal.
Select any or all three User, Group, and Contact check boxes next to Quick Search Objects to make that object type searchable in quick search. - Click Save.
See Also
Customize Search Forms
You can customize the search forms for a portal. You can:
- Add new fields
- Edit existing fields
- Remove fields
- Change the arrangement of fields on a page
NOTE: You can only customize existing search forms; you cannot add new ones.
Customizable Search Forms
The following table lists the search forms that you can customize:
| Search Form Name | Description |
|---|---|
| Default | Manage the search fields on the Advanced Search page, where users can search directory objects (user, group, contact) by different attributes. This page is displayed when users click the Advanced Search link. |
| Find Dialog | Manage the search fields on the Find dialog box. The Find dialog box can be launched from various portal pages, for example, from the Owner tab, Members tab, and Member Of tab in group properties. It is used to search for objects to designate as owners, managers, additional owners, group members, and more. |
What do you want to do?
- Add a Field to a Search Form
- Update a Field on a Search Form
- Remove a Field from a Search Form
Add a Field to a Search Form
- In Admin Center, select Applications in the left pane.
On the GroupID Portal tab, a portal's card displays its info. - Click the ellipsis button for a portal and select Settings.
- Select an identity store under Design Settings to customize the portal for it.
All identity stores linked with the portal are listed under Design Settings. You can design a different portal for each of these. - Click Search Forms in the left pane.
- On the Search Form tab, the search forms available in the portal are listed under Name.
To modify a form, click Edit for it. - On the Edit Search Form pane, the Fields area lists the fields available on the search
form for performing a search.
Click Add Field to add a new field. The Add Field pane is displayed. - In the Field drop-down list, select a schema attribute to link to the field.
The search string that portal users enter in the field will be matched to this attribute’s values to fetch search results. - In the Display Name box, enter a display name for the field. This name is the field’s label on the search form.
- In the Tooltip box, enter the text to appear when a user hovers the mouse over the field.
- In the Display Type drop-down list, select the display type to use to render this field in the portal. The list contains basic display types and custom display types defined on the Custom Display Types page. See the Display Type Categories topic.
- Click OK. The field is displayed in the Fields area on the Edit Search Form pane.
To rearrange the fields on the search form, click the plus sign for a field and drag to change its position. - Click OK.
- Click Save on the Search Forms page.
Update a Field on a Search Form
You can change the following for a field on a search form:
- The name of the field, as displayed in the portal
- The schema attribute linked to the field
- The display type used to render the field in the portal
- The tooltip for the field
To update a field:
- In Admin Center, select Applications in the left pane.
On the GroupID Portal tab, a portal's card displays its info. - Click the ellipsis button for a portal and select Settings.
- Select an identity store under Design Settings to customize the portal for it.
All identity stores linked with the portal are listed under Design Settings. You can design a different portal for each of these. - Click Search Forms in the left pane.
- On the Search Form tab, the search forms available in the portal are listed under Name.Click Edit for a form to update its fields.
- On the Edit Search Form pane, click Edit for a field to update it.
- The Edit Field pane is displayed. Refer to step 7 and onwards in the Add a Field to a Search Form topic to update the field.
Remove a Field from a Search Form
- In Admin Center, select Applications in the left pane.
On the GroupID Portal tab, a portal's card displays its info. - Click the ellipsis button for a portal and select Settings.
- Select an identity store under Design Settings to customize the portal for it.
All identity stores linked with the portal are listed under Design Settings. You can design a different portal for each of these. - Click Search Forms in the left pane.
- On the Search Form tab, click Edit for the form you want to remove a field from.
- On the Edit Search Form pane, click Remove for a field to remove it.
- Click OK.
- Click Save on the Search Forms page.
See Also
- Design a Portal with Display Types
- Display Type Categories
- Customize Search Results
- Customize Quick Search
Customize Search Results
You can customize the search result pages for a portal. You can:
- Add new fields
- Edit existing fields
- Remove fields
- Change the arrangement of fields on a page
NOTE: You can only customize existing search result pages; you cannot add new ones.
Customizable Search Results Pages
The following table lists the search results pages that you can customize:
| Form Name | Description |
|---|---|
| Smart Group Preview | Manage the column headers on the preview page, which is displayed when users click the Preview button on the Query Designer dialog box. It enables users to preview the results returned with the specified query for the Smart Group/Dynasty. The Query Designer dialog box can be launched from the Smart Group page when creating a new Smart Group or Dynasty, and from the Smart Group tab in group properties. |
| Default | Manage the column headers on the All tab of the search results page, which is displayed when users perform a search on the Advanced Search page in the portal. The Advanced Search page can be launched using the Advanced Search link. |
| User | Manage the column headers on the following portal pages: - The My Direct Reports tab, where users can view a list of their direct reports. This tab is displayed when users click Users > My Direct Reports in the portal. - The Users and Contacts tabs on the search results page, which is displayed when users perform a search on the Advanced Search page in the portal. |
| Disabled Users | Manage the column headers on the Disabled Users tab in the portal, which displays a list of disabled users in the directory. This tab is displayed when users click Users > My Direct Reports and then the Disabled Users tab in the portal. |
| Groups | Manage the column headers on the following portal pages: - The All Groups page – all except the Expired Groups and Expiring Groups tabs - The My Groups page – all except the My Expired Groups and My Expiring Groups tabs - The Groups tab on the search results page, which is displayed when users perform a search on the Advanced Search page in the portal. |
| Expiring Groups | Manage the column headers on the following tabs in the portal: - Groups > All Groups and then the Expiring Groups tab . It displays the groups in the directory that will expire in 30 days or less. - Groups > My Groups and then the My Expiring Groups tab. It displays the logged-on user’s groups that will expire in 30 days or less. |
| Expired Groups | Manage the column headers on the following tabs in the portal: - Groups > All Groups and then the Expired Groups tab. It displays the expired groups in the directory. - Groups > My Groups and then the My Expired Groups tab. It displays the logged-on user’s groups that have expired. |
| Find dialog | Define the attributes to display for objects shown as search results on the Find dialog box. The Find dialog box is used to search and select objects to designate as owners, managers, additional owners, group members, and more. It has a search area and a search results area. This option controls the column headers (attributes) displayed in the Search Results area. The Find dialog box can be launched from various portal pages, for example, from the Owner tab, Members tab, and Member Of tab in group properties. |
Add a Field to a Search Results Page
- In Admin Center, select Applications in the left pane.
On the GroupID Portal tab, a portal's card displays its info. - Click the ellipsis button for a portal and select Settings.
- Select an identity store under Design Settings to customize the portal for it.
All identity stores linked with the portal are listed under Design Settings. You can design a different portal for each of these. - Click Search Forms in the left pane. Then click the Search Results tab.
- On the Search Results tab, the search results pages available in the portal are listed under Name. To modify a page, click Edit for it.
- On the Edit Search Results pane, the Fields area lists the fields that display search
results on the selected page.
Click Add Field to add a new field. - On the Add Field pane, use the Field drop-down list to select a schema attribute to link to the field. The field will display the value of this attribute on the search results page.
- In the Display Name box, enter a display name for the field. This name is the field’s label on the search results page.
- In the Tooltip box, enter the text to appear when a user hovers the mouse over the field.
- In the Display Type drop-down list, select the display type to use to render this field in the portal. Available options are limited to textbox, DN, DNs, and Link, which are basic display Types. See the Basic Display Types topic.
- Click OK. The field is displayed in the Fields area on the Edit Search Results
pane.
To rearrange the fields on the search form, click the equal sign for a field and drag to change its position. - Click OK.
- Click Save on the Search Forms page.
Update a Field on a Search Results Page
You can change the following for a field on a search results page:
- The name of the field, as displayed in the portal
- The schema attribute linked to the field
- The display type used to render the field in the portal
- The tooltip for the field
To update a field:
- In Admin Center, select Applications in the left pane.
On the GroupID Portal tab, a portal's card displays its info. - Click the ellipsis button for a portal and select Settings.
- Select an identity store under Design Settings to customize the portal for it.
All identity stores linked with the portal are listed under Design Settings. You can design a different portal for each of these. - Click Search Forms in the left pane; then click the Search Results tab.
- On the Search Results tab, click Edit for a form to update its fields.
- On the Edit Search Results pane, click Edit for a field to update it.
The Edit Field pane is displayed. Follow step 7 and onwards in the Add a Field to a Search Results Page topic to update the field.
Remove a Field from a Search Results Page
- In Admin Center, select Applications in the left pane.
On the GroupID Portal tab, a portal's card displays its info. - Click the ellipsis button for a portal and select Settings.
- Select an identity store under Design Settings to customize the portal for it.
All identity stores linked with the portal are listed under Design Settings. You can design a different portal for each of these. - Click Search Forms in the left pane; then click the Search Results tab.
- On the Search Results tab, click Edit for the form you want to remove a field from.
- On the Edit Search Results pane, click Remove for a field to remove it.
- Click OK.
- Click Save on the Search Forms page.
See Also
- Design a Portal with Display Types
- Display Type Categories
- Customize Search Results
- Customize Quick Search
Specify Attributes for Import/Export of Group Owners and Members
In the Directory Manager portal, users can:
- Export members and additional owners of a group to a file, such as a csv or an xls file
- Import members and additional owners for a group from a file. Members can also be imported from an external data source.
You can specify schema attributes to be used for export/import, along with a user-friendly name for each attribute.
- The import function reads the objects’ information from an external file or data source and
searches for matching objects in the directory based on field mapping (where a column name in the
file or data source is mapped to any of the attributes specified here).
Objects having the same values for the mapped fields are added to the membership or additional ownership of the target group. - The export function reads the membership/additional ownership of the group and exports the values of the specified attributes for members/additional owners to an external file.
The schema attributes you specify are displayed with their user-friendly names on the following wizards in the portal:
| Wizard Name | Description |
|---|---|
| Import Members | This wizard is used to import members to a group using a file or an external data source. Users can launch it from the Members page on the Create Group wizard and from the Members tab in group properties. |
| Export Members | This wizard is used to export the members of a group to an external file. Users can launch it from the Members tab in group properties. |
| Import Additional Owners | This wizard is used to import additional owners to a group using an external file. Users can launch it from the Owners page on the Create Group wizard and from the Owner tab in group properties. |
| Export Additional Owners | This wizard is used to export the additional owners of a group to an external file. Users can launch it from the Owner tab in group properties. |
NOTE: The attributes you specify apply to all four wizards. You cannot specify a different set of attributes for a wizard.
What do you want to do?
- Specify Attributes for Import and Export
- Update an Attribute
- Remove an Attribute from Import and Export
Specify Attributes for Import and Export
- In Admin Center, select Applications in the left pane.
On the GroupID Portal tab, a portal's card displays its info. - Click the ellipsis button for a portal and select Settings.
- Select an identity store under Design Settings to customize the portal for it.
All identity stores linked with the portal are listed under Design Settings. You can design a different portal for each of these. - Click Import/Export in the left pane.
On the Import/Export page, schema attributes for display name, first name, last name, and email are specified by default. These attributes are available in the portal for the export and import of group members and additional owners. - To add an attribute, click Add. The Import/Export Attribute dialog box is displayed.
- In the Schema Attribute drop-down list, select a schema attribute to use for import/export.
- In the User-Friendly Name box, enter an easy and meaningful name for the attribute. The attribute will be displayed with this name on the Import Members, Export Members, Import Additional Owners, and Export Additional Owners wizards in the portal.
- Click OK. The attribute is displayed with its user-friendly name on the Import/Export page.
- Click Save.
Update an Attribute
- In Admin Center, select Applications in the left pane.
On the GroupID Portal tab, a portal's card displays its info. - Click the ellipsis button for a portal and select Settings.
- Select an identity store under Design Settings to customize the portal for it.
All identity stores linked with the portal are listed under Design Settings. You can design a different portal for each of these. - Click Import/Export in the left pane.
- On the Import/Export page, click Edit for an attribute.
- On the Import/Export Attribute dialog box, change the user-friendly name for the attribute. You can also select a different attribute to replace the current one. Then click OK.
- Click Save on the Import/Export page.
Remove an Attribute from Import and Export
- In Admin Center, select Applications in the left pane.
On the GroupID Portal tab, a portal's card displays its info. - Click the ellipsis button for a portal and select Settings.
- Select an identity store under Design Settings to customize the portal for it.
All identity stores linked with the portal are listed under Design Settings. You can design a different portal for each of these. - Click Import/Export in the left pane.
- On the Import/Export page, click Remove for an attribute to remove it.
The attribute will not be available on the Import Members, Export Members, Import Additional Owners, and Export Additional Owners wizards in the portal. - Click Save.
See Also
Customize the Navigation Bar
The left navigation bar in a portal lists nodes that enable users to navigate in the portal: These nodes are:
- Create New
- Dashboard
- Groups
- Users
- Requests
- History
- Entitlement
- Synchronize
- Reports
On expanding a node, its sub-nodes are displayed. On clicking a sub-node, users are redirected to a page that contains tabs under that sub-node. It is as:
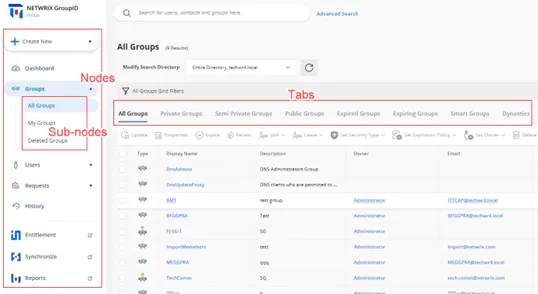
Directory Manager enables you to customize the nodes, sub-nodes, and their respective tabs.
What do you want to do?
At the node level:
- Add a Node (Category)
- Update the Details of a Node
- Rearrange the Nodes on the Navigation Bar
- Remove a User-defined Node
At the sub-node level:
- Add a Sub-node to a Node
- Update the Details of a Sub-node
- Rearrange the Sub-nodes for a Node
- Remove a Sub-node from a Node
At the tab level:
- Update Tab Properties
- Rearrange the Tabs for a Sub-node
- Remove a Tab from a Sub-node
Add a Node (Category)
The following nodes have been defined by default on the navigation bar:
| Category (Node) | Mapped To |
|---|---|
| Create New | The Create New button on the portal’s navigation bar. It has four buttons as its sub-nodes: Group, User, Mailbox, and Contact. Sub nodes do not have tabs. |
| High Priority | The Dashboard node on the navigation bar. It has one sub-node, Dashboard, with no tab. |
| Groups | The Groups node on the navigation bar. It has four sub-nodes: All Groups, My Groups, Transfer Ownership, and Deleted Groups. All except the Transfer Ownership sub-node have tabs. |
| Users | The Users node on the navigation bar. It has two sub-nodes: My Direct Reports and Linked Accounts. Only the My Direct Reports sub-node has tabs. |
| Requests | The Requests node on the navigation bar. It has three sub-nodes: All Requests, My Requests, and Request Inbox. Sub nodes do not have tabs. |
| Others | The History node on the navigation bar. It has one sub-node, History, that has tabs. |
| External Links | The Entitlement, Synchronize, and Reports nodes on the navigation bar. It has three sub-nodes, Entitlement, Synchronize, and Reports, that can be modified to a limited extent. You cannot manage the tabs or other options displayed under these nodes in the portal. |
Note the following:
- The Create New, High Priority, Others, and External Links nodes cannot be edited or removed.
- You can add and remove sub-nodes for nodes; however, you cannot add sub-nodes for the Create New node.
- You cannot add tabs to sub-nodes; only edit and remove tabs that exist by default.
To add a node:
-
In Admin Center, select Applications in the left pane.
On the GroupID Portal tab, a portal's card displays its info. -
Click the ellipsis button for a portal and select Settings.
-
Select an identity store under Design Settings to customize the portal for it.
All identity stores linked with the portal are listed under Design Settings. You can design a different portal for each of these. -
Click Navigation Bar in the left pane.
The Navigation Bar page has two tabs: the Navigation Bar Categories tab is used to manage nodes while the Navigation Bars tab is used to manage sub-nodes and their respective tabs. -
Click Navigation Bar Categories to define a new node.
-
On the Navigation Bar Categories tab, click Add. The Add Navigation Category pane is displayed.
-
Enter a name for the node in the Title box. The node will be displayed with this name on the navigation bar.
-
In the Access Level drop-down list, select a security role. The node would be visible to users of this role and roles with a priority value higher than this role. For all other users, the node would be hidden. See Priority.
Select Never to hide the node for all users. -
In the Tooltip Text box, enter the text to appear when a user hovers the mouse over the node.
-
Use the Icon Class box to upload the image (icon) to be displayed with the node name.
-
If no image is uploaded, click Save to browse and select an image for upload.
-
If an image has been uploaded, the very image is displayed. Click the icon below the image to replace the existing image with a new one.
NOTE: Image dimensions: 30 x 30 pixels
Supported formats: .webp, .jpg, .jpe, .jpeg
-
-
Click OK.
-
Click Save on the Navigation Bar page.
Update the Details of a Node
You can update the following details for the Groups, Users, and Requests nodes on the portal’s navigation bar:
- Node name
- Access level
- Tooltip text
- Node icon
The Create New, High Priority, Others, and External Links nodes cannot be modified.
To update a node:
- In Admin Center, select Applications in the left pane.
On the GroupID Portal tab, a portal's card displays its info. - Click the ellipsis button for a portal and select Settings.
- Select an identity store under Design Settings to customize the portal for it.
All identity stores linked with the portal are listed under Design Settings. You can design a different portal for each of these. - Click Navigation Bar in the left pane. Then click the Navigation Bar Categories tab.
- On the Navigation Bar Categories tab, click Edit for a node to update it.
The Edit Navigation Category pane is displayed. Follow step 7 and onwards in the Add a Node (Category) topic to update node details.
Rearrange the Nodes on the Navigation Bar
- In Admin Center, select Applications in the left pane.
On the GroupID Portal tab, a portal's card displays its info. - Click the ellipsis button for a portal and select Settings.
- Select an identity store under Design Settings to customize the portal for it.
All identity stores linked with the portal are listed under Design Settings. You can design a different portal for each of these. - Click Navigation Bar in the left pane. Then click the Navigation Bar Categories tab. The Navigation Bar Categories tab is displayed.
- To rearrange the nodes on the navigation bar, click the equal sign for a node and drag to change
its position.
You can move all except the Create New node. - Click Save.
Remove a User-defined Node
You can delete user-defined nodes on the portal’s navigation bar. System-defined nodes cannot be deleted.
To delete a node:
- In Admin Center, select Applications in the left pane.
On the GroupID Portal tab, a portal's card displays its info. - Click the ellipsis button for a portal and select Settings.
- Select an identity store under Design Settings to customize the portal for it.
All identity stores linked with the portal are listed under Design Settings. You can design a different portal for each of these. - Click Navigation Bar in the left pane. Then click the Navigation Bar Categories tab.
- On the Navigation Bar Categories tab, click Remove for a node to delete it.
- Click Save.
Add a Sub-node to a Node
You can customize the nodes on the portal’s navigation bar by defining sub-nodes for them. Note that:
- You cannot add sub-nodes to the Create New node.
- You cannot add tabs to a sub-node.
To define a sub-node:
-
In Admin Center, select Applications in the left pane.
On the GroupID Portal tab, a portal's card displays its info. -
Click the ellipsis button for a portal and select Settings.
-
Select an identity store under Design Settings to customize the portal for it.
All identity stores linked with the portal are listed under Design Settings. You can design a different portal for each of these. -
Click Navigation Bar in the left pane. The Navigation Bar page is displayed with the Navigation Bars tab selected by default.
-
In the Select Navigation Bar Type drop-down list, select a node on the portal’s navigation bar; its sub-nodes get listed under Name.
-
To add a sub-node to the selected node, click Add .The Add Link pane is displayed.
-
In the Tab Name box, enter a name for the sub-node.
-
In the Display Text box, enter the text to display as the sub-node name on the navigation bar.
-
In the Tooltip Text box, enter the text to appear when a user hovers the mouse over the sub-node.
-
Use the Icon Class box to upload the image (icon) to be displayed with the sub-node name. See step 10 in the Add a Node (Category) topic for details.
The facility to upload an image is not available for sub-nodes under Groups. Users, Requests, and External Links. -
In the URL box, provide the URL of a webpage to link to this sub-node. The respective webpage will be displayed when users click the sub-node in the portal.
Use the following formats to specify the URL:- To link a page from within the Directory Manager portal template:
GroupManagement/Groups/MyGroups - To link to an external webpage:
https://www.xyz.com.
Click View in Browser to preview the webpage.
- To link a page from within the Directory Manager portal template:
-
Select the Open in new tab check box to open the linked page in a new tab in the browser.
If you do not select it, users will directly navigate to the linked page. They will have to use the browser’s back button to return to the previous page. -
In the Access Level drop-down list, select a security role. The sub-node would be visible for users of this role and roles with a priority value higher than this role. For all other users, the sub-node would be hidden. See Priority.
Select Never to hide the sub-node for all users. -
Click OK.
-
Click Save on the Navigation Bar page.
Update the Details of a Sub-node
You can change the following for a sub-node:
- The name of the sub-node
- The display name of the sub-node (this is the sub-node’s name on the portal’s navigation bar)
- The tooltip text for the sub-node
- The URL of the webpage that opens when a user clicks the sub-node
- Access level
To update sub-node properties:
- In Admin Center, select Applications in the left pane.
On the GroupID Portal tab, a portal's card displays its info. - Click the ellipsis button for a portal and select Settings.
- Select an identity store under Design Settings to customize the portal for it.
All identity stores linked with the portal are listed under Design Settings. You can design a different portal for each of these. - Click Navigation Bar in the left pane. The Navigation Bar page is displayed with the Navigation Bars tab selected by default.
- In the Select Navigation Bar Type drop-down list, select a node on the portal’s navigation bar; its sub-nodes get listed under Name.
- Click Edit for a sub-node to update its properties; the Edit Link pane is displayed.
- Follow steps 7-14 in the Add a Sub-node to a Node topic to update the required information and
save it.
The Links section is displayed for system-defined nodes only. Use it to manage the tabs for a sub-node.
Rearrange the Sub-nodes for a Node
- In Admin Center, select Applications in the left pane.
On the GroupID Portal tab, a portal's card displays its info. - Click the ellipsis button for a portal and select Settings.
- Select an identity store under Design Settings to customize the portal for it.
All identity stores linked with the portal are listed under Design Settings. You can design a different portal for each of these. - Click Navigation Bar in the left pane. The Navigation Bar page is displayed with the Navigation Bars tab selected by default.
- In the Select Navigation Bar Type drop-down list, select a node on the portal’s navigation bar; its sub-nodes get listed under Name.
- To rearrange the sub-nodes under the selected node, click the equal sign for a sub-node and drag to change its position.
- Click Save.
Remove a Sub-node from a Node
- In Admin Center, select Applications in the left pane.
On the GroupID Portal tab, a portal's card displays its info. - Click the ellipsis button for a portal and select Settings.
- Select an identity store under Design Settings to customize the portal for it.
All identity stores linked with the portal are listed under Design Settings. You can design a different portal for each of these. - Click Navigation Bar in the left pane. The Navigation Bar page is displayed with the Navigation Bars tab selected by default.
- In the Select Navigation Bar Type drop-down list, select a node on the portal’s navigation bar; its sub-nodes get listed under Name.
- Click Remove for a sub-node to remove it. This also removes all tabs defined for the sub-node.
- Click Save.
Update Tab Properties
You can modify the following for a tab:
- The name of the tab
- The display name of the tab (the tab is displayed in the portal with this name)
- Tooltip text
- The URL of the webpage that opens when a user clicks the tab
- Access level
To update tab properties:
-
In Admin Center, select Applications in the left pane.
On the GroupID Portal tab, a portal's card displays its info. -
Click the ellipsis button for a portal and select Settings.
-
Select an identity store under Design Settings to customize the portal for it.
All identity stores linked with the portal are listed under Design Settings. You can design a different portal for each of these. -
Click Navigation Bar in the left pane. The Navigation Bar page is displayed with the Navigation Bars tab selected by default.
-
In the Select Navigation Bar Type drop-down list, select a node on the portal’s navigation bar; its sub-nodes get listed under Name.
-
Click Edit for a system-defined sub-node. On the Edit Link pane, the Links area lists the tabs for the sub-node (in case the sub-node has tabs).
-
Click Edit for a tab to edit it.
-
On the Edit Link pane (for the tab), update the required information and click OK:
- Link Name – The name of the tab.
- Display Text – The text displayed as the tab name in the portal.
- Tooltip Text – The text that appears when a user hovers the mouse over the tab.
- URL – The address of the webpage to display when a user clicks the tab.
- Access Level – Select a security role. The tab would be visible to users of this role and
roles with a priority value higher than this role. For all other users, the tab would be
hidden. See Priority.
Select Never to hide the tab for all users.
-
Click OK twice on the Edit Link pane.
-
Click Save on the Navigation Bar page.
Rearrange the Tabs for a Sub-node
- In Admin Center, select Applications in the left pane.
On the GroupID Portal tab, a portal's card displays its info. - Click the ellipsis button for a portal and select Settings.
- Select an identity store under Design Settings to customize the portal for it.
All identity stores linked with the portal are listed under Design Settings. You can design a different portal for each of these. - Click Navigation Bar in the left pane. The Navigation Bar page is displayed with the Navigation Bars tab selected by default.
- In the Select Navigation Bar Type drop-down list, select a node on the portal’s navigation bar; its sub-nodes get listed under Name.
- Click Edit for a system-defined sub-node. On the Edit Link pane, the Links area lists the tabs for the sub-node (in case the sub-node has tabs).
- To change the order in which tabs are displayed in the portal, click the equal sign for a tab and drag to change its position.
- Click OK.
- Click Save on the Navigation Bar page.
Remove a Tab from a Sub-node
- In Admin Center, select Applications in the left pane.
On the GroupID Portal tab, a portal's card displays its info. - Click the ellipsis button for a portal and select Settings.
- Select an identity store under Design Settings to customize the portal for it.
All identity stores linked with the portal are listed under Design Settings. You can design a different portal for each of these. - Click Navigation Bar in the left pane. The Navigation Bar page is displayed with the Navigation Bars tab selected by default.
- In the Select Navigation Bar Type drop-down list, select a node on the portal’s navigation bar; its sub-nodes get listed under Name.
- Click Edit for a system-defined sub-node. On the Edit Link pane, the Links area lists the tabs for the sub-node (in case the sub-node has tabs).
- Click Remove for a tab to remove it.
- Click OK.
- Click Save on the Navigation Bar page.
See Also
Specify Attributes for the Object Card
In the portal, the names of directory objects are displayed as links. When a user hovers the mouse over this link, a card is displayed, showcasing information about the object. For a user object, for example, the card displays the name, email address and phone number. It is as:

For each object type, you can specify a different set of attributes to display on this card. For a group, the card is as:

Notice that the card has three sections, namely:
- Header - The card template allows for four attributes to be specified for display in the header. When a specified attribute does not contain a value, NA is displayed on the card.
- Body - You can specify any number of attributes for this section. When you do not specify any attribute, this section is not displayed.
- Footer - This section has the Add To Contact and Send An Email buttons. You can choose whether you want to display these buttons on the card or not.
What do you want to do?
- Manage the Card Header
- Manage the Card Footer
- Specify an Attribute for the Card Body
- Update the Display Name for an Attribute
- Remove an Attribute
Manage the Card Header
By default, four attributes are specified for display in the card header. You can change the default attributes, but you cannot add a fifth attribute or reduce the number to three.
To modify the card header:
- In Admin Center, select Applications in the left pane.
On the GroupID Portal tab, a portal's card displays its info. - Click the ellipsis button for a portal and select Settings.
- Select an identity store under Design Settings to customize the portal for it.
All identity stores linked with the portal are listed under Design Settings. You can design a different portal for each of these. - Click Card View in the left pane. The Card View page is displayed.
- In the Select Directory Object drop-down list, select User, Contact, Group, or Mailbox to manage the card for.
- In the Name list, click Edit for Header.
The Card View Header/Footer pane displays a sample header and how the specified attributes populate it. - From the Title drop-down list, select an attribute whose value will be displayed as the title of the header. By default, the title is set to the object’s display name.
- From the Image drop-down list, select an attribute that can store images for directory objects .
- Use the Attribute 1 and Attribute 2 drop-down lists to select any other object attributes to display on the card. By default, mail and mobile are selected.
- Click OK.
- Click Save on the Card View page.
Manage the Card Footer
- In Admin Center, select Applications in the left pane.
On the GroupID Portal tab, a portal's card displays its info. - Click the ellipsis button for a portal and select Settings.
- Select an identity store under Design Settings to customize the portal for it.
All identity stores linked with the portal are listed under Design Settings. You can design a different portal for each of these. - Click Card View in the left pane.
- On the Card View page, use the Select Directory Object drop-down list to select User, Contact, Group, or Mailbox to manage the card for.
- In the Name list, click Edit for Header.
- In the Footer section of the Card View Header/Footer pane, select the Add to Contact and Send Email check boxes to display the respective buttons on the card.
- Click OK.
- Click Save on the Card View page.
Specify an Attribute for the Card Body
In addition to the card header, you can specify additional object attributes for the card. The values of these attributes would be displayed on the card body.
To add an attribute:
- In Admin Center, select Applications in the left pane.
On the GroupID Portal tab, a portal's card displays its info. - Click the ellipsis button for a portal and select Settings.
- Select an identity store under Design Settings to customize the portal for it.
All identity stores linked with the portal are listed under Design Settings. You can design a different portal for each of these. - Click Card View in the left pane.
- On the Card View page, use the Select Directory Object drop-down list to select User, Contact, Group, or Mailbox to manage the card for.
- Click Add to add an attribute to the body of the card. The Add New Card View Attribute pane is displayed.
- Use the Field Name box to select one or more schema attributes. The value of these attributes will be displayed on the object card.
- Specify a name for the attribute in the Display Name box. The attribute value would be
displayed next to this label on the card.
This box is not available when multiple attributes are selected. - Click OK.
- Click Save on the Card View page.
Update the Display Name for an Attribute
You can update the display name of an attribute on the body of an object card.
To update the display name:
- In Admin Center, select Applications in the left pane.
On the GroupID Portal tab, a portal's card displays its info. - Click the ellipsis button for a portal and select Settings.
- Select an identity store under Design Settings to customize the portal for it.
All identity stores linked with the portal are listed under Design Settings. You can design a different portal for each of these. - Click Card View in the left pane.
- On the Card View page, use the Select Directory Object drop-down list to select User, Contact, Group, or Mailbox to manage the card for.
- In the Name list, click Edit for an attribute.
- On the Edit Card View Attribute pane, the Field Name box is not editable, so you cannot change the attribute. However, you can specify a different display name for it. This display name is displayed on the card's body and the attribute’s value is shown next to it.
- Click OK.
- Click Save on the Card View page.
Remove an Attribute
You can remove an attribute from the body of an object card.
To remove an attribute:
- In Admin Center, select Applications in the left pane.
On the GroupID Portal tab, a portal's card displays its info. - Click the ellipsis button for a portal and select Settings.
- Select an identity store under Design Settings to customize the portal for it.
All identity stores linked with the portal are listed under Design Settings. You can design a different portal for each of these. - Click Card View in the left pane.
- On the Card View page, use the Select Directory Object drop-down list to select User, Contact, Group, or Mailbox to manage the card for.
- In the Name list, click Remove for an attribute to remove it.
- Click Save.
See Also
Specify Attributes for Object List View
In the portal, the object list refers to a listing of groups that are similar to another group, Group similarity is measured on the basis of group type and membership.
Let’s assume you want to view the groups that are similar to Group A. On the Similar Groups tab in Group A’s properties, six groups that bear the most similarity to Group A will be displayed, with the strongest match at the top. It is as:

For a similar group, three attributes are displayed:
- Attribute 1 - The group’s display name. This attribute cannot be changed.
- Attribute 2 - You can specify any attribute. The default attribute is mail.
- Attribute 3 - You can specify any attribute. The default attribute is expiration policy.
What do you want to do?
- Change the Attributes on the Object List
Change the Attributes on the Object List
- In Admin Center, select Applications in the left pane.
On the GroupID Portal tab, a portal's card displays its info. - Click the ellipsis button for a portal and select Settings.
- Select an identity store under Design Settings to customize the portal for it.
All identity stores linked with the portal are listed under Design Settings. You can design a different portal for each of these. - Click Card View in the left pane.
- On the Card View page, select Object List in the Select Directory Object drop-down
list.
The Name list shows the Header option only. - Click Edit for Header.
On the Card View Header/Footer pane, you can view the attributes currently displayed for a similar group in the portal. - The Title box displays the displayName attribute. The value of this attribute will be displayed as the name of a similar group.
- The Image box displays the thumbnailPhoto attribute, which can store images for directory objects .
- Use the Attribute 1 and Attribute 2 boxes to display any other object attributes for similar groups. By default, the mail and expiration policy attributes are selected.
- Click OK.
- Click Save on the Card View page.
See Also
Customize Properties Pages
Directory Manager enables you to customize the property pages displayed in the portal for these directory objects:
- User
- Group (static group)
- Smart Group
- Parent Dynasty
- Middle Dynasty
- Leaf Dynasty
- Mailbox
- Contact
- Computer (Only available for adding to group memberships in the portal. Its properties are read-only.)
NOTE: A Microsoft Entra ID identity store does not support the computer and contact object types.
In the Directory Manager portal, the properties page of an object has multiple tabs, where each tab groups similar attributes. These tabs are referred to as categories.
You can customize the following:
For a tab:
- Add a new tab (category) to an object’s properties page
- Update the details for a tab
- Remove a tab from an object’s properties page
For a field on a tab:
- Add a field to a tab
- Update the details for a field
- Rearrange the fields on a tab
- Remove a field from a tab
What do you want to do?
- Add a Tab (Category)
- Update Tab Details
- Remove a Tab
- Add a Field to a Tab
- Update a Field
- Rearrange the Fields on a Tab
- Remove a Field from a Tab
Add a Tab (Category)
-
In Admin Center, select Applications in the left pane.
On the GroupID Portal tab, a portal's card displays its info. -
Click the ellipsis button for a portal and select Settings.
-
Select an identity store under Design Settings to customize the portal for it.
All identity stores linked with the portal are listed under Design Settings. You can design a different portal for each of these. -
Click Properties in the left pane; the Properties page is displayed.
-
In the Select Directory Object list, select a directory object to add a tab to its properties page.
The Name list displays the tabs (categories) currently available on the object’s properties page. -
Click Add. The Add Design Category pane is displayed.
-
Enter a name for the tab in the Name box. The tab will be displayed on the object’s properties page with this name.
-
In the Visibility Level drop-down list, select a security role. The tab would be visible to users of this role and roles with a priority value higher than this role. The tab would not be visible to group owners (for their respective groups) and user managers (for their direct reports) if they fall in a lower priority role. See Priority.
-
Select Never to hide the tab from all users.
-
Select Manager and Owner to make the tab visible only to the owner (in case of a group) or manager (in case of a user or contact). It would be hidden from other users, such as group members or a user. For example:
- If Manager and Owner is selected for the Email tab in group properties, the tab would be visible to group owners for their respective groups in the portal.
- If Manager and Owner is selected for the Account tab in user properties, the tab would be visible to managers for their respective direct reports in the portal.
-
If you have selected ‘User’ or ‘Mailbox’ in the Select Directory Object drop-down list, the Self option is also available in the Visibility Level drop-down list. Select Self to make the tab visible to the respective user or mailbox. It would be hidden from other users, such as the user’s manager. For example, if the Self role is selected for the General tab in user properties, it means that:
- A user can view the General tab on his or her properties page. He or she cannot view this tab on the properties page of another user.
- A role with a higher priority value cannot see it for another user.
- User managers cannot view it for their direct reports.
- A role with the ‘Manage any profile’ permission in the identity store cannot view it for other users.
-
-
In the Access Level drop-down list, select a security role. Users of this role and roles with a priority value higher than it can add and update the values of fields on this tab. If group owners/user managers fall in a lower priority role, they cannot update the fields on the tab for their respective groups/direct reports. See Priority.
-
Select Never to make the tab and its fields read-only for all users.
-
Select Manager and Owner to enable the owner (in case of a group) or manager (in case of a user or contact) to specify or modify the value of the fields on the tab. It would be read-only for other users, such as group members or the respective user. For example, if Manager and Owner is selected for the Email tab in group properties, it means that:
- Only group owners can specify or modify the values of fields on this tab for their respective groups in the portal.
- A role with a higher priority value cannot specify or update field values.
- Group members cannot specify or update field values.
- A role with the ‘Manage any Group’ permission in the identity store cannot specify or update field values.
-
If you have selected ‘User’ or ‘Mailbox’ in the Select Directory Object list, the Self option is available in the Access Level drop-down list.
Select Self to enable the respective user or mailbox to specify or modify the value of the fields on the tab. The tab would be read-only for the user’s manager and other users. For example, if Self is selected for the General tab in user properties, it means that:- Only the user can add and update the values of fields on the General tab of his or her properties page.
- A role with a higher priority value cannot specify or update field values.
- The user’s manager cannot specify or update field values.
- A role with the ‘Manage any profile’ permission in the identity store cannot specify or update field values.
-
-
To add fields to the tab, see the Add a Field to a Tab topic.
-
Click OK.
-
Click Save on the Properties page.
Update Tab Details
You can change the following for a tab:
- Tab name
- Visibility level
- Access level
- Add and remove fields from the tab
To update a tab:
- In Admin Center, select Applications in the left pane.
On the GroupID Portal tab, a portal's card displays its info. - Click the ellipsis button for a portal and select Settings.
- Select an identity store under Design Settings to customize the portal for it.
All identity stores linked with the portal are listed under Design Settings. You can design a different portal for each of these. - Click Properties in the left pane.
- On the Properties page, select a directory object in the Select Directory Object list.
- In the Name list, click Edit for the tab you want to update.
- On the Edit Design Category pane, update the tab details. Refer to step 7 and onwards in the Add a Tab (Category) topic for details.
Remove a Tab
- In Admin Center, select Applications in the left pane.
On the GroupID Portal tab, a portal's card displays its info. - Click the ellipsis button for a portal and select Settings.
- Select an identity store under Design Settings to customize the portal for it.
All identity stores linked with the portal are listed under Design Settings. You can design a different portal for each of these. - Click Properties in the left pane.
- On the Properties page, select a directory object in the Select Directory Object list.
- In the Name list, click Remove for a tab to remove it.
- Click Save.
Add a Field to a Tab
-
In Admin Center, select Applications in the left pane.
On the GroupID Portal tab, a portal's card displays its info. -
Click the ellipsis button for a portal and select Settings.
-
Select an identity store under Design Settings to customize the portal for it.
All identity stores linked with the portal are listed under Design Settings. You can design a different portal for each of these. -
Click Properties in the left pane.
-
On the Properties page, select a directory object in the Select Directory Object list.
-
In the Name list, click Edit for the tab you want to add a field to.
-
On the Edit Design Category pane, click Add Field; the Add Field pane is displayed.
-
In the Field drop-down list, select a schema attribute to link to this field.
Updating the field in the portal is akin to updating the value of this attribute. -
In the Display Name box, enter a display name for the field. This name is the field’s label on the tab.
-
In the Display Type drop-down list, select the display type to use for rendering this field on the tab.
The list contains basic display types and custom display types defined on the Custom Display Types page. See the Display Type Categories topic. -
In the Visibility Level drop-down list, select a security role. The tab would be visible to users of this role and roles with a priority value higher than this role. It would not be visible to group owners (for their respective groups) and user managers (for their direct reports) if they fall under a lower priority role. See Priority.
-
Select Never to hide the field from all users.
-
Select Manager and Owner to make the field visible only to the owner (in case of a group) or manager (in case of a user or contact). It would be hidden from other users, such as group members or a user. For example:
- If Manager and Owner is selected for the Expiration Date field on the General tab in group properties, the field would be visible to group owners for their respective groups in the portal.
- If Manager and Owner is selected for the Manager field on the Organization tab in user properties, the field would be visible to managers for their direct reports in the portal.
-
If you have selected ‘User’ or ‘Mailbox’ in the Select Directory Object drop-down list, the Self option is also available in the Visibility Level drop-down list. Select Self to make the field visible to the respective user or mailbox. It would be hidden from other users, such as the user’s manager. For example, if Self is selected for the Notes field on the Phone/Notes tab in user properties, it means that:
- A user can view the field on his or her properties page only. He or she cannot see this field on the properties page of another user.
- A role with a higher priority value cannot view it for another user.
- User managers cannot view it for their direct reports.
- A role with the ‘Manage any profile’ permission in the identity store cannot view it for other users.
-
-
In the Access Level drop-down list, select a security role. Users of this role and roles with a priority value higher than this role can add and update the value of this field. If group owners/user managers fall in a lower priority role, they cannot able to update the value of the field for their respective groups/direct reports. See Priority.
-
Select Never to make this field read-only for all users.
-
Select Manager and Owner to enable only the owner (in case of a group) or manager (in case of a user or contact) to specify or modify the value of this field. It would be read-only for other users, such as group members or the respective user. For example, if Manager and Owner is selected for the Expiration Date field on the General tab in group properties, it means that:
- Only group owners can specify or modify the value of this field for their groups in the portal.
- A role with a higher priority value cannot specify or update the field value.
- Group members cannot specify or update the field value.
- A role with the ‘Manage any Group’ permission in the identity store cannot specify or update the field value.
-
If you have selected ‘User’ or ‘Mailbox’ in the Select Directory Object list, the Self option is available in the Access Level drop-down list. Select Self to enable the respective user or mailbox to specify or modify the value of the field. The field would be read-only for other users, such as the user’s manager or a role with a higher priority value. For example, if Self is selected for the Notes field on the Phone / Notes tab in user properties, it means that:
- Only the respective user can add and update the value of this field on the Phone / Notes tab in his or her properties page.
- A role with a higher priority value cannot specify or update the field value.
- The user’s manager cannot specify or update the field value.
- A role with the ‘Manage any profile’ permission in the identity store cannot specify or update the field values.
-
-
Click Advanced Options to display additional fields.
-
As mentioned for visibility level and access level, the field is visible and editable for members of the selected role and roles with a priority value higher than it.
In the Exclude Roles area, select the check boxes for the higher priority role(s) to deny them access and visibility on the field. -
In the Tooltip Text box, enter the text to display when a user hovers the mouse over the field.
-
In the Max Length box, enter a number that represents the maximum number of characters that users can enter as value for this field.
Entering 0 indicates that users can enter an unlimited number of characters as value. -
Use the Search Object Types area to specify the object types (User, Contact, and/or Group) that can be searched on the portal’s Find dialog box, to set as value for the field.
The following display types support the Find dialog box:- DN
- DNs
- Custom display types created with the Grid type
When you select any of these display types, Directory Manager identifies that the value for the field has to be searched and selected using the Find dialog box. The Search Object Types area is displayed, where you can select the required object type(s). For example, if you select Group, only groups can be searched and selected as value for the field.
You can launch the Find dialog box from multiple portal pages to search for objects to designate as owners, managers, additional owners, members, and more. While specifying the searchable object type(s), you must be aware of the kind of value the field requires. -
Select the Is Required check box to make it mandatory for users to provide a value for the field.
-
Select the Is Read Only check box to make the field read-only.
-
Select the Filter Bad Words check box to ensure that users do not enter any bad word in this field.
A value entered for the field is checked against the words listed on the Bad Words List page. Matched values cannot be saved. See the Manage the Bad Words List topic. -
The Image Attribute list is available when ‘DN’ is selected as the display type. This list supports ‘thumbnailPhoto’ as its value.
- Select the ‘thumbnailPhoto’ attribute in the Image Attribute drop-down list when you want
to auto upload an image for the field. Let’s assume you apply this setting for the Primary
Manager field in group properties. In the portal, the primary manager's image will be
displayed alongside his or her name on the group properties page.
Note that for the image to display, the ‘thumbnailPhoto’ attribute must have a value stored; in case of no value, an image placeholder is displayed. - If you do not want to auto upload an image for the field, clear the value in the Image Attribute box.
- Select the ‘thumbnailPhoto’ attribute in the Image Attribute drop-down list when you want
to auto upload an image for the field. Let’s assume you apply this setting for the Primary
Manager field in group properties. In the portal, the primary manager's image will be
displayed alongside his or her name on the group properties page.
-
Click OK.
The field is displayed in the Fields area on the Edit Design Category pane. You can rearrange the fields, update field details, and even remove a field from the tab. -
Click OK.
-
Click Save on the Properties page.
Update a Field
You can change the following for a field:
- The name of the field (used as the field’s label in the portal)
- The schema attribute linked with the field
- The display type used to render the field in the portal
- Visibility level
- Access level
- Tooltip
The following field properties vary from field to field. You can:
- Specify the maximum characters that a user can enter as value for the field
- Make the field editable or read–only
- Place a check that prevents users from using certain words as value for the field
- Make it optional or mandatory for users to provide a value for the field
- For search fields, you can specify the object types (groups, users, contacts) that can be searched and set as field value
- Specify whether to auto upload user photos with fields that require user names as value
To update a field:
- In Admin Center, select Applications in the left pane.
On the GroupID Portal tab, a portal's card displays its info. - Click the ellipsis button for a portal and select Settings.
- Select an identity store under Design Settings to customize the portal for it.
All identity stores linked with the portal are listed under Design Settings. You can design a different portal for each of these. - Click Properties in the left pane.
- On the Properties page, select a directory object in the Select Directory Object list.
- In the Name list, click Edit for the tab you want to update a field for.
- On the Edit Design Category pane, click Edit for a field.
- On the Edit Field pane, update the field details. Refer to step 8 and onwards in the Add a Field to a Tab topic to update the required details and save the changes.
Rearrange the Fields on a Tab
- In Admin Center, select Applications in the left pane.
On the GroupID Portal tab, a portal's card displays its info. - Click the ellipsis button for a portal and select Settings.
- Select an identity store under Design Settings to customize the portal for it.
All identity stores linked with the portal are listed under Design Settings. You can design a different portal for each of these. - Click Properties in the left pane.
- On the Properties page, select a directory object in the Select Directory Object list.
- In the Name list, click Edit for the tab you want to rearrange the fields for.
- On the Edit Design Category pane, the Fields area displays the fields on the tab.
To rearrange the fields, click the equal sign for a field and drag to change its position. - Click OK.
- Click Save on the Properties page.
Remove a Field from a Tab
- In Admin Center, select Applications in the left pane.
On the GroupID Portal tab, a portal's card displays its info. - Click the ellipsis button for a portal and select Settings.
- Select an identity store under Design Settings to customize the portal for it.
All identity stores linked with the portal are listed under Design Settings. You can design a different portal for each of these. - Click Properties in the left pane.
- On the Properties page, select a directory object in the Select Directory Object list.
- In the Name list, click Edit for the tab you want to remove a field from.
- On the Edit Design Category pane, the Fields area displays the fields on the tab.
Click Remove for a field to remove it. - Click OK.
- Click Save on the Properties page.
See Also
Specify Attributes for Organizational Hierarchy
Using the portal, you can view the organizational hierarchy for a user in the organization. This hierarchy is displayed in graphical form, creating a kind of an organogram. It presents a 360° view of the organization with the specified user as the focal point.
By default, the organizational hierarchy chart displays four attributes of a user: title, display name, email, and picture. You can replace an attribute with another one but you cannot add or remove attributes. Hence the attribute count remains ‘four’.
What do you want to do?
- Replace an Attribute on the Organizational Hierarchy Tree
Replace an Attribute on the Organizational Hierarchy Tree
- In Admin Center, select Applications in the left pane.
On the GroupID Portal tab, a portal's card displays its info. - Click the ellipsis button for a portal and select Settings.
- Select an identity store under Design Settings to customize the portal for it.
All identity stores linked with the portal are listed under Design Settings. You can design a different portal for each of these. - Click Organizational Hierarchy in the left pane. The Organizational Hierarchy page is
displayed.
By default, the Display Name area displays four attributes. The values of these attributes are displayed for users on the organizational hierarchy chart in the portal. You can only replace an attribute with another attribute; you cannot add a fifth attribute or reduce the list to three. - Click Edit for an attribute to replace it. The Edit Field pane is displayed.
- In the Field drop-down list, select a schema attribute to display on the organizational hierarchy chart.
- In the Display Name box, enter a user-friendly name for the attribute, that would serve as the attribute name on the chart. The attribute’s value will be displayed next to this name.
- In the Display Type drop-down list, select the display type to use for rendering the
attribute on the organizational hierarchy chart. The display type must match the attribute. For
example, the ‘TreePicture’ display type matches the ‘thumbnailPhoto’ attribute.
This list contains basic display types and custom display types defined on the Custom Display Types page. See the Display Type Categories topic. - Click OK.
- Click Save on the Organizational Hierarchy page.
See Also
Manage Property Validation Attributes
In Directory Manager, property validation applies to:
- Users
- Groups
Profile Validation for Users
Profile validation is designed to ensure the accuracy of users’ information in the directory. It applies to users who are members of the group specified for profile validation in an identity store. These users must verify and update their directory profile information at a set frequency using the portal.
While validating his or her profile, a user can:
- Update his or her directory profile information
- Change his or her primary manager
- Transfer his or her direct reports to another manager
- Terminate his or her direct reports
You can specify the schema attributes (fields) for user profile validation. These attributes (fields) are displayed on the Validate Profile Properties window of the portal, where users can validate and update the values for these attributes.
NOTE: A few fields for profile validation are specified in the default portal template. You can add more fields, edit the existing fields, or remove them. However, the My Direct Reports field can neither be edited nor removed.
Property Validation for Groups
The Directory Manager administrator can enforce group owners to review and validate the attributes and membership of an expiring group before renewing it. See the Enable Group Attestation topic.
While attesting a group in the portal, the owner can:
- Update a few attributes, such as the group’s display name, expiration policy, security type, etc.
- Verify the group’s membership and inactivate undesired members. Inactive members are removed from group membership instantly or after x number of days, depending on the configurations made by the administrator.
Group attestation applies to expiring groups with an expiry policy other than ‘never expire’.
You can specify the schema attributes (fields) for group attestation. These attributes (fields) are displayed on the Attest & Renew Group wizard in the portal, where group owners can validate and update the values for these attributes.
NOTE: A few fields for group attestation are specified in the default portal template. You can add more fields, edit the existing fields, or remove them. However, the Members grid can neither be edited nor removed.
What do you want to do?
- Add a Property Validation Field
- Update a Field
- Remove a Field
Add a Property Validation Field
-
In Admin Center, select Applications in the left pane.
On the GroupID Portal tab, a portal's card displays its info. -
Click the ellipsis button for a portal and select Settings.
-
Select an identity store under Design Settings to customize the portal for it.
All identity stores linked with the portal are listed under Design Settings. You can design a different portal for each of these. -
Click Property Validation in the left pane. The Property Validation page is displayed.
-
In the Select Directory Object drop-down list, select:
- Group: to add, edit, or remove attributes for group attestation.
- User: to add, edit, or remove attributes for user profile validation.
On selecting an option, the fields available for group attestation/profile validation in the portal are listed under Name.
-
Click Add to specify a new attribute (field) for group attestation/profile validation.
The Add Profile Validation Attribute pane is displayed. -
Select an attribute from the Field drop-down list.
-
In the Display Name box, specify a name to use as the field’s label on the Attest & Renew Group wizard/Validate Profile Properties window of the portal.
-
Use the Display Type drop-down list to specify the display type to use for rendering the attribute in the portal. The list contains basic display types and custom display types defined on the Custom Display Types page. See the Display Type Categories topic.
-
In the Visibility Level drop-down list, select a security role. The field would be visible to users of this role and roles with a priority value higher than this role. See Priority.
Select Never to hide the field from all users. -
As mentioned for visibility level, the field is visible to members of the selected role and roles with a priority value higher than the selected role.
In the Exclude Roles area, select the check boxes for the higher priority role(s) you want to hide the field from. -
In the ToolTip Text box, enter the text to display when a user hovers the mouse over the field.
-
In the Max Length box, enter a number that represents the maximum number of characters that users can enter as value for the field. Entering 0 indicates that the field can accept an unlimited number of characters for its value.
-
Select the Is Required check box to make it mandatory for users to provide a value for the field.
-
Select the Is Read Only check box to make the field read-only.
-
Select the Filter Bad Words check box to ensure that users do not enter any bad word in this field.
A value entered for the field is checked against the words listed on the Bad Words List page. Matched values cannot be saved. See the Manage the Bad Words List topic. -
The Image Attribute list is available when ‘DN’ is selected as the display type. This list supports ‘thumbnailPhoto’ as its value.
- Select the ‘thumbnailPhoto’ attribute in the Image Attribute drop-down list when you want
to auto upload an image for the field. Let’s assume you apply this setting while defining the
Primary Manager field on the Validate Profile Properties window. In the portal, the
primary manager's image will be displayed alongside his or her name on the Validate Profile
Properties window.
Note that for the image to display, the ‘thumbnailPhoto’ attribute must have a value stored; in case of no value, an image placeholder is displayed. - If you do not want to auto upload an image for the field, clear the value in the Image Attribute box.
- Select the ‘thumbnailPhoto’ attribute in the Image Attribute drop-down list when you want
to auto upload an image for the field. Let’s assume you apply this setting while defining the
Primary Manager field on the Validate Profile Properties window. In the portal, the
primary manager's image will be displayed alongside his or her name on the Validate Profile
Properties window.
-
Click OK.
-
Click Save on the Property Validation page.
Update a Field
You can change the following for a field available in the portal for group attestation or user profile validation:
- The attribute mapped to the field
- The display name (the field is displayed with this label in the portal)
- The display type used to render the field in the portal
- Visibility level
- Tooltip
The following field properties vary from field to field. You can:
- Specify the maximum characters that a user can enter as value for the field
- Whether to auto upload an image with the field
- Make the field editable or read–only
- Make it optional or mandatory for users to provide a value for the field
- Prevent users from using certain words as value for the field
To update field properties:
-
In Admin Center, select Applications in the left pane.
On the GroupID Portal tab, a portal's card displays its info. -
Click the ellipsis button for a portal and select Settings.
-
Select an identity store under Design Settings to customize the portal for it.
All identity stores linked with the portal are listed under Design Settings. You can design a different portal for each of these. -
Click Property Validation in the left pane.
-
On the Property Validation page, select Group or User in the Select Directory Object drop-down list.
- Group: to update a field for group attestation
- User: to update a field for user profile validation
-
In the Name area, click Edit for a field.
-
On the Edit Profile Validation Attribute pane, update the required information. Follow steps 7-19 in the Add a Property Validation Field topic for help.
Remove a Field
-
In Admin Center, select Applications in the left pane.
On the GroupID Portal tab, a portal's card displays its info. -
Click the ellipsis button for a portal and select Settings.
-
Select an identity store under Design Settings to customize the portal for it.
All identity stores linked with the portal are listed under Design Settings. You can design a different portal for each of these. -
Click Property Validation in the left pane.
-
On the Property Validation page, select Group or User in the Select Directory Object drop-down list.
- Group: to remove a field from the Attest & Renew Group wizard in the portal.
- User: to remove a field from the Validate Profile Properties window in the portal.
-
In the Name area, click Remove for a field to remove it.
-
Click Save.
See Also
Specify Smart Group Query Attributes
For an identity store, you can choose whether all or specific schema attributes should be available on the following pages in the portal:
-
The Query Designer, where you can specify queries for Smart Groups and Dynasties for membership update. The Query Designer can be launched from:
- The Create Object wizard for Smart Groups and Dynasties
- The properties page for Smart Groups and Dynasties
- When you upgrade a static group to a Smart Group or Dynasty
The schema attributes you specify would be available to portal users on the Filter Criteria tab of the Query Designer for building Smart Group/Dynasty queries.
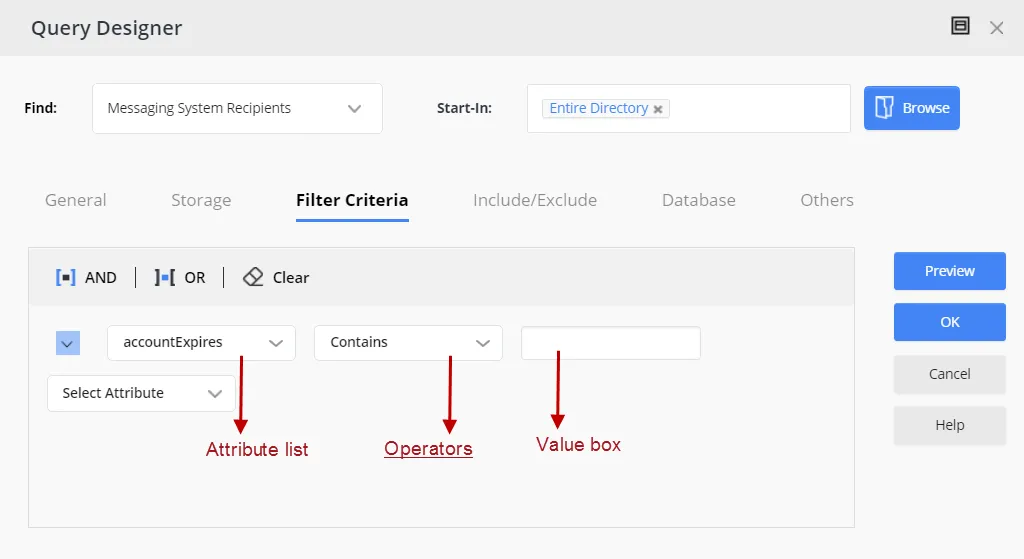
-
The Sub-Manager Query Designer for a Recursive Managerial Dynasty, where you can specify a query for sub-manager selection.
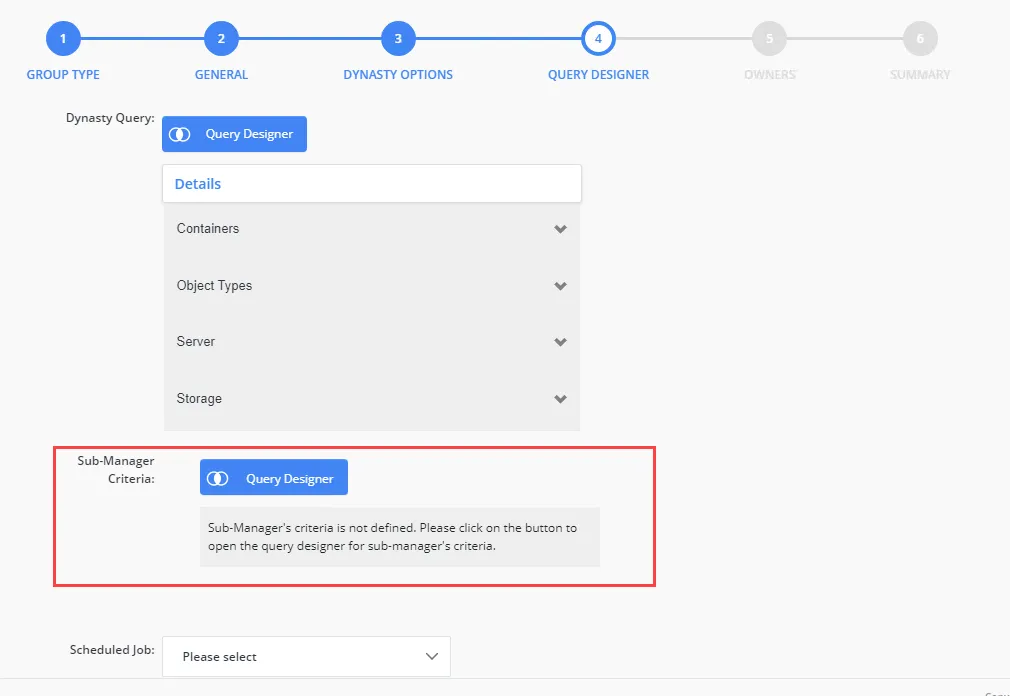
-
The Add Attributes dialog box for Dynasties. The schema attributes you specify would be available in the Group Items By field, which is used to divide the query results into groups. Directory Manager creates a new child group for each unique value of the attribute that users select in the Group Items By field.

-
The Query Designer for importing members to a group using an external data source. The specified schema attributes would be available on the Filter Criteria tab of the Query Designer for building membership import queries.
You can launch this Query Designer using the Import button on the Members tab in group properties (for static groups, Smart Groups and Dynasties).
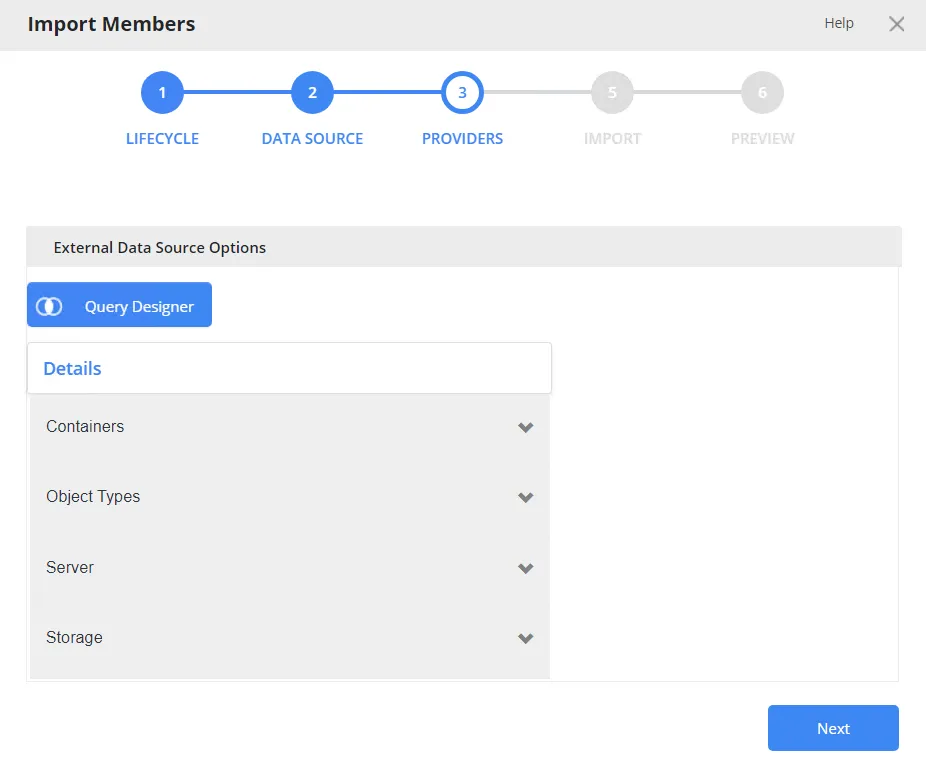
-
The Query Designer for query-based search, where users can define a query to search the directory.
The schema attributes you specify would be available to portal users on the Filter Criteria tab of the Query Designer for building search queries.
Users can launch the Query Designer for searches from the portal’s Advanced Search page.
You can also specify the following for an attribute:
- The operator(s) that can be applied to the attribute on the Query Designer dialog boxes. For example, if you allow the ‘Contains’ and ‘Equals’ operators for the ‘cn’ attribute, then only these operators will be displayed when users select the ‘cn’ attribute on any of the Query Designers.
- The display type to use for specifying the value of the attribute. For example, it can be a simple text box, a drop-down list, or a button that launches the Find dialog box for searching and selecting an object.
- The maximum number of characters that users can enter as value for an attribute.
Allow All Schema Attributes
- In Admin Center, select Applications in the left pane.
On the GroupID Portal tab, a portal's card displays its info. - Click the ellipsis button for a portal and select Settings.
- Select an identity store under Design Settings to customize the portal for it.
All identity stores linked with the portal are listed under Design Settings. You can design a different portal for each of these. - Click Smart Group Attributes in the left pane.
- On the Smart Group Attributes page, click the All Attributes tile under Select Smart
Group Attributes.
All schema attributes in the identity store (directory) would be available to portal users on the different Query Designers and the Add Attributes dialog box. - Click Save.
Allow Specific Attributes
-
In Admin Center, select Applications in the left pane.
On the GroupID Portal tab, a portal's card displays its info. -
Click the ellipsis button for a portal and select Settings.
-
Select an identity store under Design Settings to customize the portal for it.
All identity stores linked with the portal are listed under Design Settings. You can design a different portal for each of these. -
Click Smart Group Attributes in the left pane.
-
On the Smart Group Attributes page, click the Selected Attributes tile under Select Smart Group Attributes. The Name column lists any attributes that you have already specified.
-
To add an attribute, click Add. The Add Smart Group Attribute pane is displayed.
-
Use the Fields box to select one or more schema attributes. These attributes would be available in the portal, where users can use them for building Smart Group queries and other purposes.
-
Use the Display Name box to specify a user-friendly name for the attribute. The attribute would be displayed in the portal with this name.
This box is not available when multiple attributes have been selected. -
Select a security role in the Visibility Level drop-down list. The attribute(s) would be visible to users of the selected role and roles with a priority value higher than the selected role. See Priority.
Select Never to hide the attribute(s) from all users. -
Use the Display Type drop-down list to specify the display type to use for enabling users to provide a value for the attribute(s) in the portal. For example, you can select a text box, drop-down list, or DN as display type. In case of DN, users can search and select a directory object as value for the attribute.
The list contains basic display types and custom display types defined on the Custom Display Types page. See the Display Type Categories topic.
When multiple attributes are selected in the Fields box, this display type applies to each of them. You can edit an attribute later to apply a different display type. -
In the ToolTip Text box, enter the text to display when a user hovers the mouse over the attribute .
This box is not available when multiple attributes have been selected.
-
In the Max Length box, enter a number that represents the maximum number of characters that users can enter as value for an attribute.
Entering 0 indicates that the attribute(s) can accept an unlimited number of characters as value. -
The Selected Operators area lists the operators that can be applied to attributes in the Query Designers.
Select the check box for the operator(s) you want to provide for the selected attribute(s). -
Click OK.
-
Click Save on the Smart Group Attributes page.
Update the Properties of a Query Attribute
You can change the following for an attribute:
- The display name of the attribute (the attribute is displayed with this name in the Query Designers and the Add Attribute dialog box)
- The operators that users can apply to the attribute in the Query Designers
- The display type used to provide a value for the attribute in the Query Designers
- The maximum characters that users can enter as value for the attribute in the Query Designers
- Visibility level
- Tooltip
To update attribute properties:
- In Admin Center, select Applications in the left pane.
On the GroupID Portal tab, a portal's card displays its info. - Click the ellipsis button for a portal and select Settings.
- Select an identity store under Design Settings to customize the portal for it.
All identity stores linked with the portal are listed under Design Settings. You can design a different portal for each of these. - Click Smart Group Attributes in the left pane.
- On the Smart Group Attributes page, click the Selected Attributes tile under Select Smart Group Attributes. The Name column lists any attributes that you have already specified.
- Click Edit for an attribute to update its properties.
- On the Edit Smart Group Attribute pane, the attribute name is read-only. To update all other details, follow steps 8 - 15 in the Allow Specific Attributes topic.
Remove a Query Attribute
- In Admin Center, select Applications in the left pane.
On the GroupID Portal tab, a portal's card displays its info. - Click the ellipsis button for a portal and select Settings.
- Select an identity store under Design Settings to customize the portal for it.
All identity stores linked with the portal are listed under Design Settings. You can design a different portal for each of these. - Click Smart Group Attributes in the left pane.
- On the Smart Group Attributes page, click the Selected Attributes tile under Select Smart Group Attributes. The Name column lists any attributes that you have already specified.
- Click Remove for an attribute to remove it. Removed attributes would not be available in the portal for building Smart Group queries and other purposes. However, Smart Groups and Dynasti created using those attributes will be unaffected.
- Click Save.
See Also
The ‘Send on Behalf’ and ‘Send As’ Permissions
Using the portal, a user can delegate the Send on Behalf and Send As permissions to other objects.
The Send on Behalf Permission
The Send on Behalf permission in Microsoft Exchange and Office 365 allows a user to send an email as another user, while showing the recipient that it was sent from a user on behalf of another user.
For example, when User A grants Send on Behalf permissions to User B, then User B can send email on behalf of User A. User B will be able to choose User A’s email address in the ‘From’ field when composing a message in Outlook. Message recipients will see both User A’s address and User B’s address, as the ‘From’ address will read as:
From: Mailbox <User B's address> on behalf of Mailbox <User A's address>.
The Send As Permission
The Send As permission in Microsoft Exchange and Office 365 enables a user to send a message as another user. For example, when User A grants Send As permissions to User B, User B will be able to choose User A’s email address in the ‘From’ field when composing a message in Outlook. This message, while sent by User B, will appear as sent by User A.
Prerequisites for the Send As and Send on Behalf Permissions
In the following content, a ‘target object’ refers to the object that can add other objects to its Send As and Send on Behalf lists using the portal.
- The target object can be a mailbox or a mail-enabled group.
- Microsoft Exchange or Office 365 must be configured as the messaging provider for the identity store.
- An SMTP server must be configured for the identity store.
- The user logged in the portal must have the “Manage any Profile” permission for its respective role in the identity store.
- The XAdPermissionExtendedRights attribute should be available for Send As and the publicDelegates attribute should be available for Send on Behalf.
- The ExchangeTrustedsubsystem object should have modify permissions on the target objects in Active Directory for the Send As permission to be set using the portal. For more information, see Access denied when you try to give user "send-as" or "receive as" permission for a Distribution Group in Exchange Server.
What do you want to do?
- Set up the Send As Feature
- Set up the Send on Behalf Feature
Set up the Send As Feature
You can provide the Send As setting on any tab of an object’s properties page in the portal. This would enable the object to delegate the Send As permission to users.
-
In Admin Center, select Applications in the left pane.
On the GroupID Portal tab, a portal's card displays its info. -
Click the ellipsis button for a portal and select Settings.
-
Select an identity store under Design Settings to customize the portal for it.
All identity stores linked with the portal are listed under Design Settings. You can design a different portal for each of these. -
Click Properties in the left pane. The Properties page is displayed.
-
In the Select Directory Object drop-down list, select a Mailbox or Group object to add the Send As setting to its properties page. The Name list displays the tabs on the object’s properties page.
-
Click Edit for a tab (for example, the Email tab).
The Edit Design Category pane is displayed, with the Fields area displaying the fields on the tab. -
Click Add Field to add the Send As field. The Add Field pane is displayed.
-
In the Field drop-down list, select the XAdPermissionExtendedRights attribute.
-
In the Display Name box, provide a label for the field, such as ‘Send As Permissions’. The Send As field will be displayed with this name in the portal.
-
In the Display Type drop-down list, select ‘DNs’.
-
In the Visibility Level drop-down list, select a security role. The Send As field would be visible to users of this role and roles with a priority value higher than this role. It would not even be visible to group owners (for their respective groups) and user managers (for their direct reports) if they fall in a lower priority role. See Priority.
- Select Never to hide the field from all users.
- Select Manager and Owner to make the field visible only to the owner (in case of a group) or manager (in case of a mailbox). It would be hidden from other users, such as group members or the mailbox itself. In other words, the field would be visible to group owners for their respective groups and to managers for their respective direct reports in the portal.
- If you have selected ‘Mailbox’ in the Select Directory Object list, the Self option is also available in the Visibility Level drop-down list. Select Self to make the field visible only to the mailbox on his or her properties page. It would not be visible to any other user, such as a role with a higher priority value or a role with the ‘Manage any profile’ permission in the identity store.
-
In the Access Level drop-down list, select a security role. Users of this role and roles with a priority value higher than this role can add and update the value of the Send As field, i.e., add and remove objects in the Send As list. If group owners/user managers fall in a lower priority role, they would not be able to update the value of the field for their respective groups/direct reports.
- Select Never to make the field read-only for all users.
- Select Manager and Owner to enable only the owner (in case of a group) or manager (in case
of a mailbox) to specify or modify the value of this field. It would be read-only for other
users, such as group members or the mailbox itself.
In other words, only group owners can specify or modify the value of this field for their respective groups in the portal. A role with a higher priority value cannot change the value; group members cannot change the value; and even a role with the ‘Manage any Group’ permission in the identity store cannot change the value.
Similarly, only mailbox managers can specify or modify the value of this field for their respective direct reports in the portal. A role with a higher priority value cannot change the value; and even a role with the ‘Manage any profile’ permission in the identity store cannot change the value. - If you have selected ‘Mailbox’ in the Select Directory Object drop-down list, the Self option is available in the Access Level drop-down list. Select Self to enable the mailbox to specify or modify the value of the field. It would be read-only for other users, such as the mailbox’s manager or a role with a higher priority value or even a role with the ‘Manage any profile’ permission in the identity store.
-
As mentioned for access level and visibility level, the field is editable and visible to members of the selected role and roles with a priority value higher than the selected role.
In the Exclude Roles area, select the check boxes for the higher priority role(s) to deny them access and visibility on the field. -
Use the Search Object Types area to specify the object types that can be searched on the portal’s Find dialog box, to set as value for the Send As field.
The following display types support the Find dialog box:- DN
- DNs
- Custom display types created with the Grid type
When you select any of these display types, Directory Manager identifies that the value for the Send As field has to be searched using the Find dialog box. The Search Object Types area is displayed, where you can select the required object type(s). For example, if you select User, only user objects can be searched and selected as value for the field.
-
Select the Is Required check box to make it mandatory for users to add at least one object to the Send As list.
-
Select the Is Read Only check box to make the Send As field read-only.
-
Click OK on the Add Field pane and the Edit Design Category pane.
-
Click Save on the Properties page.
The Send As Field in the Portal
Launch the portal and go to the properties of the target object (group or mailbox) you defined the Send As field for, then click the respective tab. The Send As field is displayed as follows:

Use the Add and Remove buttons to add and remove objects in the Send As list. The added objects can send email for the target object in accordance with the Send As functionality.
Set up the Send on Behalf Feature
You can provide the Send on Behalf setting on any tab of an object’s properties page in the portal. This would enable the object to delegate the Send on Behalf permission to users.
-
In Admin Center, select Applications in the left pane.
On the GroupID Portal tab, a portal's card displays its info. -
Click the ellipsis button for a portal and select Settings.
-
Select an identity store under Design Settings to customize the portal for it.
All identity stores linked with the portal are listed under Design Settings. You can design a different portal for each of these. -
Click Properties in the left pane. The Properties page is displayed.
-
In the Select Directory Object list, select a Mailbox or Group object to add the Send on Behalf setting to its properties page. The Name list displays the tabs on the object’s properties page.
-
Click Edit for a tab (for example, the Email tab).
The Edit Design Category pane is displayed, with the Fields area displaying the fields on the tab. -
Click Add Field to add the Send on Behalf field. The Add Field pane is displayed.
-
In the Field drop-down list, select the publicDelegates attribute.
-
In the Display Name provide a label for the field, such as ‘Send on Behalf Permissions’. The Send on Behalf field will be displayed with this name on the portal.
-
In the Display Type drop-down list, select ‘DNs’.
-
In the Visibility Level drop-down list, select a security role. The Send on Behalf field would be visible to users of this role and roles with a priority value higher than this role. It would not be visible to group owners (for their groups) and user managers (for their direct reports) if they fall in a lower priority role. See Priority.
- Select Never to hide the field from all users.
- Select Manager and Owner to make the field visible only to the owner (in case of a group) or manager (in case of a mailbox). It would be hidden from other users, such as group members or the mailbox itself. In other words, the field would be visible to group owners for their respective groups and to managers for their respective direct reports in the portal.
- If you have selected ‘Mailbox’ in the Select Directory Object list, the Self option is also available in the Visibility Level drop-down list. Select Self to make the field visible only to the mailbox on his or her properties page. It would not be visible to any other user, such as a role with a higher priority value or a role with the ‘Manage any profile’ permission in the identity store.
-
In the Access Level drop-down list, select a security role. Users of this role and roles with a priority value higher than this role can add and update the value of the Send on Behalf field, i.e., add and remove objects in the Send on Behalf list. If group owners/user managers fall in a lower priority role, they would not be able to update the value of the field for their respective groups/direct reports.
- Select Never to make the field read-only for all users.
- Select Manager and Owner to enable only the owner (in case of a group) or manager (in case
of a mailbox) to specify or modify the value of this field. It would be read-only for other
users, such as group members or the mailbox itself.
In other words, only group owners can specify or modify the value of this field for their respective groups in the portal. A role with a higher priority value, group members, or a role with the ‘Manage any Group’ permission in the identity store cannot change the value.
Similarly, only mailbox managers can specify or modify the value of this field for their respective direct reports in the portal. A role with a higher priority value or a role with the ‘Manage any profile’ permission in the identity store cannot change the value. - If you have selected ‘Mailbox’ in the Select Directory Object drop-down list, the Self option is available in the Access Level drop-down list. Select Self to enable the mailbox to specify or modify the value of the field. It would be read-only for other users, such as the mailbox’s manager or a role with a higher priority value or even a role with the ‘Manage any profile’ permission in the identity store.
-
As mentioned for access level and visibility level, the field is editable and visible to members of the selected role and roles with a priority value higher than the selected role.
In the Exclude Roles area, select the check boxes for the higher priority role(s) to deny them access and visibility on the field. -
Use the Search Object Types area to specify the object types that can be searched on the portal’s Find dialog box, to set as value for the Send on Behalf field.
The following display types support the Find dialog box:- DN
- DNs
- Custom display types created with the Grid type
When you select any of these display types, Directory Manager identifies that the value for the Send on Behalf field has to be searched using the Find dialog box. The Search Object Types area is displayed, where you can select the required object type(s). For example, if you select User, only user objects can be searched and selected as value for the field.
-
Select the Is Required check box to make it mandatory for users to add at least one object to the Send on Behalf list.
-
Select the Is Read Only check box to make the Send on Behalf field read-only.
-
Click OK on the Add Field pane and the Edit Design Category pane.
-
Click Save on the Properties page.
The Send on Behalf Field in the Portal
Launch the portal and go to the properties of the target object (group or mailbox) you defined the Send on Behalf field for, then click the respective tab. The Send on Behalf field is displayed as follows:

Use the Add and Remove buttons to add and remove objects in the Send on Behalf list. The added objects can send email on behalf of the target object in accordance with the Send on Behalf functionality.
Customize the Toolbars
Toolbars are available on different pages of the Directory Manager portal; however, not all of these are customizable.
You can customize the following toolbars:
| Toolbar | Availability in the portal |
|---|---|
| User | The My Profile and user properties pages NOTE: The Validate your profile, Extend, and Reinstate buttons on this toolbar are displayed in the portal when user profile validation is enabled: |
| Group | The group properties page NOTE: (1) The Update button is not displayed for static groups. (2) The Expire button is not displayed for groups with an expiation policy set to Never Expire. (3) The Attest Group and Renew buttons are displayed when group attestation is enabled. (4) The Upgrade To button is displayed for static groups only. |
| Default Search | The All tab on the Search Results page for Quick Search and Advanced Search |
| Users Search | The Users and Contacts tabs on the Search Results page for Quick Search and Advanced Search |
| Groups Search | The Groups tab on the Search Results page for Quick Search and Advanced Search |
| My Membership Groups | The My Memberships tab of the My Groups page |
| My Expiring Groups | The My Expiring Groups tab of the My Groups page |
| My Expired Groups | The My Expired Groups tab of the My Groups page |
| My Deleted Groups | The My Deleted Groups tab of the My Groups page |
| My Dynasties | The My Dynasties tab of the My Groups page |
| My Smart Groups | The My Smart Groups tab of the My Groups page |
| All Groups | The All Groups tab of the All Groups page |
| My Groups | The My Groups tab of the My Groups page |
| Expired Groups | The Expired Groups tab of the All Groups page |
| Expiring Groups | The Expiring Groups tab of the All Groups page |
| Private Groups | The Private Groups tab of the All Groups page |
| Semi-Private Groups | The Semi-Private Groups tab of the All Groups page |
| Public Groups | The Public Groups tab of the All Groups page |
| Smart Groups | The Smart Groups tab of the All Groups page |
| Dynasties | The Dynasties tab of the All Groups page |
| My Direct Reports | The My Direct Reports tab of the Users page |
| Disabled Users | The Disabled Users tab of the Users page |
| Members Grid | The Members tab in static group properties |
| Smart Members Grid | The Members tab in Smart Group and Dynasty properties |
| User Members Of Grid | The Member Of tab in user properties |
| Computer Members Of Grid | The Member Of tab in computer properties |
| Additional Owner | The Owner tab in group properties |
| Additional Manager | The Organization tab in user properties |
| Create Group Wizard – Members | The Members page of the Create New Group wizard (for static group only) |
| Create Group Wizard - Additional Owner | The Owners page of the Create New Group wizard (for all group types) |
| Contact Member Of Grid | The Member Of tab in contact properties |
| Group Member Of Grid | The Member Of tab in group properties |
| Direct Reports Grid | The Organization tab in user properties |
NOTE: The Computer Members of Grid and Contact Member of Grid toolbars are not available for a Microsoft Entra ID identity store.
The buttons available on these toolbars are predefined. You cannot add or remove a button, but you can update a few details for a button, such as its name and image.
Update the Properties of a Toolbar Button
-
In Admin Center, select Applications in the left pane.
On the GroupID Portal tab, a portal's card displays its info. -
Click the ellipsis button for a portal and select Settings.
-
Select an identity store under Design Settings to customize the portal for it.
All identity stores linked with the portal are listed under Design Settings. You can design a different portal for each of these. -
Click Toolbars in the left pane; the Toolbars page is displayed.
-
In the Select Toolbar Type drop-down list, select the toolbar you want to update.
The Name area lists all buttons on this toolbar. -
Click Edit for a toolbar button to update its properties.
-
On the Toolbar Button Properties pane, update the following information as required:
-
Name – The name of the toolbar button. It is read-only.
-
Text – The text displayed on the button as its name.
-
Show Text – Select this check box to display the text on the button; else the button would be displayed without the text.
-
Tooltip Text - The text to appear when a user hovers the mouse over the button.
-
Icon Class – The image (icon) to be displayed for the button on the toolbar.
-
Active Icon Class – The image (icon) to be displayed when a user hovers the mouse over this button.
-
To manage images for Icon Class and Active Icon Class:
-
If no image has been uploaded, click Upload to browse and select an image to upload.
-
If an image has been uploaded, the very image is displayed. Click Upload to replace the existing image with a new one.
NOTE: Image dimensions: 30 x 30 pixels
Supported formats: .webp, .jpg, .jpe, .jpeg
-
-
Visibility Level – Select a security role. The toolbar button would be visible to users of this role and roles with a priority value higher than this role. See Priority.
Select Never to hide the button from all users.
-
-
Click OK.
-
Click Save on the Toolbars page.
Rearrange the Buttons on a Toolbar
- In Admin Center, select Applications in the left pane.
On the GroupID Portal tab, a portal's card displays its info. - Click the ellipsis button for a portal and select Settings.
- Select an identity store under Design Settings to customize the portal for it.
All identity stores linked with the portal are listed under Design Settings. You can design a different portal for each of these. - Click Toolbars in the left pane.
- On the Toolbars page, select a toolbar in the Select Toolbar Type drop-down list.
The Name area lists all buttons on this toolbar. - To change the order of buttons on the toolbar, click the equal sign for a button and drag to change its position.
- Click Save.
See Also