Manage Local Replication Settings
You can manage the following replication settings for an identity store:
- Specify the object attributes that you want to use in the identity store. The Replication service
then replicates the selected attributes to Elasticsearch.
Attributes that you do not select for replication will not be available in the identity store and cannot be used in Directory Manager functions. - Force run the service at any given time to replicate object attributes.
- Restore object data to Elasticsearch for an identity store.
Specify Object Attributes to Replicate
For an identity store, a few attributes have been specified for replication by default. You can modify the list as required.
Follow the steps to select object attributes.
Step 1 – In Admin Center, click Identity Stores in the left pane.
Step 2 – On the Identity Stores page, click the ellipsis button for an identity store and select Edit.
Step 3 – Click Replication under Settings in the left pane.
Step 4 – On the Replication page, the Attribute Name column displays a list of the object attributes that the Replication service replicates to Elasticsearch for the identity store.
-
Use the search box to search for an attribute in the list.
Simply enter a search string in the box; attribute names containing the string will be displayed. -
To remove an attribute from the list, click Remove for it.
-
To reset to the default attribute listing, click Reset to Default.
Step 5 – Click Add Replication Attributes to add an attribute to the list.
Step 6 – The Select Replication Attributes dialog box displays a list of the schema attributes in the provider. Select the check boxes for the attributes you want to replicate for the identity store and click Save. The attributes are added to the Attribute Name column on the Replication page.
NOTE: If in a Microsoft Entra ID based identity store extension attributes are added, Directory
Manager Schema Replication schedule fetches the latest schema at its next run and add the newly
added extension attributes to the Select Replication Attributes list. See the
Schema Replication Schedule for additional information.
Select the required extension attributes from the Select Replication Attributes list and add them to
the attribute to replicate list. See the Specify Object Attributes to Replicate section of the
Manage Local Replication Settings topic.
Step 7 – Click Save.
Replicate a Custom Attribute
By default, a custom attribute for any object type (user, group, computer, public folder) is not replicated for an identity store.
Let’s assume you have a custom attribute, SerialNumber, for the user object in Active Directory.
Follow the steps to replicate its value in the Elasticsearch repository.
Step 1 – In Admin Center, click Identity Stores in the left pane.
Step 2 – On the Identity Stores page, click the ellipsis button for an identity store and select Edit.
Step 3 – Click Replication under Settings in the left pane.
Step 4 – On the Replication page, click Add Replication Attributes to search, select, and add the required attribute (for example, SerialNumber) to the Attribute Name list.
Step 5 – The Replicate to Objects dialog box is displayed, click:
- RECOMMENDED: Yes – To run replication from scratch for the object type the added attribute belongs to (i.e., user object in the example).
- No – To run replication for the object at next replication interval when the object is modified.
Step 6 – Click Save on the Replication page.
Step 7 – Click Restore on the Restore Data card to restore object data to Elasticsearch for the identity store.
NOTE: When a Smart Group, created with a custom attribute in a previous Directory Manager version, is upgraded using the Upgrade wizard, you will have to replicate the respective object type from scratch.
Force Run the Replication Service (for Object Replication)
By default, the Replication service runs every 10 minutes. However, you can force run it any time for an identity store to replicate object attributes to Elasticsearch.
Force-starting the service has no impact on the interval set for triggering the service on the Replication page. See the Specify a Replication Interval for Objectstopic.
You can force run the Replication service for an identity store in any of the following ways:
Method 1
Step 1 – In Admin Center, click Identity Stores in the left pane.
Step 2 – On the Identity Stores page, click the ellipsis button for an identity store and select
Replicate Objects.
Any changes made to the values of attributes during the last and current run of the Replication
service are replicated to Elasticsearch.
Method 2
Step 1 – In Admin Center, click Identity Stores in the left pane.
Step 2 – On the Identity Stores page, click the ellipsis button for an identity store and select Edit.
Step 3 – Click Replication under Settings in the left pane.
Step 4 – On the Replication page, click Run on the Replication Service card to run the
Replication service instantly. Any changes made to the values of attributes during the last and
current run of the Replication service are replicated to Elasticsearch.
The card also displays the last run date and time of the service.
Force Run the Replication Service (for Deleting Objects)
Objects that are deleted from the directory must also be removed from Elasticsearch. By default, the interval for removing deleted objects from Elasticsearch is set to 60 minutes. You can, however, force run the Replication service for an identity store any time to remove deleted objects.
Force-starting the service has no impact on the interval set for triggering the service on the Replication page. See the Specify Interval for Deleting Tombstone Objects topic.
For an identity store, you can force run the Replication service (for deleting objects) in any of the following ways:
Method 1
Step 1 – In Admin Center, click Identity Stores in the left pane.
Step 2 – On the Identity Stores page, click the ellipsis button for an identity store and select Replicate Deleted Objects. Any objects deleted in the directory between the last and current run of the Replication service will be removed from Elasticsearch.
Method 2
Step 1 – In Admin Center, click Identity Stores in the left pane.
Step 2 – On the Identity Stores page, click the ellipsis button for an identity store and select Edit.
Step 3 – Click Replication under Settings in the left pane.
Step 4 – On the Replication page, click Run on the Deleted Objects Replication card to run the
Replication service instantly. Objects deleted from the directory between the last and current run
of the Replication service will be removed from Elasticsearch.
The card also displays the last run date and time of the service.
Restore Object Data
You may need to restore data for an identity store to Elasticsearch. The restore object data event restores the following for an identity store:
- the current attribute values of objects (group, user, contact, computer, and OU) from the provider (for example, Active Directory)
- the Directory Manager pseudo attributes of those objects from the Directory Manager database to Elasticsearch
Follow the steps to restore object data:
Step 1 – In Admin Center, click Identity Stores in the left pane.
Step 2 – On the Identity Stores page, click the ellipsis button for an identity store and select Edit.
Step 3 – Click Replication under Settings in the left pane.
Step 4 – On the Replication page, click Restore on the Restore Data card to restore object data for the identity store to Elasticsearch.
Elasticsearch and Replication
Searches performed in Directory Manager are catered through Elasticsearch.
Elasticsearch relies on two services:
-
Elasticsearch Service is responsible for searching the Elasticsearch repository and displaying search results when a search is performed through Directory Manager. If this service stops, Elasticsearch will not work.
-
Replication Service is responsible for replicating attributes of the following objects from the provider (such as Active Directory) to Elasticsearch.
- Group
- User
- Contact
- Computers
- Organizational Unit
The Replication Service only replicates changes that are made to these objects on the directory server. Changes made to these objects using Admin Center, Directory Manager portal, or Management Shell, are directly saved in the Elasticsearch repository and replicated to the Directory Manager database by the Data service. See the Data Service topic.
Synchronize directly updates objects in the directory. As soon as objects are provisioned, de-provisioned, or updated in the directory using Synchronize, the Replication service replicates them to Elasticsearch.
Synchronize history is saved to Elasticsearch when Active Directory, Microsoft Entra ID, Generic LDAP, or Google Workspace is the destination provider in the respective Synchronize job. This history is replicated to the Directory Manager database by the Data s ervice.
NOTE: The Recycle Bin in the Directory Manager portal fetches data from the directory server and not from Elasticsearch.
Replication Settings
In Admin Center, you can specify settings for the Replication service at the global and local levels. Global settings apply to all identity stores in Directory Manager while local settings are specific to an identity store.
- At the global level, you can schedule the service to run every x minutes to replicate object attributes to Elasticsearch. You can also manually restore object data to Elasticsearch. See the Manage Global Replication Settings topic.
- For an identity store, you can specify the object attributes the service should replicate to Elasticsearch. See the Manage Local Replication Settings topic.
NOTE: The Replication service does not replicate excluded domains for an identity store. See the Exclude an Active Directory Domain from Replication topic.
Replication Service Logs
Logs for the Replication service are stored in the folder for the service on the Directory Manager server.
To view the logs:
- Launch IIS on the Directory Manager server and navigate to:
…\Sites\GroupIDSite11\GroupIDReplicationService - Right-click this folder and select Explore.
- Locate the Logs folder to read the logs.
Events are logged in a text file. When the file size reaches 100 MB, Directory Manager archives it in the same directory by replacing the file extension with the suffix .Log.X and then creating a new text file with the original name. X in .Log.X is a number from 1 to 10 representing the archiving order; where ‘1’ denotes the most recent file.
Manage Global Replication Settings
The Replication service is responsible for replicating attributes of the group, user, contact, computer, and organizational unit objects from a provider (such as Active Directory) to Elasticsearch.
You can configure certain settings for the Replication service in Admin Center. You can schedule it to run every x minutes, force run it at any time, set a threshold for triggering replication error notifications, and view the Elasticsearch health status.
On every successful run of the Replication service, Directory Manager generates the replication status of object types for each domain in an identity store and alerts you to any errors that may have occurred during the replication process.
NOTE: The Replication service does not replicate excluded domains for an identity store. See the Exclude an Active Directory Domain from Replication topic.
How to Resolve Replication Errors
Possible actions to eliminate replication errors are:
- Make sure the Replication service and Elasticsearch service are running.
- Make sure Search Guard or any other security plugin you use for Elasticsearch is operational.
- Consult the Replication service logs. They provide elaborate information about the object type in the specific domain of the identity store the error occurred for, and whether that error comes from the identity provider or Elasticsearch. See the Replication Service Logs topic.
What do you want to do?
- Monitor Elasticsearch Health Status
- Specify a Replication Interval for Objects
- Force Run the Replication Service (for Object Replication)
- View the Replication Status for Objects
- Specify Interval for Deleting Tombstone Objects
- Force Run the Replication Service (for Deleting Objects)
- Restore Object Data to Elasticsearch
- Clear Unused Indices
- Change the Search Guard Password
- Set a Threshold to Trigger Replication Error Notifications
Monitor Elasticsearch Health Status
Directory Manager enables you to monitor the Elasticsearch service for the following:
-
The status of the Elasticsearch service. See the Elasticsearch Service card on the Admin Center dashboard.
-
Elasticsearch cluster health stats, which include:
- Cluster name, health status, node info and shards info
- Cluster indices information, like health, number of documents, and status
Directory Manager checks if the Elasticsearch service is running, if all nodes are working, and if the cluster is intact. It also checks the health of each index.
To view Elasticsearch health status:
-
In Admin Center, click Replication in the left pane.
-
On the Replication page, click Elasticsearch Health Monitor.

This dialog box lists the Elasticsearch clusters in your environment, with the following information for each cluster:
-
Health: the cluster health status denoted by the following colors:
- Green – the service is running and the cluster is intact. Moreover, two or more nodes exist within the cluster.
- Yellow – the cluster is running but with warnings. It also indicates that a single node exists within the cluster. Elasticsearch recommends a three-node topology for improved performance and high availability.
- Red – the service has stopped or the cluster is broken (for reasons such as network connectivity.
-
Nodes: the number of nodes in the cluster.
-
Master: the name of the master node in the cluster.
-
-
To refresh the information displayed, click the Refresh icon.
-
Click a cluster name to view it in detail.
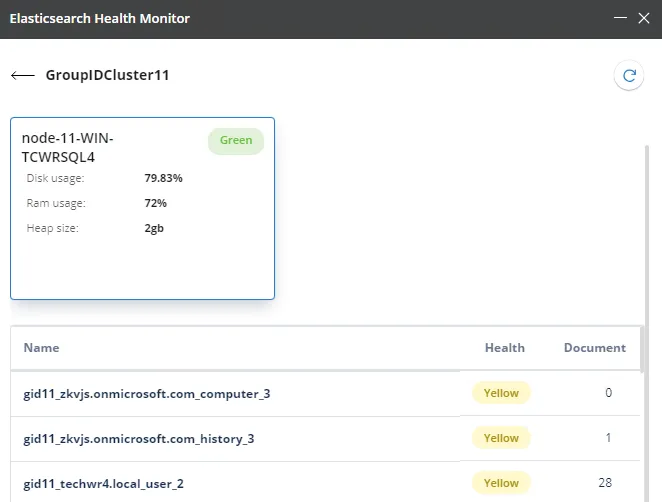
This dialog box displays the total number of nodes in the cluster. Each node is represented by a card, that displays the following for the node:
-
The name of the node
-
The system resources the node uses, such as hard disk space, RAM, and heap size
-
Node health with respect to disk space usage, denoted by the following colors:
- Green – when hard disk space usage is 79.99% or less
- Yellow – when hard disk space usage is 80-89.99%
- Red – when hard disk space usage is 90% or more
-
-
The indices in the cluster are listed in the gird.
-
The Name column displays the names of the indices.
-
The Health column displays the health of the index, which is denoted by the following colors:
- Green – the index is replicated to all nodes within the cluster.
- Yellow – the index is replicated to some but not all nodes within the cluster.
- Red – the index is not replicated to any node within the cluster.
-
The Document column shows the number of documents in the index.
-
-
Click the back arrow to return to the Elasticsearch Health Monitor dialog box.
Specify a Replication Interval for Objects
The Replication service interval applies to all identity stores defined in Admin Center. Object attributes to be replicated are specified in the respective identity store settings. See the Manage Local Replication Settings topic.
To set global replication interval:
-
In Admin Center, click Replication in the left pane.
-
On the Replication page, the Replication Service Interval card displays:
- the date and time the Replication service last ran
- the date and time the service will run next
- the interval (in minutes) between each run of the service
-
By default, the interval is set to 10 minutes, which indicates that the service is triggered every 10 minutes. In this way, changes made to objects in the directory during the last 10 minutes are replicated to Elasticsearch. In Active Directory, the whenChanged attribute stores the time and date the object was last changed. This service checks the value of this attribute and replicates any changes to Elasticsearch.
To change the interval, click Edit next to Service Interval on the on the Replication Service Interval card. Specify the interval (in minutes) between each run of the service and click the check mark.
Force Run the Replication Service (for Object Replication)
- In Admin Center, click Replication in the left pane.
- On the Replication page, click Force Replication Now on the Replication Service
Interval card to run the Replications service instantly.
Changes made to objects in the directory between the last and current run are replicated to Elasticsearch. Force-starting the service has no impact on the interval set in the Service Interval box for triggering the service.
View the Replication Status for Objects
After every run of the Replication service, you can view the replication status of each object type for each domain in an identity store. You can view which object types were successfully replicated and which ones failed to replicate.
To view the replication status:
-
In Admin Center, click Replication in the left pane.
-
On the Replication page, click Advanced Replication Status. The Advanced Replication Status dialog box displays the status of object types for each domain in an identity store.
-
The domains or object types that failed to replicate in the last run of the Replication service are displayed in red. Reasons could be inaccessibility or partial failure. Replication errors are brought to the administrator’s notice in the following ways:
- On the Identity Stores page, the card for the identity store turns red and Errors is displayed as the identity store status.
- A notification is sent to relevant personnel. See the Set a Threshold to Trigger Replication Error Notifications topic.
These alerts are triggered when replication fails in the last run of the Replication service, or if the service does not run at the required triggering interval. To resolve replication errors, see the How to Resolve Replication Errors topic.
-
The ‘Never replicated’ status indicates that the particular object type is not replicated yet. Similarly, a child domain that is not being used will have its status marked in red. To avoid these recurring errors, set the dates for these objects to a distant future date in the Directory Manager database. Or you can exclude a domain from replication. See the Exclude an Active Directory Domain from Replication topic.
-
Specify Interval for Deleting Tombstone Objects
Objects that are deleted from the directory must also be removed from Elasticsearch. For this purpose, you can specify a triggering interval for the Replication service to remove tombstone objects from the Elasticsearch repository. By default, the interval is set to 60 minutes, indicating that the service is triggered every 60 minutes. As a result, objects deleted in the directory during the last 60 minutes are removed from Elasticsearch.
To identify objects that have been deleted in the directory but exist in Elasticsearch, the Replication service compares the objects in both, and deletes objects that do not exist in the directory anymore.
To specify an interval:
-
In Admin Center, click Replication in the left pane.
-
On the Replication page, the Deleted Objects Replication Interval card displays:
- the date and time the Replication service last ran to remove tombstone objects from Elasticsearch
- the date and time the service will run again
- the interval (in minutes) between each run of the service
-
By default, the interval is set to 60 minutes, which indicates that the service is triggered every 60 minutes. In this way, objects that are deleted in the directory during the last 60 minutes are removed from Elasticsearch.
To change the interval, click Edit next to Service Interval on the Deleted Objects Replication Interval card. Specify the interval (in minutes) between each run of the service and click the check mark. This Replication service interval applies to all identity stores in Directory Manager.
Force Run the Replication Service (for Deleting Objects)
- In Admin Center, click Replication in the left pane.
- On the Replication page, click Force Replication Now on the Deleted Objects Replication
Interval card to run the Replication service instantly.
Objects deleted in the directory between the last and current run of the service, will be removed from Elasticsearch. Force-starting the service has no impact on the interval set in the Service Interval box for triggering the service.
Restore Object Data to Elasticsearch
You may need to restore object data to Elasticsearch. The restore object data function restores the following for all identity stores in Directory Manager:
- the current attribute values of objects (groups, users, contacts, computers, and OUs) from the provider (for example, Active Directory)
- the Directory Manager pseudo attributes of these objects from the Directory Manager database to Elasticsearch
To restore object data:
- In Admin Center, click Replication in the left pane.
- On the Replication page, click Restore Now in the Restore Objects Data area to restore data to Elasticsearch.
Clear Unused Indices
Directory Manager stores object attributes and their values in Elasticsearch, where each object type in an identity store is distinctly indexed. In a situation where an identity store is deleted from Directory Manager, its indices are not required anymore. So, you can clear them from Elasticsearch to avoid glut.
To clear unused indices:
- In Admin Center, click Replication in the left pane.
- On the Replication page, click Clear Now in the Clear Unused Indices area. The system checks if there exist any indices in Elasticsearch for an identity store that no longer exists in Directory Manager.
- The Delete Unused Indices dialog box displays the indices that will be deleted from
Elasticsearch. Click Delete to proceed or click Don't Delete to close the dialog box
without clearing the indices.
In case no unused indices are found, a notification pops up in the bottom right corner to inform that no unused indices were found.
Change the Search Guard Password
Search Guard is a security plugin used to induce an authentication mechanism in Elasticsearch. The option to change the Search Guard password is available when you install and manage Elasticsearch with Directory Manager. Users who use their own instance of Elasticsearch cannot change the Search Guard password using Directory Manager.
You can change the password of the admin account that Directory Manager uses to access Elasticsearch.
To change the password:
- In Admin Center, click Replication in the left pane.
- On the Replication page, click Change Password in the Search Guard Settings area.
- On the Change Password dialog box, provide the current password for the Search Guard admin account in the Your current password box.
- Specify a new password in the New Password and Confirm Password boxes.
- Click Change Password.
Set a Threshold to Trigger Replication Error Notifications
The Replication service runs every x minutes to replicate objects in an identity store. In case it fails to replicate during a run, a replication error is displayed, as discussed in the View the Replication Status for Objects topic.
Directory Manager generates notifications to alert administrators to replication errors. By default, the triggering threshold is set to ‘3 attempts’, which means that notifications will be sent when errors occur in three consecutive runs of the Replication service. You can change the threshold value as required.
Replication error notifications are sent to recipients whose email addresses are specified in the To and CC boxes on the Notifications page. See the Specify Notification Recipients topic.
To set a triggering threshold:
- In Admin Center, click Replication in the left pane.
- On the Replication page, the Replication Error Notification area displays ‘3 Attempts’ as
the default threshold for initiating notifications. This means that notifications will be sent
when three consecutive runs of the replication service result in error. Notifications will not be
sent when errors occur say, in two consecutive runs but no error shows in the third consecutive
run.
To change the threshold value, click Edit. Specify a threshold value to trigger replication error notifications and click the check mark.
See Also
Replication Service
The Replication service replicates the attributes of the following objects from the provider (such as Active Directory) to the Elasticsearch repository.
- Group
- User
- Contact
- Computers
- Organizational Unit
For more on the Replication service, see the Elasticsearch and Replication topic for additional information.
The service is also responsible for syncing data between the Elasticsearch clusters in your environment.
View Replication Service Details
Follow the steps to view Replication Service details.
Step 1 – In Admin Center, click Applications in the left pane.
Step 2 – On the Applications page, click the Service tab.
The tab displays the default Replication service hosted in native IIS. When multiple Directory
Manager instances have been deployed, you will find multiple default Replication services on this
tab page, as each instance has its own default Replication service. See the
Elasticsearch Clusters, Nodes, and Directory Manager
topic for additional information.
For details displayed on a service card, see the table in the
View Data Service Details topic.
You cannot create a Replication Service or delete an existing one from Admin Center.
Manage Replication Service Settings
You can manage the following settings for a Replication service.
- Change a Service’s Display Name
- Start or Stop a Service
- View the Deployment Settings for a Service
- Specify Log Settings for a Service
Enable Elastic Cluster Syncing
In an environment with multiple Elasticsearch clusters, you can choose to sync data between clusters. You can also specify an interval for syncing.
NOTE: In Directory Manager, a separate Replication service is created for each node in a cluster. To enable data syncing between clusters, simply enable the sync option for one Replications service within each cluster.
Follow the steps to sync data between clusters.
Step 1 – In Admin Center, select Applications in the left pane.
Step 2 – On the Applications page, click the Replication Service tab.
Step 3 – Click the ellipsis button for a service and select Settings.
Step 4 – Click Configurations under Server Settings.
Step 5 – On the Configurations page, enable the Elastic Cluster Syncing toggle button to sync
data from all other clusters to the cluster that uses this Replication service.
If this toggle button is disabled for a cluster (say, ClusterA), data from other clusters will not
be synced to ClusterA.
Suppose syncing is disabled for ClusterA but enabled for ClusterB and ClusterC. This means that (a)
data from ClusterB and ClusterC will not be synced to ClusterA (b) data from ClusterA will be synced
to ClusterB and ClusterC.
Step 6 – You can specify an interval for syncing data. Click Edit under Elastic Cluster Syncing
Interval, specify an interval (in seconds) and click the check mark.
By default, the interval is set to 5 seconds. You can specify a maximum interval of 900 seconds.
Step 7 – Click Save.