Installation and Configuration
Table of Contents
- Introduction
- Glossary
- First-Time Setup Guide
- Configuration Methods
- Configuration Reference
- Common Deployment Scenarios
- Troubleshooting & FAQ
- Security Best Practices
- Rollback Instructions (includes upgrade procedure)
- Support
Introduction
The Netwrix Directory Manager Credential Provider, formerly known as Netwrix GroupID Credential Provider, is a Windows Credential Provider that extends the Windows login screen to provide self-service password reset and account unlock functionality. This enables users to reset their passwords or unlock their accounts directly from the Windows login screen without administrator assistance.
What This Documentation Covers
- Step-by-step installation and configuration for first-time users
- Upgrade procedure (uninstall old version, install new version)
- Detailed configuration reference for all available settings
- Common scenarios with example configurations
- Troubleshooting guide for resolving common issues
- Security considerations and best practices
Prerequisites
- Windows 10 or Windows 11 (64-bit)
- Administrator access to the target machine
- Visual C++ 2022 Redistributable (x64) - included in installer
- Network access to your password reset portal (HTTPS recommended)
- Minimum 500 MB free disk space for installation
Upgrade Policy
Important: This product does NOT support in-place upgrades. To upgrade to a newer version:
- Uninstall the current version (see Rollback Instructions)
- Restart the computer
- Install the new version following the First-Time Setup Guide
- Apply your configuration settings
Your configuration settings in CPSettings.xml or Group Policy will be preserved during uninstall and can be reused with the new version.
Glossary
Understanding these terms will help you configure the credential provider effectively:
| Term | Definition |
|---|---|
| Credential Provider | A Windows component that handles user authentication at the login screen. Windows supports multiple credential providers simultaneously (password, PIN, fingerprint, etc.). |
| CLSID | Class Identifier - A unique GUID (Globally Unique Identifier) that identifies a COM class in Windows. The credential provider uses {c8765b62-7058-4d7f-9421-11a75d623206} as its identifier. |
| CPSettings.xml | Configuration file that contains all settings for the credential provider. Located in the installation directory by default. |
| CEF | Chromium Embedded Framework - An open-source framework used to embed a Chromium-based web browser in the credential provider for rendering password reset web pages. |
| PLAP | Pre-Logon Access Provider - A credential provider that appears before the user selects a logon option, typically used for VPN connections before login. |
| GPO | Group Policy Object - A Windows feature that allows centralized management of settings across multiple computers in an Active Directory environment. |
| Tile | The visual element on the Windows login screen representing a credential provider or user account. |
| Filter | A mechanism to control which other credential providers appear on the login screen when the Netwrix credential provider is active. |
| Registry | Windows database that stores system and application configuration settings. |
| MSI | Microsoft Installer package - The installation file format for Windows applications. |
Common CLSIDs Referenced in Filters
These are Windows built-in credential provider CLSIDs that you may want to filter (show/hide):
{60b78e88-ead8-445c-9cfd-0b87f74ea6cd}- Password Credential Provider (standard Windows password login){2135F72A-90B5-4ED3-A7F1-8BB705AC276A}- Picture Password Provider{8AF662BF-65A0-4D0A-A540-A338A999D36F}- Fingerprint Provider{BEC09223-B018-416D-A0AC-523971B639F5}- Windows Hello Face Provider{D6886603-9D2F-4EB2-B667-1971041FA96B}- PIN Provider
Why these CLSIDs matter: The FilterLogon and FilterUnlock settings use these CLSIDs to control which credential providers appear alongside the Netwrix provider. This helps simplify the login experience for users.
First-Time Setup Guide
This section provides a complete step-by-step walkthrough for installing and configuring the Netwrix GroupID Credential Provider for the first time.
Quick Start Checklist
Essential steps to get up and running:
- Install the MSI package (PasswordCenterClientSetup64.msi)
- Configure password reset URLs in CPSettings.xml
- Restart the machine
- Verify the credential provider appears on login screen
- Test password reset functionality
Time Required: Approximately 15-20 minutes
Step 1: Manual Installation
This method is suitable for single computers or small deployments where centralized management is not required.
Installation Steps
-
Download the Installer
- Obtain
Netwrix Directory Manager Credential Providerfrom your Netwrix Product Library or link shared by your Account Manager - Verify the file is digitally signed by Netwrix
- Obtain
-
Run the Installer
- Navigate to the folder where you have copied the MSI package
- Right-click the MSI file and select "Run as administrator"
-
Installation Complete
- The installer will copy all necessary files
- Register the credential provider with Windows
- Install Visual C++ 2022 Redistributable if not already present
- Important: A system reboot is required to activate the credential provider
-
Reboot the System
- The installer will prompt for a reboot
- Save all work and restart the computer
- After reboot, the credential provider will be active
Default Installation Location:
C:\Program Files\Imanami\Password Center Client (x64)\
Installed Files:
Imanami.PasswordCenter.Credential64.dll- Core credential providerGroupIDBrowser.exe- Browser launcherWebBrowser.exe- CEF-based browserCPSettings.xml- Configuration file (see Step 2)- Additional CEF runtime files and resources
Post-Installation Verification
After reboot, the Windows logon screen will display with the credential provider active:
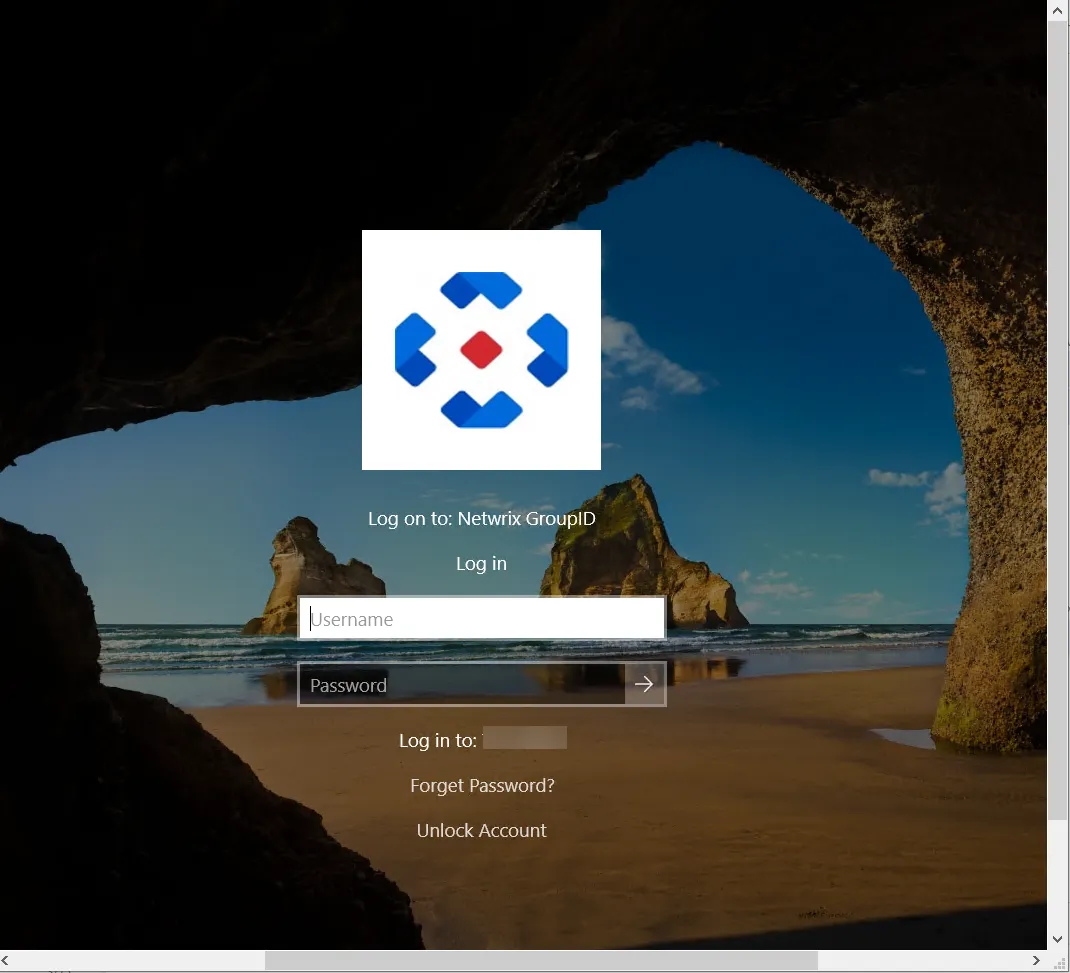
The logon screen will show:
- Netwrix logo (or custom logo if configured)
- Title text under the logo (customizable via CPTitle setting)
- "Forgot Password?" link (default text, customizable)
- "Unlock Account" link (default text, customizable)
These options route users to the URLs configured in the CPSettings.xml file.
Quick Configuration of CPSettings.xml
The CPSettings.xml file is created during installation with default values. Before first use, you should customize these key settings:
Location: C:\Program Files\Imanami\Password Center Client (x64)\CPSettings.xml
Essential Settings to Configure:
Open CPSettings.xml in a text editor (as administrator) and modify these values:
-
Forgot Password Link Text:
<ForgotPasswordText value="Forgot Password?" />Customize the text that appears on the Windows logon screen for the password reset option.
-
Unlock Account Link Text:
<UnlockAccountText value="Unlock Account" />Customize the text that appears on the Windows logon screen for the unlock option.
-
Password Reset URL:
<ResetMyPasswordUrl value="https://MachineName:port/Portalname" />Set the URL where users will be redirected to reset their password:
- For GroupID 10:
https://MachineName:port/portalname - For GroupID 11:
https://MachineName:port/portalname/Home/PasswordReset
- For GroupID 10:
-
Account Unlock URL:
<UnlockMyAccountUrl value="https://MachineName:port/Portalname" />Set the URL where users will be redirected to unlock their account:
- For GroupID 10:
https://MachineName:port/Portalname - For GroupID 11:
https://MachineName:port/portalname/Home/UnlockAccount
- For GroupID 10:
-
Credential Provider Title:
<CPTitle value="Log on to: Netwrix GroupID" />This text appears as the title under the Netwrix logo on the Windows logon screen.
Important: After modifying CPSettings.xml, restart the computer or lock/unlock the session twice for changes to take effect.
For complete configuration options, see Configure Required Settings below.
Step 1A: Enterprise Deployment via Group Policy Software Installation
For organizations managing multiple computers in an Active Directory environment, deploying via Group Policy Software Installation provides centralized management and automated deployment.
Prerequisites:
- Active Directory domain environment
- Domain Administrator or delegated GPO management rights
- Network share accessible by all target computers
- MSI package (PasswordCenterClientSetup64.msi)
Deployment Steps:
1. Prepare the Installation Package
-
Create Network Share:
- Create a shared folder accessible by all computers
- Example:
\\fileserver\software\CredentialProvider\ - Set share permissions:
- Domain Computers: Read
- Authenticated Users: Read
- Administrators: Full Control
-
Copy MSI to Network Share:
\\fileserver\software\CredentialProvider\PasswordCenterClientSetup64.msi -
Set NTFS Permissions on Share:
- Right-click the shared folder → Properties → Security
- Add "Domain Computers" with Read permissions
- Add "Authenticated Users" with Read permissions
- This ensures computers can access the MSI during installation
-
Copy CPSettings.xml to Network Share (Optional):
- Copy the customized
CPSettings.xmlfile to the same network share - This file will be referenced by the MSI during installation
- Share this file with Read permissions for Domain Computers
- Copy the customized
1A. (Optional) Create MSI Transform File Using Orca
If you need to customize the MSI installation (such as pre-configuring the SOURCEPATH for CPSettings.xml), you can create a Transform (.mst) file using Orca. This is an advanced method for organizations that want to embed configuration settings directly into the deployment package.
When to Use This Method:
- You want to pre-configure the CPSettings.xml source path
- You need to modify MSI properties before deployment
- You want a single, reusable deployment package with custom settings
Prerequisites:
- Orca MSI editor tool (included in Windows SDK)
- MSI package (PasswordCenterClientSetup64.msi)
Steps to Create MST Transform File:
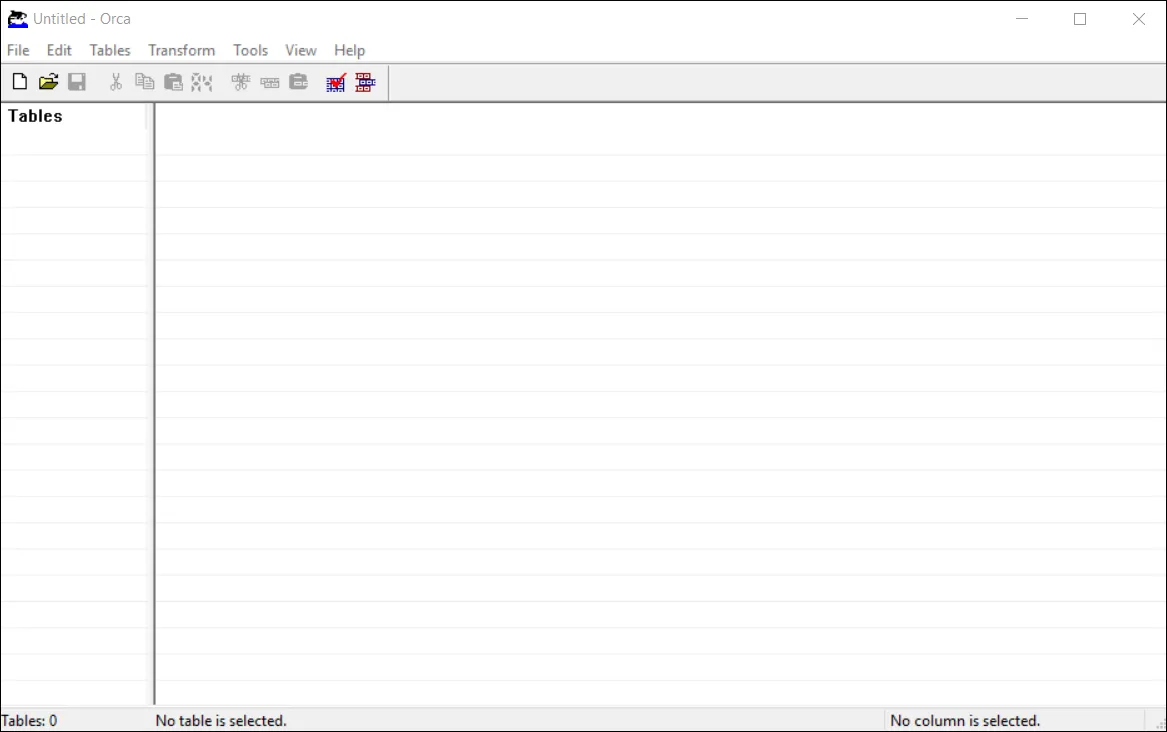
-
Install Orca:
- Browse to the folder containing the Credential Provider package
- Navigate to the
MST Guidefolder (if included with your package) - Run
Orca-x86_en-us.msito install Orca - The Orca console will open after installation
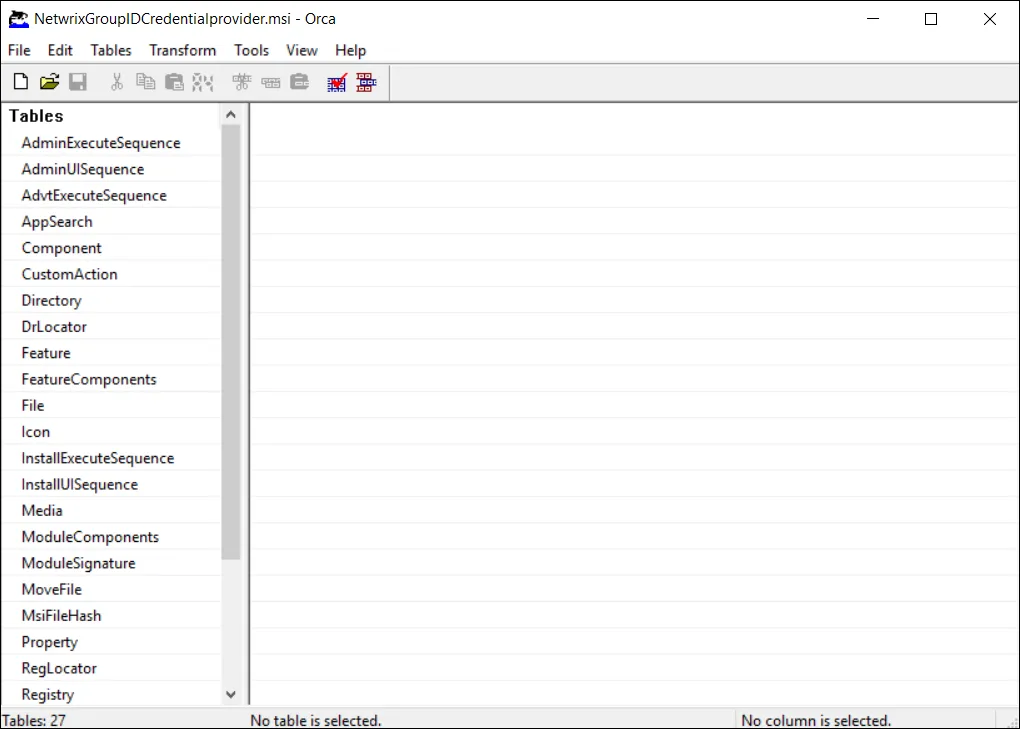
-
Open MSI in Orca:
- Launch Orca application
- Click File → Open
- Browse to the Credential Provider folder
- Select and open
PasswordCenterClientSetup64.msi
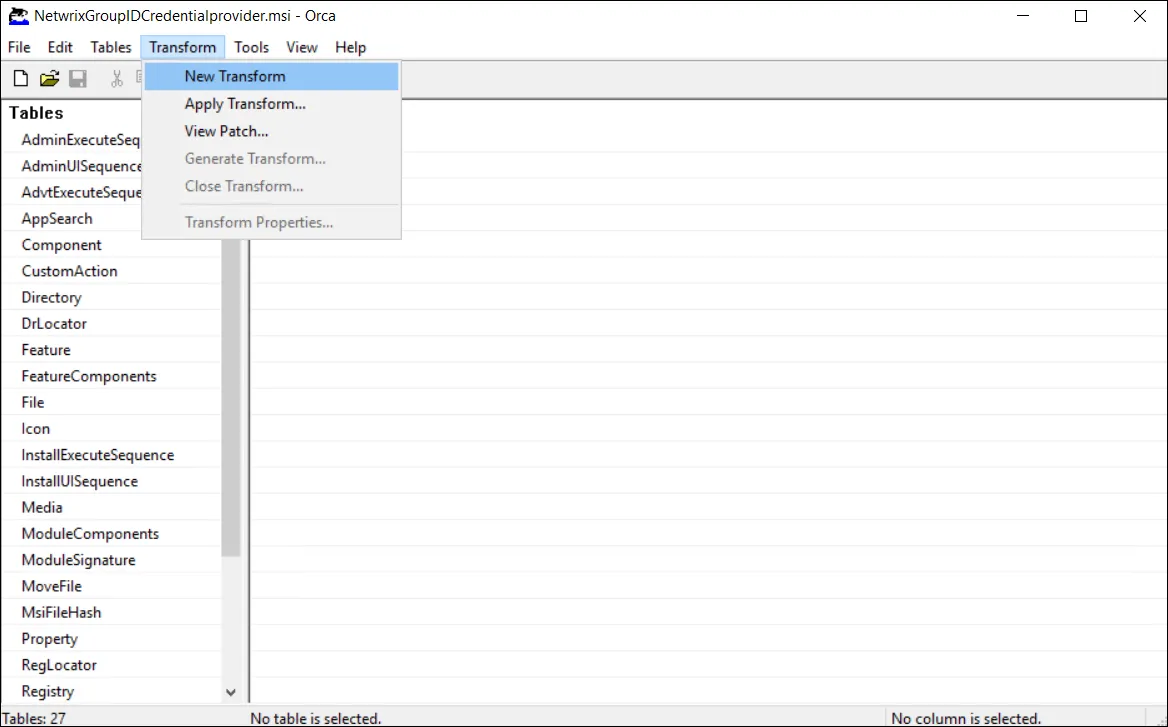
-
Create New Transform:
- From the menu, select Transform → New Transform
- This creates a new transform that will store your customizations
-
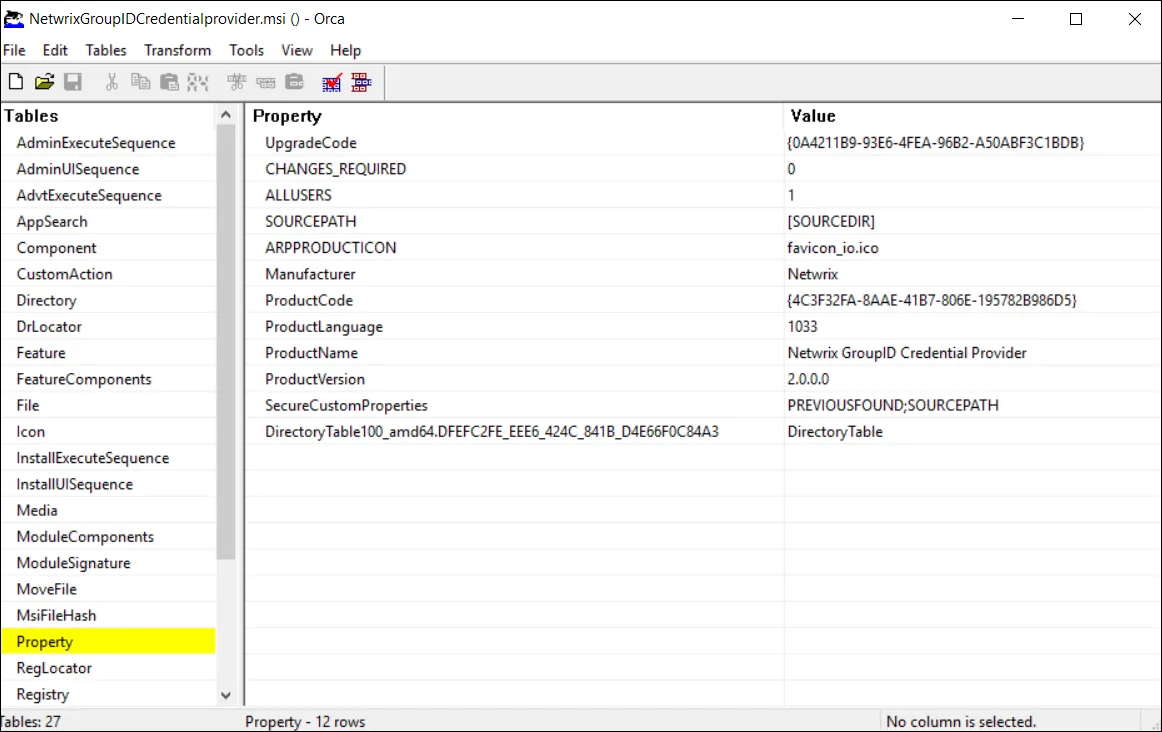
Modify Properties:
- In the left pane, click Property
- The main window displays a list of MSI properties
- Locate the SOURCEPATH property in the property list
-
Configure Source Path:
-
Create a shared folder for configuration files:
- Example:
\\fileserver\software\CredentialProvider\Config\ - Copy
CPSettings.xmlto this folder - Share with Everyone group with Read permission
- Example:
-
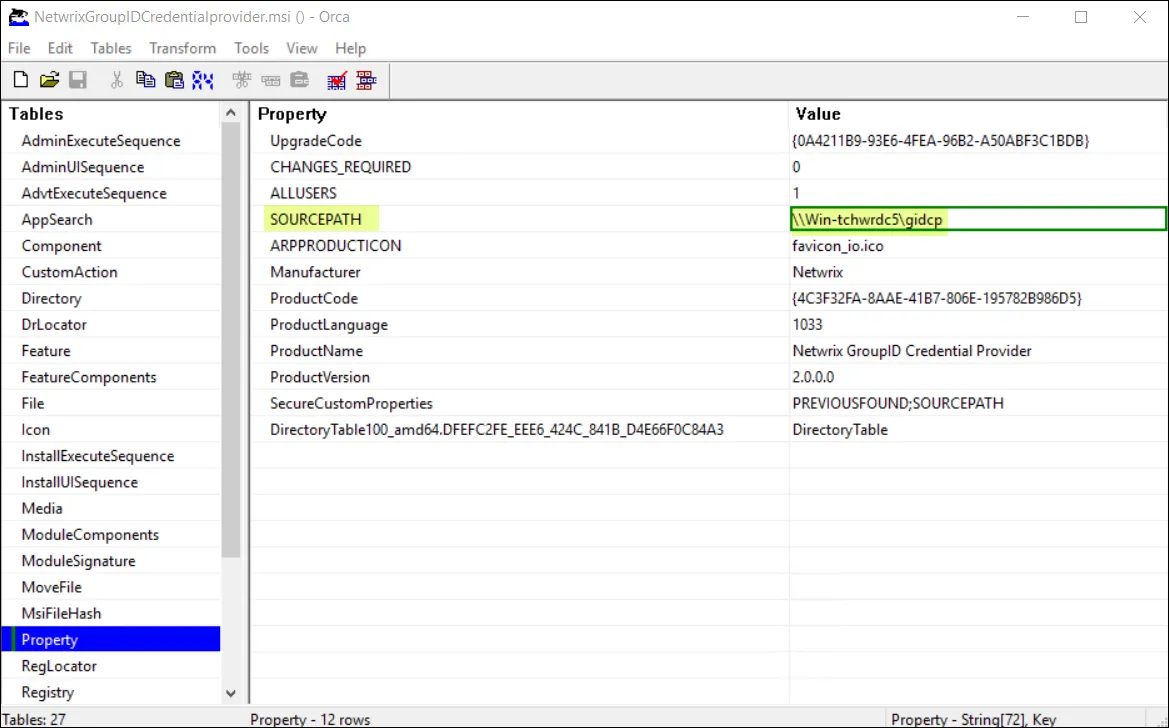
In Orca, double-click the SOURCEPATH property value
-
Enter the UNC path to the shared folder:
\\fileserver\software\CredentialProvider\Config\ -
Click OK
-
-
Generate Transform File:
- From the menu, select Transform → Generate Transform
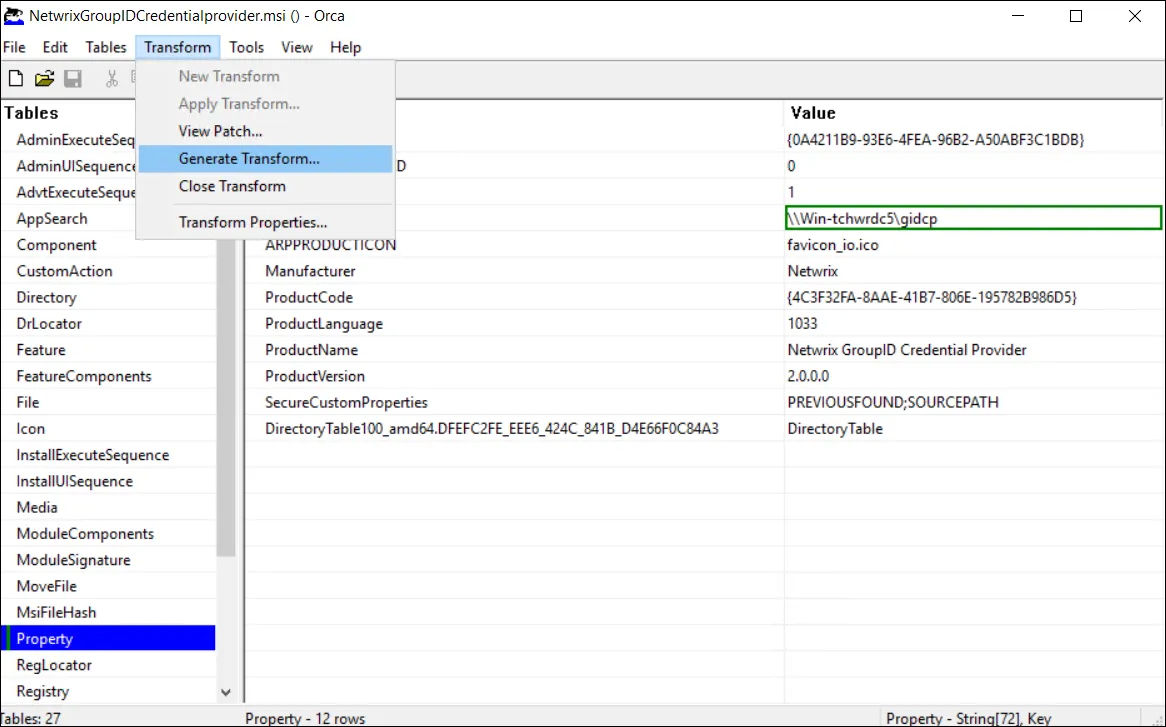
- Save the transform file with a descriptive name (e.g.,
CustomConfig.mst) - Save it to the same shared folder as the MSI package:
\\fileserver\software\CredentialProvider\CustomConfig.mst
-
Close Orca:
- Close the Orca application
- Your transform file is now ready for use with GPO deployment
Files Required in Network Share After This Step:
\\fileserver\software\CredentialProvider\
├── PasswordCenterClientSetup64.msi
├── CustomConfig.mst                  (your generated transform file)
└── Config\
    └── CPSettings.xml                (configuration file)
Important Notes:
- The .mst file must be in the same network share as the MSI
- The SOURCEPATH must point to a valid network location accessible by Domain Computers
- Transform files are applied during GPO deployment (see step 3.3 below)
2. Create Group Policy Object
-
Open Group Policy Management Console (GPMC):
- On Domain Controller or management workstation
- Run:
gpmc.msc - Or: Start → Administrative Tools → Group Policy Management
 note
noteGroup Policy Management console is available if the Group Policy Management feature has been installed.
-
Create New GPO:
- Navigate to your domain or appropriate Organizational Unit (OU)
- Right-click → "Create a GPO in this domain, and Link it here"
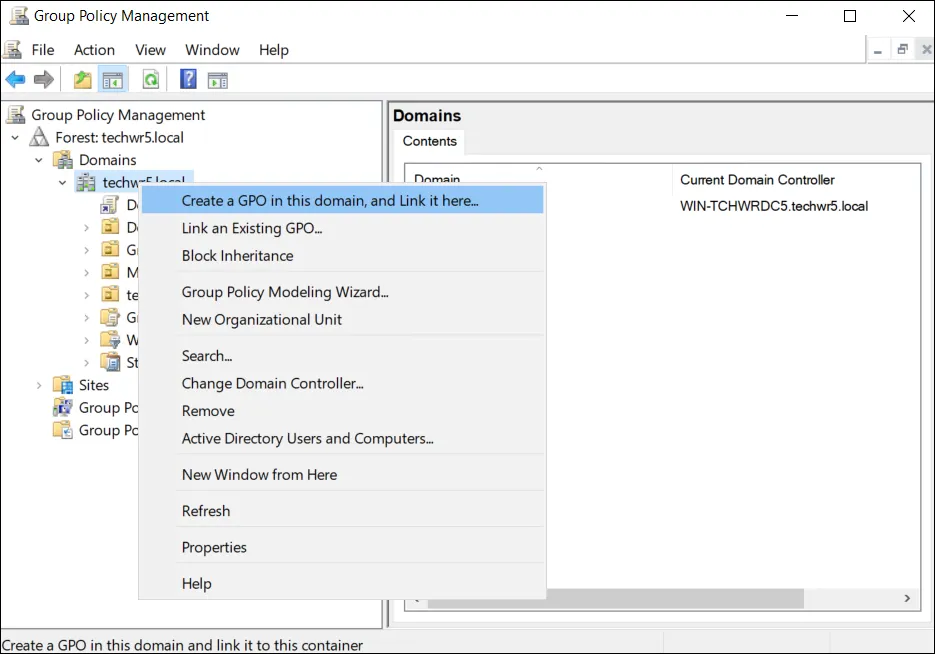
- Name: "Deploy Netwrix Credential Provider"
- Click "OK"
Or
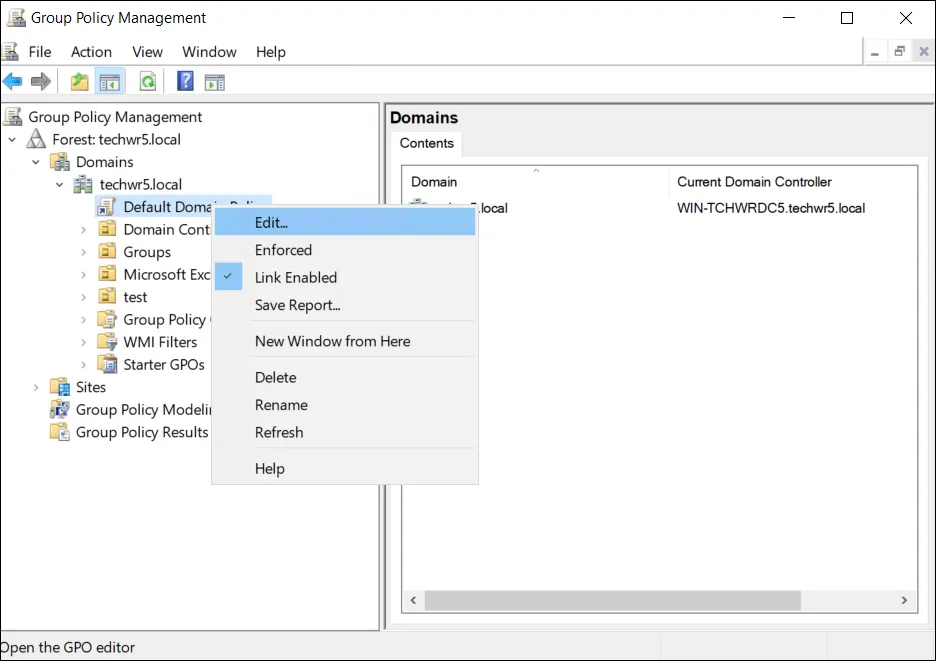
Right-click the Select Default Domain Policy and select Edit:
- Link GPO to Target OUs (if not already linked):
- Right-click the GPO
- Select "Link an Existing GPO"
- Choose organizational units containing target computers
- Typical targets: Workstations OU, All Computers
3. Configure Software Installation Policy
-
Edit the GPO:
- Right-click the newly created GPO
- Select "Edit"
- Group Policy Management Editor opens
-
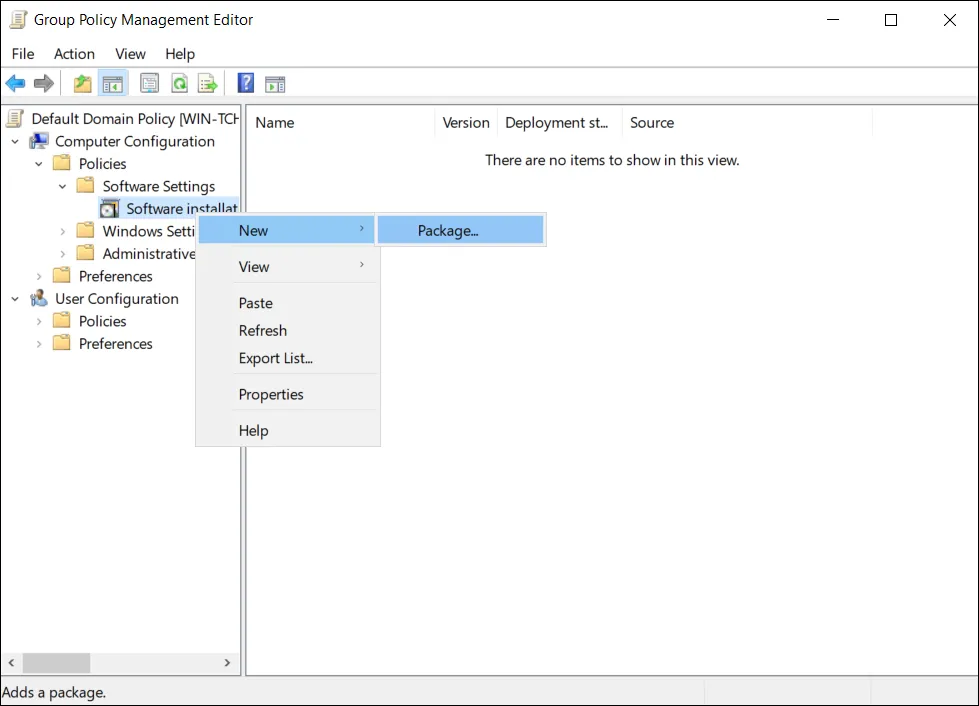
Navigate to Software Installation:
- Expand:
Computer Configuration - Expand:
Policies - Expand:
Software Settings - Click:
Software installation
 note
noteThis documentation describes steps for editing the default policy.
- Expand:
-
Add New Package:
- Right-click in the right pane → New → Package
- Navigate to the network share:
\\fileserver\software\CredentialProvider\ - Select:
PasswordCenterClientSetup64.msi - Important: Use UNC path, not mapped drive letter
-
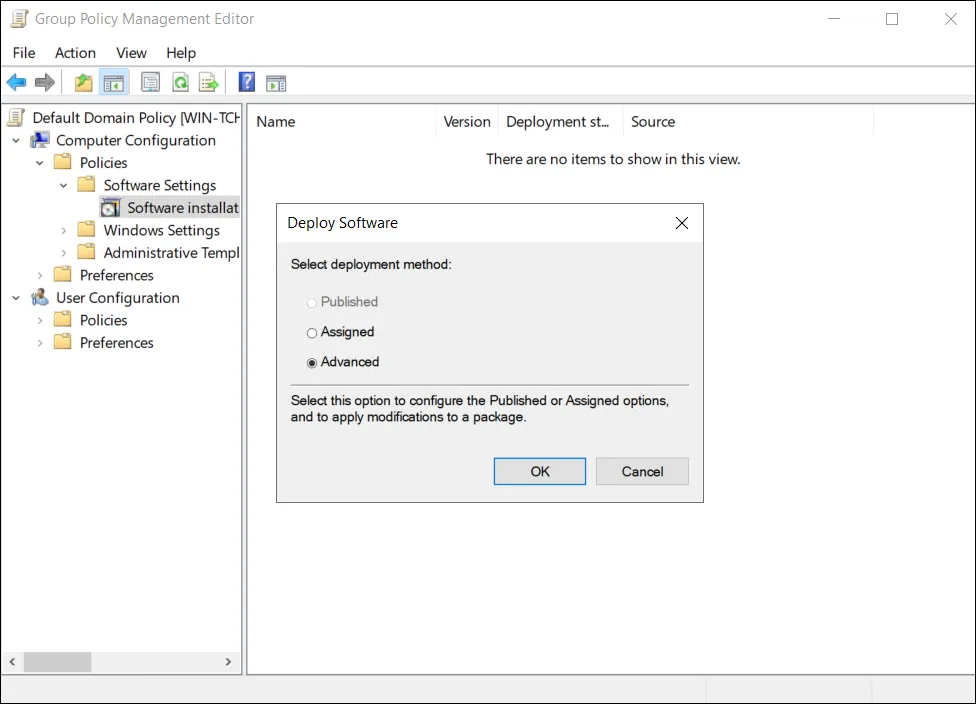
Choose Deployment Method:
- Dialog appears: "Deploy Software"
- Select: "Assigned" (recommended)
- Software installs automatically during computer startup
- No user interaction required
- Installation happens before user login
- Alternative: "Advanced" for custom options (including MST transforms)
- Click "OK"
4. Configure Installation Options (Optional Advanced Settings)
If you selected "Advanced" in step 3.4, configure additional options:
-
Deployment Tab:
- ☑ Auto-install this application by file extension activation
- ☑ Uninstall this application when it falls out of the scope of management
- Deployment type: Assigned
- Installation user interface options: Basic (default)
-
Modifications Tab (For MST Transform Files):
If you created an MST transform file using Orca (see section 1A above), apply it here:
- Click the Modifications tab

- Click Add button
- Browse to the network share where you saved the .mst file
- Select your transform file (e.g.,
CustomConfig.mst) - Click Open
- The transform file will appear in the modifications list
- Click OK
Important:
- The .mst file must be accessible via the same UNC path as the MSI
- Ensure Domain Computers have Read access to the .mst file
- The transform will be applied automatically during installation
Verification:
- After adding the modification, you should see the .mst file listed in the Modifications tab
- Multiple transforms can be added if needed (processed in order from top to bottom)
-
Upgrades Tab:
- Note: This tab is for MSI supersedence configuration only, NOT for in-place upgrades
- Configure only if this MSI package should replace/uninstall a different product
- Leave empty for standard deployments (the product does not support version upgrades)
-
Security Tab:
- Verify "Authenticated Users" has "Read" permission
- Add "Domain Computers" with "Read" permission if not present
-
Click "OK" to save settings
5. Configure Registry Settings via GPO (Configuration)
-
In the same GPO, configure credential provider settings:
- Navigate to:
Computer Configuration→Preferences→Windows Settings→Registry
- Navigate to:
-
Add Registry Items:
- Right-click → New → Registry Item
- Configure each setting:
Example Registry Items:
| Action | Hive | Key Path | Value Name | Value Type | Value Data |
|---|---|---|---|---|---|
| Update | HKEY_LOCAL_MACHINE | SOFTWARE\Policies\Imanami\GroupID\Version 10.0\PasswordCenterClient\Settings | ResetMyPasswordUrl | REG_SZ | https://portal.company.com/reset |
| Update | HKEY_LOCAL_MACHINE | SOFTWARE\Policies\Imanami\GroupID\Version 10.0\PasswordCenterClient\Settings | UnlockMyAccountUrl | REG_SZ | https://portal.company.com/unlock |
| Update | HKEY_LOCAL_MACHINE | SOFTWARE\Policies\Imanami\GroupID\Version 10.0\PasswordCenterClient\Settings | WindowTitle | REG_SZ | Company Password Reset |
| Update | HKEY_LOCAL_MACHINE | SOFTWARE\Policies\Imanami\GroupID\Version 10.0\PasswordCenterClient\Settings | CPTitle | REG_SZ | Company Self-Service |
| Update | HKEY_LOCAL_MACHINE | SOFTWARE\Policies\Imanami\GroupID\Version 10.0\PasswordCenterClient\Settings | Log | REG_SZ | false |
| Update | HKEY_LOCAL_MACHINE | SOFTWARE\Policies\Imanami\GroupID\Version 10.0\PasswordCenterClient\Settings | DisableAutoFilter | REG_SZ | false |
- Configure Item-Level Targeting (Optional):
- Use to apply settings only to specific computer groups
- Right-click registry item → Properties → Common tab
- ☑ Item-level targeting → Targeting button
- Add conditions (e.g., Computer in Group, Operating System)
6. Test in Pilot Group
Before full deployment, test with a small group:
-
Create Test OU:
- Create "Pilot Computers" OU
- Move 2-3 test computers to this OU
-
Link GPO to Test OU:
- Link "Deploy Netwrix Credential Provider" GPO to Pilot OU
- Ensure no conflicting GPOs
-
Force Policy Update on Test Computer:
gpupdate /forceshutdown /r /t 0 -
Verify Installation:
- After reboot, check installation:
wmic product where "name like '%Credential%'" get name,version- Verify credential provider appears on login screen
- Test password reset functionality
-
Review Event Logs:
- Check for installation errors
- Event Viewer → Applications and Services Logs → Microsoft → Windows → GroupPolicy
7. Deploy to Production
-
Link GPO to Production OUs:
- After successful pilot testing
- Link GPO to main Workstations or All Computers OU
-
Staggered Rollout (Recommended):
- Week 1: Deploy to 10% of computers
- Week 2: Deploy to 50% of computers
- Week 3: Deploy to all remaining computers
- Use Security Filtering or WMI filters to control deployment scope
-
Monitor Deployment:
- Check Group Policy Results on sample computers:
gpresult /h gpreport.html- Monitor Windows Event Logs for installation issues
- Collect feedback from help desk
8. Verify Deployment Status
Check GPO Application:
Get-ADComputer -Filter * -SearchBase "OU=Workstations,DC=company,DC=com" | ForEach-Object {
    $computer = $_.Name
    Write-Host "Checking $computer..."
    Invoke-Command -ComputerName $computer -ScriptBlock {
        Get-ItemProperty -Path "HKLM:\SOFTWARE\Microsoft\Windows\CurrentVersion\Uninstall\*" |
        Where-Object {$_.DisplayName -like "*Credential*"}
    } -ErrorAction SilentlyContinue
}
Check Installation Status:
- Active Directory Users and Computers → Computers
- Right-click computer → Properties → Software
- Verify credential provider is listed
Client Machine Deployment:
Once the GPO is configured and linked, client machines within the scope of the policy will automatically receive and install the credential provider:
-
Automatic Installation Trigger:
- Installation occurs automatically during the next computer startup
- The modified domain policy applies to all computers within the linked OU
- No user intervention is required on client machines
-
Force Installation Immediately (Optional):
On client machines, administrators can force the policy update and installation without waiting for the next scheduled refresh:
gpupdate /forceThen restart the computer to complete installation:
shutdown /r /t 0 -
Verify on Client Machines:
After restart, the Windows logon screen will display the credential provider with:
- Netwrix logo (or custom logo if configured)
- "Forgot Password?" link
- "Unlock Account" link
- Custom title text under the logo
The credential provider is now active and ready for use on client workstations.
Troubleshooting GPO Deployment
Issue: Software Not Installing
-
Verify GPO Link:
- Check GPO is linked to correct OU
- Verify link is not disabled
- Check GPO status is "Enabled"
-
Check Computer Account:
- Verify computer is in target OU
- Check "Authenticated Users" has Read permission on GPO
-
Verify Network Share Access:
net use \\fileserver\software\CredentialProvider- Should succeed without errors
- Check from a domain computer account context
-
Check Event Logs on Client:
- Event Viewer → Application Log
- Look for MSI Installer events (Event ID 1033, 1034, 11707, 11708)
- Windows Logs → System → Look for Group Policy errors
-
Force Policy Refresh:
gpupdate /force /boot
Issue: Installation Fails
-
Check MSI Package:
- Verify MSI is not corrupted
- Check digital signature is valid
- Test manual installation on one computer
-
Review MSI Log:
- Enable MSI logging via GPO or manually
- Check:
C:\Windows\Temp\MSI*.log
-
Prerequisites Missing:
- Verify Visual C++ 2022 Redistributable installs correctly
- May need to deploy VC++ Redist separately first
Step 1B: Enterprise Deployment via Microsoft Intune (Entra ID)
For organizations using Microsoft Intune and Entra ID (Azure AD), deploy the credential provider to cloud-managed or hybrid-joined devices.
Prerequisites:
- Microsoft Intune subscription
- Global Administrator or Intune Administrator role
- Windows 10/11 devices enrolled in Intune
- Devices are Entra ID (Azure AD) joined or hybrid-joined
- MSI package (PasswordCenterClientSetup64.msi)
Deployment Steps:
1. Prepare the Installation Package
-
Convert MSI to IntuneWin Format:
Microsoft Intune requires applications to be packaged in
.intunewinformat.Download Microsoft Win32 Content Prep Tool:
- Download from: https://github.com/Microsoft/Microsoft-Win32-Content-Prep-Tool
- Extract
IntuneWinAppUtil.exe
-
Create Source Folder:
C:\IntuneApps\CredentialProvider\- Copy
PasswordCenterClientSetup64.msito this folder
- Copy
-
Run Content Prep Tool:
cd C:\IntuneAppsIntuneWinAppUtil.exe -c C:\IntuneApps\CredentialProvider -s PasswordCenterClientSetup64.msi -o C:\IntuneApps\OutputParameters:
-c: Source folder containing the MSI-s: Source setup file (MSI filename)-o: Output folder for the .intunewin file
-
Verify Output:
- Output file:
C:\IntuneApps\Output\PasswordCenterClientSetup64.intunewin - This file is ready for upload to Intune
- Output file:
2. Upload Application to Microsoft Intune
-
Sign in to Microsoft Intune Admin Center:
- URL: https://intune.microsoft.com
- Sign in with Global Admin or Intune Admin credentials
-
Navigate to Apps:
- Click: Apps (left navigation)
- Click: All apps
- Click: + Add (top toolbar)
-
Select App Type:
- App type: Windows app (Win32)
- Click: Select
3. Configure App Information
Step 1: App Information
-
Select App Package File:
- Click: Select app package file
- Browse and select:
PasswordCenterClientSetup64.intunewin - Click: OK
-
Fill in Application Details:
- Name:
Netwrix GroupID Credential Provider - Description:
Windows Credential Provider for self-service password reset and account unlock.Integrates with Netwrix GroupID Password Center portal.
- Publisher:
Netwrix - App Version:
3.1.0.0 - Category: Select Computer Management (optional)
- Show this as a featured app in the Company Portal: No (not applicable for device-targeted app)
- Information URL:
https://www.netwrix.com(optional) - Privacy URL:
https://www.netwrix.com/privacy.html(optional) - Developer:
Netwrix - Owner:
IT Department(optional) - Notes: (optional)
- Logo: Upload company or Netwrix logo (optional, 512x512 PNG recommended)
- Name:
-
Click: Next
Step 2: Program
-
Install Command:
msiexec /i "PasswordCenterClientSetup64.msi" /quiet /norestart -
Uninstall Command:
msiexec /x {4C3F32FA-8AAE-41B7-806E-195782B986D5} /quiet /norestart -
Install Behavior:
- Select: System
- This ensures installation runs in SYSTEM context before user login
-
Device Restart Behavior:
- Select: Determine behavior based on return codes
- Or: Force a restart (if you want mandatory reboot)
- Recommended: Use return codes for flexibility
-
Click: Next
Step 3: Requirements
Define which devices can install this application:
-
Operating System Architecture:
- ☑ 64-bit
- ☐ 32-bit (credential provider is x64 only)
-
Minimum Operating System:
- Select: Windows 10 20H2 or Windows 10 21H2
- Or: Windows 11 22H2 if only deploying to Windows 11
-
Disk Space Required (MB):
- Enter:
500MB (approximate size including CEF components)
- Enter:
-
Physical Memory Required (MB):
- Leave blank or enter
4096(4 GB) for modern systems
- Leave blank or enter
-
Number of Logical Processors Required:
- Leave blank (not required)
-
CPU Speed Required (MHz):
- Leave blank (not required)
-
Click: Next
Step 4: Detection Rules
Configure how Intune detects if the application is already installed:
Choose Detection Rule Format: Manually configure detection rules
-
Click: + Add
-
Configure Detection Rule:
- Rule type: Registry
- Key path:
HKEY_LOCAL_MACHINE\SOFTWARE\Microsoft\Windows\CurrentVersion\Uninstall\{4C3F32FA-8AAE-41B7-806E-195782B986D5} - Value name:
DisplayVersion - Detection method: String comparison
- Operator: Equals
- Value:
3.1.0.0 - Associated with a 32-bit app on 64-bit clients: No
-
Alternative Detection Rule (Registry Key Existence):
- Rule type: Registry
- Key path:
HKEY_LOCAL_MACHINE\SOFTWARE\Microsoft\Windows\CurrentVersion\Authentication\Credential Providers\{c8765b62-7058-4d7f-9421-11a75d623206} - Detection method: Key exists
- Associated with a 32-bit app on 64-bit clients: No
-
Click: OK
-
Click: Next
Step 5: Dependencies
If your app depends on other applications (e.g., Visual C++ Redistributable):
-
Add Dependencies (if needed):
- Click: + Add
- Search for "Visual C++ 2022 Redistributable"
- If not present, add VC++ Redist as separate app first
- Select appropriate dependency
- Dependency type: Auto install
-
Or Skip if dependencies are included in MSI:
- The credential provider MSI includes VC++ Redistributable
- Click: Next without adding dependencies
Step 6: Supersedence
Note: Supersedence is for replacing different products, NOT for upgrading versions of this product.
For version upgrades of this credential provider:
- You must first uninstall the old version
- Then deploy the new version as a fresh installation
- See Upgrade Policy for details
For first-time deployment:
- Skip this step:
- Click: Next without adding supersedence
Step 7: Assignments
Configure which devices/users receive this application:
-
Required (Recommended for device-wide installation):
- Click: + Add group under Required
- Search and select device groups:
- Example: "All Corporate Devices"
- Example: "Workstations"
- Or specific OU-synced groups: "Workstations-Finance", "Workstations-HR"
- Mode: Included
- Click: OK
-
Available for Enrolled Devices (Optional):
- Use if you want users to install from Company Portal
- Not recommended for credential provider (should be device-level)
-
Exclude Groups (Optional):
- Add groups to exclude from installation
- Example: "Pilot Excluded", "VIP Devices"
-
End User Notifications:
- Select: Hide all toast notifications
- Credential provider should install silently
-
Delivery Optimization Priority:
- Select: Not configured or Foreground
-
Click: Next
Step 8: Review + Create
-
Review all settings:
- Verify app information
- Check install/uninstall commands
- Confirm detection rules
- Verify assigned groups
-
Click: Create
-
Wait for Upload:
- Application uploads to Intune (may take several minutes)
- Progress indicator shows upload status
4. Configure Credential Provider Settings via Intune
After deploying the application, configure settings using Configuration Profiles:
-
Create Configuration Profile:
- Navigate to: Devices → Configuration profiles
- Click: + Create profile
- Platform: Windows 10 and later
- Profile type: Templates → Custom
- Click: Create
-
Basic Information:
- Name:
Netwrix Credential Provider Configuration - Description:
Registry settings for Netwrix GroupID Credential Provider - Click: Next
- Name:
-
Configuration Settings:
- Click: + Add
- Configure OMA-URI settings for each registry value:
OMA-URI Settings:
| Setting | Configuration |
|---|---|
| Name | Reset Password URL |
| Description | URL for password reset portal |
| OMA-URI | ./Device/Vendor/MSFT/Policy/Config/ADMX_CredentialProviders/ResetMyPasswordUrl |
| Data type | String |
| Value | <enabled/><data id="ResetMyPasswordUrl" value="https://portal.company.com/reset"/> |
Alternatively, use Registry OMA-URI format:
| Setting | Configuration |
|---|---|
| Name | Reset Password URL |
| OMA-URI | ./Vendor/MSFT/Registry/HKLM/SOFTWARE/Policies/Imanami/GroupID/Version 10.0/PasswordCenterClient/Settings/ResetMyPasswordUrl |
| Data type | String |
| Value | https://portal.company.com/reset |
Repeat for each setting:
UnlockMyAccountUrlWindowTitleCPTitleDisableAutoFilterLog
-
Assignments:
- Click: Next
- Assign to: Same groups as the application
- Click: Next
-
Review + Create:
- Review settings
- Click: Create
5. Monitor Deployment
-
Check Application Status:
- Navigate to: Apps → All apps
- Click on:
Netwrix GroupID Credential Provider - Click: Device install status
- View installation progress per device:
- Installed
- In Progress
- Failed
- Not Applicable
-
View Device Details:
- Click: Devices → All devices
- Select a device
- Click: Managed Apps
- Verify credential provider is listed as "Installed"
-
Check for Errors:
- Navigate to: Tenant administration → Intune operational (Insider preview)
- Or check: Devices → Monitor → App install status
- Filter by application name
- Review error messages for failed installations
6. Sync Devices to Apply Policy
Force Immediate Sync from Intune:
- Navigate to: Devices → All devices
- Select target device(s)
- Click: Sync (top toolbar)
- Device checks in with Intune and applies policies
Force Sync from Device:
# Run on target Windows device
psexec -s cmd
Then:
# Force Intune sync
C:\Program Files (x86)\Microsoft Intune Management Extension\Microsoft.Management.Services.IntuneWindowsAgent.exe /sync
Or use Settings app:
- Settings → Accounts → Access work or school
- Click on your work account
- Click: Info
- Scroll down and click: Sync
7. Verify Installation on Client Device
-
Check Installed Applications:
Get-WmiObject -Class Win32_Product | Where-Object {$_.Name -like "*Credential*"} -
Verify Registry Configuration:
Get-ItemProperty -Path "HKLM:\SOFTWARE\Policies\Imanami\GroupID\Version 10.0\PasswordCenterClient\Settings" -
Check Credential Provider Registration:
reg query "HKLM\SOFTWARE\Microsoft\Windows\CurrentVersion\Authentication\Credential Providers\{c8765b62-7058-4d7f-9421-11a75d623206}" -
Test on Login Screen:
- Lock the device (Win + L)
- Verify Netwrix credential provider tile appears
- Test password reset URL opens correctly
8. Troubleshooting Intune Deployment
Issue: Application Not Deploying
-
Check Device Enrollment:
- Devices → All devices → Select device
- Verify: Managed by shows "Intune"
- Check last check-in time (should be recent)
-
Verify Group Membership:
- Check if device is member of assigned group
- Groups → Search for deployment group → Members
- Verify target devices are listed
-
Check Application Assignment:
- Apps → All apps → Select credential provider app
- Properties → Assignments
- Verify Required assignment to correct groups
-
Review Intune Logs on Device:
- Location:
C:\ProgramData\Microsoft\IntuneManagementExtension\Logs\ - Key files:
IntuneManagementExtension.logAgentExecutor.log
- Search for credential provider or MSI filename
- Location:
Issue: Installation Fails
-
Check Detection Rule:
- Verify detection rule is correct
- Test registry key existence manually on device
- Modify detection rule if needed
-
Review Return Codes:
- Check Intune app installation status
- Common MSI return codes:
0= Success1603= Fatal error during installation1618= Another installation is in progress3010= Success, reboot required
-
Test Manual Installation:
- Download MSI to test device
- Run manually:
msiexec /i PasswordCenterClientSetup64.msi /l*v install.log
- Review
install.logfor errors
-
Check Prerequisites:
- Verify Windows 10/11 version meets requirements
- Check available disk space (>500 MB)
- Ensure device has internet connectivity
Issue: Configuration Not Applied
-
Verify Configuration Profile Assignment:
- Devices → Configuration profiles
- Select credential provider configuration
- Check assignments match app assignments
-
Check Profile Status on Device:
- Devices → All devices → Select device
- Click: Device configuration
- Verify profile shows as "Succeeded"
-
Force Profile Sync:
- From device: Settings → Accounts → Access work or school → Sync
- Or use Intune portal: Devices → Select device → Sync
-
Verify Registry Values on Device:
Get-ItemProperty -Path "HKLM:\SOFTWARE\Policies\Imanami\GroupID\Version 10.0\PasswordCenterClient\Settings" | Format-List
9. Best Practices for Intune Deployment
-
Test with Pilot Group:
- Create "Pilot Devices" group in Entra ID
- Assign application to pilot group first
- Test thoroughly before full rollout
-
Staggered Deployment:
- Phase 1: Pilot group (10-20 devices)
- Phase 2: Department group (50-100 devices)
- Phase 3: Full organization
- Monitor each phase before proceeding
-
Use Dynamic Groups:
- Create dynamic device groups based on attributes
- Example: All Windows 10/11 devices
(device.deviceOSType -eq "Windows") and (device.deviceOSVersion -ge "10.0") -
Monitor Compliance:
- Create compliance policy to check credential provider installation
- Flag non-compliant devices for review
-
Document Configuration:
- Document portal URLs and settings
- Keep configuration profile settings in version control
- Maintain runbook for troubleshooting
Step 2: Locate and Configure CPSettings.xml
The CPSettings.xml file is the primary configuration file for the credential provider.
File Location:
C:\Program Files\Imanami\Password Center Client (x64)\CPSettings.xml
Important Notes:
- This file is created during installation if it exists within the same directory as the installer.
- You need administrator privileges to edit this file
- Changes take effect after the next login screen refresh or machine restart
- The file is in XML format - maintain proper XML syntax when editing
How to Edit:
- Open Notepad as Administrator (right-click → Run as administrator)
- Open the CPSettings.xml file from the installation directory
- Make your changes (see configuration below)
- Save the file
- Lock the computer (Win + L) or restart to see changes
Step 3: Configure Required Settings
Minimum Required Configuration:
At minimum, you must configure these two URLs:
<?xml version="1.0" standalone="yes" ?>
<CPSettings>
    <!-- REQUIRED: URL for password reset portal -->
    <ResetMyPasswordUrl value="https://your-password-portal.com/reset" />

    <!-- REQUIRED: URL for account unlock portal -->
    <UnlockMyAccountUrl value="https://your-password-portal.com/unlock" />

    <!-- All other settings below are optional and have defaults -->
    <WindowTitle value="Netwrix Directory Manager" />
    <CPTitle value="Netwrix Directory Manager" />
    <ForgetPasswordText value="Forgot my password?" />
    <UnlockAccountText value="Unlock my account" />
    <Log value="false" />
</CPSettings>
Replace the URLs:
- Replace
https://your-password-portal.com/resetwith your actual password reset portal URL - Replace
https://your-password-portal.com/unlockwith your actual account unlock portal URL - Both URLs should use HTTPS for security (HTTP is supported but not recommended)
⚠️ Common Mistake: Using placeholder URLs like https://google.com or https://localhost. Make sure to use your actual portal URLs!
Step 4: Verify Installation
After saving the configuration and restarting (or locking the screen):
-
Lock your computer (press Win + L)
-
Expected Behavior:
- You should see the standard Windows login screen
- Below or alongside your user account, you should see the Netwrix credential provider tile
- The tile should display:
- The custom title you configured (
CPTitle) - Two options:
- "Forgot my password?" (or your custom text)
- "Unlock my account" (or your custom text)
- Your custom logo if configured
- The custom title you configured (
-
Visual Confirmation:
[Your User Account Tile][Netwrix Directory Manager Tile]→ Forgot my password?→ Unlock my account -
Test the Functionality:
- Click "Forgot my password?"
- A browser window should open displaying your password reset portal
- The URL should match your
ResetMyPasswordUrlsetting
Step 5: Test Password Reset (Optional but Recommended)
-
Click on "Forgot my password?" from the login screen
-
Verify that:
- A browser window opens
- Your password reset portal loads correctly
- You can navigate through the reset process
- SSL certificate is valid (if using HTTPS)
-
If the portal doesn't load:
- Check the URLs in CPSettings.xml
- Verify network connectivity
- Check firewall settings
- See Troubleshooting section
What's Next?
Basic Setup Complete! You now have a working credential provider.
Optional Next Steps:
- Configure filtering to control which other login options appear
- Customize the appearance with logos and custom text
- Configure proxy settings if behind a corporate proxy
- Deploy via GPO for enterprise environments
- Enable logging for troubleshooting
Configuration Methods
The Netwrix GroupID Credential Provider can be configured using three methods, listed in order of precedence:
1. Group Policy (Highest Priority)
Registry Path:
HKEY_LOCAL_MACHINE\SOFTWARE\Policies\Imanami\GroupID\Version 10.0\PasswordCenterClient\Settings
Use When:
- Managing multiple computers in an Active Directory environment
- Enforcing configuration across an organization
- Preventing local administrators from changing settings
Precedence: Settings configured via Group Policy override all other configuration methods.
Example GPO Configuration:
- Open Group Policy Management Console (GPMC)
- Create or edit a GPO
- Navigate to: Computer Configuration → Preferences → Windows Settings → Registry
- Add registry values under the policy path above
2. Local Registry (Medium Priority)
Registry Path:
HKEY_LOCAL_MACHINE\SOFTWARE\Imanami\GroupID\Version 10.0\PasswordCenterClient\Settings
Use When:
- Configuring a single computer
- Testing settings before GPO deployment
- Managing standalone computers
How to Configure:
- Open Registry Editor (regedit.exe) as Administrator
- Navigate to the registry path above
- Create or modify String (REG_SZ) values
- Restart or lock the computer to apply changes
Example Registry Values:
ResetMyPasswordUrl (REG_SZ) = "https://portal.company.com/reset"
UnlockMyAccountUrl (REG_SZ) = "https://portal.company.com/unlock"
WindowTitle (REG_SZ) = "Company Password Reset"
Log (REG_SZ) = "true"
3. CPSettings.xml (Lowest Priority)
File Location:
C:\Program Files\Imanami\Password Center Client (x64)\CPSettings.xml
Use When:
- Initial setup and testing
- Standalone deployments
- Providing default values during installation
Precedence: Settings in CPSettings.xml are used only if not defined in Registry or Group Policy.
⚠️ Note: This file is installed with the MSI package and contains default values. It's the easiest method for first-time configuration.
Configuration Priority Summary
When the credential provider starts, it reads settings in this order:
1. Group Policy Registry (Policies key)
   ↓ (if not found)
2. Local Registry (Software key)
   ↓ (if not found)
3. CPSettings.xml file
   ↓ (if not found)
4. Hard-coded defaults in the DLL
💡 Best Practice:
- Use CPSettings.xml for initial setup and testing
- Use Local Registry for single-computer deployments
- Use Group Policy for enterprise-wide deployments
Configuration Reference
This section provides detailed information about all available configuration settings.
Defaults & Required Settings
| Setting | Required | Default Value | Description |
|---|---|---|---|
ResetMyPasswordUrl | ✅ Yes | (none) | URL for password reset portal |
UnlockMyAccountUrl | ✅ Yes | (none) | URL for account unlock portal |
WindowTitle | ❌ No | "Netwrix Directory Manager" | Browser window title |
CPTitle | ❌ No | "Netwrix Directory Manager" | Tile title on login screen |
ForgetPasswordText | ❌ No | "Forgot my password?" | Text for reset button |
UnlockAccountText | ❌ No | "Unlock my account" | Text for unlock button |
Log | ❌ No | "false" | Enable/disable logging |
DisableAutoFilter | ❌ No | "false" | Disable automatic filtering |
⚠️ Important: You MUST configure both ResetMyPasswordUrl and UnlockMyAccountUrl for the credential provider to function properly.
Basic Settings
ResetMyPasswordUrl
- Type: String (URL)
- Required: Yes
- Default: None (must be configured)
- Description: The URL of your password reset web portal
- Example:
https://passwordreset.company.com/reset - Notes:
- Must be a valid HTTP or HTTPS URL
- HTTPS strongly recommended for security
- This URL opens when user clicks "Forgot my password?"
<ResetMyPasswordUrl value="https://passwordreset.company.com/reset" />
UnlockMyAccountUrl
- Type: String (URL)
- Required: Yes
- Default: None (must be configured)
- Description: The URL of your account unlock web portal
- Example:
https://passwordreset.company.com/unlock - Notes:
- Must be a valid HTTP or HTTPS URL
- HTTPS strongly recommended for security
- This URL opens when user clicks "Unlock my account"
- Can be the same as ResetMyPasswordUrl if your portal handles both functions
<UnlockMyAccountUrl value="https://passwordreset.company.com/unlock" />
UI Customization
WindowTitle
- Type: String
- Required: No
- Default: "Netwrix Directory Manager"
- Description: Title displayed in the browser window title bar
- Example:
Company Password Reset
<WindowTitle value="Acme Corp Password Reset" />
CPTitle
- Type: String
- Required: No
- Default: "Netwrix Directory Manager"
- Description: Title displayed on the credential provider tile at the login screen
- Example:
Company Self-Service - Notes: Keep this short (20-30 characters max) for best display
<CPTitle value="Acme Corp Self-Service" />
ForgetPasswordText
- Type: String
- Required: No
- Default: "Forgot my password?"
- Description: Text displayed for the password reset option
- Example:
Reset Password
<ForgetPasswordText value="Reset My Password" />
UnlockAccountText
- Type: String
- Required: No
- Default: "Unlock my account"
- Description: Text displayed for the account unlock option
- Example:
Unlock Account
<UnlockAccountText value="Unlock My Account" />
ImageFile
- Type: String (filename)
- Required: No
- Default: "logo.bmp"
- Description: Logo image displayed on the credential provider tile
- Supported Formats: BMP, PNG, JPG
- Recommended Size: 128x128 pixels
- Location: Must be in the installation directory
- Example:
company-logo.bmp
<ImageFile value="company-logo.bmp" />
How to Use Custom Logo:
- Create a 128x128 pixel BMP, PNG, or JPG image
- Copy the image file to:
C:\Program Files\Imanami\Password Center Client (x64)\ - Update the
ImageFilesetting with your filename - Lock/unlock the computer to see changes
IconImage
- Type: String (filename)
- Required: No
- Default: "favicon.ico"
- Description: Icon displayed in the browser window and taskbar
- Supported Formats: ICO
- Recommended Size: 32x32 or 64x64 pixels
- Location: Must be in the installation directory
<IconImage value="company-icon.ico" />
Credential Provider Filtering
Filtering controls which other Windows credential providers (login methods) are visible when the Netwrix credential provider is active.
Understanding Filtering
What is Filtering? By default, Windows displays all registered credential providers on the login screen (password, PIN, Windows Hello, etc.). Filtering allows you to:
- Hide specific credential providers in certain scenarios
- Simplify the login screen by showing only relevant options
- Create a cleaner user experience
When is Filtering Applied?
- Logon Scenario: When the computer starts or after logout
- Unlock Scenario: When the workstation is locked (Win + L)
DisableAutoFilter
- Type: Boolean (true/false)
- Required: No
- Default: "false"
- Description: Controls whether automatic filtering is enabled
Values:
false(default): Filtering is enabled. Other credential providers are filtered based on FilterLogon and FilterUnlock settingstrue: Filtering is disabled. All Windows credential providers appear on the login screen
<DisableAutoFilter value="false" />
When to Use:
- Set to
falsefor production (recommended): Provides a controlled, simplified login experience - Set to
truefor troubleshooting: Allows you to see all credential providers, useful for debugging
Visual Example:
DisableAutoFilter = false (Filtering Enabled):
┌─────────────────────────────┐
│  Windows Login Screen       │
├─────────────────────────────┤
│  [User Account]             │
│  [Netwrix Self-Service]     │
│    → Reset Password         │
│    → Unlock Account         │
└─────────────────────────────┘

DisableAutoFilter = true (Filtering Disabled):
┌─────────────────────────────┐
│  Windows Login Screen       │
├─────────────────────────────┤
│  [User Account]             │
│  [Netwrix Self-Service]     │
│  [Windows Hello Face]       │
│  [PIN]                      │
│  [Fingerprint]              │
└─────────────────────────────┘
FilterLogon
- Type: String (semicolon-separated CLSIDs)
- Required: No
- Default: (list of common credential provider CLSIDs)
- Description: Specifies which credential providers to filter (hide) during logon scenario
Format:
<FilterLogon value="CLSID1;CLSID2;CLSID3" />
Common CLSIDs to Filter:
<FilterLogon value="{2135F72A-90B5-4ED3-A7F1-8BB705AC276A};{25CBB996-92ED-457E-B28C-4774084BD562};{3DD6BEC0-8193-4FFE-AE25-E08E39EA4063};{4DA7114C-DE47-43BF-A644-62876DCC2A72};{8AF662BF-65A0-4D0A-A540-A338A999D36F};{8FD7E19C-3BF7-489B-A72C-846AB3678C96};{BEC09223-B018-416D-A0AC-523971B639F5};{C5D7540A-CD51-453B-B22B-05305BA03F07};{C885AA15-1764-4293-B82A-0586ADD46B35};{D6886603-9D2F-4EB2-B667-1971041FA96B};{F64945DF-4FA9-4068-A2FB-61AF319EDD33};{F8A0B131-5F68-486C-8040-7E8FC3C85BB6}" />
What These CLSIDs Represent:
{2135F72A-90B5-4ED3-A7F1-8BB705AC276A}- Picture Password{8AF662BF-65A0-4D0A-A540-A338A999D36F}- Fingerprint{BEC09223-B018-416D-A0AC-523971B639F5}- Windows Hello Face{D6886603-9D2F-4EB2-B667-1971041FA96B}- PIN- (Additional CLSIDs for other credential providers)
💡 Tip: The default value filters most alternative credential providers, leaving only standard password login and the Netwrix provider visible.
FilterUnlock
- Type: String (semicolon-separated CLSIDs)
- Required: No
- Default: (same as FilterLogon)
- Description: Specifies which credential providers to filter during workstation unlock scenario
Usage: Typically set to the same value as FilterLogon unless you want different filtering behavior when unlocking vs. logging on.
<FilterUnlock value="{2135F72A-90B5-4ED3-A7F1-8BB705AC276A};{D6886603-9D2F-4EB2-B667-1971041FA96B}" />
Example Scenario: You might want to allow Windows Hello Face during logon but not during unlock:
FilterLogon: Don't include Windows Hello CLSID → Hello appears during logonFilterUnlock: Include Windows Hello CLSID → Hello hidden during unlock
AllowedCP
- Type: String (semicolon-separated CLSIDs)
- Required: No
- Default: Empty (allow all)
- Description: Whitelist of credential providers to allow (opposite of filtering)
Usage: Instead of specifying what to hide (FilterLogon/FilterUnlock), specify what to show.
<AllowedCP value="{60b78e88-ead8-445c-9cfd-0b87f74ea6cd};{c8765b62-7058-4d7f-9421-11a75d623206}" />
This example allows only:
- Standard password login (
{60b78e88-ead8-445c-9cfd-0b87f74ea6cd}) - Netwrix credential provider (
{c8765b62-7058-4d7f-9421-11a75d623206})
💡 When to Use:
- Use
AllowedCPwhen you want to explicitly allow specific providers (whitelist approach) - Use
FilterLogon/FilterUnlockwhen you want to hide specific providers (blacklist approach) - Don't use both simultaneously - choose one approach
Network & Proxy Settings
If your organization uses a proxy server for internet access, configure these settings:
ProxyServer
- Type: String (hostname or IP)
- Required: No (only if using proxy)
- Default: Empty (no proxy)
- Description: Hostname or IP address of the proxy server
- Example:
proxy.company.comor10.0.0.1
<ProxyServer value="proxy.company.com" />
ProxyPort
- Type: String (port number)
- Required: No (only if using proxy)
- Default: Empty
- Description: Port number of the proxy server
- Example:
8080,3128
<ProxyPort value="8080" />
ProxyType
- Type: String
- Required: No
- Default: Empty (direct connection)
- Description: Type of proxy configuration
Supported Values:
http- HTTP proxyhttps- HTTPS proxysocks- SOCKS proxypac- Proxy Auto-Configuration file
<ProxyType value="http" />
ProxyPacUrl
- Type: String (URL)
- Required: No (only if using PAC file)
- Default: Empty
- Description: URL to a Proxy Auto-Configuration (PAC) file
- Example:
http://proxy.company.com/proxy.pac
<ProxyPacUrl value="http://proxy.company.com/proxy.pac" />
When to Use: If your organization uses a PAC file for proxy configuration, specify the PAC file URL here.
ProxyUserName
- Type: String
- Required: No (only if proxy requires authentication)
- Default: Empty
- Description: Username for proxy authentication
<ProxyUserName value="proxyuser" />
⚠️ Security Note: Storing credentials in plain text is not recommended. Consider using integrated Windows authentication with your proxy server instead.
ProxyPassword
- Type: String
- Required: No (only if proxy requires authentication)
- Default: Empty
- Description: Password for proxy authentication
<ProxyPassword value="password123" />
⚠️ Security Warning:
- This stores the password in plain text
- Readable by anyone with administrator access
- Recommended: Use proxy servers that support Windows integrated authentication instead
- If you must use a password, ensure proper file permissions on CPSettings.xml
Complete Proxy Configuration Example
<!-- HTTP Proxy with Authentication -->
<ProxyServer value="proxy.company.com" />
<ProxyPort value="8080" />
<ProxyType value="http" />
<ProxyUserName value="proxyuser" />
<ProxyPassword value="ProxyPass123" />

<!-- OR: PAC File Configuration -->
<ProxyType value="pac" />
<ProxyPacUrl value="http://proxy.company.com/proxy.pac" />
Logging and Debugging
Log
- Type: Boolean (true/false)
- Required: No
- Default: "false"
- Description: Enable or disable detailed logging
Values:
false(default): Logging disabled (recommended for production)true: Logging enabled (use for troubleshooting)
<Log value="true" />
Log File Location:
C:\Program Files\Imanami\Password Center Client (x64)\log.txt
What is Logged:
- Configuration loading and parsing
- Credential provider initialization
- URL loading attempts
- Browser launching events
- Filtering decisions
- Errors and exceptions
⚠️ Privacy Warning:
- Log files may contain sensitive information (URLs, usernames)
- Enable logging only when troubleshooting
- Delete log files after troubleshooting is complete
- Restrict access to log files to administrators only
How to Use Logs for Troubleshooting:
- Enable logging:
<Log value="true" /> - Save CPSettings.xml
- Restart or lock the computer
- Reproduce the issue
- Open
log.txtin the installation directory - Look for ERROR or WARNING entries
- Share relevant log excerpts with support (redact sensitive information)
CEFLogMode
- Type: String
- Required: No
- Default: "Disabled"
- Description: Controls Chromium Embedded Framework logging level
Supported Values:
Disabled(default): No CEF loggingEnabled: Basic CEF loggingVerbose: Detailed CEF logging (very verbose)
<CEFLogMode value="Enabled" />
CEF Log Location:
C:\Program Files\Imanami\Password Center Client (x64)\debug.log
When to Use:
- Enable when troubleshooting browser rendering issues
- Enable when web pages fail to load
- Use
Verbosemode only when specifically requested by support
SSL/Certificate Settings
IgnoreCertificateErrors
- Type: Boolean (true/false)
- Required: No
- Default: "false"
- Description: Whether to ignore SSL certificate errors
Values:
false(default): Enforce SSL certificate validation (recommended)true: Ignore SSL certificate errors (not recommended)
<IgnoreCertificateErrors value="false" />
⚠️ SECURITY WARNING:
Setting this to true is a significant security risk:
- Disables SSL/TLS certificate validation
- Makes the connection vulnerable to man-in-the-middle attacks
- Allows connections to servers with expired, self-signed, or invalid certificates
- Should NEVER be used in production environments
When You Might See Certificate Errors:
- Self-signed certificates: Your password reset portal uses a self-signed SSL certificate
- Expired certificates: The portal's SSL certificate has expired
- Hostname mismatch: Accessing the portal via IP instead of hostname
- Untrusted CA: The certificate is issued by a CA not in the Windows trust store
Recommended Solutions Instead of Ignoring Errors:
-
Get a valid SSL certificate from a trusted Certificate Authority:
- Let's Encrypt (free)
- DigiCert, Sectigo, GlobalSign (commercial)
-
Add self-signed certificate to Windows trust store:
- Export the certificate from your portal
- Import it into: Certificates (Local Computer) → Trusted Root Certification Authorities
-
Use proper hostname:
- Access the portal via its proper FQDN, not IP address
- Ensure the certificate matches the hostname
-
For testing only (temporary workaround):
<IgnoreCertificateErrors value="true" />Remember to set this back to
falsebefore production deployment!
Advanced Settings
WebView
- Type: String
- Required: No
- Default: "cef"
- Description: Selects which web rendering engine to use
Supported Values:
cef(default): Use Chromium Embedded Framework (recommended)2: Use Microsoft IE (legacy option)
<WebView value="cef" />
Recommendation: Keep the default value (cef) unless specifically instructed by support.
Common Deployment Scenarios
This section provides ready-to-use configuration examples for typical deployment scenarios.
Scenario 1: Small Business (Basic Setup)
Environment:
- Single location
- 10-50 computers
- Direct internet connection (no proxy)
- Password reset portal:
https://reset.company.com
Configuration (CPSettings.xml):
<?xml version="1.0" standalone="yes" ?>
<CPSettings>
    <!-- Basic Configuration -->
    <ResetMyPasswordUrl value="https://reset.company.com" />
    <UnlockMyAccountUrl value="https://reset.company.com" />

    <!-- Company Branding -->
    <WindowTitle value="Company Password Reset" />
    <CPTitle value="Company Self-Service" />
    <ImageFile value="logo.bmp" />

    <!-- Keep it simple - default filtering -->
    <DisableAutoFilter value="false" />

    <!-- No proxy needed -->
    <!-- Logging disabled for production -->
    <Log value="false" />
</CPSettings>
Deployment Steps:
- Install MSI on each computer
- Copy company logo as
logo.bmpto installation directory - Edit CPSettings.xml with settings above
- Restart computers
- Test on one computer before rolling out to all
Scenario 2: Enterprise with Group Policy
Environment:
- Multiple locations
- 500+ computers
- Active Directory domain
- Password reset portal:
https://selfservice.enterprise.com - Corporate proxy server
Deployment Method: Group Policy
GPO Configuration Steps:
-
Create GPO:
- Open Group Policy Management Console
- Create new GPO: "Netwrix Credential Provider Configuration"
-
Configure Registry Settings:
- Edit GPO → Computer Configuration → Preferences → Windows Settings → Registry
- Target Path:
HKLM\SOFTWARE\Policies\Imanami\GroupID\Version 10.0\PasswordCenterClient\Settings
-
Add Registry Values:
| Name | Type | Value |
|---|---|---|
| ResetMyPasswordUrl | REG_SZ | https://selfservice.enterprise.com/reset |
| UnlockMyAccountUrl | REG_SZ | https://selfservice.enterprise.com/unlock |
| WindowTitle | REG_SZ | Enterprise Self-Service |
| CPTitle | REG_SZ | IT Self-Service |
| DisableAutoFilter | REG_SZ | false |
| ProxyServer | REG_SZ | proxy.enterprise.com |
| ProxyPort | REG_SZ | 8080 |
| ProxyType | REG_SZ | http |
| Log | REG_SZ | false |
- Deploy MSI:
- Use Group Policy Software Installation or SCCM
- Link GPO to appropriate OUs
- Force group policy update:
gpupdate /force
Benefits of GPO Deployment:
- Centralized configuration management
- Consistent settings across all computers
- Easy to update settings organization-wide
- Prevents local administrators from changing settings
- Automatic application to new computers
Scenario 3: Enterprise with Proxy + Authentication
Environment:
- Corporate proxy with authentication required
- Password reset portal:
https://passwordreset.company.com
Configuration (CPSettings.xml or GPO):
<?xml version="1.0" standalone="yes" ?>
<CPSettings>
    <!-- Portal URLs -->
    <ResetMyPasswordUrl value="https://passwordreset.company.com/reset" />
    <UnlockMyAccountUrl value="https://passwordreset.company.com/unlock" />

    <!-- Proxy Configuration -->
    <ProxyServer value="proxy.company.com" />
    <ProxyPort value="8080" />
    <ProxyType value="http" />
    <ProxyUserName value="serviceaccount" />
    <ProxyPassword value="ServicePassword123" />

    <!-- UI Customization -->
    <WindowTitle value="Company IT Services" />
    <CPTitle value="Self-Service" />

    <!-- Standard Configuration -->
    <DisableAutoFilter value="false" />
    <Log value="false" />
</CPSettings>
⚠️ Security Recommendations:
- Use a dedicated service account for proxy authentication
- Grant only proxy access permissions to this account
- Rotate password regularly
- Use Group Policy to deploy (more secure than local file)
- Consider using proxy servers that support Windows integrated authentication
Scenario 4: Testing/Development Environment
Environment:
- Test environment
- Need detailed logging
- Testing with self-signed certificates
- Single test machine
Configuration (CPSettings.xml):
<?xml version="1.0" standalone="yes" ?>
<CPSettings>
    <!-- Test Portal URLs -->
    <ResetMyPasswordUrl value="https://test-portal.company.local/reset" />
    <UnlockMyAccountUrl value="https://test-portal.company.local/unlock" />

    <!-- Development Settings -->
    <WindowTitle value="TEST - Password Reset" />
    <CPTitle value="TEST - Self-Service" />

    <!-- Enable All Logging -->
    <Log value="true" />
    <CEFLogMode value="Verbose" />

    <!-- Disable Filtering (show all credential providers) -->
    <DisableAutoFilter value="true" />

    <!-- Allow Self-Signed Certificates (TEST ONLY!) -->
    <IgnoreCertificateErrors value="true" />
</CPSettings>
⚠️ WARNING: This configuration is for testing only! Never use in production!
Testing Checklist:
- Credential provider tile appears on login screen
- "Forgot my password?" opens correct URL
- "Unlock my account" opens correct URL
- Browser window displays portal correctly
- Can complete password reset process
- Check log.txt for any errors
- Test with and without filtering enabled
- Verify behavior matches production expectations
Before Moving to Production:
<!-- Change these back to secure values -->
<Log value="false" />
<CEFLogMode value="Disabled" />
<IgnoreCertificateErrors value="false" />
<DisableAutoFilter value="false" />
Scenario 5: High Security Environment
Environment:
- Financial or healthcare organization
- Strict security requirements
- All connections must use HTTPS
- Audit logging required
- Minimal credential provider exposure
Configuration:
<?xml version="1.0" standalone="yes" ?>
<CPSettings>
    <!-- HTTPS Only URLs -->
    <ResetMyPasswordUrl value="https://secure-reset.company.com/reset" />
    <UnlockMyAccountUrl value="https://secure-reset.company.com/unlock" />

    <!-- UI Configuration -->
    <WindowTitle value="Secure Password Reset" />
    <CPTitle value="Authorized Access" />
    <ForgetPasswordText value="Reset Password" />
    <UnlockAccountText value="Unlock Account" />

    <!-- Security Settings -->
    <IgnoreCertificateErrors value="false" />

    <!-- Filter Everything Except Password and Netwrix -->
    <AllowedCP value="{60b78e88-ead8-445c-9cfd-0b87f74ea6cd};{c8765b62-7058-4d7f-9421-11a75d623206}" />

    <!-- Enable Audit Logging -->
    <Log value="true" />
    <CEFLogMode value="Enabled" />
</CPSettings>
Additional Security Measures:
- Deploy via Group Policy (prevents local tampering)
- Use valid SSL certificates from trusted CA
- Enable Windows Event Log monitoring
- Restrict physical access to log files
- Regular security audits of configuration
- Monitor log files for suspicious activity
- Use multi-factor authentication on password reset portal
Scenario 6: Kiosk or Shared Computer
Environment:
- Shared computer in lobby or common area
- Multiple users throughout the day
- Limited credential provider options needed
Configuration:
<?xml version="1.0" standalone="yes" ?>
<CPSettings>
    <!-- Portal URLs -->
    <ResetMyPasswordUrl value="https://reset.company.com" />
    <UnlockMyAccountUrl value="https://reset.company.com" />

    <!-- Simple UI -->
    <WindowTitle value="Password Help" />
    <CPTitle value="Need Help?" />
    <ForgetPasswordText value="I forgot my password" />

    <!-- Only show standard password and self-service -->
    <AllowedCP value="{60b78e88-ead8-445c-9cfd-0b87f74ea6cd};{c8765b62-7058-4d7f-9421-11a75d623206}" />

    <!-- No logging (privacy) -->
    <Log value="false" />
</CPSettings>
Additional Kiosk Configuration:
- Enable automatic logoff after inactivity
- Disable or hide unlock option (show only reset)
- Lock down browser navigation (if supported by portal)
- Clear browser cache periodically
Troubleshooting & FAQ
This section addresses common issues and frequently asked questions.
Frequently Asked Questions (FAQ)
Q1: Where is the CPSettings.xml file located?
Answer:
C:\Program Files\Imanami\Password Center Client (x64)\CPSettings.xml
This file is created during installation if it exists within the same directory as the installer. You need administrator privileges to edit it.
How to Find It:
- Open File Explorer
- Navigate to:
C:\Program Files\Imanami\ - Open the
Password Center Client (x64)folder - Look for
CPSettings.xml
If File is Missing:
- Reinstall the credential provider
- Check if installation completed successfully
- Verify you're looking in the correct directory
Q2: I changed CPSettings.xml but don't see any changes. Why?
Answer: Changes to configuration require refreshing the login screen.
To Apply Changes:
Option 1: Lock and Unlock:
- Save CPSettings.xml
- Press
Win + Lto lock - Press
Ctrl + Alt + Del, then press Escape - Lock again (
Win + L) - Changes should now be visible
Option 2: Restart Computer (most reliable):
- Save CPSettings.xml
- Restart the computer
- Changes will be applied on next login screen
Option 3: Restart Windows Logon Process (advanced):
- Open Task Manager as Administrator
- Go to Details tab
- Find
winlogon.exe - End process (will restart automatically)
- ⚠️ Use with caution - may log you out
Note: Configuration cached from Group Policy or Registry takes precedence over CPSettings.xml.
Q3: The credential provider tile doesn't appear on the login screen
Troubleshooting Steps:
-
Verify Installation:
- Check if files exist in:
C:\Program Files\Imanami\Password Center Client (x64)\ - Verify
Imanami.PasswordCenter.Credential64.dllis present
- Check if files exist in:
-
Check Registry Registration:
- Open Registry Editor (regedit.exe)
- Navigate to:
HKLM\SOFTWARE\Microsoft\Windows\CurrentVersion\Authentication\Credential Providers\{c8765b62-7058-4d7f-9421-11a75d623206} - Verify the key exists
- Check if default value is: "Imanami.PasswordCenter.Credential64"
-
Verify DLL Registration:
- Open Command Prompt as Administrator
- Run:
reg query "HKLM\SOFTWARE\Classes\CLSID\{c8765b62-7058-4d7f-9421-11a75d623206}" - Should show InprocServer32 pointing to the DLL
-
Check Event Logs:
- Open Event Viewer
- Navigate to: Windows Logs → System
- Look for errors related to credential providers or winlogon
-
Try Reinstalling:
- Uninstall the credential provider
- Restart the computer
- Reinstall the MSI package
- Restart again
-
Check Group Policy:
- Run:
gpresult /h gpreport.html - Open gpreport.html
- Check for any policies that might disable custom credential providers
- Run:
Q4: Browser window opens but portal doesn't load
Common Causes and Solutions:
Cause 1: Incorrect URL
- Check
ResetMyPasswordUrlandUnlockMyAccountUrlin CPSettings.xml - Verify URLs are correct (copy-paste from working browser)
- Ensure URLs include
https://orhttp:// - Test URLs in a regular browser first
Cause 2: Network Connectivity
- Ping the portal server from command prompt
- Check firewall settings
- Verify internet connection is working
- Test from the login screen user context (not your user context)
Cause 3: Proxy Issues
- If behind a proxy, configure proxy settings in CPSettings.xml
- Verify proxy server address and port are correct
- Check if proxy requires authentication
- Test proxy settings in regular browser first
Cause 4: SSL Certificate Errors
- Enable logging:
<Log value="true" /> - Check log.txt for certificate errors
- Verify portal has valid SSL certificate
- See IgnoreCertificateErrors section for handling certificate issues
Debugging Steps:
- Enable logging in CPSettings.xml
- Reproduce the issue
- Check
log.txtin installation directory - Look for errors related to URL loading
- Test the URL in a regular browser from the same computer
Q5: How do I hide Windows Hello or PIN options?
Answer: Use the FilterLogon and FilterUnlock settings to hide specific credential providers.
Example - Hide Windows Hello Face and PIN:
<FilterLogon value="{BEC09223-B018-416D-A0AC-523971B639F5};{D6886603-9D2F-4EB2-B667-1971041FA96B}" />
<FilterUnlock value="{BEC09223-B018-416D-A0AC-523971B639F5};{D6886603-9D2F-4EB2-B667-1971041FA96B}" />
Where:
{BEC09223-B018-416D-A0AC-523971B639F5}= Windows Hello Face{D6886603-9D2F-4EB2-B667-1971041FA96B}= PIN
Alternative - Show Only Specific Providers:
<AllowedCP value="{60b78e88-ead8-445c-9cfd-0b87f74ea6cd};{c8765b62-7058-4d7f-9421-11a75d623206}" />
This shows only:
- Standard password login (
{60b78e88-ead8-445c-9cfd-0b87f74ea6cd}) - Netwrix credential provider (
{c8765b62-7058-4d7f-9421-11a75d623206})
See Credential Provider Filtering section for complete list of CLSIDs.
Q6: Can I use the same portal URL for both reset and unlock?
Answer: Yes! If your password reset portal handles both functions, you can use the same URL:
<ResetMyPasswordUrl value="https://portal.company.com" />
<UnlockMyAccountUrl value="https://portal.company.com" />
Many self-service portals automatically detect whether the user needs password reset or account unlock based on their account status.
Alternative: Use different paths on the same server:
<ResetMyPasswordUrl value="https://portal.company.com/reset" />
<UnlockMyAccountUrl value="https://portal.company.com/unlock" />
Q7: How do I deploy to multiple computers?
Answer: There are several deployment methods:
Method 1: Group Policy Software Installation (Recommended for AD environments)
- Copy MSI to network share
- Open Group Policy Management
- Create/Edit GPO
- Navigate to: Computer Configuration → Policies → Software Settings → Software Installation
- Right-click → New → Package
- Select the MSI file
- Choose "Assigned"
- Configure settings via Group Policy (see Scenario 2)
Method 2: SCCM/Intune
- Import MSI into SCCM/Intune
- Create deployment package
- Target computer collections
- Deploy with automatic installation
Method 3: PowerShell Script
# Deploy to multiple computers
$computers = Get-Content "computers.txt"
$msiPath = "\\server\share\PasswordCenterClientSetup64.msi"

foreach ($computer in $computers) {
    Invoke-Command -ComputerName $computer -ScriptBlock {
        Start-Process msiexec.exe -ArgumentList "/i $using:msiPath /quiet /norestart" -Wait
    }
}
Method 4: Manual Installation (Small deployments)
- Copy MSI to each computer
- Run MSI as administrator on each computer
- Configure CPSettings.xml on each computer
- Restart computers
Q8: How do I enable logging for troubleshooting?
Answer:
Step 1: Enable Logging in Configuration
Edit CPSettings.xml:
<Log value="true" />
<CEFLogMode value="Enabled" />
Step 2: Apply Changes
- Save the file
- Restart the computer or lock/unlock twice
Step 3: Reproduce the Issue
- Trigger the problem you're troubleshooting
- Interact with the credential provider
Step 4: Collect Log Files
Log files are located in the installation directory:
C:\Program Files\Imanami\Password Center Client (x64)\log.txt
C:\Program Files\Imanami\Password Center Client (x64)\debug.log (CEF log)
Step 5: Review Logs
- Open log.txt in Notepad
- Look for ERROR or WARNING entries
- Check timestamps to find relevant entries
- Note any error codes or messages
Step 6: Disable Logging After Troubleshooting
<Log value="false" />
<CEFLogMode value="Disabled" />
⚠️ Important:
- Delete log files after troubleshooting (may contain sensitive info)
- Don't leave logging enabled in production (performance impact)
Q9: SSL certificate errors appear when accessing the portal
Answer: This usually means your password reset portal uses:
- Self-signed SSL certificate
- Expired certificate
- Certificate from untrusted CA
- Certificate hostname doesn't match
✅ Recommended Solutions (in order of preference):
Solution 1: Get Valid SSL Certificate
- Obtain certificate from trusted CA (Let's Encrypt, DigiCert, etc.)
- Install on your password reset portal
- Problem solved permanently
Solution 2: Add Certificate to Windows Trust Store
- Export the certificate from your portal
- Copy certificate to the computer
- Open Certificate Manager: Run →
certlm.msc - Navigate to: Trusted Root Certification Authorities → Certificates
- Right-click → All Tasks → Import
- Import the certificate
- Restart computer
Solution 3: Use Proper Hostname
- Access portal via its proper domain name, not IP address
- Ensure certificate matches the hostname exactly
❌ NOT Recommended: Ignore Certificate Errors
Only as a temporary workaround for testing:
<IgnoreCertificateErrors value="true" />
⚠️ WARNING: This is insecure! See IgnoreCertificateErrors for security implications.
Q10: How do I upgrade to a newer version?
Answer: This product does NOT support in-place upgrades. You must uninstall the old version first.
Upgrade Procedure:
-
Backup Current Configuration:
- Export registry settings (if using GPO)
- Copy CPSettings.xml to a safe location
- Document current configuration
-
Uninstall Current Version:
- Control Panel → Programs and Features
- Select "Netwrix GroupID Credential Provider"
- Click "Uninstall"
- Restart the computer
-
Install New Version:
- Follow the First-Time Setup Guide
- Install the new MSI package
- Restart the computer
-
Restore Configuration:
- Copy your backed-up CPSettings.xml to the installation directory
- Or reapply GPO settings
- Restart or lock/unlock to verify
For Enterprise Deployments:
- Update the MSI package in your GPO/SCCM deployment
- Configure the GPO to uninstall old version before installing new version
- Test with a pilot group before rolling out organization-wide
See Upgrade Policy for details.
Q11: Do I need to restart after changing configuration?
Answer: It depends on what you changed and how:
Requires Restart:
- ✅ Installing/uninstalling the credential provider
- ✅ First-time configuration
- ✅ Changing filtering settings (FilterLogon, FilterUnlock, AllowedCP)
- ✅ When in doubt, restart to be safe
May Not Require Restart (lock/unlock may be sufficient):
- URL changes (ResetMyPasswordUrl, UnlockMyAccountUrl)
- UI customization (titles, text)
- Logging settings
- Proxy settings
Recommended:
- For critical changes: Restart the computer
- For testing: Lock/Unlock and test
- For production: Always restart to ensure changes are fully applied
Common Error Messages
Error: "The page cannot be displayed"
Cause: Network connectivity or proxy issues
Solutions:
- Verify internet connection is working
- Check firewall settings - allow outbound HTTPS (port 443)
- Configure proxy settings if behind corporate proxy
- Test URL in regular browser
- Check Windows Event Log for network-related errors
Error: "This site is not secure" or Certificate Error
Cause: SSL certificate validation failed
Solutions:
- Install valid SSL certificate on portal (best solution)
- Add self-signed certificate to Windows trust store
- Verify accessing portal via correct hostname (not IP)
- For testing only: temporarily set
<IgnoreCertificateErrors value="true" />
Error: Login screen appears blank or freezes
Cause: Credential provider DLL failed to load or crashed
Solutions:
- Check Windows Event Log:
- Windows Logs → System
- Look for winlogon or credential provider errors
- Verify DLL exists:
C:\Program Files\Imanami\Password Center Client (x64)\Imanami.PasswordCenter.Credential64.dll - Check Visual C++ 2022 Redistributable is installed
- Reinstall credential provider
- Boot in Safe Mode to access system if locked out
⚠️ Important: If locked out of system, see Emergency Removal below.
Error: "Access Denied" when editing CPSettings.xml
Cause: Insufficient permissions
Solutions:
- Open Notepad as Administrator:
- Right-click Notepad
- Select "Run as administrator"
- Then open CPSettings.xml from within Notepad
- Or use elevated Command Prompt:
notepad "C:\Program Files\Imanami\Password Center Client (x64)\CPSettings.xml"
Advanced Troubleshooting
Collecting Diagnostic Information
When contacting support, collect this information:
1. Configuration Files:
C:\Program Files\Imanami\Password Center Client (x64)\CPSettings.xml
2. Log Files (if logging enabled):
C:\Program Files\Imanami\Password Center Client (x64)\log.txt
C:\Program Files\Imanami\Password Center Client (x64)\debug.log
3. Registry Export: Open Command Prompt as Administrator:
reg export "HKLM\SOFTWARE\Imanami\GroupID\Version 10.0\PasswordCenterClient\Settings" CPRegistry.reg
reg export "HKLM\SOFTWARE\Microsoft\Windows\CurrentVersion\Authentication\Credential Providers\{c8765b62-7058-4d7f-9421-11a75d623206}" CPProviderReg.reg
4. Event Logs:
wevtutil epl System SystemLog.evtx
wevtutil epl Application ApplicationLog.evtx
5. Group Policy Report:
gpresult /h GPReport.html
6. Installation Information:
wmic product where "name like '%Credential%'" get name,version
⚠️ Redact Sensitive Information: Before sharing with support, remove:
- Passwords
- Internal URLs/server names
- Usernames
- Internal IP addresses
Recovery Mode (Locked Out)
If the credential provider causes issues and you're locked out:
Option 1: Safe Mode
- Restart computer
- Press F8 during boot (or Shift + F8)
- Select "Safe Mode"
- Login with administrator account
- Uninstall credential provider or fix configuration
- Restart normally
Option 2: Boot from Recovery Media
- Boot from Windows installation media
- Select "Repair your computer"
- Choose "Command Prompt"
- Navigate to credential provider installation folder
- Rename or delete the DLL:
cd "C:\Program Files\Imanami\Password Center Client (x64)"ren Imanami.PasswordCenter.Credential64.dll Imanami.PasswordCenter.Credential64.dll.bak
- Restart computer
Option 3: Remote Registry Edit
- From another computer on the network
- Open Registry Editor (regedit.exe)
- Connect to remote registry:
- File → Connect Network Registry
- Enter computer name
- Navigate to credential provider registration key
- Delete or rename the key
- Restart remote computer
Testing Filtering Behavior
To verify filtering is working correctly:
Step 1: Disable Filtering
<DisableAutoFilter value="true" />
- Lock computer
- Note which credential providers appear (should see all)
Step 2: Enable Filtering with Specific Filter
<DisableAutoFilter value="false" />
<FilterLogon value="{D6886603-9D2F-4EB2-B667-1971041FA96B}" />
- Lock computer
- PIN provider should be hidden
- Other providers should appear
Step 3: Test AllowedCP
<AllowedCP value="{60b78e88-ead8-445c-9cfd-0b87f74ea6cd};{c8765b62-7058-4d7f-9421-11a75d623206}" />
- Lock computer
- Should see ONLY password and Netwrix provider
Security Best Practices
Follow these best practices to ensure secure deployment of the credential provider:
1. Use HTTPS for Portal URLs
✅ DO:
<ResetMyPasswordUrl value="https://portal.company.com/reset" />
<UnlockMyAccountUrl value="https://portal.company.com/unlock" />
❌ DON'T:
<ResetMyPasswordUrl value="http://portal.company.com/reset" />
Why: HTTPS encrypts communication between the client and portal, protecting user credentials in transit.
2. Use Valid SSL Certificates
✅ DO:
- Obtain SSL certificates from trusted Certificate Authorities
- Keep certificates up-to-date (monitor expiration)
- Use proper hostname matching
- Implement certificate pinning if available
❌ DON'T:
- Use self-signed certificates in production
- Ignore certificate errors with
IgnoreCertificateErrors = true - Use expired certificates
- Access portal via IP address instead of hostname
3. Secure Proxy Credentials
✅ DO:
- Use proxy servers with Windows integrated authentication
- If credentials required, deploy via Group Policy (more secure than local file)
- Use dedicated service account with minimal privileges
- Rotate proxy passwords regularly
- Monitor service account for suspicious activity
❌ DON'T:
- Store proxy credentials in CPSettings.xml if avoidable
- Use personal accounts for proxy authentication
- Use passwords that don't expire
- Share proxy credentials across multiple services
4. Restrict File Permissions
Recommended File Permissions for CPSettings.xml:
C:\Program Files\Imanami\Password Center Client (x64)\CPSettings.xml
- SYSTEM: Full Control
- Administrators: Full Control
- Users: Read only
How to Set:
- Right-click CPSettings.xml
- Properties → Security tab
- Click "Advanced"
- Remove all permissions
- Add:
- SYSTEM: Full Control
- Administrators: Full Control
- Users: Read
- Disable inheritance
- Apply changes
Why: Prevents non-administrators from modifying configuration or reading proxy credentials.
5. Control Credential Provider Filtering
✅ DO:
- Use filtering to limit credential provider options
- Simplify user experience by showing only necessary options
- Use
AllowedCPfor whitelist approach (more secure) - Test filtering thoroughly before deployment
❌ DON'T:
- Leave
DisableAutoFilter = truein production - Expose unnecessary credential providers
- Filter out standard password login (users need a fallback method)
Recommended Filtering (show only password and Netwrix):
<AllowedCP value="{60b78e88-ead8-445c-9cfd-0b87f74ea6cd};{c8765b62-7058-4d7f-9421-11a75d623206}" />
6. Disable Logging in Production
✅ DO:
<Log value="false" />
<CEFLogMode value="Disabled" />
❌ DON'T:
- Leave logging enabled in production
- Store logs indefinitely
- Share logs without redacting sensitive information
Why:
- Log files may contain sensitive information (URLs, usernames)
- Logging impacts performance
- Logs consume disk space
When Troubleshooting:
- Enable logging temporarily
- Reproduce issue
- Collect logs
- Disable logging immediately
- Delete logs after analysis
7. Use Group Policy for Enterprise Deployment
✅ DO:
- Deploy configuration via Group Policy
- Use Group Policy Software Installation for MSI deployment
- Centralize configuration management
- Prevent local administrators from changing settings
❌ DON'T:
- Rely solely on local CPSettings.xml file in enterprise
- Allow users to modify credential provider settings
- Deploy without testing in pilot group first
Benefits:
- Configuration stored in registry (more secure than XML file)
- Centralized management
- Audit trail of changes
- Automatic deployment to new computers
8. Regular Security Audits
Audit Checklist:
- Review CPSettings.xml or GPO configuration quarterly
- Verify SSL certificates are valid and up-to-date
- Check for unauthorized changes to configuration
- Review Windows Event Logs for credential provider errors
- Test password reset functionality periodically
- Verify filtering is working as expected
- Check file permissions on installation directory
- Review proxy credentials and rotate if needed
- Confirm logging is disabled in production
- Test rollback procedures
9. Protect Against Brute Force Attacks
Portal-Side Protections (implement on your password reset portal):
- Rate limiting on reset attempts
- Account lockout after failed attempts
- CAPTCHA for reset requests
- Multi-factor authentication
- Email/SMS verification
- Audit logging of all reset attempts
- Anomaly detection
Credential Provider Protections:
- Use
AllowedCPto limit authentication methods - Enable Windows audit policies to log logon attempts
- Monitor failed login attempts via Event Log
- Deploy alongside Windows account lockout policies
10. Data Protection Considerations
Compliance Requirements:
GDPR/Privacy:
- Disable logging in production (logs may contain PII)
- If logging required, implement log retention policy
- Document what data is processed
- Ensure password reset portal complies with data protection regulations
PCI DSS (if applicable):
- Use strong SSL/TLS (TLS 1.2 or higher)
- Do not store cardholder data in logs
- Regular security testing
- Strong access controls
HIPAA (healthcare):
- Use encrypted connections (HTTPS)
- Implement audit logging on portal side
- Regular security risk assessments
- Business Associate Agreement with portal provider
Rollback Instructions
If the credential provider causes issues or you need to revert changes, follow these procedures:
Rollback Scenario 1: Undo Configuration Changes
Situation: Configuration changes caused unexpected behavior but credential provider works
Steps:
-
Revert to Previous Configuration:
- Edit CPSettings.xml
- Restore previous settings
- Or delete customizations to use defaults
-
Or Revert Registry Changes:
- Open Registry Editor (regedit.exe)
- Navigate to:
HKLM\SOFTWARE\Imanami\GroupID\Version 10.0\PasswordCenterClient\Settings - Delete modified values
- Or restore from previous registry export
-
Or Revert Group Policy:
- Open Group Policy Management
- Edit the GPO
- Delete or modify credential provider settings
- Run
gpupdate /forceon client computers
-
Apply Changes:
- Restart computer
- Verify expected behavior
Rollback Scenario 2: Uninstall Credential Provider
Situation: Need to completely remove the credential provider
Method 1: Uninstall via Control Panel
- Open Control Panel
- Programs and Features (or Apps & Features)
- Find "Netwrix GroupID Credential Provider"
- Click "Uninstall"
- Follow uninstall wizard
- Restart computer
Method 2: Uninstall via Command Line
wmic product where name="Netwrix GroupID Credential Provider" call uninstall
Or using MSI:
msiexec /x {4C3F32FA-8AAE-41B7-806E-195782B986D5} /quiet /norestart
Method 3: Uninstall Silently (for scripts)
msiexec /x "C:\Path\To\PasswordCenterClientSetup64.msi" /quiet /norestart
Method 4: Uninstall via Group Policy Object
For enterprise environments where the credential provider was deployed via GPO:
-
Open Group Policy Management:
- Run:
gpmc.msc - Or: Start → Administrative Tools → Group Policy Management
- Run:
-
Locate and Edit the GPO:
- Right-click the GPO that contains the credential provider deployment (e.g., "Deploy Netwrix Credential Provider" or "Default Domain Policy")
- Select Edit
- The Group Policy Management Editor opens
-
Navigate to Software Installation:
- Expand:
Computer Configuration - Expand:
Policies - Expand:
Software Settings - Click:
Software installation
- Expand:
-
Remove the Package:
- Right-click the Credential Provider package
- Point to All Tasks
- Click Remove
-
Select Removal Method:
- In the "Remove Software" dialog box:
- Select: "Immediately uninstall the software from users and computers"
- Click OK
-
Close the Editor:
- Click Close to close the Group Policy Object Editor
-
Client Workstation Removal Process:
- When client workstations restart, the GPO (now without the Credential Provider) is applied
- This removes the installed Credential Provider from all client workstations
- Important: Once the software is removed, users must restart the workstation again to remove the links from the Windows logon screen
Force Immediate Removal on Specific Computers:
On client computers, administrators can force policy update:
gpupdate /force /boot
Verify Removal on Client Machines:
Check if credential provider has been uninstalled:
Get-WmiObject -Class Win32_Product | Where-Object {$_.Name -like "*Credential*"}
Or check registry:
reg query "HKLM\SOFTWARE\Microsoft\Windows\CurrentVersion\Authentication\Credential Providers\{c8765b62-7058-4d7f-9421-11a75d623206}"
If registry key doesn't exist, uninstallation was successful.
Monitoring Uninstallation Status:
Check GPO application results:
gpresult /h gpreport.html
Review the HTML report to verify the software removal policy was applied.
Rollback Scenario 3: Emergency Removal (System Locked Out)
Situation: Credential provider prevents login and need immediate access
Option 1: Safe Mode
- Reboot computer
- Press F8 during boot (or Shift + Restart → Troubleshoot → Advanced Options → Startup Settings → Restart → F4)
- Select "Safe Mode"
- Login with administrator account
- Uninstall credential provider via Control Panel
- Restart normally
Option 2: Manual Removal via Recovery Mode
- Boot from Windows installation media
- Select "Repair your computer"
- Troubleshoot → Command Prompt
- Identify Windows drive (usually C:):
dir C:\
- Navigate to installation folder:
cd "C:\Program Files\Imanami\Password Center Client (x64)"
- Rename the DLL to disable it:
ren Imanami.PasswordCenter.Credential64.dll Imanami.PasswordCenter.Credential64.dll.disabled
- Remove registry entries:
reg delete "HKLM\SOFTWARE\Microsoft\Windows\CurrentVersion\Authentication\Credential Providers\{c8765b62-7058-4d7f-9421-11a75d623206}" /f
- Restart:
wpeutil reboot
Option 3: Remote Registry Edit
- From another computer on the network
- Ensure Remote Registry service is running on target computer
- Open Registry Editor (regedit.exe)
- File → Connect Network Registry
- Enter computer name
- Navigate to:
HKEY_LOCAL_MACHINE\SOFTWARE\Microsoft\Windows\CurrentVersion\Authentication\Credential Providers - Delete the key:
{c8765b62-7058-4d7f-9421-11a75d623206} - Restart remote computer
Rollback Scenario 4: Restore from Backup
Situation: Need to restore entire system configuration
If you have Registry Backup:
- Open Registry Editor (regedit.exe) as Administrator
- File → Import
- Select previously exported .reg file
- Restart computer
If you have System Restore Point:
- Boot to Safe Mode or Recovery Mode
- System Restore → Choose restore point
- Select point before credential provider installation
- Complete restore process
- Restart computer
Rollback Checklist
Use this checklist when rolling back:
- Document current configuration before rollback
- Export registry keys before making changes
- Test rollback procedure on non-production computer first
- Notify users if credential provider will be unavailable
- Have administrator access credentials ready
- Backup current configuration files
- Create system restore point
- Verify other credential providers work after removal
- Document reason for rollback (for future reference)
- Update change management documentation
Post-Rollback Verification
After rolling back, verify:
-
Login Still Works:
- Test standard password login
- Verify other credential providers (PIN, Windows Hello) work
- Test with multiple user accounts
-
No Remnants:
- Check installation folder is removed (or DLL disabled)
- Verify registry keys removed
- Check no orphaned files remain
-
Clean Event Log:
- Check Windows Event Log for credential provider errors
- Should see no new credential provider-related errors
-
Document:
- Record what was rolled back
- Note any issues encountered
- Document lessons learned
Preventing Rollback Needs
Best Practices to Avoid Rollback:
-
Test Thoroughly Before Production:
- Deploy to pilot group first
- Test all scenarios
- Verify compatibility with existing credential providers
-
Use Staging Environment:
- Test configuration changes in lab environment
- Validate before deploying to production
-
Incremental Deployment:
- Deploy to small group first
- Monitor for issues
- Gradually expand deployment
-
Maintain Backups:
- Regular system backups
- Export registry before changes
- Keep previous versions of configuration files
-
Document Configuration:
- Maintain configuration documentation
- Record all changes
- Keep history of previous working configurations
Support
Getting Help
If you need assistance with the Netwrix GroupID Credential Provider:
Before Contacting Support:
-
Check This Documentation:
- Review Troubleshooting & FAQ
- Check Common Deployment Scenarios
- Verify your configuration against examples
-
Enable Logging and Collect Information:
- Enable logging in CPSettings.xml
- Reproduce the issue
- Collect diagnostic information (see Collecting Diagnostic Information)
-
Check Netwrix Knowledge Base:
- Visit: https://www.netwrix.com/support.html
- Search for known issues and solutions
Contact Information
Netwrix Support:
- Website: https://www.netwrix.com/support.html
- Email: support@netwrix.com
- Phone: Check website for regional support numbers
When Contacting Support, Provide:
-
Product Information:
- Product name: Netwrix GroupID Credential Provider
- Version: 3.1.0.0
- Installation date
-
Environment Details:
- Windows version (Windows 10/11)
- Domain or workgroup
- Number of affected computers
- Deployment method (standalone, GPO, SCCM)
-
Issue Description:
- Detailed description of the problem
- Steps to reproduce
- When did issue start
- What changed recently
- Error messages (exact text)
-
Diagnostic Files (if applicable):
- CPSettings.xml (redact sensitive info)
- log.txt (redact sensitive info)
- Registry export
- Event log export
- Screenshots of error messages
Community Resources
Netwrix Community Forum:
- Share experiences with other users
- Ask questions
- Learn best practices
- https://community.netwrix.com/
Appendix
Appendix A: Complete Configuration Example
Complete CPSettings.xml with all available settings:
<?xml version="1.0" standalone="yes" ?>
<CPSettings>
    <!-- Required URLs -->
    <ResetMyPasswordUrl value="https://portal.company.com/reset" />
    <UnlockMyAccountUrl value="https://portal.company.com/unlock" />

    <!-- UI Customization -->
    <WindowTitle value="Company Password Reset" />
    <CPTitle value="Company Self-Service" />
    <ForgetPasswordText value="Forgot my password?" />
    <UnlockAccountText value="Unlock my account" />
    <ImageFile value="logo.bmp" />
    <IconImage value="favicon.ico" />

    <!-- Filtering Configuration -->
    <DisableAutoFilter value="false" />
    <FilterLogon value="{2135F72A-90B5-4ED3-A7F1-8BB705AC276A};{25CBB996-92ED-457E-B28C-4774084BD562};{3DD6BEC0-8193-4FFE-AE25-E08E39EA4063};{4DA7114C-DE47-43BF-A644-62876DCC2A72};{8AF662BF-65A0-4D0A-A540-A338A999D36F};{8FD7E19C-3BF7-489B-A72C-846AB3678C96};{BEC09223-B018-416D-A0AC-523971B639F5};{C5D7540A-CD51-453B-B22B-05305BA03F07};{C885AA15-1764-4293-B82A-0586ADD46B35};{D6886603-9D2F-4EB2-B667-1971041FA96B};{F64945DF-4FA9-4068-A2FB-61AF319EDD33};{F8A0B131-5F68-486C-8040-7E8FC3C85BB6}" />
    <FilterUnlock value="{2135F72A-90B5-4ED3-A7F1-8BB705AC276A};{25CBB996-92ED-457E-B28C-4774084BD562};{3DD6BEC0-8193-4FFE-AE25-E08E39EA4063};{4DA7114C-DE47-43BF-A644-62876DCC2A72};{8AF662BF-65A0-4D0A-A540-A338A999D36F};{8FD7E19C-3BF7-489B-A72C-846AB3678C96};{BEC09223-B018-416D-A0AC-523971B639F5};{C5D7540A-CD51-453B-B22B-05305BA03F07};{C885AA15-1764-4293-B82A-0586ADD46B35};{D6886603-9D2F-4EB2-B667-1971041FA96B};{F64945DF-4FA9-4068-A2FB-61AF319EDD33};{F8A0B131-5F68-486C-8040-7E8FC3C85BB6}" />
    <AllowedCP value="" />

    <!-- Proxy Configuration -->
    <ProxyServer value="" />
    <ProxyPort value="" />
    <ProxyType value="" />
    <ProxyPacUrl value="" />
    <ProxyUserName value="" />
    <ProxyPassword value="" />

    <!-- Logging -->
    <Log value="false" />
    <CEFLogMode value="Disabled" />

    <!-- Advanced Settings -->
    <WebView value="cef" />
    <IgnoreCertificateErrors value="false" />
</CPSettings>
Appendix B: Registry Configuration Reference
Complete registry configuration for Group Policy deployment:
Registry Path:
HKEY_LOCAL_MACHINE\SOFTWARE\Policies\Imanami\GroupID\Version 10.0\PasswordCenterClient\Settings
Registry Values (all REG_SZ type):
| Name | Value Example | Description |
|---|---|---|
| ResetMyPasswordUrl | https://portal.company.com/reset | Password reset URL |
| UnlockMyAccountUrl | https://portal.company.com/unlock | Account unlock URL |
| WindowTitle | Company Password Reset | Browser window title |
| CPTitle | Company Self-Service | Tile title |
| ForgetPasswordText | Forgot my password? | Reset button text |
| UnlockAccountText | Unlock my account | Unlock button text |
| ImageFile | logo.bmp | Logo filename |
| IconImage | favicon.ico | Icon filename |
| DisableAutoFilter | false | Enable/disable filtering |
| FilterLogon | CLSID;CLSID | Logon filter list |
| FilterUnlock | CLSID;CLSID | Unlock filter list |
| AllowedCP | CLSID;CLSID | Allowed providers |
| ProxyServer | proxy.company.com | Proxy server |
| ProxyPort | 8080 | Proxy port |
| ProxyType | http | Proxy type |
| ProxyPacUrl | http://proxy.company.com/proxy.pac | PAC file URL |
| ProxyUserName | username | Proxy username |
| ProxyPassword | password | Proxy password |
| Log | false | Enable logging |
| CEFLogMode | Disabled | CEF logging |
| WebView | cef | Web engine |
| IgnoreCertificateErrors | false | Certificate validation |
Appendix C: Version History
| Version | Date | Changes |
|---|---|---|
| 1.0 | October 15, 2025 | Initial technical documentation release |
Appendix D: Credential Provider CLSIDs Reference
Complete list of common Windows credential provider CLSIDs for filtering:
| CLSID | Description |
|---|---|
{60b78e88-ead8-445c-9cfd-0b87f74ea6cd} | Password Credential Provider |
{2135F72A-90B5-4ED3-A7F1-8BB705AC276A} | Picture Password Provider |
{25CBB996-92ED-457E-B28C-4774084BD562} | Windows Biometric Provider |
{3DD6BEC0-8193-4FFE-AE25-E08E39EA4063} | Generic Provider |
{4DA7114C-DE47-43BF-A644-62876DCC2A72} | FIDO Provider |
{8AF662BF-65A0-4D0A-A540-A338A999D36F} | Fingerprint Provider |
{8FD7E19C-3BF7-489B-A72C-846AB3678C96} | Smart Card Provider |
{BEC09223-B018-416D-A0AC-523971B639F5} | Windows Hello Face Provider |
{C5D7540A-CD51-453B-B22B-05305BA03F07} | NGC (Next Generation Credentials) Provider |
{C885AA15-1764-4293-B82A-0586ADD46B35} | Cloud Experience Provider |
{D6886603-9D2F-4EB2-B667-1971041FA96B} | PIN Provider |
{F64945DF-4FA9-4068-A2FB-61AF319EDD33} | IrisRecognition Provider |
{F8A0B131-5F68-486C-8040-7E8FC3C85BB6} | Generic Tile Provider |
{c8765b62-7058-4d7f-9421-11a75d623206} | Netwrix GroupID Credential Provider |
Document Changelog
Version 1.0 - October 15, 2025
- Initial release
- Complete technical documentation
- Step-by-step first-time setup guide
- Glossary of terms and acronyms
- Configuration reference with defaults table
- Common deployment scenarios with examples
- Comprehensive troubleshooting and FAQ section
- Security best practices
- Rollback instructions for safe undoing
- Appendices with complete configuration examples
Document End