Creating Your First AppSet
Endpoint Policy Manager DesignStudio generally works well with most applications. This includes most items that are built into Windows, Windows Media Player, tons of third-party applications, and custom tools you might have built for your business.
NOTE: You might find applications that are not good candidates for Endpoint Policy Manager DesignStudio. If you do encounter one, then don't keep it a secret. Post your questions about Endpoint Policy Manager DesignStudio on the Endpoint Policy Manager DesignStudio support forum.
In this section, we're going to perform the following procedures:
Step 1 – Install the application that we want to control with Endpoint Policy Manager Application Settings Manager
Step 2 – Run the PolicyPak Capture Wizard to capture the user interface (UI) and Endpoint
Policy Manager AppLock™ data
Step 3 – Run PolicyPak DesignStudio to tweak, complete, and compile the AppSet
If you followed along in Troubleshooting, you installed WinZip on your target machine, which is the kind of machine that regular users would run WinZip on. We will use WinZip in many of our later examples in this lesson. For these next steps, however, we are going to use PuTTY as our pilot application. We chose PuTTY because the interface has rarely changed over the years so there is little risk of examples becoming outdated.
Step 4 – In order to work through these examples, you will need to install PuTTY on your
PolicyPak creation station. (You can substitute just about any application in this step.) PuTTY
can be found at https://www.putty.org/. Select the MSI Windows installer
that fits your OS.
Figure 6 shows the PuTTY interface. The settings outlined in red are the ones we can capture using Endpoint Policy Manager DesignStudio.
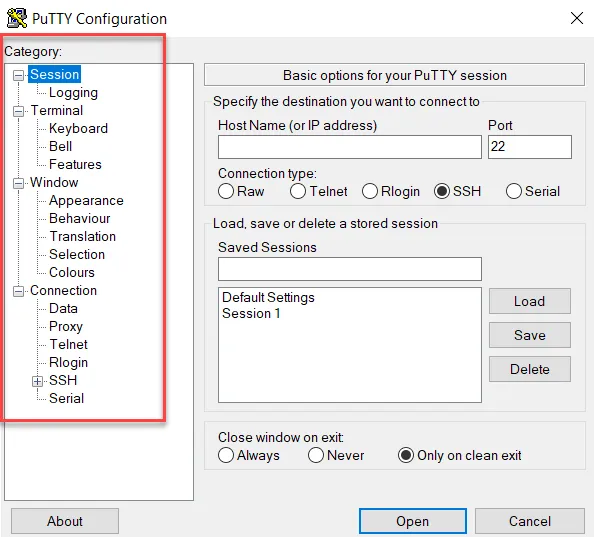
Figure 6. The PuTTY interface.
Step 5 – Click on the various setting categories to get a feel for the settings contained within
PuTTY. Leave the PuTTY application open as you proceed to run the Endpoint Policy Manager
DesignStudio tool. Run PolicyPak DesignStudio by clicking
Start|PolicyPak|PolicyPak Design Studio. When you do, the Endpoint Policy Manager Design Studio
Wizard will run, as shown in Figure 7. Choose to start a new project using the Capture Wizard. Then
click "Next."
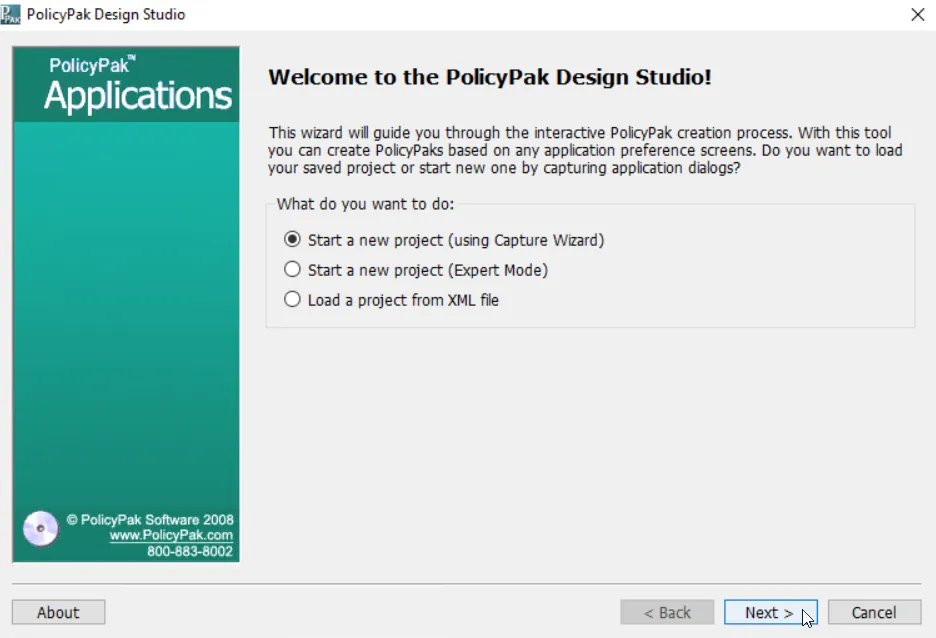
Figure 7. The Endpoint Policy Manager Design Studio Wizard.
Step 6 – You will now see a list of all the processes that are running and might have a UI for
the Endpoint Policy Manager Capture Wizard to capture, as shown in Figure 8. In the top pane
(Processes), select "PuTTY Configuration [putty.exe]." You will then see "PuTTY Configuration"
in the bottom pane (Windows).
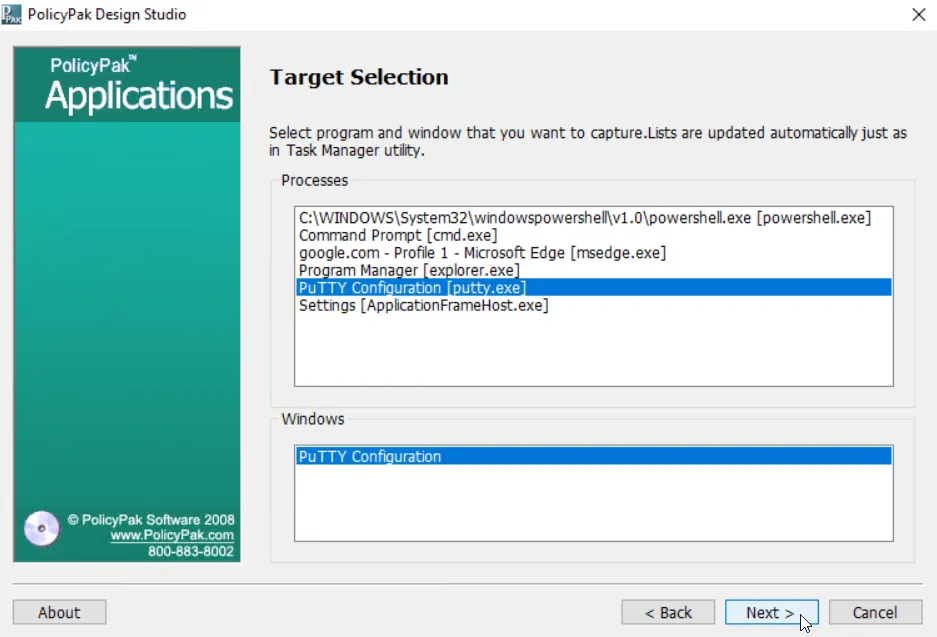
Figure 8. Selecting "PuTTY Configuration" from the list of running processes.
Step 7 – Once PuTTY is selected, click "Next." You'll then be prompted to name your project and
define what type of project it is. Keep the project type to the default value of "Registry," as
shown in Figure 9. Endpoint Policy Manager Application Settings Manager can deliver settings to
applications that store data inside the registry or in .ini files, .js files (Firefox-style
files), Mozilla-specific config files (also .js files), .xml files, .preferences files (Java
config file types), .xcu files (OpenOffice/LibreOffice config files), and .rdp files (remote
desktop settings) files. When capturing applications, you will need to know where the settings are
stored.
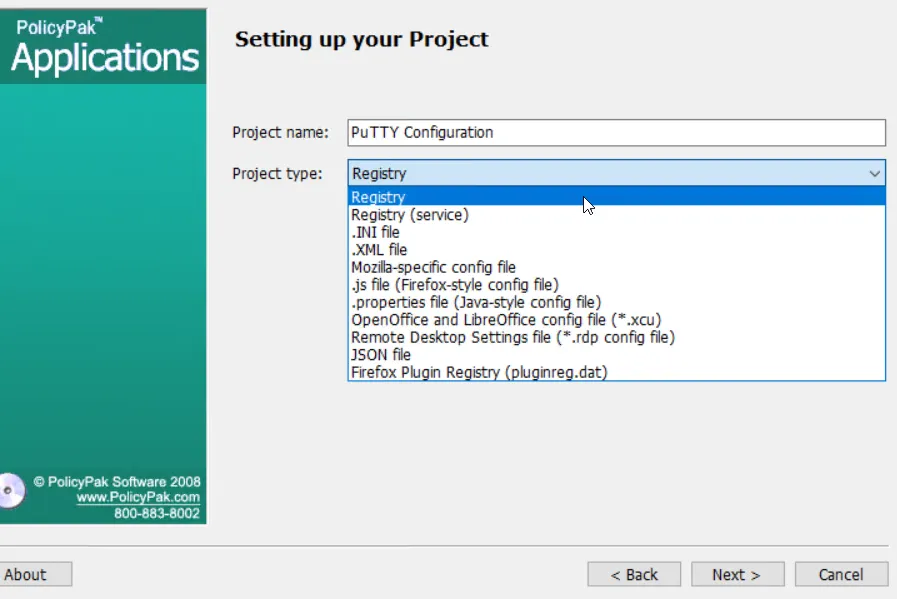
Figure 9. Selecting "Registry" as the project type.
NOTE: Your version of DesignStudio might support more file types than this one since DesignStudio is always being updated.
Step 8 – Next, you'll specify the data root for your project, as shown in Figure 10. The data
root is the topmost location where your application, in this case PuTTY, stores the majority of its
settings. Select "Simon Tatham," which is located in HKEY_Current_USER\Software. Then click
"Finish."
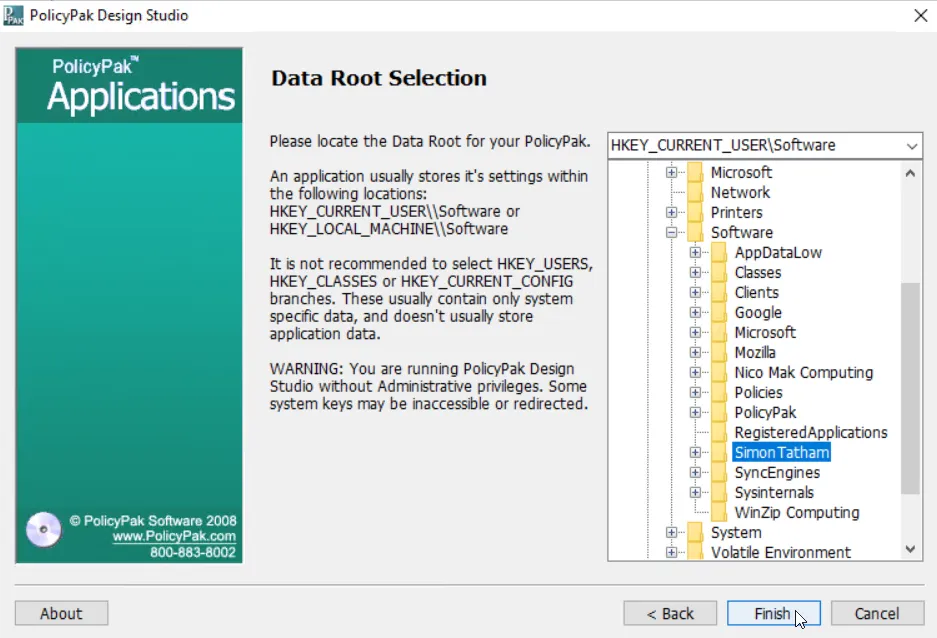
Figure 10. Selecting "Simon Tatham" as the data root.
NOTE: Finding the data root for your project can take some amount of trial and error. Most applications store their information in HKCU_Software or HKLM_Software. Then under the manufacturer, you'll find the product. Other applications use INI files, XML files, or other types of files to store their data.
Step 9 – At this point, the Endpoint Policy Manager Capture Wizard will bring the first tab of settings into DesignStudio, as shown in Figure 11. While there are no tabs within the PuTTY interface, the term tab refers to the current category of visible settings. Each time you capture a new category of settings, a new tab will be created. Note that Endpoint Policy Manager DesignStudio will usually bring in all the existing defaults for your application. For instance, Endpoint Policy Manager DesignStudio can determine the checked status of the checkboxes, the content of the dropdown boxes, and the status of radio buttons. Since DesignStudio is large, instead of showing you everything now, we'll focus on what's most important during your project creation.

Figure 11. The first tab of captured settings.
Step 10 – In the next step, you'll add a new tab by clicking on the "Add a new tab" icon at the upper left corner of the Tabs tab, as indicated by the arrow in Figure 12. When you do, you'll be prompted for another tab in PuTTY. Select the next setting category, which in this case is Logging. Once the tab is selected in the application, return to the Endpoint Policy Manager DesignStudio tool. When you do, the tab will be captured automatically. Click "OK" to capture the active tab.
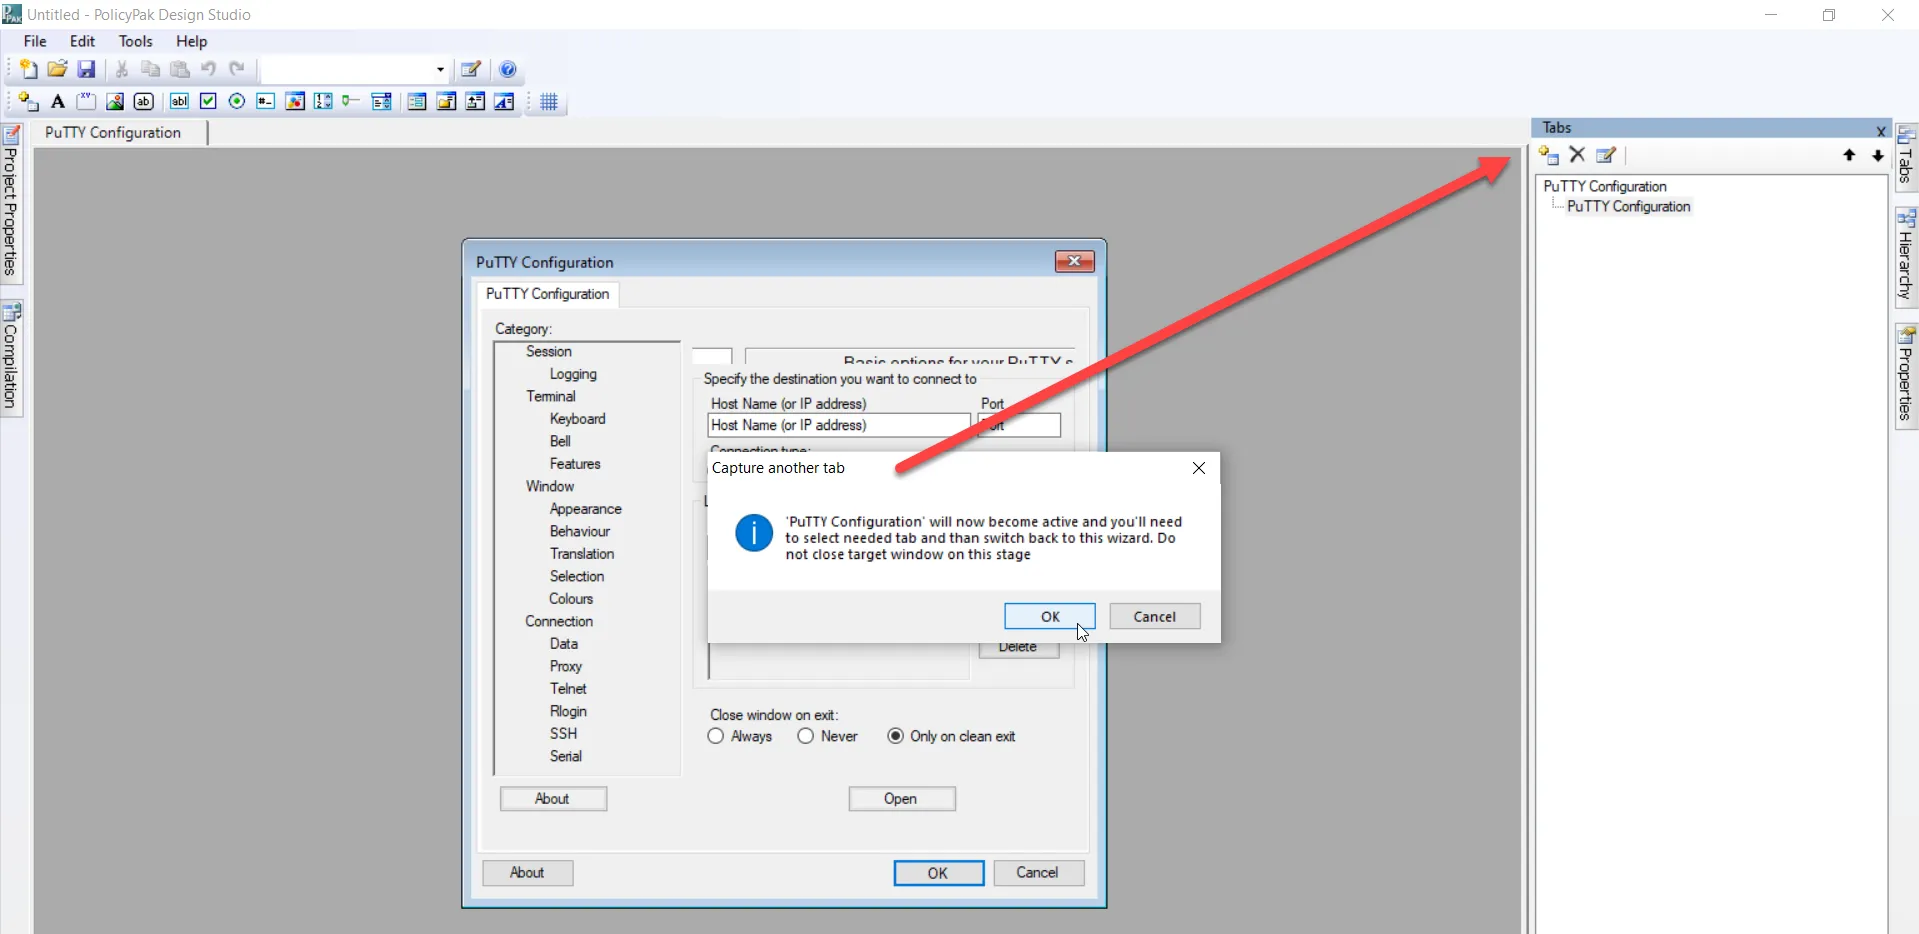
Figure 12. Capturing another tab of settings.
Step 11 – Sometimes, as in the case of PuTTY, you will be asked to if you want to supply a new name for the captured tab, as shown in Figure 13. Click "Yes," and give the tab the same name as its category.

Figure 13. Applying a new name for the captured tab.
Step 12 – The new tab will be brought into the Endpoint Policy Manager Capture Wizard, as shown in Figure 14. Note the tab hierarchy listed on the right side of the screen.
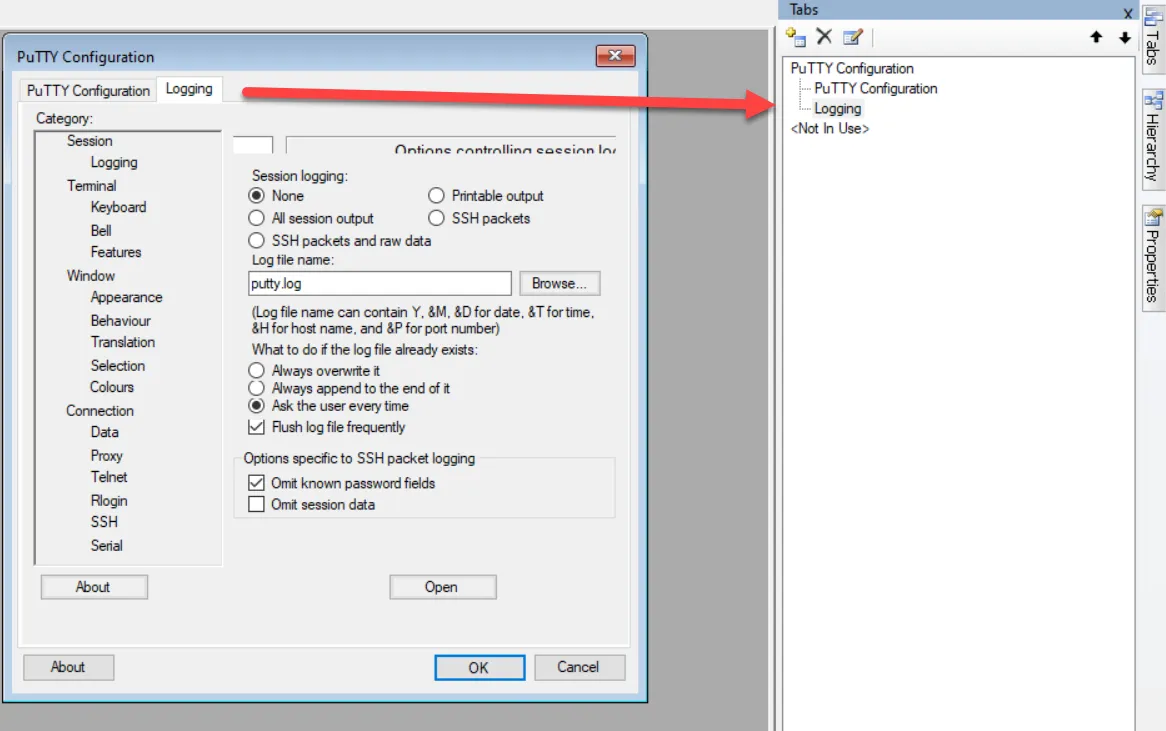
Figure 14. The new Logging tab.
Step 13 – For this Quickstart, we will also capture the Keyboard tab as shown in Figure 15. Follow the same procedure you did for the Logging tab. Also, note the arrow in the figure that is pointing to text that has been cut off. This is because the capture process doesn't always process cleanly. One option to fix this is to delete the tab and recapture it.
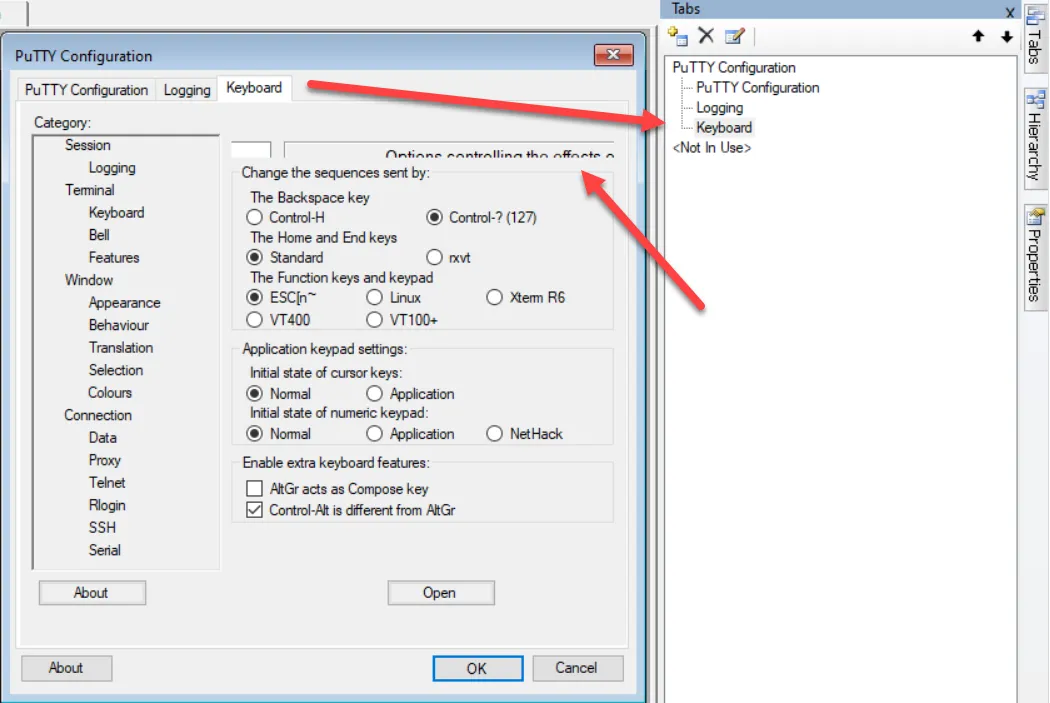
Figure 15. The Keyboard tab.
Step 14 – If you click around the tab, you will notice that it is split into segmented blocks. Figure 16 shows a block of settings that are grouped together. As you can see, the block is covering up the text behind it.
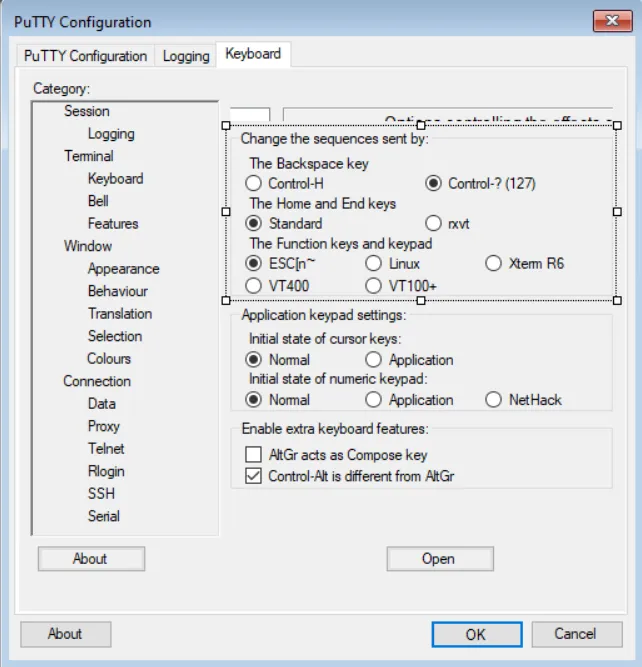
Figure 16. Settings grouped together that are blocking the text behind them.
In this example, we have solved this problem by highlighting the block segment that contains the obstructed text and deleting it. Figure 17 shows the final result. You can add text and other types of elements, such as checkboxes, radio buttons, etc., from the Endpoint Policy Manager DesignStudio menu.
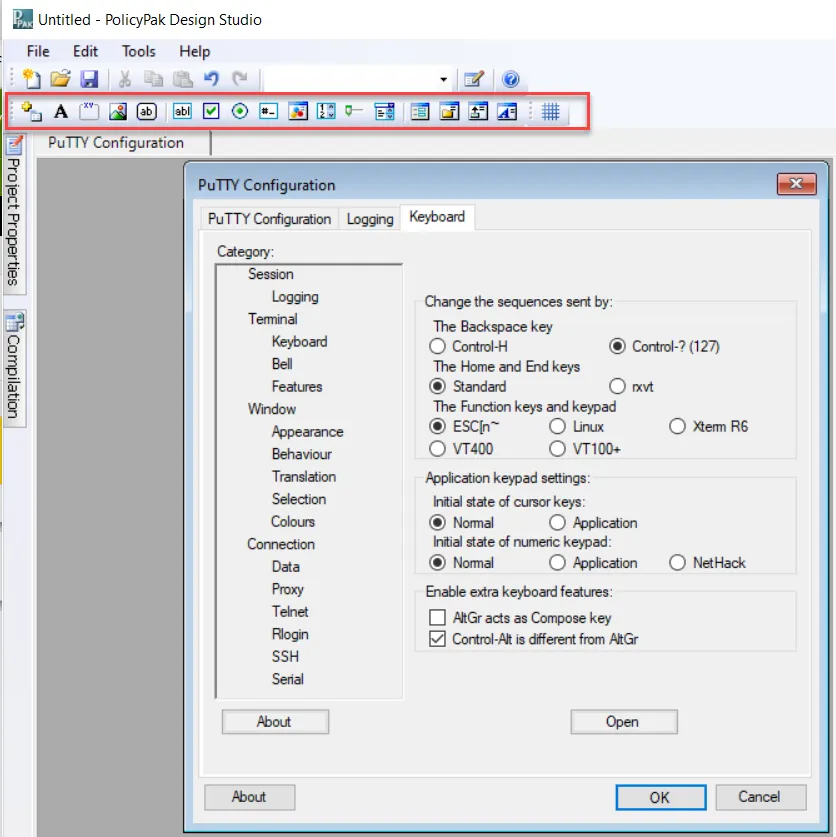
Figure 17. Using the DesignStudio menu.
Step 15 – You can capture tabs in any order and reorder them using the up and down arrows in DesignStudio, as shown in Figure 18.
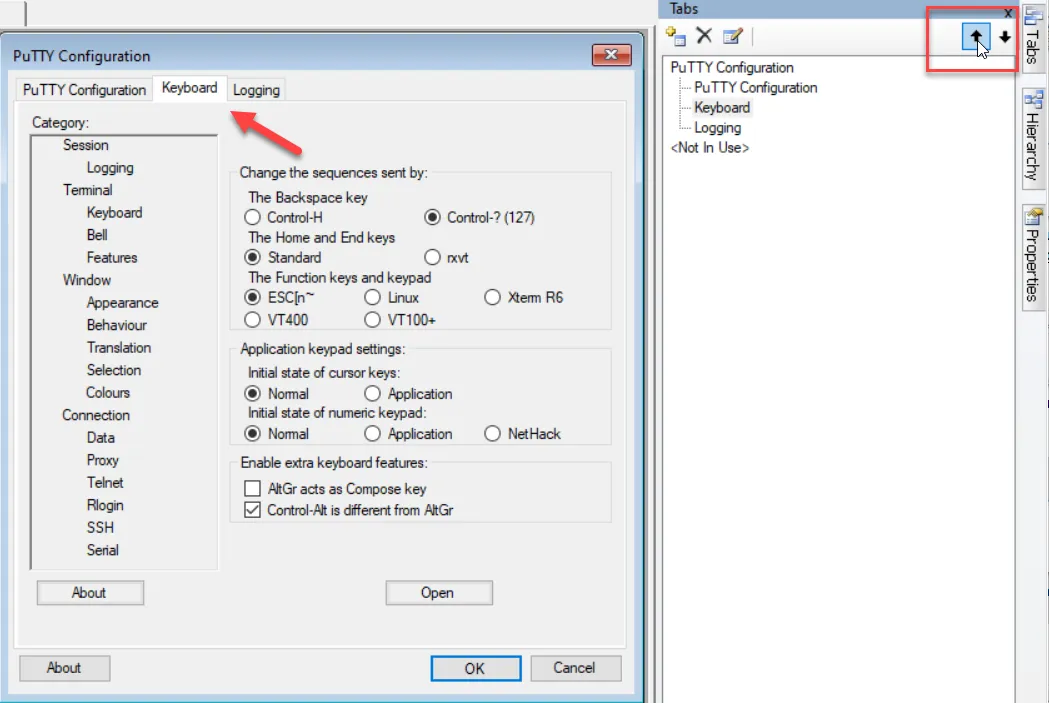
Figure 18. Reordering the tabs.
NOTE: The Endpoint Policy Manager Capture Wizard isn't perfect. There are some UI elements that cannot be captured. If you find a UI element that isn't captured correctly, let us know so we can try to adjust the DesignStudio to capture more applications.
When complete, your capture should have tabs such as PuTTY Configuration, Logging, and Keyboard.
Step 16 – Endpoint Policy Manager DesignStudio can help you automatically configure the behavior of each checkbox, dropdown, radio button, slider, or other element in your project. To get started, we'll work with the initial PuTTY Configuration tab settings. Let's begin with the most common PuTTY setting which is the "Host Name (or IP address)" field. Right-click and select "Configuration Wizard…," as shown in Figure 19.
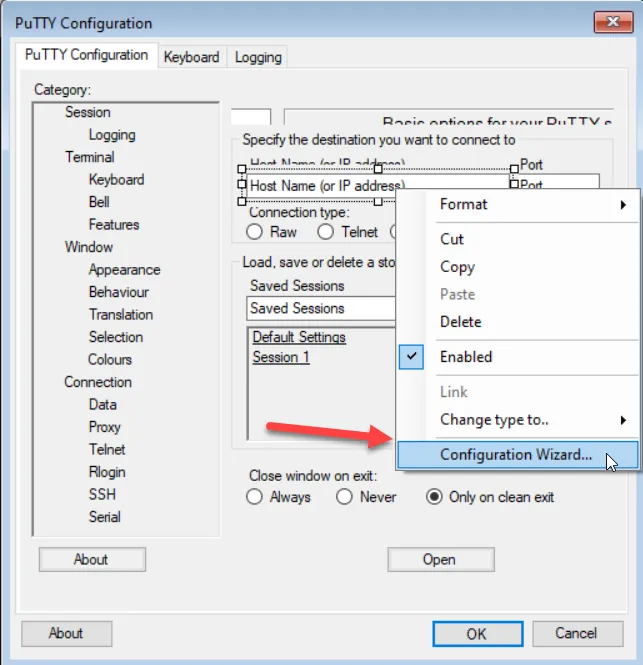
Figure 19. Opening the Configuration Wizard.
Step 17 – Each element may be independently configured. To help you understand how an element acts when it is configured, the system has created a wizard that helps guide you through the learning process. On the first page of the wizard, confirm that the element lives in the registry. All elements for PuTTY live in the registry under the root path we configured earlier. DesignStudio will remember that root path each time you run the wizard. Figure 20 shows that the PuTTY wizard has automatically chosen registry as the place you want your registry items stored.
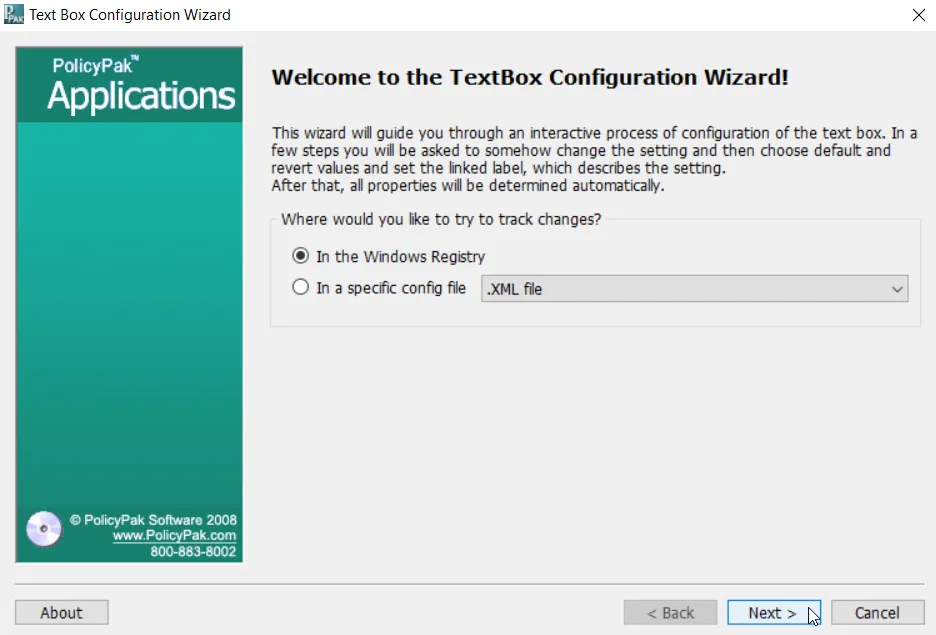
Figure 20. Items will be stored in the Windows registry.
Step 18 – You can see that the wizard already knows the location that you previously selected for the storage of PuTTY's registry items (Simon Tatham). Often times, settings may congregate within multiple subkeys within the data root. The closer you can point to the actual storage location, the easier it will be for you to find the assigned registry key for the designated element. In this case, we have selected the PuTTY subkey.
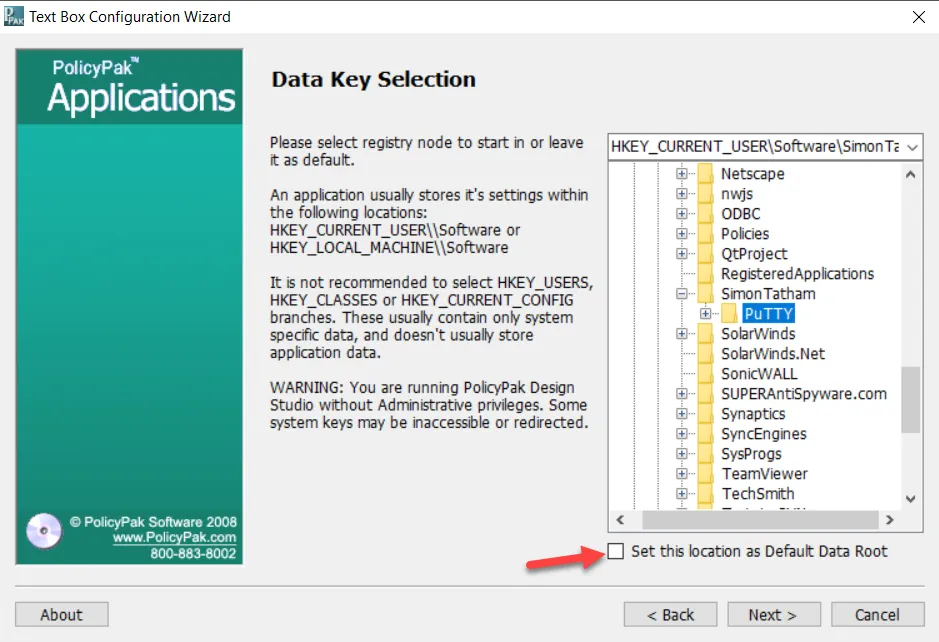
Figure 21. Choosing the PuTTY subkey.
NOTE: If you made a mistake earlier and selected the wrong data root, you can change it in the Registry Key Selection window. Once there, select "Set this location as Default Data Root," as shown in Figure 20.
Step 19 – Note that the current state of the Host Name (IP address) in PuTTY is blank. In Endpoint Policy Manager DesignStudio, ensure that the field is blank to begin with. This will help the DesignStudio know what the current state is before moving to the next step. The wizard will prompt you to change the value at this point, as displayed in Figure 22.

Figure 22. Changing the Host Name setting.
Step 20 – In order for the settings to be stored within the registry, you must first save your changes. Type in 192.168.50.101 as the IP address. Then, click the "Save" button and create a name for the saved session. In Figure 23, we chose "Design Studio Capture" as the name. Now click "Save" again.
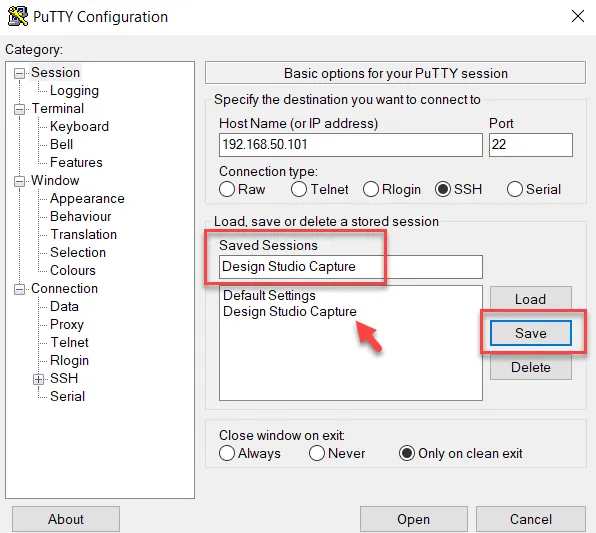
Figure 23. Saving your session changes to preserve them within the registry.
Step 21 – In Figure 24, you can see what DesignStudio has learned about the new value. Note that in the capture, the port setting was also captured as it underwent a change as well. In this case, we want to work with the HostName setting. Click the radio button next to HostName to select it, and click "Next."
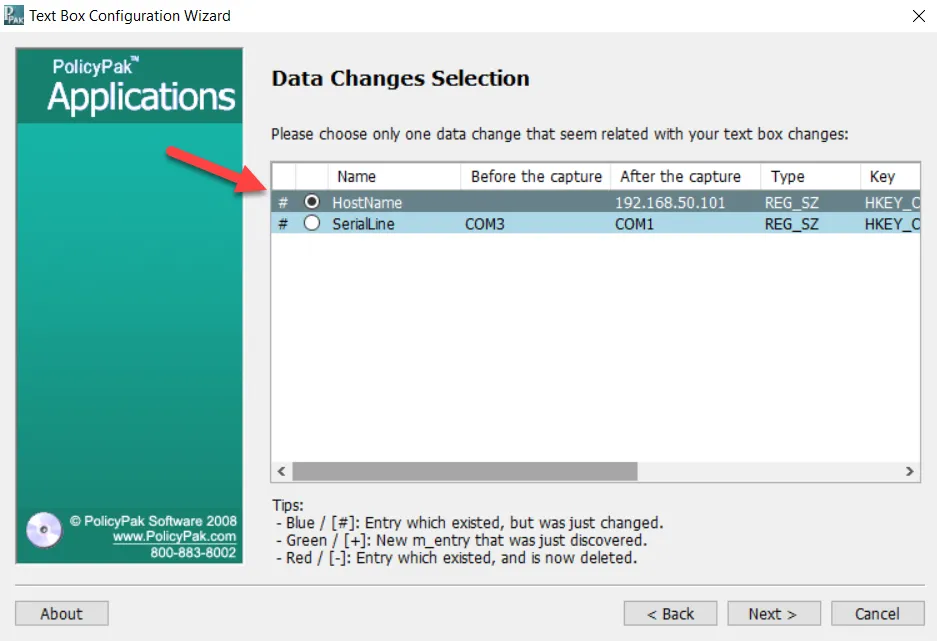
Figure 24. Selecting the HostName setting.
Step 22 – You must then choose a default value for the HostName setting. We want the default value to be blank so delete the embedded value and click "Next," as shown in Figure 25. The next screen will prompt you for a revert value and you will do the same thing on that screen as well.
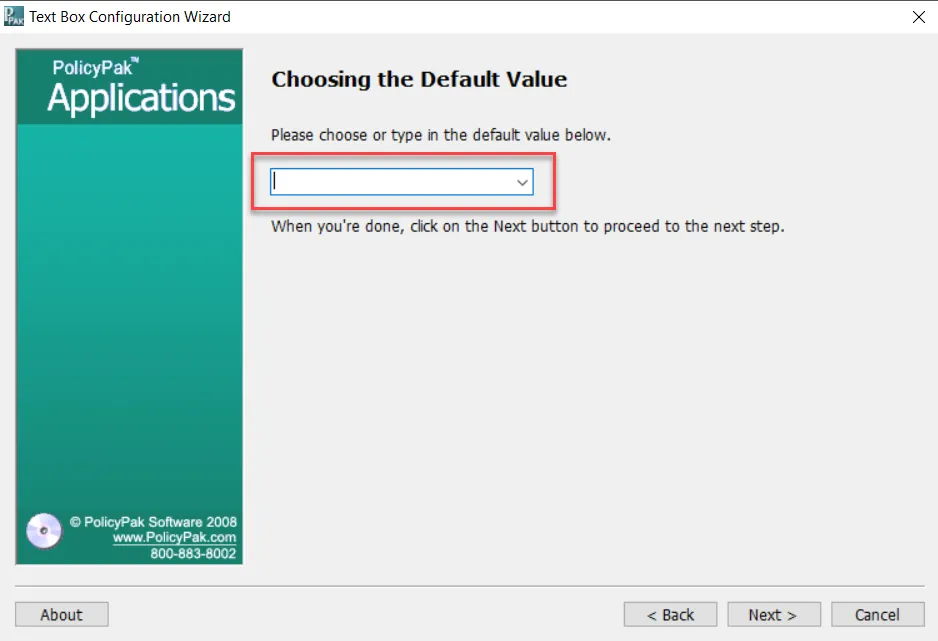
Figure 25. Deleting the text in the HostName field.
Step 23 – The last step is to choose the linked label for any GPMC reports you may run for the PuTTY application, as shown in Figure 26. Then, click "Next."
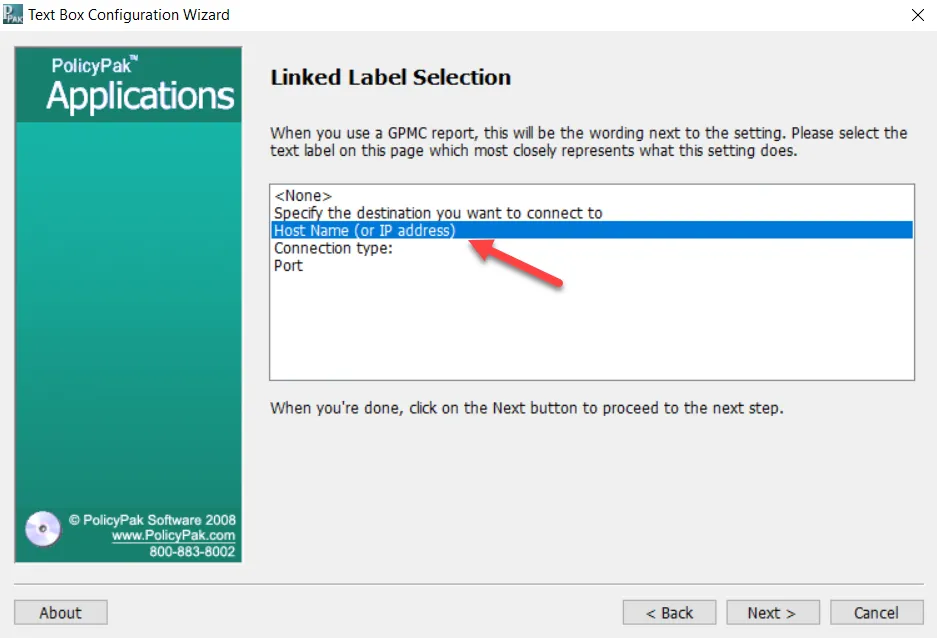
Figure 26. Choosing the linked label.
Step 24 – You have now completed your first setting capture using Endpoint Policy Manager DesignStudio. Figure 27 shows the congratulatory screen that you should see when you are finished.
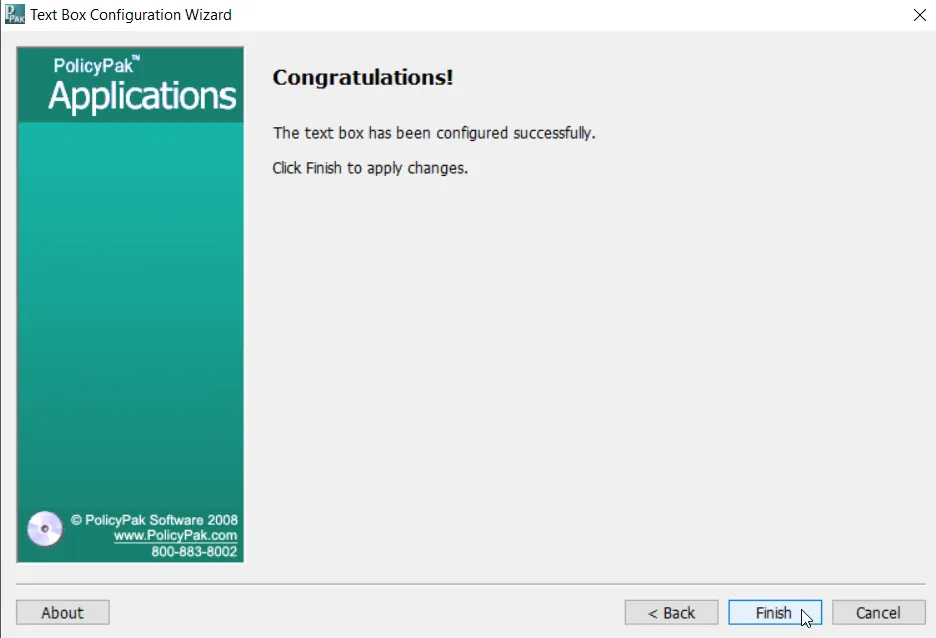
Figure 27. The completion of the Configuration Wizard process.
Step 25 – Now we'll move on to some other elements. We will illustrate the process for capturing a check element. For this example, we will capture the "Omit known password fields" setting. Note that this setting is checked by default. Right-click on the element, and select "Configuration Wizard," as shown in Figure 28.
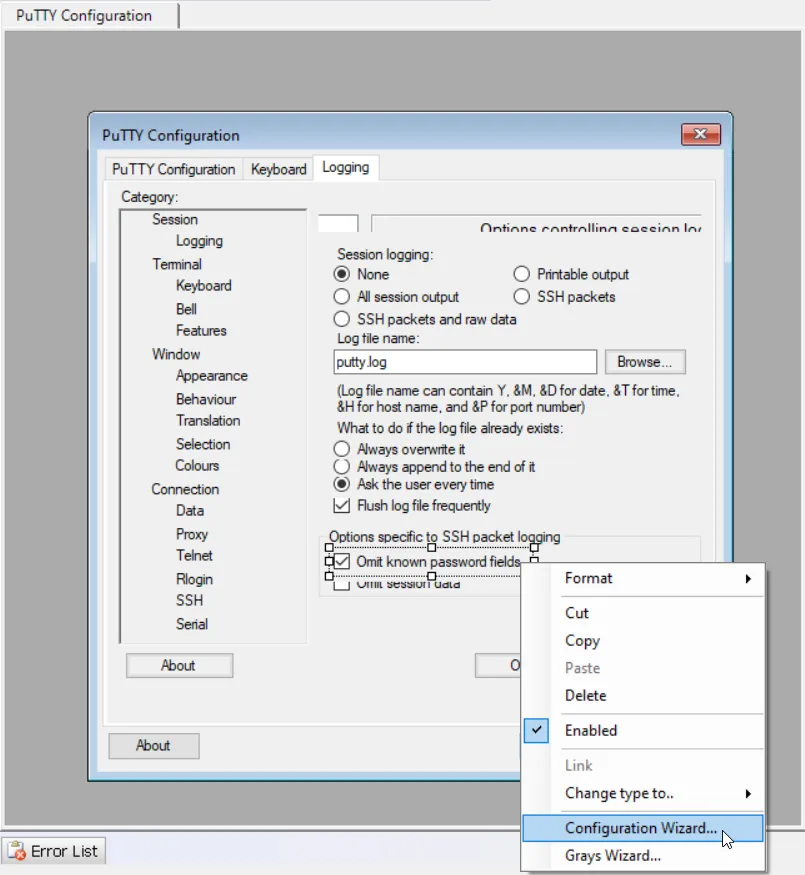
Figure 28. Capturing the "Omit known password fields" setting.
Step 26 – We won't recap all of the steps in the wizard. However, Figure 29 shows the current checkbox state for the setting in the "Indicating the Current Checkbox State" step of the wizard. After selecting this, click "Next."
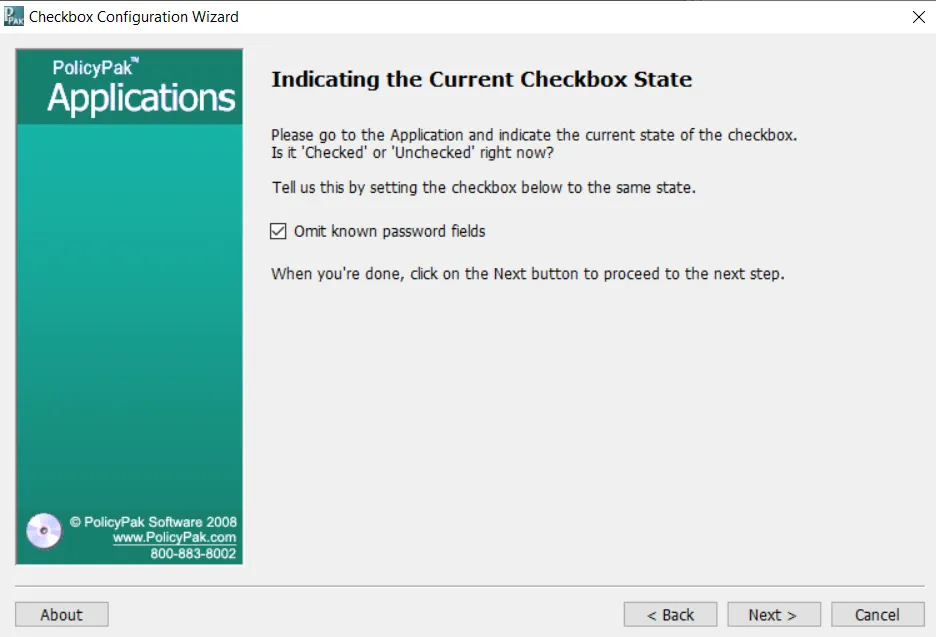
Figure 29. Verifying the checkbox state.
Step 27 – Now the wizard will prompt you to return to PuTTY and uncheck the setting (see Figure 30). Remember that you have to save your session as you did previously in order to save the change you made.
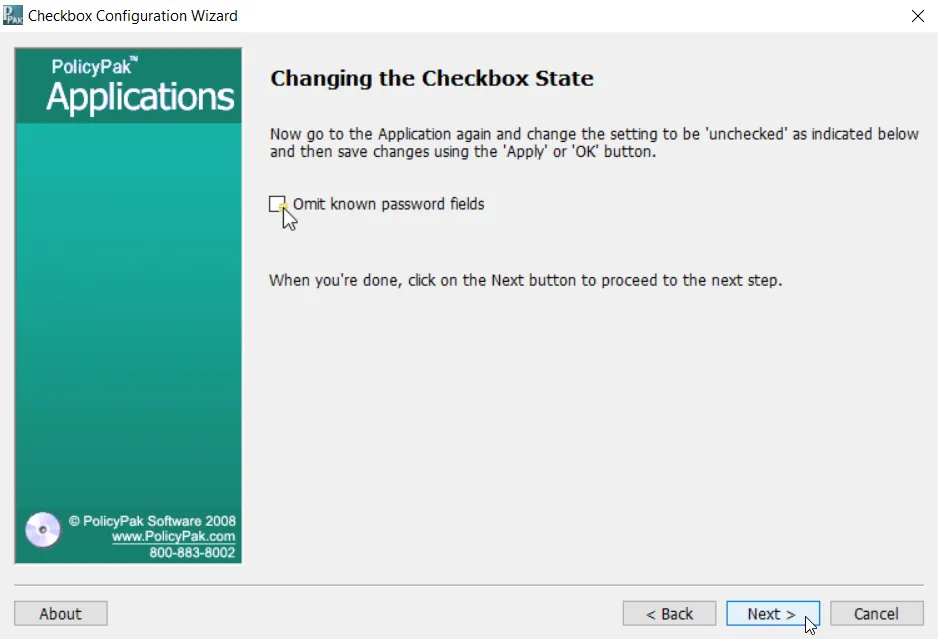
Figure 30. Returning to PuTTY to uncheck the setting.
Step 28 – The process is now complete as DesignStudio has discovered the associated registry values for the checked and unchecked states. When the checkbox is checked the SSHLogOmitPasswords registry value is set to 1. When the checkbox is unchecked, the SSHLogOmitPasswords registry value is set to 0, as shown in Figure 31.
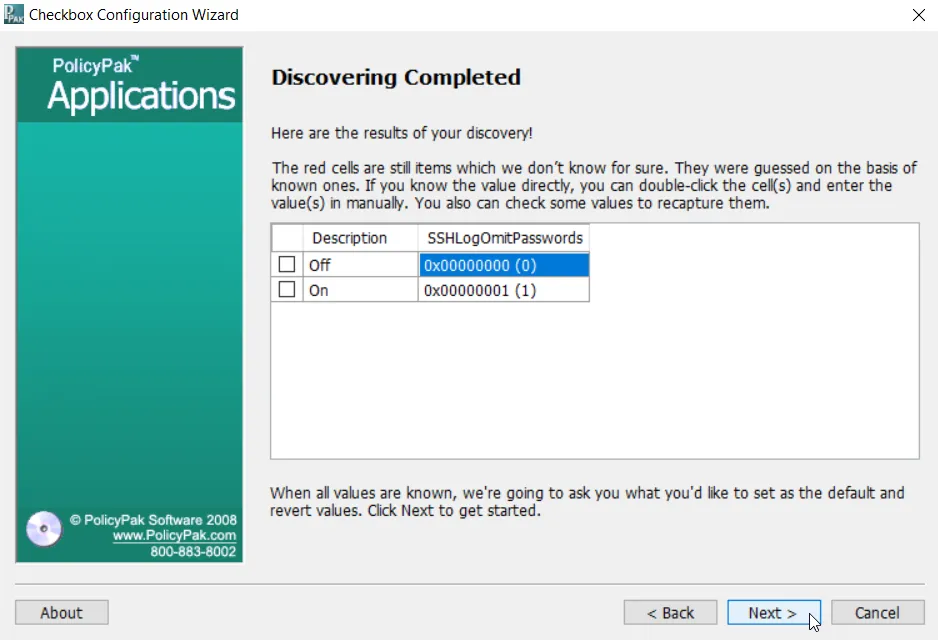
Figure 31. The SSHLogOmitPasswords registry values have been discovered.
NOTE: If you don't see the result shown in Figure 30, but instead get an error, it's possible that you didn't select the right default data root, or you didn't click "OK" in WinZip. Either way, DesignStudio needs to be able to see where the changes occurred. Try changing the default data root, as specified earlier, or try clicking "OK" in WinZip again if you didn't earlier.
Step 29 – Next, you will be asked to choose the default state and revert state for the setting. Figure 32 shows how you can accept the checked value as is or uncheck it. You will do the same for the revert state before finishing.
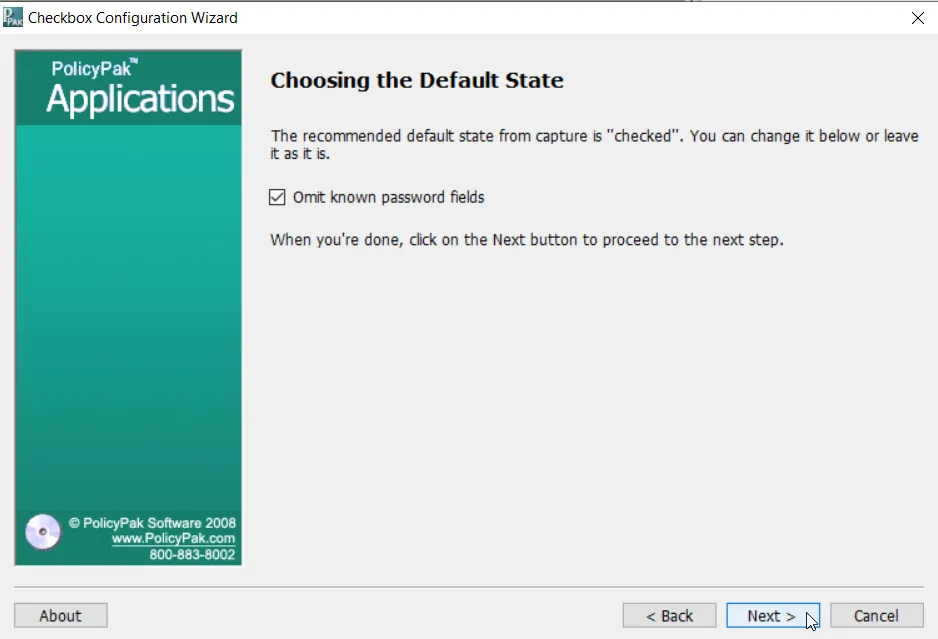
Figure 32. Check or uncheck the value as desired for the default state.
Step 30 – Next, we'll work with a radio button. We will capture the registry settings for a radio button set called "Initial state of numeric keypad," as shown in Figure 33.
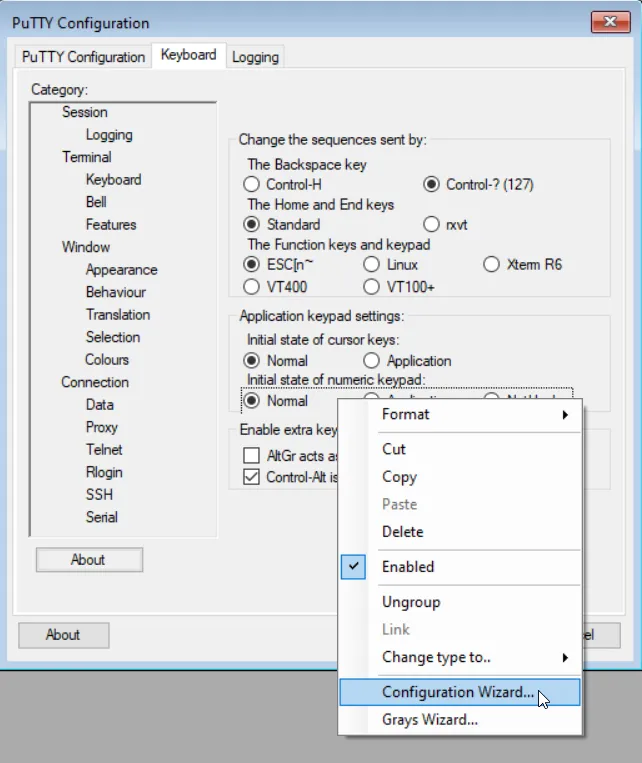
Figure 33. Using the Configuration Wizard to capture radio button settings.
Step 31 – In the wizard, you will asked to confirm which radio button is currently selected, which is this case is "Normal." Click "Next" and you will be asked to select the application radio button within the PuTTY application. After selecting it, save the session, return to the Configuration Wizard, and click "Next." Here you will be asked to choose which captured data change applies to the radio button. Choose the "ApplicationKeypad" registry setting, as shown in Figure 34.
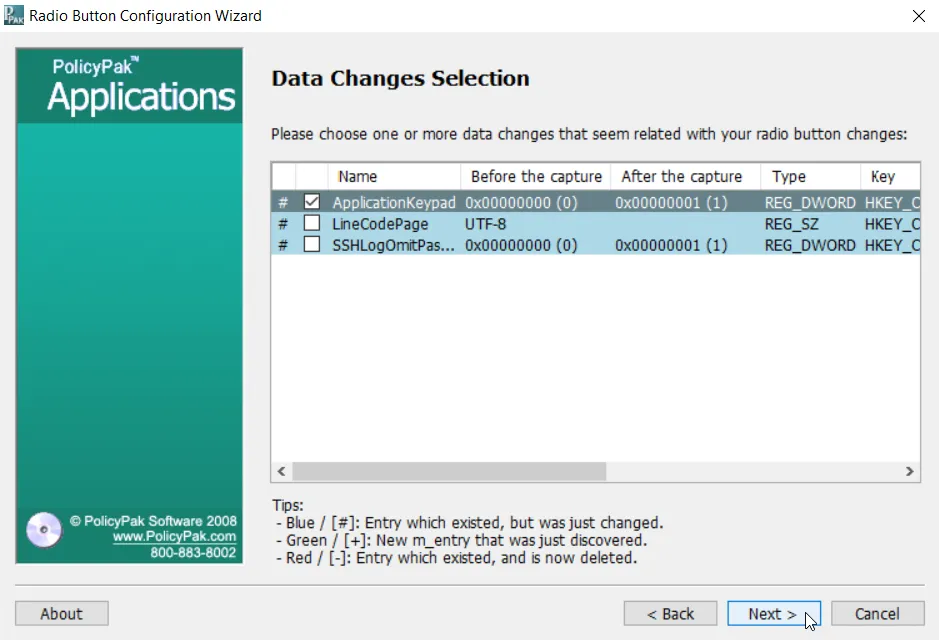
Figure 34. Choosing the ApplicationKeypad registry setting.
Step 32 – Click "Next." You will now be asked to select the NetHack radio button, as shown in Figure 35. Go to PuTTY, make the change, and save the session one more time. Then click "Next."
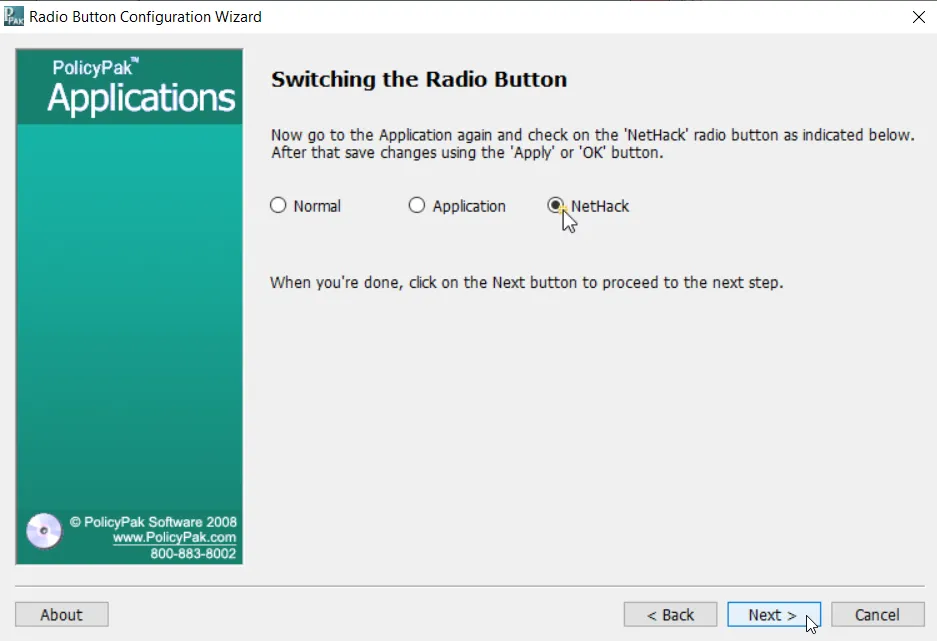
Figure 35. Capturing the radio button called NetHack.
Step 33 – The process is complete now that the registry values have been captured, as shown in Figure 36. You will then be asked to select the default and revert values. Once you've done that, you are finished.
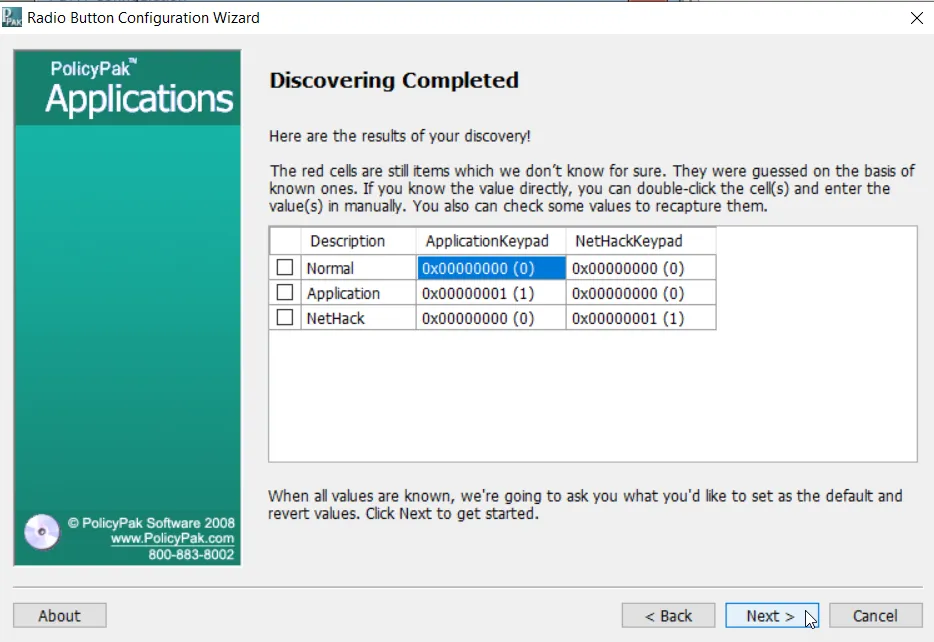
Figure 36. The completion of the process.
NOTE: A red shading on a value indicates that the Endpoint Policy Manager DesignStudio Configuration Wizard is not certain that it knows the value. You can start with a different default state to help the capture process.
Step 34 – There are no spinbox elements within the PuTTY interface so let's use WinZip to illustrate how the capturing process works for spinboxes since you may come across these from time to time. In this example, we will work with the "Minimum password length" under the Passwords tab, as shown in Figure 37. To work with this element, right-click it, and then select "Configuration Wizard."
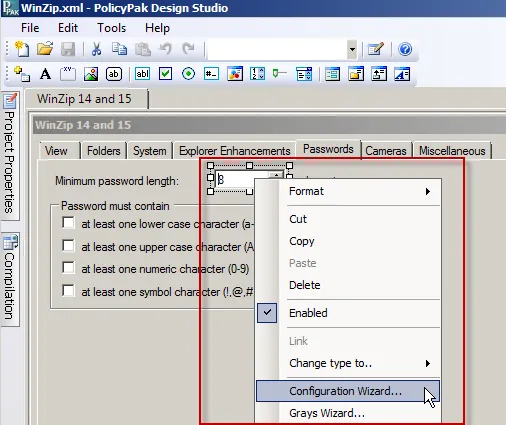
Figure 37. Using the Configuration Wizard with the "Minimum password length" setting.
Step 35 – The wizard indicates that you are configuring a spinbox, as shown in Figure 38. Keep the selection for the "Registry" option that the wizard chooses automatically, and click "Next" to continue.
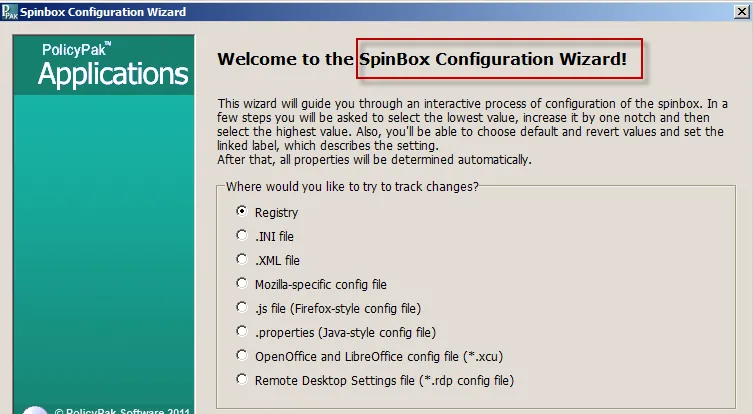
Figure 38. Choosing the registry as the location to track changes.
Step 36 – Next, you'll confirm the default data root, which should be configured to the "Niko Mak Computing" entry, as shown in Figure 39. Click "Next" to continue.
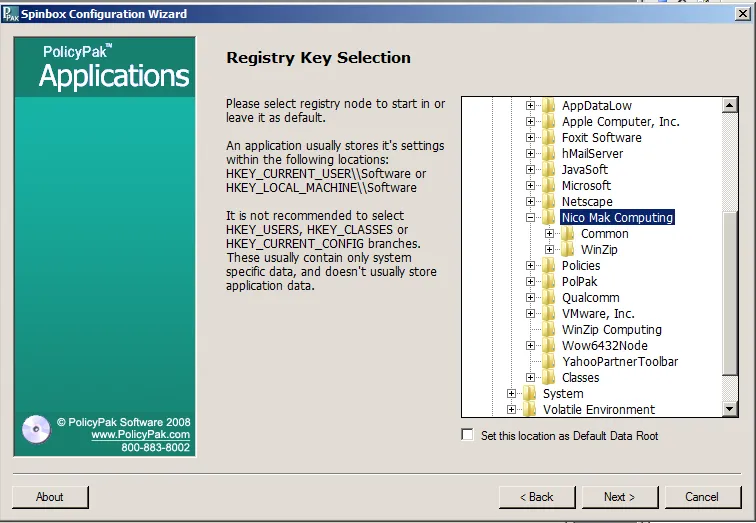
Figure 39. Confirming the data root.
Step 37 – You'll be prompted to set the minimum value for this spinbox. Change WinZip's "Minimum password length" to 1, as shown in Figure 40, and click "OK" inside WinZip. Close WinZip's Configuration page, and then click "Next" to continue in the wizard.
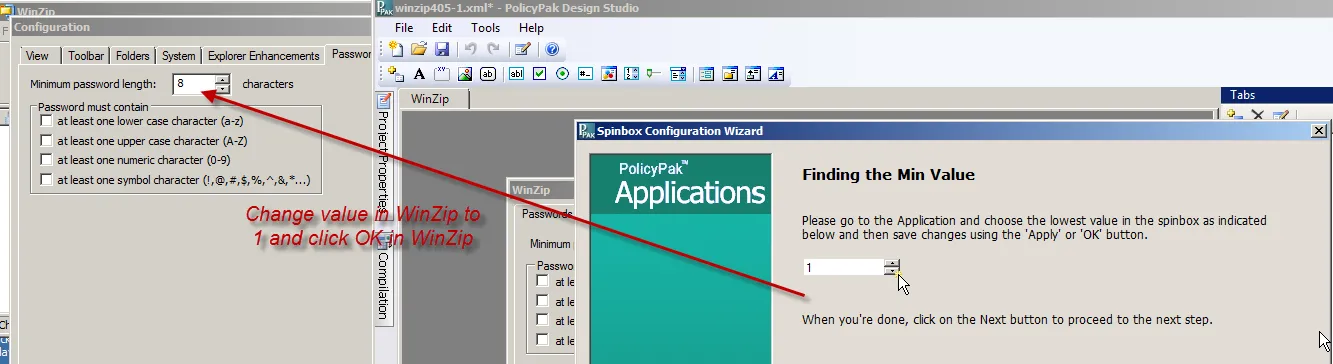
Figure 40. Setting the "Minimum password length" option to 1.
Step 38 – Next, open WinZip's Configuration page (Tools | Options), and follow the wizard's prompts. That is, change "Minimum password length" to 2, as illustrated in Figure 41, and then click "OK" inside WinZip. After doing this, close WinZip's Configuration page, and then click "Next" in the wizard.
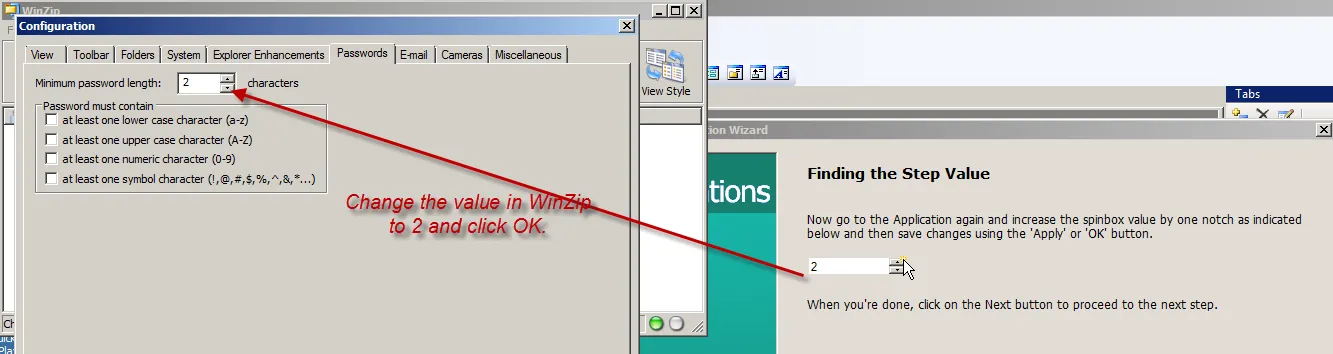
Figure 41. Setting the "Minimum password length" option to 2.
Step 39 – Next, the wizard asks for the maximum value of the minimum password length. This might be 99 for most apps, but it could also be any other number. The maximum value for this spinbox is 99, so enter this value into WinZip, as shown in Figure 42. Then, click "OK" in WinZip. Close the WinZip Configuration page, and click "Next" in the wizard.
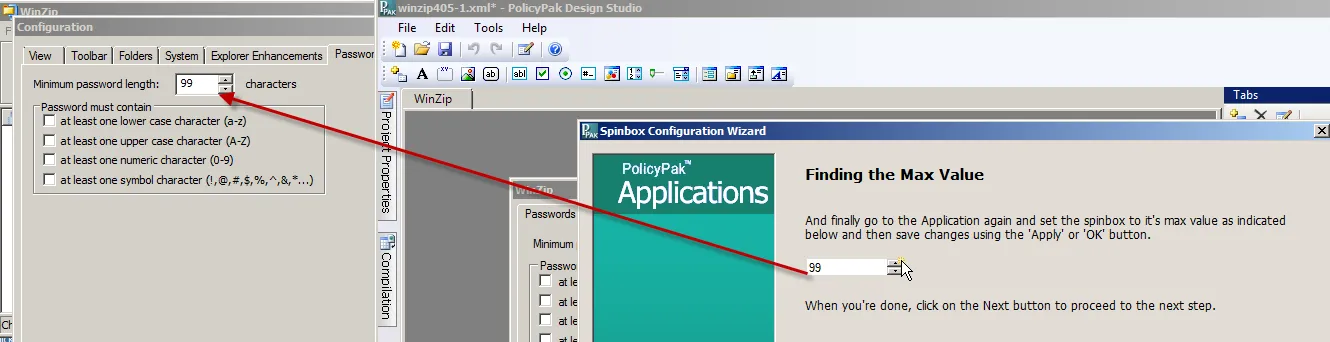
Figure 42. Setting the "Minimum password length" option to the maximum value.
Step 40 – The wizard will then show you what it learned, as shown in Figure 43. Make sure the discovered values match the values you entered. If they don't, you can manually edit the cells to match. Once that's complete, click "Next" to continue.
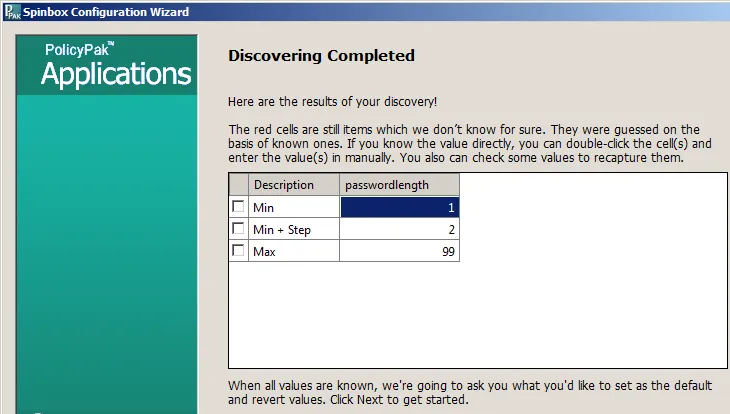
Figure 43. Confirming the discovered values.
Step 41 – You are then asked to choose the default value. We already discovered it was 8 when we captured the values originally, so set the value to 8, as shown in Figure 44. Then, click "Next" to continue.
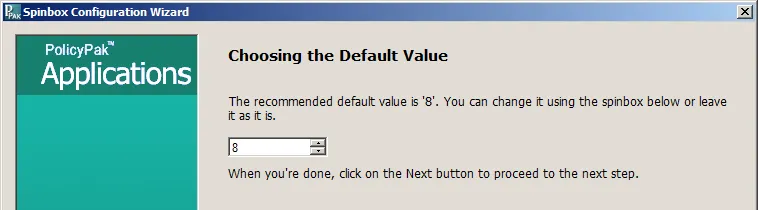
Figure 44. Choosing the default value.
Step 42 – You are then asked to set the revert value, as shown in Figure 45. This is what will be set when the policy no longer applies. You will usually want to keep the revert value the same as the default value, but you are welcome to change it.
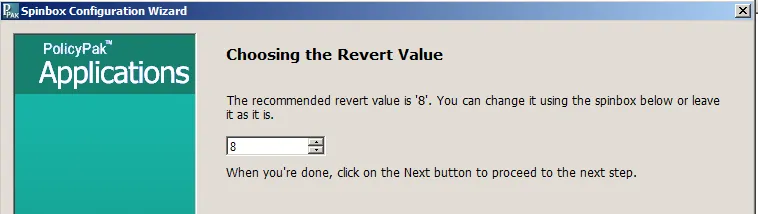
Figure 45. Setting the revert value.
Step 43 – Next, you will need to set the linked label selection. This selection will help us when we do Group Policy reporting. To set this selection, choose the words on the page that most closely represent what we're configuring, which in this case is "Minimum password length." When this is set, click "Next" to continue.
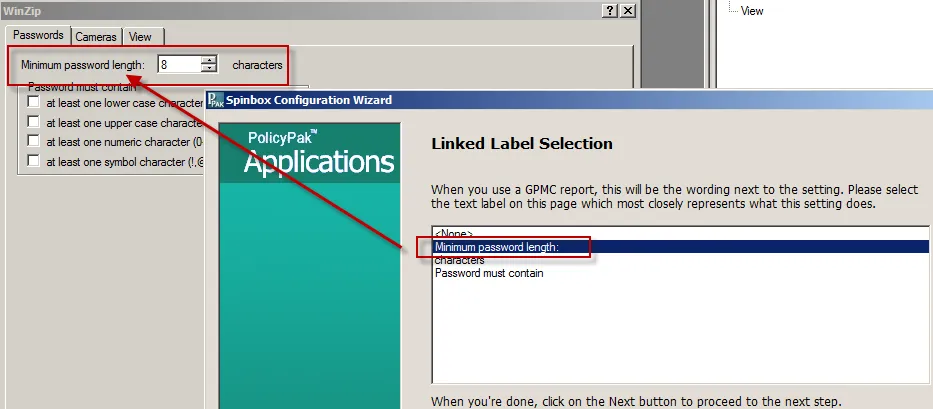
Figure 46. Selecting the words on the page that most closely represent what is being configured.
Step 44 – You are then presented with the Congratulations page, which states that you are finished (not shown). You are welcome to configure more settings using PuTTY, but the above steps should have given you an idea of how to use the DesignStudio Configuration Wizard. Next, we'll continue onward with utilizing your AppSet.
Step 45 – Now, you're ready to make your AppSet by compiling it. Click the Compilation tab on the left pane of DesignStudio. Click "Save pXML and Compile," as shown in Figure 47. You are forced to save your work before continuing. At this point, the AppSet is compiled (see Figure 48). Remember that compiling only works when you have the Microsoft C++ Express Edition (2008 and later) compiler loaded on your Endpoint Policy Manager creation station.
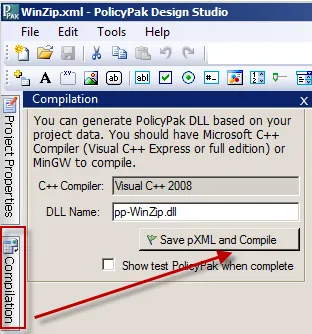
Figure 47. The wizard prompts the user to save their work.
Tip: Use the "Show test Endpoint Policy Manager when complete" checkbox to see a preview of your AppSet.
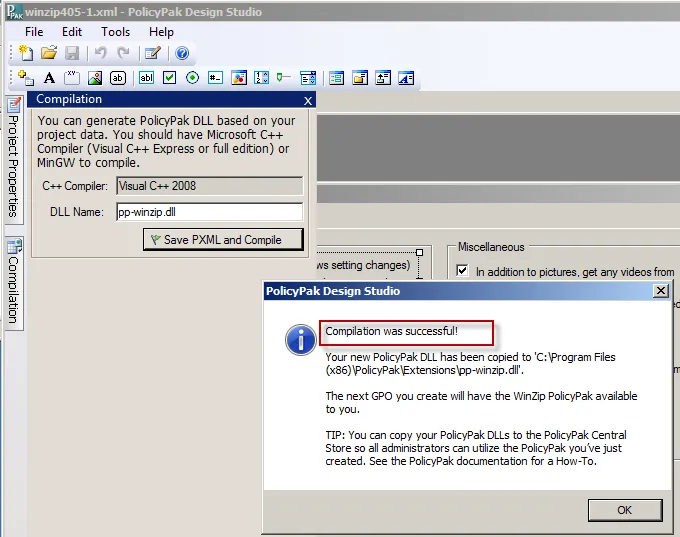
Figure 48. The successful compilation of the project.
Step 46 – Click "OK" to exit, and then close Endpoint Policy Manager DesignStudio.